Cheat sheet: Simple lighting techniques
#photographyhobbyist #photographybestoftheday #photographyforever
Scroll down for your cheat sheetProfessional-looking portraits don't require professional lighting setups. While it definitely helps to have appropriate lights, what makes the crucial difference between an average portrait and a great one is knowing what to do with the kit you have.
Much of your success comes down to arranging your lights so that they complement the subject being photographed, and to use a few accessories where required, such as a diffuser, brolly or reflector, to modify the light in the scene. These don't need to be expensive, and often you can substitute something you may have lying around the house. A large piece of white foam or sturdy cardboard, for example, can often work perfectly well as a reflector.
Six simple ways to light a portrait
The six setups on the cheat sheet below show what kind of effects you can achieve when you arrange lights in a certain way and use accessories wisely.Perhaps you can start by thinking: what kind of look do I want to achieve? Do you want Rembrandt-style lighting, where part of the face is lit and part is in shadow? Or do you want a more even kind of light throughout?
Read more: Cheat sheet: Pro portrait lighting setups
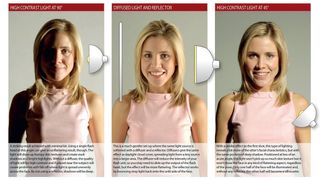
For a strong light that results in a high-contrast look, you may want to use the light as it is, close to the subject. This will create shadows which can highlight certain facial features, and with the right subject this can look great. A bit of distance and an accessory like a diffuser will help to spread and soften the light, giving a softer effect.
The use of a reflector can add balance and help to fill in shadows, and using a coloured one can add a warmth or a coolness too. A gold-coloured reflector, for example, will bounce a warmer light back to the subject, while a silver one will help to keep things cool.
Read more: Why do small apertures have large f-numbers?
Maybe you want to emphasize the shape of the subject by lighting it from behind? This will create a rim light that will catch the hair, and it can easily give the final image more vitality. It won't always be appropriate with every model, but it's easily achieved and gives you something less obvious to experiment with. Make sure to check back for more great cheat sheets too!
No comments:
Post a Comment
Note: Only a member of this blog may post a comment.