Congratulations April Johnson! You're our lucky "blog follower" pick for the month of February. We hope you'll enjoy spending that Benjamin - $100. You will need to reply within 72 hours of this post to collect your One Hundred Dollars (No later than 9:30 pm Thursday, March 3rd, 2022) We'll give you full details via a private message (we don't want to share your personal information online). Again, Congratulations!
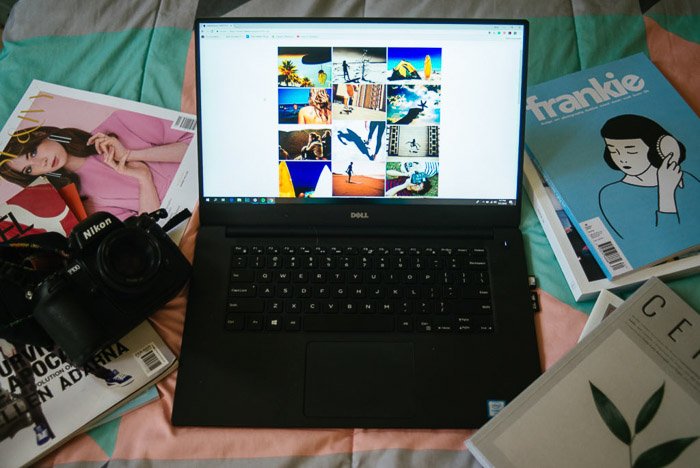
There’s really nothing like seeing your name and images printed in a magazine for the first time.
Do you think you’re ready to make the leap and become a magazine photographer?
Here are 12 tips to help you get there.
1. Choose a Speciality to Stand Out More
Some people tend to think that publications love portfolios with different types of images. That’s not true at all.
Editors like consistency. Focus on what you’re good at, and stick with that.
Don’t worry about not landing gigs if you like landscape or food photography. There are a lot of freelance and professional photographers out there, but better to be the best in your field than average in a niche. Niche photographers are harder to come by. Pursue less popular genres. You’ll have a better chance of getting hired for magazine photographer jobs.
Try out still life, or astrophotography, or even macro photography.
But don’t discard popular genres altogether. The important thing is that
your work stands out, regardless of the field you’ve chosen.
2. Ask Your Friends to Pose for Practice Shoots
Ask your friends to be your “models.” Even though you’re doing it for “fun” at this point, you should still treat it seriously.
Remember that you need to use the pictures you took of your mates for
your portfolio. So make it look professional even when you’re just
playing around.
Ultimately, you need to be comfortable around your camera no matter the situation. This will help.
Learn how to manipulate aperture, shutter speed, and ISO. Make sure you know how to focus correctly as well as how to use manual settings.
3. What Equipment Should You Buy
You don’t need professional equipment when you’re still starting.
That doesn’t mean that you can get away with using your phone or a
compact camera, either.
The best choices are DSLRs or mirrorless cameras. These let you change lenses and use Manual Mode. It’s okay if you buy the entry-level option.
It may be cheap, but believe it or not, it has all you need to produce work that’s magazine-worthy.
For lenses, you’ll need at least one f/1.8 or f1/4 prime lens (either 35mm or 50mm) on top of your kit lens.
These are especially useful for portraits that need significant background blur. They’re also great for shooting fast movement.
Once you earn more money doing commercial photography, you can upgrade your equipment.
Having said that, don’t obsess over buying gear even if you have the money. What matters is how you use whatever you already have.
4. How to Build a Portfolio
The next step is creating a decent portfolio. It doesn’t matter if you haven’t done any real photo shoots yet. You still have to make everything look professional.
Select a few images that you consider are the best. If you have any
doubt about any particular picture, don’t include it– even if you can’t
explain why it seems off.
Try to include at least 10 photographs for your first portfolio. That’s
more or less the right amount of pictures to help editors gauge if
you’re a good fit for the publication or not.
Just make sure everything looks coherent. If you plan to do an editorial photography portfolio, stick to editorial images and nothing else.
Say you have non-editorial photos that you think the publication would also be interested in. Put them in a separate category.
Organize everything so the editor doesn’t get a headache navigating your website.
They’ll be much more likely to stay on your website.
5. Use Instagram to Increase Your Potential Reach
Consider social media as an extension of your portfolio. Anyone who decides to look you up online is bound to find your Instagram sooner or later.
You might as well make sure that the photos you post on your feed are topnotch as well.
Photographers get discovered on Instagram all the time. So you should use the platform to promote your work as well.
The amount of followers doesn’t matter that much. Especially now that
people are reluctant to follow you even if you’re really good.
What’s important is the number of impressions you get from each photo
you upload. If you get a lot of likes on your posts all the time, that
means you can engage people through your photography.
You should also integrate hashtags of your favourite magazines where appropriate. If they like your work, they might end up reposting some of your tagged photos.
Later on, you can mention your interactions with them when you decide to apply for a job.
6. Read Magazines to Figure Out What Styles They’re After
If you want to sell photos
to magazines, read a few that interest you. It may seem strange to buy
physical copies of publications these days. But they offer a plethora of
information you’ll find helpful.
Browsing through the pages of a magazine allows you to get a sense of
its style. Study the photographs and list down the patterns you see.
Do you find more documentary-style photos or fashion-related work? How do they use images to tell stories? Can you relate to their aesthetics?
Try to incorporate what you like in those photos into your own work. Of
course, the goal is not to copy exactly what you see, but to help build
your personal style.
Ultimately, you don’t want your pictures to look like they’ve been torn
out of a Vogue magazine. Just about everyone wants to achieve that look.
Make your work unique and it’ll stand out.
7. Check the Masthead for Submission Guidelines
You’ll find this in the first few pages of the magazine. Masthead is the other term for the editorial page of the publication.
It provides the names of the editors, writers, photographers, and their contact information.
It also lists their submission guidelines.
Not every magazine accepts submissions. But if they do, the masthead is where you’ll find information about it.
Submission guidelines give you the chance to appear in the magazine.
Each publication has a different set of guidelines. So follow the
directions carefully when submitting photos to magazines.
You don’t want to blow your chances just because you failed to rename or resize your files the way they wanted you to.
8. Contact Editors to Get Noticed
If you don’t see the submission section, that doesn’t mean you should
give up. You can correspond with the publication via email, instead.
You can also use websites such as Workbook. These provide access to a directory of various publications.
Once you have an email address, feel free to write the publication a
short message. Introduce yourself and share your portfolio. You can also
tell them what services you can offer for them.
In most situations, you’ll want to send your email to a photo editor or a
creative director. They’re the ones who handle photographers.
Don’t be surprised if most won’t answer back. They get letters from other photographers like you all the time.
You might only get one response or two. But you’re already a step closer to becoming a real professional photographer.
9. Start Locally
If you want to jumpstart your commercial photography career, look for local publications. They’re more accessible than well-known companies.
Local publications will pay you less or even have you work for free. But this type of work means experience and exposure.
Working locally also gives you the chance to collaborate or interact
with magazine photographers. Talk to them and ask for advice.
You’d be surprised how willing they are to help you out with photography.
10. Being Prepared Will Help You Work Under Pressure Better
Your first professional
photo shoot is going to be the most nervewracking. When a publication
takes a chance on you, you’ll need to create quality work no matter what
happens.
On your first professional photo shoot, you’ll realize that things may
not always go according to plan. The shots you expected to be awesome
may end up looking terrible.
That’s why knowing the ins and outs of your camera is essential. You
have to know how to capture any subject in any situation using the right
settings on the spot.
To avoid any issues you may face on the field, make sure you’re prepared for the shoot.
Bring two of everything, especially batteries and SD cards.
Also, throw in a black gaffer tape in your bag. If you’re wondering
what you need it for, wait for something to break, and you’ll understand
why.
Eventually, when you’re confronted with problems in the future, you’ll know exactly how to solve them.
11. Always Follow the Assignment Guidelines
Some photographers make the mistake of going against what their
editor tells them. They think that their vision is better than other
people’s, so they ignore their opinions.
The truth is, doing that only risks their chances of achieving what they want.
Once you start working for a publication, always keep in mind that your editors know best.
They have significantly more experience than you. Follow what they tell you–even if you don’t exactly agree with them.
Take notes all the time and avoid the mistakes that your editors warn you about.
If an editor tells you that he doesn’t like how you shot a particular
image, ask them why. List down what they want to see in your work and
make sure you include them into your next set of images.
Most of all, don’t make the same mistakes they already pointed out.
Knowing how to accommodate your editor’s needs gives them a reason to work with you more in the future.
Make them feel that you’re easy to work with, and you’ll increase your chances of getting even more gigs.
12. Don’t Be Afraid to Show Your Own Style
Although you should always do what your editor tells you, you shouldn’t
be afraid to experiment as well.If your editor tells you to capture a
subject using a specific manner, you can create extra pictures in your
own style.
As long as you make sure you’ve satisfied what your superior wants, it won’t hurt to include a few photos of your own.
Editors love a magazine photographer who has a vision. It’s okay to take
the initiative every once in a while and show them what you’re capable
of.
Your success in commercial photography will depend on how different your images are.
There are a lot of photographers that can shoot fashion. But only a few of them are truly unique.
Keep working at your craft and strive to be excellent… and one-of-a-kind.
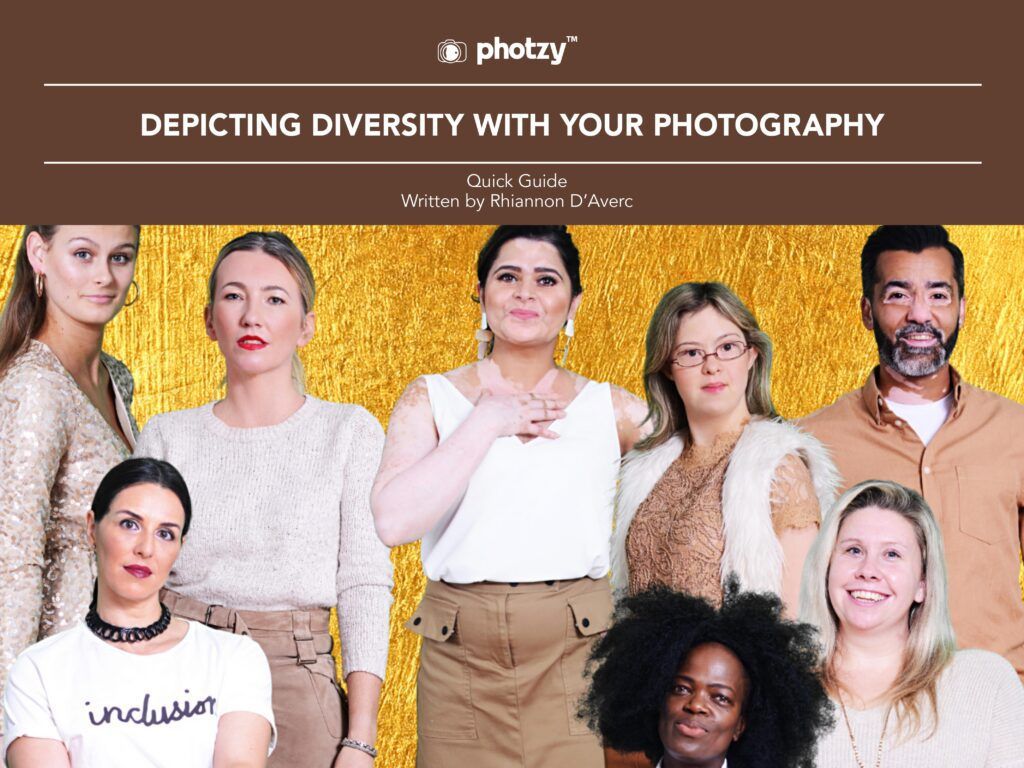
You have probably heard a lot about diversity in recent years.
You’ll
know that it’s been a huge and controversial issue, with protestors
pushing for diversity and representation across all forms of media.
While
Hollywood films, fashion magazines, and business leaders may have been
heavy targets, all kinds of photography should be considered places to
push for greater representation.
Diversity in photography means
ensuring that your photos include people from different backgrounds and
walks of life, rather than always presenting a homogeneity in the people
you photograph.
There are some surprising benefits to taking this
route. Once you’ve learned what they are, you’ll be keen to incorporate
more representation in your shots.
This guide will show you how by covering the following topics:
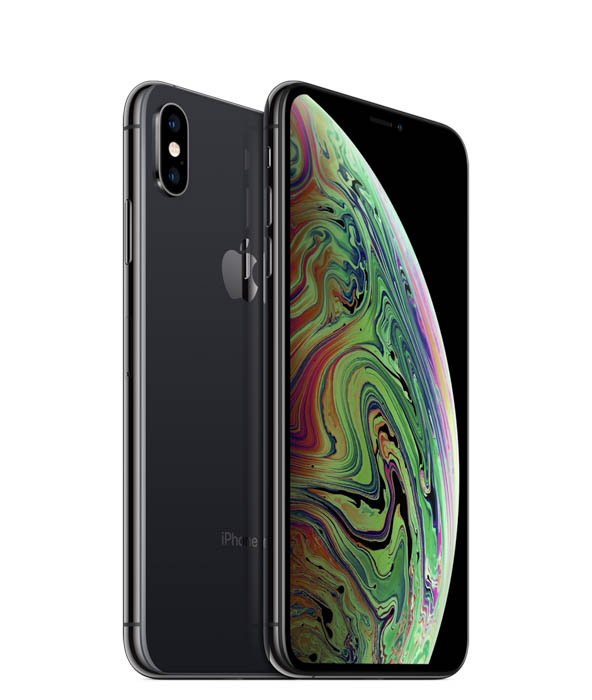
When buying a phone, there’s one question that a lot of us often ask:
Is the iPhone better than Android for photography? It’s a tricky
question.
We’ll discuss the differences between iPhone vs Android and help you decide which is the best.
Price
Price is one of the crucial factors that any phone buyer needs to
consider. All the cool features of the newest phone wouldn’t matter if
you couldn’t afford it. Let’s look at the difference in price between
iPhones and Androids.
There’s no denying that iPhones are generally more expensive than
many Android versions. The cost of Apple’s latest release, the iPhone
XS, exceeds $1000.
Meanwhile, some Android phones can be as cheap as $30 (Alcatel Raven and other models).
But Android also has high-end options that are even more expensive than some iPhone models. Devices such as the Samsung Galaxy S10 have as many, if not more, features as the iPhone XS or XR.
If you’re on a tight budget, you’ll have better chances of owning an
Android phone. Or you could buy a used iPhone instead. This would still
cost more than $100 in most cases.
If you’re willing to shell out top dollar for a phone, then you have to do some research on what you want.
At this price range, it can be hard to tell apart the difference
between Android and iPhone. Many of them share similar features.
Hardware
Apart from the price, you’re going to want to look at the physical features that iPhone and Android phones offer.
Hardware varies a lot from one phone to another. Even iPhone models
differ in the features they offer. But in general, the iPhone has a
uniform look and parts.
Since only Apple manufactures the iPhone, they get to have full control over the design.
On the other hand, Android phones look a lot more different from each
other than iPhones. And the reason is that there are dozens of
manufacturers from Samsung to LG that create these devices.
That means some Android devices may have plastic lenses while others
have glass. The sensors also vary from one manufacturer to another. So
despite being Android, the quality of the photos may differ from each
other.
But the fact that Android phones are different is also the reason why they’re popular.
People get to enjoy more variety of features instead of getting stuck with the uniform features of the iPhone.
Resolution
As we mentioned earlier, it’s the price that determines your device’s
features. And this category is where you’ll see tangible differences
between the Android and the iPhone.
iPhones feature some of the best cameras for mobile devices. Their
latest model, the XR, has a 12-megapixel camera that can even record in
4K.
Meanwhile, camera features vary a lot when it comes to Android. A
cheap Android phone such as the Alcatel Raven only has a 5-megapixel
camera that produces grainy pictures.
But Android also has a few phones with cameras that rival that of the
iPhone’s. Let’s take a look at the Samsung Galaxy S10 Plus’s specs for
instance.
Apart from a 12-megapixel dual camera, it also features a
16-megapixel wide-angle camera. And just like the iPhone, it can also
record 4K.
When it comes to cameras, you get what you pay for. So invest in a
good phone that does the job for you. If you want a hassle-free
experience that lets you take pictures with ease, then go with the
iPhone.
If you like customization and features that the iPhone doesn’t offer, then consider buying an Android, instead.
Dual-Camera
Dual-cameras used to be exclusive to expensive flagship phones a few
years ago. But these days, even the cheaper options also have them. And
that steps ups the game when it comes to the iPhone vs Android debate.
These days, you can get a great Android dual-camera phone such as the
Honor 10 Lite for less than $200. It features a whopping 24-megapixel
main front camera and a 13-megapixel rear dual-camera.
That means you can now take beautiful bokeh shots on your device without breaking the bank.
But of course, the cream of the crop for Android phones are still the
expensive flagship options. In general, they offer better resolution
and performance in low-light conditions. Not to mention that they also have way more features than their budget counterparts.
For instance, Smartphone such as the $900 Huawei P30 Pro offers both
telephoto and wide-angle cameras that cheaper dual-camera phones lack.
Its aperture can also go as low as f/1.4 to let you shoot in low light without bumping the ISO.
Meanwhile, the iPhone XR’s camera features seem to pale in comparison
to phones such as the Huawei P30. For instance, it only has a
12-megapixel wide-angle lens as opposed to Huawei’s 20-megapixel ultra-wide lens.
But the iPhone also has a larger sensor which allows it to perform better in low light than its competitors despite the lower resolution. It also has an optical image stabilization which lets it shoot crisp photos even at low shutter speeds.
Many Android phones boast more features than the iPhone. But at the
same time, the iPhone often excels in what it does offer. For instance,
it may not have the highest megapixel camera for example.
The dual cameras have a variety of functions when it comes to smartphone photography. Of course, you can choose the telephoto or wide-angle lens individually for zooming in or taking close-up shots.
You can also use the two simultaneously to create photos with background blur.
If you want to learn how to make photos look professional, simply
turn on Portrait Mode on the iPhone or Live Focus on Samsung devices.
Then the dual camera set-up does its magic to create bokeh shots that look like they have been taken with an SLR.
For the most part, both the iPhone and high-end Android phones do a
really good job creating professional-looking background blur.
Unlike real DSLRs
that achieve such effect through the use of lenses, these mobile
devices use software in conjunction with the dual-lens instead.
The dual-lens works together to create a “depth map” that helps the
phone calculate the distance of the subject from the background. Then,
it uses software to blur the background.
In other words, these phones replicate the bokeh effect. Especially
since even the dual-camera lenses aren’t enough to create it naturally.
The caveat of using this technology is that it tends to be a
hit-or-miss when you use it. iPhones and Android devices equally suffer
from miscalculating the background blur. So much so that it even appears
too fake at times.
Fortunately, technology keeps improving and the newer phones that are coming out do a better job at creating realistic bokeh.
Native Camera Apps
For the most part, the native camera app of the iPhone and Android
have so many similarities. The locations of the buttons and selections
may be different, but they all work the same.
Both the iPhone and Android share the same features. In most cases,
the only difference is what they call certain functions. For instance,
the Portrait Mode on an iPhone is called Live Focus on an Android
device.
So in many ways, the iPhone and Android are a tie when it comes to this category. Their native apps are both easy to use.
It’s just a matter of getting used to it especially if you’re more
familiar with one platform than the other. But it doesn’t take a long
time to figure out that they’re very much alike.
Third-Party Apps
Apps
are as important as the camera features on your phone. That’s why you
need to choose a device that is compatible with the apps you want to
use.
For years, Apple has had tight control over the apps it accepts to its app store. That means it has fewer choices than Android.
But at the same time, the apps you see on Apple’s app store have
better user satisfaction. The reason is that the company has strict
guidelines that ensure the quality and safety of the apps they offer.
On the other hand, Android suffers from plenty of apps that are hit
or miss. Many of the apps tend to suffer from more bugs and glitches due
to the differences between software and/or hardware of various Android
phones.
Android also doesn’t offer updates as often as Apple. As a
consequence, it becomes even more susceptible to faulty apps. And this
is also one of the reasons why some apps end up becoming incompatible
with some Android devices.
The good news is that many camera/editing apps such as Lightroom and VSCO work with the iPhone and Android. That means both platforms get to enjoy the benefits of the best digital photography tools.
There are plenty of variables to consider when buying a smartphone.
But for the most part, choosing between iPhone and Android is all a
matter of preference. Android devices are just as good if not better as
the iPhone.
If you love having dozens of features, then Android is the best for
you. But if you want a phone that offers a seamless experience and still
take great photos, then the iPhone is a great choice.
Don’t get stuck on the brand. Instead, do your research and look at
all the specs of the device you want to buy. If it has everything you
need for taking photos, then that’s the best smartphone camera for you.
NOTE: We made a fancy PDF of this post for printing and viewing offline. Click here: https://photzy.com/better-landscapes-with-a-smartphone/ to download it for free.
by Kent DuFault
I’m
going to just flat-out say it, “I love taking photographs with my
iPhone 6+.” In fact, on a recent trip to Italy, I experimented with
taking ALL of my travel photographs on the iPhone 6+.
Monday, February 21, 2022
What Is The Best Macro Lens for iPhone Photography
Tags: Shutterbug, Photography for Beginners, Newbie Photography
Most modern smartphones have built-in wide angle lens and telephoto
lens. But one area that even high-end phones currently lack is a macro
lens feature. So if you’re looking for an excellent macro lens
attachment to take close-up photos, we’ll show you a few options to
consider.
What Is a Macro Lens?
A macro lens is a special type of optics that let you create close-up shots of objects.
Regular lenses convert real-life objects into a small image that could fit into the sensor
of your camera. But a macro lens keeps the actual size of the item
being photographed the same as the sensor. As a result, the subject in
your image looks bigger.
Technically, the ratio of true macro lenses needs to be 1:1. Meaning
that there shouldn’t be magnification or reduction when you convert the
object you photograph into an image.
While some lenses on this list are true macro lenses, others are
technically not. But they retain the “macro lens” label because they
still take super close-up shots.
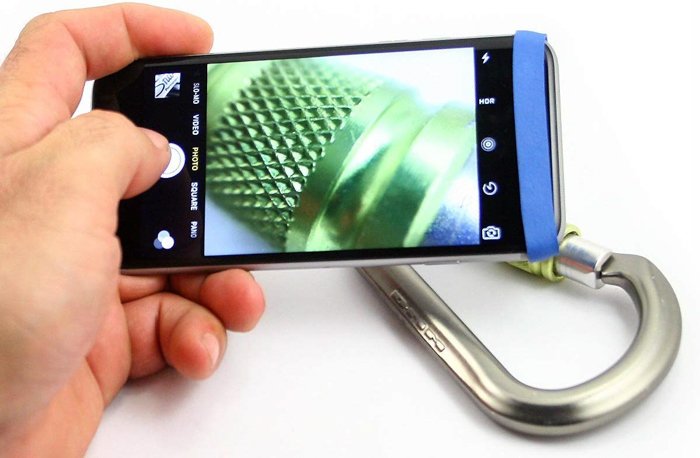
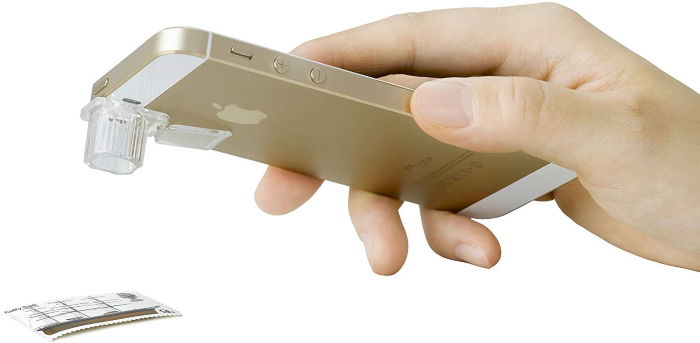
Easy-Macro Lens Band
This is one of the cheapest and simplest macro lens attachments on the list. It’s a rubber band with a small bead of a lens that you align with your smartphone or iPhone lens.
Frankly, it doesn’t look fancy at all and can be challenging to
install. But the photos it takes are surprisingly sharp considering how
simple this lens attachment is. It’s also secure enough that you don’t
have to worry about it falling off while taking photos.
The lens boasts a 4x magnification at a shooting distance of one
inch. Because of its design, the lens band is compatible with almost any
phone from iPhones to Androids. And did we mention it works even with a case?
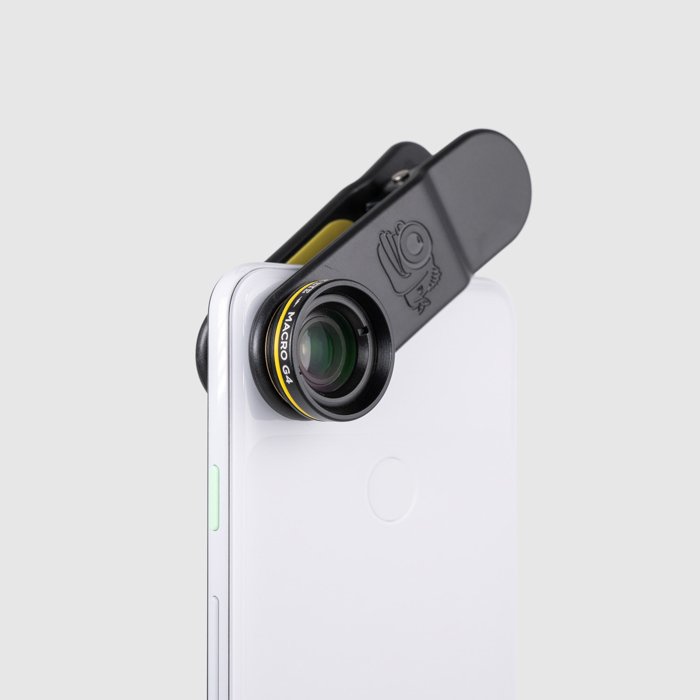
Black Eye Macro G4
The Macro G4
has a classic clip-on design that never fails its users for its
simplicity. But don’t let its plain design fool you. It’s just as
effective as the more expensive lens options on the list.
The G4 has a 15x magnifying power. It’s not as powerful as its
counterparts, but it’s undoubtedly one of the sharpest. It features
cinema-grade glass that’s coated to minimize flares and ghosting, and
give high image quality.
Of course, we also have to mention that the G4’s simple clip design
makes it compatible with all sorts of phones. It even works with
dual-camera phones! All you have to do is align the attachment with the
phone lens, and you’re good to go.
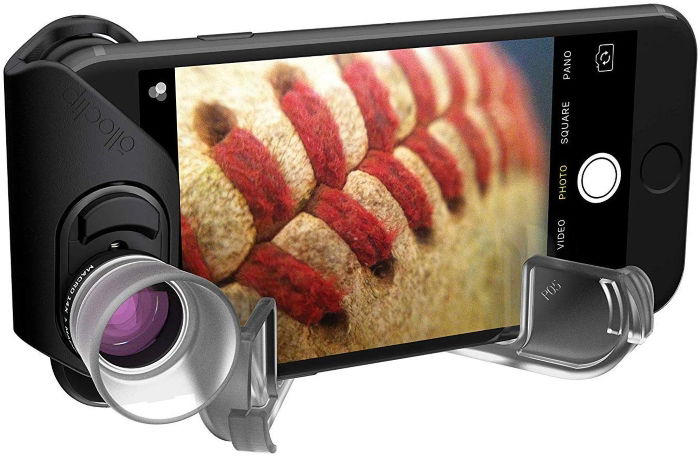
Olloclip Essential Macro Premium Glass Kit
If you’re a big fan of macro photography, then this is the lens kit for you. As it says in the product title, this is the essential macro lens kit which includes 7x, 14x and 21x magnification. That’s quite a good range for all types of macro and close-up shots.
The entire kit is connected, so you don’t have to worry about
changing lenses all the time. All you have to do is unscrew the lenses
you don’t need and keep the lens you want to use on your phone.
Olloclip is a brand known for quality lenses, so you can guarantee
that the photos this kit lens takes are going to be sharp. It also comes
with a remote, which is perfect if you want a hands-free operation. We
all know how hard it is sometimes to take macro shots without a tripod.
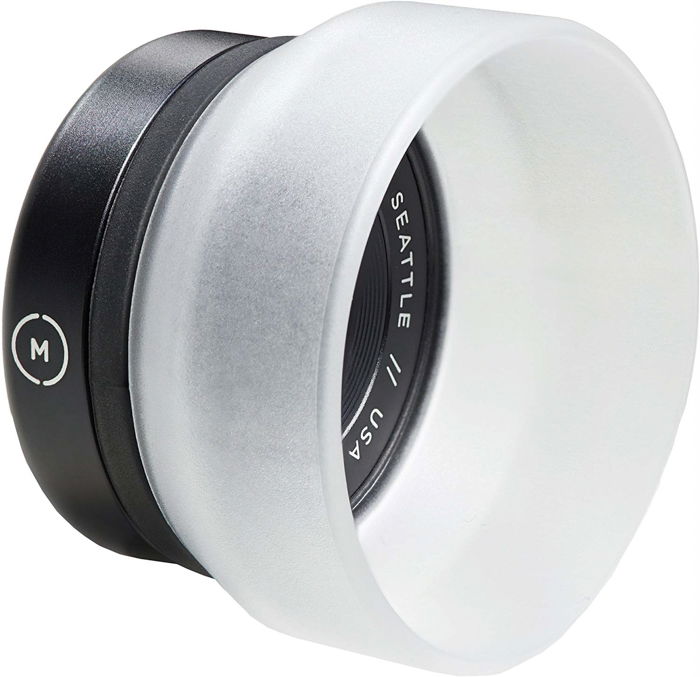
Moment Macro Lens
Moment is one of the best brands out there when it comes to
smartphone lenses. And their macro lens attachment is undoubtedly one of
their best-sellers.
So what makes the Moment macro lens
good? Well, it comes with superior optics that are coated to prevent
undesirable glares. And the body that encases the lens is made of
aerospace-grade metal that can endure heavy-duty use. Furthermore, it
also comes with a diffuser hood that creates even lighting around your
subject.
This pro lens is about $100, which is a bit expensive. You’ll also
need to buy a compatible phone case by Moment to install it on your
phone. It sure is a bit of an investment, but if you want top-quality
for your macro images, this is definitely what you’ll need to get.
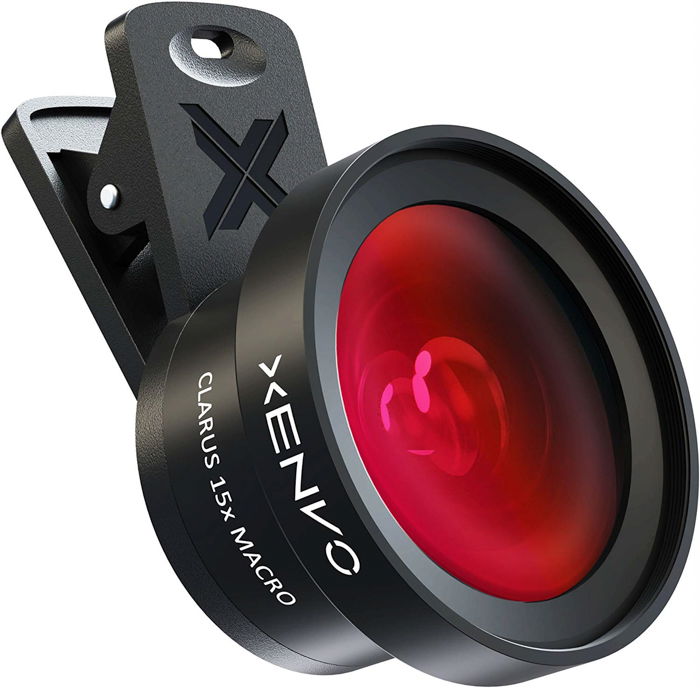
Xenvo Pro Lens Kit
The Xenvo kit
includes two types of standard lenses you commonly see in most other
brands. It comes with a wide-angle lens and a macro lens. To use the
macro lens, all you have to do is unscrew the wide-angle lens that’s on
top of it.
Xenvo also comes with a standard clip-on attachment that makes it
compatible with most phones. Because of its basic design, it works on
both single and dual camera phones from either Apple or Android.
So if Xenvo is pretty standard, what makes it special from other
macro lenses? The answer is that it’s cheaper than both Olloclip and
Moment. It is also is one of the best-reviewed budget lenses online.
Don’t discount it for how simple it is, it could be exactly what you
need.
Angfly 4K HD 2-in1 lens kit
Like the Olloclip and the Xenvo, Angfly
also comes with both a wide-angle and a macro lens. What makes it
different from its competitors is that it’s specifically built to be
compatible with dual-lens phone cameras.
The Angfly works well with both iPhones and Androids. The best thing
about it is its glass lens. This ensures that you can record in 4k or
high definition without losing any quality. Its magnifying power is not
as good as its counterparts, but at least you can guarantee sharp
photos.
The downside of using Angfly is that it doesn’t work with phone
cases. But it has a well-designed bracket that lets you secure the lens
to your device in a snap. The bracket also goes around the phone lenses
so they don’t get any damage when you install the macro attachment.
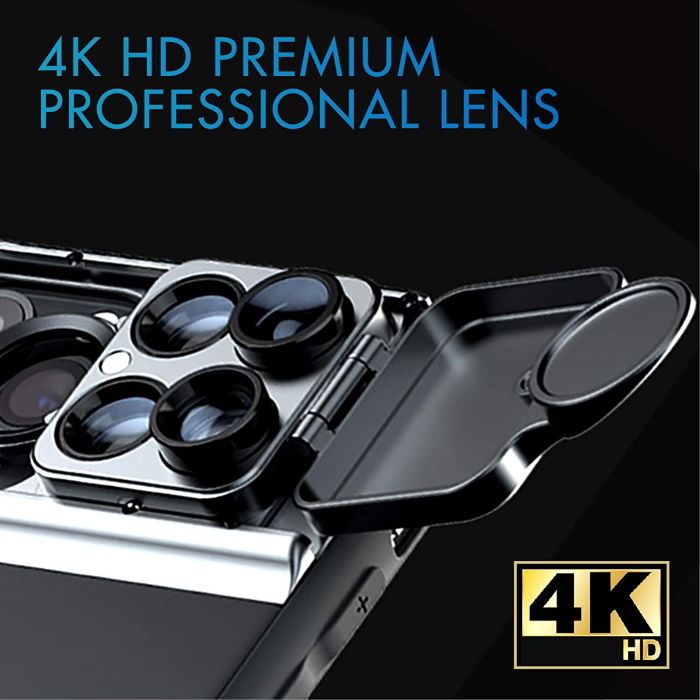
Pro Max Camera Lens Kit
If you don’t like lugging around lens attachments, then take a look at Pro Max’s lens kit.
This interesting phone case comes with five lenses that you can
conveniently slide over your built-in phone camera. It features a CPL
filter, fisheye, telephoto, and two macro lenses.
Pro Max’s macro lenses have a magnification power of 10x and 20x,
giving you the freedom to shoot in various conditions. Like most
well-made lens attachments, the optics are made of glass and can be used
for shooting 4k.
The Pro Max is compatible with dual-camera iPhones and even comes
with a 3-lens version for the iPhone 11. Now that’s quite a feat since
this is the only brand that has tackled three-camera smartphones so far.
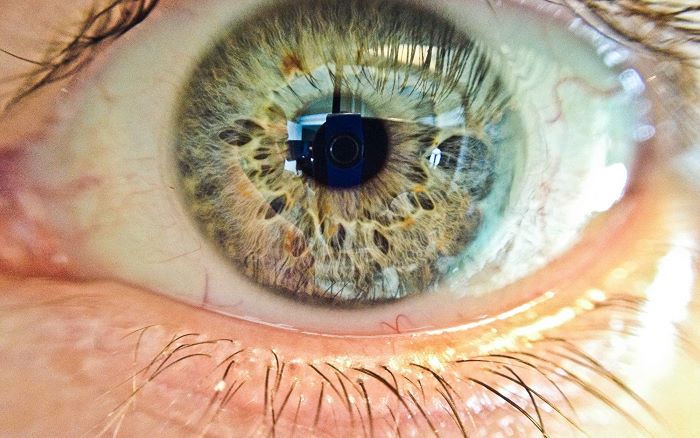
Super Eyes Macro Lens
This is arguably the most unique (and cheapest) macro lens you can
buy online. Marketed as a dermascope that lets you take closeup photos
of your skin, it has a 200x magnifying power. That means it can capture
images on a micro-level.
The Supereyes macro lens
is a long plastic tube with an adhesive at the base. You stick it to
your phone lens instead of attaching it with a clip or a bracket. The
clear shaft allows light to illuminate your subject even when you’re
close.
Since the Supereyes uses an adhesive, you can only attach it so many
times before it loses its stickiness. You would also need to zoom in
digitally to avoid vignetting the plastic shaft causes. But despite its
few caveats, it takes awesome images of even the most basic objects.
The best iPhone macro lens depends on you and your phone’s
requirements. Remember that even though the products on the list do the
same job, they all work a little differently. And don’t think so much
about the prices. You can get a cheap lens and still take great macro
photos with your iPhone.
Figure out what you need to accomplish and choose your iPhone lens
carefully. Most of all, make sure that it’s compatible with your device.
Otherwise, you can’t use it at all.
Lens: Olympus Zuiko OM 50 f/1.4 (equivalent to a 100mm lens on full-frame)
Accessories: tripod and a +2 close up lens
Light source: natural lighting
Light modifier: circular reflector
White 100x70cm cardboard as background and white 50x70cm cardboard as stage
Lighting setup
Setup: High Key
Key light: a window to the left of the scene
Fill light: circular reflector on the right of the scene
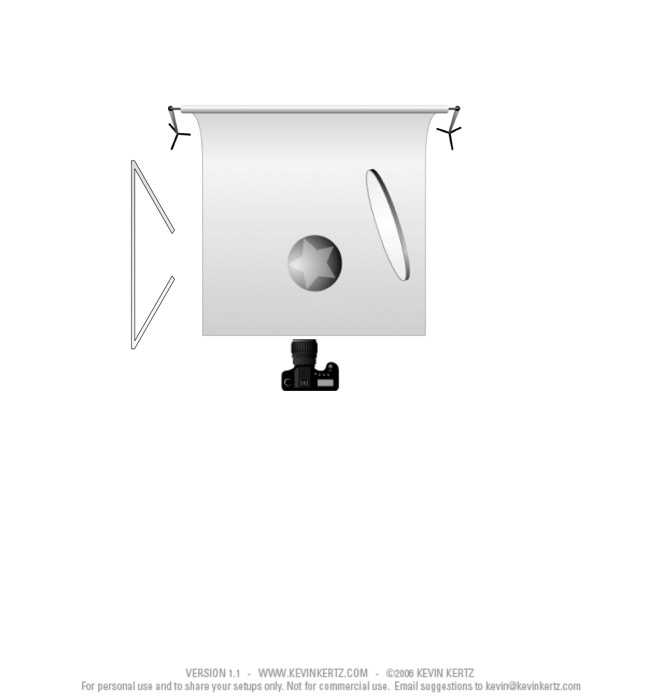
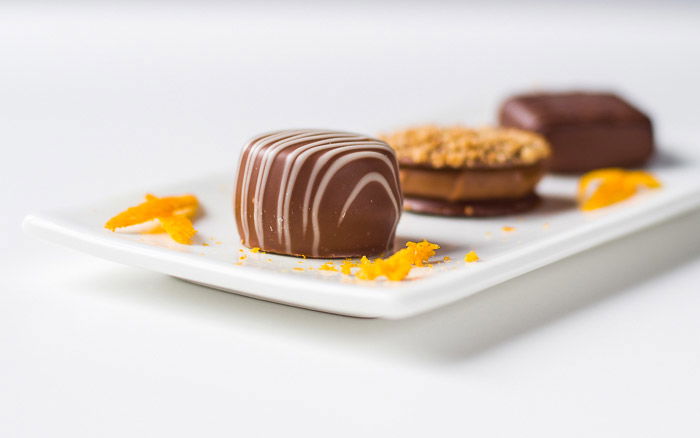
This is a classic setup in food photography. I decided to photograph
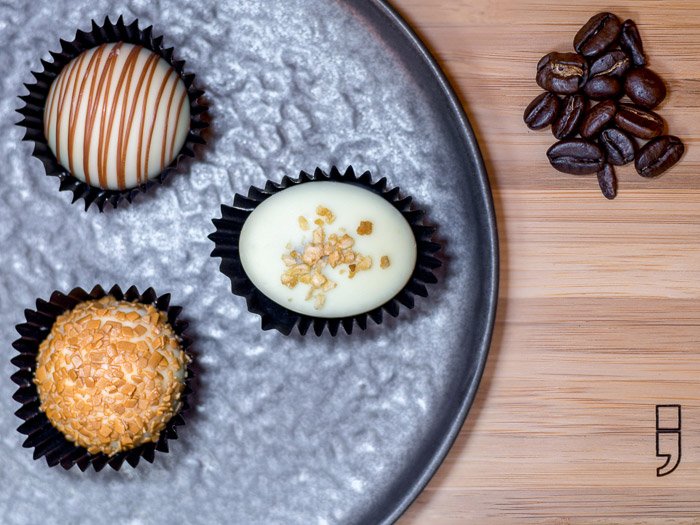
dark chocolate pralines, creating contrast by choosing a nice High Key image.
I have used a long and narrow white plate, decorated with orange peel,
to display
the pralines. And then I focused on the first chocolate.
Belgian pralines decorated with orange peel.
Case Study #3
Gear Used
Camera: Olympus OM-D EM-10 Micro Four-Thirds camera
Lens: Olympus Zuiko OM 50 f/1.4 (equivalent to a 100mm lens on full-frame)
Accessories: tripod and a +3 close up lens
Light source: iPhone 5S
Light modifier: circular reflector
Black (matte) 100x70cm cardboard as background and black (glossy) 50x70cm
cardboard as stage
Lighting setup
Setup: Low Key Lighting
Key light: iPhone 5S running the pro version of the Soft Box Color app from
above the scene on the right
Fill light: circular reflector on the front right of the scene
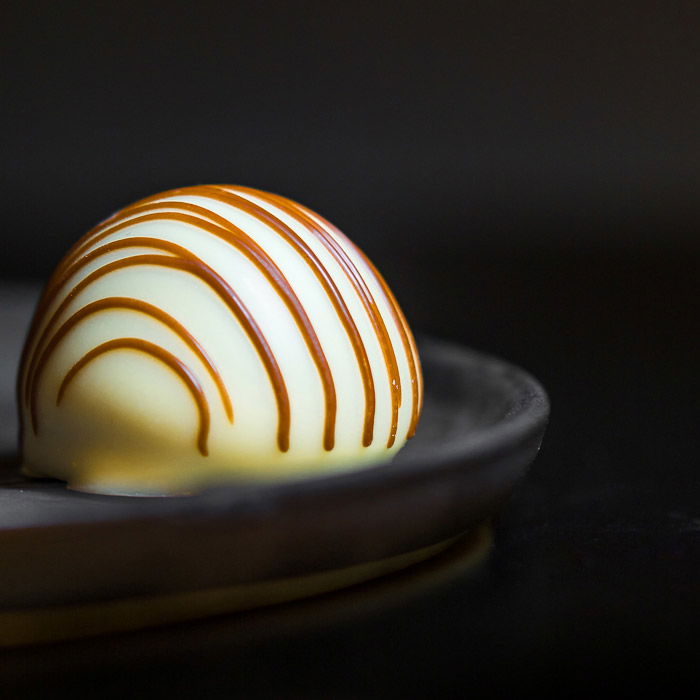
In order to stand out, white chocolate pralines call for Low Key images. A dark grey
plate was used to display a single white praline decorated with caramel.
The use of a +3 close up lens allowed me to get really close to my subject. I then decided
to crop the image in square format, with the subject off-centre. It provides a better and
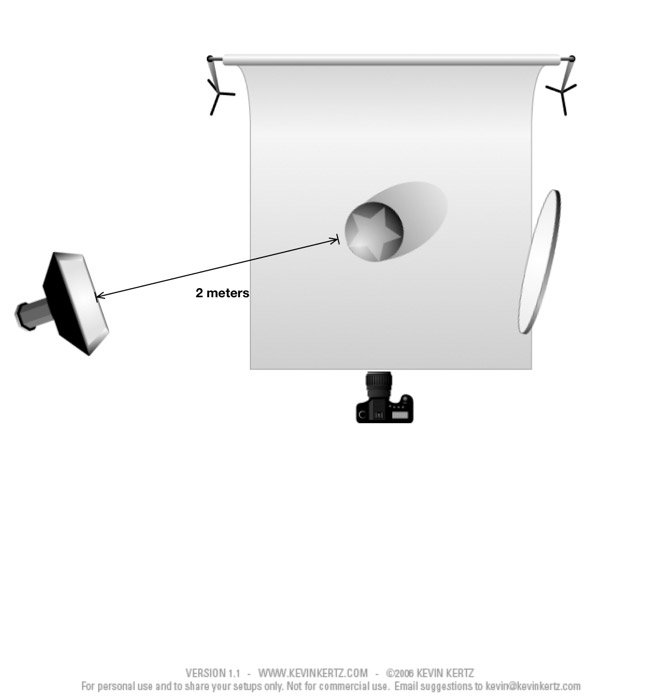
Camera: Olympus OM-D EM-10 Micro Four-Thirds camera
Lens: Sigma Art 30mm f/1.4 DN (equivalent to a 60mm lens on full-frame)
Accessories: tripod, light stand (a simple lollipod tripod), 3m long E-TTL cord
Light source: flashgun Metz 48 AF-1 digital in manual mode, output power set
to 1/16
Light modifier: circular reflector, softbox
Black (matte) 100x70cm cardboard as background and black (glossy) 50x70cm
cardboard as stage
Lighting setup
Setup: Low Key
Key light: flashgun on the right side of the scene, a couple of meters away
Fill light: circular reflector on the left of the scene
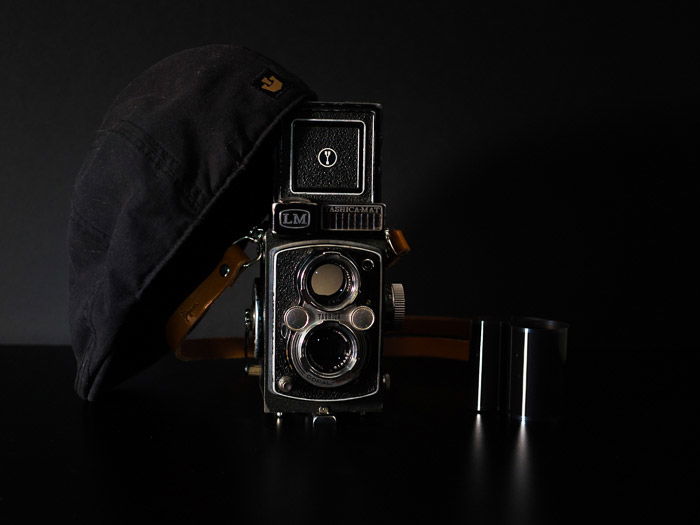
Yashica-MAT LM TLR 6X6 medium format camera.
A more complex setup for this Low Key scene is showing my Yashica-MAT
LM TLR
medium format film camera from 1950 (still in working condition,
by the way). The
props
used to fill the scene were a used roll of 120 film and my favourite
hat. I also
made sure the Figosa leather strap was clearly visible.
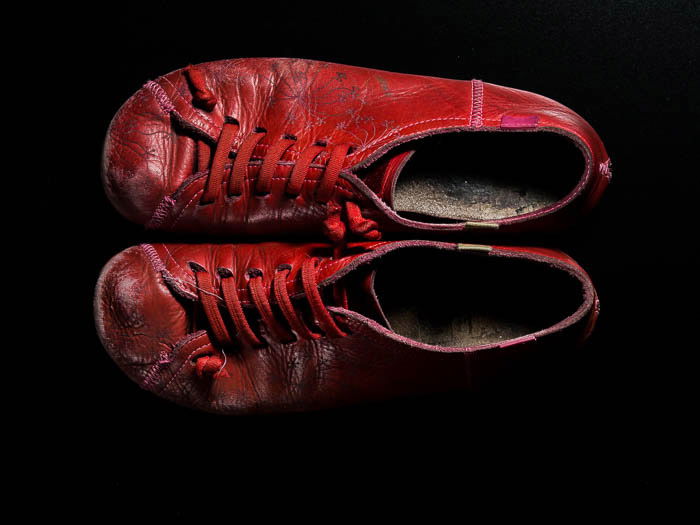
Note that you do not need to be in a pitch-black environment to do
this kind of low key
image. Actually, you can even do them in broad
daylight, as long as you are ok with
using very narrow apertures.
It is best to take a shot without flash to get a black image of the
scene (e.g. using very
fast shutter speeds, lowest ISO settings and
narrow apertures). Then, connect the flash
and take the real photo.
The scene will be illuminated by the flash only, regardless of the amount of
ambient light. Remember, you can out power the Sun with a flashgun.
This kind of setup is great if you want to reveal textures and make your shot moody.
This is what I did for the used red Camper Peu leather shoes shown in the photo below.
Red Camper Peu lady
Use Creativity for the Best Still Life Shots
As you have seen, you can do quite a lot with minimal equipment.
You can photograph
whatever you want, as long as you have the place to
stage it and enough light power to
light it. The main limit is your
creativity. Until now, I presented you quite classic still
life images,
but you can go for completely different things.
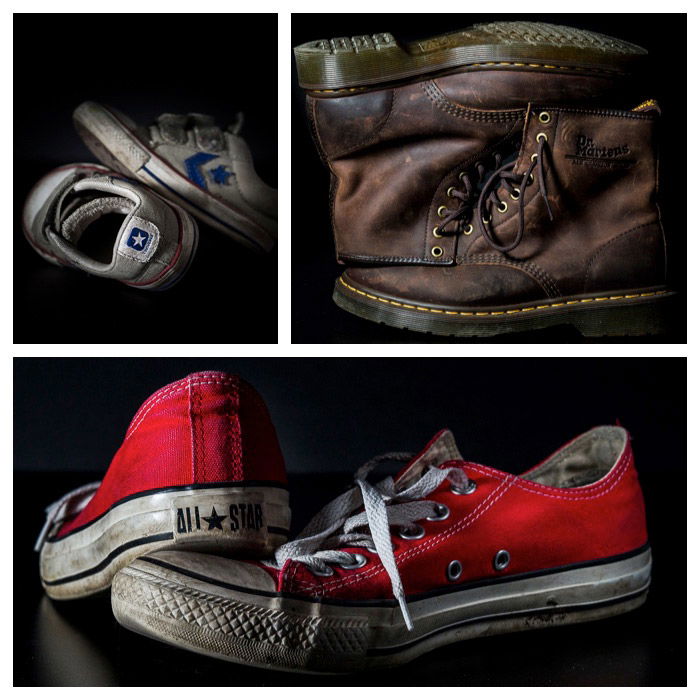
I love to use setups based on that of the case study #4 to photograph
old, battered shoes.
My favourites are old Converse All-Stars and
leather shoes because of the texture.
Some low key images from my Shoes Project.
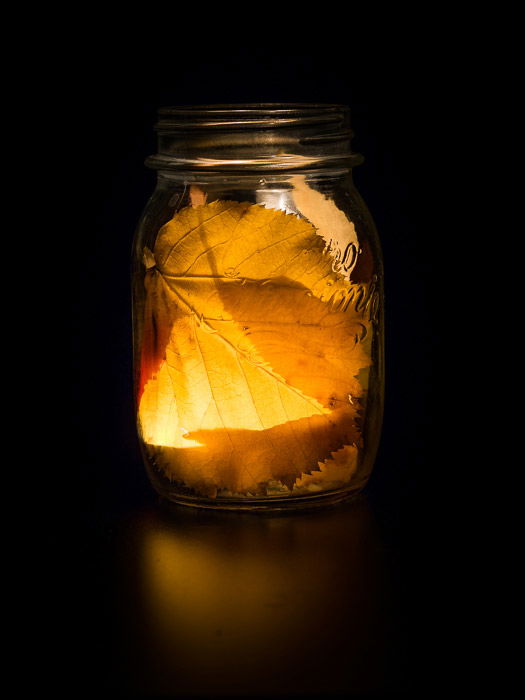
And what about Autumn in a vase? For this shot, I put some yellow leaves inside a jar
and lit a candle inside.
Technical Tips for Still Life Photography
Low Key Setup
For low key photography, I prefer to work in low light. I build my
set with two pieces
of black cardboard: the one I use as the stage
(50×70 cm) has a glossy finish, while the
one for the background (100 x
70 cm) is matte.
The flash is off-camera, on its light stand, and I usually place it on the front/side of the set.
This setup is very similar to the one used in the case study #4, and the resulting photo is
shown below.
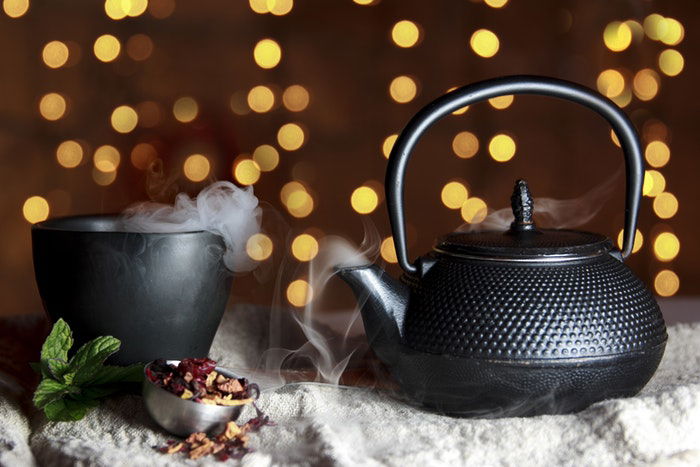
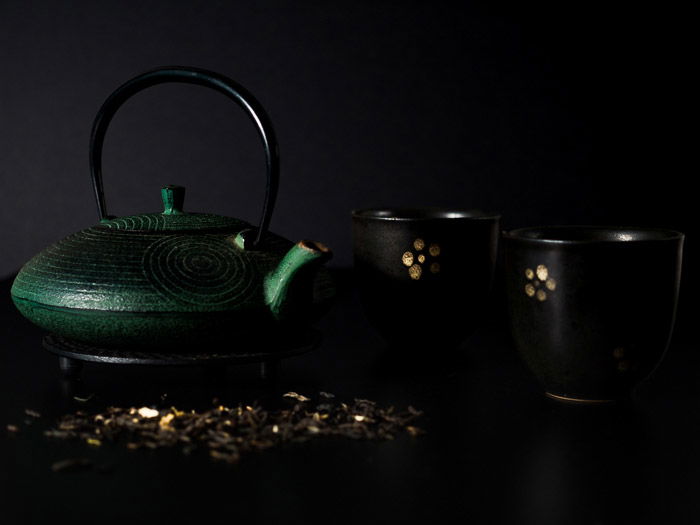
Cast
iron teapot with two cups and tea leaves sprinkled on the set floor.
Note how clearly visible the texture and drawings in the cast iron
teapot are.
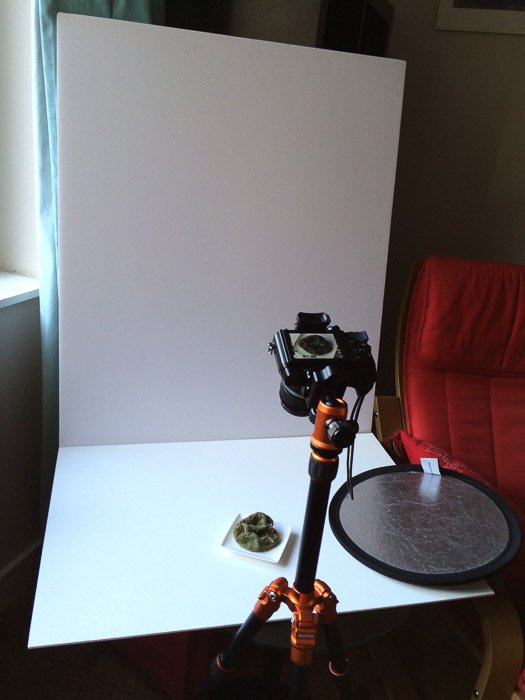
High Key Setup
This is my typical setup for high key photography: Two pieces of
white cardboard. The
one for the floor stage (50×70 cm) is resting on a
coffee table. The background
(100×70 cm) is vertical and on a rest foot.
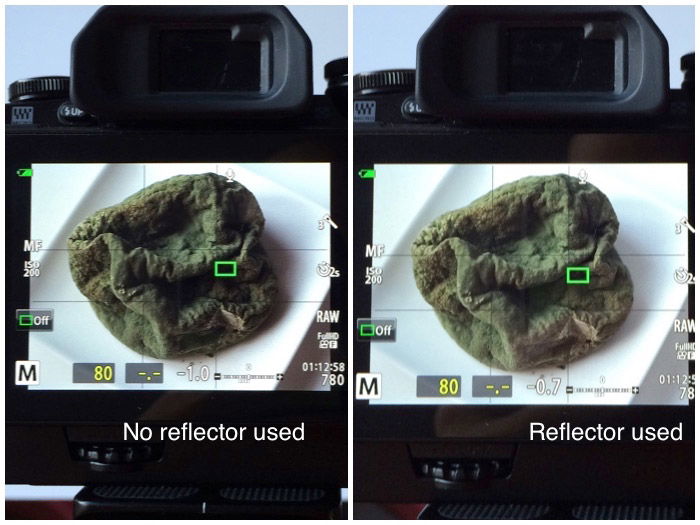
The set up is next to a window to ensure
I use it to soften the shadows by bouncing back some of the light
into the scene. The
photo below shows a comparison between a scene
photographed with (on the right)
and without (on the left) a reflector.
As you can see, the shadows in the right image are softer when the reflector is used
and the scene is more pleasant.
A Few Words on Focusing and Focus Stacking
First of all, forget autofocus and go manual: you want to have
absolute control of what
is in focus and what is not. If your camera has
it, use the live view and turn on any possible
manual focus assisting
function you have. Image magnification, focus peaking, or a
combination
of the two.
For this kind of shot, where you have a narrow depth of field, and you need to focus,
have your camera mounted on a tripod. Use a remote shutter or the self-timer, to avoid
camera shaking.
Be aware of one problem that you may have to face when working with
macro or close
up lenses; the very narrow DOF. Sometimes, even a small
subject cannot be all in focus.
If stepping down your lens, (i.e. selecting a smaller aperture is not
desirable) or the
resulting DOF is still too narrow, the only solution
left is to do focus stacking.
Focus stacking tends to happen in post-processing. But there are now
some cameras that
allow you to do in-camera focus stacking (e.g. the
Olympus OM-D EM-1 with the

 You will need to reply within 72 hours of this post to collect your One Hundred Dollars (No later than 9:30 pm Thursday, March 3rd, 2022) We'll give you full details via a private message (we don't want to share your personal information online). Again, Congratulations!