Monday, June 19, 2023

 #Basic Photography, Amateur Photography

What is the Best Photo Resolution for Printing?


What is the Photo Resolution for Printing of a Megapixel?

A digital camera captures images through what we know as pixels. Pixels are the smallest components of a digital camera sensor. This means they are the smallest parts of a sensor (or a camera display).

Digital images are made from thousands of tiny tiles capturing light and color. A megapixel (MP) is one million of these pixels. (1,048,576, to be precise.) So a 30 MP camera has around 30 million pixels on its sensor.

A diagram explaining what is a megapixel and photo resolution 

What is Image Resolution?

The number of pixels on an image determines the image resolution. The more pixels, the more detailed the image is and the higher its resolution. Image resolution is measured in pixels and megapixels.

To calculate the image’s resolution, multiply its width and height. For example, an image that’s 2,048 pixels wide and 1,152 pixels tall has a resolution of 2.36 MP (megapixels).

Image resolution is often given in PPI (pixels per inch). It means how many pixels are displayed per inch in the image. This refers to the photograph or image’s detail when viewed at 100% on a computer monitor.

But image resolution also relates to the image’s print size. This is given in DPI (dots per inch).

Photo resolution is a factor that determines image quality. But the camera sensor, processor, and even the quality of the lens you are using also play a part.A woman from above, with a camera in her hands, and with a laptop, a mobile, an apple and coffee on the office table 

Do More Megapixels Mean a Better Image?

You might think more pixels mean better images. But then smartphones could outrank some semi-pro DSLRs. Yes, they might have a higher MP number written on them, but it’s not what determines image quality.

Higher-resolution photography can mean higher image quality. But only if you have the right lens. Sharpness, definition, and detail go up alongside the image resolution. And a good-quality image results from many other factors. This includes good lighting, correct exposure, and proper composition.

But yes, more megapixels can mean better quality. And you also need a higher resolution for printing and editing. A clear, well-focused image at the best resolution is key.

Why is it Important to Have the Right Lens?

You could have a 40 MP camera and still won’t be able to take advantage of it without the right lens. Usually, your lens is not able to resolve as much information as your camera is capable of providing. The quality of the lens determines how much detail it can manage.

And what if your lens produces errors? A high-resolution sensor will draw them more sharply. For example, lines of chromatic aberration will be more visible in your images.

Professional camera with lens on wooden table.
Diffraction is also something that limits the resolution of a lens. This means that image quality changes above a certain aperture value. Usually, at f/16, you encounter a loss in image quality and a decrease in sharpness. That’s because of the optical interference of light. But it’s a general phenomenon in optical physics. So every lens has this disadvantage.

What is the best way to compare optics and see your lens capabilities? Double-check its ranking on this chart by DxOMark. This is one of the most reliable databases online.

Sometimes it’s better to buy an expensive lens for a not-so-expensive body. That way, you can maximize image resolution.

Why is High Image Resolution Important for Post-Processing?

A composition can look much better after cropping an image. This is a technique you can use in analog photography too. Having a higher photo resolution gives you a little more playroom. It helps avoid a serious drop in image quality.

Also, your image might need perspective correction. Or maybe you need to adjust it to standard aspect ratios (i.e., for printing purposes). Both can result in losing some details.

An image with more pixels holds more information. So it’s less of a problem if you lose some.

screenshot of editing and cropping an architectural image - the importance of megapixels. 

How Can You Find the Resolution of Images?

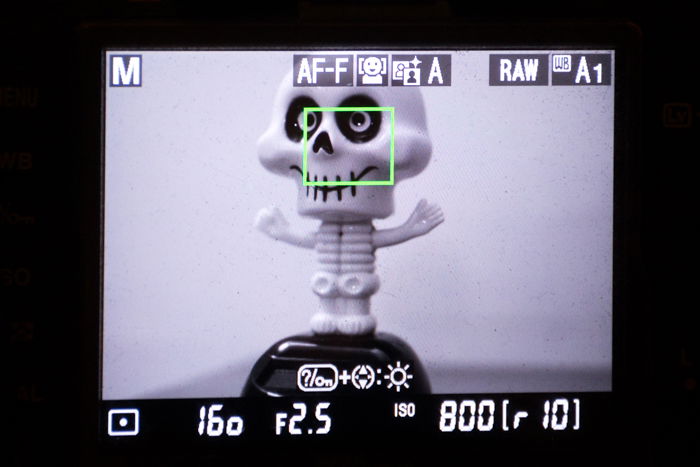
You may want to find out the pixel size of your camera or the resolution of your images. You can look at the information from one of your images. For example, a camera may produce its largest image at 6016 x 4016 pixels. This means the max resolution of the camera is 24.2 megapixels.

This information is easily accessible on a computer. Right-click on your image and then click Properties in Windows or Get Info on a Mac to see the EXIF data of your shot. Sometimes it’s also written in your camera’s manual.

Best Resolutions for Editing and Exporting

For photo editing, you need images with as high a resolution as possible. You should set your camera to the maximum resolution (image size) it can achieve. Most of the time, it’s best to shoot in RAW file format.

RAW files are better for editing than JPEGs. They contain a lot of information. And you can bring more details out of them during post-processing. And as mentioned, they are also better for cropping.

When exporting, you may find that your 20 MP (or higher) image becomes redundant. If your image is for a website, or sharing platform such as Flickr, don’t use the highest image resolution. You’re shooting yourself in the foot.

Man working at home editing pictures on computer 

Sure, it makes your image look great. But if it takes too long to load due to the file size, viewers will scroll past.

Facebook and Instagram automatically resize any images over a certain resolution. They compress them to a lower resolution to be able to store millions of photos added each week. This has the potential to turn a great image into one with poor resolution.

You can resize your images before uploading them to Facebook. Setting the longer edge of an image to 2048 pixels while exporting is just enough. It will also take less time to upload them.

Best Resolution for Printing Photos

There is also a difference between screen resolution and photo resolution for printing. Your image may look great on the computer screen. But it’s a whole different ballgame when it comes to printing or print quality.

We talked about PPI, which means the number of pixels per inch on a screen or a sensor. Now we should talk about DPI, which means dots per inch.

This refers to the number of ink dots on a print. The higher the number, the higher the quality. You can set the DPI value on your computer. But it really matters when it comes to printing.

The standard is 300 DPI. You might want a higher resolution, but usually, it’s enough. Under this, your images quickly lose their quality.

 Do you have limited knowledge about printing? Then it may be best to leave this to the professionals until you get up to speed. Printing your image at a high resolution on the wrong paper will cause inks to bleed. This results in a blurry effect.

A man checking on Print Quality of the Photo Custom Digitally Printed Album.

Ensure the ink and materials you use are for digital photo printing. You can find great print labs and online print services to print your images. You’ll also be able to learn information about the materials and techniques they use.

Optimize your image for a canvas that fits the desired scale of your print. You should also pay attention to the RGB and CMYK color spaces.

Remember, you should never print your images at the same resolution as your screen. These are typically 72 DPI (dots per inch). So you want to aim for anything between 300 and 1,800 DPI when printing.

Also, we should mention file formats. It’s preferable to use TIFF file format or TIFF compression (LZW) for printing. Printing an image as a JPEG can cause a huge loss in image quality. It decreases pixel density. This is done by compressing and merging pixels to optimize the file size.

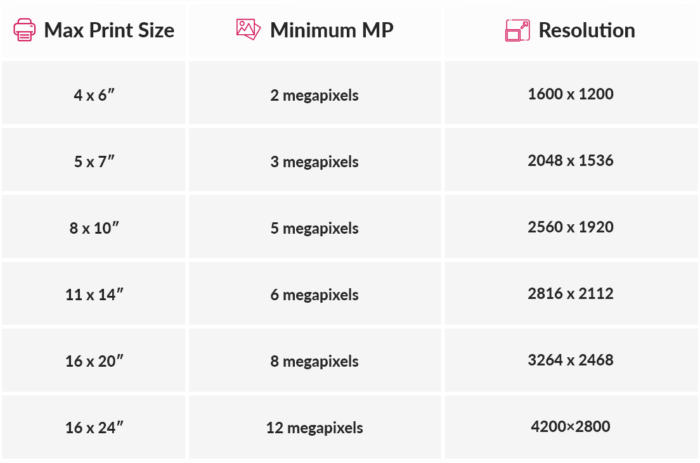
For images at 300 DPI, follow this table to print your photographs at the ideal size.

A table that shows what resolution you can use for printing 

 It’s a myth that you need more megapixels for your images to look great… But it’s a great way to sell cameras. Remember that there’s more to photography than image resolution.

Some photographers need more megapixels for advertising, fashion, or editorial purposes. They may need to print their high-quality images up to the size of small buildings! But everyday photographers aren’t taking images for multi-million dollar campaigns.

So what’s the best resolution for printing photos? New cameras these days are never below 10 MP. And that is enough for 99% of your photographic work!  

-----------------------------------------------------------------------------

Is High ISO the Enemy? When and Why?


Low light truly is the bugaboo for the digital photographer.

Low light can be dealt with. However, each alternative has its drawbacks.

  • We can use some means of support for the camera, so that we don’t get camera shake.
  • We can use a wide aperture. However, this has limitations as the aperture can only go so wide and depth of field may be a factor.
  • We can use an electronic flash. Many times this isn’t practical or creates a look that is creatively dysfunctional for our picture.
  • We can raise the ISO setting according.


Raising the ISO setting is the simplest resolution to this complex and frequent problem.

However, it also has limitations, and these limitations are not standard. They vary from camera to camera.

Today, photographer and university level photography instructor Robin Nichols takes a close look at the HIGH ISO setting on the camera.

What are the benefits?

What are the drawbacks?

What is the very best way for you to handle the ISO setting on your camera?!

Photo Credit: Robin Nichols

Sunday, June 18, 2023

 #Basic Photography, Amateur Photography


Photography Memes

20 Funny Photographer Memes That Will Make You Laugh          Top 10 Best Photography Memes to Make Your Day - Adam's Trail Notes


Tuesday, June 13, 2023

 #Photography Basics, Photography Tutorial 

A Simple Guide to the Different Types of Cameras in 2023


7. Types Of Cameras: Compact Cameras

Also known as a point-and-shoot camera. A compact camera is an inexpensive entry-level camera for the amateur digital photographer.

These cameras are small and lightweight. They usually come with standard, automatic settings. They tend to be smaller as they don’t have an optical viewfinder.

They are the most user friendly of the types of cameras options. You frame your subject and press the button. The camera does all the work. It assesses the scene and determines a correct exposure.

Compact cameras have a built-in flash and a zoom lens. They also come with an LCD screen. You can view your scene before pressing the button to take the picture.

Many of these cameras even have some manual functions. These allow you to have more control over your photography. 

But these types of cameras are all about ease of use. They won’t give you control over every camera setting. Some models also offer the ability to change lenses.

The downside of compact cameras is that they have a very small sensor. It doesn’t allow for great picture quality or printing large images.

Compact cameras are great for the hobbyist starting out. But they are not suitable for professional use.

Recommendations:
Nikon Coolpix A300
Canon Powershot Elph 190is
A sony camera placed on a wooden table

6. Zoom Compact Camera

Compact zoom cameras have a more powerful zoom lens. This means a much greater magnification ability.

They offer automatic exposure settings as well. But most also offer manual options and HD recording. 

These types of cameras do not offer interchangeable lenses. This is due to the nature of the enhanced zoom function. The zoom ranges from 28-300mm.

Most models offer at least 12 megapixels. This is excellent for your personal images. As with other compact cameras, these types of cameras are not suitable for professional use.

Recommendations:
Canon Powershot SX540
Panasonic Lumix ZS50
Olympus Stylus 1s
A zoom lens on a photographers desk

5. Advanced Compact Cameras

These types of cameras are for the more experienced hobbyists. They want more control over their photos than what a regular compact camera provides.

Advanced compact cameras come with manual exposure mode and manual focusing.

These features put these a cut above regular compact cameras. But these cameras are still lightweight and user-friendly. 

They will allow you to take higher-resolution pictures than your smartphone can provide. But they’re still small and compact. This makes them an easy walk-around solution for many shooting situations.

Recommendations:

Canon PowerShot G3X
Sony RX100 IV
Close up of a person holding a Canon DSLR

4. Adventure Cameras

Action cameras have become very popular lately, and more and more models are coming out.

These types of cameras are similar in many respects to compact cameras. But they have the bells and whistles that allow them to withstand extreme conditions.

They are weatherproof and shockproof, with their lens behind very durable glass. Action cameras are very small, yet offer a lot of versatility and high resolution for their size. 

As with other compact cameras, they are not suitable for professional use. This is due to its small sensor. They also don’t come with interchangeable lenses. They may also lack an optical viewfinder or even an electronic viewfinder.

Recommendations:

Nikon Coolpix AW130
Olympus TG-870
A Nikon camera placed on a shelf beside a camera backpack

3. DSLRs – Digital Single Lens Reflex

Digital SLRs are for serious amateurs and professionals alike. These are larger and heavier than compact cameras. Most professional cameras out there are DSLRs, even through bridge cameras and mirrorless are gaining in popularity too.

Their design and function comes from film cameras. The higher-end models have a full frame sensor. This is also inspired by the traditional 35mm film camera.

Many come with a cropped-sensor. This is cheaper for camera manufacturers to make. And it allows DSLRs to be accessible to a wide variety of consumers.

The lenses are interchangeable on these cameras. How they behave will depend on whether the camera you choose has a cropped sensor or a full frame sensor. 

The lenses for these cameras range in quality. Most manufacturers offer a line for amateur photographers. And then a much more expensive line aimed at professional photographers. An example here is Canon’s L-series.

DSLRs also offer a variety of manual settings and creative controls. You can take images in Automatic mode. But these types of cameras offer Shutter Priority, Aperture Priority, and Manual mode as well.

The benefit is that they have an optical viewfinder. They come in a range of sensor sizes, some being APS-C while others are full frame. Shutter speeds can reach faster ranges and have a better low-light capability.

Recommendations:

Canon EOS Rebel T6i
Nikon D3400
A Canon 60d DSLR on a table

2. Compact Mirrorless Cameras

They say that mirrorless cameras are the wave of the future. They offer most of the features of a DSLR camera. But they are smaller, lighter, and generally less expensive. 

The name “mirrorless” is from the lack of an internal mirror that reflects light onto the sensor.

The light that comes in through the lens goes straight to the sensor. This then transmits the information it captures on to the LCD screen.

The new mirrorless cameras are a powerful alternative to the DSLR. They tend to use an electronic viewfinder rather than an optical viewfinder.

In fact, many professional photographers are switching over to mirrorless cameras. Or they’re using them as an alternative to their usual DSLRs, such as while traveling.

They are versatile, high-performance types of cameras. They will allow you a lot of control over your results.

You can change lenses on these cameras, and they have a ton of features for creative control. Some models offer facial recognition and have focus points in every part of the frame. This is excellent for event or wedding photography.
noop
Most offer high resolution and video, and also Wi-Fi capability. This latter allows you to remotely control your camera. You can use your smart device from a distance.

The new mirrorless cameras are now capable of capturing incredible, high-resolution images. These types of cameras are comparable to some of the best DSLRs out there at a lower price point.

Recommendations:

Canon EOS M50
Sony a7R  III
Flat lay of a sony camera beside two canon lenses 

1. Medium Format Camera Types

It’s out of the average person’s price range. And it’s unnecessary for most shooting situations. But the medium format camera bears mentioning.

Medium format refers to the 120 size film format used in the Hasselblad V system film cameras. Hasselblad are the leading manufacturer of this type of camera system.

Medium-format is a camera with a larger sensor than a full frame DSLR. It is common in certain types of advertising work where very high resolutions are the norm.

These types of cameras offer amazing resolution. But they have less sophisticated autofocusing systems and burst modes. Thus, they are not suitable for every genre of photography.

The other downside is that the price tag for this type of cameras is exorbitant. Even most pros rent them rather than buy their own.

For example, the Hasselblad H6D-400c offers 100 megapixels and a 53.4×40.0mm sensor. And it costs almost $50,000 USD for the body alone.

Recommendations:

Hasselblad H6D-100c
Hasselblad H6D-50c
A black and white photo of two medium format film cameras  

Maybe you’re a beginner, hobbyist, or looking to get into professional-level photography. No matter your level, there are many types of cameras to choose from that will suit your needs. You can even find a variety of cameras for kids.

Take the time to explore the features of several models before narrowing it down to a final choice.

Ebay Camera Deals!

 -----------------------------------------------------------------------------------

Viewfinder vs LCD for Composing & Focusing – Pros & Cons – Free Quick Guide


You’ll probably have noticed that your camera has an LCD screen on the back of the camera body for the Live View function, as well as a viewfinder.

But which one should you be using and when?

Is one better than the other?

The answer is that each has a correct time and place in your photography, and if you’re using the wrong one at the wrong time, you’re likely hurting your images.

In this guide, we’ll take a look at viewfinders vs. LCD screens to help you understand the technology behind both.

Here’s what we’ll cover:

  • What is a viewfinder?
  • Is an optical or electronic viewfinder better?
  • Pros and cons of using a viewfinder
  • What is an LCD screen, and what is Live View?
  • Pros and cons of using Live View on an LCD screen

Get your guide today.

Photo Credit: Imansyah Muhamad Putera


Saturday, June 10, 2023


 Photographers shouldn’t date other photographers. No idea where to focus their attention.

funniest photography memes - photographers speed dating


Monday, June 5, 2023

#Photography Basics, Photography Tutorial 

How to Easily Understand Your Camera Autofocus Modes


Exploring the Benefits of Using Autofocus Modes Over Manual Mode

Focusing is choosing the part of your photo that will be sharp and well defined. Our brains usually prefer sharp images over blurry. A well defined subject draws attention, and is the most important part of the composition.
Mastering autofocus system will allow you to better convey the message of your image. It will also save you from deleting lots of blurry photos!

A blurry photo of a purple flower  


A sharp photo of a purple flower shot using correct focus - autofocus mode
If you compare this photo with the one above you clearly see the importance of using correct 
focus, which photo do you like looking at better?

Focusing manually gives you more control but it is an acquired skill. There’s a steep learning curve. Basically you focus by turning the ring on your lens (in DSLR cameras) until you see in focus the part of the photo.
It gives you more freedom for artistic effects, or to take photos in difficult situations, like low light conditions. But struggling with manual focus at the beginning can cause you to miss key moments.
This is where autofocus comes in.
A person pointing to autofocus mode on a Nikon DSLR
Autofocus is a practical option that will allow you to focus much faster. You will be able to pay attention to other things like composition and exposure.
You can switch between manual and autofocus either through the lens or through the camera itself. Depending on your camera model, you’ll have a dedicated button or can access this through the menu.
A close up of autofocus mode on a Nikon DSLR 


What Is AF All About?

When you set the focus, you arrange the glass parts in your lens so that specific light beams meet on the sensor. Beams that reach the lens from different distances require different arrangements.
In other words, focus is a matter of distance of the objects from the lens. In autofocus mode you select pre-determined “focus points”. The number of these points depends on your camera you have.
You can see them through the viewfinder. Your camera will focus on the area that is in front of the focus point you selected. 


Camera Focus point display
Focus point display. Photo credit: Nikon (https://imaging.nikon.com/lineup/dslr/basics/16/02.htm)

How to Select the Best Focus Area for Your Subject

Digital these days have very advanced autofocus modes. They offer more options than just selecting one focus point.
A 4 photo grid showing how to change autofocus modes on a DSLR 


  • Single-Point AF-Area Mode (Manual AF-Point in Canon). The camera will only use the focus point you’ve selected.
  • Dynamic AF-Area Mode (AF Point Expansion in Canon). You also select one focus point. But in this mode, if your subject moves a little, the camera will use the surrounding focus points to focus. You need to track the subject with your camera. This way, you can make sure that it remains close to the first selected focus point. If not, your camera won’t be able to refocus.
  • 3D Tracking. You select the first focus point and your camera, using an algorithm, tracks your subject while moving. There’s a risk that your camera will ‘jump’ to another subject and ‘decides’ to focus on it instead.
  • Auto- area AF. This mode is completely automatic. The camera decides for you what focus points are going to be used. It chooses the subject in the photo according to contrast differences. I do not use this mode often. I like to keep some control over what to focus on.

Use Single-Servo AF (Nikon, AF-S) or One-Shot AF (Canon) for Static Subjects

Most cameras have different autofocus modes to help you focus in different situations. You can select one either through the camera settings menu or with a button dedicated to it.
The most common autofocus modes options are : AF-S (single point), AF-C (Continuous) or AF-A (automatic).
The basic option is the AF-S. With it selected, you focus using one focus point. The camera will allow you to choose the focus point (probably using some arrow buttons or a dial).
This autofocus mode has the advantage that it allows you to block the focus when you half-press the shutter release. This is handy when you want to reframe the image without losing the focus point.
AF-S mode is useful when the subject of your photo is not moving (landscape, still photography) or it moves just a little (static portraits).
A female model posing on the beach shot using af mode 


Use Continuous Servo AF (Nikon, AF-C) or AI Servo (Canon) With Moving Objects

Another camera focus option is Continous (AF-C). This is especially useful when the subject of your photo moves around. Think sport events, vehicles, animals, or kids.
The camera does not lock the focus point when you half-press the shutter release. Instead, it tracks your subject and refocuses accordingly.
Remember that when you select this autofocus option, you can’t lock the focus. This means that you can’t reframe. 

A girl in sports clothes jumping energetically on the beach shot using af mode

What About Autofocus Automatic (Nikon, AF-A) or AI Focus AF (Canon)?

There is a third option: the Autofocus Automatic. Your camera will select Single or Continuous AF if it detects the subject as stationary or moving respectively.
This might seem like a great option, but it leads to confusion. The camera switches between the two AF modes.
This makes it hard to know if half-pressing the shutter release will lock the focus or track the subject. 

How to Combine Autofocus Modes With Focus Areas for Better Photos

Now it is time to put the Autofocus mode and autofocus area together.

Single Point Area + AF-S Mode

Perfect for stationary subjects such as landscapes and still photography. I also use it in portraits where the model is not moving fast.
You choose one focus point and the camera won’t refocus.

A colorful city street view - understand autofocus mode
Single Point Area+ AF-C Mode

Ideal for when your subject is moving, like animals, kids, sports, etc. Also handy in nature photography for windy days.
You select one focus point and your camera will refocus if needed if the subject moves.
It will refocus only on the selected focus point, so you need to track the subject.
A close up of plants outdoors - what is autofocus mode 

Dynamic Area + AF-C Mode

Useful when the subject is moving in an unpredictable way. Select one focus point and the camera will use also the surrounding ones if the subject moves.
You might be wondering why you should not use this all the time. Since the camera can track the movement and refocus accordingly (selecting Continuous mode and a 3D Tracking/Dynamic area).
Why bother switching to one single focus point?
If your subject is not isolated in the frame, your camera can get confused. It might end up tracking another subject you are not interested in.
For that reason, the one single focus is still more precise than the dynamic area/3D tracking. If your subject is not moving, you have better chances for a sharper image. 

Which Combinations Not to Use

Dynamic Area + AF-S Mode
Although your camera might let you select this combination, these 2 options are incompatible. On one side you are telling the camera to use an area of using several focus points to refocus if needed (dynamic area). But you are not allowing it to refocus (AF-S mode has not this option).
The dynamic area will get disabled and it will works as a Single-Point.
If you select this option because your subject is moving you can miss the shot. Your camera is working as if it were in Single Point Area+AF-S Mode (the one for static subjects).
3D Area + AF-S Mode
Same as with the previous, the camera won’t refocus. The 3D Area will get disabled and you’ll be taking photos like in Single Point Area+AF-S Mode.

How to Autofocus in Live View

Autofocus mode work slightly differently when you’re using Live View. In this case, you can select any point on the screen to focus on and not just the predefined focus points.
Live view autofocus mode works by detecting contrast in the scene while the viewfinder autofocus technology is based on phase shift sensors. Live view focusing is slower. But it is also more accurate for static subjects.
I recommend using it with AF-S mode. When selected, you will see a red square you can move around the screen using the arrow bottoms.
When it is in focus it will appear green and then it’s time to shoot!
Close up of adjusting autofocus modes on a camera while focusing on a plastic figure of a skeleton 


How to Use Autofocus Modes in Low Light Situations

In low light situations, your autofocus might go a bit crazy. Your lens will go into a loop looking for focus without success.
In these cases the AF-Assist built-in light can be really useful. Turn it on through your menu. When activated, your camera will send out an orange-red light that will point to your subject. This will help you focus.
But it’s not a perfect solution. It selects the AF-S Mode and focuses using the central focus point. It has a limited range too, so you need to be relatively close to your subject (0.5-3m).
An alternative you could use is to briefly illuminate the point you want to focus on using a flashlight or some other light source.
A wedding photo in low light shot using autofocus modes 

 Autofocus Modes

Getting familiar with the autofocus modes that your camera offers will allow you to take sharper images.
Select an autofocus area according to how your subject behaves. If it is static, use a single focus point and combine it with the Single-Servo Mode (to lock the focus when you half-press the shutter release) or the Continuous mode (to allow the camera to refocus on that point if the subjects moves slightly). 

--------------------------------------------------------------------------------

Camera Basics Series: Shooting Modes Explained – Free Quick Guide


There probably isn’t a more confusing and misunderstood topic on the camera side of photography than the shooting modes.

Shooting modes may be incredibly confusing to people just starting in photography; after all, there are so many letters and icons on that mode dial! What do these letters and icons mean?

Good question! And the sooner you understand them; the earlier your photography will improve and become more predictable.

This is what will be covered in this guide:

  • Auto Mode
  • Program Mode
  • Shutter Speed Priority Mode
  • Aperture Priority Mode
  • Manual Mode
  • The differences in the Nikon and Canon mode dials
  • A note on Scene Modes

There are those that believe that the manual mode is the only mode that a real photographer uses.

We don’t believe that. There are reasons that all of these different modes are available to photographers, even on the most professional level DSLR cameras.

Each mode has a purpose.

Are you ready to learn about them? Let’s go!

Photo Credit: Angela Fulks