Monday, February 27, 2023

#ACX, Photography Life, Autofocus

Why Use Manual Focus? (How to Manually Focus Your Camera)

width=

It’s hard to imagine a time before our trusty autofocus (AF) systems when we used manual focus. We now have cameras that boast a whopping total of 850 AF points. And the manual focus ring barely seems to be touched anymore.

Today, I’ll show you how to manually focus and tell you why this function is still available on every lens produced.

Close-up man in hat looking through camera and using manual focus

What is Manual Focus?

Manual focus is the process of adjusting the depth of field by hand—manually selecting the clarity of the image in the various distances you set your lens. When you turn the manual focusing ring, you adjust elements inside the lens. You change the distance between a selection of lenses, moving one or more lenses either closer or further from the imaging sensor. It is how a telescope or pair of binoculars work.

Most analog film cameras require manual adjustments because they don’t have digital features. It means they only use manual focus lenses. It wasn’t until 1978 that Sony released the first-ever SLR with auto focusing. Every camera that came out before this time (and many film cameras after) would strictly involve manual focus.

How to Use Manual Focus

Manually focusing your image is as easy as turning the focus ring on your lens. But this can be trickier than it seems. I don’t recommend using this function when taking quick shots is a crucial factor in your photography, like wedding photography, when missing important moments can cost you the job.

But if your camera’s AF starts to fail you, there are some ways to work around that by manually focusing. Various kinds of cameras will have different techniques. You can even manually focus on your iPhone! Simply by tapping the element on the screen that you want in focus. But I will mainly focus on DSLRs.

Viewfinder on top of mirrorless camera for manual focus

3 Manual Focus Techniques

1. Depth of Field Preview

Pretty much all modern DSLRs feature a depth of field (DoF) button. Pressing this button will give you an idea of your image with your selected aperture. It will show how far your depth of field focus range will span through the viewfinder.

The button is usually found next to your lens mount but can vary from camera to camera. If you have an issue finding it, you can always check the manual for your camera.

The DoF button will show the exact aperture you have set on your camera. The presented image will look a bit darker. So don’t worry about the image turning out like this. If you set a higher numerical aperture like f/22, the aperture is smaller. Therefore, it lets less light into the camera.

The feature is helpful, giving you an idea of how the image will look. It shows how much of your surroundings will be in sharp focus or soft focus.

2. Live View

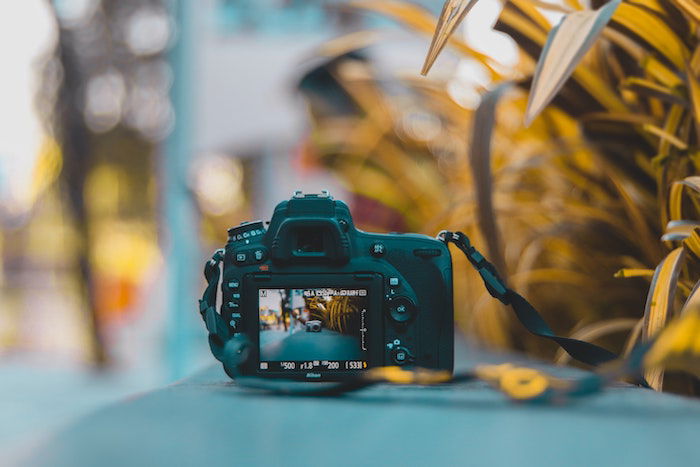
Modern cameras, especially DSLRs with video capabilities, can have a ‘Live View’ feature. It is beneficial when it comes to manual focusing. Using this feature will bring up a real-time view through your lens on your LCD screen.

It provides a wider screen to view your image. That makes it easier to judge the sharpness of the subject you are focusing on. You can also zoom into this screen. It allows you to take time and care with this process, giving you confidence in the sharpness of the image.

Some cameras will have a focus-magnifier setting. It will automatically zoom in to give you a part of the image for you to focus on. Some new cameras, especially mirrorless ones, have this function applied whenever you move the focus ring.

2. Focus Distance Windows

The oldest way of manually focusing is still readily presented to us, of measuring the distance from your lens to the subject. These distance windows can be helpful when all else fails, giving you a chance to judge or even measure the length. The distance the camera provides should be in both metric and imperial measurements.

Most lenses should have a focus distance window (or even numbers engraved on older lenses). But they are getting less common, especially in mirrorless ranges of cameras. This window is an active lens element that moves according to how much you alter the focus ring.

This method is not the most accurate way of focusing an image. But it can be a lifesaver when emergency occasions arise!
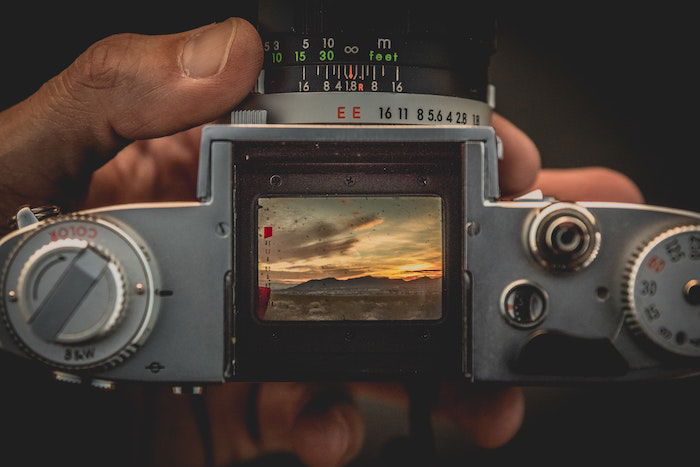
3. Rangefinder

Some cameras use alternate ways of focusing because the viewfinder doesn’t look through the lens. These are found on ‘rangefinder’ cameras and digital rangefinders—for example, many of Fuji’s X Series.

The rangefinder presents a section showing two images of the same scene. To get the desired focus point, you have to overlay the two images to match them up perfectly.

When to Use Manual Focus

Now I’ll look at seven situations that benefit from using manual focusing. These may be due to personal preferences or from the automatic features of your camera not allowing you to be fully in control.

1. Choosing Your Subject of Focus

A pretty obvious one, but regardless, manual focusing allows you to pick the exact subject you want to focus on. It is handy when there are many layers throughout your scene. For instance, if you’re going to shoot through flowers or windows.

Sometimes in these situations, the auto focus system will snap to elements that you don’t want in focus. When this happens, that’s when I recommend hitting the manual focus switch and adjusting it yourself.

It can be helpful when photographing crowded or busy situations.

A small bird in focus in a tree.

2. Low Light

If it hasn’t happened to you already, it will do at one point. In a dark environment, you will hold down the auto focus button, and all you will hear is the lens adjusting and readjusting itself. With no sign of that comforting beep, it is time to focus manually.

Cameras have a hard time reading distance in low light, which isn’t surprising. Hopefully, you should be able to make out some forms through your viewfinder. Turn your focus ring manually to make an accurate selection of the subject.

Multiple lit tea candles at night with center manual focus

2. Macro Photography

Macro photography fans out there will already know the importance that manual focus brings. Macro photography involves taking images very close to the lens. It requires wide apertures. And wide apertures give hardly any forgiveness when it comes to sharp focus.

You don’t need manual focus for this process. But it is where a majority of the creative aspects come from. Mastering manual focusing is a must for macro photography because it allows for a much greater range of experimentation.

Close-up macro photo of four white flower petals in focus with a blurred green background

3. Focus Stacking

Focus stacking is a method to ensure that every element is in focus to its fullest. It is often used in landscape photography, mainly by photographers who like the HDR process.

This process is very similar to HDR. You have your camera on a tripod, take many images, and then stitch them together through post-production. Instead of taking the best exposure for each section of the image, you’ll be gathering the sharpest focus. You use manual focus to target each different aspect.

This method is helpful because you will be able to take images on a wide aperture. Using a wide aperture will allow you to drop your ISO down, in turn producing sharper images. It also allows you to take many photos to pick the best ones later when looking on a bigger screen.

Macro image of a dragonfly using manual focus stacking

4. Low Contrast

If you have been a photographer for a while, you will have identified situations where the autofocus system can fall short. Certain cases are when there isn’t much definition in the subject or no contrast in particular areas.

The autofocus function looks for lines of contrast to find depth to base its measurements. Environments with a lack of different tones can force you to use manual focus. Use the techniques I wrote above to work through this issue.

Low contrast landscape image of a coastline with cliffs, a beach, and water

5. Fast-Moving Objects

Relying on auto focus for fast-moving objects isn’t the best idea. Especially if you only have a small window to get the perfect shot.

Hopefully, you know your subject well or can quickly assess how the subject will act. Preparation will allow you to measure out and take some test images beforehand. By using manual focus, you can get the sharpest image. Adjust the camera in manual focus and then wait for the subject to move by and snap.

Two blurred fast moving trains about to pass each other at night

6. Panoramas

A panorama is an image where a whole landscape or skyline is presented seamlessly in one picture. Some cameras, as well as iPhones, have this feature embedded in their software already. The manual way of doing this is to take a series of images and stitch them together in the post-photography process.

If you were to take these images with an autofocus system, you would risk the focus adjusting. If this happens, the viewer will notice it in the final result. The image will look disjointed, and the believability of the image being one seamless photograph will be lost entirely. I suggest focusing beforehand and then taking each image accordingly.

Panorama landscape image of clouds a setting sun and vast land of grassland and ridges

Technology has come so far with its constant advancements in autofocusing capabilities. Still, there is no denying the importance of being able to use manual focus with confidence.

The more you photograph, the more this will become clear. I’m not saying you need to be the quickest manual focus photographer to be a confident photographer. But there will be times when you will be glad you studied this article. So turn that switch to manual focus, put your hand on the focusing ring, and get practicing!

Are you looking for an amazing way to improve your Photography Skills?  Click the link below.

 
or
 

The Big Three: Focal Points, Leading Lines, and Frames – Free Quick Guide


Photo composition is a complicated subject. No matter their level of expertise, any photographer can spend years, if not a lifetime, working on their composition skills.

Most photographers can benefit by limiting their efforts to a group of concepts and mastering them before moving on to more advanced ideas.

This guide teaches you about the Big Three.

The big three are three tools of composition that you should master first. They include focal points, leading lines, and frames.

In this guide, you will learn…

  • What is a focal point?
  • What creates a focal point?
  • How does a focal point work in a photo composition?
  • What creates a poorly executed focal point?
  • What is a leading line?
  • How do leading lines work in a photo composition?
  • What not to do with leading lines
  • What is a frame?
  • How is a frame effective in composition?
  • Recognizing a good frame in a scene versus a not-so-good one

Click Below and Grab Your Free Copy

Photo Credit: Simon Launay

 
----------------------------------------------------------------

Want more best of "Photography for beginners" digital "gold mine" of photography tips.  It's called "The Open Library".

https://mrdarrylt.blogspot.com/2023/05/photography-photography-tutorial-by.html


Wednesday, February 1, 2023

#Photography Tutorial


12 Tips for Long Exposure Landscape Photography


Landscape photography can be so much more creative with long exposures. They add that extra wow-factor to your landscape image.

Here are 12 tips to help you take better long exposure photography. 

1. Long Exposure Landscape Photography: Looking for Overcast Weather to Add More Interest to Your Photos

When I scout for a new location, or I search the internet, I always have long exposure photography in mind.

You can do long exposure landscape photography almost anywhere on the globe. You need to know where and when to find an element that moves at an adequate speed.

The two main subjects are water (including waterfallsseas, streams) and clouds in the sky.

But there may also be other possibilities. For example, a car’s lights moving on a winding mountain or hill road. Or the movement of stars in the sky.

One of the less considered aspects of this kind of photography is the weather.

A sunset or sunrise with a cloudless sky can be beautiful to see live. A unique experience. But it can turn into a boring image because there’s no movement in the sky.

Even worse is leaving home with a beautiful sky overhead and then arriving at the shooting location only to find bad weather.

So get familiar with weather websites! Check out The Weather Channel or AccuWeather. These will show you the movement of clouds and precipitation levels.

Then you can have a better idea of ​​what you will find once in the field.

A coastal seascape in Porto Venere, Italy
Two-minute long exposure photography in Porto Venere, Italy. Without an incoming storm, 
I would not have been able to take this long exposure.

2. Track the Sun’s Position To Avoid Overexposed Areas

The position of the sun and the path it will follow are also important when planning long exposures. It is a good rule to exclude the sun from the composition as much as possible.

The first reason is that with long exposures, the sun will no longer be circular. But you will start to see its movement during the exposure.

Plus, it will create an overexposed area which is close impossible to correct in post-production.

To preview the sun path you can use a lot of mobile apps. I use Photopills to plan my shots and you can find it on the Apple Store and Google Play Store.

The sun path as seen in the Augmented Reality section of the mobile app PhotoPills.
The sun path as seen in the Augmented Reality section of the mobile app PhotoPills. Amazing feature.

3. Scout the Location Beforehand To Get a Preview of Your Composition

As I said before, long exposure photography looks very different from the reality perceived by our eye. This is why it’s necessary to have a clear idea of what you will find on the field. You can double-check the sites in Google Maps if you can’t do it in-person.

Location scouting also means getting a preview of your composition. You’ll have a better idea of the possible direction of the clouds and sunlight, the power of the sea and tide, or how the light will reach the mountains.

Long-exposure photography of a coastal town and seascape in Italy.
I took this long exposure photography after waiting two hours for the sun to set.

4. Focus a Third of the Way Into the Scene To Avoid Blurry Results

After deciding about your long exposures composition, you should set your focus point. For a landscape shot your lens will be set to an aperture value of f/10 or f/11. You should try not to go over f/16 to not stumble on diffraction problems. It will cause unsharp images.

Don’t use aperture to make a shot last longer. But what if you think that your shutter speed is not slow enough? This is where ND filters help a lot.

You can even try this simple trick to be sure of your focus point. You can try to focus on one of the two lower intersection points of the rule of thirds.

At this point, set the manual focus, so you do not have to change it anymore.

When it comes to long exposure photography composition, focusing is the most important part of your final photo. Better spend a lot of time to be sure of your point of focus than regret it later.

There’s nothing worse than going home and having an exposed photo for 1 or 2 minutes that’s totally out of focus.

Photoshop interface using rule of thirds composition for long exposure landscapes
The focus point for this image is in the red circle, the left lower point of the rule of thirds grid.

5. Use a Tripod To Adverse Weather Conditions

A sturdy tripod is essential for successful long exposures. It will prevent camera shake and blurry pictures.

If you don’t want to buy a heavy or expensive tripod, you can get away with an average one. In that case, weigh the tripod down with your backpack if the weather conditions are not in your favour.

A bridge over a coastal scene

6. Lower Your ISO to Avoid Digital Noise

Now that you decided the composition and you set the focus point, it’s time to move on to the technical aspects of photography.

We start from the ISO. You are taking landscape pictures with a tripod and the camera fixed on it. So set the ISO as low as your camera allows.

Forget the so-called “extended” downwards and upwards values. These are only an electronic change to the sensor’s native sensitivity values.

Beautiful long exposure landscape with mountain and waterfall

7. Learn to Read The Histogram for Better Exposure

Once you’ve set your focus point and ISO, it’s time to move on to exposure.

Start making some test shots, see the exposure you like best. Keep in mind the mood you want to give to the image.

The idea is to have a good and balanced histogram. Make sure it’s not too shifted to the highlights and not too far to the left, where there are blacks.

At this stage, do not check the exposure only with the image on the camera screen. Learn to read your histogram.

There is no perfect histogram or one that is always correct. But there are clear signs for the wrong one. If it is too much shifted to the left (blacks) or too far to the right (the highlights).

Beautiful long exposure seascape

8. Use an ND Filter to Enhance Your Long-Exposure Photography

It is now time to add your ND filter. Be careful though. If you use a very dark filter (for example a 10 stop), you will not see anything through the viewfinder or the live view.

That’s why it’s important that you set the focus and exposure before using an ND filter.

At this point, recalculate the correct exposure for the ND filter you added to match the one without it.

For example, if a correctly exposed photo without a filter was f/8, 1/50 and ISO 100, and then you added a 6 stop filter, you need to remove 6 stops of light from that exposure. The new photo could be shot at f/11, 0.6 seconds, ISO 100.

You can do this work with smartphone apps, or with a table that you can find on the website of your ND filter manufacturer.

Long-exposure photography setup with CPL, a 3 stop Medium GND filter and a 6 stop ND filter.
A classic setup with CPL, a 3 stop Medium GND filter and a 6 stop ND filter.

9. Experiment With Bulb Mode for Exciting Results

Take a test shot and check the histogram for the last time.

If you have calculated the new exposure time in the right way, you are ready to switch to Bulb mode (if necessary). And then shoot your final image.

Long-exposure photo of a coastal town and seascape in Manarola at sunset.
A 2-minute exposure for this Manarola sunset

10. Act Fast Before the Scene Changes

Be aware that the perfect conditions to take the shot could last only a few moments. The sunrise pastel colors, the fire sunset on the tops of the mountains, the wind that speeds up clouds. They can be gone in a second.

If your exposure time is one or two minutes, you only have one shot available to set them in your photo.

You must also be able to change all the settings in seconds if the weather conditions change. And be able to change the intensity of filters to accommodate for new light conditions.

A long exposure seascape

11. Set Aside Enough Time To Make Sure You Get Your Shot

Landscape photography is a continuous game to test your patience.

You have to find the chosen location and arrive there with plenty of time to spare. Then you have to find the right composition. And then you have to wait for the ideal conditions.

It might happen that that one chance to shot won’t materialise. Then you have to go home empty-handed, waiting and planning the next trip.

A mountainous landscape surrounding a lake.
It took almost an hour for the cloud to pass quickly enough to give some movement to the image.

12. Use Post-Processing to Stack Your Images

Now that you know how to make a long exposure landscape photograph, you can learn how to create it without filters.

Yes, you can simulate a long exposure without using ND filters. But you’re still going to need a tripod.

Then all you need is a scene with an element that moves fast enough. For example, the clouds in the sky.

Put the camera on the tripod and follow the same “rules” for the composition of your image.

When you are ready to shoot you can create a series of shots which show the movement of your element. You will need at least 20-30 images.

And now, go to Lightroom. Once you have imported the images into the catalog, work your edits on one shot. Then synchronise all the edits of this shot with the others of the series.

Once done, select all the images in the series, right-click, and open in Photoshop as layers. This process will take some time, so relax a little and let your computer work.

Once finished you will have a Photoshop document with all the images in a stack of layers. Next step is to select all the levels and then right-click “Create smart object”.

This is a single layer object that contains the information of all the previous layers. Once finished go to Image -> Smart Object -> Stack Mode -> Mean.

And watch the magic and your long exposure combine together.

The Matterhorn mountain on a cloudy day
The Matterhorn, 60 single frames combined for a 3-minute long exposure

As Ansel Adams said: “Landscape photography is the supreme test of the photographer, and often the supreme disappointment.”

For me, the best thing is to be out there in nature, thinking about creating something that will always remind me of that moment.

Get out there with the above photography tips you’ve read, have fun, experiment, make mistakes and try again.

----------------------------------------------------------------------------

5 Camera Controls for Landscape Photography – Free Quick Guide


When we talk about camera controls, there are three that always come to mind: aperture, shutter, and ISO.

That’s not what we are going to discuss today.

Today, you are going to learn about 5 camera controls (that are lesser known) that can vastly improve your landscape photography.

Learn how to create dreamy landscape images without the need for neutral density filters!

Discover how you can pre-check DOF image sharpness – right on the spot!

Learn the camera meter settings that will make or break a winter wonderland shot just like this!

 
------------------------------------------------------------------------------------
 

Turn Your Passion into Profits!

  • Make an extra income from your Photography!
  • Turn your hobby into a profitable passive income
  • Upload and instantly sell to millions of potential buyers
  • Instant Access, Start Today no matter where you are in the world!
  •  Click Here