| #Photography Tutorial |
12 Tips for Long Exposure Landscape Photography
Landscape photography can be so much more creative with long exposures. They add that extra wow-factor to your landscape image.
Here are 12 tips to help you take better long exposure photography.
1. Long Exposure Landscape Photography: Looking for Overcast Weather to Add More Interest to Your Photos
When I scout for a new location, or I search the internet, I always have long exposure photography in mind.
You can do long exposure landscape photography almost anywhere on the globe. You need to know where and when to find an element that moves at an adequate speed.
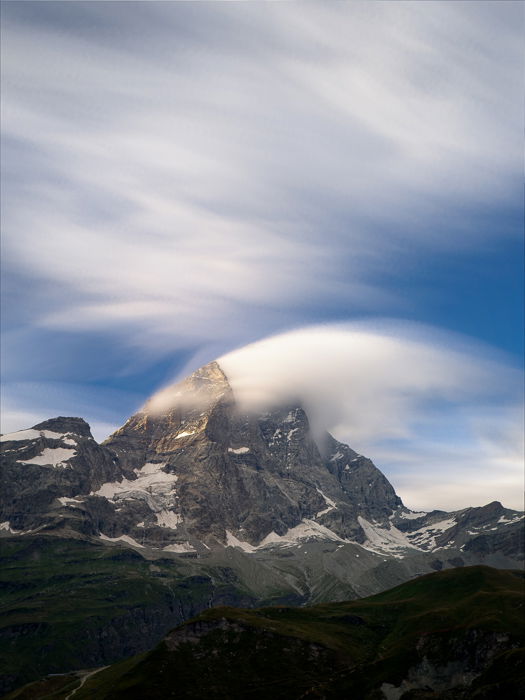
The two main subjects are water (including waterfalls, seas, streams) and clouds in the sky.
But there may also be other possibilities. For example, a car’s lights moving on a winding mountain or hill road. Or the movement of stars in the sky.
One of the less considered aspects of this kind of photography is the weather.
A sunset or sunrise with a cloudless sky can be beautiful to see live. A unique experience. But it can turn into a boring image because there’s no movement in the sky.
Even worse is leaving home with a beautiful sky overhead and then arriving at the shooting location only to find bad weather.
So get familiar with weather websites! Check out The Weather Channel or AccuWeather. These will show you the movement of clouds and precipitation levels.
Then you can have a better idea of what you will find once in the field.

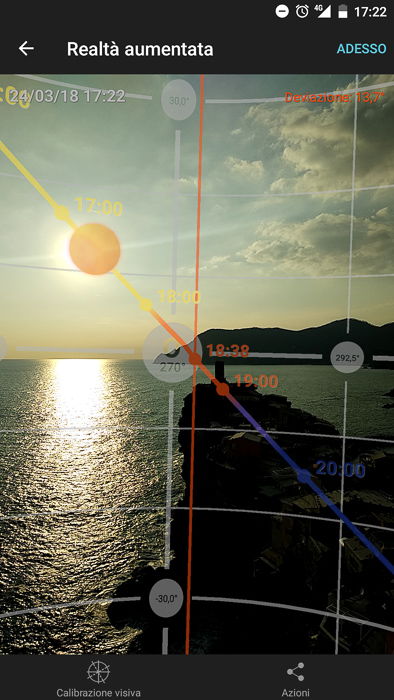
2. Track the Sun’s Position To Avoid Overexposed Areas
The position of the sun and the path it will follow are also important when planning long exposures. It is a good rule to exclude the sun from the composition as much as possible.
The first reason is that with long exposures, the sun will no longer be circular. But you will start to see its movement during the exposure.
Plus, it will create an overexposed area which is close impossible to correct in post-production.
To preview the sun path you can use a lot of mobile apps. I use Photopills to plan my shots and you can find it on the Apple Store and Google Play Store.
3. Scout the Location Beforehand To Get a Preview of Your Composition
As I said before, long exposure photography looks very different from the reality perceived by our eye. This is why it’s necessary to have a clear idea of what you will find on the field. You can double-check the sites in Google Maps if you can’t do it in-person.
Location scouting also means getting a preview of your composition. You’ll have a better idea of the possible direction of the clouds and sunlight, the power of the sea and tide, or how the light will reach the mountains.

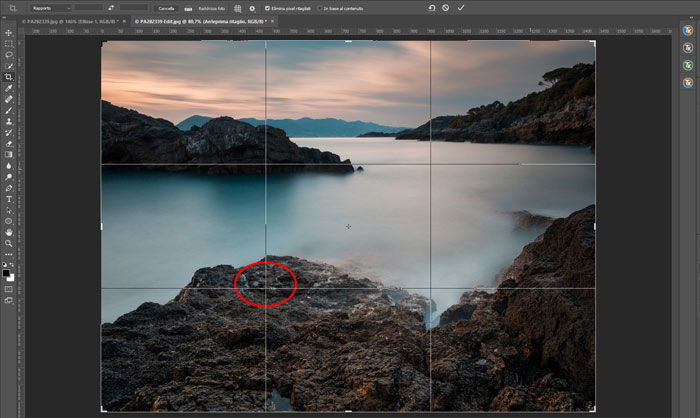
4. Focus a Third of the Way Into the Scene To Avoid Blurry Results
After deciding about your long exposures composition, you should set your focus point. For a landscape shot your lens will be set to an aperture value of f/10 or f/11. You should try not to go over f/16 to not stumble on diffraction problems. It will cause unsharp images.
Don’t use aperture to make a shot last longer. But what if you think that your shutter speed is not slow enough? This is where ND filters help a lot.
You can even try this simple trick to be sure of your focus point. You can try to focus on one of the two lower intersection points of the rule of thirds.
At this point, set the manual focus, so you do not have to change it anymore.
When it comes to long exposure photography composition, focusing is the most important part of your final photo. Better spend a lot of time to be sure of your point of focus than regret it later.
There’s nothing worse than going home and having an exposed photo for 1 or 2 minutes that’s totally out of focus.
5. Use a Tripod To Adverse Weather Conditions
A sturdy tripod is essential for successful long exposures. It will prevent camera shake and blurry pictures.
If you don’t want to buy a heavy or expensive tripod, you can get away with an average one. In that case, weigh the tripod down with your backpack if the weather conditions are not in your favour.
6. Lower Your ISO to Avoid Digital Noise
Now that you decided the composition and you set the focus point, it’s time to move on to the technical aspects of photography.
We start from the ISO. You are taking landscape pictures with a tripod and the camera fixed on it. So set the ISO as low as your camera allows.
Forget the so-called “extended” downwards and upwards values. These are only an electronic change to the sensor’s native sensitivity values.

7. Learn to Read The Histogram for Better Exposure
Once you’ve set your focus point and ISO, it’s time to move on to exposure.
Start making some test shots, see the exposure you like best. Keep in mind the mood you want to give to the image.
The idea is to have a good and balanced histogram. Make sure it’s not too shifted to the highlights and not too far to the left, where there are blacks.
At this stage, do not check the exposure only with the image on the camera screen. Learn to read your histogram.
There is no perfect histogram or one that is always correct. But there are clear signs for the wrong one. If it is too much shifted to the left (blacks) or too far to the right (the highlights).
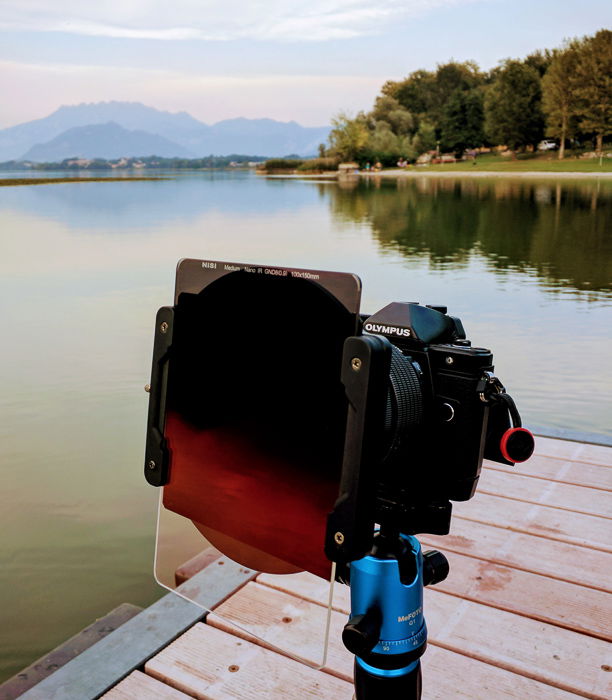
8. Use an ND Filter to Enhance Your Long-Exposure Photography
It is now time to add your ND filter. Be careful though. If you use a very dark filter (for example a 10 stop), you will not see anything through the viewfinder or the live view.
That’s why it’s important that you set the focus and exposure before using an ND filter.
At this point, recalculate the correct exposure for the ND filter you added to match the one without it.
For example, if a correctly exposed photo without a filter was f/8, 1/50 and ISO 100, and then you added a 6 stop filter, you need to remove 6 stops of light from that exposure. The new photo could be shot at f/11, 0.6 seconds, ISO 100.
You can do this work with smartphone apps, or with a table that you can find on the website of your ND filter manufacturer.
9. Experiment With Bulb Mode for Exciting Results
Take a test shot and check the histogram for the last time.
If you have calculated the new exposure time in the right way, you are ready to switch to Bulb mode (if necessary). And then shoot your final image.
10. Act Fast Before the Scene Changes
Be aware that the perfect conditions to take the shot could last only a few moments. The sunrise pastel colors, the fire sunset on the tops of the mountains, the wind that speeds up clouds. They can be gone in a second.
If your exposure time is one or two minutes, you only have one shot available to set them in your photo.
You must also be able to change all the settings in seconds if the weather conditions change. And be able to change the intensity of filters to accommodate for new light conditions.
11. Set Aside Enough Time To Make Sure You Get Your Shot
Landscape photography is a continuous game to test your patience.
You have to find the chosen location and arrive there with plenty of time to spare. Then you have to find the right composition. And then you have to wait for the ideal conditions.
It might happen that that one chance to shot won’t materialise. Then you have to go home empty-handed, waiting and planning the next trip.
12. Use Post-Processing to Stack Your Images
Now that you know how to make a long exposure landscape photograph, you can learn how to create it without filters.
Yes, you can simulate a long exposure without using ND filters. But you’re still going to need a tripod.
Then all you need is a scene with an element that moves fast enough. For example, the clouds in the sky.
Put the camera on the tripod and follow the same “rules” for the composition of your image.
When you are ready to shoot you can create a series of shots which show the movement of your element. You will need at least 20-30 images.
And now, go to Lightroom. Once you have imported the images into the catalog, work your edits on one shot. Then synchronise all the edits of this shot with the others of the series.
Once done, select all the images in the series, right-click, and open in Photoshop as layers. This process will take some time, so relax a little and let your computer work.
Once finished you will have a Photoshop document with all the images in a stack of layers. Next step is to select all the levels and then right-click “Create smart object”.
This is a single layer object that contains the information of all the previous layers. Once finished go to Image -> Smart Object -> Stack Mode -> Mean.
And watch the magic and your long exposure combine together.
As Ansel Adams said: “Landscape photography is the supreme test of the photographer, and often the supreme disappointment.”
For me, the best thing is to be out there in nature, thinking about creating something that will always remind me of that moment.
Get out there with the above photography tips you’ve read, have fun, experiment, make mistakes and try again.
----------------------------------------------------------------------------
No comments:
Post a Comment
Note: Only a member of this blog may post a comment.