George Floyd - "I can't breathe" - Black Lives Matter
by: Darryl Turner
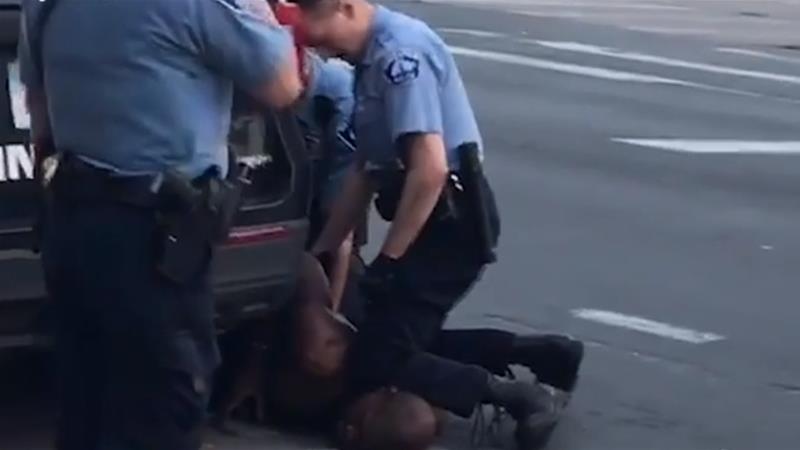
If you live in America, you are aware of the present controversy we as a nation are experiencing in regard to this man, George Floyd, and the sadistically brutal way he was murdered by a "Police Officer". Mr. Floyd was handcuffed and later wrestled to the ground where he lay on his stomach.
He was not resisting arrest, nor was he non-compliant with the directives given to him by the arresting officers. One of the 4 Police Officers conducting the arrest decided to place his knee on the neck of George Floyd, as depicted below.
Mr. Floyd complained that he could not breathe, but the Officer continued to apply his weight on the neck of Mr. Floyd until he died. The Officer knew people were videotaping his conduct, and yelling at him to take his knee off because George Floyd was complaining, "I can't breathe". Approximately 5 minutes later, George Floyd was dead. The result of this blatant murder has been racially motivated demonstrations that boil over into riots at nightfall, all across America which involved more than 20 cities over this weekend.
George Floyd's murder occurred in the state of Minnesota.
Specifically, because the demonstration marches tend to turn violent at nightfall, I chose to take a few pictures during the daylight hours of Ferguson, Missouri (the city where a black teenager - Michael Brown) was murdered by a white Police Officer nearly 6 years ago. Many people in the Ferguson area are still angry about the fact that the Officer was not arrested. And this recent murder of yet another black American by Police has fueled the fires of racially motivated hate and distrust of local Cops. The Ferguson Police Department Headquarters building has had several of the windows broken over this past weekend.
As you can see, there are a few people holding up "Black Lives Matter" signs. Unfortunately, the "crowd" of 9 above will grow to hundreds after nightfall.
In an effort to keep their respective businesses from being destroyed or damaged like the building above, some local business owners whose shops are located on the South Florissant Road (the same street as the Police Headquarters) have resorted to putting signs in the windows.
Ironically, images like these can be found around the Ferguson Missouri area.
This is the former Police Officer (after 3 days of protest demonstrations he was finally fired) who is responsible murdering George Floyd. His name is Derek Chauvin.
He has been arrested and formally charged with 3rd-degree murder and manslaughter. His wife has recently filed for divorce, and if convicted he faces up to 25 years in prison, and having to live with other inmates (some of whom will be Black and will know why he's there). The last time I checked, disgraced, former Cops don't do all that well in prison. I hope he doesn't drop his soap in the shower.
Share this article.
Photography FREEBIE
Try either of these EBooks FREE for 30 days. Just click on the link
below and get a FREE 30 day trial membership. If you choose to cancel
before day 30 you owe nothing.
Adjusting
color, recovering highlights, and salvaging shadow detail are just some
of the capabilities
that make these three software packages powerful
challenger to the Adobe dynasty.
ON1 Photo RAW 2019, Alien Skin Exposure X4.5, and Capture One 12
Apples, oranges, and bananas
Yes, they are all fruits, all are natural, and they all taste sweet,
but there are differences between each that appeal to different pallets.
When comparing these three alternative post-processing applications to
the revered Adobe offerings of Photoshop, Lightroom, and Camera RAW, the differences are as noticeable as the similarities.
A little background
When it all began, Photoshop offered digital photographers a simple
collection of imaging tools that allowed them to adjust the colors,
tones, and sharpness of their pictures. It was all nice and simple.
However, that simplicity got more complicated.
The ’90s was an era that awakened a new generation of photographers.
The taste of blood was in the public waters, and it attracted all forms
of predators. As users became more sophisticated, demanding more power
and software magic, Silicon Valley awoke to the smell of profits.
Computer technology companies sprung up everywhere, developing new and
faster processors, higher resolution monitors and larger storage
devices.
The door to the digital darkroom swung wide open, and the Adobe
marketing machine began rolling out yearly updates for their
breakthrough photo editing software. Cha-Ching.
Adobe not only started a new industry – they owned it. For the first
ten years or so, Adobe wisely kept any imaging software challengers at
bay by enlisting them to develop supporting software (called plugins)
that added functionality to Photoshop without challenging its command
directly. Dozens of very cleaver plug-in technology companies were
welcomed to demonstrate their products (and their allegiance) to Adobe
within their mammoth booth at all the trade shows.
Adobe Systems became a very extended family and quickly established themselves as the Goliath that nobody dared to provoke.
Adobe booth at MacWorld show in San Francisco.
The Adobe scientists invested in the digital camera manufacturers and
Silicon Valley chip wizards. Every year these developers delivered
smaller and more powerful image sensors and processors able to capture
and deliver incredible levels of detail from digital camera images.
Adobe introduced a powerful plug-in package of their own called Camera
Raw, able to mine and manipulate the vast amounts of RAW data captured
by the sensors.
Early Panasonic PV-SD4090 PalmCam digital camera and Panasonic Lumix DMC-G7 4K
Mirrorless, 2018.
When first introduced, digital cameras were only able to capture 256
levels (8-bits) of color. However, the sensors and processors for the
new generation of cameras upped the ante by delivering up to 4 trillion
(14-bits) color.
The
Photoshop dreadnaught continued to grow and dominate the market. For
that first decade, Photoshop was not only the digital imaging Sheriff –
it was the law!
However, as it happens with many other products, Photoshop eventually
became so gorged with various tools and appliances intended to address
every need of photographers and artists, that it began to resemble a
cramped and crowded commercial kitchen; pots, pans, and ladles hanging
from every conceivable hook. The once swift, svelte and powerful
software buckled under its own excesses, eventually being tagged by one
industry pundit as bloatware.
But nobody has ever accused Goliath of being either daft or deaf.
Adobe listened and learned from its more sophisticated photographer base
who demanded a software package streamlined and focused specifically on
the professional user. This new software would include filing and
database features allowing professional photographers to catalog, label,
sort, and shape their images in one arena, and free of most of the
fluffy and artsy features of Photoshop. Adobe crowned this new
pro-focused software Lightroom. Pretty cleaver… Photo Shop and Light
Room. Hmm-m.
Goliath and the David class
All this time, quietly in the background, several talented Photoshop
plug-in developers were busy developing their own image-altering
software. Software consisting of mostly specialty filters and visual
effects tools that worked within both Photoshop and Lightroom as
plug-ins. In addition, they operated as standalone software editing
applications.
Behind the scenes, a silent revolution existed that would someday
rise up and directly challenge Goliath. These same “deep-bit” RAW
processing tools once only available in Camera Raw and Lightroom were
now available from these independent developers who had quietly amassed
millions of faithful followers. The “David” class of software emerged,
with the battle lines now drawn. Goliath had some worthy opponents to
contend with and some new battles to fight.
Many of the software developers in this “David class” were long-term
seasoned veterans in the image editing field with their own stable of
brilliant young engineers. They had initially opened their doors for
business in the early nineties, just a couple of years after the
introduction of Photoshop.
These companies included Extensis, Alien Skin, and Phase One Camera
Systems. My own software company, ImageXpress, introduced our Scanprep
plug-in product in 1993, so I have known and respected these companies
for over twenty-five years. They each offer unique products and have
earned long and distinguished records in the industry.
Extensis, Alienskin and Eye Candy
Extensis, founded in Portland, Oregon in 1993, offered several
products, including Intellihance. At that time, Craig Keudell was the
company’s VP of Sales and Operations and would later become President.
Originally developed as a plug-in for Photoshop, Intellihance offered
simple image corrections.
Craig went on to found ON1, Inc in 2005. ON1 is the developer of
Photo RAW 2019, a dead-serious Lightroom contender sporting a powerful
Raw processor, image editor, and DAM (digital asset management) system.
Alien Skin Software was also founded in 1993 by Jeff Butterworth
(joined soon thereafter by Finley Lee), on the other side of the country
in Raleigh, North Carolina. This company’s first software product was
called Eye Candy, an image interpreter that gave users the ability to
produce attractive (and sometimes bazaar) special effects from digital
images. Alien Skin’s current flagship software, Exposure X4.5, provides
RAW processing, image editing, and a nearly exhaustive collection of
pre-set filters. These filters simulate the look of just about every
film-age photo paper, film emulsion, and toning process.
Phase One – Capture One 12
Phase One Camera A/S is a Danish company founded that very same year
(1993). It produced a unique medium format digital camera system for the
professional market. The Copenhagen-based camera manufacturer’s latest
hardware offering is the XF IQ4 Camera System, now in its fourth
generation. Phase One’s precision camera systems require a very
sophisticated software product to exploit the massive amounts of
spectral data delivered by their cameras.
In 2003, Capture One software first began to support 35mm DSLR cameras from third-party manufacturers such as Canon, Nikon, and Fuji. The software now supports 500+ cameras. Capture One 12 is the current version of this advanced editing software.
Products and uses
Most users of Lightroom operate the software for similar reasons – cataloging,
organizing, and the basic editing of digital images. In that respect,
all of the challengers offer similar services and features.
But not all users have the same needs with their software.
Digital photographers come in all sizes with diverse desires. Many
users don’t get beyond the simple primping stages of brightening,
straitening, and cleaning up their images – the basic processes that all
began thirty years ago with Photoshop. Others are either professional
photographers or dead-serious enthusiasts who utilize very advanced
features of the software.
With the variety of software available in this field, there is something for everyone.
The Adobe alternatives
Just as these original three “David class” developers focused on
different areas of the imaging industry with their initial products back
in the ‘90s, each of their current products has established turf in
today’s market. While offering the same basic editing and
non-destructive RAW adjustment tools as Camera Raw and Lightroom, each
product maintains its own personality.
There are similarities with these post-processing applications in the
initial “sliders” appearance and the operation of each application, but
beyond the basic tonal and color adjustments, the individual strengths
become more evident.
Depending on your needs and personal preference, you may find that
one of these products appeal to you and draw you away from your Adobe
subscription addiction.
Let’s take a look at the strengths and personalities of the software products.
ON1 Photo RAW 2019.5
Purchase price $100 (upgrade from the previous version: $80) ON1 Photo RAW 2019.5
will give you the features photographers use the most from the
Lightroom and Photoshop worlds in a single application. With Photo RAW,
you can quickly browse, organize, manage, and catalog photos in your
photo editing workflow. The ultra-fast photo browser and organizer are
perfect for rapidly viewing and culling through photos without waiting
on previews to generate or an import process.
Importing images is not necessary with Photo RAW. You don’t create
libraries or catalogs with this software. Instead, you view the images
where they reside on your computer. If you want easy access to specific
images within specific folders, use the indexing feature. Indexing these
folders in Photo RAW keeps track of all thumbnails in each folder.
Photo RAW actually moves the image files to a folder that you specify.
Photo RAW key features: HDR, Noise Reduction, Versions (Virtual
Copies), Photo Stitching (Merge to Panorama), Keywords, Tethered
Shooting, Portrait Retouching, and Layers.
With the addition of layers, ON1 ups the ante by allowing you to
blend, mask, replace backgrounds, and more. ON1 Photo RAW also provides
27 unique filters, LUTs, and textures, delivering ample interpretations
of each image.
ON1 also includes a Lightroom Migration assistant that utilizes
AI-powered algorithms to transfer Lightroom edited photos, keep the
non-destructive settings, and move them into ON1 Photo RAW.
Alien Skin Exposure X4.5
Purchase price: $119, (upgrade from previous versions $79-$89), and bundled with Blow up and Snap Art for $149. Exposure X4.5
offers powerful organizing tools, fast performance, an intuitive
design, and a subscription-free approach. With this one piece of
software, you can handle all your photo editing work. Exposure X4.5 is
best known for its selection of beautiful customizable presets, which
span the entire history of film and beyond.
With Exposure X4.5, you choose the image folders you want to organize
by adding them as “bookmarks.” Once a folder is ‘bookmarked,’ you can
browse the subfolders as indexed and cataloged folders, searching for
photos using keywords or image metadata.
Exposure X4.5 key features: Extensive browsing, search, and
cataloguing tools (Smart Collections and Bookmarks), Light Effects and
Textures, analog film effects, ample LUTs (lookup tables for instant
tone and color shifts), Virtual Copies, sophisticated Bokeh effects,
transform tools to straighten and correct perspective shots and watched
folders.
Phase One Camera Systems Capture One 12.03
Perpetual license: $299, subscription $15/mo. Capture One
offers a lot of everything for just about every level of interest.
Delving into its inner workings allows one to tinker with color on a
near-molecular level. While it is not a particularly intuitive tool for
the beginner, it is a pure delight for those who want infinite control
over their adjustments. New users can go to learn.captureone.com to get
started. Capture One offers a very logical and exhaustive array of tools
and controls, leaving little need for a wishlist. The learning curve is
steep, but the control provided is nearly exhaustive.
Capture One offers two ways to access and file images:
Catalog – a full DAM (digital asset management) system which works very similar to Lightroom, and
Session – a per project-based image access process.
The Session choice works by clicking on the small folder icon in the
upper left-hand part of the original open window and accessing a very
simple Mac/finder-type search dialogue. You indicate your image folder
and then view the images inside that folder stacked vertically on the
right-hand side of the Capture One window. Double-click an image and
start working. Capture One
key features: Near-infinite masking tools for Basic, Advanced, and Skin
Tone colors, including Hue, Saturation, Lightness, and Smoothness
(feathered edges), Color Balance for Highlight, Midtone, Shadow, 3-Way
(overall), color channel controlled B/W conversions, Layers (up to 16,
each with individual chroma/luma range assignments), and dynamic
Histogram readouts that track every adjustment.
Capture One’s extensive masking tools provide unparalleled control
over both color and tonal shape with each mask creating its own layer.
The variety of masks include Luminosity, Linear Gradient, and Radial
Gradients. Each mask is infinitely adjustable and can be tweaked and
finessed at any time. You can also purchase additional Styles Packs
(essentially, presets that don’t alter the exposure or white balance).
The
goal of any image editing software is a successful result. Each of the
software packages
mentioned herein is capable of delivering just that.
I’ll leave it to you to predict which software
I chose to rescue and
produce this example.
I’ve made no attempt to declare a winner in this article, but most
assuredly these alternative post-processing applications are very valid
and capable challengers to the Adobe dynasty.
You certainly owe it to yourself to download a trial to each one of
these packages and experiment with the possibilities. The alternatives
are both diverse and similar in their offerings.
Each of these three packages requires a bit of habit remapping, and
you should afford the time needed to draw your conclusions. Your
personal requirements and tastes will ultimately deliver your answer.
I should note that no one piece of software; neither the Adobe family
nor the challengers, provides a single comprehensive solution for all
needs. Whichever addresses your particular needs best will become the
backbone of your post-production work.
Fortunately for me, I own (and use) all of these alternative post-processing applications.
Have you used these any of these alternative post-processing applications? What are your thoughts?
Share this article.
Tips on Choosing a Free Photo Editor for Post-Processing
A question I get asked a lot is, “What software for post processing
would you recommend if you were starting out in photography today?”
Don’t know which photo editor to choose, here are some free options worth considering.
My go-to software for editing photos is Adobe Photoshop. This doesn’t
mean I am advocating that Photoshop is the only photo editor worth
considering – far from it. I will be using Photoshop as a frame of
reference only, and not as a direct comparison to other software
products mentioned in this article.
Deciding which Photo Editor can be daunting for a beginner, especially as there are so many to
choose from!
However, it is the industry’s number one software for professionals.
Prior to the new subscription model, Photoshop was a standalone piece of
software and was expensive. But even with the subscription model, it’s a
recurrent expense, which over time will amount considerably for your
buck.
After doing some research, I was quite amazed at the plethora of
photo editing software applications, on the market that are relatively
inexpensive to purchase. Most of which equip the beginner with more than
enough features and tools to get your images looking great.
Also, most of the applications can be downloaded free, for a limited
trial period. This gives you a better idea what it’s like, and you’re
able to test the software and its capabilities.
Other products can be downloaded for entirely free and some are even
web based, so you don’t have to download any software onto your
computer. The disadvantage is that you do need a reliable internet
connection. Also, I did find the annoying ads that pop up alongside the
interface distracting. An alternative to get rid of these ads is to pay
for an upgrade.
Let’s take a look at some of the free options:
Pixlr
Pixlr is a web based, online editing
tool. You can create a new image, upload an image, or grab one directly
from a URL location. I found this product very intuitive and easy to
use. The images load up fast in the web browser. The interface is quite
similar to Photoshop. It has all the tools like: layers, lasso tool,
brush controls, cloning, and filters.
The Launch screen as it appears when you load Pixlr in your web browser.
You have four options to choose from when you go to open your file. It’s that easy.
Ok, so where do you start with your post-processing?
When you have your image open, duplicate it so that you keep the
original intact. That way, if you completely mess up, don’t worry, you
still have the original to begin again.
Post editing is a skill. It does take patience and time to master.
Color correction
I would consider color correction an important area to begin your post-processing.
The Levels setting exists in many image editors. It is a powerful
tool for adjusting the tones (contrast) in your image, and for making
color adjustments. In Photoshop, you select Layer> New Adjustment
Layer > Levels. In Photoshop Elements choose Enhance > Adjust
Lighting > Levels. Other image editors place it differently, but
essentially it does the same job. The Levels setting is a bit daunting
and complex to begin with, but I do feel it is worth the time to get to
know.
The Levels dialog box has an image histogram which is similar to the
display on the back of your camera. A simple explanation of the
histogram is: the shadows (blacks) are on the far left, mid-tones
(grays) are in the middle and the highlights (whites) are on the far
right. So by adjusting any of the sliders on the bottom, you will affect
the contrast of your image.
The Levels setting on the left belongs to Pixlr, and on the right is the Levels adjustment as it appears
in Photoshop CS6.
Okay, but what about the color of the image?
An easy way to adjust color correction is by changing the color
channels which are found in the Levels dialog box. The default setting
is RGB in Pixlr.
Where you find the Levels setting in Pixlr.
Go to Adjustment Tab and select Levels. Click on the downward arrow
next to RGB in Channel, this brings up a drop-down menu for the red,
green and blue channels. Choose the first one, which is red. Look at the
histogram graph and check for gaps in it.
The colour channels appear in a drop down menu by clicking on the small arrow to the right of RGB.
For this image, as it is quite over-exposed a lot of the shadow
detail is lost (overly gray and no black in the image), see left of the
graph. Move the shadow slider to the right, in towards the middle, where
the graph starts to go up.
You want your graph to represent a nice mountain shape starting from
the shadows rising high in the midtones and back down to the highlights.
See photo. Repeat this process for the other two channels. Click back
to RGB.
To
add some contrast, just move the middle slider (mid-tones) to the
right, see photo below. There is a lot more to learn about the Levels
adjustment, but this is just an easy way for beginners to start.
Before and after colour correction on the RGB channels using Pixlr.
Some other alternative web based solutions are SumoPaint, which has a similar interface to Photoshop, and another called PicMonkey.
SumoPaint
Similar to Pixlr, SumoPaint was very easy to use. I was able to
adjust the color correction on this image using the Levels adjustment
and modifying the color channels, as I did using Pixlr.
If you prefer to download software onto your computer. Again there is a wide choice of free products available.
Here’s another one that you may or may not have come across, called Photoscape. This
software is packed with excellent features for free. It has a built-in
image viewer, which lets you see all your images quickly at a glance
using thumbnails. It also has a Batch Editor, so if you apply an edit to
one photo or resize it – using the Batch Editor will apply the same
edit to multiple images. It even has a RAW Converter. For beginners, it
offers image cropping, brightness and colour adjustment, red eye
removal, and some great effects too. It does appear to more intuitive
and offer a less steep learning curve for beginners.
Photoscape
Main editor tools in Photoscape
Adding frames in Photoscape
Edit photo edge in Photoscape
Preview,
which is Apple’s built-in image and document viewer for OS X, surprised
me. It has the capability to crop, resize, and do color adjustment
which was quite impressive.
In summing up, there is a vast range of post-processing image editors
to choose from. In this article, I only hinted at a mere few. The list
is endless!
As a guide for beginners, I would experiment with the free options
and test them out for yourself. There is no financial investment only
your time. The time invested will give you a better idea which
application suits you best in the long run.
Post-processing does require time, no matter how skillful you become
at it. Once you have established a certain level of skill at post
editing, you can then graduate to purchasing a reasonable priced
standalone image editor, if you prefer.
Example products are:
Or you could simply download GIMP,
(some equate this software as being powerful to Photoshop) which is an
open source image editor with versions available for Windows, OS X, and
Linux. There are lots of tutorials and resources already on the web to
help you further with this software.
In fact, if I was new to photography and I had to decide which photo editor to pick, I would feel spoilt for choice!
Disclaimer: I was not contacted or sponsored to test any of the above software applications. Opinions are purely by the author only.
Share this article.
Ferguson Community come out and join me
Viral video - Cell phone video, Inspiration for you videographers considering a topic for your next project. 6,500
views on Facebook. Your video may receive more.
(Pssst...as good a deal as this is at only $7.99, how would you like to
have access to the Smartphone Filmmaking Handbook absolutely FREE? Just
scroll down to the bottom of this page and click on the Amazon Kindle
Unlimited Access offer)
Loupedeck CT Review – Could This Be The Best Editing Tool?
If you’ve read my previous review of the Loupedeck+,
you’ll know I am a massive fan and it is now a firm part of my editing
routine. As I said in that review, it was something that I was honestly
wary of before trying it, but something I do edit without now. So when I
got the chance to do the new Loupedeck CT review, I jumped at it.
The Loupedeck CT
is a completely new editing station. Loupedeck has marked this as their
professional tool, designed to deliver a premium editing experience.
Along with the dials and buttons familiar to those who have used the Loupedeck+,
the Loupedeck CT features a touchscreen interface system of virtual
buttons, that you can fully customize to your editing needs.
Compatibility
The CT is compatible with a wide range of software right out of the
box. And it has the ability to add even more software via an
ever-growing library of custom profiles.
Here is a list of compatible software out of the box (takes deep breath):
Profiles exist for many more programs, including Davinci Resolve,
Photomechanic, and Logic Pro X, amongst others. This is a serious list
of professional software, and the ability to customize the Loupedeck CT
means that there is an almost limitless opportunity to create your very
own tailored workspace.
Design and build quality
The Loupedeck CT is very different from the Loupdeck+. It is much
more compact in its footprint. The size is about the same as two mobile
phones placed side by side. This smaller footprint not only makes having
the CT on a smaller desk much easier, but it also means it is simple to
add to your bag when editing on the road or on location.
The packaging looks and feels premium. It reminded me of an Apple
device in the way that the quality oozes out before you even see the
product.
Jet
black packaging with an embossed and foiled logo on the side really
does make this product feel luxurious. It may sound silly, but when
packaging is this good, I feel that it shows the importance of attention
to detail to the company.
Once the Loupedeck CT is removed from the packaging and those, oh so
satisfying, clear plastic covers get removed, the quality of the
Loupedeck CT shines through.
The build quality on this device is excellent, with the device itself
comprised of an aluminum top plate (save the virtual buttons workspace)
with a solid plastic underside. All buttons and dials are all
reassuringly firm, with the dials having a tactile click when turning,
whilst the virtual buttons have haptic feedback, which you turn on or
off.
The center dial is used as a touch screen interface for some
adjustments, and again, it works perfectly. It is responsive and has
worked flawlessly during my time with the unit.
This is a very well-made piece of equipment that is another step forward in quality from the already well-made Loupedeck+.
The Loupedeck CT also has a Bluetooth chip, which will eventually, via an update, make the unit connect wirelessly.
It also comes with 8GB of storage, which mounts as an external drive
when you connect the Loupedeck CT. This storage allows you to save all
settings and preferences within the device. So, when you transport the
product, all your settings travel with you. This is great for those that
travel regularly or use different computers for different projects.
Ergonomically, the unit is made for one-handed operation. This is not
to underestimate the amount of editing this thing can do on its own.
Whilst the Loupedeck+ feels like something that is aimed to replace your
keyboard, the CT feels like an addition to your keyboard and mouse. It
is an incredibly powerful enhancement to your workflow.
Buttons on the Loupedeck CT are backlit in a way that aids your use
of the device. The buttons’ color shows how it is mapped at a glance.
The three colors are green, purple, and blue.
Green buttons are assigned to workspaces (of which you can have
multiple per application). The purple buttons are assigned to actions
(such as applying a preset
or creating a copy of the image, etc.). Finally, the blue buttons are
there to take you into page-based layouts. This allows you to create
sub-menus within a workspace, such as a page dedicated to your image
presets, without the need to change the entire workspace.
Installing the Loupedeck CT
Installing the Loupedeck CT is a simple affair. You just download and
install the software from the Loupedeck website, then connect the
Loupedeck.
The Loupedeck itself is USB-C, which helps future-proof the product.
However, it comes packaged with a USB-C to USB-A braided cable, which
will be welcomed by a lot of people. The cable itself is of high
quality, reinforcing the attention to detail that Loupedeck has put into
this product. The
installation and setup is easy. But you will need to spend some time
with the software to set the Loupedeck CT to your preferences.
Learning curve
The learning curve is the part of Loupedeck CT that is the thing that
you will find hardest. It’s not that the CT is hard to use, in fact, it
is the total opposite of that. It is more about remembering which
button is where, how you have your dials set, and moving your hands away
from existing workflows.
With the Loupedeck+ everything is set and you quickly become
accustomed to where everything is. However, whilst the flexibility of
the Loupedeck CT is its strongest feature, it does mean you have a
larger learning curve. As an example, when moving from Lightroom to Photoshop, the button layout changes, so it takes more time to become a power user across multiple software.
The
initial setting up of custom workspaces will take time and effort from
the user. However, this is the step that is essential for those looking
to get the most out of this device.
The software makes it simple to set up, but you need to customize the
layout of the deck for your specific editing style. You will then need
to do this on a software-by-software basis. This process may take a few
hours, but it is so worth it. The profiles supplied by Loupedeck are
great and get you started instantly, but every editing workflow is
different and the Loupedeck profiles are unlikely to match your specific
workflow. As
with the Loupdeck+, the CT makes using software easier. It does have a
learning curve though, one for each software you use it with.
The Loupdeck CT in use
The first thing I noticed about the Loupedeck CT was its software
awareness. Switching over to Photoshop from Lightroom, the Loupedeck
instantly changed to its Photoshop workspace. There was no lag or
waiting. It was ready to go. This smoothness is the same for every
software. You can even set it up to control your Spotify, so you can
keep your hands on the Loupedeck whilst you decide what music you want
to listen to whilst you edit.
This key feature makes the Loupedeck CT amazing for those who work in
several different pieces of software. It really does make this device a
huge step up from the Loupedeck+.
I know when I reviewed the Loupedeck+, I said that video editing wasn’t great. With the CT, it really performs.
Moving to Premiere Pro, you get the tools you use the most right at
your fingertips. As someone who isn’t a huge video editor, it makes
editing easier for me. I have also been experimenting with Final Cut
Pro, and again, the Loupedeck saves me having to search through menus
when I am looking for a tool.
I am sure that in the hands of a more capable editor, this tool will
be huge in speeding up workflow. For an amateur like me, it makes things
easier and encourages me to dig deeper.
This is also true of Adobe Illustrator and Adobe Audition, which I
profess to be completely lacking in in-depth knowledge. However, I can
see how this, in the right hands, will be incredibly useful. The centre wheel is one of the highlights of the CT. Being able to use it for things such as colour grading is so intuitive.
Moving on to photography (the reason I am sure most of you are
reading this), to sum it up, it is amazing. If the Loupedeck+ is a
high-quality, off-the-peg suit, the CT is a custom-tailored suit from
Saville Row; every button and dial customized to fit your editing
needs.
In Lightroom Classic,
it performs beautifully. Editing is effortless and the Loupedeck makes
the whole process quicker, easier, and more tactile. The ability to
customize a setup to be exactly how you want is something that gives
this an advantage over the Loupedeck+ for those who use more advanced
features regularly. This is shown in the ease of adding your own presets
to buttons. Simply create the preset, then ask Lightroom Classic to
update, and instantly, it is available to add to your layout.
It is when you move to Photoshop that the Loupedeck CT really shines.
The ability to customize your button layout combined with size means
using this with a mouse or graphics tablet is a joy. Also, the ability
to use the touchscreen center button makes working in color an amazing
experience. The Loupedeck CT is a much more enhanced experience than the
Loupdeck+ when it comes to Photoshop.
The integration with Adobe products is still deeper than with other software, though. Switching to Capture One Pro,
the experience is simply not quite as fluid. Capture One is in Beta
mode even though it comes pre-installed. In use, it lacks the level of
integration found in Lightroom and can’t offer the same functionality.
This is due to Loupedeck relying on keyboard shortcuts
rather than the software API. Loupedeck has released an enhanced plugin
profile, which allows greater integration for Capture One users. This
does help, but it relies on you having to set your keyboard to the US
setting, which as a UK user, is an annoyance.
I know discussions have taken place with Phase One on fully
integrating the Loupedeck CT, and for many professionals who use Capture
One, this would be a game-changer. Until that happens, the best way to
describe the Capture One experience is good, but not as good as
Lightroom.
What I love
There is a lot to love about this product. The main things for me are:
Size
Look and build quality
Unlimited customization options
Multi-software usage
What could be better
Integration with non-Adobe products
No wireless option (although this may be coming)
Is it worth it?
This is the big question. This Loupedeck CT is not cheap. It currently retails at £469.
It warrants that money to those who spend a lot of time editing and
those who use a variety of software daily. It is much more suitable for a
wider variety of programs than the Loupedeck+. If you use Adobe
products, it is pretty much flawless.
However, if you mainly edit in Lightroom, you will possibly be better served with the Loupedeck+. It has all the features you need and comes at a lesser cost.
The other question is whether it is better to invest in the Loupedeck
CT or a graphics tablet. Again, this depends on your usage and editing
style. Personally, I would make more use of the Loupedeck CT. However,
you may not.
The Loupedeck CT is aimed at a certain group of people. To those that
will get the most out of this product, the £469 price tag is easily
justified in the time saving and workflow enhancements the CT will give
them. The Loupedeck CT is no mere editing gadget – it is a tool that
takes your editing workflow to another level.
I really suggest you try a Loupedeck before dismissing it out of hand. Be warned though, you will probably fall in love.