Thursday, September 15, 2022

11 Techniques for Capturing the Best Sunset Photography

Tags: Shutterbug Photography, Rookie Photographer
width=

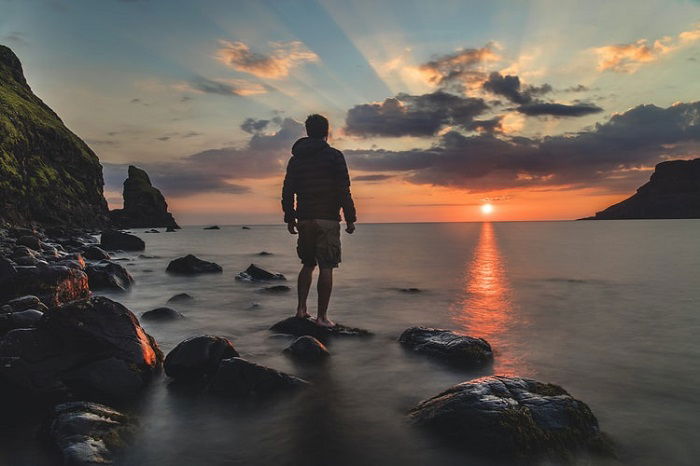
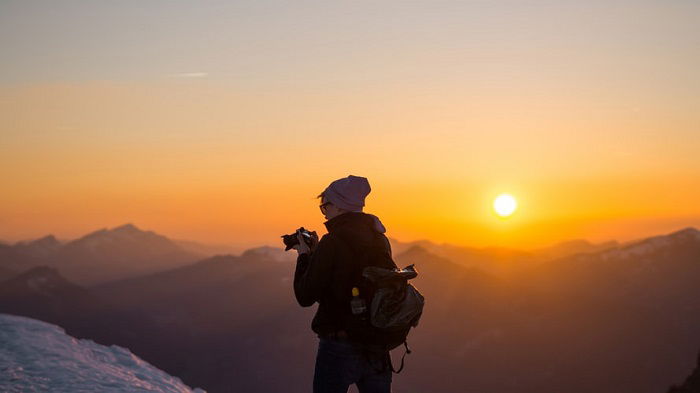
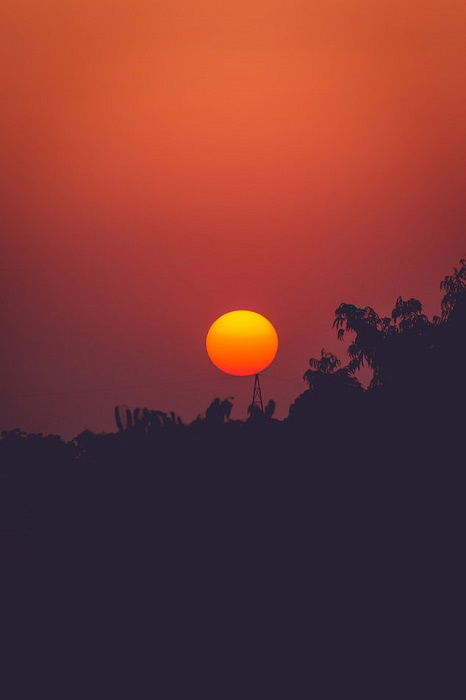
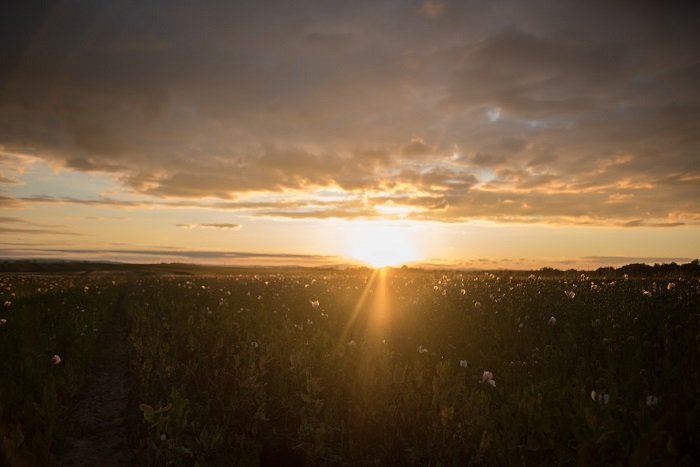
There’s nothing quite like a sunset. The sun slowly disappearing below the horizon is one of the most awe-inspiring sights in the natural world.

But despite their beauty, sunset photography is not as easy as you might think. Their glory doesn’t always translate into stunning sunset photos.

In this article, we’ve gathered our 11 favorite tips to help you capture stunning sunset photographs.

man standing at a seashore with a sunset in the background 

11 Tips for Stunning Sunset Photography

Shooting sunsets is one of the most popular types of landscape photography. It’s hardly surprising. But sunset photography is a discipline all its own.

You need to know what gear to use. And how to use it in the right way. But follow our sunset photography tips, and you’ll become a master of sunset photography.

1. You’ll Need the Right Camera

We know we’re stating the obvious, but different photography genres often require different cameras. And sunset photography is no different.

For sunset photography, you need a camera that is well suited to landscape photography.

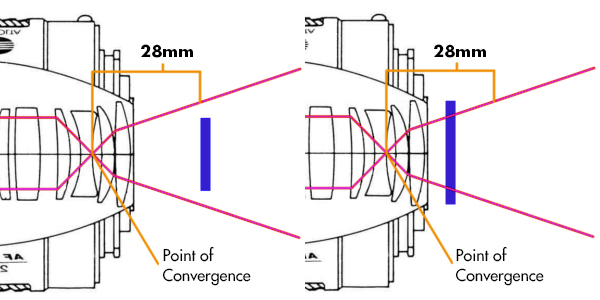
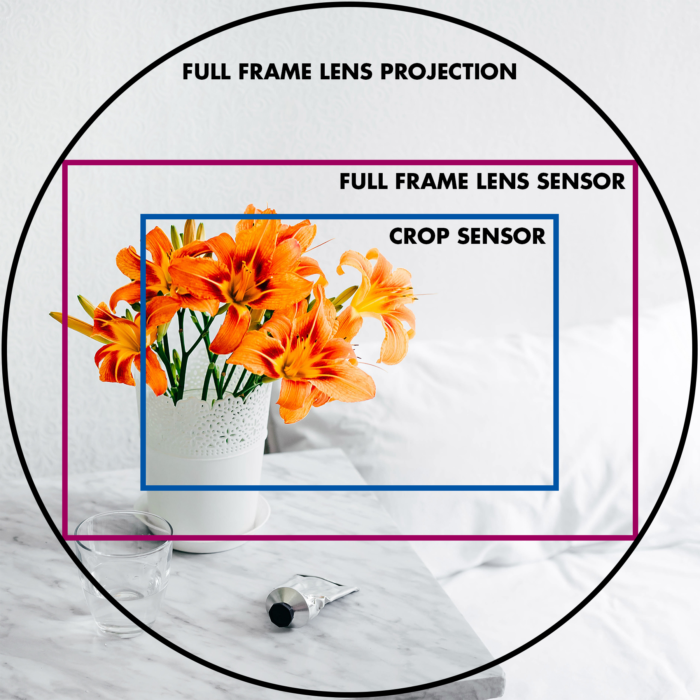
You want to capture every detail, so image resolution is important to look out for when selecting a camera. You can go DSLR or mirrorless, but we recommend a full-frame over a crop sensor camera.

Medium format cameras, with their larger sensors, are also excellent for landscape photography. But they are expensive and lack the versatility of smaller format cameras.

One thing to look for in a camera for sunset photos is a high dynamic range. A typical sunset shot will have brights and dark areas. You need to know that the camera will be able to capture the detail in both. A high dynamic range will bring depth to your sunset photos.

And good ISO range is also important. It might look like some cameras have a limited ISO range. But they often have expandable ranges, so make an effort to check that out before purchasing.

camera set up on a tripod looking out at a countryside landscape
Photo by Ben Griffiths

2. Select the Right Lens for Landscape Photography

When it comes to specific genres of photography, you want to have a lens suited to the work you’re doing.

For sunset photos, you’ll ideally want a wide-angle lens. They’re excellent for landscapes. And the wide focal length will allow you to capture a broad sunset scene.

Whenever you’re shooting an image that includes the horizon, you want to include as much of it as possible. It helps provide the sense of grandeur that’s a feature of good landscape photography.

You can still capture an excellent landscape image without a wide-angle lens. But you’ll need to set your lens to its widest focal length. Usually, you will want to include as much of the scene as possible.

A prime lens is all you need. Zoom or telephoto capabilities aren’t necessary for sunset photography.

Your lens options will be determined by the camera you have. But Nikon, Canon, and Fujifilm all have excellent selections.

bright orange and red clouds over a dark sunset scene
Photo by Byron Johson

3. Use Manual Mode to Capture Fleeting Sunsets

Modern cameras have excellent automatic functions. For sunset photography, we recommend you go manual. Like Luke Skywalker, turn off your guidance system and trust your feeling.

Conditions are constantly changing as the sun sinks lower in the sky. You’ll have to adapt and change as quickly as the conditions. There’s a higher risk involved. But the rewards will be greater.

The auto-settings will produce consistent results. But they can often be flat and lifeless. So, to get the best sunset photos, you need to master the settings. It could take time, but once you’ve nailed it, you won’t be sorry.

bare tree on a green landscape with a sunset in the background
Photo by Johannes Plenio

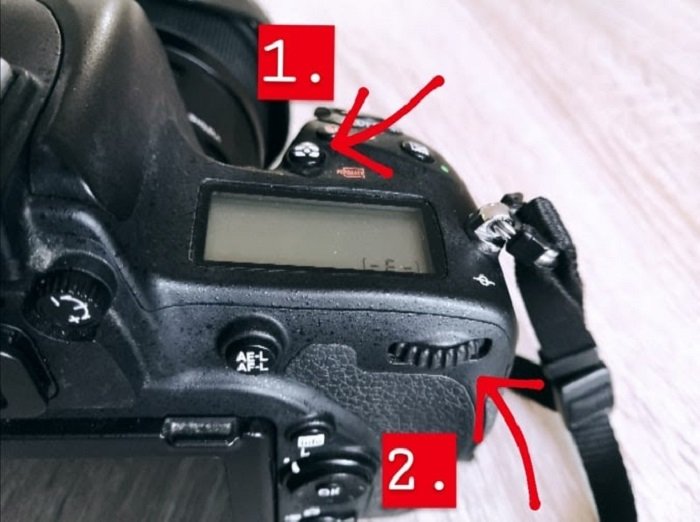
4. Adapt Your Camera Settings

The demands of a sunset scene are pretty unique in photography. You need to have your camera settings adjusted for the purpose at hand.

White Balance

Set your camera up with a daylight white balance preset. The sunlight won’t be as bright as at midday. But if you select a different preset, it won’t pick up the richer colour tones of the golden hour.

The auto white balance is another attractive feature. But again, we say go manual. The auto mode is fine for most situations. But sticking to the daylight preset will give you a more vibrant sunset image.

Aperture

Any landscape photographer will tell you to go with a narrow aperture. And they’d be right. Something around f.16 or f.22 is ideal.

A narrow aperture setting will give you a wider depth of field. The smaller your aperture, the more of your image will be in focus.

You are free to experiment with this. But a shallow depth of field might give you a flat and featureless sunset image.

ISO and Shutter Speed

Landscape photographers tend to opt for a lower ISO and a slow shutter speed. This approach will give your sunset photos stronger tones and sharper detail.

ISO 100 or 200 is a good place to start. You can venture lower if your camera is able. You’ll need to compensate with a slower shutter speed. Just remember the exposure triangle to get the camera set up correctly.

Photographer in a mountainous scene with a sunset in the background
Photo by Robert Richarz

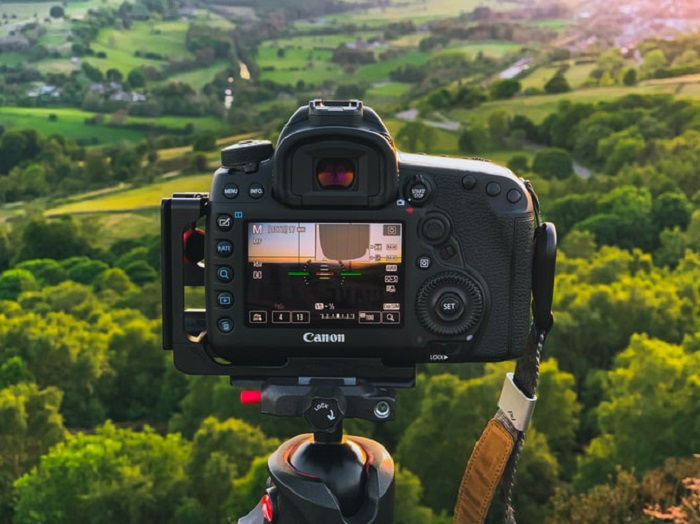
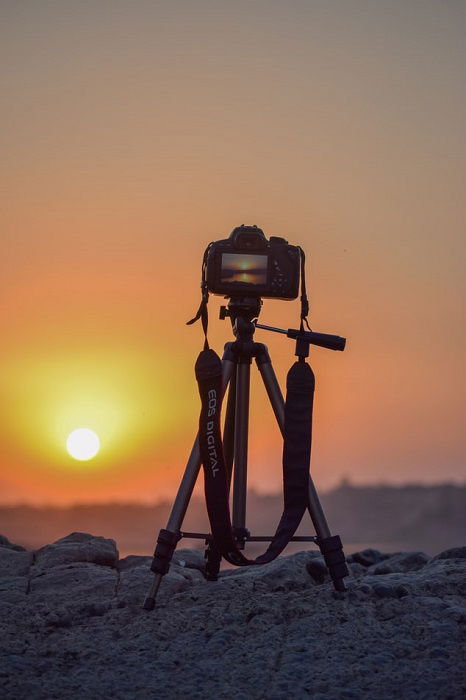
5. Use a Tripod to Avoid Camera Shake

A tripod is a vital piece of equipment for sunset photography. Of course, you could get some good shots without one. But having one will make your life a whole lot easier.

A tripod gives you more flexibility with your camera settings. You’ll be using a narrow aperture, so a tripod will allow you to use a slow shutter speed without camera shake.

You’ll need a tripod with legs that can be adjusted independently. You’ll be working in natural environments, and the ground will often be uneven. The tripod needs to give you the level platform to work from.

camera on a tripod aimed at a sunset
Photo by Yash Prajapati

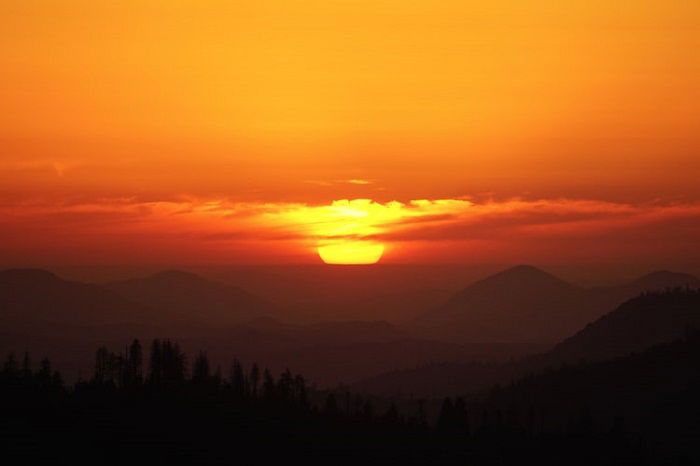
6. Use an ND Grad Filter to Capture the Perfect Exposure

During the golden hour, you often have brights areas contrasted with dark areas. With sunsets, the sky around the sun will be bright. And earth and clouds are dark.

Even a camera with a good dynamic range can struggle to find a balance between light and dark. An ND Grad Filter can really help address this issue.

A Neutral-Density Graduated filter is a tinted piece of glass you can put over bright areas of your shot. It allows you to find exposure setting that suit the whole scene.

If you don’t have a filter set, you can try exposure blending. You take two shots of your image. The first shot has your camera set to capture the bright areas. And the second shot has settings for the darker sections of the frame. You then blend the two images in post-processing.

If you try this technique, don’t move the camera between shots. The composition needs to be identical. And you’ll need to act quickly. The sun will be sinking fast, and you don’t want to miss the second shot.

black and white film photograph of a seafront sunset
Photo by Joris Linge

7. Look for an Ideal Location

Sunset is spectacular no matter where you are. But when you want to photograph sunsets, your location is essential.

Scout out the best locations in advance. Take evening walks to find the best spots. You can take a smaller camera with you so that you can experiment and generate ideas.

Find the locations where the sunset is at its most breathtaking. Think about composition and what you want your images to include. Perhaps there are landmarks that can make your sunset images unique.

If you’re travelling and you don’t have the time to scout locations, ask the locals. They’ll know all the best viewpoints in the area.

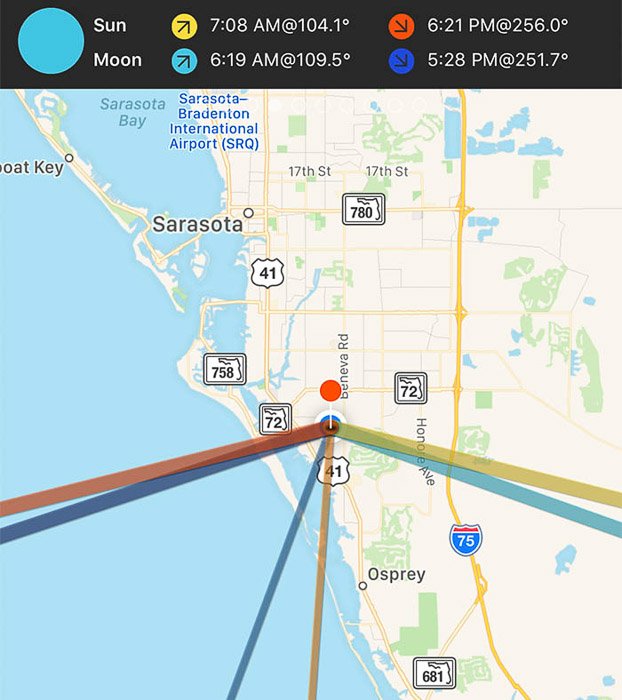
Some handy smartphone apps can help you plan for a sunset shoot. Photo Ephemeris and PhotoPills are two great apps that help predict lighting conditions for outdoor shoots.

It has to be a location that is easy to get access. On the day of the real shoot, you’ll be carrying all your gear. Mobility won’t be as easy.

Screenshot of PhotoPills app

8. Plan Ahead to Capture Stunning Sunsets

A powerful sunset can make you think time has stopped completely. But when you’re shooting sunsets, you’re working against the clocks. The sun sinks fast. And before you know it, the burning globe has sunk below the horizon.

You should already know your location so get there as early as you can. Give yourself time to get set up before the golden hour starts to get into gear.

If it’s a location you’re heading to for the first time, set off early. Give yourself plenty of time in case you get lost.

The tripod needs to be flat and stable. And you need to get the camera framed just as you light it. This preparation means you can start snapping as soon at the sun begins its earthward descent.

Even if you’re only a few minutes late, you might miss the best shots. You don’t want to be adjusting your tripod legs when the sky explodes with colour.

sunset behind trees
Photo by Vivek Doshi

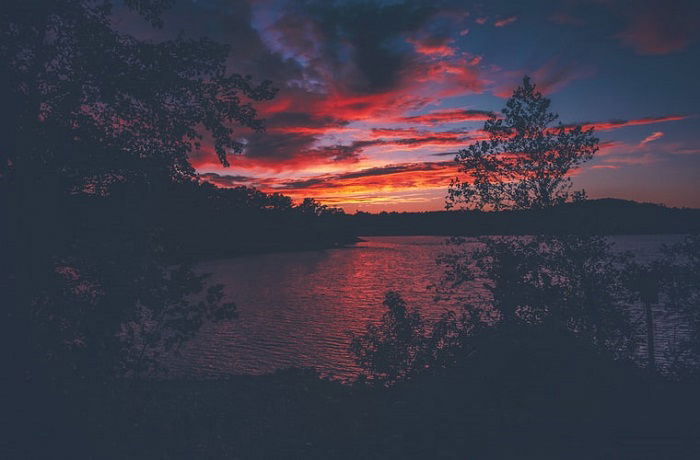
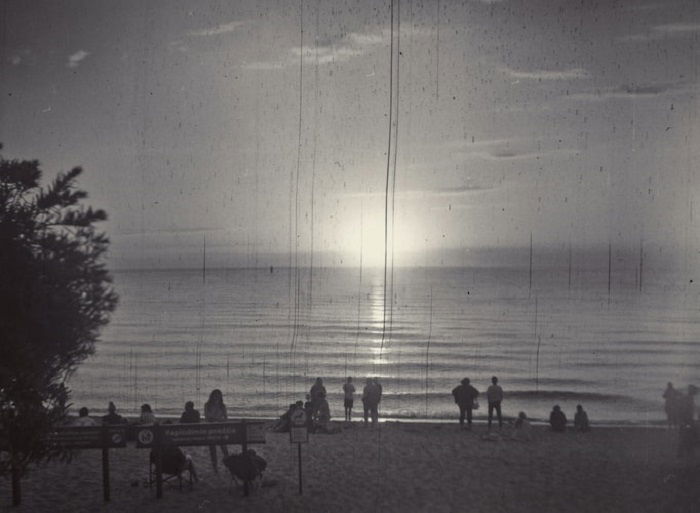
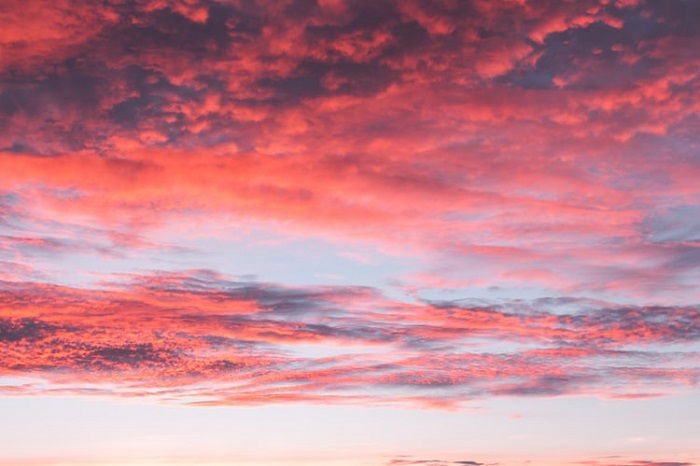
9. Use Clouds to Add Dynamism to Your Sunsets

There’s an assumption that sunsets only work when you have a clear sky. But this is not true. If the sky is completely overcast, there won’t be much of a sunset. But having clouds in the sky can add something special.

Clouds are the perfect canvas for the setting sun’s last splash of colour. They can add extra shades and tones. And they’ll enhance the sense of depth in your sunset images.

The weather is not something you can control, so there is a large element of luck involved. But don’t be disheartened if there are clouds in the sky. Embrace them. Watch how they move so you can plan your shots.

There are many different types of cloud. They can add texture to a smooth sky. And they can add depth to otherwise flat imagery. And they can hold colour after the sun as stunk below the horizon.

The colours and textures often make clouds the most prominent element of your shot. They can steal the show. Use them to strengthen your sunset images.

Photo by Diego PH

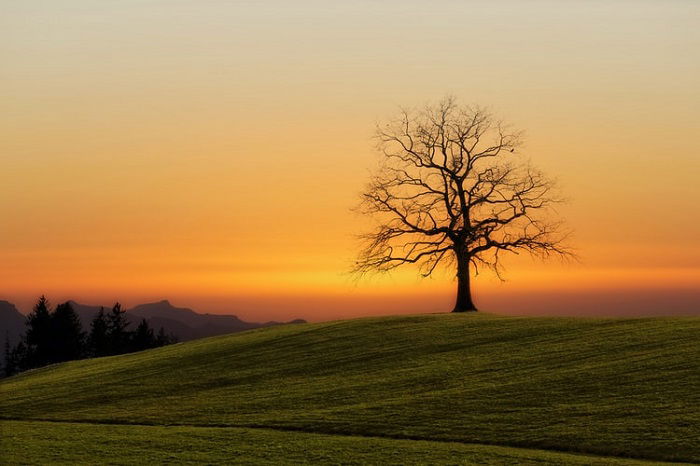
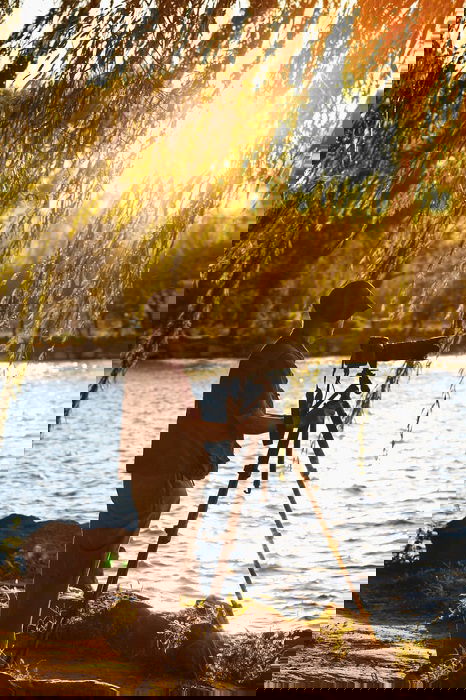
10. Search for a Unique Perspective

For genuinely stunning sunset photography, you need your photos to stand out. There are millions of good sunsets photos out there. But many are very similar and much the same.

Embrace your surroundings. Natural features or landmarks in the landscape can help to identify your image. In addition, they can help tie your photo to that specific location, making it more meaningful.

Water is another asset to the sunset photographer. It has a reflective quality you can exploit to make your sunset photos pop with colour. And the surface also adds new textures. The ocean is an obvious choice, but pools and ponds are excellent too.

Don’t let the weather scare you. Don’t venture out if it’s dangerous. But if the conditions aren’t as you planned, head out anyway. It’s a chance for you to experiment. And you might end up with some stunning images you didn’t expect.

Photo by Chi Chen

11. Be Prepared for Outdoor Photography

If you live in a beach-side villa, you won’t need to consider much other gear. But if your sunset shoot involves an excursion, there are other things you will need.

If you’re not familiar with the area, take a map. Smartphones have GPS capabilities, but you might run out of battery. A paper map won’t let you down.

If you’re shooting in a remote location, plan your route home. Things look different in the dark, and it’s easy to get lost.

A torch is an essential piece of equipment for a sunset shoot. When your shoot is over, night will have fallen, and you’ll be in the dark. We favour a head torch as this leaves your hands free to pack up your gear.

Warm and waterproof clothes are important. You might work up a sweat hiking up to your location. But once the sun dips below the horizon, the temperature can drop fast. And the rain clouds could close in at any moment. You don’t want to be caught in a rainstorm unprepared.

Sunset over a mountain range
Photo by David Mullins

The natural beauty of a sunset can make some believe sunset photography is easy. But that’s not the case. Sunset photography is a form of landscape that has a unique set of skills and considerations.

You need the right gear. And you need to know how to use it to make your images special. And great sunset photos have features that make them stand out.

We hope these sunset photography tips have helped, and you now feel confident about shooting sunsets. Be confident and have fun. Go out and experiment with the information we’ve provided. 

-----------------------------------------------------------------------------------------

The Benefits of Photographing in Nature – Free Quick Guide


Sometimes we get so caught up in thinking about what we can do to make our photography better that we lose sight of how photography can make us better.

Think about that for a moment. You are improving yourself by using your camera. Pretty awesome thought!

In this guide, author Leanne Cleaveley walks us through her growth journey through nature photography.

Along the way, she will provide you with tips and suggestions on how to use her story as a springboard for your photography and learning experience.

She covers…

  • How photography can soothe the soul.
  • Why nature photography, in particular, is calming.
  • How to ground yourself through introspection and exercises.
  • Using photography to relieve the stresses of work.
  • The benefits of having a plan or perhaps not having one.
  • The joy of shooting in any weather or any season.
  • How to enjoy the moment—even if you don’t take any photos!

Ready to relax?

Get your special copy below.

Photo Credit: Leanne Cleaveley


 #Biden Gaffes

                                                                           Advertisement


undefined 

                                To state your beliefs about the economy Click Here

                 Enjoy this video:   https://www.youtube.com/watch?v=3bWM1zsnTJc

Thursday, September 8, 2022

Camera Metering Modes Explained (How & When To Use Them!)

Tags: Shutterbug Photography, Rookie Photographer  

Finding the ideal exposure is one of the first things that photographers learn. Metering is a process in digital photography that works out what the correct exposure should be.

The camera uses the so-called metering sensor, which is a device located inside the camera. It measures the brightness of the subject and adjusts the metering accordingly.

Some people use a light meter to calculate the appropriate settings. In this article, I will show you how to take pictures without the light meter.

A woman in a diner
Photo by Luke Barky 
 

Why Should You Adjust the Metering?

The camera can’t change the exposure of separate parts of the photo. This is why it needs to 

figure out an exposure that works for the whole picture. Many photographers encounter 

problems with it when taking images of high contrast subjects.

Let’s take landscape photography as an example. During sunset, you would usually focus on 

the beautiful sky with your camera. The problem is, this can result in the landscape and other 

parts of the photo being too dark, such as on the picture below.

To avoid this, you need to adjust the metering according to the subject.

Evening landscape at sunset

The default metering mode of the camera is matrix/evaluative metering. To switch between 

the modes, all you have to do is to press the metering mode button on the camera (1.) and use 

the main command dial (2.).

You will see how the modes change on the camera LCD or the control panel.

A close up of changing a cameras metering mode

It is crucial to reach a balance between shadows, highlights and mid-tones. This is what you 

should be aiming for when choosing a metering mode. Before taking a picture, you have to 

weigh the options that the different modes provide you with.

Let’s look at what camera metering modes do and when you should be using them.

What the Different Metering Modes Are

Evaluative (Canon) / Matrix (Nikon)

This mode has different names depending on the manufacturer. Canon calls it evaluative, 

whereas Nikon calls it Matrix. But there is no difference in the way they decide on exposure.

Matrix/Evaluative metering is the most complex and modern way of metering a scene. It 

collects data from across the entire frame and even gives priority to your focus point.

I prefer using this mode as it is the most reliable way of metering in most situations.

If the camera sees a bright area, such as the sun, it takes that spot into account. According 

to this spot, it will try to work out the best exposure settings.

A collie dog lying down on grass

Partial Metering Mode

This metering mode collects data from a small circular area in the metering centre of the 

camera. It covers about 10-15% of the entire scene and is only found in Canon cameras.

Partial light metering is useful when your subject is in the centre of the frame. Most likely, 

you want the camera to prioritise the subject during exposure calculation.

There’s not a lot of difference between matrix and partial metering.

Spot Metering Mode

Here the dot in the camera centre is smaller than partial metering, meaning roughly 5% 

of the frame. It sets the exposure according to where your focus point is. To get the focus 

point right and achieve your desire results, your subject has to be still.

This is a more advanced way of working out the good exposure for your camera. This is 

because it involves metering for the small area of your focus point. The rest of the scene 

may not be correct, leaving that up to you to work out.

Notice that the white fur on the dog looks much softer and less highlighted. Even though 

this is pleasant to look at, it leaves the rest of the scene underexposed.

Be careful when using this metering mode. It can be useful, but you don’t want to end up 

with all your photos in this style.

A collie dog lying down on grass

Highlight-Weighted Metering

Some newer Nikon cameras have highlight-weighted metering as an option. It is almost 

the same as spot metering.

But unlike spot metering, here, the camera recognises the highlights even in motion. 

This prevents the whites on your photo from blowing out. It is the most useful when 

photographing moving, highlighted subjects, such as a white car.

Keep in mind to adjust the shutter speed of your camera according to the subject in motion.

Centre-Weighted Metering

The centre-weighted mode is a halfway between matrix and partial metering. It measures 

the exposure of a pretty big metering spot in the viewfinder of the camera.

Most people take photographs in which the subject is in the metering centre of the image. 

DSLR camera manufacturers realised this. They needed to include an effective 

centre-weighted metering system in the camera. This way, photographers can reach an 

accurate exposure value.

You’ll notice in the photo below that the dog is quite well exposed. This results in darker, 

less visible background and surroundings. For this reason, centre-weighted metering can 

add a special atmosphere to your photos.

The outcome of centre-weighted metering can be hard to predict in digital photography. 

I only suggest using it when the corners of the frame don’t have much importance. You 

always have to look into the viewfinder and consider how much detail do you need to 

keep in the corners.

A collie dog lying down on grass

Average Metering Mode

This works in a similar way to matrix metering in photography. The camera looks at the 

light from the whole scene.

But it does so in a very unintelligent way. Not only does it not recognise what’s in the 

scene, but it also doesn’t make any suitable changes. If there’s a bright sun or a dark 

shade in a scene, the camera will treat this region in the same way as the rest of the photo.

This often results in over and underexposed areas in the same image. For this reason, 

average metering isn’t usually found in modern cameras.A portrait of a female model in a forest

Which Modes You Should Use and When

You should have a pretty good understanding of what metering modes do and when to use 

them by now.

But I’d like to go into more detail about the two I use the most – Matrix and Spot Metering.

I find matrix to be pretty good at working out what I want in the majority of situations. 

For me, it would be pointless to switch to centre-weighted metering.

When matrix metering doesn’t deliver the subject well, I use spot metering. It gives 

me more control over the light and dark parts of the scene.

Evaluative/Matrix Metering in Use

There are cases where the dynamic range of the photo is very small. This means, that 

there are no strong shadows or highlights. Thus it’s easier for the camera to balance 

the exposure with the help of light metering. I leave my camera with matrix mode on 

for shots like this.

I took this photo well into the evening when there were no strong highlights within 

the image. Hence I didn’t need any special metering modes.

a seascape at sunset shot using Evaluative Metering ModesThis next photo is 

different from the one above since the shadows are stronger. The majority 

of the image is dark, but the effect that the matrix metering mode gives us is 

almost the same. It brings out the small amount of highlights on the side of the 

bridge. But it still keeps the silhouettes where I wanted them.

A Lake At Twilight shot using Evaluative Metering ModeHere’s an example of where 

the matrix metering mode has prevailed.

The camera noticed the light creeping through the top of the photo and ignored it. Instead, 

it correctly exposed the rest of the picture. This is what we are looking for in difficult 

light conditions.

Mediterranean Buildings shot using Evaluative Metering Mode

Sometimes on matrix metering, the camera sees a black subject and thinks that it 

should be grey. It will try to boost the brightness too much because it is aiming for 

the average 18% grey. This is where you will need to use exposure compensation 

to reach the desired exposure.

You can also switch the camera to manual mode and adjust the aperture, ISO 

and/ or shutter speed according to the light conditions.

Now let’s have a look at when you might want to use spot metering.

Spot Metering in Use

Taking photographs while facing the sun makes it a lot harder for matrix metering 

to get the lights right. You’re going to end up with silhouettes instead of correct 

exposure.

This is when I like to switch the camera to spot metering.

Remember that the focus point in the metering centre is very small. Make sure you 

have it pointed on something where the light balance is essential. Spot metering is 

especially useful in the case of portraits, where you are trying to set the skin tone right.

Portrait of a girl in Field of Flowers using spot metering mode

Take some time and experiment with the different metering modes. It could help you 

figure out your style, as well as give your photos an artistic look.

FREE Guide – Understanding Metering Modes


Don’t be a chimp!

Have you ever watched someone taking photographs with a fancy DSLR and after every 

shot they check the screen to see what’s there? Have you done this yourself? 

Come on- be honest.

This has become so common that they even have a term for it now; it’s called ‘chimping’.

Chimping is when a photographer is CONSTANTLY checking the screen: sometimes 

after every shot.

Why are they doing this?

Because they don’t trust that they got the picture!

One of the prime reasons that photographers chimp is because their images are 

consistently too dark or too light.

And the reason for that- is because they’re not properly using their metering modes.

This week’s quick guide will teach you all about Metering Modes, Covering-

  • What are the different metering modes
  • What exactly does each metering mode do
  • What’s the best metering mode for a situation
  • How to ‘read’ the lighting in a scene and choose the correct metering mode based 
  • on your knowledge
  • And more…

Image Credit: János Csongor Kerekes


Thursday, September 1, 2022

Best Noise Reduction Software for Photographers

Tags: Shutterbug Photography, Rookie Photographer 

Noise reduction software has been steadily improving over the years. Noise in a photograph looks like grains of sand, with a rough or “grainy” texture to the image. Often the culprit is a high ISO. Photographers use high ISO when shooting in low light or at night when a tripod and a long shutter speed are not feasible. Digital cameras continue to increase in their ability to make clear images at high ISOs. But there is a point where the noise is noticeable.

Whether you decide to remove high ISO noise is up to you. Some photographers like the look of noise. It gives the photos a vintage feel. But for those of you who want a cleaner look, I’ll show you what I think is the best noise reduction software.

Best Noise Reduction Software to Buy

Before we dive into the best software, let’s look at the images I used to test noise reduction. I used two images in my quest to find the best noise reduction software. They were shot at high ISOs and had noticeable digital noise. I took them with a Sony A7R3. I edited the baseline images in Lightroom Classic before applying noise reduction.

One image was a night shot taken at ISO 10,000. I chose this photo to see if the programs could distinguish between noise and stars.

Night sky with meteor closeup
Night sky with meteor. My settings were f/4.0 @ 10 seconds ISO 10,000.

The other was a wildlife image taken at ISO 6,400 with a shallow depth of field. I wanted to see how the programs handle the blurred background and detail in the bird’s feathers. Noise removal programs can create a waxy look that would be noticeable in the feathers.

Blue Heron noise closeup
Blue heron. My settings were f/8.0 @ 1/500th of a second, ISO 6400.

I started my search for the best noise reduction software by looking at complete post-processing programs that include noise reduction. I then looked at noise reduction plug-ins for Lightroom Classic or Photoshop.

Here’s how I ranked the complete post-processing programs.

1. Capture One Pro

Capture One Pro is a complete photo editing program competitive with Lightroom Classic. Plans start at $14/month, and there is a free trial.

Capture One Pro was the only program to get good results with both images. Some plug-ins did better with the wildlife shot than either Capture One Pro or Lightroom Classic. But Capture One Pro beat them all on the night image.

I compared the photos edited in Capture One Pro with and without noise reduction. The program did a good job retaining the detail in the bird’s wings while also softening the background. Though the night photo edited in Capture One Pro initially had more noise, the program did a good job of removing noise in the sky.

 However, while Capture One Pro will open RAW files, my Lightroom Classic edits were lost. I re-edited my RAW files in Capture One Pro to provide comparison images. Bear this in mind when comparing the results of Capture One Pro with other programs.

Capture One Pro includes noise reduction to control both luminance and colour noise. The detail slider brings out more detail. Unique to Capture One Pro is the Single Pixel slider that eliminates hot pixels in your photo. These are isolated white pixels that pop out of the dark areas.

2. Photo Ninja

Photo Ninja is a full-service post-processing program that costs $129. The program includes a noise-reducing program previously called Noise Ninja. As with Capture One Pro, I edited my RAW files in the program. I created a comparison photo and then used the noise reduction tool.

Photo Ninja was a close second! Capture One Pro just edged out this powerful program thanks to its enhanced detail. But I loved the creamy smoothness the Photo Ninja created.

Processing the images in Photo Ninja initially resulted in more noise. But the program handled the noise in the wildlife image very well. On the night image, the program did tend to eat stars and make the sky clumpy. I liked the noise reduction results overall. With more familiarity, I may get even better results.

 As a photo editing tool, Photo Ninja is easy to use. The program includes three noise reduction “engines”. I used Noise Ninja 4 Turbo. The description given by the developers stated that this option gives a more natural look and worked best on high-ISO images. I selected the Smart preset option, which analyzes the image and applies a correction based on my camera model. The results were pretty good straight away. I added a bit more colour noise reduction and reduced the smoothing effect. The training information on how to use this tool is exceptionally clear.

The sliders were super sensitive. It did not take much to start seeing noise reduction. It was too easy to go overboard on the smoothing effects. I had to push the Color noise reduction sliders much higher than the luminance sliders.

3. Lightroom Classic

Lightroom Classic comes with the Creative Cloud plan, which starts at $9.99/month.

Lightroom Classic did an OK job with both images, and handled the night image challenge better than some of the other programs. If you are already an Adobe user, this program will likely handle most of your light noise reduction needs. But for a challenging image, there is better noise reduction software on the market.

 Noise reduction is located in the Detail panel in the Develop Module alongside Sharpening. By default, the Noise Reduction sliders, Luminance and Color, are set to zero.

When I pushed all noise reduction sliders to the maximum, there was a noticeable difference in the image. But I also saw some colour haloing around the bird’s wings. Most of the Chroma noise in the background disappeared, but so too did some of the detail in the bird’s feathers. In the night photograph, fainter stars disappeared leaving blank areas in the sky. Even at 100, colour noise remained in the darkest part of the image.

4. Photoshop

Photoshop comes with the Creative Cloud plan, which starts at $9.99/month.

I do a fair amount of photo processing in Photoshop, but have always used Lightroom Classic to reduce noise instead.

Photoshop came in last in my ranking. The built-in noise removal tools were sub-standard compared to the other programs.

Photoshop has a set of noise reduction filter tools. To find these, go to the Filter drop-down menu. Select Filter > Noise > Reduce Noise. Photoshop automatically reduces noise. You have the option to adjust the strength of the effect, preserve details, reduce colour noise, and sharpen details.

For my wildlife image, I chose maximum strength and to reduce colour noise by 100%. The results were alarming. Photoshop added an odd texture to my entire image. I tried again and again with various settings. In my opinion, Photoshop made the image worse. I tried it with my night shot with similar results. Photoshop seemed to add rather than reduce noise. I tried the other options under the Noise Filter. Median with a radius of 2 pixels seemed to work the best. But it still wasn’t that good.

If you use Photoshop for photo editing, it is worth investing in a plug-in.

Here’s how I ranked the plug-in noise reduction software.

1. Neat Image

Neat Image is available as a Photoshop plug-in or a standalone program for $39.00.

I ranked Neat Image as the best noise reduction plug-in for 2021. Not only is it effective, but much quicker and less expensive than the other plug-ins. The programs retained detail in the subject while pleasantly smoothing the blurred background. Neat Image gave me a lot of control over the noise-to-blur balance.

Once installed, the Neat Image plug-in shows up under the Filter drop-down menu. Once open, Neat Image builds a noise profile of the image. The program was quick and easy once I read the instructions. The initial results were good. From there, you can adjust the noise reduction amount, noise level, and sharpening.

Of all the programs, Neat Image was easily the quickest in rendering changes. I had instant control over various sharpening options and amount of noise reduction.

2. Topaz DeNoise AI

DeNoise AI is noise reduction software from Topaz Labs. The program is $79.99. There is a free trial available. This works as a standalone program or as a plug-in for Lightroom Classic and Photoshop.

DeNoise AI did a good job of retaining detail in the blurred background and removing chroma noise. But results were more mixed with my night image.

 When you open the tool, you will have three quick options: DeNoise AI, AI Clear, and Low Light. I chose AI Clear as the description, “removing noise from high-ISO images,” which seemed the best fit for my examples. The program lets you select if you want low, medium, or high noise removal (I chose “high”) and how much you want sharpness enhanced. You also have sliders that allow you to control how much detail the program recovers and how much colour noise reduction you want. DeNoise AI also includes a mask feature that lets you selectively reduce noise in parts of your image.

Even without enhancing detail, Topaz DeNoise AI is better than Lightroom Classic. It preserved detail and removed noise from the wildlife image. But it struggled with my night scene. I tried various settings, but I couldn’t get the program to make a dent in the noise.

3. Noiseware

Noiseware is a plug-in for Photoshop by Imagenomic. The software costs $79.99, and there is a free trial available.

In my opinion, Noiseware was similar to DeNoise AI. Both programs struggled with the night image. But Noiseware smoothed the feathers more, and so ranked lower.

Once installed, the Noiseware plug-in is the Filter drop-down menu. You can choose how much noise to remove, and also how much smoothing of details. Noiseware includes presets that adjust luminance, colour noise, detail protection, and detail enhancement. You can also adjust the presets, depending on the noise in your image.

I chose Full Noise Reduction. This preset did remove more noise, but also smoothed the feathers.

In both images, the results were like DeNoise. I liked the smoothness in the background blur. Noiseware seemed to keep good colour in my wildlife image. Knowing my night scene was problematic, I pushed the noise sliders to the max, but there was still too much noise.

4. Dfine

Dfine is noise reduction software included in the Nik Collection. This set of 8 plug-ins will cost you $149. You can only purchase Dfine as part of the collection. A free trial is also available. I have used an older version of the Nik Collection for years. I was interested in whether noise reduction had improved in the current version.

Dfine handled the blurred background well, but not the detail in the subject. Like the Photoshop other plug-ins, Dfine struggled with the night image. But the results were only slightly better than using Lightroom Classic without a plug-in. It doesn’t seem worth the effort to edit my image with this plug-in.

When you open an image in Dfine, it automatically corrects for contrast (luminance) and colour noise. You have the option of removing more noise, balancing noise removal with retention of detail. You also have the option to adjust noise in colours selectively. One feature across the Nik Collection is the use of Control Points. These are like the selective edits. Place a Control Point over a targeted area, and you can control the contrast and colour noise reduction for that area.

Dfine cleaned up a lot of the noise in the wildlife picture, but there was still some chroma noise. I liked the result in the blurred background better than Lightroom Classic, but the bird lost a lot of detail and looked waxy. Dfine struggled with the night scene. It removed all but the brightest stars and blurred the points of light.

The two images I used in this review challenged the noise reduction software in different ways. There are pros and cons to each program which I have outlined.

heron compare program noise reduction
Comparison of noise reduction in complete post-processing programs
heron noise reduction comparison plug-ins
Comparison of noise reduction plug-ins

So, there are my picks! But you don’t have to take my word for the best noise reduction software. Try the programs for yourself. Most have free trials. Use the programs on dark photos or those with high ISO. Try the programs on scanned film images. I would love to hear about your results!

--------------------------------------------------------------------------------------------

A Match Made in Heaven: Lightroom and Photoshop – Free Quick Guide


If you have been a member of one or more photography forums or social media pages, then you have probably seen this question posted at least once: “What should I start with first—Lightroom or Photoshop?”

The problem with such a question is that it assumes one should have either-or as if they are mutually exclusive.

In this guide, we’re going to look at a couple of reasons why you’d want to team up with both Lightroom and Photoshop.

We’ll also have a quick look at how you would do that.

Finally, we will witness them as the perfect team.

After reading this eBook, you should have a good understanding of when to call in Photoshop’s help while you’re editing images in Lightroom.

Perhaps not all of the reasons to do so, but certainly the most important ones.

Click below to get your copy.

Photo Credit: Tobie Schalkwyk

-------------------------------------------------------------------------------------- 


Friday, August 26, 2022

#Photography Lessons

Photography for Beginners (The Ultimate Guide)

Cameras are complicated. I was frustrated with my first DSLR. I couldn’t capture what I saw through my viewfinder. It took a ton of trial and error to improve my photography.

When I managed to work it all out, I started taking some pretty spectacular images. This photography for beginners guide will share with you everything that I’ve learned from my mistakes.

A black and white photo of four beginners photographers holding DSLR cameras 

How Do Cameras Work?

As beginner photographers, we tend to be visual learners. And it’s my job to make beginning photography as easy as possible for you.

So I thought to myself, “What better way to help beginner photographers learn how to use their cameras than by creating an infographic?” And that’s exactly what I did.

I collaborated with an illustrator friend of mine, and together we made these images. The following are something that will make understanding exposure, and how cameras work, a whole lot easier!  

Exposure

For those beginning photography, exposure is key to capturing a great image.

Learning how exposure works will help you to take control of your camera and take better photos. Shutter speed, aperture and ISO are the elements that combine to create an exposure.

As you’ll soon learn, these elements have an effect on more than the exposure. They also cause alterations in depth of field, motion blur, and digital noise.

Once you understand how each one works, you can start diving into manual mode. This is where you take control back from your camera.

The exposure triangle is a great way to remember the three settings. When combined, they control the amount of light captured from any given scene.

This will help you to understand that changing one setting will need a change in the others. That is if you are photographing the same scene with the same exact lighting conditions. 

Aperture

Exposure happens in three steps. We will start with the aperture. This is the hole inside the lens, through which the light passes.

It’s similar to the pupil of your eye. The wider the aperture, the more light is allowed in and vice versa. Simple? Not quite.

As the aperture widens, the f/number gets lower and more light is allowed into the camera. This is great for low light. But be aware that it’s going to make the depth of field very shallow. This is not ideal when taking landscapes photos.

So this is a short summary but I go into full detail about that in this post. The aperture is the preferred setting to set first, as it directly influences how much of your scene is in focus. But, if you are looking to create motion blur, then it is second to the shutter speed.

Exposure will be much easier if you can memorize the f/stop scale.

The scale is as follows: f/1.4, f/2, f/2.8, f/4, f/5.6, f/8, f/11, f/16, f/22. 


Shutter Speed

Once the light has passed through the aperture of the lens, it reaches the shutter. Now you need to decide how much of that light you’re going to allow into the camera.

Ordinarily, you only want a very small fraction of a second (for example 1/250) to prevent motion blur. However, different shutter speeds complement different situations.

Anything from really fast (1/4000) for sports photography to really slow (30 seconds) for night photography. It all depends on what you’re shooting and how much light you have available to you.

Knowing how your shutter speed works is a key element in the basics of photography.

A conceptual portrait of a girl in her bedroom surrounded by flying books

ISO

Once the light has passed through the aperture and been filtered by the shutter speed, it reaches the sensor. This is where we decide how to set the ISO.

As you turn the ISO number up, you increase the brightness. But, at the same time, the image quality decreases. There will be more digital noise or “grain”.

So you have to decide upon your priorities in terms of exposure versus the grain.

For example, I would reduce the image quality if it meant that I could prevent motion blur in my photo. There’s no possible way to fix that in post-production (yet, at least).

An atmospheric shot of an underground tunnel

Exposure Summary

Once you’ve understood aperture, shutter speed and ISO, you need to learn how each of these elements of exposure work together.

For all those basics of photography, exposure is the most important.

If you don’t have this down, composition and framing become a moot point in beginner photography.

In this post, you will learn about the ‘stop’ based system for measuring exposure. And you’ll also learn how to prioritize the aperture, shutter speed, and ISO for the best photo.

The corridor of an abandoned building taken during an urban exploration photography trip

Understanding Your Camera

Metering Modes

Digital photography for beginners can be confusing. Exposure isn’t as simple as learning about aperture, shutter speed, and ISO. You also have to learn about how your camera looks at light.

Metering modes are there to tell your camera how you want it to look at a scene.

The picture below was taken on spot metering mode. If you were to take the same photo using the evaluative mode, you would end up with a completely different exposure.

This is also covered in my free video training. If you’re looking for an article that explains digital, including Canon, metering modes, here it is.

Understanding this basic photography point might be the key to understanding why your photos are coming out underexposed or overexposed.

A pristine winter landscape scene

Histograms

The histogram shows you a mathematical review of exposure after the photo has been taken. It tells you how evenly exposed a photo is. New photographers often find it frightening to understand. But it is easy, and I tell you how.

LCD screens aren’t very good at showing you this information through their display of the image. This is because they are affected by the ambient lighting conditions you’re in and the brightness of the screen itself.

That’s why the histogram is such a powerful tool to utilize in beginning photography correctly.

Screenshot of a photography histogram

Shooting Modes

Full-Auto, Program, Aperture Priority, Shutter Speed Priority or Manual Mode. How do you work out which one you should be using?

There’s also a lot of misconceptions about which mode to use under which conditions.

When you understand what each mode does, the one that will be suitable for your situation becomes a lot clearer. This is also covered in my free video training.

Portrait of a man onstage during a performance, atmospheric purple light behind

Depth of Field

When you’re shooting in low light, you have to widen your aperture to allow enough light into the lens. But this has a major side effect. A shallow depth of field.

You can use this in a creative way. But it’s not the only possibility. There are many situations, such as landscapes, where you’ll want to use a narrower aperture. So that the whole scene remains in focus.

This tutorial walks you through everything you need to know about choosing the right aperture (and the DoF) for the right situation.

When it comes to covering all of the basics of photography, DoF is very important.

A person holding a dslr camera to take a street photo

White Balance

White balance is something I wish I’d learned more about much sooner than I did. I look back on some photos now and wonder what I was thinking.

The white balance changes the colour cast of the entire photo. It is responsible for the overall warmth. It can determine whether your photo appears blue or orange, cold or warm.

Auto white balance doesn’t often do a good job. Especially with tungsten light. The sooner you learn about this basic photography idea, the more accurate your photos will look.

This is also covered in my free video training.

Bright and colourful outdoor travel photography portrait

Focal Length

Have you ever wondered what the ‘mm’ on your lens means? Or why people use longer focal lengths for portraits?

It’s all discussed in this post. The focal length affects more than the ‘zoom’. It also influences the perspective.

I cover which focal length you would want to use in different situations. As well as their possible side effects.

It’s a really worthy read and one of my favourite tutorials to date.

A diagram explaining how focal length works

Crop Factor

A lot of you may not realize but, unless you spend about $2000 on your camera, you’re shooting on a crop sensor.

This means that your sensor is much smaller than professional SLR cameras. It is cropping your image. The crop factor has a range of effects on your photos.

It creates a narrower viewing angle and will influence your lens purchases in the future. For those beginner photographers, research what lenses will help your field of photography first.

A diagram showing how the crop factor works

Polarizing Filters

Polarizing filters only allow light into the lens from a certain direction. This results in the removal of glare and reflections from non-metallic objects.

Water and glass are the most affected, as well as haze from the sky. Cutting out these reflections and anomalies will make for more natural saturated colours.

This looks fantastic and it cannot be replicated in post-production. That’s why it’s so important to understand.

A black and White street photo of people walking in the rain, one umbrella is spot colored red

How to Take Sharp Images Like a Pro

Photography beginners, I will walk you through the 10 step process of taking sharp photos like a professional.

It covers everything from choosing the right aperture and shutter speed to shooting in RAW.

It’s pretty easy to make only a few small mistakes which will result in less sharp images. That’s why we cover all ten in order of importance.

Black and white abstract architectural photo

The Nifty Fifty

What can I say about the nifty fifty? What’s not to love?

For those of you who are beginner photographers, when I talk about the nifty fifty, I’m referring to the 50mm f/1.8 (or faster) prime lens. This can be picked up very cheap for most digital SLRs.

It’s a great introduction to buying better quality lenses. And an excellent way of getting to grips with aperture.

The article linked is a review and guide. I wrote it because I recommend this lens as the first upgrade for every beginner photographer to make.

It’s easy to use and, for the price, will yield some excellent results.

Dreamy close up of meadow flowers

Composition

It’s important to understand exposure. But, if you can’t get to grips with basic composition, you’ll struggle to take really good photos.

I’m not saying that you have to follow every compositional rule. But it helps to learn these rules so they can help guide you in taking better photos.

A shot of a domed ceiling to show composition

Rule of Thirds

This is often the first compositional rule that any beginner photographer comes across. And that’s for an excellent reason: it’s simple, and it works.

The basic premise is that you divide your camera’s frame into thirds. By planting key objects on these lines, the composition of the image works better.

This is a tool that always works. But it is easy to overuse it. If you’ve not learned much about photography yet, it’s a great way of improving your photos.

It will help to make them more exciting.

A bright and airy photo of a child playing in a tower against a blue sky, demonstrating the rule of thirds in photography

Visual Weight

Visual weight differs in size or weight as we know it. It’s all about what we’re drawn to when we look at a photo.

When you understand visual weight, you’ll start to understand how people look at photos. And how you can position certain elements in a frame to direct the viewer’s attention to where you want them to look.

It’s not so much a tool or a rule, but an understanding.

A cityscape shot of three tall buildings demonstrating the use of visual weight in photography

Triangles

Shapes are essential in photography. Triangles are in almost everything we see in one way or another. It’s only a case of distinguishing and knowing what to do with them.

Triangles make great compositional tools. They’re easy to make and manipulate and are quite common. These are a great way to use the simplest and most basic photography compositions.

They are also perfect for combining different compositional techniques. These include lines and paths to create a more interesting part of a photograph.

You can even use them to make a photo feel more stable or unstable.

A bright and airy photo of a family sitting in the woods

Eye-Lines

If you take photos of people, you’re taking photos with eye lines. It’s important to understand the effect that eye lines have on how we view a photo.

Eye-lines are the direction your subject’s eyes are pointed in. The negative space in front of the subject’s face is known as ‘lead room‘.

These have the ability to focus our attention on a particular part of the photo. They also produce tension and other photographic elements.

Although they’re not physical lines, they can be used as such to produce different elements. These will help make triangles and vertical lines.

Portrait of a cats face demonstarting the use of eyelines in photography

Balance

Balance in a photo affects how we feel when we look at it. An unbalanced photo can make us feel uneasy. A balanced photo will make us feel more relaxed.

It doesn’t matter whether you choose to make the photo balanced or unbalanced. But you should understand why you’ve chosen one or the other.

Both affect your photos in different ways.

Again, it’s one of those situations where the more you know, the easier it will be to produce the desired effect.

The silhouettes of birds perched on 5 electrity wires against a blue sky - digital photography for beginners

So that’s a brief introduction to digital photography for beginners. 

------------------------------------------------------------------------------------------

Three Mid-Range Cameras That Are Perfect for Beginner Photographers – Free Quick Guide


You’re tired of the limitations of your smartphone camera. Perhaps, you’re thinking about buying a new dedicated camera body and lens.

Maybe you’re feeling a bit overwhelmed by all of the choices?

We asked photographer Tobie Schalkwyk to provide us with a recommendation for three entry-level cameras for that first big purchase.

Tobie went deep into his research and came up with some excellent recommendations.

He looked at many factors, including…

  • Cost
  • Lenses
  • Menus
  • Aesthetics

He also gives you the pros and cons of all three models that are discussed.

Even if you don’t want to invest in one of these particular cameras, the information will be valuable to reference when selecting the model you are interested in buying!

Click below for an excellent read.

Photo Credit: Tobie Schalkwyk