Best Noise Reduction Software for Photographers
Noise reduction software has been steadily improving over the years. Noise in a photograph looks like grains of sand, with a rough or “grainy” texture to the image. Often the culprit is a high ISO. Photographers use high ISO when shooting in low light or at night when a tripod and a long shutter speed are not feasible. Digital cameras continue to increase in their ability to make clear images at high ISOs. But there is a point where the noise is noticeable.
Whether you decide to remove high ISO noise is up to you. Some photographers like the look of noise. It gives the photos a vintage feel. But for those of you who want a cleaner look, I’ll show you what I think is the best noise reduction software.
Best Noise Reduction Software to Buy
Before we dive into the best software, let’s look at the images I used to test noise reduction. I used two images in my quest to find the best noise reduction software. They were shot at high ISOs and had noticeable digital noise. I took them with a Sony A7R3. I edited the baseline images in Lightroom Classic before applying noise reduction.
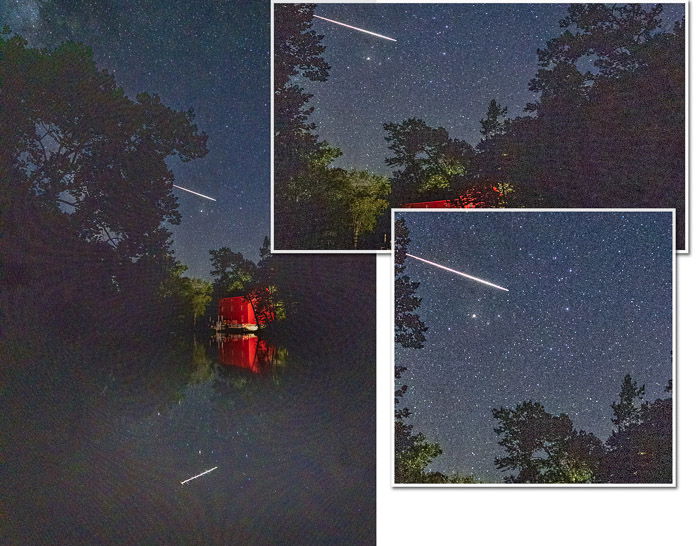
One image was a night shot taken at ISO 10,000. I chose this photo to see if the programs could distinguish between noise and stars.
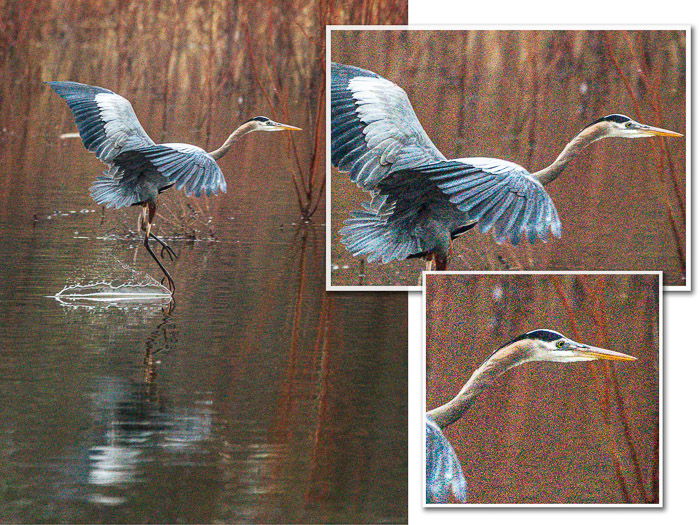
The other was a wildlife image taken at ISO 6,400 with a shallow depth of field. I wanted to see how the programs handle the blurred background and detail in the bird’s feathers. Noise removal programs can create a waxy look that would be noticeable in the feathers.
I started my search for the best noise reduction software by looking at complete post-processing programs that include noise reduction. I then looked at noise reduction plug-ins for Lightroom Classic or Photoshop.
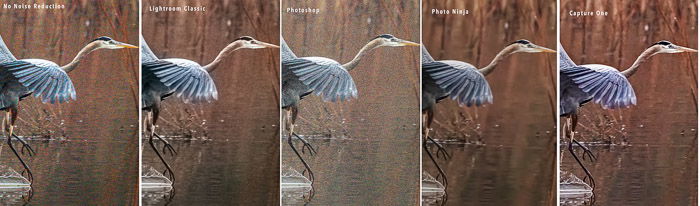
Here’s how I ranked the complete post-processing programs.
1. Capture One Pro
Capture One Pro is a complete photo editing program competitive with Lightroom Classic. Plans start at $14/month, and there is a free trial.
Capture One Pro was the only program to get good results with both images. Some plug-ins did better with the wildlife shot than either Capture One Pro or Lightroom Classic. But Capture One Pro beat them all on the night image.
I compared the photos edited in Capture One Pro with and without noise reduction. The program did a good job retaining the detail in the bird’s wings while also softening the background. Though the night photo edited in Capture One Pro initially had more noise, the program did a good job of removing noise in the sky.
However, while Capture One Pro will open RAW files, my Lightroom Classic edits were lost. I re-edited my RAW files in Capture One Pro to provide comparison images. Bear this in mind when comparing the results of Capture One Pro with other programs.
Capture One Pro includes noise reduction to control both luminance and colour noise. The detail slider brings out more detail. Unique to Capture One Pro is the Single Pixel slider that eliminates hot pixels in your photo. These are isolated white pixels that pop out of the dark areas.
2. Photo Ninja
Photo Ninja is a full-service post-processing program that costs $129. The program includes a noise-reducing program previously called Noise Ninja. As with Capture One Pro, I edited my RAW files in the program. I created a comparison photo and then used the noise reduction tool.
Photo Ninja was a close second! Capture One Pro just edged out this powerful program thanks to its enhanced detail. But I loved the creamy smoothness the Photo Ninja created.
Processing the images in Photo Ninja initially resulted in more noise. But the program handled the noise in the wildlife image very well. On the night image, the program did tend to eat stars and make the sky clumpy. I liked the noise reduction results overall. With more familiarity, I may get even better results.
As a photo editing tool, Photo Ninja is easy to use. The program includes three noise reduction “engines”. I used Noise Ninja 4 Turbo. The description given by the developers stated that this option gives a more natural look and worked best on high-ISO images. I selected the Smart preset option, which analyzes the image and applies a correction based on my camera model. The results were pretty good straight away. I added a bit more colour noise reduction and reduced the smoothing effect. The training information on how to use this tool is exceptionally clear.
The sliders were super sensitive. It did not take much to start seeing noise reduction. It was too easy to go overboard on the smoothing effects. I had to push the Color noise reduction sliders much higher than the luminance sliders.
3. Lightroom Classic
Lightroom Classic comes with the Creative Cloud plan, which starts at $9.99/month.
Lightroom Classic did an OK job with both images, and handled the night image challenge better than some of the other programs. If you are already an Adobe user, this program will likely handle most of your light noise reduction needs. But for a challenging image, there is better noise reduction software on the market.
Noise reduction is located in the Detail panel in the Develop Module alongside Sharpening. By default, the Noise Reduction sliders, Luminance and Color, are set to zero.
When I pushed all noise reduction sliders to the maximum, there was a noticeable difference in the image. But I also saw some colour haloing around the bird’s wings. Most of the Chroma noise in the background disappeared, but so too did some of the detail in the bird’s feathers. In the night photograph, fainter stars disappeared leaving blank areas in the sky. Even at 100, colour noise remained in the darkest part of the image.
4. Photoshop
Photoshop comes with the Creative Cloud plan, which starts at $9.99/month.
I do a fair amount of photo processing in Photoshop, but have always used Lightroom Classic to reduce noise instead.
Photoshop came in last in my ranking. The built-in noise removal tools were sub-standard compared to the other programs.
Photoshop has a set of noise reduction filter tools. To find these, go to the Filter drop-down menu. Select Filter > Noise > Reduce Noise. Photoshop automatically reduces noise. You have the option to adjust the strength of the effect, preserve details, reduce colour noise, and sharpen details.
For my wildlife image, I chose maximum strength and to reduce colour noise by 100%. The results were alarming. Photoshop added an odd texture to my entire image. I tried again and again with various settings. In my opinion, Photoshop made the image worse. I tried it with my night shot with similar results. Photoshop seemed to add rather than reduce noise. I tried the other options under the Noise Filter. Median with a radius of 2 pixels seemed to work the best. But it still wasn’t that good.
If you use Photoshop for photo editing, it is worth investing in a plug-in.
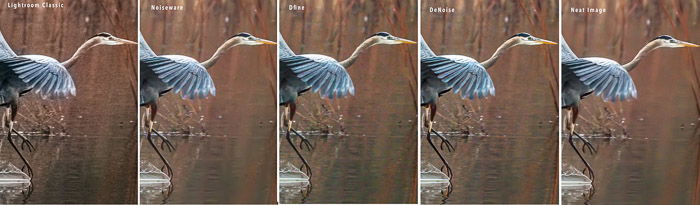
Here’s how I ranked the plug-in noise reduction software.
1. Neat Image
Neat Image is available as a Photoshop plug-in or a standalone program for $39.00.
I ranked Neat Image as the best noise reduction plug-in for 2021. Not only is it effective, but much quicker and less expensive than the other plug-ins. The programs retained detail in the subject while pleasantly smoothing the blurred background. Neat Image gave me a lot of control over the noise-to-blur balance.
Once installed, the Neat Image plug-in shows up under the Filter drop-down menu. Once open, Neat Image builds a noise profile of the image. The program was quick and easy once I read the instructions. The initial results were good. From there, you can adjust the noise reduction amount, noise level, and sharpening.
Of all the programs, Neat Image was easily the quickest in rendering changes. I had instant control over various sharpening options and amount of noise reduction.
2. Topaz DeNoise AI
DeNoise AI is noise reduction software from Topaz Labs. The program is $79.99. There is a free trial available. This works as a standalone program or as a plug-in for Lightroom Classic and Photoshop.
DeNoise AI did a good job of retaining detail in the blurred background and removing chroma noise. But results were more mixed with my night image.
When you open the tool, you will have three quick options: DeNoise AI, AI Clear, and Low Light. I chose AI Clear as the description, “removing noise from high-ISO images,” which seemed the best fit for my examples. The program lets you select if you want low, medium, or high noise removal (I chose “high”) and how much you want sharpness enhanced. You also have sliders that allow you to control how much detail the program recovers and how much colour noise reduction you want. DeNoise AI also includes a mask feature that lets you selectively reduce noise in parts of your image.
Even without enhancing detail, Topaz DeNoise AI is better than Lightroom Classic. It preserved detail and removed noise from the wildlife image. But it struggled with my night scene. I tried various settings, but I couldn’t get the program to make a dent in the noise.
3. Noiseware
Noiseware is a plug-in for Photoshop by Imagenomic. The software costs $79.99, and there is a free trial available.
In my opinion, Noiseware was similar to DeNoise AI. Both programs struggled with the night image. But Noiseware smoothed the feathers more, and so ranked lower.
Once installed, the Noiseware plug-in is the Filter drop-down menu. You can choose how much noise to remove, and also how much smoothing of details. Noiseware includes presets that adjust luminance, colour noise, detail protection, and detail enhancement. You can also adjust the presets, depending on the noise in your image.
In both images, the results were like DeNoise. I liked the smoothness in the background blur. Noiseware seemed to keep good colour in my wildlife image. Knowing my night scene was problematic, I pushed the noise sliders to the max, but there was still too much noise.
4. Dfine
Dfine is noise reduction software included in the Nik Collection. This set of 8 plug-ins will cost you $149. You can only purchase Dfine as part of the collection. A free trial is also available. I have used an older version of the Nik Collection for years. I was interested in whether noise reduction had improved in the current version.
Dfine handled the blurred background well, but not the detail in the subject. Like the Photoshop other plug-ins, Dfine struggled with the night image. But the results were only slightly better than using Lightroom Classic without a plug-in. It doesn’t seem worth the effort to edit my image with this plug-in.
When you open an image in Dfine, it automatically corrects for contrast (luminance) and colour noise. You have the option of removing more noise, balancing noise removal with retention of detail. You also have the option to adjust noise in colours selectively. One feature across the Nik Collection is the use of Control Points. These are like the selective edits. Place a Control Point over a targeted area, and you can control the contrast and colour noise reduction for that area.
Dfine cleaned up a lot of the noise in the wildlife picture, but there was still some chroma noise. I liked the result in the blurred background better than Lightroom Classic, but the bird lost a lot of detail and looked waxy. Dfine struggled with the night scene. It removed all but the brightest stars and blurred the points of light.
The two images I used in this review challenged the noise reduction software in different ways. There are pros and cons to each program which I have outlined.
So, there are my picks! But you don’t have to take my word for the best noise reduction software. Try the programs for yourself. Most have free trials. Use the programs on dark photos or those with high ISO. Try the programs on scanned film images. I would love to hear about your results!
--------------------------------------------------------------------------------------------
No comments:
Post a Comment
Note: Only a member of this blog may post a comment.