How Do You Know If an Image Is Underexposed or Overexposed
Underexposure or overexposure can happen when your camera is not set correctly. Most often on any auto mode, modern cameras will not produce images with extremely poor exposure.
In these series of photographs, I have purposely used settings to demonstrate:
- underexposure,
- correct exposure,
- and overexposure.
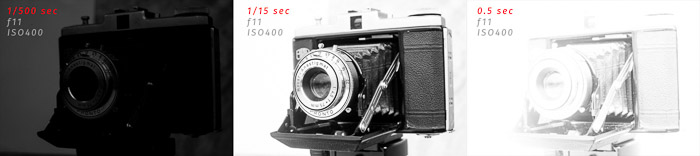
I photographed this camera outdoors on a cloudy day.
The tone range between the darkest and brightest parts of the photo is
not extreme. In the middle photo, only a few highlight areas appear a
little overexposed.
Wherever you stand on the issue of correct exposure,
you should know how to tell if a photo, or parts of a photo, are
underexposed or overexposed. Overexposure occurs when your camera’s
sensor doesn’t record any details in the brightest parts of an image.
Underexposure occurs when your camera’s sensor doesn’t record any
details in the darkest parts of an image. Your camera is able to display
information about detail loss. Or you can see it in software such as Lightroom and Photoshop.
The histogram is an easy way to view the exposure information or exposure level on your camera or computer monitor. Histograms show you a graphical representation of the tonal values in your photo.
If your histogram graphic is showing a spike at the left or right edge
this represents high contrast. You have underexposed and/or overexposed
pixels. There will be no detail visible in the extremely dark and/or
light parts of the image.
Your camera may also have a highlight alert option for when you are
reviewing your photos. This is also known as the ‘blinkies’. In this
view mode, you will see the areas of your photo with no highlight
details flashing.
Some cameras will allow you to manually set a limit for when the highlights will blink so you must check this is set correctly.
This information will help you discern if your exposure is acceptable to
you. I do not believe that having detail visible in all the highlights
and/or dark areas is necessary for every photo I make.
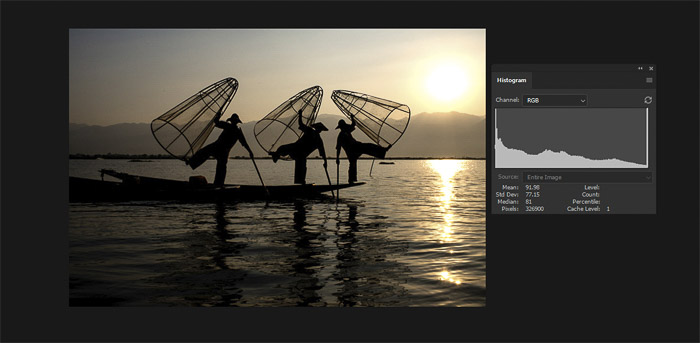
Here is a good example, I wanted the fishermen in this photo to appear as silhouettes. I also knew there would be no detail in the sun.
The contrast range in the composition is just too great for my camera’s sensor to record detail in both the darkest and brightest areas.
You can see the histogram spike on both the left and right showing there
is no detail in the shadows and the sun. I still consider this
photograph to be well exposed.
What Range of Tones Can Our Cameras Record
Our eyes can see a broader range of tone than most cameras currently
available can record. The human eye is capable of seeing about 30 stops
of light. This is the ‘static contrast range.’
At any one time, we can only see about ten stops of light. This is the
‘dynamic range’ of our eyes as it changes over time. Our brains
constantly make adjustments so what we see is ‘well exposed.’
Modern digital cameras (like Nikon, Canon, etc.) vary in how many stops of light they can capture. The best full frame cameras only capture 13 to 14 stops in test situations. Some claim this differs in ‘real world’ or ‘real life’ situations.
The most extreme range is limited to the lowest ISO setting. At higher ISO settings the dynamic range is reduced.
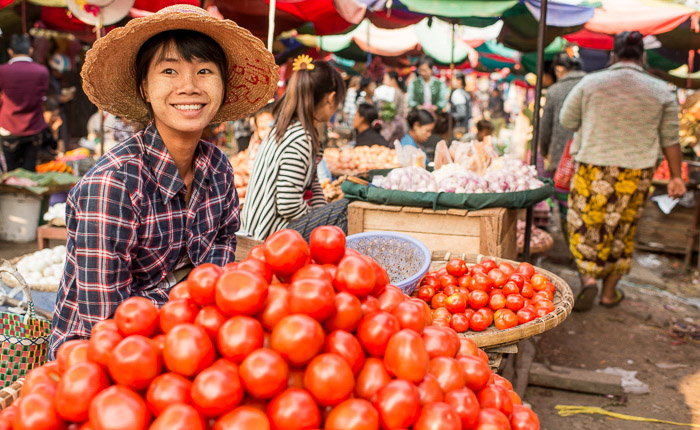
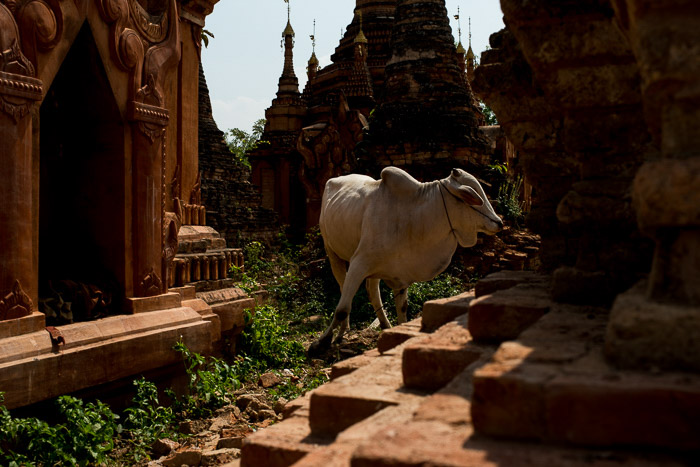
This photo of a market vendor in Mandalay, Myanmar, contains detail in
the majority of the image because the tone range is not so broad.
No matter what camera you are using, you need to make decisions
concerning proper exposure. Taking photos in high contrast situations,
when the light is harsh and bright, you need to make more careful
choices.
Your eyes may be able to see detail in the highlights and shadows, but
your camera may not be able to record as much as you can see.
How Do You Choose Your Exposure
To make a choice of how your photos are exposed, it is a requirement to be in control of your camera.
I prefer to set my exposure using manual mode, not
in program mode. This gives me more control and accuracy with the
camera settings and exposure adjustment than if I am using any of the
auto exposure modes.
When the camera is in any of the auto or semi-auto exposure modes it is
programmed to give a correct exposure based on middle grey.
Unless you override these settings you will not have so much control over how your photo is exposed. In high contrast situations, the camera on auto would probably expose the photos unsatisfactorily.
This photo of fishermen on Inle Lake in Myanmar may have resulted in an exposure like this with an auto exposure setting.
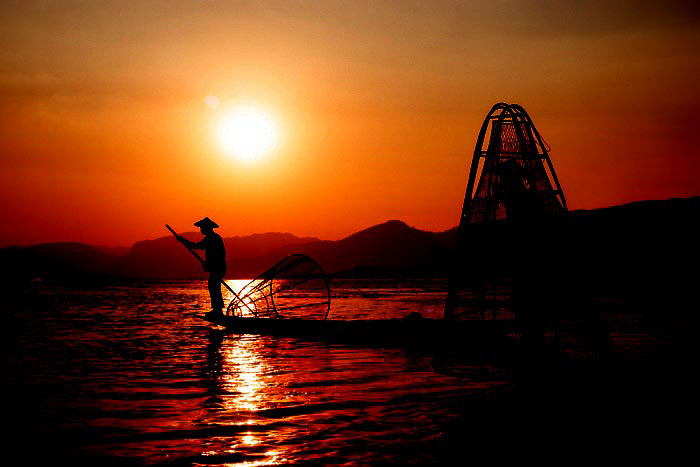
Including the sun and the sun’s reflection in my composition increases the tone range dramatically.
The digital sensor cannot record detail in the brightest and darkest
areas in the same exposure because the tone range is too broad.
I chose to expose this photo so there was some detail in the shadow areas and none in the sun and its reflection.

I used my spot meter to read the light from the fisherman’s trousers
who was closest to me. My exposure was at 1/2000 sec, f8 and ISO 400,
which was a little less than my exposure meter indicated as correct.
I chose to underexpose a little so the two men appeared somewhat as silhouettes.
In high contrast situations particularly, you must carefully choose how
you make your exposure reading. This will influence whether your photo
is well exposed in the most important parts of the composition or not.
In this photo, I wanted some detail in the men and water. I also wanted
some colour in the sky. That is why I took the exposure reading from his
trousers. These were a fairly neutral tone.
Had I taken a spot meter reading from his white shirt with the aim of
seeing it white in my photo, most of the photo would then be
overexposed.
Even though his shirt is white, because the sun is behind it, all I can
see of it is in shadow. The shirt will not show as being clean white
because it is reflecting less light than if the sun was behind me.
Find a mid-tone to make a reading from. This will help you choose the best exposure settings for your image.
What Is Middle Grey and Why Is It Important
Middle grey is the tone halfway between black and white. Exposure
meters are calibrated to this standard tone. When you compose a
photograph and there are extremely light and dark areas you will not
have an exposure which is overall correct.
You will have loss of detail in the highlights and/or dark areas. This
is because the light value in those areas is too far removed from middle
grey.
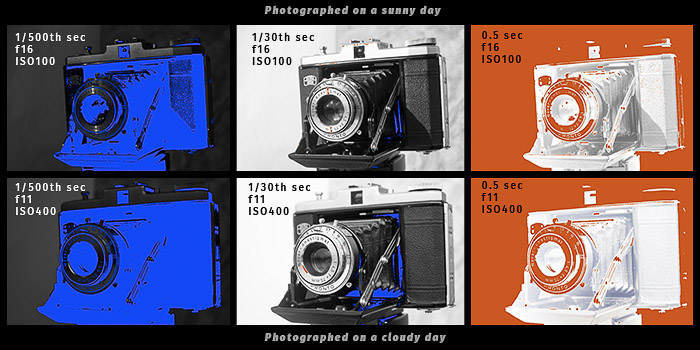
Here is an example with three exposures of the same subject with hard lighting, and three in soft lighting.
I have taken screen grabs from Lightroom with the highlight and shadow clipping turned on the Develop Module.
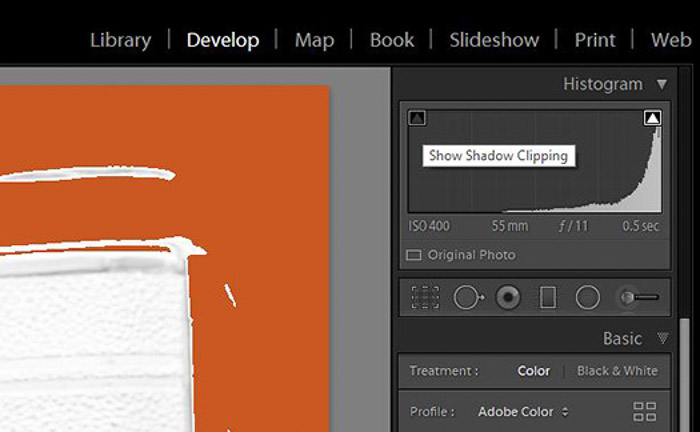
I took all the top row photos at f16 and ISO 100 and I varied the shutter speed.
The bottom row photos, made on a cloudy day, show the differences when
photographing in lower contrast conditions. I took those at f11 and ISO
400 with shutter speeds corresponding to the top row of photos.
The orange represents overexposed areas. The blue represents underexposed areas with no detail recorded.
The middle photos are the closest I could get to an exposure with minimal highlight or shadow detail lost.
You can see some detail loss in the darkest areas. There’s also a tiny amount of highlight detail lost on the lens.
How much detail you lose or keep varies from camera to camera, depending
on the quality of the sensor. Modern sensor technology allows you to
capture a much broader range of tone either side of middle grey.
This means less chances of overexposed and underexposed photos. A modern
sensor is able to record more detail in darker and lighter areas of a
composition.
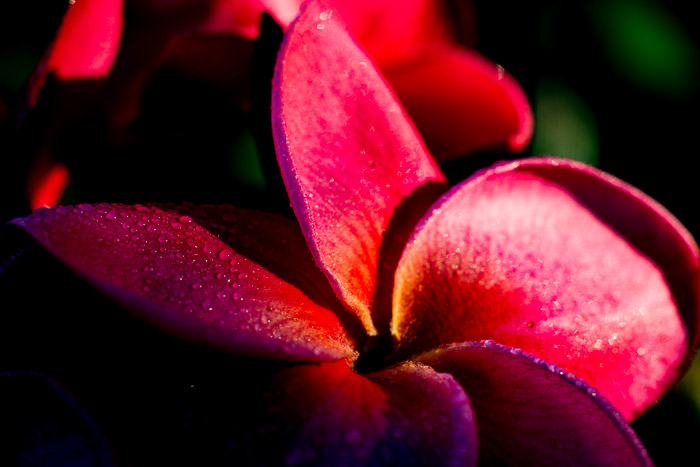
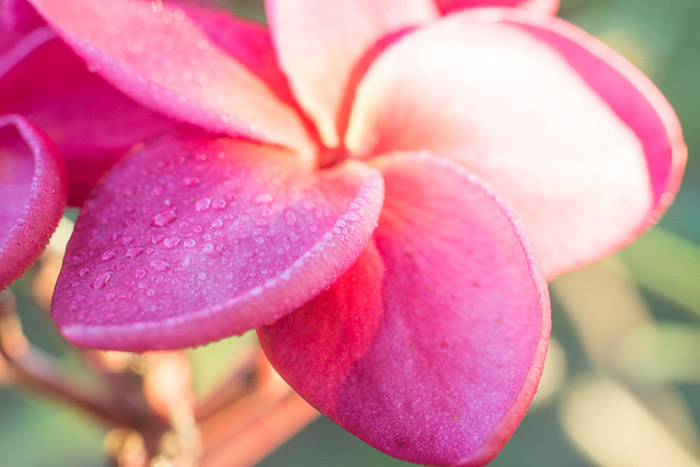
Use Underexposure and Overexposure For Mood
You can influence the feeling conveyed in your photos by purposely choosing how your set the exposure.
Underexposing part of a photo can create more drama and intensity in a photograph. Overexposing will produce a much softer, gentler look and feel.
Look at these two very different exposures of this frangipani flower.
My exposure settings of the lighter image were 1/60th of a second,
f2.8 and ISO 400. I exposed the darker image at 1/250th of a second,
f2.8 and ISO 400.
I also post-processed them differently to accentuate the different mood I wanted to convey.
Boost It in Post
Modern camera sensors are so much more capable of capturing a broad tonal range than film ever has been able to.
This means that if you want to render images as underexposed or
overexposed you may need to use post-processing techniques to assist
you in the amount of light that you want to have.
In Lightroom and similar photo processing software
you can accentuate the contrast levels. Drag the Black and the Shadow
sliders to the left to make dark areas of a photo darker. Sometimes the
Dehaze slider will help darken up an image.
Dragging the Exposure slider to the left will affect the whole of the
image. Adding contrast in this way will make photographs look as if
parts or the whole picture is underexposed.
Be careful if you are making extreme changes. Taking any of the sliders
to their extremes can cause an image to start breaking down or prevent
you from having a realistic image. Visible posterization can appear in
dark areas which are not completely black.
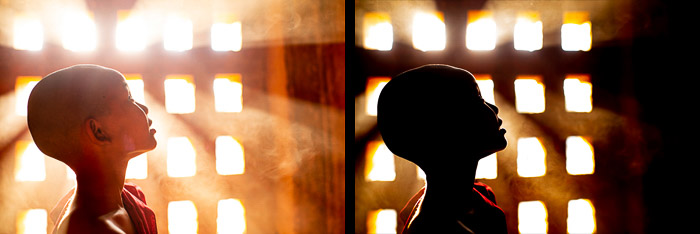
This photo of a novice monk in a temple in Baga, Myanmar, I measured the
exposure from his face. In the original on the left, there is detail
visible in his skin and much of the background.
When I post-processed the photo I added contrast by using the dragging the sliders in Lightroom as outlined.
Alternatively, dragging the Highlights and Whites sliders to the right will brighten the lighter areas in an image.
Similarly, you can use the Dehaze slider, dragging it to the left.
Dragging the Exposure slider to the right will lighten the entire photo.
Any reasonable quality digital camera is capable of producing an acceptably correct exposure.
Choosing the darkest area of a composition to make an exposure reading
from can mean the lightest areas of the photo are overexposed.
Choosing the lightest area of the image to make an exposure reading from can mean the darkest parts will be underexposed.
If you want to make perfectly exposed photographs all the time, you
need to consider the contrast range. That is one of the most important
photography tips for good exposure.
Compositions that are entirely low contrast give you an even exposure
more easily. With high contrast, you’ll have a harder time getting an
evenly exposed photograph.
Concerning yourself too much with making perfectly exposed photographs
can lead to rather dull images. If there’s little contrast, the mood
will also be missing.
-------------------------------------------------------------------------------------------------------------
PHOTOGRAPHY FREEBIE:
How to make money with your Photography even if you're not a Pro.
Copy & paste this link into your browser, click ENTER, and enjoy:
https://mrdarrylt.blogspot.com/2020/01/how-to-make-500-month-from-your.html
_____________________________________________________________________
Cash App Earn Money. (to buy more photo gear) Just copy & paste this link into your browser,
click "ENTER" and follow the easy steps: bit.ly/3g2Ghhi
No comments:
Post a Comment
Note: Only a member of this blog may post a comment.