Thursday, September 22, 2022

#Analogue Photography

10 Cool Vintage Film Cameras for Less Than $100 (Top Picks 2022)


Throughout the history of the camera, there are a few models that gain a special status. Either they house some special feature, an interesting setting range, or simply, have a great shutter sound.

We aren’t talking about the box brownie or the original Leica. Firstly, they wouldn’t cost less than $100. We are looking toward vintage cameras that have cult status, that you can still find today. 

Classic Film Cameras

When we think about classic film cameras we wish we owned, many of us will stare off into the distance. Our eyes glaze over as we imagine another world where our everyday shooter was a Leica M6 rangefinder camera.
Unfortunately, the reality is harsh. The camera body alone costs upwards of $1,000.
Although the Leica may remain a pipe dream for years to come, I’m here with some good news. You can own a huge range of classic film cameras for less than $100!
Sure, brands such as Leica are famous for their quality and prestige, but so are many of the cameras on this list. Some of the sharpest images I’ve ever captured have been on a film camera that cost me less than $100.
In no particular order, let’s have a look at some of these vintage cameras now.

1. Olympus Pen

I love my Olympus Pen. The thing that makes this vintage camera so unique is that it’s a half frame camera. That means that each photo only fills half a frame, so you can fit 72 photos onto a single roll of film!
It also means that when you hold the camera in landscape orientation, you’re actually taking a portrait photo.

Diptych of a girl drinking beers outdoor taken with a film/vintage camera

It’s a 35mm camera that was produced from 1959 to the beginning of the 1980s, and it’s named Pen because of its size. Olympus thought it would be as portable as a pen… which it almost is!
There’s tons of different models of Pen available, even an SLR camera version, and digital camera versions too. 
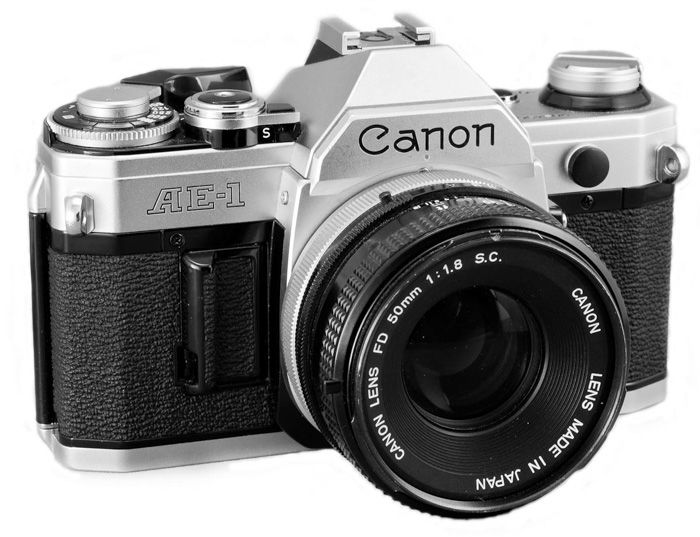
An Olympus Pen vintage camera

2. Canon AE-1

The Canon AE-1 was produced by Canon for nearly 10 years, which sounds a bit absurd when you consider our throwaway culture these days. But that’s just down to how good, and how popular this camera was.
This is Canon’s first affordable TTL (Through The Lens metering) camera, which added autoexposure modes as well as shutter-speed priority, which we’re all familiar with today.
Because of the low cost, huge advertising campaign, and added features, it became one of the most popular cameras of the time.

It sold over 1 million units! You would expect this from one of the best, vintage cameras. For a Canon film camera, this should be at the top of your list. 
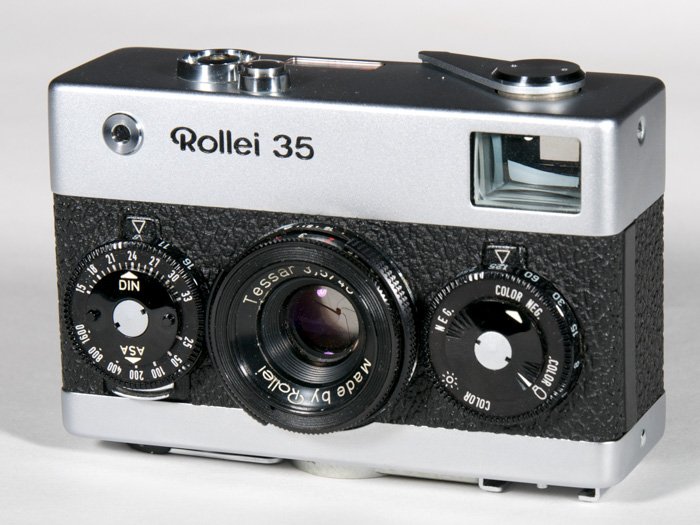
Canon AE-1 vintage camera

3. Rollei 35

When the Rollei 35 was released in 1966, it was the smallest existing 35mm camera on the market. Even today it remains the second smallest in compact cameras.
Like many film cameras, they were produced for a very long time so there’s a wide variety of models on the market. Something you’ll want to look out for is light leaks, as they can be quite common in older cameras.
Here’s a photo I took on mine recently:
Black and white shot of a girl cycling past a river, taken with the vintage camera Rollei B35
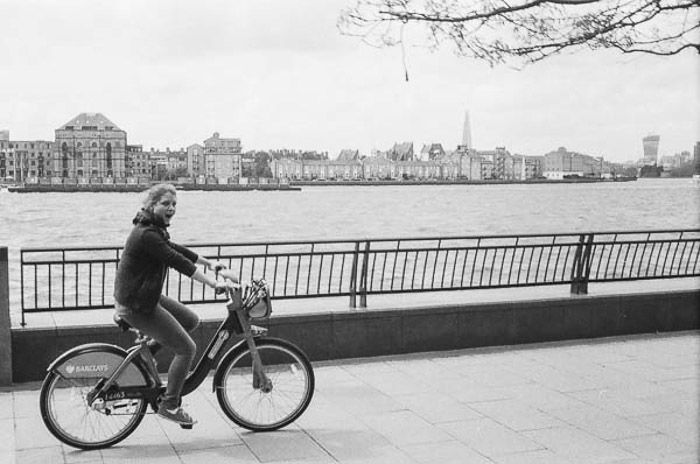
Something interesting about this is it’s such a compact camera, the fixed lens ‘folds’ into the vintage camera. And the hotshoe is on the bottom as there’s no space on top. Check out this video I made of the one I own:
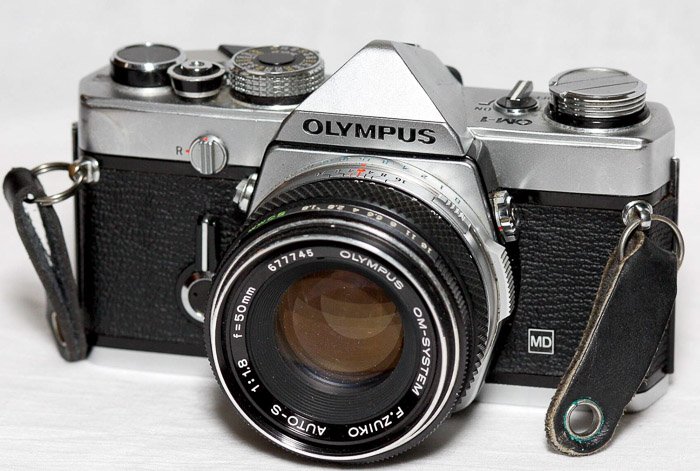
Rollei 35 vintage camera

4. Olympus OM-1

When it was released in 1972, the Olympus OM-1 was a change of pace in the SLR world—a smaller, lighter, and quieter 35mm camera among big and bulky peers. 

This mechanical camera was Olympus’s conscious step towards making pro-level cameras which were more compact and usable.

Some of the features included were mirror lock-up, a self-timer, a through-the-lens exposure meter, and depth of field preview (via a button on the lens). The slimmed-down design was a hit and the vintage camera is considered a classic today.

These were very popular cameras with students. That’s because they were a great camera to learn on, having just enough features to provide flexibility and control without too many confusing extras.

Plus they were sturdy cameras that lasted for ages. It continued to be manufactured for 15 years with some variations such as the OM-1MD and OM-1n being produced over the course of that time.
Film/vintage Camera - Olympus OM-1 MD on white background

5. Pentax K1000

If you were impressed by the sales of the Canon AE-1, then get a load of this! The K1000’s extraordinary longevity makes it a historically significant camera.

The K1000’s inexpensive simplicity was a great virtue and earned it unrivaled popularity as a basic but sturdy workhorse. And it eventually sold over three million units.

Super easy to get your hands on still, and very well made too. This vintage camera should be at the top of anyone’s list. 
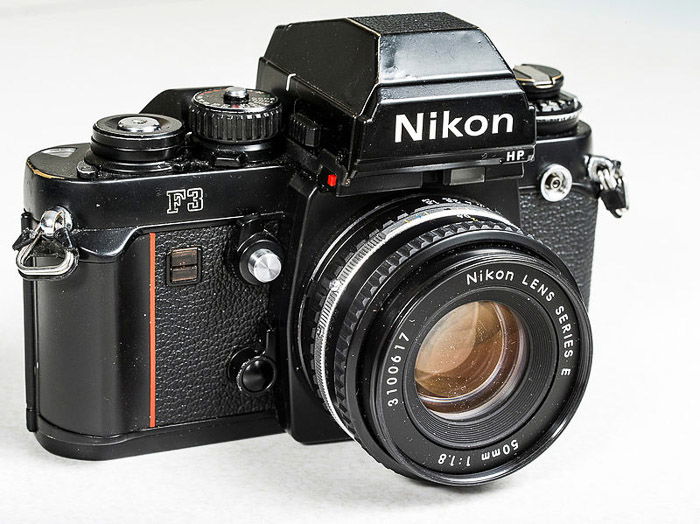
Pentax K1000 vintage camera

6. Nikon F3

Okay, so this one may be stretching the $100 budget ever so slightly, but there’s always bargains to be had on eBay. The Nikon F3 succeeded the Nikon F and the F2. These two models were already famous for extreme ruggedness and durability.

It was a very popular camera, and you’ll still find people shooting with them today. Just like Canon EOS film cameras, the lenses of newer Nikon’s will still fit on these old models’ camera body.

A perfect sought after vintage camera. As far as Nikon film cameras go, you can’t go wrong with the F3.
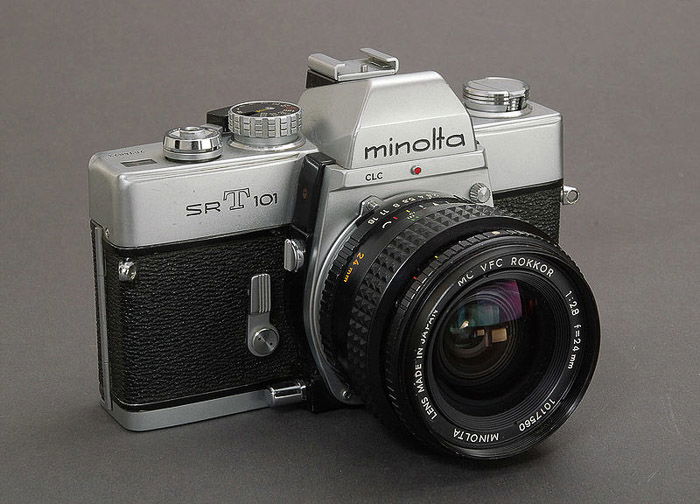
A 800px-Nikon F3 vintage camera with viewfinder

7. Minolta SRT-101

Fun fact for you, Minolta is an acronym for “Mechanism, Instruments, Optics, and Lenses by Tashima”. This Japanese brand is one of my favorite vintage camera brands that takes film. 
This is a camera close to my heart, and one that I’ve owned two of.

The first one was dropped and damaged the light meter, so I replaced it while waiting for it to be repaired. It was first brought into production in 1966, and was produced for 10 years, with only very minor changes.
The easy-to-use light meter in the viewfinder makes exposure very easy, and the pin-sharp lenses make for some spectacular images. I recommend the 35mm f/1.7.
I honestly can’t recommend this camera enough.
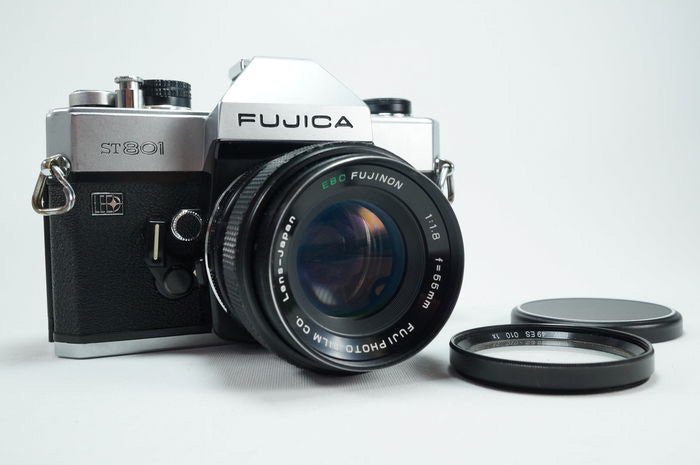
Minolta SRT-101 classic vintage camera on grey background

8. Fujica ST801

This camera was the first to have a viewfinder LED digital data display, instead of the traditional but delicate galvanometer needle pointer, which made for much easier and more accurate exposures.
It’s a 35mm SLR with TTL metering.

And as you set aperture or shutter speed, LEDs would glow in one or two of seven positions, indicating whether the exposure was correct or not. A vintage camera that surpasses most. Not bad for under $100.
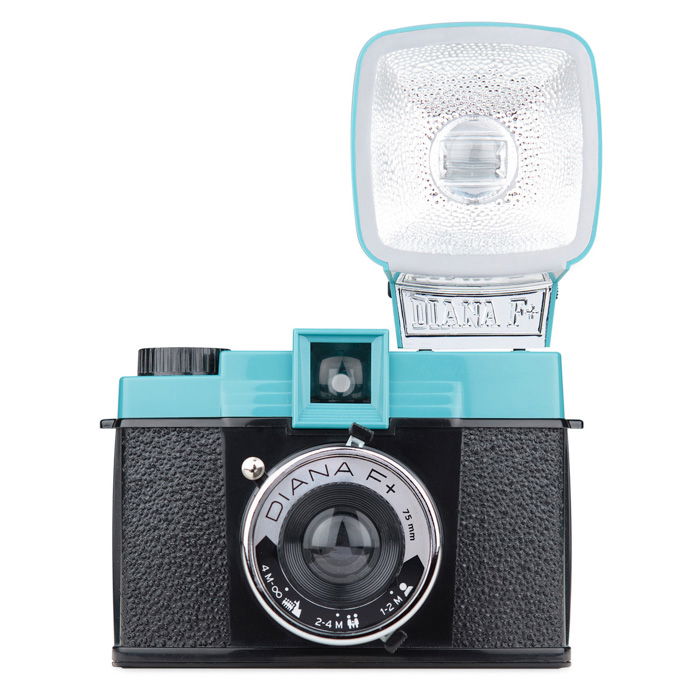
Fujica St-801 vintage camera

9. Diana

The Diana is a classic cheap toy camera of the 1960s. Made in China, they were very popular in the UK and US. They’re made entirely from plastic, which meant that most were given away as prizes, or sold for nominal sums.

It’s had a revival in recent years and Lomography has made a resurgence especially in street photography. And film photography has become more popular overall.

The Diana’s you’ll see on the market today are likely reproductions, but that’s not necessarily a bad thing. It houses 120 film, which is a little harder to develop. With the newer models you can get 35mm backs, or simply buy a Diana mini instead.

It just goes to show how much fun you can have with a bit of cheap plastic! It still makes a helluva great vintage camera. 
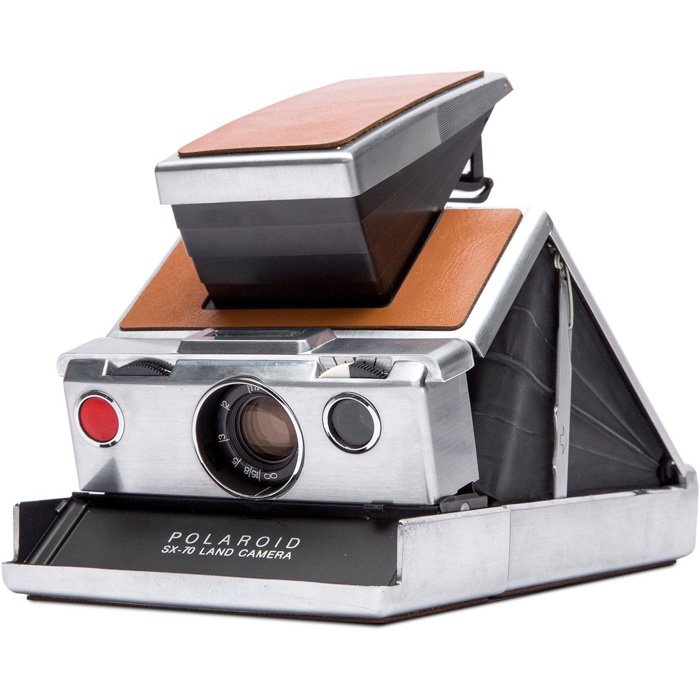
Diana vintage camera

10. Polaroid SX-70

Thanks to The Impossible Project (now Polaroid Originals) film for Polaroid cameras once again being manufactured. You hardly need me to explain what makes Polaroid so special. We all know them for producing hand-shake inducing instant pictures.

What makes the SX-70 so special though is the fact that it folds flat. This is no easy feat for an instant SLR film camera. And well, just look at that vintage camera design!

Polaroid SX-70 vintage camera 

Want to know more about photography?

Photography Books

--------------------------------------------------------------------------------------- 

Watch this video:  https://www.youtube.com/watch?v=Ax4Yn16Rw8s


Friday, September 16, 2022

 #Photography Basics, Learn Photography, Tutorial

Thanks for stopping by my blog.  With the Autumn Season starting (September 22, 2022) less than a week from today, I thought You'd enjoy a few freebies to enhance your photography skills.  If you've been following my blog you know I'm a big fan of "giving back" to the Photography Community.  Enjoy!

5 Tips for Success When Starting Out in Night Sky Photography – Free Quick Guide


Night sky photography has been all the rage lately.

Check out the example photograph above…

You may look at images like this and think, “I can’t do that.” (That’s what I thought!)

However, you CAN create photographs just like these, and you don’t need a ton of special gear.

What you do need is some carefully worded guidance, and that’s where WE (Photzy) come in.

Photzy has a new writer, and her name is Shari Hunt.

Shari is an expert on night sky photography. She hails from the great state of Texas in the United States. (Bet they have some big open skies there!!)

She even teaches workshops on night sky photography.

She has amazing images and techniques that she is going to share with us over the coming year.

Click below to check out her first Quick Guide…

Photo Credit: Shari Hunt 


What to Do When Faced with Low Light – Free Quick Guide


Every photographer that has ever lived since the inception of photography has battled this one consistent challenge.

What challenge, you ask?

Low lighting is photography’s nemesis.

It is the sole reason that camera manufacturers are singularly obsessed with improving their image sensors.

Until the perfect digital sensor is invented—if ever—we photographers must work with low light.

And that is the topic of this gorgeous and perfectly written photo guide by Jenn Mishra.

Jenn gives you her top five tips for dealing with low lighting—tips that anyone at any level can use.

Are you interested in mastering the art of low-light photography?

Click below to read about it!

Photo Credit: Jenn Mishra


How to Make the Most of Early Morning Light – Free Quick Guide


As a photographer, the morning is an especially magical time because of the varied light it offers.

While the same sequence of light occurs at the end of the day, it is often easier to stay engaged with the moment when you have an empty schedule early in the morning as compared to a typical evening.

In this guide, author Tomas Alvarez will offer some tips on how to maximize early morning light.

Most of these tips will focus on efficiently using the morning light, and one will be specifically for you as a creative person.

Here is what he will be covering:

  • What type of lighting to expect
  • The importance of creating a photography plan
  • Why you should get up earlier than you think you should
  • The importance of bringing neutral density filters
  • How to maximize your experience by stepping out from behind the camera

Are you ready? Let’s get to it!

Click below to read it now.

Photo Credit: Tomas Alvarez


What I’ve Learned About Storm Chasing Photography – Free Quick Guide


Have you ever sat and watched a storm in the distance, admiring the shapes and textures in the clouds as they rolled past? Or have you enjoyed watching a lightning show with thunder growling off in the distance?

Perhaps you’ve been in awe of some of the fantastic storm images you’ve seen and wanted to capture something similar?

This guide will walk you through the steps needed to chase and capture stunning images throughout a storm.

Here’s what will be covered:

  • Safety
  • Terminology
  • Useful apps, tools, and resources
  • How to determine favorable conditions
  • What gear to pack
  • What to shoot
  • Editing your images

If you have a desire to chase some storms, this is the guide for you!

Get your copy now.

Photo Credit: Lisa Cannon


Top Tips for Improving Your Outdoor Sports Photography – Free Quick Guide


Everyone loves a fantastic sports shot! You know, the one with a player catching the ball, and you can see every bead of sweat as they make the winning play.

We know that many photographers out there photograph their children in every sport ranging from little league to figure skating. And most of the time, these folks are disappointed with their results.

Okay. It’s time to get you off of the ‘Sports Mode.’

Lisa Cannon is an expert at sports Photography, and we have commissioned her to write us two guides on sports photography.

The first is on outdoor sports and the second will be on indoor sports.

Today, we are proud to announce “Top Tips for Improving Your Outdoor Sports Photography.”

Here are the chapters:

  • Gear choices
  • Camera settings
  • Dealing with lighting
  • Knowing your sport
  • Composition tips
  • Shooting with purpose

Get Your Copy Now.

Photo Credit: Lisa Cannon


Why the Foreground in Your Photos Is Super Important – Free Quick Guide


When you’re composing your photos, do you think about the foreground?

I’m talking about any object located close to the camera and not the subject, which could be far out in the background.

The foreground is often a critical element to successful photography.

It’s essential to understand what it is and how to utilize it.

If you’re not thinking about your foreground, your photos are lacking. It’s that simple.

In this guide, you will learn…

  • The numerous roles that the foreground plays in raising the aesthetic experience a viewer will derive from your images.
  • How you can achieve a great foreground in all of your pictures!

Let’s get started right now by learning this exciting topic.

Get it below.

Photo Credit: Tobie Schwalkwyk


Three Tips for Maximum Photo Sharpness – Free Quick Guide


“Tack sharp” is a term that we use in photography.

We want our images to be as sharp as they can possibly be.

But how do we take sharp photographs? There is not a ‘getting it sharp’ setting on our cameras.

In this free guide, Jenn Mishra walks you through her three best tips for maximum photo sharpness.

You may well be surprised by what she has to say!

Here is what she covers:

  • How the camera settings affect the sharpness of your picture.
  • Using the auto focus options on your camera to achieve maximum sharpness every time.
  • How to post-process your photos to create a sharper image in your final output.

This is a fabulous guide, and you don’t want to miss it.

Photo Credit: Jenn Mishra

 
Okay, you now have 7 no - cost guides to help you take better pictures.  I hope you'll download them all, read, use, and enjoy them. 
 
Here's another FREEBIE.  "How to make $500 per month from your photography Hobby".  Just copy & paste the link below into your web browser, click ENTER, and you'll be taken to the page on this blog that details how novice Photographer, "James Wheeler" did it, and is still doing it.  
 
https://mrdarrylt.blogspot.com/search?q=How+to+make+%24500
 
Enjoy your FREEBIES and have a great weekend! 


Thursday, September 15, 2022

11 Techniques for Capturing the Best Sunset Photography

Tags: Shutterbug Photography, Rookie Photographer
width=

There’s nothing quite like a sunset. The sun slowly disappearing below the horizon is one of the most awe-inspiring sights in the natural world.

But despite their beauty, sunset photography is not as easy as you might think. Their glory doesn’t always translate into stunning sunset photos.

In this article, we’ve gathered our 11 favorite tips to help you capture stunning sunset photographs.

man standing at a seashore with a sunset in the background 

11 Tips for Stunning Sunset Photography

Shooting sunsets is one of the most popular types of landscape photography. It’s hardly surprising. But sunset photography is a discipline all its own.

You need to know what gear to use. And how to use it in the right way. But follow our sunset photography tips, and you’ll become a master of sunset photography.

1. You’ll Need the Right Camera

We know we’re stating the obvious, but different photography genres often require different cameras. And sunset photography is no different.

For sunset photography, you need a camera that is well suited to landscape photography.

You want to capture every detail, so image resolution is important to look out for when selecting a camera. You can go DSLR or mirrorless, but we recommend a full-frame over a crop sensor camera.

Medium format cameras, with their larger sensors, are also excellent for landscape photography. But they are expensive and lack the versatility of smaller format cameras.

One thing to look for in a camera for sunset photos is a high dynamic range. A typical sunset shot will have brights and dark areas. You need to know that the camera will be able to capture the detail in both. A high dynamic range will bring depth to your sunset photos.

And good ISO range is also important. It might look like some cameras have a limited ISO range. But they often have expandable ranges, so make an effort to check that out before purchasing.

camera set up on a tripod looking out at a countryside landscape
Photo by Ben Griffiths

2. Select the Right Lens for Landscape Photography

When it comes to specific genres of photography, you want to have a lens suited to the work you’re doing.

For sunset photos, you’ll ideally want a wide-angle lens. They’re excellent for landscapes. And the wide focal length will allow you to capture a broad sunset scene.

Whenever you’re shooting an image that includes the horizon, you want to include as much of it as possible. It helps provide the sense of grandeur that’s a feature of good landscape photography.

You can still capture an excellent landscape image without a wide-angle lens. But you’ll need to set your lens to its widest focal length. Usually, you will want to include as much of the scene as possible.

A prime lens is all you need. Zoom or telephoto capabilities aren’t necessary for sunset photography.

Your lens options will be determined by the camera you have. But Nikon, Canon, and Fujifilm all have excellent selections.

bright orange and red clouds over a dark sunset scene
Photo by Byron Johson

3. Use Manual Mode to Capture Fleeting Sunsets

Modern cameras have excellent automatic functions. For sunset photography, we recommend you go manual. Like Luke Skywalker, turn off your guidance system and trust your feeling.

Conditions are constantly changing as the sun sinks lower in the sky. You’ll have to adapt and change as quickly as the conditions. There’s a higher risk involved. But the rewards will be greater.

The auto-settings will produce consistent results. But they can often be flat and lifeless. So, to get the best sunset photos, you need to master the settings. It could take time, but once you’ve nailed it, you won’t be sorry.

bare tree on a green landscape with a sunset in the background
Photo by Johannes Plenio

4. Adapt Your Camera Settings

The demands of a sunset scene are pretty unique in photography. You need to have your camera settings adjusted for the purpose at hand.

White Balance

Set your camera up with a daylight white balance preset. The sunlight won’t be as bright as at midday. But if you select a different preset, it won’t pick up the richer colour tones of the golden hour.

The auto white balance is another attractive feature. But again, we say go manual. The auto mode is fine for most situations. But sticking to the daylight preset will give you a more vibrant sunset image.

Aperture

Any landscape photographer will tell you to go with a narrow aperture. And they’d be right. Something around f.16 or f.22 is ideal.

A narrow aperture setting will give you a wider depth of field. The smaller your aperture, the more of your image will be in focus.

You are free to experiment with this. But a shallow depth of field might give you a flat and featureless sunset image.

ISO and Shutter Speed

Landscape photographers tend to opt for a lower ISO and a slow shutter speed. This approach will give your sunset photos stronger tones and sharper detail.

ISO 100 or 200 is a good place to start. You can venture lower if your camera is able. You’ll need to compensate with a slower shutter speed. Just remember the exposure triangle to get the camera set up correctly.

Photographer in a mountainous scene with a sunset in the background
Photo by Robert Richarz

5. Use a Tripod to Avoid Camera Shake

A tripod is a vital piece of equipment for sunset photography. Of course, you could get some good shots without one. But having one will make your life a whole lot easier.

A tripod gives you more flexibility with your camera settings. You’ll be using a narrow aperture, so a tripod will allow you to use a slow shutter speed without camera shake.

You’ll need a tripod with legs that can be adjusted independently. You’ll be working in natural environments, and the ground will often be uneven. The tripod needs to give you the level platform to work from.

camera on a tripod aimed at a sunset
Photo by Yash Prajapati

6. Use an ND Grad Filter to Capture the Perfect Exposure

During the golden hour, you often have brights areas contrasted with dark areas. With sunsets, the sky around the sun will be bright. And earth and clouds are dark.

Even a camera with a good dynamic range can struggle to find a balance between light and dark. An ND Grad Filter can really help address this issue.

A Neutral-Density Graduated filter is a tinted piece of glass you can put over bright areas of your shot. It allows you to find exposure setting that suit the whole scene.

If you don’t have a filter set, you can try exposure blending. You take two shots of your image. The first shot has your camera set to capture the bright areas. And the second shot has settings for the darker sections of the frame. You then blend the two images in post-processing.

If you try this technique, don’t move the camera between shots. The composition needs to be identical. And you’ll need to act quickly. The sun will be sinking fast, and you don’t want to miss the second shot.

black and white film photograph of a seafront sunset
Photo by Joris Linge

7. Look for an Ideal Location

Sunset is spectacular no matter where you are. But when you want to photograph sunsets, your location is essential.

Scout out the best locations in advance. Take evening walks to find the best spots. You can take a smaller camera with you so that you can experiment and generate ideas.

Find the locations where the sunset is at its most breathtaking. Think about composition and what you want your images to include. Perhaps there are landmarks that can make your sunset images unique.

If you’re travelling and you don’t have the time to scout locations, ask the locals. They’ll know all the best viewpoints in the area.

Some handy smartphone apps can help you plan for a sunset shoot. Photo Ephemeris and PhotoPills are two great apps that help predict lighting conditions for outdoor shoots.

It has to be a location that is easy to get access. On the day of the real shoot, you’ll be carrying all your gear. Mobility won’t be as easy.

Screenshot of PhotoPills app

8. Plan Ahead to Capture Stunning Sunsets

A powerful sunset can make you think time has stopped completely. But when you’re shooting sunsets, you’re working against the clocks. The sun sinks fast. And before you know it, the burning globe has sunk below the horizon.

You should already know your location so get there as early as you can. Give yourself time to get set up before the golden hour starts to get into gear.

If it’s a location you’re heading to for the first time, set off early. Give yourself plenty of time in case you get lost.

The tripod needs to be flat and stable. And you need to get the camera framed just as you light it. This preparation means you can start snapping as soon at the sun begins its earthward descent.

Even if you’re only a few minutes late, you might miss the best shots. You don’t want to be adjusting your tripod legs when the sky explodes with colour.

sunset behind trees
Photo by Vivek Doshi

9. Use Clouds to Add Dynamism to Your Sunsets

There’s an assumption that sunsets only work when you have a clear sky. But this is not true. If the sky is completely overcast, there won’t be much of a sunset. But having clouds in the sky can add something special.

Clouds are the perfect canvas for the setting sun’s last splash of colour. They can add extra shades and tones. And they’ll enhance the sense of depth in your sunset images.

The weather is not something you can control, so there is a large element of luck involved. But don’t be disheartened if there are clouds in the sky. Embrace them. Watch how they move so you can plan your shots.

There are many different types of cloud. They can add texture to a smooth sky. And they can add depth to otherwise flat imagery. And they can hold colour after the sun as stunk below the horizon.

The colours and textures often make clouds the most prominent element of your shot. They can steal the show. Use them to strengthen your sunset images.

Photo by Diego PH

10. Search for a Unique Perspective

For genuinely stunning sunset photography, you need your photos to stand out. There are millions of good sunsets photos out there. But many are very similar and much the same.

Embrace your surroundings. Natural features or landmarks in the landscape can help to identify your image. In addition, they can help tie your photo to that specific location, making it more meaningful.

Water is another asset to the sunset photographer. It has a reflective quality you can exploit to make your sunset photos pop with colour. And the surface also adds new textures. The ocean is an obvious choice, but pools and ponds are excellent too.

Don’t let the weather scare you. Don’t venture out if it’s dangerous. But if the conditions aren’t as you planned, head out anyway. It’s a chance for you to experiment. And you might end up with some stunning images you didn’t expect.

Photo by Chi Chen

11. Be Prepared for Outdoor Photography

If you live in a beach-side villa, you won’t need to consider much other gear. But if your sunset shoot involves an excursion, there are other things you will need.

If you’re not familiar with the area, take a map. Smartphones have GPS capabilities, but you might run out of battery. A paper map won’t let you down.

If you’re shooting in a remote location, plan your route home. Things look different in the dark, and it’s easy to get lost.

A torch is an essential piece of equipment for a sunset shoot. When your shoot is over, night will have fallen, and you’ll be in the dark. We favour a head torch as this leaves your hands free to pack up your gear.

Warm and waterproof clothes are important. You might work up a sweat hiking up to your location. But once the sun dips below the horizon, the temperature can drop fast. And the rain clouds could close in at any moment. You don’t want to be caught in a rainstorm unprepared.

Sunset over a mountain range
Photo by David Mullins

The natural beauty of a sunset can make some believe sunset photography is easy. But that’s not the case. Sunset photography is a form of landscape that has a unique set of skills and considerations.

You need the right gear. And you need to know how to use it to make your images special. And great sunset photos have features that make them stand out.

We hope these sunset photography tips have helped, and you now feel confident about shooting sunsets. Be confident and have fun. Go out and experiment with the information we’ve provided. 

-----------------------------------------------------------------------------------------

The Benefits of Photographing in Nature – Free Quick Guide


Sometimes we get so caught up in thinking about what we can do to make our photography better that we lose sight of how photography can make us better.

Think about that for a moment. You are improving yourself by using your camera. Pretty awesome thought!

In this guide, author Leanne Cleaveley walks us through her growth journey through nature photography.

Along the way, she will provide you with tips and suggestions on how to use her story as a springboard for your photography and learning experience.

She covers…

  • How photography can soothe the soul.
  • Why nature photography, in particular, is calming.
  • How to ground yourself through introspection and exercises.
  • Using photography to relieve the stresses of work.
  • The benefits of having a plan or perhaps not having one.
  • The joy of shooting in any weather or any season.
  • How to enjoy the moment—even if you don’t take any photos!

Ready to relax?

Get your special copy below.

Photo Credit: Leanne Cleaveley