# Biden
Advertisement:
# Biden
Advertisement:

Street Photography Ebook (free)
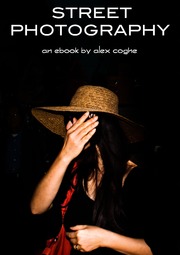
Street photographer Alex Coghe shares everything he has learned
through these years in this eBook. A really comprehensive guide on
street photography, it gives a first hand account of how to
approach street photography and get better, with some really insightful
tips coming from his experience. Just click on the title below to get your FREE copy.
The great thing about film cameras (especially the older ones) is
that they force you to learn what each part of the camera does before
taking a photo.
This is something that many amateur photographers overlook when they get
their first camera; they’ve seen what it can do and just want to start
taking photos. It often results in the camera being left in full auto
mode or a preset when, with just a few clicks of the dial, much better
photos could be taken.
When you choose a roll of film to put in your camera, you’re effectively
setting the ISO speed as you can’t change the film until you’ve
finished, leaving just the shutter speed and aperture to play with.
When you take photography back to basics like this, you quickly start to
learn how exposure works and how to use it to your advantage. If you’re
a kinaesthetic learner like me, you’ll find film cameras a much more
effective way of learning about photography.
We’re all guilty of getting a little bit snap happy with our
cameras, taking a load of useless photos of nothing in particular just
because we can.
This isn’t really an option with film (unless you’ve got more money than
sense) because you can’t just take a bunch of photos and transfer them
to your computer.
Film forces you to think before taking a photo – it can’t just be of anything.
This added pressure of wasting money on film and developing will make
you a much more careful photographer; you’ll start considering how else
you might take a photo before actually taking it.
Think twice, shoot once.
Mistakes can become pretty expensive if you’re not sure what you’re
doing with your film camera, which forces you to learn quickly what
you’re doing wrong.
There will be times when you go to take your camera out, adjust the
aperture and shutter speed, manually focus and end up missing the shot.
This is ok; it’s all part of the learning process. You’ll soon get
faster and better at using your camera; transferable skills to digital
photography.
Don’t worry about missing a shot; we all do that. The chances are, if you wait a little bit, you’ll get an even better photo.")
The cost of second hand, top quality film cameras has dropped
dramatically since the advent of cheap DSLRs, making it a great time to
get into film photography.
Just because a lens doesn’t autofocus or fit onto a modern day camera,
it doesn’t mean it’s no good. One of the best lenses I have is a cheap
50mm f/1.7 that fits onto my Minolta with a bayonet mount.
Old prime lenses without autofocus have very few elements to worry
about, meaning that that the overall quality tends to be better.
Another great advantage is that you can get a ‘full frame’ camera for
less, meaning that you get the most out of any full frame lenses you may
have.
I’m a Canon shooter and all their EF lenses from 1987 onwards fit on both their EOS digital and film cameras.
This means that I can spend money on a lens and still be able to use it on my film camera, in full frame.
I won’t go into too much detail about full frame cameras, I’ll just link to this post but what I will say is that modern digital full frame sensors are called ‘full frame’ because they’re the size of a 35mm piece of film.
If you don’t have a full frame camera, using film is a great way of seeing what you’re missing and from a different perspective.
The first thing I noticed when I got into film photography was the difference in quality – it was shocking.
A camera’s sensor is simply an expensive imitation of the roll of film that is no way near film technology, from decades before.
Not only that but a camera’s sensor is limited to a built in number of
pixels, whereas a roll of film is only restricted by the quality of the
scanner that captures it – usually much higher. Remember, you can still
get digital copies of your photos when you go and get them developed.
All of that aside, I just find photos shot on film to be sharper. 
The color of the photos produced are much better than on digital as a
roll of film isn’t limited by the same restrictions as a sensor.
Not only that but you don’t have to worry nearly as much about pesky white balance when shooting on film.
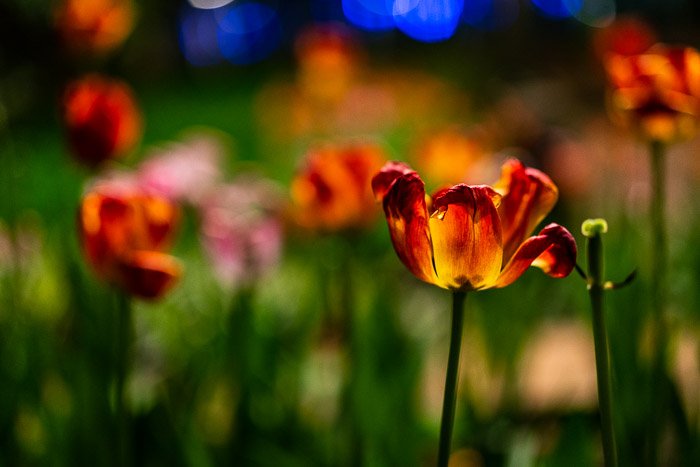
Have a look at the photo below. This is one of my favourite
photos because of how well it has captured the purple, red, blue and
brown without losing any detail.
This was shot on my Minolta SRT 101, a from the 1960’s.
Another thing I noticed when shooting on film was that I could shoot
in conditions that I wouldn’t normally be able to and still get good
result.
This came from the dynamic range of the film that I was shooting on; if
you have a look at the photo below, you’ll see trees that would
have appeared as silhouettes had I shot them on digital, with a lot
more detail. 
In general, I find film to be much more sensitive and better at handling grain than any digital camera I’ve used.
Have a look at the photo below and you’ll see that, even though there is
noise present, it’s a uniform color and appears much smoother than it
would shot on digital.
The speed I shot at was ASA 200, which provided excellent results for the conditions I was shooting in.
This photo is another great example of how the dynamic range is better
in film photography; there’s no way my camera’s sensor would have
handled that shot as well as the film did. 
You can shoot all day long on digital but it doesn’t mean much if you
end up just looking at them once before storing them to be lost on your
computer.
It’s great to have physical copies of photos that you can frame and hang
around the house to be seen – the way photos were always supposed to be
handled.
No matter how much I rant and rave about film photography, it’s still
a dated technology, so you will end up having to buy second hand.
Find a good second hand retailer nearby and you won’t have too many
problems; they know how to check the cameras before selling them and
will guarantee anything they do sell.
That being said, make sure you check the camera yourself; you can’t retake holiday photos that don’t come out.
I once bought a camera, took it on holiday with me and it wasn’t until I
got home and had the photos developed that I found that the shutter
wasn’t going up fast enough, ruining my exposures. I had it replaced
without hassle for a better camera, but the damage had already been
done.
If you buy a rangefinder as opposed to an SLR, you will always end up
leaving your lens cap on for a few photos here and there – I’ve done it
many times.
You become so used to being able to see your photos framed through a
viewfinder that you forget that the viewfinder is not connected to the
lens on a rangefinder camera.
Something a little bit rarer is “light leaks”. These are usually found on much older cameras for a variety of reasons.
In my photo below, I was using an old Olympus Pen (which used to shoot
two shots to every frame). The tripod mount fitting had fallen out of
the bottom of my camera which allowed loads of light in. This ruined the
centre of each exposure.

Interestingly, there’s a sub-genre of film photography that uses
analogue cameras and aims for a lo-fi aesthetic which actually favours
images with light leaks and other imperfections, which were common in
cheaper analogue cameras from decades ago.
The point behind embracing the imperfections is nostalgia, as light
leaks, lens artifacts, etc. were hallmarks of a bygone era of film
photography that many still remember from their childhoods. In fact,
this imperfect look influenced many of the filters so common today on
Instagram and other social media.
I still shoot film because it helps me be a complete photographer. When
you care about the image, you should be able to master it across media,
whether analogue or digital. There are certainly a lot of lessons to be
learnt when shooting on film, especially if you’ve started out learning
photography with digital cameras, but the results are always worth it.
I still shoot film. Years from now I know I’ll be saying the same, and I hope you will too.
-----------------------------------------------------------------------------------
Depth of field (DoF) is one tool that will make your images more powerful and interesting. It is an artistic focusing choice with a technical foundation.
In this article, I’ll help you understand depth of field and how you can use it in your own photography.
Depth of field in photography describes how much of your scene is in focus. Technically, depth of field is the distance between the closest objects in focus and the farthest point of focus. Imagine looking out into a landscape through your camera. Depth of field starts at the first thing you see that’s in focus and extends to the furthest object in focus.
We talk about depth of field in terms of “deep” and “shallow”. Deep DoF is also called “wide” or “large”. Shallow DoF is also called “small” or “narrow”.
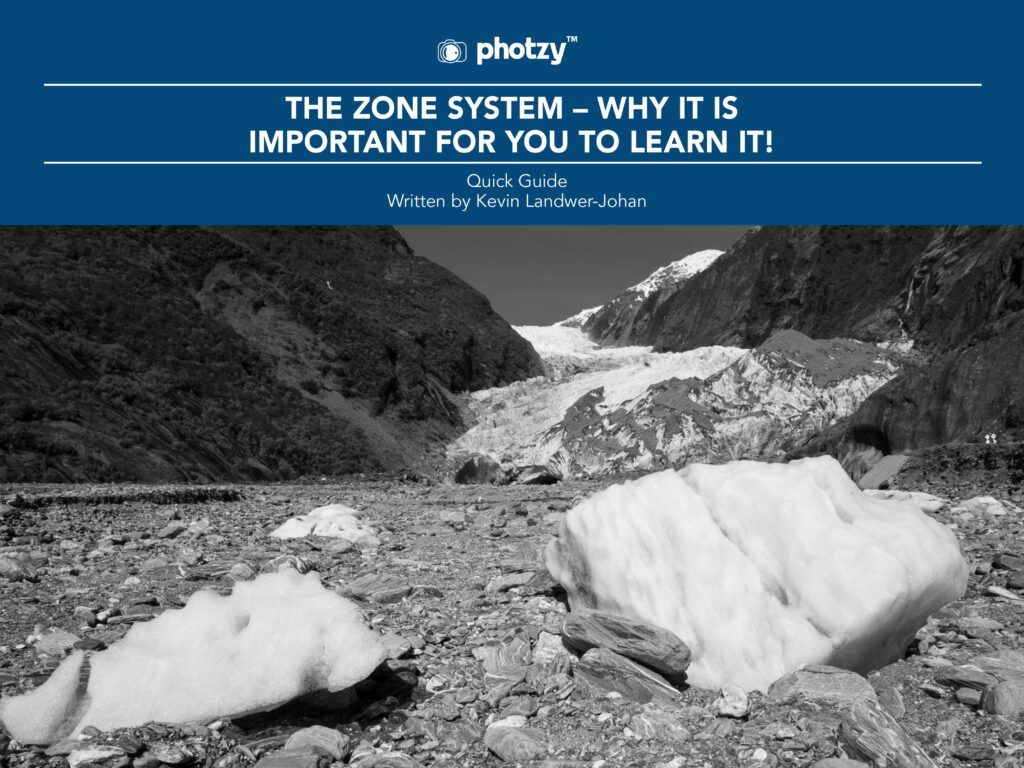
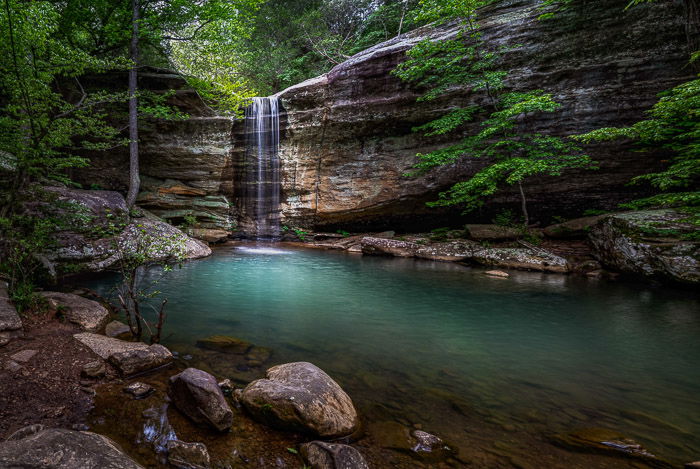
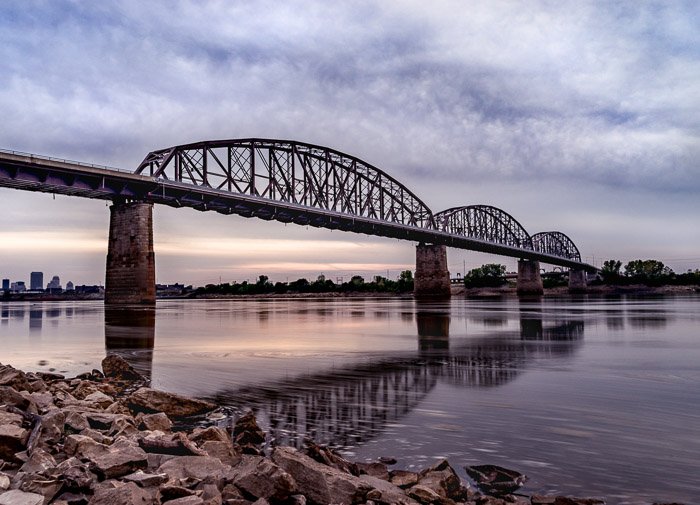
Landscape photographers often want the entire scene in focus, from the closest rock to the furthest mountain. This is a “deep” depth of field.
In this image, the waterfall in the background and the rocks in the foreground are both in focus.
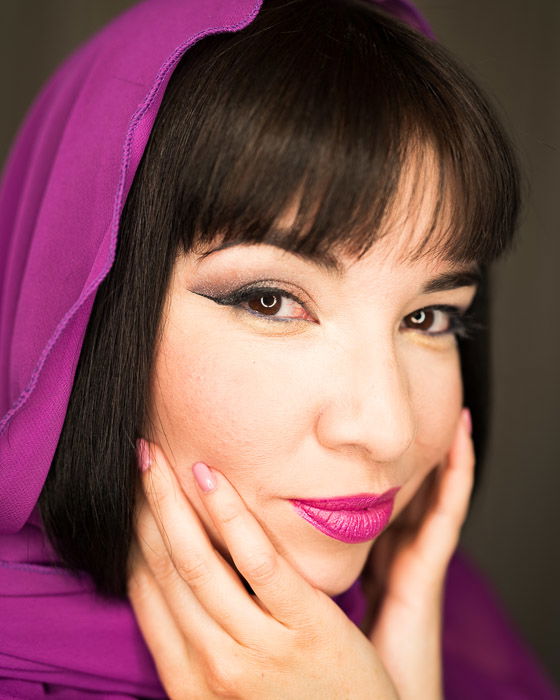
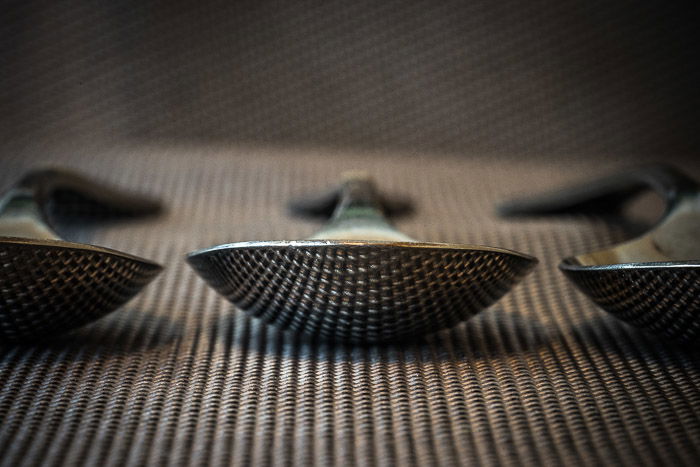
Portrait photographers don’t necessarily want the entire scene in focus. If you’re walking around a city taking street portraits, you want the person to be the main focus. A distracting background should be minimized. To do this, you use a shallow depth of field. Your foreground is in focus, but the background is not.
In this image, only the foreground holy man is in focus. The background gives a sense of the environment without distracting from the foreground.
Shallow DoF is a great way to separate your foreground from the background. The background might be uninteresting or distracts attention from your subject. Check out this article about more ways to use shallow depth of field.
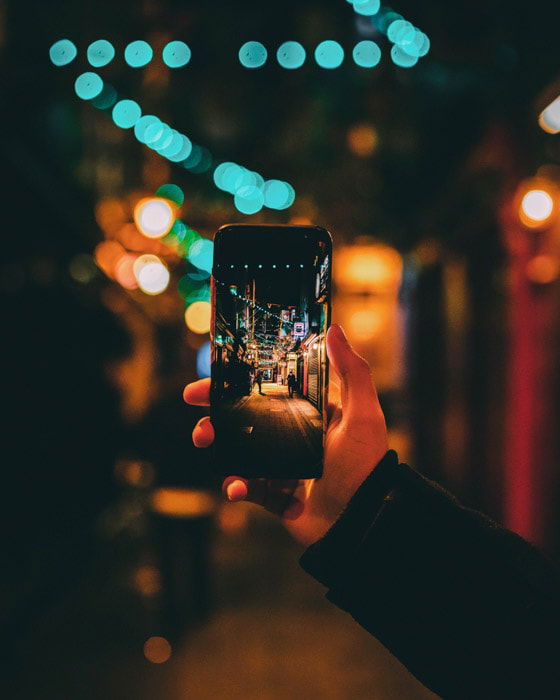
It is possible to cleverly combine shallow and deep DoF in one photograph. In this image, the photographer used a smartphone to capture a wide DoF. Then photographed the image using a shallow DoF.
I’ll show you in a minute how to achieve deep and shallow depth of field. But before I do, there’s one more thing you need to know about the focus area.
Focus draws the eye. So as a general rule, you should focus on the point of greatest interest. Depth of field tells you how much of the scene will be in focus in front of your focus point and how much of the background will be in focus.
When you select a focus point, focus isn’t equally distributed in front of and behind this point. Often one-third of your focus falls in front of your focus point and the other two-thirds behind it.
Let me give you an example.
I’m going to use an online depth of field calculator to compute how far in front of and behind a subject will be in focus. It might help to open the calculator yourself and follow along.
The DoF calculator says that the nearest point in focus is 2.14 meters away and the furthest point is 5 meters. This calculator also tells me that 0.86 meters in front of the subject will be in focus (29.97%). Two meters behind my subject (70.03%) will be in focus. This is roughly the one-third versus two-thirds I just mentioned.
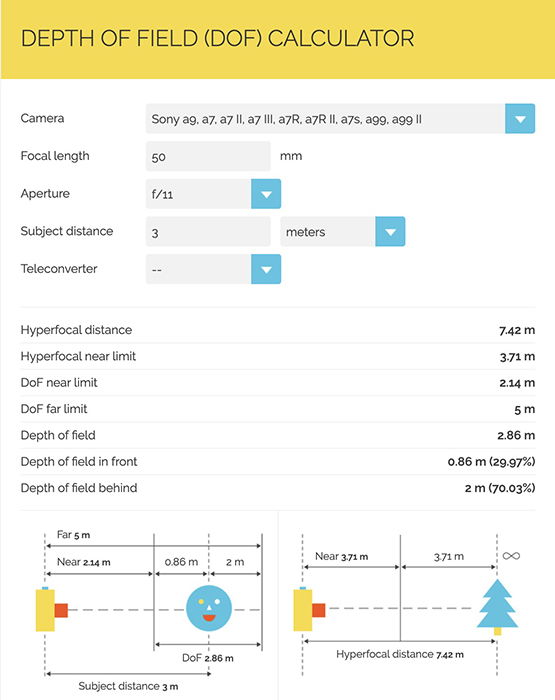
The DoF calculator also tells me the hyperfocal distance. This is important for landscape photographers.
Hyperfocal distance tells me where to focus in the scene so that I’ll have sharp focus all the way to infinity. Infinity is as far as the eye can see.
In landscapes, if you focus on the foreground, the background will appear blurry in the image. If you focus on the background, the foreground will look out of focus. To fix this, focus needs to be somewhere in the middle, between the foreground and background. This focusing point is the hyperfocal distance.
Now that I’ve introduced you to the DoF calculator, play with it a bit. Enter your camera body and different focal lengths. Notice that the numbers change. All sorts of factors control depth of field.
Now that you have a little theory under your belt, let’s get practical. Let me show you how to control depth of field in your images.
Deep and shallow depth of field fall on a continuum. You can go for an entirely sharp scene or you can have the very slimmest line of focus. It’s up to you. Most photographers find a sweet spot somewhere in the middle.
I’m going to talk about three elements that change how much of the scene is in focus: aperture, focal length, and relative distance. Once you know how to control depth of field, you’ll be able to decide how deep or shallow you want your focus to be.
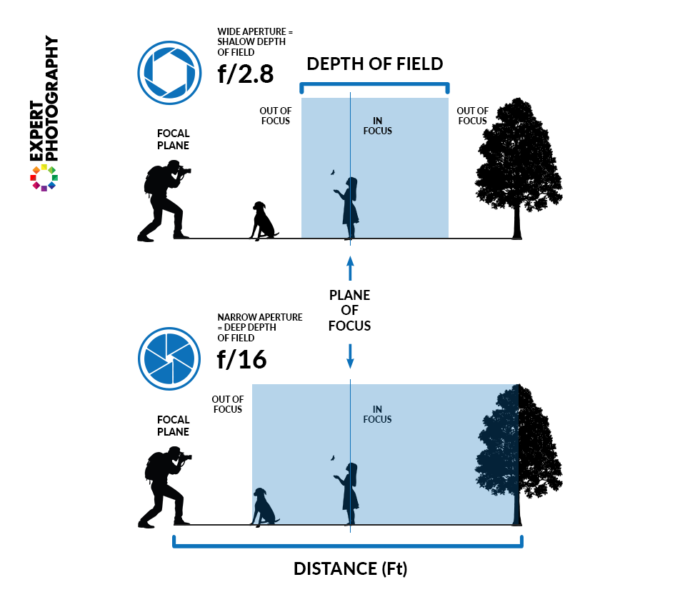
Changing your aperture (f/stop) is one of the major ways of changing depth of field. In general, the wider the aperture, the shallower the depth of field and vice versa. Remember that wide apertures have small numbers.
Take a look at this illustration. The top highlights DoF when using an aperture of f/2.8. The girl is in focus, but the dog in the foreground and the tree in the background will be blurred. The bottom shows how the focus area expands with an aperture of f/16. The dog, the girl, and the tree will be in focus.
Neither is right or wrong. It depends on what you want in focus.
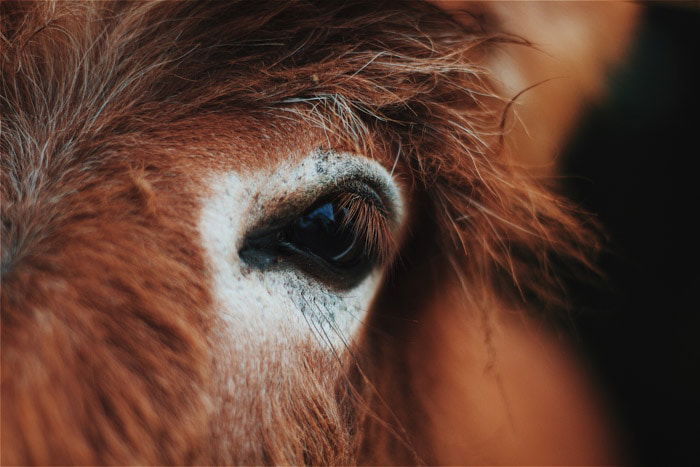
If you are taking a portrait, a very wide aperture like f/1.2 can put the eyes in focus, but make the nose and ears blurry. Using the same f/stop, you can focus on the nose, which will blur the eyes. To get both eyes and nose in focus, you may need to use f/5.6 or f/8.0.
Let’s return to the online depth of field calculator and put in a couple of different f/stops to see what happens.
Notice that the DoF in front and behind my subject changed a lot. With f/11, my DoF was 2.86 meters. With f/2.8, only 0.61 meters will be in focus. It’s a much narrower range.
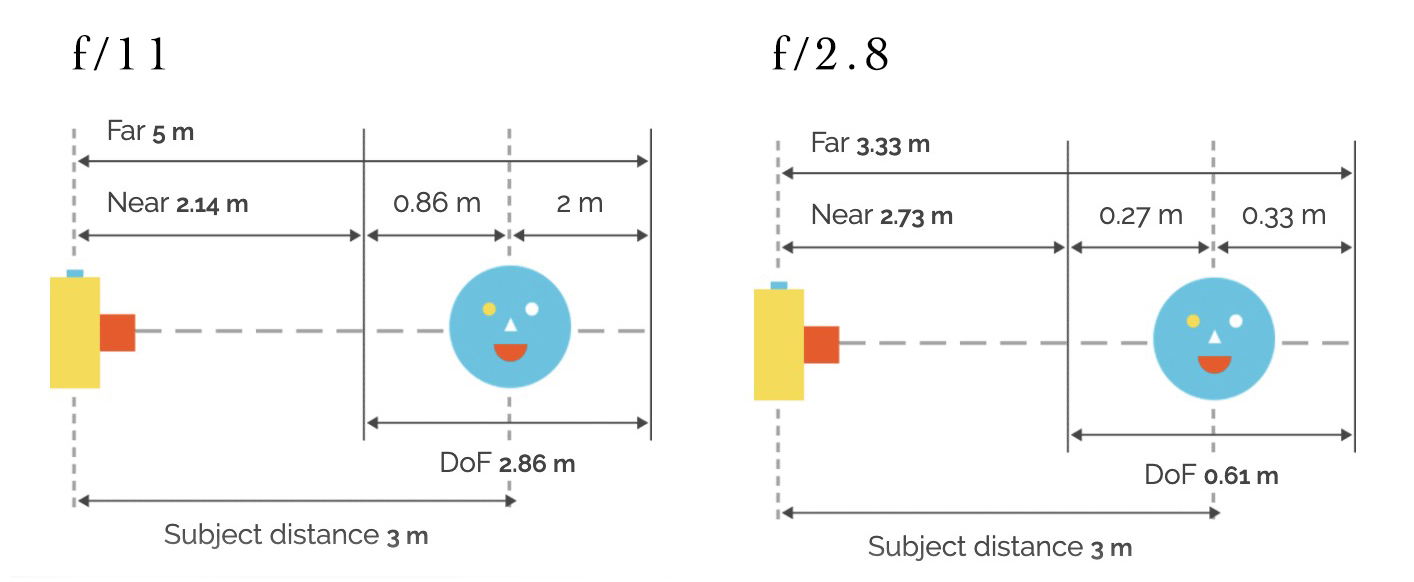
In general, an f/stop of 2.8 will have a blurrier background than an f/stop of 16.
If you want to create a shallow depth of field, select a wide aperture. If you want more of the scene in focus, select a smaller aperture. This is one reason portrait photographers prefer apertures of f/1.4 to f/5.6 while landscape photographers prefer apertures from f/11 to f/22.
But that’s not all there is to it. Other things factor into how wide or narrow your depth of field is.
The focal length of the lens also affects depth of field. Without getting too complicated, a longer focal length like 300mm gives you a shallower DoF than a 35mm wide-angle lens.
Let’s return to our online depth of field calculator and put in a couple of different focal lengths to see what happens.
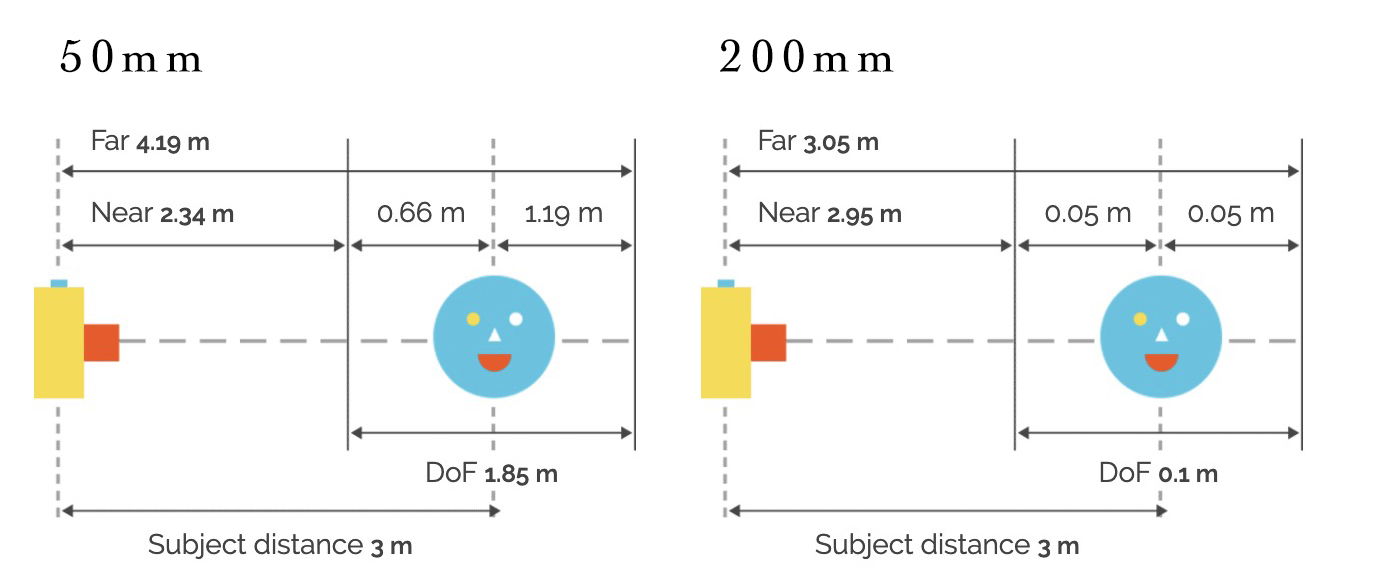
With a 50mm focal length, my focus area would start at 2.34 meters and extend to 4.19 meters. Everything between these distances (1.85 meters) will be in sharp focus.
But with a 200mm focal length, my focus area would start at 2.95 meters and extend to 3.05 meters. This is a much shallower depth of field. Only 0.10 meters will be in focus!
But there’s a bit more to it than that.
A 200mm lens focused at 3 meters isn’t showing you the same composition as a 50mm lens focused at 3 meters. A 50mm focal length gives you a field of view of 40°. A 200mm focal length gives you a field of view of about 10°. The composition is very different.
Compare these two images taken from the same vantage point. The only setting that changed was focal length. The image on the left was taken at 133mm. The image on the right was taken at 100mm. Notice the change in blur in the waterlilies in the background.
You can equalize the compositions by walking closer to your subject with the wide-angle lens. If you do this, the depth of field difference is less noticeable.
Depth of field has a lot to do with distance. But relative distance rather than absolute distance in terms of feet or meters.
Moving farther away from your subject will make your depth of field wider. Moving closer to your subject will make it narrower.
If you want shallow depth of field, your subject needs to away from the background. For instance, if your model is standing up against a wall, you won’t be able to blur the wall. The model and the wall will be on the same plane of focus. Ask your model to step towards you.
There is one instance where your depth of field can be manipulated. That is by using a tilt and shift lens. By playing around with the ’tilt’ of a lens, you can place an entire scene in focus when using a wide aperture.
Depth of field isn’t one setting on your camera. You can change three different variables to affect DoF: aperture, focal length, and relative distance.
Your sensor size also affects depth of field. Larger sensors have a shallower depth of field. So, a crop sensor camera will generally have a narrower depth of field. I didn’t cover this variable because most photographers don’t change their camera body as a way of controlling depth of field. I mention this in case you’re comparing images with a friend who has a different camera body.
If you’re not getting the depth of field you want, the next thing to change is relative distance. Get closer to your subject. If that doesn’t help, then move your subject away from the background. It will be impossible to create a blurred background if your subject and the background are right next to each other. Creating depth of field is all about depth relationships.
If you’re trying for a deep depth of field, you may need to figure out exactly where your focus point should be. Computing the hyperfocal distance will tell you this.
Finally, know that the focal length of your lens also impacts depth of field. If you have a zoom lens, try a wide-angle lens for greater depth of field and zooming in for less. Changing focal length also affects your composition, so you’ll have to balance the perfect depth of field with the perfect frame.
I’ll finish this article by introducing you to a couple of related depth of field topics. Focus stacking is a way of creating a very deep depth of field. It is also possible to simulate shallow depth of field. This is particularly useful when using a smartphone.
There are situations where it is impossible to get a deep enough depth of field in one image. Landscape photographers sometimes struggle to get a very close foreground element in focus while at the same time keeping distant elements in focus.
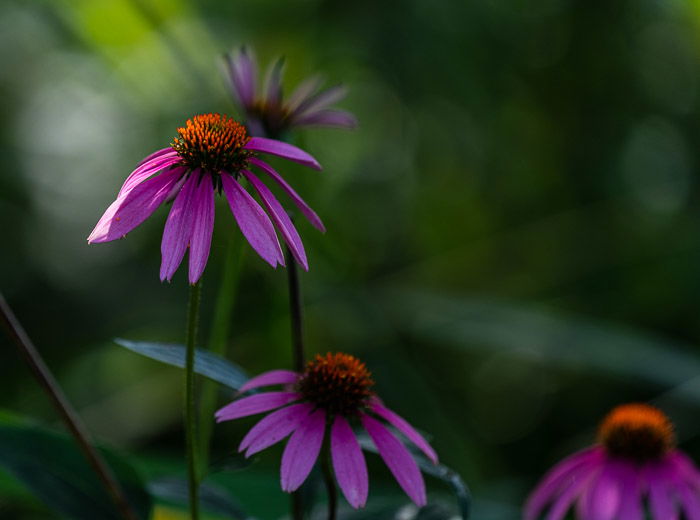
Macro photographers capture very small subjects like flowers and insects with a long macro lens. A macro lens allows photographers to get very close to their subjects. Because they are close to their subjects with a long focal length lens, the depth of field is often very shallow.
To combat both situations, photographers focus stack images. They take many images of a scene. With each image, they slightly change the focal point. A landscape photographer may take three or more images. The first focused on the foreground element, the second focused on the mid-ground, the third focused on the background. Later, the images are stitched together in Photoshop. The in-focus parts of each image are merged to create one image.
If you want to know how to focus stack image, see the article “How to Use Focus Stacking for Sharper Photos“.
It is possible to simulate the blurred depth of field effect of a shallow depth of field. You can add a blur effect in Photoshop or you can use apps or software that digitally simulate the effect.
Smartphones are limited in the ability to create blurred backgrounds. But you can still achieve the effect by getting close to your subject or using a depth of field simulator app.
Newer versions of the iPhone have made it easier to control the effect. I still can’t change the aperture on my iPhone 11S, but I can simulate and control shallow DoF.
Let me give you an example.
I used portrait mode on my iPhone 11S to take a photo of my cat. Because I selected portrait mode, the camera automatically applies a background blur to the image. I can use this mode even if I’m not shooting portraits to get a blurred background.
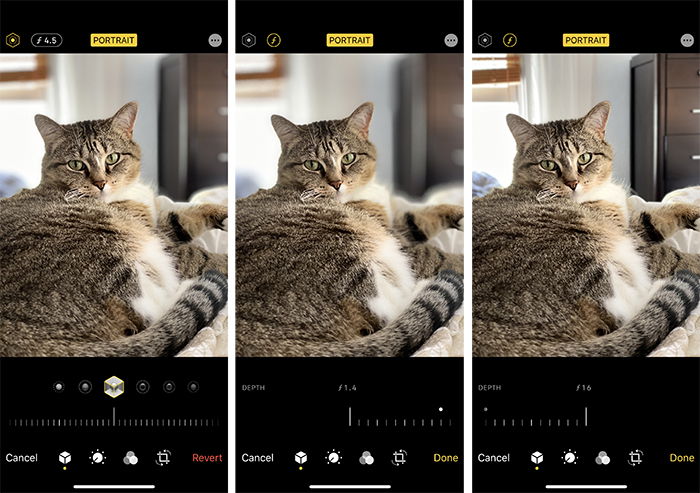
When I click the EDIT button, I have some options. The left image is the original. You can see that the camera chose an aperture of f/4.5. If I click the aperture, I’m given a slider tool that I use to change the aperture. The middle image shows what happens if I select f/1.4. The right image shows what happens if I select f/16.
If your phone’s camera doesn’t have this feature, apps like Focos on iPhone or Android simulate depth of field by virtually changing the aperture.
To increase your depth of field, you have three options:
You can narrow your aperture by increasing the f/stop, move further away from your subject, or by shortening the focal length of your lens.
To decrease your depth of field, you have three options:
You can widen your aperture by decreasing the f/stop, move closer to your subject, or by lengthening the focal length of your lens.
----------------------------------------------------------------------------


Most of the content is the same, but I’ve learned a lot in the last three years, so I’ve updated just about every page in the book, and replaced a few tips with newer articles.
Anyway, here’s a sneak peak of what you’ll learn in this ebook:
So, what are you waiting for?

----------------------------------------------------------------------------
Great Photography Tips Here: https://www.youtube.com/watch?v=mZq_-NL6Z8g
A blurred background draws the focus to what’s important. It also often plays a part in differentiating the professional portrait from the casual snapshot.
But how, exactly, do you create a blurry background? Through a mixture of gear, settings, and subject placement.
Here’s how.
The gear that you use will make that blurred background easier or
more difficult to achieve. While getting that background blur isn’t all
about the gear, it’s a big part of the equation.
Here’s the gear that’s best for background blur, and why.
This can be a mirrorless or DSLR camera.
The larger the camera sensor is, the easier it is to get that background
blur. That’s why you see smartphone companies creating fake background
blur through software in portrait modes. The sensors are so small that
it’s difficult to create that background blur in camera.
A full frame camera will get you the most background blur (unless of course you have the budget for medium format). But even a budget DSLR or mirrorless camera or a compact camera with an APS-C sensor inside will still offer a good amount of that background blur.
The aperture of the lens is one setting that helps create that
background blur. But different lenses have different aperture settings
available. Ideally, for a blurred background, you should use a lens that has at least an f/2.8 aperture available.
Lower f-numbers will offer even more blur. A 50mm f/1.8 is even better, with several manufacturers offering options for less than $300.
An f/1.4 is even blurrier, but these lenses sit at a much higher price point.
Contrary to popular belief, a lens with a longer focal length
doesn’t actually create more blur. However, the longer the focal
length, the more compressed (or closer) that background appears.
That brings that blur closer and tends to exaggerate the blur more than short lenses.
Background blur is exaggerated with a longer lens. But it’s still possible to get nice background blur with a wide angle lens.
Note that portrait photographers also tend to prefer longer focal lengths. These also tend to be more flattering.
Gear is part of the equation, but the camera settings are just as
essential. The camera setting that determines that background blur is
called aperture. This refers to how wide (or narrow) the hole in the lens is.
Aperture is designated by f-numbers; higher numbers mean a smaller lens
opening. An f/1.8 is a wide aperture, and f/11 is a narrow aperture.
A wide aperture will create what’s called a shallow depth of field. In an image with a shallow depth of field, very little of the image is in focus.
There may be an inch of distance in the image that’s sharp, and the rest
of the objects outside that range is blurred. That shallow depth of
field is key to getting that background blur.
The narrower your aperture is, the more of the image is sharp. That tiny
bit of distance that’s in focus at f/1.8 expands as you increase the
aperture.
A wide aperture creates that soft, blurred background. A narrow aperture leaves more of the image in focus.
Just because a wide aperture creates that blurred background doesn’t
mean you always want to shoot portraits at the widest aperture that your
lens allows. If you shoot a group photo at f/1.8, most of the group
won’t be in focus.
That additional depth of field is needed when taking portraits of more than one person, unless everyone is standing the exact same distance from the camera.

Even when photographing a single person, don’t leave the aperture at the
widest possible setting. A narrower aperture might be necessary to get
both eyes in focus if the subject is standing at a slant.
The portrait background is an important part of the image in
environmental portraits, for example. So use a narrower aperture to keep
more of those background details intact.
So how do you adjust the aperture for that background blur? Use aperture priority mode on your camera, or, manual mode for more advanced users.
Every camera is a bit different. But typically in that aperture priority mode,
one of the control wheels on the right side of the camera adjusts
aperture. On some cameras/lenses, the aperture control is around the
lens barrel.
You should see those f-numbers change as you move the control. This will
be either on the screen or displayed on the viewfinder. If you’re
unsure, consult your camera’s user manual.
As you adjust your aperture, make sure the shutter speed doesn’t fall
too low. You’ll end up with an entirely different kind of blur (and not a
pleasant one either).
As a guideline, you should be using a shutter speed with that bottom number at or higher than the lens you are using. A 50mm lens should use at least 1/50th handheld, for example.
If the shutter speed drops too low while in aperture priority mode, increase the camera’s ISO.
Aperture priority mode will get you started shooting those blurry
backgrounds. But manual mode will help you balance it all and control
the entire exposure. Learn more about manual mode here.

Aperture and gear plays a big role in how blurred that background looks.
But there’s one more piece to the puzzle on soft backgrounds — and it’s
the simplest of the bunch.
A lens focuses based on distance — something the same distance from the camera as the subject will be just as sharp.
The farther away the background is from the subject, the blurrier that
background will be. If you take a portrait of someone leaning against a
brick wall, even at f/1.8, that wall will only be slightly blurred.
Try taking a portrait of someone standing several feet in front of that
same wall. The wall will create a much softer background.

Try moving the subject farther away from the background. Or add more
empty space between the subject and the background. This will help
create more of that blur.

Bokeh is a photography term
that stems from a Japanese word meaning blur. Bokeh refers to the
quality of the blur in an image. But it’s often also associated with the
circular, out-of-focus points of light in an image.
Those blurry lights often create an excellent background. This leaves many new photographers asking how to create bokeh.
The answer is simple — create that background blur using gear, aperture
and distance. But use a background with many points of light.
Christmas lights or twinkle lights in the background, for example, create excellent bokeh.
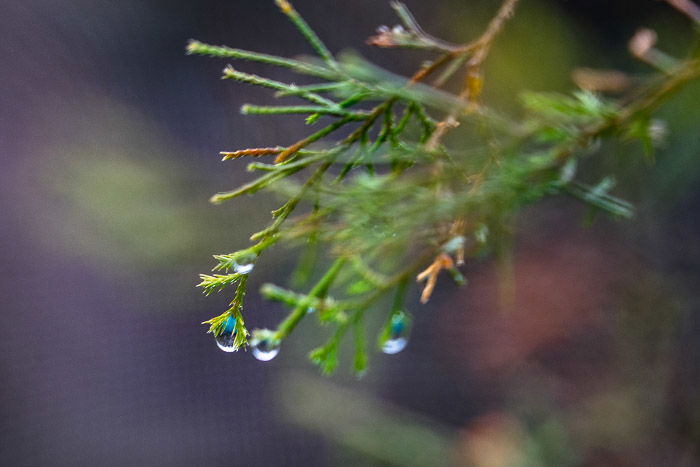
Twinkle lights aren’t the only way to create bokeh. Highlights or bright
points in the background can also be rendered as circular bokeh. For
example, the sun hitting the leaves on a tree in the background.
The lights of a city skyline, the glow of a crackling fireplace, a crumpled piece of tinfoil — there are many different ways to create bokeh. You just have to find it and mix with aperture, subject placement and gear.
Learn to look for lights and highlights. Then you’ll be able to find easy backgrounds that create excellent bokeh.

A blurred background is created through a mix of gear, aperture, and
subject placement. Photographers can combine all three to create the
most background blur. Or you can mix and match to what’s available.
If you don’t have a wide aperture lens, you can create more distance
between the subject and the background. If you want the subject posed
against a brick wall, you can use a wide aperture lens. It will make
that background as soft as possible.
Remember, blurry backgrounds are a mix of:
Adding in lights or simply highlights from the available natural light, adds circular, blurry lights to create excellent bokeh.
Used together, a blurred background can hide away all the distractions and draw the eye to the subject.
-----------------------------------------------------------------------------------------
Free Photography Ebook