When you’re ready to take the
dive into film photography, or perfect the skills you’ve been working
on, a solid 35mm SLR with interchangeable lenses is absolutely
imperative. An SLR, or Single Lens Reflex, means that a mirror and prism
system lets you see exactly what you are shooting. Interchangeable
lenses mean just that - you can take the lenses on and off. Most SLRs
are sold as “kits,” meaning you get at least one lens with the body;
however sometimes you may come across an amazing body on its own which
means you’ll have to find a lens yourself.
So what exactly makes a
good SLR for beginners? First, it should be fully manual! You’ll never
learn shooting automatic, so let that one go. Second, it should be easy
to repair and easy to find extra lenses and accessories. Go with a
well-known brand versus something obscure (no matter how gorgeous it
is!) to make sure you won’t be struggling.
Quite a few major
brands manufactured 35mm SLRs, but we’ve put together a list of solid,
reliable models that are a perfect fit for any beginner looking to
invest in a camera that will last a lifetime. You cannot go wrong with
one of these classics:
1. Canon AE-1
The
Canon AE-1 is one of the most well-known 35mm SLRs of all time and has a
hugely loyal fan base - people literally swear by this camera. It was
manufactured in Japan from 1976 to 1984, and in those 8 years enough
were produced that you will not have a hard time getting your hands on
one for a reasonable price. This camera was not designed for
professionals, but instead featured straightforward and
easy-to-understand controls intended for beginners or hobbyists. It has
an automatic aperture feature, but you won’t be using that if you
actually want to learn something. It uses a Canon FD lens mount, making
it compatible with any FD or FDn lens. It’s not technically compatible
with Canon EF lenses, but plenty of adapters are available to solve that
problem.
A couple of fun facts: this camera sold an
unprecedented one million units - a first for any SLR. It was also the
first SLR on the market to be equipped with a microprocessor. The
microprocessor is essential to the electromagnetic focal plane shutter
system - which brings us to the one downfall of this camera: if the
battery dies the shutter won’t pop. Batteries for most 35mm SLRs are
specifically for the light meter, but this is not so in the case of the
Canon AE-1. Basically, buy extra batteries if you go for this camera and
you’ll be fine. The follow up model to the Canon AE-1 is the Canon AE-1
Program, and is also a good option. If you have a look at the top selling film cameras
, you’ll notice the Canon AE-1 is #1 on the list.
We have previously reviewed the Canon AE-1 here.
2. Pentax K1000
The
Pentax K1000 is often referred to as a “beast” or “workhorse” because
of it’s insane durability. It was manufactured from 1976 to 1997, making
it one of the longest produced 35mm SLR models of all time. It’s
inexpensive, simple and loved by photographers worldwide. Because of its
reasonable price tag and long-standing production, over 3 million
Pentax K1000s units were sold over time and today you can easily find
them in great condition without looking very far.
It’s all metal,
all manual and accepts ALL Pentax K bayonet lenses. On top of that,
almost all Pentax K-AF and K-AF2 autofocus lenses also work with it -
you just have to focus manually. With the help of an adapter, it also
accepts screw mount lenses and will even work with new autofocus lenses
that lack an aperture ring - albeit with limited functionality.
Essentially, Pentax claims that any Pentax lens will have some
functionality on a K1000 so it’s a camera that will give you lots of
options. Plus on this body, if the battery dies no biggie - it’s only
for the light meter and you can always Sunny 16.
We have previously reviewed the Pentax K1000 here.
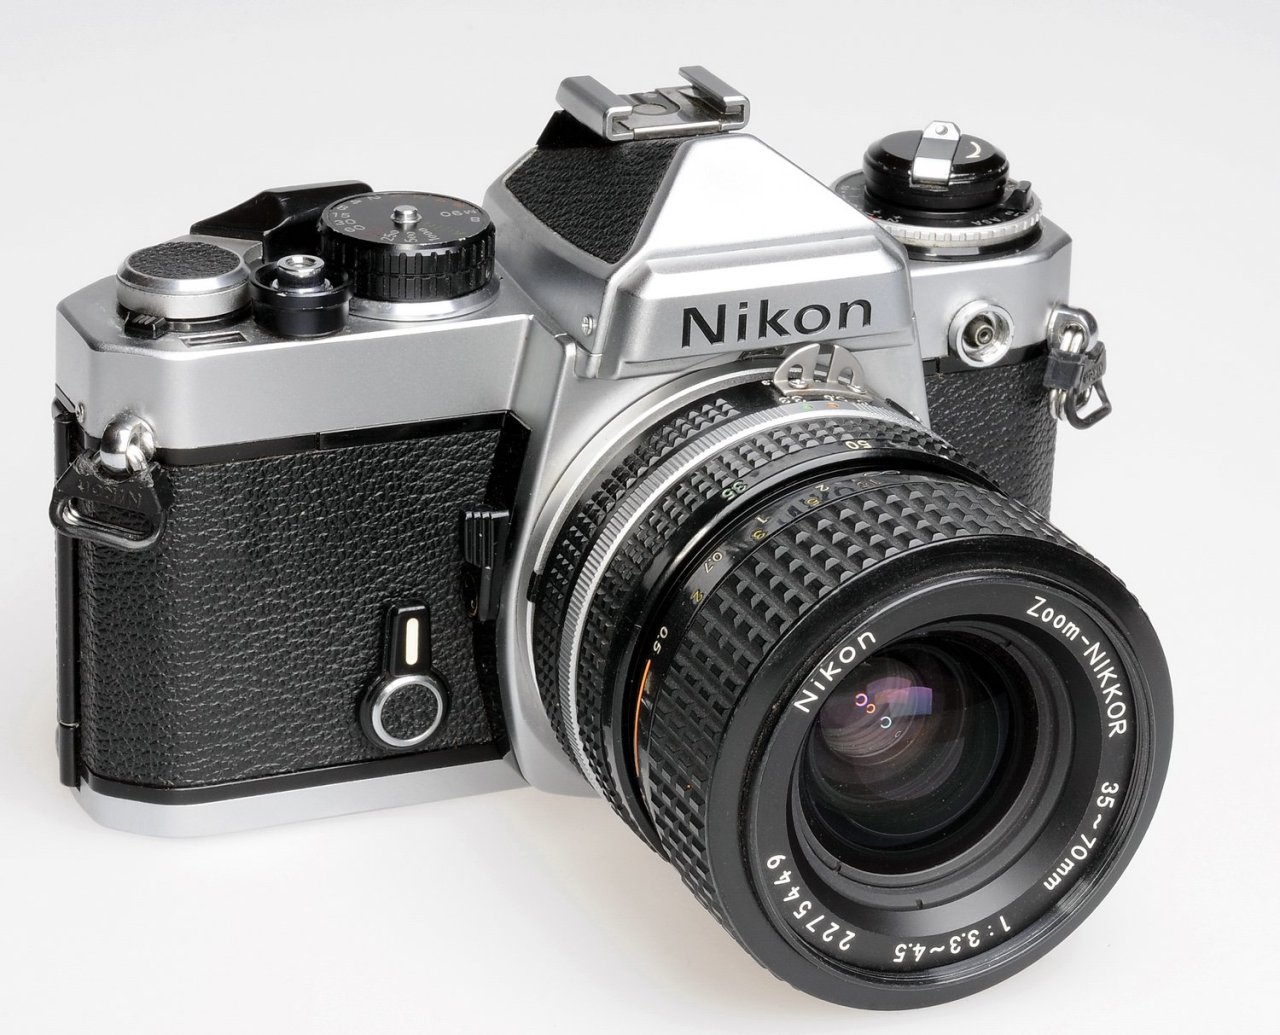
3. Nikon FM Series (Any)
The
Nikon FM series includes the original Nikon FM, Nikon FM2, Nikon FM2n,
Nikon FM-10, Nikon FM3a and a few special variants (like the illusive
Nikon FM2n Tropical Edition, which unfortunately does not feature a palm
tree print.) Starting with production of the Nikon FM in 1977, the
Nikon FM10 is one of the few film cameras still currently available. You
can buy a new one from Nikon right now in 2015.
The simple fact
that Nikon FM series cameras have been in production for so long makes
them very easy to find, easy to repair and they are compatible with a
very large quantity of lenses. Any Nikon F bayonet mount lens is
compatible - even newer models. The only issues you may run into are an
incompatibility with autofocus - all Nikon FM series cameras are manual
focus only - and newer lenses that lack an aperture ring. That being
said, any lens you buy for a Nikon FM series body will also work on your
Nikon DSLR no problem. (Side note: I’ve had my Nikon FM2 for 25 years, have never had to have it repaired and it still works like the day I got it.)
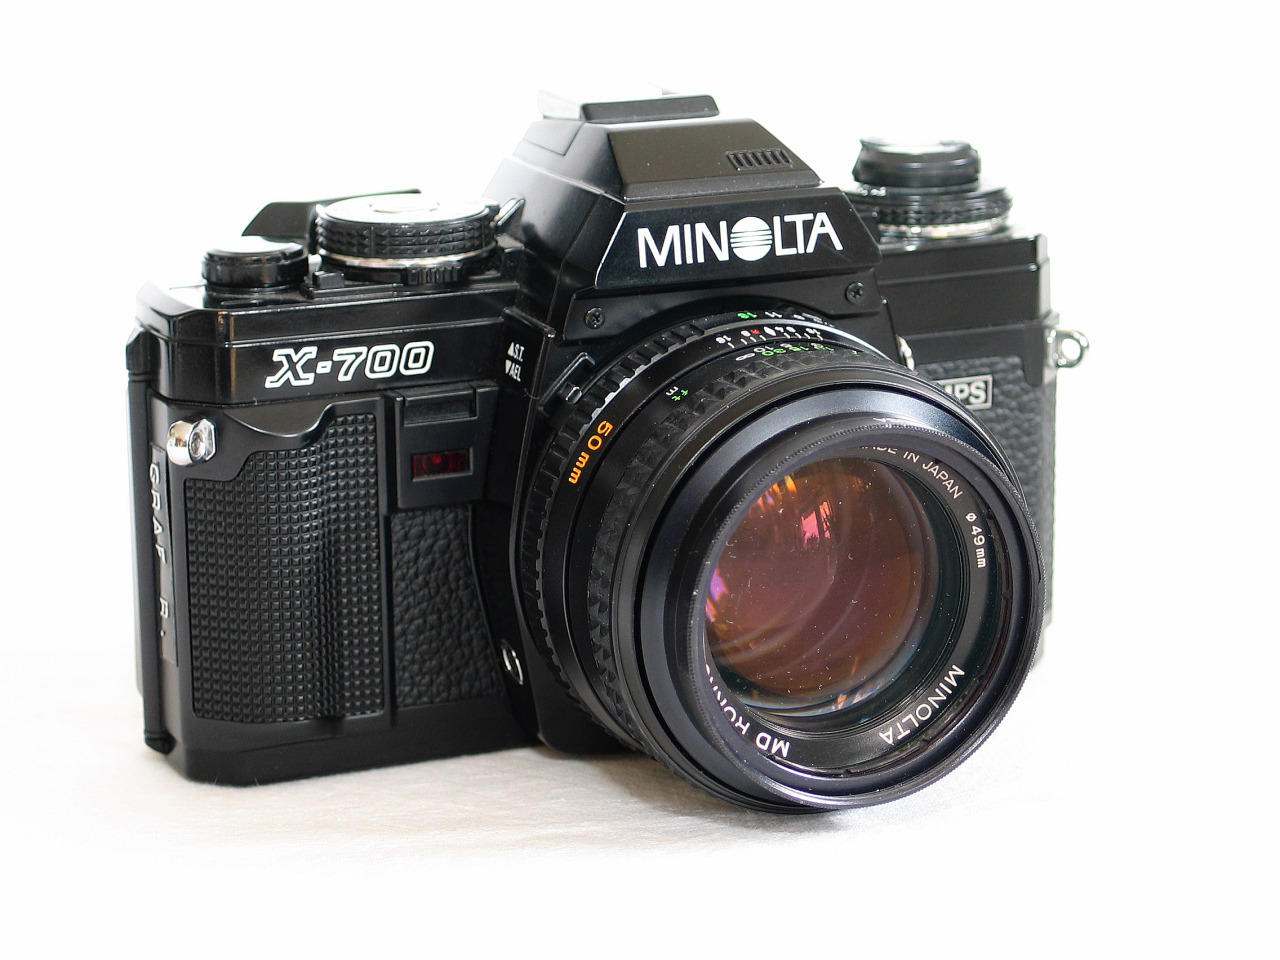
4. Minolta X-700
Introduced
in 1981 as the successor to Minolta’s XG series, the Minolta X-700 was
the company’s most popular manual-focus model. It’s inexpensive price
tag and easy-to-use features made it a perfect entry-level SLR, with the
added benefit of TTL (through-the-lens) flash metering - a feature not
available on the previous XG series models. You can grab one today for
under $100 without looking very long - these cameras are extremely
reasonable on your wallet. Not quite as durable as the previously
mentioned Pentax K1000 or Nikon FMs, but for someone interested in a
solid camera on a budget this is a great option.
Like the Canon AE-1, the Minolta X-700 has an electromagnetic shutter release and requires a battery to operate.
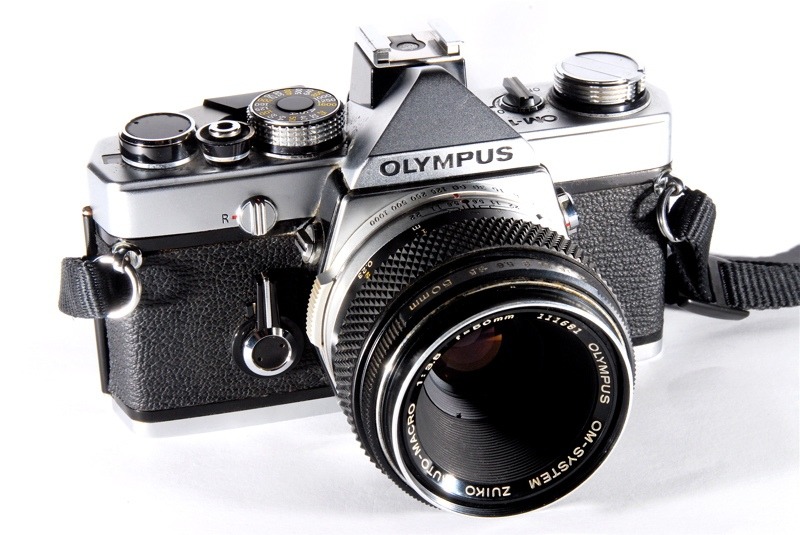
5. Olympus OM System (1-4)
The
Olympus OM system includes quite a few models, but we specifically
recommend the Olympus OM-1, Olympus OM-2, Olympus OM-3 and Olympus OM-4.
These were considered professional series, which may seem
counterproductive for beginners but in fact they offer the most manual
functions. The consumer grade OM series models have quite a few
limitations for shooting manually and are less durable.
The
Olympus OM-1 was released in 1972 at a time when plenty of 35mm manual
focus SLRs were available, but what distinctly set it apart was it’s
extremely compact and lightweight design combined with a significantly
quieter shutter than other models. For those of you specifically
interested in extended exposures, night photography and
astrophotography, the original OM-1 has a mirror lock-up feature; the
subsequent OM models do not have the mirror lock-up. The Olympus OM-4
was discontinued in 2002, giving the OM system quite a lengthy run.
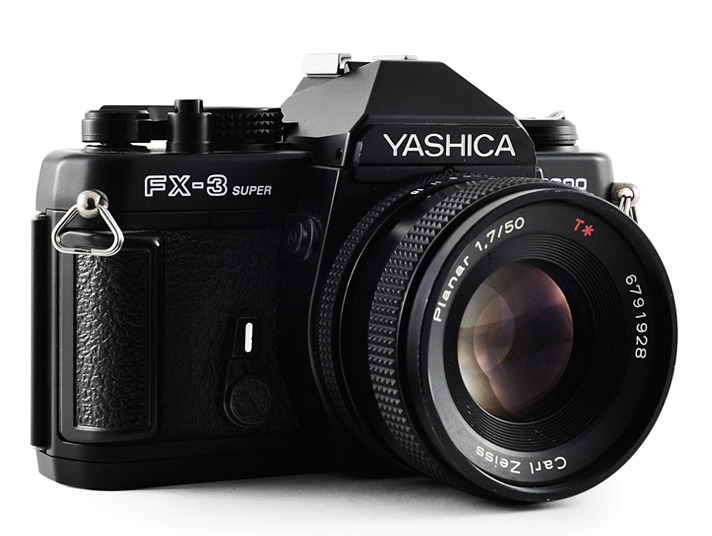
6. Yashica FX-3
The
Yashica FX-3 was released in 1979, and although it bares the Yashica
name it was technically manufactured by Cosina. It’s completely manual
and features a focal plane shutter, but the real bonus on this camera is
that it’s compatible with all Yashica and Contax lenses — including the
Contax Carl Zeiss T lenses. Like the above mentioned OM system, the
Yashica FX-3 is super compact and weights about one pound. The follow-up
models, the Yashica FX-3 Super, FX-7 Super and FX-3 Super 2000 offer
the same compatibility and are also great options.
Courtesy of: I Still Shoot Film
Friday, January 11, 2019
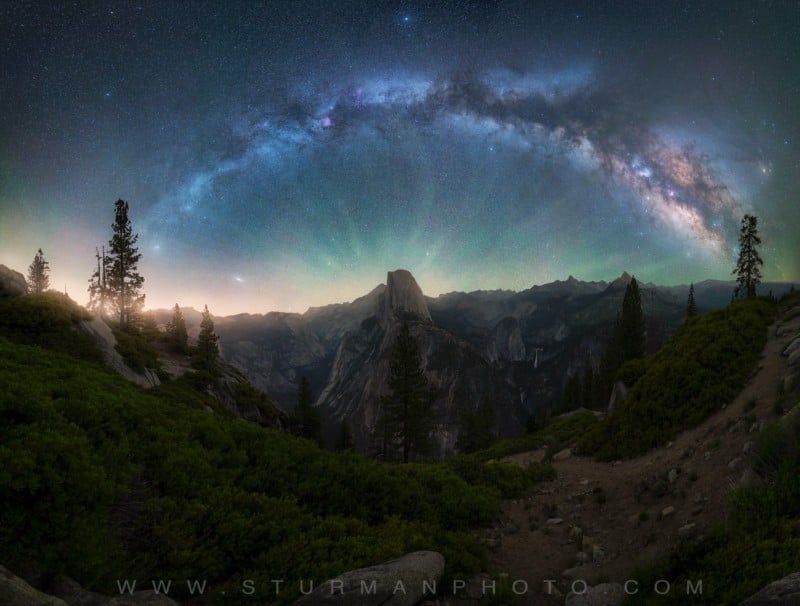
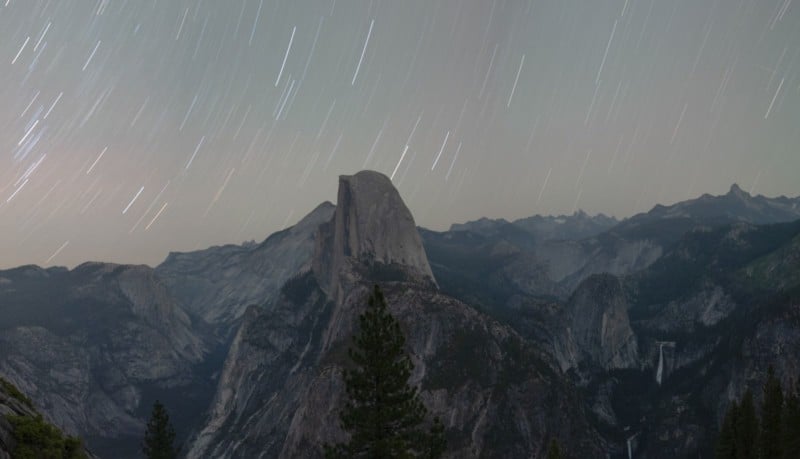
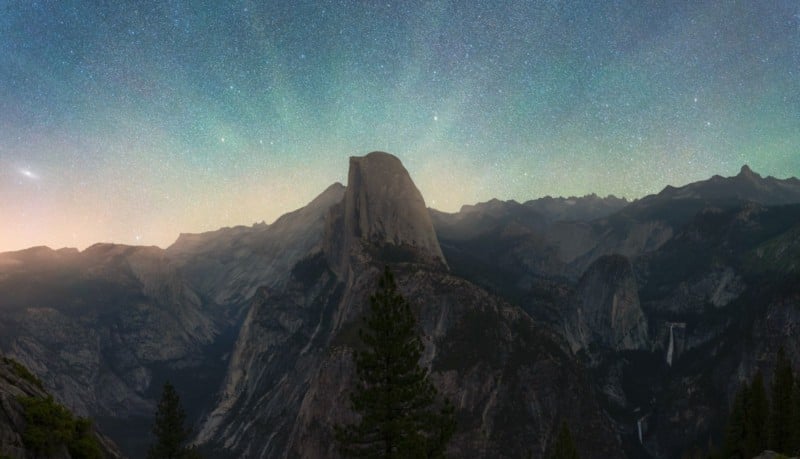
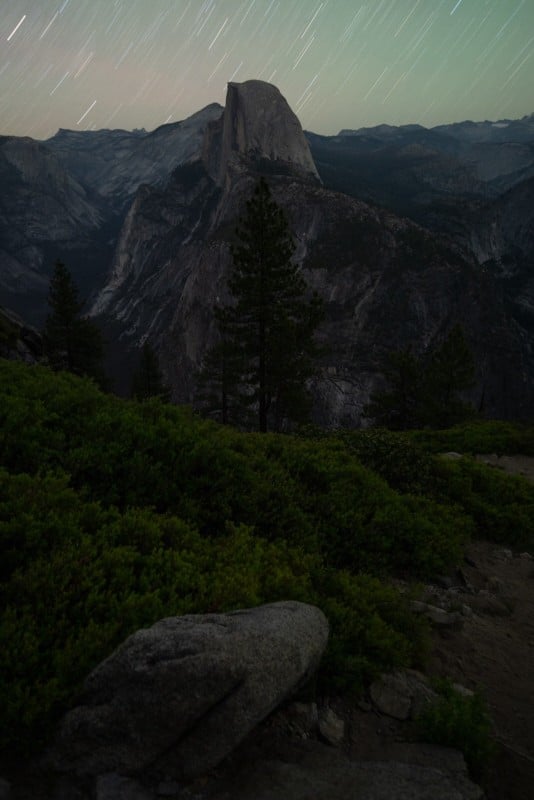
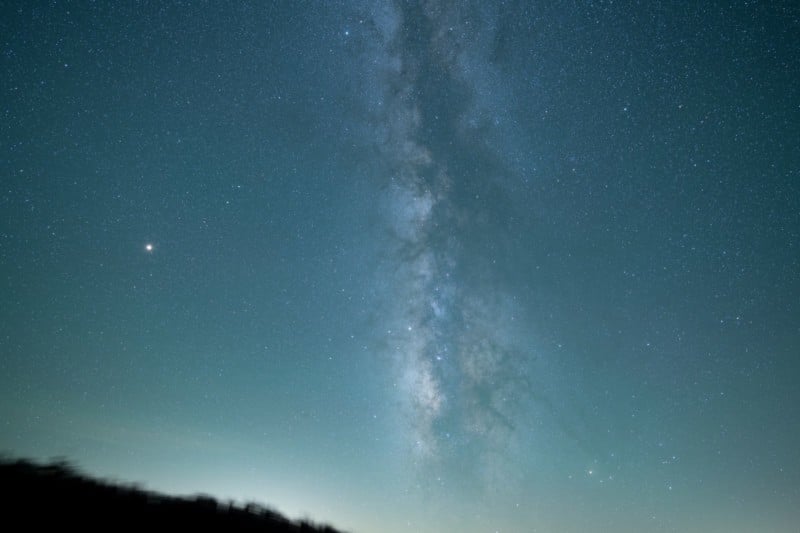
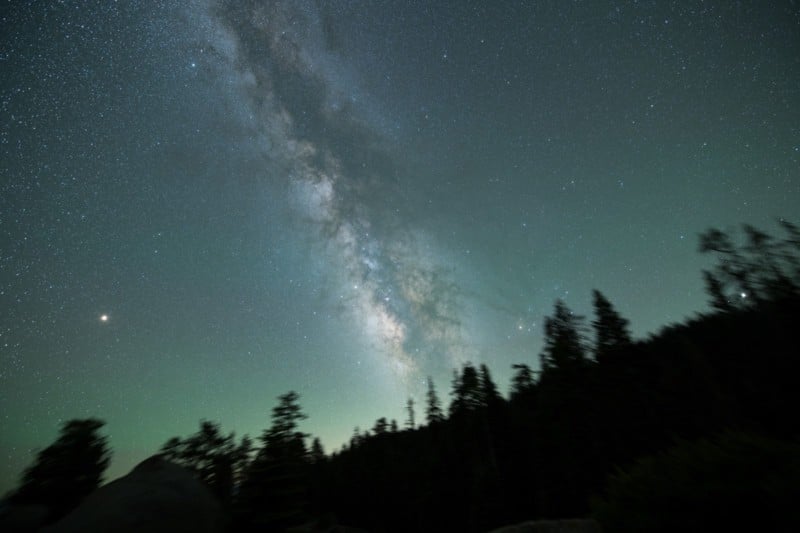
Capturing the Milky Way Over Yosemite National Park
Back in June of 2018, I was fortunate enough to make a 9-day trip to
Yosemite National Park, California to capture the Milky Way galaxy over
Half Dome. My entire trip revolved around capturing this image since I
had captured nearly this same panorama two years prior during my first
ever trip to the park in 2016.
It wasn’t until mid-2017 that I discovered that the panorama I had
photographed in daylight in 2016 lined up perfectly with the Milky Way
in May and early June. Immediately I knew that this pano was one that I
would have to perfect, whatever I had to do in order to capture it with
maximum detail.
Having improved my knowledge and technique for photographing the
Milky Way and keeping clean foreground significantly since my 2016 trip,
I knew that in order to keep the foreground free of noise I would have a
few options.
I could photograph the scene in roughly five images in vertical
orientation as single exposures and stack five or more frames per
section.
I could blend the foreground from blue hour by photographing the
foreground an hour after sunset using a little bit of atmospheric light
to illuminate the foreground and then wait to photograph the Milky Way
I could photograph the foreground as single exposures and stack them
under starlight, then track the sky to preserve the maximum sky detail
and blend them back together.
Or finally I could photograph the foreground under starlight as long
exposures at a higher aperture giving me more sharpness all the way
through the image and use a low ISO to give me less noise. Then track
the sky and blend them back together using a one image single exposure
panorama beforehand with the alignment to use as reference.
After considering my options, I decided to go with the final method
of capturing the foreground with longer exposures. This method would
allow me to capture the foreground under natural starlight and maintain
the natural colors and illumination of this time, and minimize the noise
using a low ISO. This method also guaranteed I would have a sharp image
throughout using a higher aperture and depth of field. I wanted to
maximize the quality and resolution of this image to make it as large as
possible for a potential future print.
Using the 45-megapixel Nikon D850 DSLR would give me an insanely
large file that could be printed in large dimensions. The final panorama
would be 27,500 pixels wide, and the final edit and crop was roughly a
350-megapixel image.
Original foreground panorama 500% crop RAWFinal Edit, 500% crop.
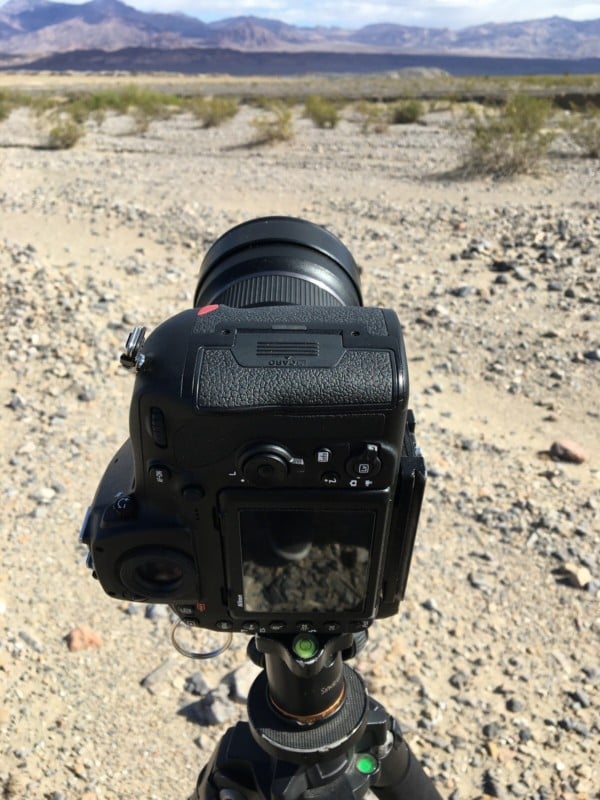
I would do this by setting my camera on my tripod in vertical
orientation, making sure that my ball head was completely level, and
waiting until I was under complete starlight.
Example of my Camera in vertical orientation during a trip to Death Valley, March 2018.
Having photographed the foreground panorama once before back in 2016,
I knew that I would need 5 vertical images at 15mm to capture
everything I needed, and having captured countless Milky Way panoramas,
4–5 images would give me a good view of our galaxy at 15 to 20mm.
In
order to keep my exposures steady and keep my shutter open for long
enough to capture all the light in a clean foreground image, I would
need to use a shutter release remote so I wouldn’t bump the camera by
pressing the shutter button. Using a remote would also allow me to
program the exposure time for each frame.
Yosemite was a 1,000-mile trip one way for me from home (on the most
boring stretch of road in the whole united states), so I planned my trip
carefully ensuring I would be there during proper moon conditions,
allowing me a window to photograph the sky without any moonlight.
Using the app PhotoPills,
I carefully projected my alignment and opportunities to shoot the Milky
Way while visiting the park. Once I had my plan together I started my
preparations for a 9-day trip to make the most of my time there.
Doing a little experimental time lapse here from Olmsted point in
Yosemite during my first night in the park. Having come from Nevada I
found myself entering Yosemite from what I would call the back of the
park and being able to see new parts of it I didn’t see in 2016.
Now if you are familiar with any of the stories of how I captured any
of my previous images, you will know that coming prepared has never
been one of my strengths. However, for a trip 1,000 miles from home and
camping out in the desert alone, I made sure to create a rigorous
checklist of things I would need. In an attempt to stay on a budget I
decided to pack all the food and water I would need and blow up an air
mattress in the back of my vehicle so I would be able to sleep
periodically for short periods while photographing some kind of night
sky image.
Included
on this list of things was sunscreen, bug spray, and a shutter remote
(of course). I ended up stopping for the first night of the trip roughly
halfway to my destination somewhere in the Nevada desert, where I had
an incredible dark sky to photograph. Already almost 500 miles from
home, I discovered that though I had packed 4 shutter remotes and a
whole pack of AAA batteries, I had left this insert for my pack
somewhere at home, leaving me without any reasonable way of triggering
my camera’s shutter remotely. Sadly the Nikon Snap bridge app would only
allow me to program 30″ exposures.
Too far to turn back, I began photographing just 30″ tracked images
to use for later images and dug through my gear for any kind of remote I
might have from the past. Sadly I didn’t find any remotes, but I did
happen to have a cool little device my father (an avid programmer and
electronic project enthusiast) had made using an Arduino programmed to
do various exposure types. Luckily for me, this device connected to any
1/8″ audio jack and I happened to have a spare cord for that. Also
fortunate for me was the fact that the device had a bulb option.
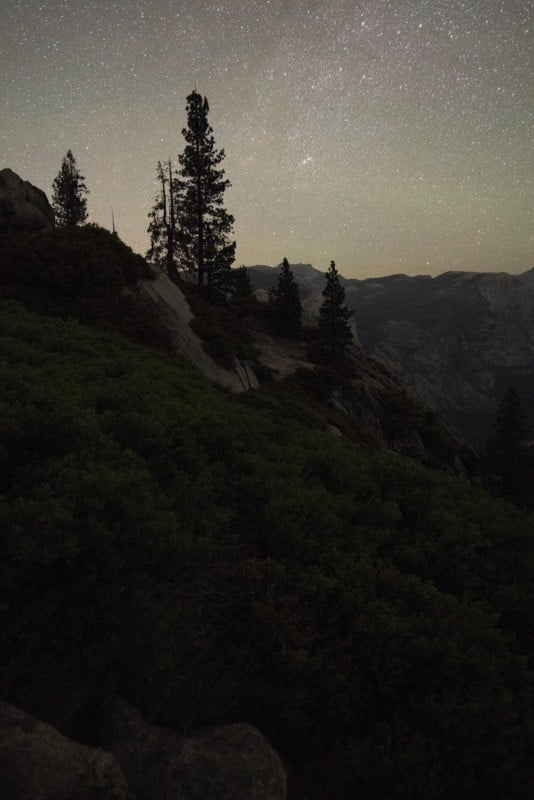
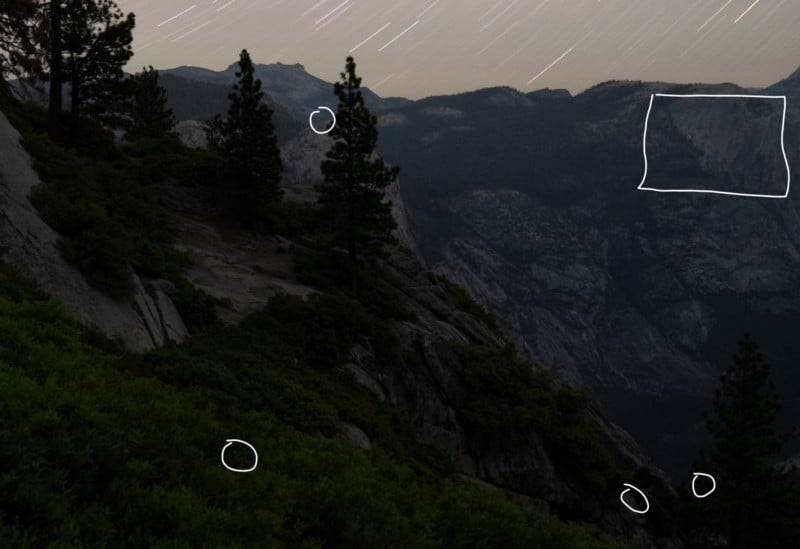
Sunset fades to Star light in Yosemite National Park.
Once inside the park I was greeted by the unbearable summer heat,
walls of mosquitoes so thick you could use them as shade, and of course
unbelievable crowds of people. Despite all of this the park was
spectacular and seeing it again was just as jaw-dropping the second time
as the first. Absolutely nothing about this park is boring.
Having felt that I was prepared, I brought a bottle some kind of
all-in-one sunscreen bug repellent spray. Immediately upon visiting the
park I needed both, as the early summer heat and pooling water in the
valley attracted millions of mosquitoes and the heat was almost
unbearable in direct sunlight.
My first night in the park I broke out in some kind of terrible rash.
Something I had not experienced since I was very young. Hives covering
my arms, neck, and body made for a very uncomfortable stay. Thinking I
had some kind of mosquito bite that had initiated the rash, I began
applying more of this bug spray sunscreen mix. The cause of my terrible
full body rash was sadly unknown to me. So from day one I was a little
irritable and had a hard time standing the conditions of the trip. Also
unfortunate to my trip itinerary, I planned to stay a full 7 days and
saw no need to buy new sunscreen or bug spray and assumed it was
anything from some kind of plants in the area to something I was eating.
I had planned to do all my shooting in new locations and scouting
first and save my Milky Way panorama over half dome from Glacier Point
until the last two nights of my stay so I would force myself to endure
the entire trip knowing I would not allow myself to give in a go home
until I had completed that image. Reserving my final two nights, since
the image would likely take several hours of shooting just to complete
the pano for the foreground and several hours of shooting just for the
sky.
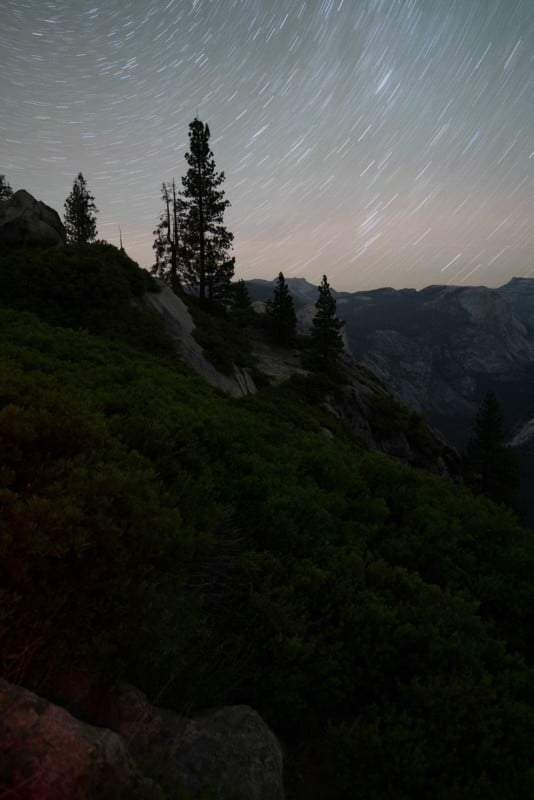
Night sky over Yosemite National Park
When the time came to capture my panorama I went to Glacier point
almost 6 hours early just to get a parking spot. The lot at the top of
the road for the popular overlook is often heavily crowded and has very
few actual parking stalls. When I arrived there weren’t any so I ended
up driving in circles for about two hours waiting on an opportunity to
park. Once I parked, I quickly began packing my gear to go watch the
sunset and set up for my image.
In
my excitement and hurry to finally get out to the spot and quickly
dying sunlight, I managed to lock my keys inside my car. Having done
this multiple times in the past I have a habit of checking for keys as I
am walking away from my vehicle and realized I had locked them inside. I
spent the next two to three hours trying to find a way to get into the
car. I had no service in that area so I would have to hitch a ride with
someone all the way down to where I would get service to call AAA. I
actually went and found a sick and managed to pry the passenger side
door open just a little and tried to slip thin sticks in and flip the
lock switch. After seeing the apparent damage I was doing to the seal on
the door I went to back pop out windows.
I noticed that these windows had a small latch that could be pressed
out so that the windows could angle outwards but no open all the way. I
figured if I could break this small plastic latch I could crawl in
through this window and unlock the car. But after prying just a little
too hard, I shattered the window and glass went all over me and the
parking lot.
You can see the small black latch next to the seat belt in the left corner.
Needless to say, I missed the sunset. And once I was inside my car
and covered in glass, I wasn’t in the most inspired mood, but after
cleaning up the glass in the parking area as best I could, I moved out
to my spot for the image.
I began by focusing on the foreground, and realized that once I had
my camera set up in the proper position, the Arduino remote’s programmed
bulb mode required me to hold the button down for the duration of the
exposure. There was no programmable time setting in its programming,
meaning I would need to sit and hold the button down until the exposure
was done.
I’m not going to lie: it’s fortunate that only my good friend the
Milky Way was there to hear what I said next. Interestingly enough,
yelling to a large beautiful vista is actually quite therapeutic, but I
was quickly distracted by the beauty of the Milky Way rising over the
Yosemite Valley.
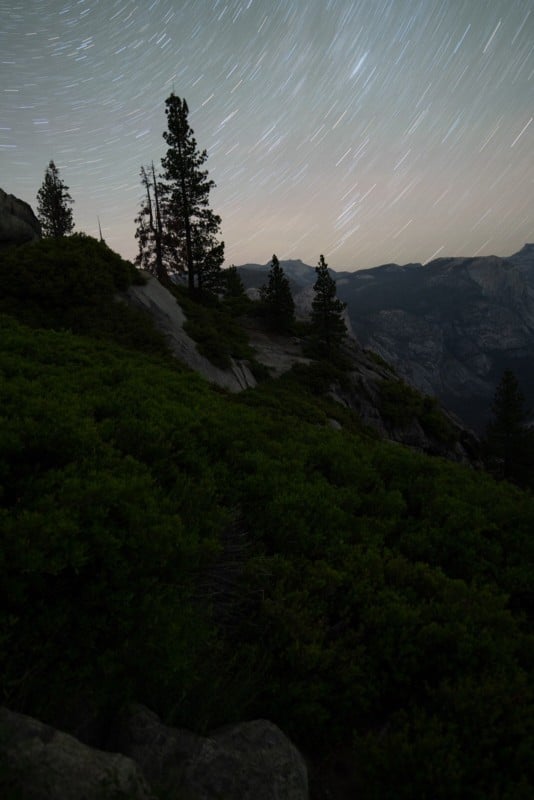
Glacier point provides one of the most amazing views of Yosemite.
Looking head on half dome, you can see an insanely large vista.
Waterfalls, peaks, and large cliff faces into forested valley’s. The
scale of this place is simply indescribable.
Once the Milky Way started to appear I took a quick test exposure,
f/2.8 ISO 12,800 30″ and focused on a bright star to make sure I was
getting infinity focus throughout. In my f/28 image, it looked like most
of the image was sharp so I decided just to increase my aperture
slightly. I started out by trying an image at f/5 but after holding down
the button for so long and seeing I made a mistake I decided to stop
back down to f/3.2. Once the test exposure was complete I used
Photopills exposure calculator to calculate the images exposure time
needed if I were to use f/3.2 at ISO 800. I figured this would give me a
clean foreground image without me losing too much time to each exposure
before sunrise.
Single test exposure, f/2.8 ISO 12,800 30″
This
gave me an exposure time of roughly 13 minutes per frame. So I set a
thirteen-minute count down timer in Photopills and sat with my finger on
the button until the alarm went off.
759″ exposure f/3.2 ISO 800
Unfortunately for me, I didn’t realize that the red light from the
homemade remote was casting onto the rocks in front of me, so I
photographed this first exposure a second time.
792″ Exposure f/3.2 ISO 800
Unfortunately, I had bumped my tripod or ball head somehow without
noticing and the image had tilted slightly. Tired and irritated, I
battled with the idea of using this image but ended up deciding to
realign and try again.
759″ Exposure f/3.2 ISO 800
I finally had the first of five images correct. I carefully reviewed the image for noise and detail at 300% zoom.
759″ f/3.2 ISO 800, 500% crop
Aside from a few hot pixels from the long exposure and warm weather,
and a little noise on the surface of the peaks the image looked sharp
and mostly clean.
Third (middle) image of pano, 759″ ISO 800 f/3.2
The following two images went smooth, though my thumb was getting a
little tired from holding down the button to keep the shutter open. That
was until the fourth image.
Hikers head lamps and flash lights illuminate the Trail between Nevada and Vernal falls. 439″ f/3.2 ISO 800
I stopped this exposure early when I noticed some hikers with
flashlights creating some trailing. This could have easily been cloned
out in post but I didn’t want to risk it so I started over.
Finally,
after a few more images I had the complete foreground merge. Due to
technical problems, bumping my tripod during a couple and starting over,
It was astronomical twilight shortly after completing the final image
in the pano.
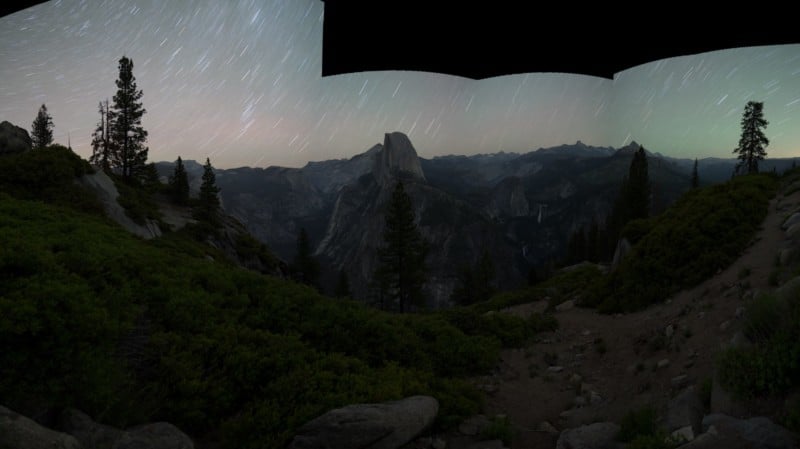
5 vertical image Stitch, Adobe LR. RAW
Once all the images had been stitched and the distortion corrected
and image compositionally balanced this was the foreground result. Now
all that was left was to photograph the sky! I returned the following
night to set up my tracker from the location where I shot this pano,
however using a tracker requires a clear view of Polaris, the northern
star, to calibrate the tracking. Sadly I was unable to see Polaris from
this location due to all the tree cover.
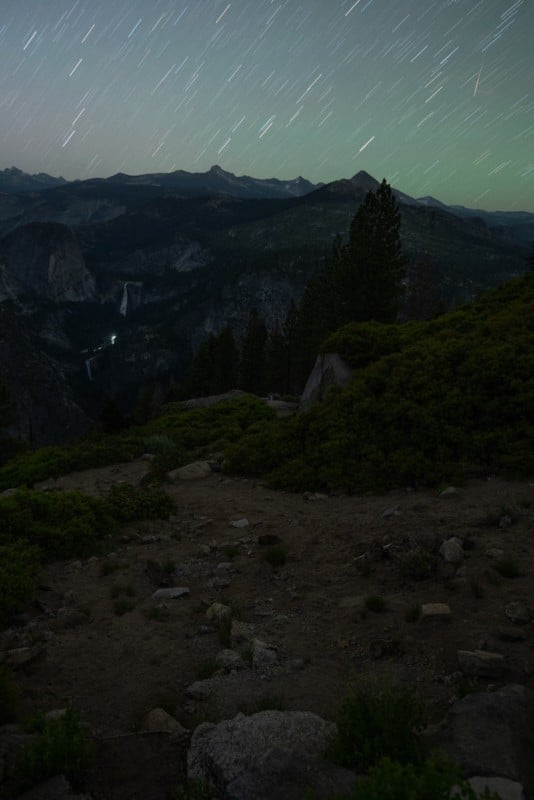
I began searching for nearby locations with absolutely clear horizons
and discovered Taft point, an overlook just back down the glacier point
road. This seemed like the closest sure-fire location with clear skies.
I quickly hiked out to the location during sunset and promptly set up my tracker to capture my sky panorama.
477″ tracked f/2.8 ISO 400 19mm
One of the single images tracked from Taft Point.
Taking several attempts to get the sky right and clean with as little
foreground as possible I had my sky after shooting all night.
And once twilight hit I was so ready to be done with shower less,
rash-ridden, mosquito-infested forests that I packed up and hiked
straight to the car to start the long journey home. My image was finally
captured and it was time to get back to the desktop and start putting
the pieces together.
250″ f/2.8 ISO 800 Tracked
And
with that my 9 day trip to the incredible Yosemite came to end, and
after a long and boring drive through the deserts of Nevada, I would be
able to review my images to see how I did.
“Galactic” Yosemite National Park, 2018
Thanks for reading! I hope something in this was beneficial to you,
or maybe at least you won’t make some of the mistakes I have and never
buy all-in-one bug spray and sunscreen… P.S. If you’d like to learn more about photographing the Milky Way you can check out some of my one-on-one and group workshops
hosted across the western United States on the techniques and tricks I
use personally. Or if you would like to know how I post process my
images, consider checking out my paid post processing Instructional courses for Adobe Photoshop. About the author: Derek Sturman is a landscape
and night photographer. The opinions expressed in this article are
solely those of the author. You can find more of Sturman’s work on his website and Instagram. This article was also published here.
(or how to wing it with a camera you don’t know how to use)
If
you’ve never shot film before, or if you’re working with a camera you
don’t really know how to use, there are shortcuts to help you get to the
gratification of shooting without so many calculations. Obviously,
these are shortcuts and do not replace actual learning, but they can
definitely helpful for trying out a film camera that you have never used
before.
1. Shoot black and white: black and white film
is way more forgiving, you have a full 5 stops of “error margin” that
will still capture information. With color negative film you have 3, and
with slide film you have 1 ½ (this is in part why slide film is
considered “professional” since it requires an exact exposure). If you
don’t know what you’re doing or you don’t know your camera yet, you are
much more likely to end up with printable images if you shoot black and
white.
2. Shoot in broad daylight outside: maybe not high
noon, but shoot during the day when there’s plenty of light. Low light
situations are tricky, so avoid shadows and interiors at first or you’ll
probably end up with a super underexposed roll, and that sucks. This is
a major one for me when I test out vintage cameras, because you can
also see if there are any leaks in the seals or foam and get a clear
sense of the definition at a higher f-stop.
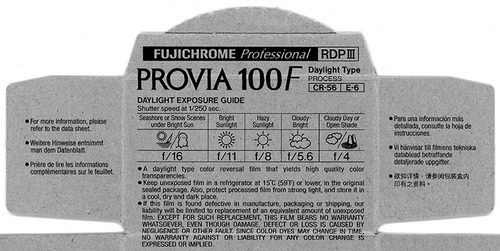
3. Use the Sunny 16 Rule: If you don’t know how to use your meter, or it doesn’t work, or you don’t have one, this trick is a life-saver.
“On a sunny day set aperture to f/16 and shutter speed to the [reciprocal of the] ISO film speed.”
Let
me translate (dummy style just in case): f/16 is an aperture number on
the lens, shutter speed is on top, and ISO is the number printed on the
film. For example, Ilford Delta 400 has an ISO of 400. [I’ve posted
articles explaining aperture and ISO for those who are interested]
An
example of the Sunny 16 Rule would be: For film with an ISO of 100,
aperture at 16 and shutter speed at 1/100 or 1/125 (depending on your
camera)
ISO 400 would be f/16 at 1/500 (unless your camera miraculously has 1/400)
Here’s a handy daylight exposure guide guide from the inside of some Fuji Provia (ISO 100):
4. Bracket:
This is a technique taught in ALL photography classes, and it’s
actually pretty useful if you really want to be sure to get “the shot.”
Basically, shoot one stop at the “correct” exposure, then shoot one stop
up and one stop down. For example, if you were following the Sunny 16
Rule (and you really, really, really wanted to be sure to have a great
photo) you could bracket like so:
(you could also bracket by changing the shutter speed instead of the aperture)
5. Avoid Portraits (just at first):
I know, I know this sounds horrible, but really if you’re learning how
to use film (or a new camera) the biggest challenge is exposure. And
portraits usually require perfect exposure and great lighting. If you’re
not great with exposure and lighting, you may be disappointed with your
first portraits.
Courtesy of : I Still Shoot Film
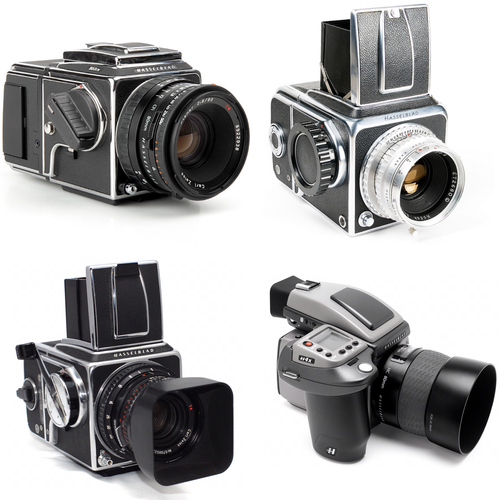
When
it comes to photography, Hasselblad is one of those legendary names
students hear about during history lessons. The name is considered
synonymous with high class photography from the most earliest days of
the medium, with quality image capturing machines that provide great
function and performance as well as versatility. The Swedish company has
produced cameras that have been in war zones and space missions, and
their largely medium format camera systems are quite hardcore, known for
being used by professionals and amateurs that are serious about
photography. What Is A Hasselblad?
Hasselblad
started producing cameras for civilian use in 1948. Their cameras are
mostly in 6x6 medium format which have interchangeable lenses,
viewfinders and film magazines. Most of their cameras feature leaf
shutters built into the lenses, but a few lines also have focal plane
shutters. The top of the camera body incorporates a waist level view
finder with a ground glass reflex screen. The Hasselblad system is well
known for the fact that all accessories are usually compatible with
different models, and so can be easily switched around. For most of the
V-system camera lines all lenses were produced by Carl Zeiss.
The
aim of Victor Hasselblad was to produce cameras which had extremely
high shutter speeds and image quality but were also compact and
portable. Most of the models that were released remained very similar in
general design but evolved in terms of functions and performance as the
years went by. Let’s have a look at some of the more popular and
significant camera lines produced by Hasselblad.
{Hasselblad 1600F medium format SLR} Beginnings
The
first camera produced by Hasselblad in 1948 was the 1600F, named after
the fact that it had the fastest shutter speed of 1/1600 sec and had a
Focal plane shutter. This first camera by Hasselblad was considered
revolutionary in its versatility offered by the interchangeable
viewfinder, film magazine and lenses, although there were some kinks
which were worked out during the length of its production.
In 1953, 1600F was replaced by the 1000F model, which was named after
its even faster minimum shutter speed of 1/1000 sec. Hasselblad used a
much improved shutter mechanism for this model which was more tough and
reliable. While Kodak Ektar was providing lenses for the Hasselblad
cameras in the beginning, by this time Cark Zeiss was in the picture and
this model came with these lenses. {Hasselblad 1000F medium format SLR}
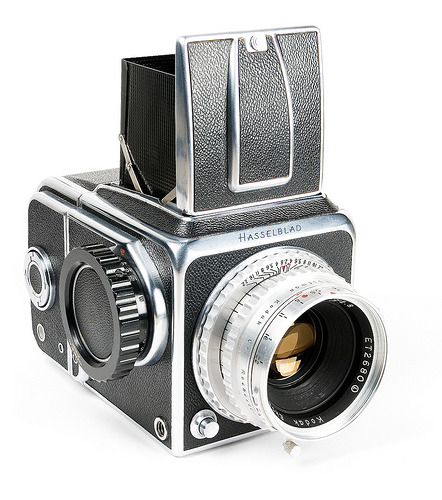
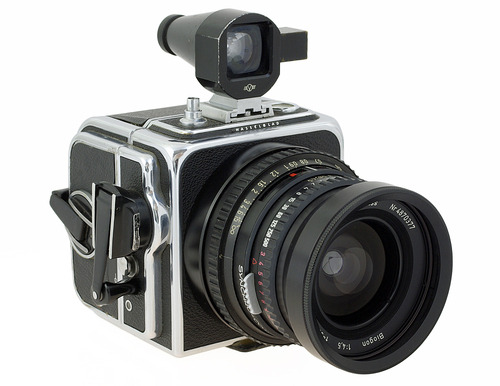
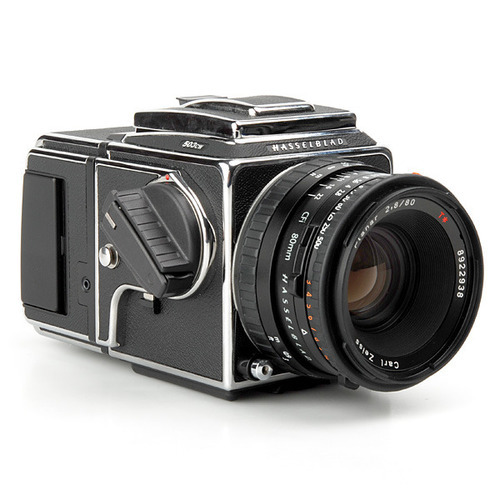
The V-System
500
series: After the 1000F, Hasselblad went on to replace the focal plane
shutter with the leaf shutter installed into the lenses. This shift was
born out of Victor Hasselblad’s quest to develop a smaller camera with
faster lenses and shutter, and is probably what defines the V-system
series. These were all 6x6 format cameras, the first and probably most
popular and significant of which was the 500C introduced in 1957. It
remained in production for 40 years and a modified version of this was
the camera that went to the moon. It was important because the leaf
shutter meant that there could now be automatic flash synchronizations
at all shutter speeds.
The rest of the 500 and 501 series
were variations of this with various improvements, additions and
subtractions, such as the 500 C/M which replaced the 500 C with a
changeable screen, and the 501 CM produced in 1997 with a Gliding Mirror
System (GMS) to reduce on the screen vignetting. {Hasselblad SW Superwide medium format camera} Superwide
Along with this, the Superwide (SW) series was also released in
1954, which was a “super wide angle” camera with a fixed Carl Zeiss
lens. This was intended for architectural photography, and also
incorporated a leaf shutter. Its successors were released with various
improvements and remained in production up until 2006.
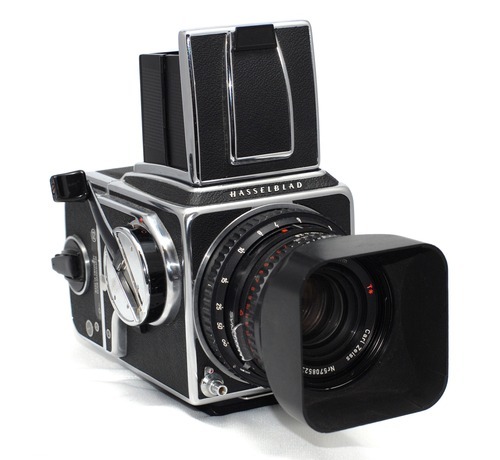
500 EL and 503
Along
with the 500 series came the 500 EL in 1964 which were motor driven
SLRs with a built in film winder and were otherwise similar to the 500C.
This model was also replace by subsequent improved models, the third
one of which, 500 ELX, introduced the TTL/OTF (through the lens/ off the
film) flash metering system. This was also seen in the 503 series,
starting with the 503 CX which was an addition to the 500 C/M, and the
503 CXi which added a winder connection and a GMS. {Hasselblad 503 CWD medium format SLR}
In
2006, the 503 CWD was released on Victor Hasselblad’s 100th birthday as
a limited edition with CFV 16 MP digital back. The 555 ELD from the 500
EL series in production from 1998-2006 also came with Electronic
Databus contacts which provided the option of attaching digital
magazines. 2000, 200 and the Reversion to Focal Plane
With
the 2000 series, Victor Hasselblad was attempting to achieve those fast
shutter speeds again with focal plane shutters. The fastest speed of the
2000 FC produced in 1977 was 1/2000 sec. However, this time round
Hasselblad came back with a better focal plane shutter made with
titanium instead of the previously used stainless steel shutter. As
newer models were released improvements were made such as winder
connections and better shutter protection when film magazines were taken
off.
The titanium shutter was replaced by a rubberized cloth
shutter with the 200 series in 1991. This series was a bit more
electronic, with automatic exposure metering and TTL/OTF flash system.
The last one of these, the 202 FA did not even have a manual mode.
{Hasselblad H1 medium format digital SLR}
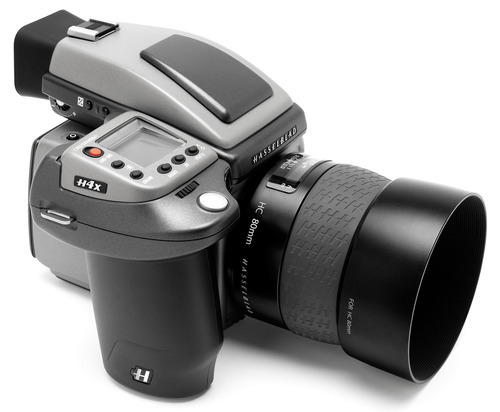
H-System and evolution to Digital
The
H-system was launched in 2002, and it was with this launch that the
previous models earned the name V-system, after Victor Hasselblad. The
H1 medium format SLR was distinct from its predecessors in many ways.
For one, the long standing 6x6 format so loved by Hasselblad was changed
to 6x4.5. It also departed from the traditional Carl Zeiss lenses in
favor of those produced by Fujinon.
The H series was also the
beginning of the digital age for Hasselblad where they started
providing the option of digital backs as well as film backs for their
camera models. The H1 took both 120 and 220 rolls of film as well as a
digital back. Hasselblad also released a digital version of the H1, the
H1D, which could only be used with an Imacon 22 mp digital back iXpress
which has to be connected with an external hard drive at all times.
Hasselblad
subsequently released further improved models which could be better
integrated with their digital backs, could be used with CF cards and had
better software operating it. Their latest product line was introduced
in January 2014, which is the world’s first medium format CMOS camera. Conclusion
So
the Hasselblad system has come a long way through its very long
history, entering the digital age as any camera company must do to keep
up with the digital age. However, their most iconic products were seen
in the age of the film, when they were seen as pioneers in the industry.
Hasselblad cameras have been in space, were in fact the cameras that
the fist images of space and the moon were taken with, which is really
kind of cool. The first cameras they ever made for us normal people, the
1600F and 1000F may still be floating around in the market, but have
reached unusable stage because of neglect and age. These cameras have
made history, and some of the best, albeit expensive, medium format
cameras you will get would have the Hasselblad name on it. Expensive
because of the fact that that name means something, and if you can get
an old Hasselblad, especially something like the antique 1600F in good
working condition, it will be a rarity. But it is true if you want to
hold a piece of history in your hands, you shouldn’t feel so bad about
paying the price.
The Beginner’s Guide to Film Photography
Here
you will find the basics of film photography in plain, simple,
understandable English to help get you on your way. Updated Regularly.
Ever
since drone photography was invented, it’s getting more and more
people’s attention every day. People are loving the bird’s eye view of
the world and it has become quite popular. Photography was never this
much cool before. So, if you are a photographer and haven’t started
looking into the drone cameras, it’s time that you should because it is
the future. Anyways you are gonna love these jaw-dropping shots from the
air.

 , you’ll notice the Canon AE-1 is #1 on the list.
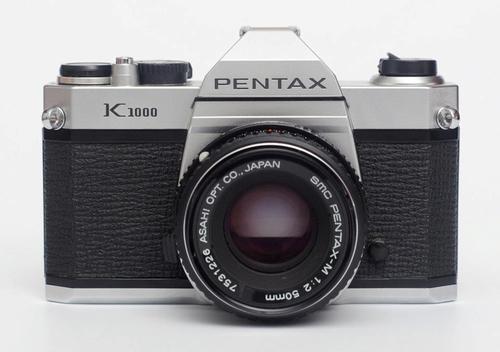


 4. Bracket:
This is a technique taught in ALL photography classes, and it’s
actually pretty useful if you really want to be sure to get “the shot.”
Basically, shoot one stop at the “correct” exposure, then shoot one stop
up and one stop down. For example, if you were following the Sunny 16
Rule (and you really, really, really wanted to be sure to have a great
photo) you could bracket like so:
4. Bracket:
This is a technique taught in ALL photography classes, and it’s
actually pretty useful if you really want to be sure to get “the shot.”
Basically, shoot one stop at the “correct” exposure, then shoot one stop
up and one stop down. For example, if you were following the Sunny 16
Rule (and you really, really, really wanted to be sure to have a great
photo) you could bracket like so: