Wednesday, January 9, 2019

Our favorite photographs of 2018: Part 1

Last year, we unveiled our favorite photos of the year for the first time—a collection that showcased the breadth and depth of the 500px community, as well as many up-and-coming talents. The curation process was an exercise in inspiration for our team, and further demonstrated how much talent, creativity, and passion 500px photographers have to offer. We’re honored to reveal another instalment of our favorite photos of the year.
Similar to last year, we started our discovery process with 500px photos that were popular in each category throughout 2018, to give us a sense of what the community was engaging with. We hand-picked some choices from that group with the aim of recognizing as many photographers and as much high-quality work as possible. We also added our favorite shots of 2018 from Editors’ Choice, and dug deep into hidden gems and “undiscovered” work through our Recommended Photos and our own discovery.
While we can’t recognize every great photographer on the platform, we want to thank you all for the outstanding work you’ve shared with us again this year. We hope you enjoy our favorite photos of 2018 as much as we enjoyed discovering them—stay tuned for parts 2 and 3 of our favorite photos on Dec. 28 and 31.

City & Architecture

MIA Atrium III by Scott Murphy on 500pxzones of light and darkness by Gilbert Claes on 500pxTK1 by Iiro Martikainen on 500px


What our photo editors loved:
Influenced by the minimalist architecture we have seen since the 1920s, these images use sharp angles and smooth contours, accenting simple design and form as decorative elements and playing on the shadows that fall from these modernist designs. This alternative perspective ultimately encourages the viewer to rethink the way they view and interact with these spaces.


Celebrities

 T-Pain by Daniel Gray on 500pxLorde in NYC by Jake Chamseddine on 500pxGoggle Portraits of Olympians - Mark McMorris by Markus Berger on 500px


What our photo editors loved:
Working with models can be challenging, but coupled with star power, things can really become difficult. Each of these photographers managed not only to rise to the challenge, but to create interesting concepts and compositions that reflect the personality of their subjects.

Urban ExplorationMessedamm Underpass by Claudio de Sat on 500px


LUMIX G9 Collaboration by LAMARR GOLDING on 500pxShaft trunk by Serafim Gromov on 500px
What our photo editors loved:
There’s a gritty feeling to these images that we appreciate—whether in the tonality of the shot or simply the location itself—and this weaves a narrative about the journey each photographer took to capture these moments.

 Transportation

DBX by Tobi Shinobi on 500pxHelicopter downwash on tall grass by Gael Le Martin on 500pxPorsche 911 991.1 GT3 Cup ready to hit the track for a night ride. by Deyan Yordanov on 500px


What our photo editors loved:
Whether it’s the view from an above-ground train speeding down a track or a high-end sports car sitting idle, the photographers here conveyed a clear sense of power and precision in each shot.

Night

Admiring the mire by Arvīds Barānovs on 500pxLit by hand by Eric  Paré on 500pxStetind by Sigrid Buene on 500px


What our photo editors loved:
In each of our selections, there’s an interesting relationship between the night sky and light. We admire the way each photographer balances these elements to create something magical without overdoing it.

Still Life

Eggs by Juan Zade on 500pxIce cream scoops in spoons in food pattern by Valeria Aksakova on 500pxPeeler by Anil Akkus on 500px

What our photo editors loved:
The simplicity of these shots is what stood out for us. Each image is attractively minimal yet still descriptive and rich with context.

Aerial

Solitude by Anders Wotzke on 500px Les Veines Bretonnes by Thibault Poriel on 500pxIsland Sunsets by Mountain Waves on 500px

What our photo editors loved:
With the environment top of mind, we couldn’t help but focus our lens on the natural beauty of trees, water, and rock formations captured from unique perspectives.

Street

Flow by Mario Mirabile on 500px*** by Babak Fatholahi on 500px by Sixstreetunder on 500px


What our photo editors loved:
Each of these street photos is framed and composed well, with a good dose of emotion to draw the viewer in. We also love the use of shadows in these shots.

Food

Bucatini all'amatriciana by Food Director mackinpo on 500pxCremeschnitte by Tatjana Zlatkovic on 500pxToast with avocado, feta cheese and boiled egg by Vladislav Nosick on 500px


What our photo editors loved:
In each of these selections, there are foreground and background elements that elevate the story and add more depth to the photos. We also like that food photographers are moving away from traditional lighting, opting for harsher lighting to create more pronounced shadows, as evidenced in ‘Cremeschnitte.’
What do you think of our favorite photos of 2018? Share your picks in the comments!

Courtesy of: 500PX Blog

Tuesday, January 8, 2019

In the News

Photographers Use Instagram to Find Fellow Analogers

iStock 000048983932 Medium image
#photographyhobbyist  #photographybestoftheday #photographyforever
 

A bunch of 20-something photographers in Phoenix buying 50-year-old cameras and putting the resulting images on Instagram, the world of food photos and selfies, sounds like a crazy notion, but it’s happening. And happening a lot.
There’s a bit of a revolution happening in the world of digital photography, and that revolution is a throwback to the days of film. The grit, the grain, and the texture produced by “real” cameras have caught the eye of many young photographers, and they are flocking to websites like eBay to buy up old equipment and put it back into use.
The result is a 21st-century photography club in which everyone uses 20th-century technology. There’s a sense that the waiting and seeing of film photography has its merits, something that many people would thumb their nose at in a day and age in which immediacy is the new normal.
From using old equipment to processing their own negatives to scanning photos and meticulously editing them, this new kind of photographer is kicking it old school, and the results are quite impressive.
Learn more about the film revolution in Phoenix and check out some incredible example images at the Phoenix New Times.

The Rumor Mill

Enormous 600mm Lens on the Horizon for Canon

canon ef m 600mm f5.6 do is lens patent 550x300 image
If you’ve been waiting for Canon to develop a super-telephoto prime lens, the wait may soon be over.
Patents recently filed in Japan show the design of the EF-M 600mm f/5.6 DO IS lens, and man does it look nice! As the name indicates, the lens will have Diffractive Optics (thus the DO in the name), which uses a nifty new element to improve image quality while reducing the overall size of the lens. The lens will also reportedly have built-in image stabilization, which is a must-have for a lens of this size.
The real kicker is that this lens is designed specifically for a mirrorless camera, which Canon has been rumored to be developing for quite some time. So, not only does it appear that there will be a giant new prime lens for Canon fans, it seems they will finally get their mirrorless camera too.
Head over to Camyx to learn more.
Courtesy of: Photography Talk

Nikon Z7 and Z6 to get eye-tracking autofocus

null
Nikon chose CES 2019 to announce a series of improvements that it has in store for its Z series of full-frame mirrorless cameras, which currently comprises of the Z 6 and Z 7 .
Three different new features will be added to the camera range in a series of future firmware updates. But the most significant of these is that the Nikon is developing an Eye AF function. This is said to automatically detect the subject’s eyes to make attaining critical focus on the eyes easier. "It will allow users to capture photos in which focus has been clearly acquired on the subject's eye, which is useful for portrait, event and street photography scenarios", said the Nikon announcement.
Eye AF is a feature that Sony has introduced to its Alpha A7 and A9 range of full-frame mirrorless cameras – and it is been proved to be highly effective and useful for photographers. Sony is currently working on refining its system, so that it can track the eyes of animals, as well as humans.

CFexpress and RAW Video

The additional two firmware updates that Nikon is demonstrating at CES 2019 in Las Vegas are:
CFexpress memory card support
Nikon has confirmed that the XQD card slots of both the Z 6 and Z 7 will be updated through firmware to supporting the soon-to-be-launched CFexpress memory card standard. Nikon had suggested that this should be the case back at the launch of the Z system (see interview).
CFexpress cards are the same size and shape as XQD – but will offer even faster write and read speeds. CFexpress is likely also to be more widely supported by other memory card manufacturers. XQD cards are currently only available from Sony, Delkin and Nikon.
RAW Video support
Nikon has also announced that it is developing a feature that works with the Atomos Ninja V external video drive to output video in RAW format, using the ProRes RAW codec.

Monday, January 7, 2019

Make your desk a photography playground - smartphone tips and tricks!


How to Shoot a Gravity-Defying Fashion Photo


#photographyhobbyist  #photographybestoftheday #photographyforever

surreal
New York-based photographer Alexi Lubomirski was recently commissioned by Allure Magazine to shoot a series of fashion photos titled “Mood Elevators.” The images show a man floating around as he walks next to a woman.

Lubomirski chose to use acrobat Richie Maguire instead of Photoshop to create the surreal images. Allure posted this short video showing how one of the shots in the series was made by having the man swing off a bar and pose at the peak of the launch:
Lubomirski also shared a couple more images from the series on his Instagram account:


7 Tips and Tricks for Nikon Cameras

7 More Of The Best Nikon Tricks Ever!

Sunday, January 6, 2019

A Definitive Guide to Not Messing Up Your Solar Eclipse Time-Lapse


eclipse

#photographyhobbyist  #photographybestoftheday #photographyforever


Credit: Rick Fienberg / TravelQuest International / Wilderness Travel
As most of you in the photography and filmmaking community know, on the 21st of August, North America (and some parts of South America, Africa, and Europe) will get to experience a moment that reminds us just how small we are on this tiny planet rocketing around the universe – a solar eclipse.
We’ve put together a handy guide on everything you need to know about being prepared to capture it, so read on, get your gear together and remember to show us what you’ve managed to shoot after it all goes down!
One thing to say before we get started - eclipses are bright. Well, the eclipse itself isn't bright, however, whenever you can see the sun throughout the eclipse, it's going to be damn bright with UV and IR rays flying all over the place. A little common sense is required to not look at it, even when you think it's covered up enough by the moon, because that's specifically when it'll get ya. Wear some fancy eclipse glasses if you can't resist (but not the ones that Amazon recalled...) 
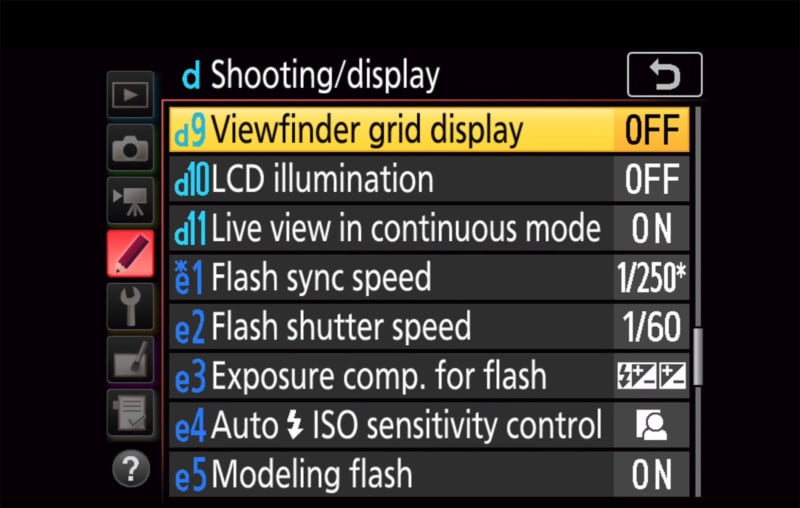
and don't look through your view finder, even with your ND on at its darkest - use the live view function instead.
A little different from a lunar eclipse where the earth passes between the sun and the moon, blocking the light that usually makes the moon shine, a solar eclipse is when the moon orbits between the earth and the sun, casting a shadow on earth.
It’s an incredibly rare sight, which is why photographers haven’t stopped talking about it for weeks.
Eclipses aren’t straight forward things either – there are several phases:
  1. Partial eclipse – when the moon begins to slide in front of the sun, partially covering it.
  2. Start of total eclipse – just before the moon fully covers the sun phenomena such as Baily’s Beads and the Diamond Ring effect occur.
  3. Totality – when the sun is fully covered by the moon. The sun’s corona is visible in a ring around the moon.
  4. The steps above reverse, and the sun is revealed.
The constant transition of an eclipse means that photography can only capture one element at a time – which is where time-lapse comes in.

So When and Where Is It All Going Down?

The two most important things you need to know when hoping to capture a solar eclipse are pretty simple – where you need to be and when you need to be there.
The upcoming eclipse will pass from the West to East Coast of the US. The path of totality – a fancy way of saying the area where you can see a total eclipse from – is a narrow 70 mile (110km) strip running from coast to coast. This strip is the ideal place to get the complete eclipse experience, although you’ll still be able to capture some pretty cool time-lapses if you’re outside of the range.
The best time to view the eclipse changes depending on where you are. To find out where and when you can check it out, there’s plenty of great online resources like this one provided by NASA (so you know it’s legit).

Getting Your Gear Together

So you know where you’re going and what time you need to get there, but what do you actually need to bring with you? To do the eclipse justice, you need to have the right camera and lens combination.
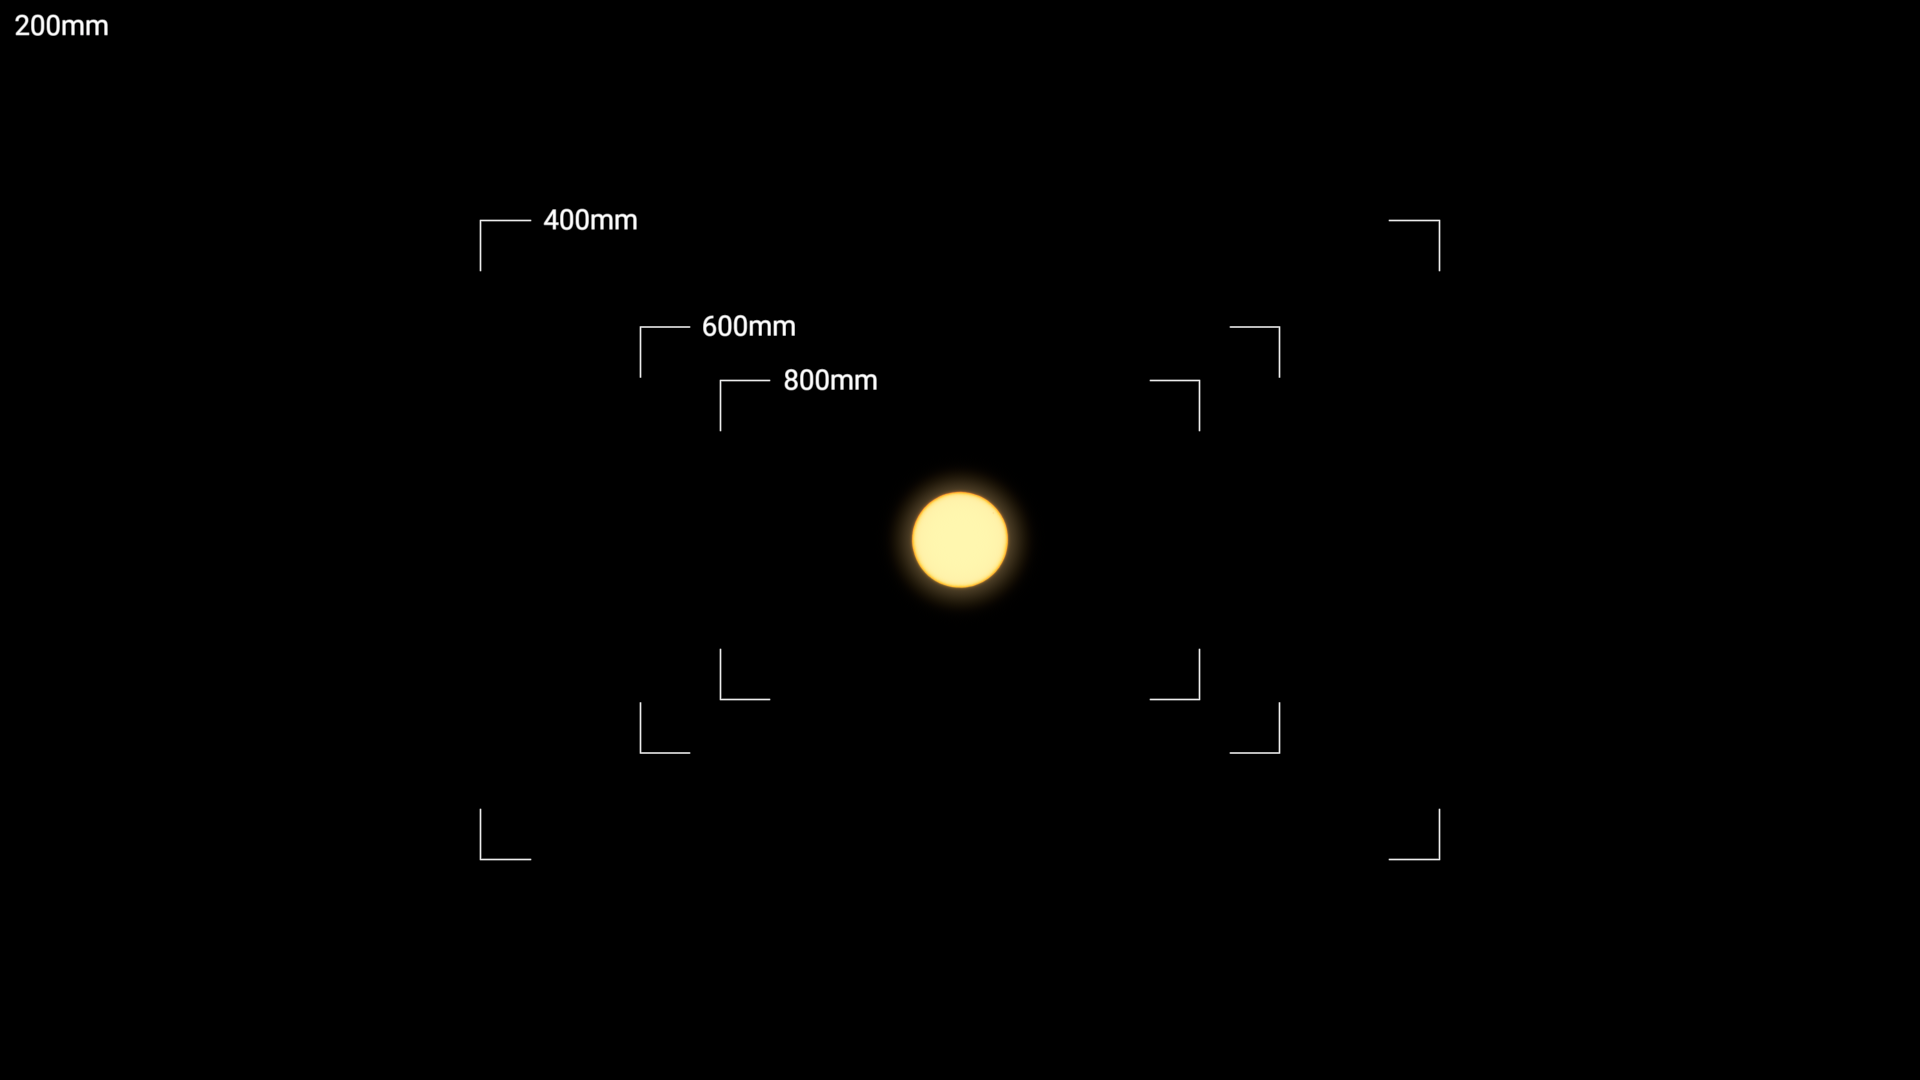
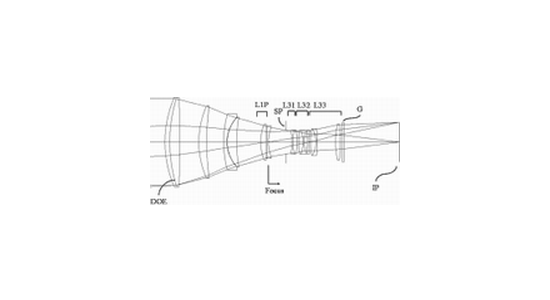
Wide angle lenses will not work well because the sun will appear too small. You’ll need to use something that’s more than 200mm (on a full frame camera), although 600mm-800mm is more ideal. The below diagram shows you how the different focal lengths affect your final image.
Composition
Long lenses can be pretty expensive, but because you’re taking pictures of the sun, you’re not going to have an issue with low light, so using cheaper lenses with higher f-stops won’t be a problem.
Having a crop factor camera can also be of advantage as their smaller sensor sizes increase your focal length, allowing you to get more out of your current lenses.

On to Exposure

One of the most difficult elements of capturing the eclipse is the massive change in exposure throughout the event. In the earlier stages, you’ll need to expose for the sun using an ND filter (it’s pretty bright, ya know). During totality, the only light you’re going to see is from the corona (edges of the sun around the moon’s outline) which is pretty dim. It’s standard practice to remove your ND filter for this part of the eclipse.
For time-lapse, you’re going to need to manually bulb ramp from bright sunlight, to when the moon is in front of the sun and back again. There are a few ways to go about this, the easiest being manually adjusting the dials on your camera – although this can cause your camera to move. Due to the nature of the scene, this can also be very hard to fix in post because there isn’t much information for post stabilization systems to grab on to. A better option would be to use an app such as Canon Connect to control the exposure of the camera wirelessly.
Something else you’ll want to avoid is the shaking that comes when removing your ND Filter. A way around is to use a variable ND Filter such the Syrp Super Dark. It’s 5-10 stops, which provides enough range to cover all phases of the eclipse.
When bulb ramping, it’s best to change one setting at a time rather than all at once – this way it’s easier to keep track of everything. For example, start by changing the ISO, ND, aperture, and finally shutter speed.
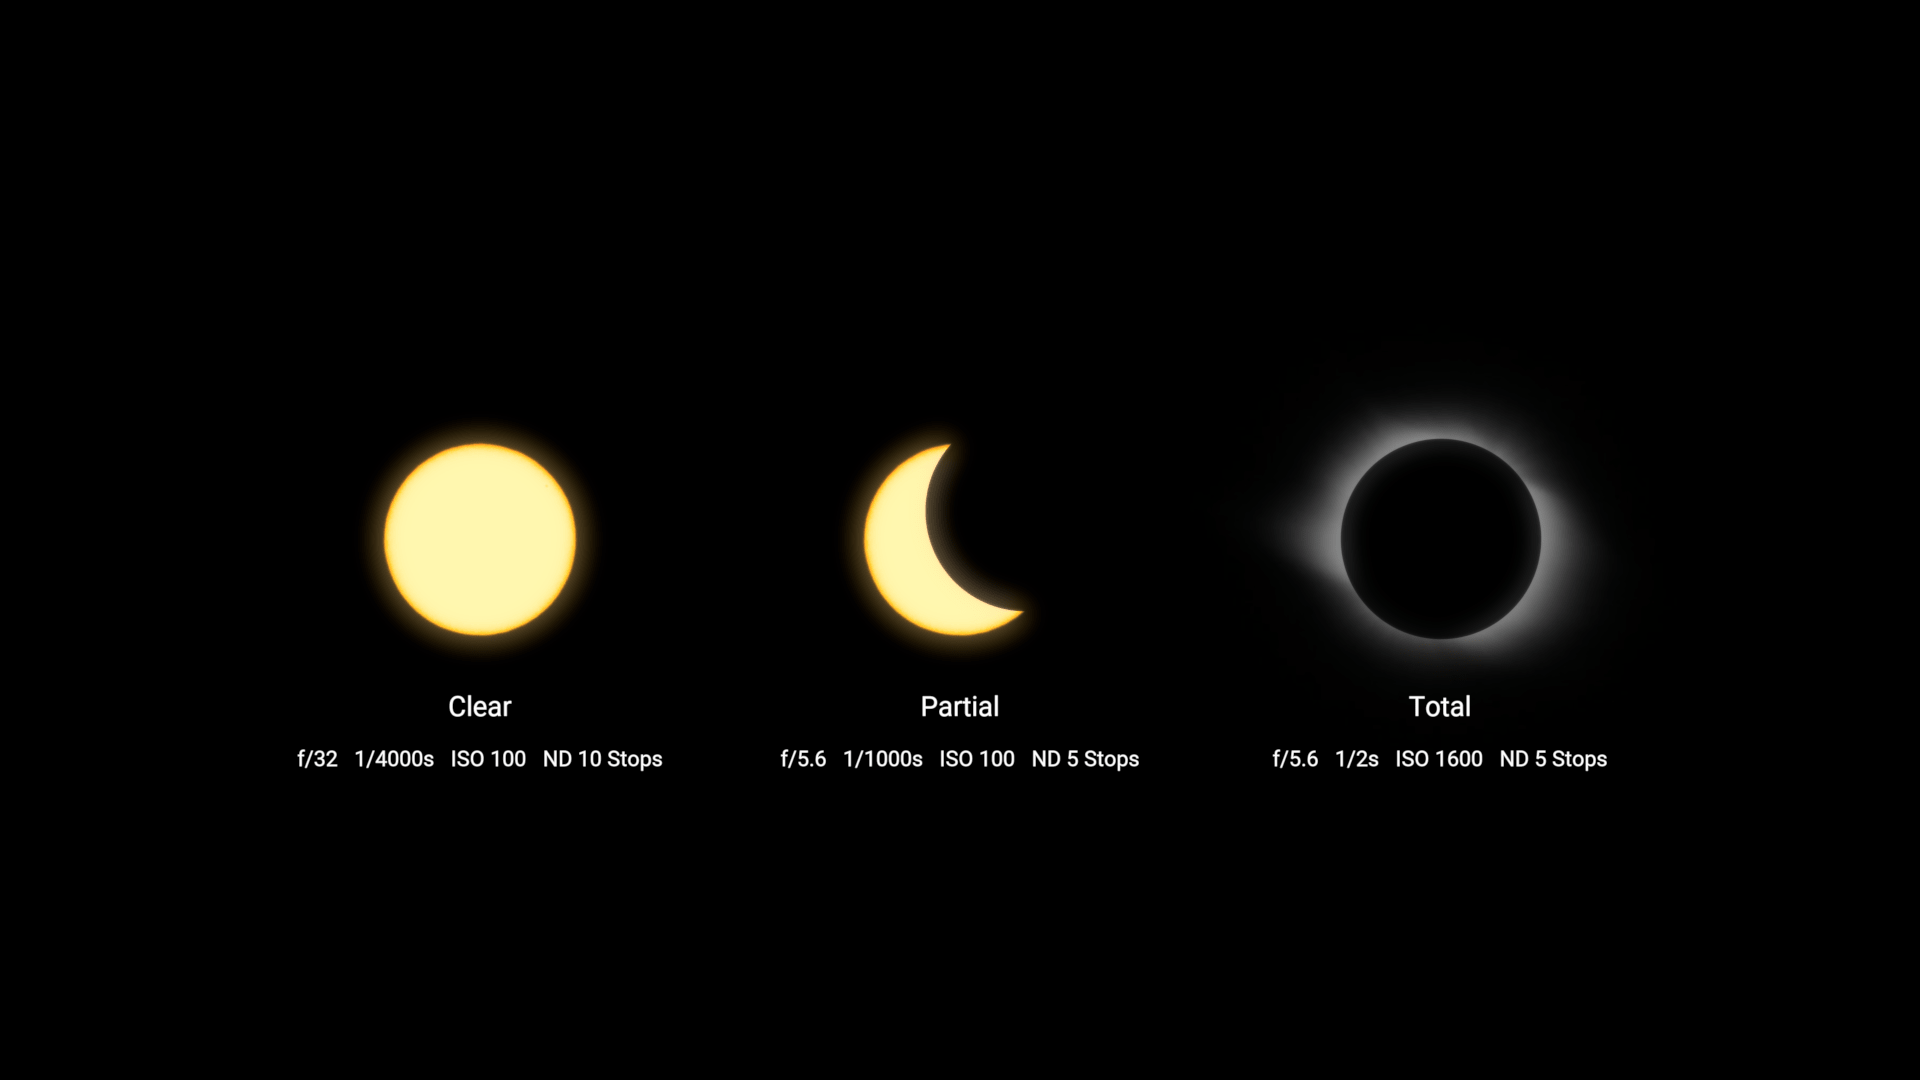
Below is a diagram showing example exposures at different parts of the eclipse.
Exposure min

Get Your Interval Right

One of the core components in creating the time-lapse is your intervalometer. This will trigger your camera at regular intervals. To do this you can use a Genie Mini. Not only does it act as an intervalometer but it also has motion control features which you can use for tracking the sun.
geniemini
Setting the Interval significantly affects the feel of the compiled time-lapse. A too long interval will cause the phases of the eclipse to go by too quick. However, a too fast interval can cause your camera to miss shots. This is due to the previous image still being processed. Using a fast camera and card will help mitigate this issue. It is best to test out what your camera is capable of before the shoot.
Below is an animation of the solar eclipse at different intervals. An interval of 1 second will mean the duration of totality during play back will last around 6.6 seconds, while at an interval of 4 seconds it will last 1.7 seconds (this is at 24 fps).

Aligning the Sun

Fun fact: the sun and moon move across the sky at 0.25° a minute, so you’ll need to ensure that you set up your camera so they don’t drift out of frame. There’s two ways to do this:
  1. Use the drift method, where the sun and moon drift into frame.
  2. Track the movement using a motion control device like the Genie Mini.

Drift Method

This is the simplest of the three methods as it doesn’t require motion control. First, you will need to set the focal length of your camera. This has a significant effect on the duration of your time-lapse. The wider the lens, the longer it takes for the sun to move from one side of the frame to the other. Below is a diagram showing how different focal lengths capture a different amount of the eclipse. Around 600 to 800mm is ideal as it will allow you to capture all the eclipse as well as providing enough room for error in aligning your camera.
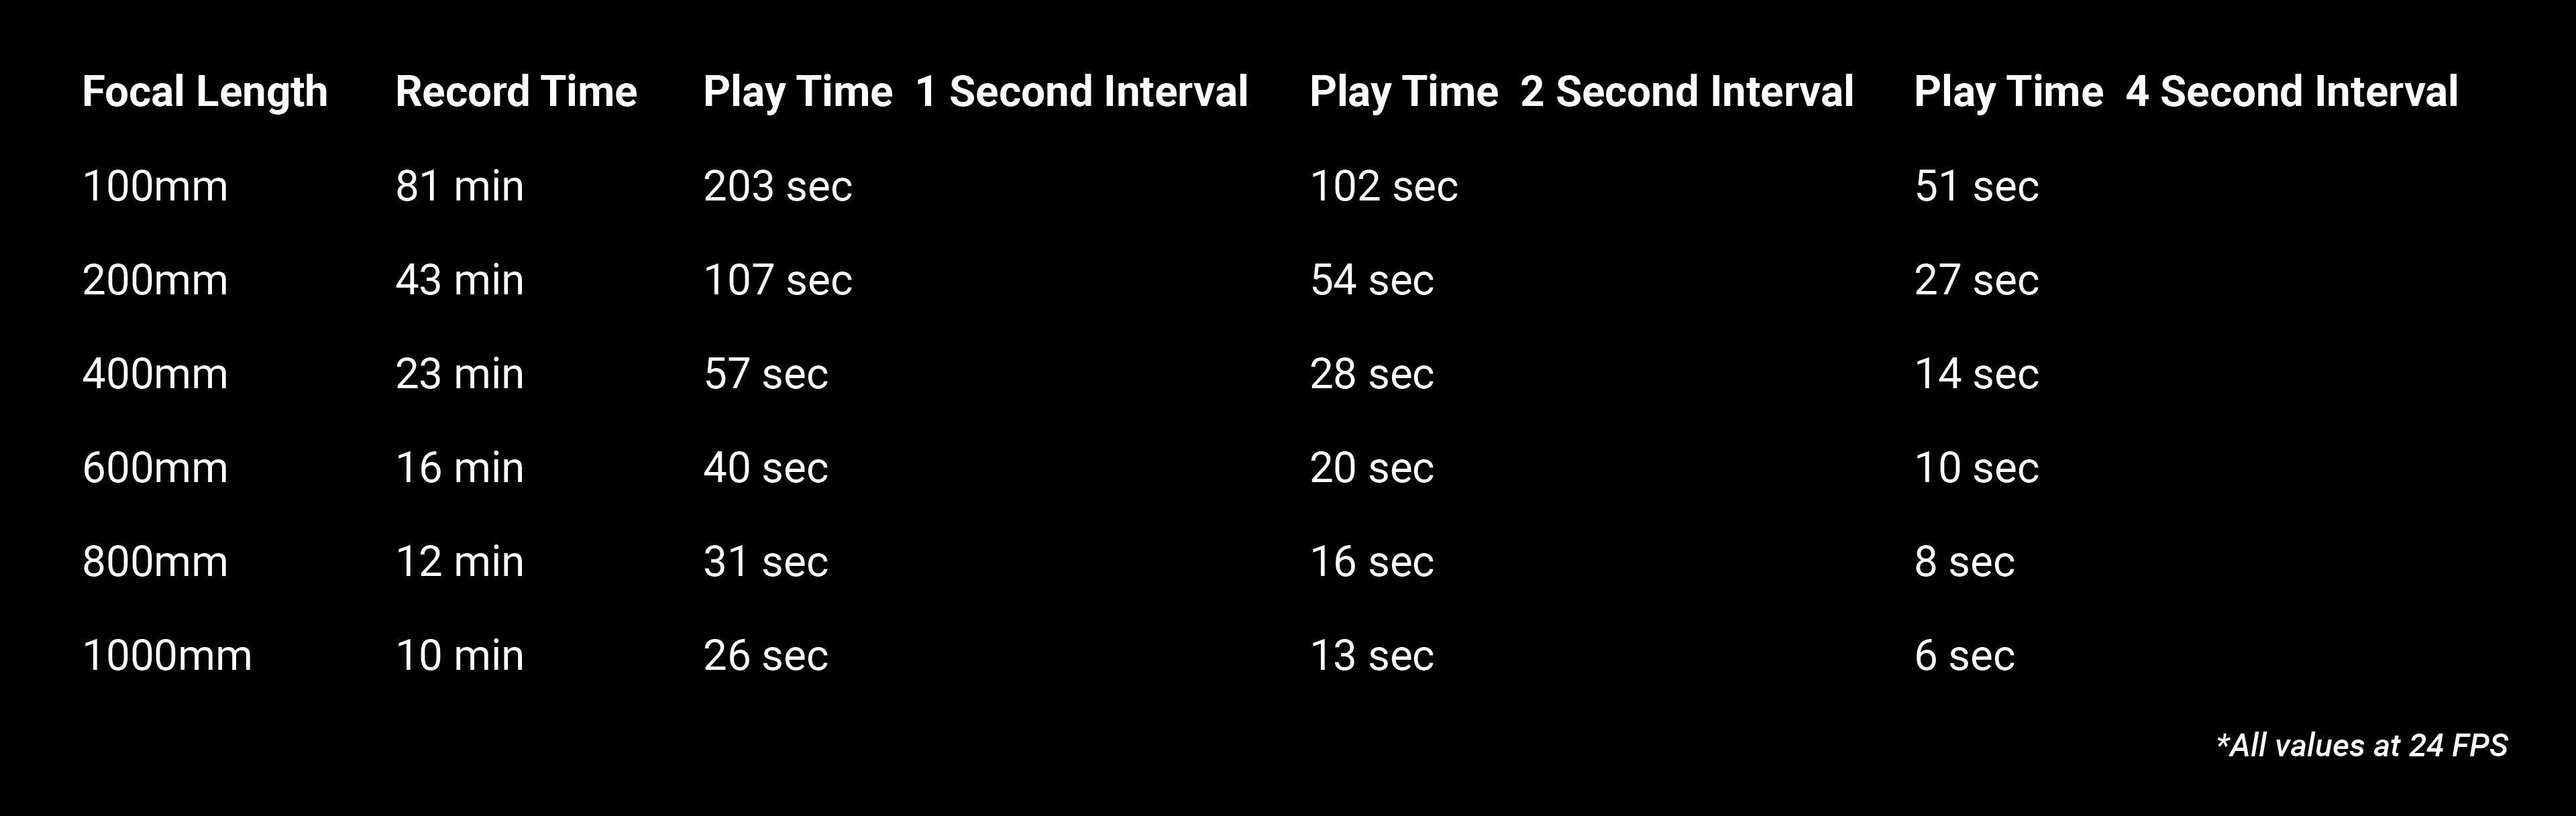
Once you have set your focal length, you can then derive your record time. This is done by calculating the time it takes for the sun to move across the frame. To do this, use the table below. If you want to calculate this for yourself, use this equation (Horizontal FOV + 0.53)/0.25, where 0.53 is the degrees the sun takes up in the sky, and 0.25 is the degrees per minute the sun moves. (As your Record Time and Interval are set, your Play Time will be determined automatically from this).
Time taken for sun to drift across spesfic focal range
The next step is to align the center of the frame with where totality will occur. To do this, you can use the NASA website we previously mentioned to figure out when totality will occur. Then in the app PhotoPills, set the time to that of totality. Using the Augmented View, roughly align your camera to where the eclipse will occur. Adjust your ball head and make sure the camera is parallel horizontally with the path of the sun so that it will sweep across the frame from left to right.
When pressing record, you want to do this so that it ensures that totality is halfway through your time-lapse. If you had a record time of 20min, you would press record 10min before totality. Before pressing record, make a small adjustment to your ball head positioning the sun on the left just out of frame. Now everything is lined up you can press go and bulb-ramp (see Exposure section above) through until it is finished. Once complete, the sun will be just out of the right side of the frame.

Genie Mini - Polar Alignment Track Method

Tracking the sun has the advantage of not having to worry about it drifting out of frame. This lets you capture a time-lapse of any desired duration, enabling you to capture every phase.
genieminipanning
To set this up, you need to align your Genie Mini’s axis of rotation to the rotational axis of the earth. The most accurate way to do this is using an equatorial mount, which is designed for telescopes. Although less accurate, you can also achieve this using a sturdy tripod and head. First, connect the Genie Mini to the tripod head. Using an app like PhotoPills, open Augmented Reality View and lie the phone flat on top of the Genie Mini. Adjust the tripod until the phone is perfectly facing the south pole. You can also align your Genie Mini at night by aligning it to the North Star, Polaris.
Once aligned, fix your camera to the Genie Mini using the tilting arm of the Pan Tilt Bracket. This will alleviate the weight of your camera and long lens, making it easier for the Genie Mini. Shift the camera backwards and forwards on the mount until it’s balanced.
Next, you’ll need to set your record time. At its longest, the eclipse will last 2hrs 55min. Depending on your location, your total duration will differ.
Once set, you’ll need to configure how far the Genie Mini rotates over this time period. Make sure it is rotating counterclockwise from east to west. As the sun moves at 0.25° per minute, you’ll want to multiply the length of your record time in minutes by 0.25. In this case, it's 43.75°.
All you need to do now is align the start point so the camera is facing the sun and press go when the start of the partial eclipse begins.

Genie Mini and Timelapse +

Timelapse+ and the Genie Mini - the method above is brand new and in beta testing. It’s been sent to us by Timelapse+ and while we haven’t tested it ourselves, we hear it’s pretty reliable.
It's pretty straightforward -- install the latest beta (enable Settings->Developer Mode to access beta versions), then make sure you either have a GPS fix or disable the GPS (Settings->GPS Module) and manually enter the Latitude, Longitude and the current time (in UTC) in settings.  Make sure Bluetooth is enabled in Settings->Wireless Setup and up to two Minis should automatically connect.
Then when you're setting up the time-lapse, you'll have the option to enable tracking = 'sun', and assign each Mini to an axis (#1 was the first connected).  Or, better still, use the app (you need to enable the Built-in AP and use the local 10.0.0.1 option with the beta) and then you can configure each axis and enable sun tracking.  You'll also have a joystick mode with live view for setup.
Also, here's how to test the eclipse program mode:
  1. Disable GPS (Settings->GPS Module) so you can enter manual coordinates
  2. Find the coordinates on Google Maps of where you plan to be, and enter them in Settings->Set GPS Latitude/Longitude
  3. Change the date to 21 Aug 2017 in Settings->Set UTC Date
  4. Set the time to a little before first contact: 16:00:00 in Settings->Set UTC Time (then check Information->Eclipse Info to verify)
  5. Go to Time-lapse and set Timelapse Mode to 'eclipse'
  6. Configure your settings for each part of the eclipse in Eclipse Circumstances
  7. Check Review Program to see the planned events and settings
  8. START the time-lapse and see how it goes!

Something To Note

Camera Sensor Size – All calculations are done with a full frame camera in mind. If you’re using a crop sensor, multiply your focal length by your crop factor and use the resulting focal length for your calculations. For example, if you have a 200mm lens on a Canon 80D with an APS-C sensor that has a crop factor of 1.6, the resulting focal length would be 320mm.
So there you have it, everything we have in our brains regarding the upcoming solar eclipse. Let us know how you get on, and have fun on Monday!

Courtesy of: Photography Talk

Night-time photography tips and tricks for beginners

Night-time photography tips and tricks for beginners | ActionHub

#photographyhobbyist  #photographybestoftheday #photographyforever


Whether you’re enjoying a camping trip or taking an evening hike, nothing beats the incredible views you get of the nighttime sky when you are far away from the city lights.
Capturing the moment on camera, however, is easier said than done if you don’t know a great deal about photography.
Luckily, we are here to share some night-time photography tips and tricks that will allow even the most novice photographer to take incredible landscape photos at night.
Plan your trip
While some photographs will be taken spontaneously, if you are purposefully setting out to capture night-time images, you should scout the location during the day first.
Choose a place away from the city to avoid light pollution; this is particularly important if you are planning on shooting the stars. You can use the International Dark Sky Association’s website to find a place with limited light pollution.
Getting to know your surroundings and checking for hazards during daylight hours will not only make it easier for you to get around in the dark, but it will also allow you to find great locations, so you can work more efficiently once the sun goes under.
While you’re checking out the location, check things like where you are allowed to park, if you are allowed to be there after a specific time, and think about how long you will have to walk around in the dark, so you can be well prepared and take enough food and water with you.
Don’t forget, it tends to get colder at night, and you’ll really start to feel it once you’ve chosen your spot and stopped moving around. Therefore, make sure you layer up before heading out, so you don’t get too cold while you’re out there. You may even want to consider taking some hand warmers with you.
Take the right gear
If you’re shooting in the dark, the gear you need is going to be a little different from what you find on your average photography gear list, so be prepared and take the following:
DSLR: Obviously you’re going to need a camera; ideally carry a DSLR with a bulb facility, along with a lens. For your lens, you want good speed, so look for an aperture in the f/1.4 to f/3.5 range.
Flashlight: A small flashlight or headlamp is a must not only to help you see your way around but also when it comes to setting up your equipment. Pack extra batteries or bring a spare so you don’t have to worry about being left in the dark.
Tripod: Make sure you pack a sturdy tripod, as you will require low shutter speeds for night-time photography. A cable release will also come in handy to ensure you get the sharpest pictures possible.
LED flashlight: Sometimes, during a long exposure, you may want to highlight an individual object in your shot. For that, you’re going to want a powerful LED flashlight or night vision flashlight.
Spare batteries: We mentioned spare batteries for your flashlight, but don’t forget to pack some for your camera too! Long exposures will drain your battery fast, so you want to ensure you have some spare, fully charged batteries in your bag.
Setting up
Ideally, you should arrive at your location a little before dark, so you can get set up and find a composition you like while you’ve still got a bit of light. Once the sun goes down, the light and colors in the sky are going to change pretty fast, so you want to be around to capture that and get some interesting shots.
You’ll experience various shades of yellows, oranges, and reds before the sky turns a nice, deep, dark shade of blue. This can last for about half an hour to an hour after sunset, and then it will go completely dark.
When setting up your camera, think about your composition. Having a strong focal point in the foreground is a good idea whenever you’re doing any type of landscape photography, but this is especially the case when shooting in the dark.
Your foreground element could be anything from a rock formation to a mountain peak or small tree. While you may choose to include it as an interesting silhouette against the moonlit sky, you could also use your LED flashlight to paint the object and really bring it to the forefront.
Having this element in your shot will make the image that much more engaging for the viewer. Play around with the height of your tripod and take a few practice shots until you are happy with the composition.
Of course, one of the best things about shooting at night is that incredible night sky, so try to capture the Milky Way in the background sky. This is where you’re planning will come in handy; pick a clear, moonless sky for some really dramatic shots.
Getting the right shot
Now, it’s time for the more technical stuff.
To get the best results, use manual focus. While cameras these days come with some pretty advanced autofocus systems, the AF sensor in your DSLR will likely not perform as well at night since there is not enough light to allow it to lock onto the subject.
While illuminating your foreground element can help with this, you should try and get your manual focus skills up to speed in case this doesn’t work out. This will also stop the focus from inadvertently changing once you’ve already locked onto your chosen scene. For nighttime shoots, you want to focus at infinity, or just before; you may find it tricky to do this at night so prepare in advance and do this during the day.
The next thing you need to tackle is your camera’s ISO capabilities. Now, you may think low light equals high ISO to avoid slow shutter speeds, but this is not always the case. Often, when shooting landscapes at night, that means low exposures, which tend to create extra grain. For this reason, you may want to turn the ISO as low as you can.
However, these days many of the newer cameras are quite adept at handling higher ISOs. That’s why you need to learn more about your camera beforehand to understand its ISO capabilities. It’s all about finding the right settings to allow your camera to perform to its full potential, so take a few test shots at different ISOs and try to find the right one.
Once you’re ready to start taking photographs, take that cable release and lock open the shutter (this is where bulb mode comes in handy). Take note of the start time with a stopwatch or using the stopwatch function on your phone.
Once the shutter is open, it’s time to illuminate your foreground element. When painting with your flashlight, try to use slow and even strokes. You should avoid shining the light on one particular spot for too long.
It may take you awhile to find the right exposure and figure out how much light you need, which is why it’s important to note down timings and how long you illuminated your subject.
Since you’re likely going to be doing a bit of guesswork on your exposure time, so it’s a good idea to shoot RAW instead of JPG. This allows you to capture the full dynamic range of a scene, giving you more possibilities in post-processing.

Cheat sheet: Simple lighting techniques

null


#photographyhobbyist  #photographybestoftheday #photographyforever

Scroll down for your cheat sheet
Professional-looking portraits don't require professional lighting setups. While it definitely helps to have appropriate lights, what makes the crucial difference between an average portrait and a great one is knowing what to do with the kit you have.
Much of your success comes down to arranging your lights so that they complement the subject being photographed, and to use a few accessories where required, such as a diffuser, brolly or reflector, to modify the light in the scene. These don't need to be expensive, and often you can substitute something you may have lying around the house. A large piece of white foam or sturdy cardboard, for example, can often work perfectly well as a reflector.

Six simple ways to light a portrait

The six setups on the cheat sheet below show what kind of effects you can achieve when you arrange lights in a certain way and use accessories wisely.
Perhaps you can start by thinking: what kind of look do I want to achieve? Do you want Rembrandt-style lighting, where part of the face is lit and part is in shadow? Or do you want a more even kind of light throughout?
Read more: Cheat sheet: Pro portrait lighting setups
For a strong light that results in a high-contrast look, you may want to use the light as it is, close to the subject. This will create shadows which can highlight certain facial features, and with the right subject this can look great. A bit of distance and an accessory like a diffuser will help to spread and soften the light, giving a softer effect.
The use of a reflector can add balance and help to fill in shadows, and using a coloured one can add a warmth or a coolness too. A gold-coloured reflector, for example, will bounce a warmer light back to the subject, while a silver one will help to keep things cool.
Read more: Why do small apertures have large f-numbers?
Maybe you want to emphasize the shape of the subject by lighting it from behind? This will create a rim light that will catch the hair, and it can easily give the final image more vitality. It won't always be appropriate with every model, but it's easily achieved and gives you something less obvious to experiment with.   Make sure to check back for more great cheat sheets too!