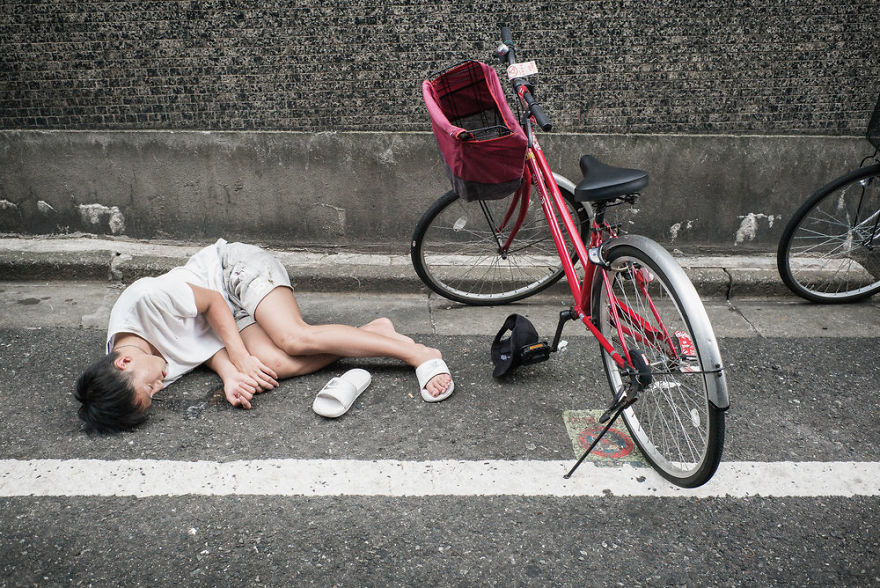
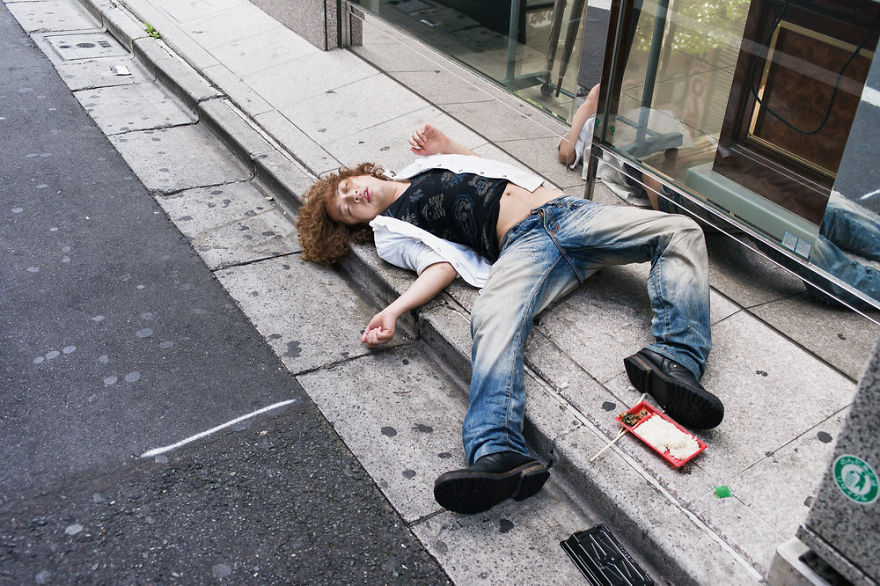
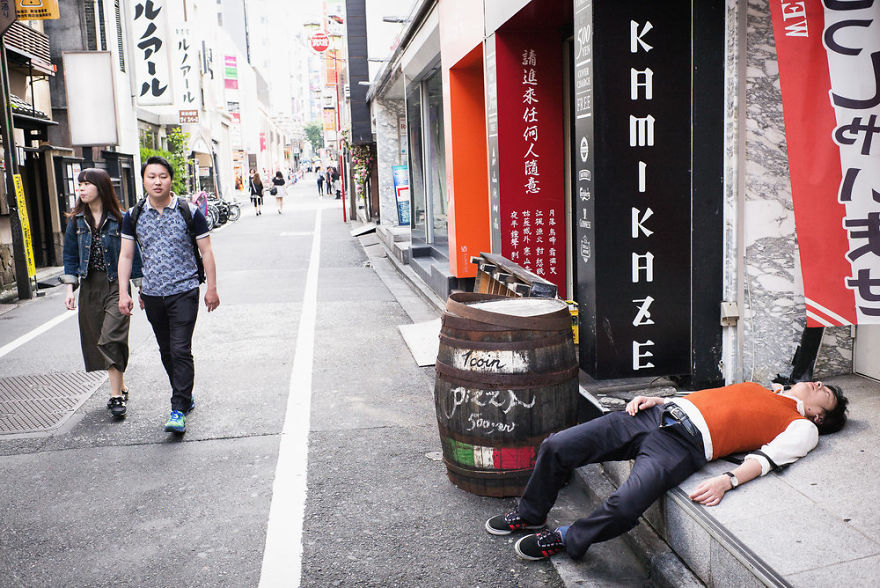
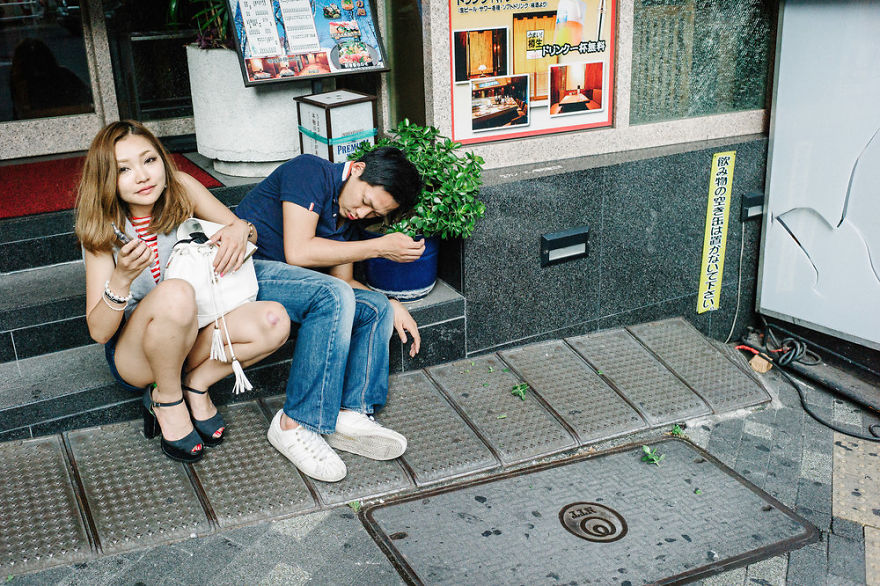
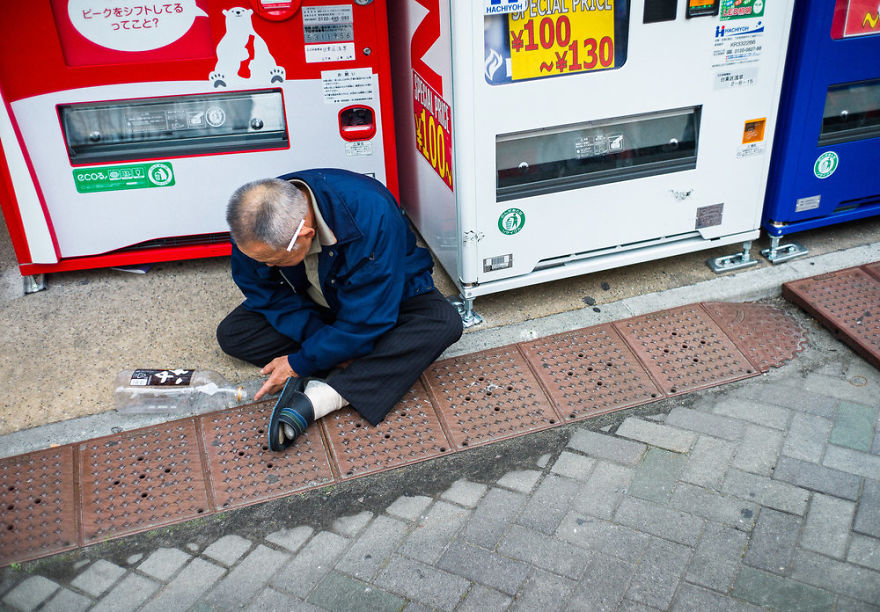
10+ Uncensored Photos Of Drunks In Japan Show The Nasty Side Of Alcohol
Published 2 days ago.
Like Demilked on Facebook:
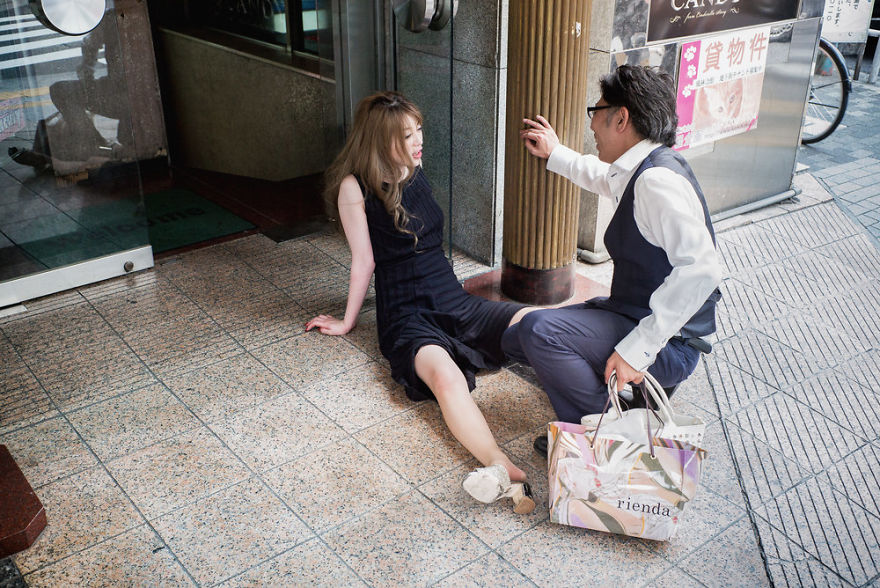
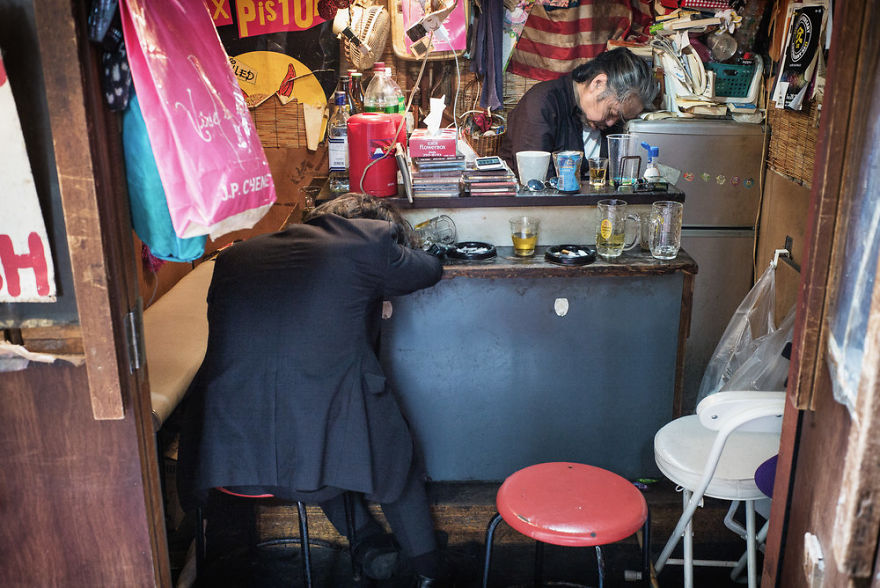
Alcohol commercials
tend to focus on the good times while drinking and the image of a
confident and fun person who’s doing it. But what they don’t like you to
see is what happens after you take a couple drinks too many. That’s
what British photographer, Lee Chapman, decided to capture in the
streets of Tokyo on the next morning after the party.
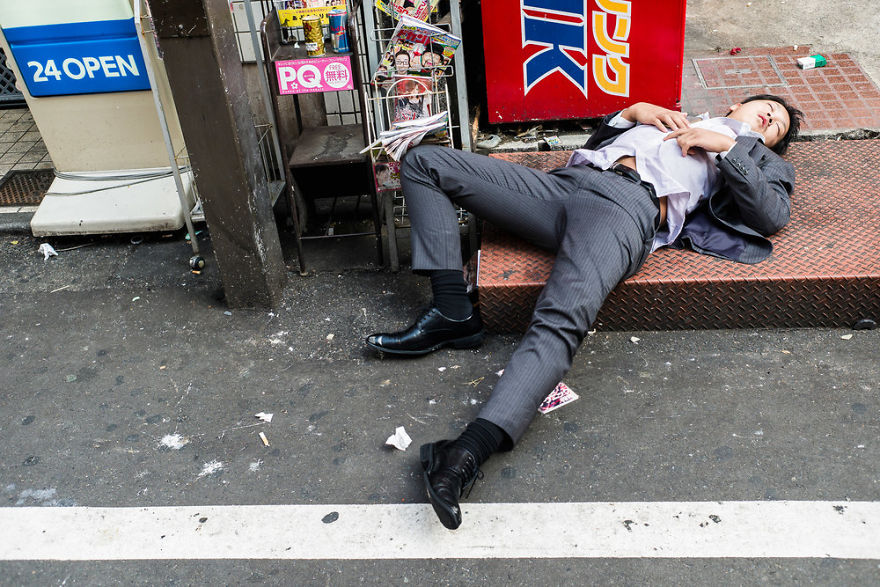
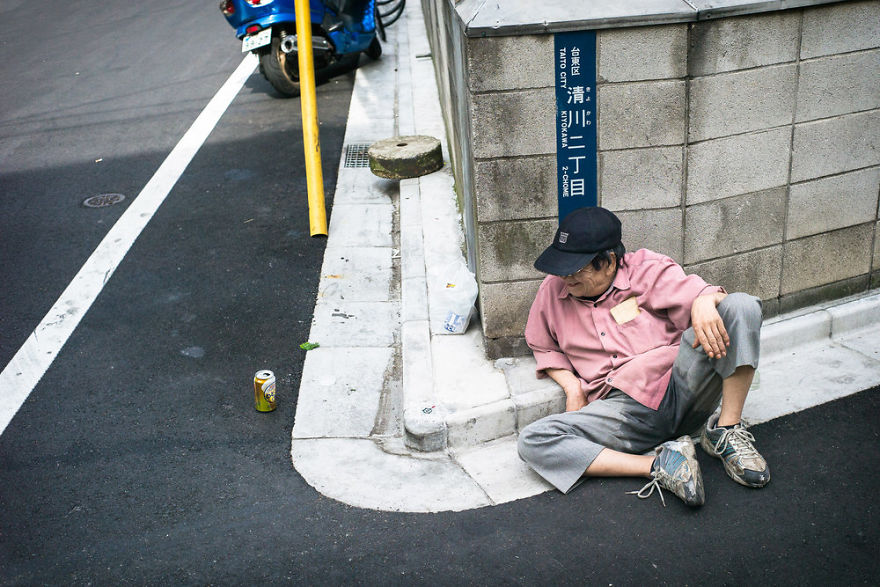
Lee Arrived in Tokyo back in 1998 for “a year or two” and stayed ever since. During that time he’s created the Tokyo Times and got to know Japan’s biggest city pretty well, allowing him to capture many of its layers.
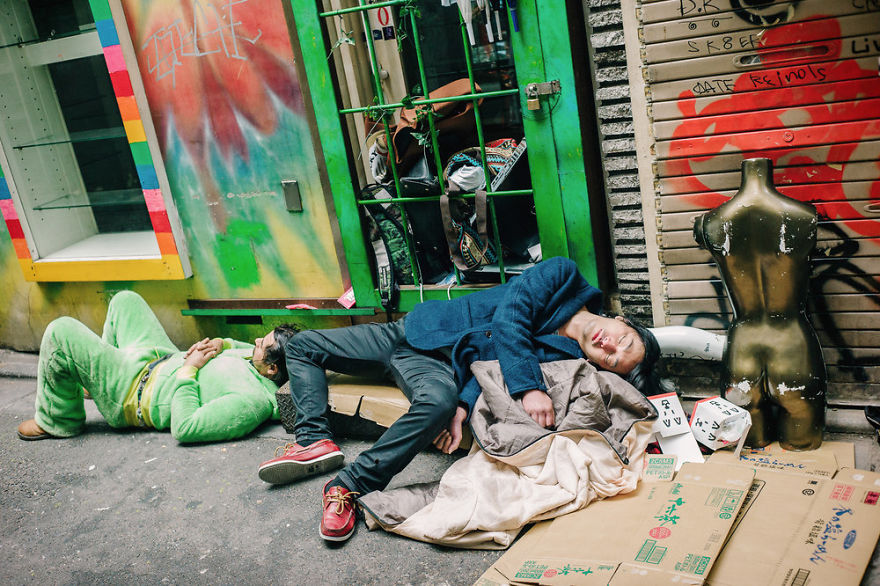
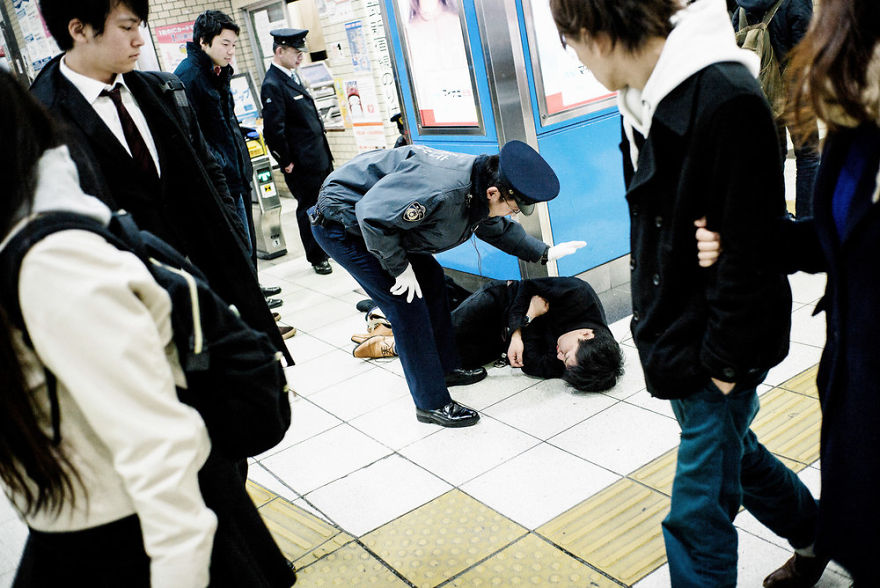
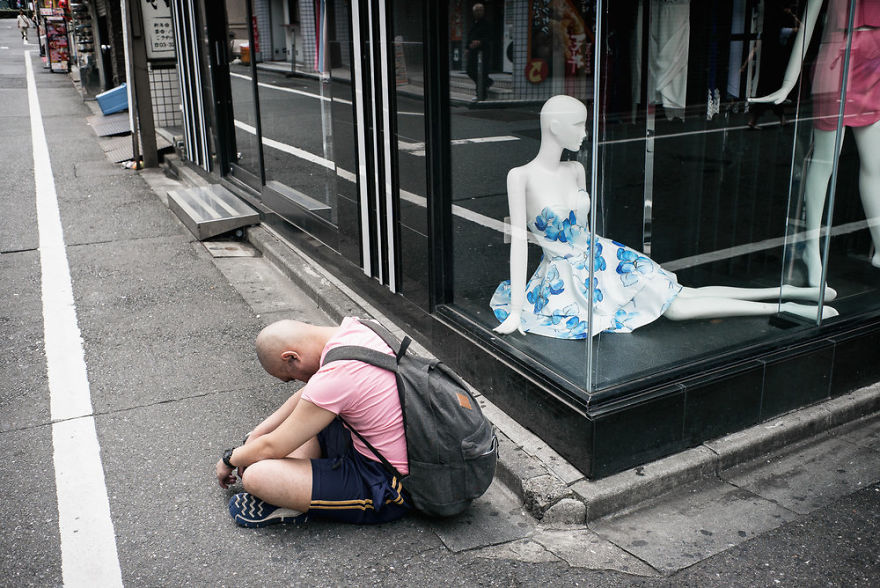
By no stretch, we mean that this is a Japanese-specific problem, as
many of you have probably witnessed cases of excessive drinking
throughout the world. And while there is no simple solution to
addictions like these, a series like this can work as a good deterrent
from experiencing this first-hand.
More info: Lee Chapman | instagram (h/t)
Jordan Kines, a travel and lifestyle photographer from Boston. #photographyforever
Q: Tell us a bit about yourself as a photographer—give us your 20-second elevator pitch!
A: I am a Boston-based travel and lifestyle photographer with a
passion for capturing the magic in everyday moments with a dramatic,
versatile style. My work spans from weathered skies and scenes in nature
to social gatherings. I’ve come to embrace the beauty and challenge in
capturing unplanned and uncontrolled occasions. Q: How would you describe where you are now compared to five years ago?
A: Five years ago, I was lost and a complete novice. Today, I have
gained so much clarity and have sharpened my eye to an unimaginable
degree. In 2013, I wanted to ask for permission, follow popular trends; I
aspired to have work that resembled the photos and photographers I saw
on 500px, Tumblr, Flickr, and Instagram. Now, I thrive on trying to be
more of an outlier. I strive to be audacious and experiment outside of
my comfort zone.
Five years ago, I thought I had to move toward what was comfortable
and what was accepted by the masses. Now, I would tell that younger
version of myself to move towards discomfort and shoot what you’re
passionate about without asking for approval. I can’t wait to see the
photographer I grow into five years from now. Q: What tools have helped you develop your skills?
A: I have used my eye and my love for telling stories as my guiding
light in developing my skills as a photographer. Five years ago, I was
consumed with the idea that one’s camera equipment and one’s editing
software were the most essential tools in creating alluring photos. My
studies and practice as an aspiring director at film school was crucial
in developing my sense of story.
Now, I realize that cutting-edge gear assists in capturing great
imagery, but it is not a prerequisite. Getting to that point started
with training and sharpening my eye. I encouraged that in a few
different ways over the years, like walking around the city or my
neighborhood and making a mental note of photographic opportunities. I
spent considerable time observing how light impacts locations and
subjects. Another exercise I used to do was take my camera to familiar
places like school, work, local parks or supermarkets and aim to capture
them in one still image. This practice gradually helped to evolve my
eye. Q: You’ve created a great personal brand. Did this come naturally to you or did you spend time developing it over the years?
A: My brand image was created both organically and deliberately. I
never sought to achieve a certain look for my content, in part because I
was somewhat obsessed with the process of creating and exploring. But
with my excursions, gigs, and passion projects over the years, my
content style progressed to a stage of which I could’ve only dreamed.
Once I realized I was advancing in my craft, I wanted to maintain
that momentum. I honed in on strengthening my post-processing, which
ensured the tonality in my photos was consistent across the board. My
post-processing became another tool for bolstering both my shooting
style and my brand. This consistency helped me to cultivate my content’s
personality and continues to steer me toward growth. Q. Do you have any advice for younger photographers building their own personal brands?
A: If I could give younger photographers any piece of advice, it
would be to not ask for permission. Explore and be fearless in
developing your brand. There isn’t a one-size-fits-all approach and
there isn’t a right or wrong way when it comes to cultivating who you
are as a photographer or artist. You have to follow what feeds your
soul, what fulfills you, and what allows you to grow and connect with
other photographers.
I would also recommend not putting all of your eggs in one basket.
Take advantage of all photo-sharing platforms and mediums that resonate
with you. When I created my Instagram account seven years ago, I thought
it was the only app I needed. Sadly, I was wrong. If I hadn’t grasped
onto 500px,
I would not have had the humbling opportunities to collaborate with
them and familiarize myself with the plethora of talented photographers
on their platform. You never know who’s watching. Remain true to who you
are and hold onto to what makes you you—the uniqueness of your brand is
what people will gravitate to. Q: How has 500px helped you in your experience with photography?
A: 500px brims with quality content; it has been pivotal in helping
me recognize and appreciate quality. What I value about 500px is their
commitment to catering their platform strictly for photographers rather
than for the general public. The work comes first with this platform,
and that indirectly pushes me to create the best images I possibly can.
500px gave me my first real-world freelance opportunity. I signed
onto a challenging gig with them, which gave me the wisdom, knowledge,
and confidence I needed to navigate the freelancing world. I have
undying gratitude for their support, their invitation to collaborate,
and their generosity for promoting me. I received my first ever feature
on the 500px Instagram page this past summer, and it truly meant the
world to me! To be recognized by a photo-sharing platform that I use was
huge. Q: How do you use 500px to market yourself?
A: When it comes to sharing on 500px and utilizing the platform, I
tend to subconsciously filter what I post. I want 500px and other
photographers in the community to see my best work. Much of the content I
scroll through and am amazed by sets the bar high. The elegant
atmosphere doesn’t encourage feelings of insecurity, instead, it
inspires me to produce and share excellence. With this perspective and
understanding, I strive to engage the community with consistency in
execution and output. Share-worthy content allows me to license directly
through 500px. Q: What’s your experience been like with licensing your photos on 500px?
A: I have been licensing photos with 500px
for a little over a year now. So far I have not sold any images, but
the fact that my work is worthy of licensing speaks volumes and
reinforces what I mentioned in the previous answer. It is humbling to be
recognized and celebrated by 500px!
#Photography
It wasn't all that long ago that photographers and videographers were two distinct groups of people.
But now that camera manufacturers from Apple and Samsung to Canon and
Nikon are outfitting cameras with solid video capabilities, more and
more photographers are becoming videographers, too.
If you're ready to expand your horizons from photography into
videography but aren't sure how to do it, get some insider tips for
doing so with these videography tips for photographers.
In the most basic sense, a video is just a whole bunch of single exposures strung together.
The number of exposures that are created each second is called frame rate, which is measured in frame per second or fps.
The higher the frame rate, the smoother the video footage appears to
be. So, 60fps offers a more fluid viewing experience than 24fps.
Typically, motion pictures are filmed at 24fps or 25fps, which give them a cinematic-looking quality.
At 50fps or 60fps, the video begins to mimic human vision more closely, and looks much more fluid.
Interestingly, common frame rates change depending on where you are in the world.
For example, in the U.S. and Canada, 24, 30, and 60fps are common. In Australia and Europe, however, 25 and 50fps are common.
In the end, you can use whatever frame rate you like; it just depends on the look you're trying to achieve.
You Need to Shoot in Manual Mode
Taking high-quality videos requires that you stop shooting in full auto mode and learn how to shoot in manual mode.
The primary reason why manual mode is required for shooting video is
that you can't have the camera constantly adjusting the exposure
settings. If it does that, it will be plainly evident in the video as it
brightens and darkens.
So, switch your camera's dial to M, manually set the aperture, ISO, and shutter speed (more on that next...), and manually focus the lens as well.
Only after you dial in those settings should you start shooting video!
If you're not quite sure how to approach shooting video in manual
mode, check out the video above by DSLR Video Shooter for a detailed
tutorial.
When you take still photos and want to adjust the level of exposure,
one thing you can do when shooting in manual mode is adjust the shutter
speed - make it faster to darken the photo and slower to brighten it.
But when you shoot video in manual mode, adjusting the shutter speed is not an option.
That's because the shutter speed is used to control the amount of motion blur in each image that's in the video sequence.
That means that it needs to remain constant for a fluid video...
A good piece of advice is to set the shutter speed at double the
frame rate. So, if you're shooting at 25fps, set the shutter at 1/50
seconds. If you're shooting at 60fps, your shutter speed will need to be
1/120 seconds.
If the exact shutter speed isn't available, just select the closest one and you'll still get good results.
Unless you're going for a Blair Witch Project vibe with jittery video, you need to stabilize the camera in some manner.
In some situations, a video tripod is the best solution.
Video tripods have what's called a fluid head, which allows you to
pan the camera from left to right and tilt it up and down with very
fluid motions.
This helps you frame your shots just how you want, which is important
because unlike still photos, videos aren't typically cropped in
post-production.
When shooting video handheld, it's often beneficial to have a gimbal to help stabilize the camera for a smoother result.
Though you can certainly shoot video handheld and without a gimbal, it takes a lot of practice to master.
Learn How to Produce Top-Notch Videos
Of course, planning your video shoots and recording the videos is only part of the process.
Instead, you also need to process and edit your videos and produce a final product that will knock people's socks off.
If that sounds complicated, it isn't...
There are plenty of video making tools out there today to help you create awesome videos, but for my money Kizoa is at the top of the list.
For starters, Kizoa has been in the business for over a decade, so
they know what they're doing when it comes to providing tools for
burgeoning videographers.
Kizoa's online video maker gives you tons of options for customizing
your videos. That includes an array of music and special effects, text
and transitions, and even ready-to-use templates that allow you to
create professional-looking videos in short order. You can see how easy
it is to create a video from a template in the video below:
Aside from all the video making features that make the process of
creating your final product easier, Kizoa also allows you to share your
videos with greater ease.
You can quickly share it on social media platforms like YouTube, burn
it to a DVD, email it, or download it in various formats, including
MOV, MP4, AVI, MPEG2, and GIF.
You also get access to Kizoa's secure online cloud storage so you have a place to keep all your videos safe and sound.
Perhaps best of all, Kizoa starts at just $30, and that gets you a lifetime membership - no annual or recurring fees to worry about!
Between learning the basics of shooting video and having access to a
wide range of professional video editing tools with Kizoa, there's
nothing stopping you from creating breathtaking videos!
Review: Luminar 3 with Libraries — The Good, the Bad, and the Ugly
Matt Suess
#photographyfromheart
On December 18, 2018, Skylum will be releasing its long-awaited DAM (Digital Asset Manager) for Luminar. Called Luminar 3 with Libraries, this will be a free update for everyone who currently owns Luminar 2018 on Mac and Windows.
Originally, it was first talked about being released in 2017.
Once that didn’t happen it was next anticipated to be released in early
2018. That didn’t happen either, but now it finally arrives a couple
weeks shy of the end of 2018.
Has the long wait been worth it? Let us find out. Full disclosure: Skylum is a sponsor of mine,
and I am a beta tester who wrote this review using a pre-release version
of Luminar 3 provided to me 2 weeks prior to the public availability.
It is possible that some issues I mention here do not make it into the
final version.
The Good
Since its arrival in 2017, Luminar quickly started replacing ON1 as
my #1 go-to program for enhancing my photographs. At the time, I was
still using Capture One Pro and, to a much lesser extent, Lightroom for
my RAW files. After some initial adjustments to my RAW file, I would
send a 16-bit TIFF file to Luminar to finish it off and give it my
signature look.
In the middle of 2018, I came across an awesome catalog program called Mylio,
which I moved all of my images into to keep things organized. Capture
One Pro had just become too slow to deal with as my catalog got larger.
So, I found myself using Mylio to send my RAW files direct to Luminar
2018, and since then it has been doing a fabulous job for most of my RAW
files.
But wouldn’t it be great, seeing that I was spending so much time now in Luminar, to have Luminar keep track of all my photos?
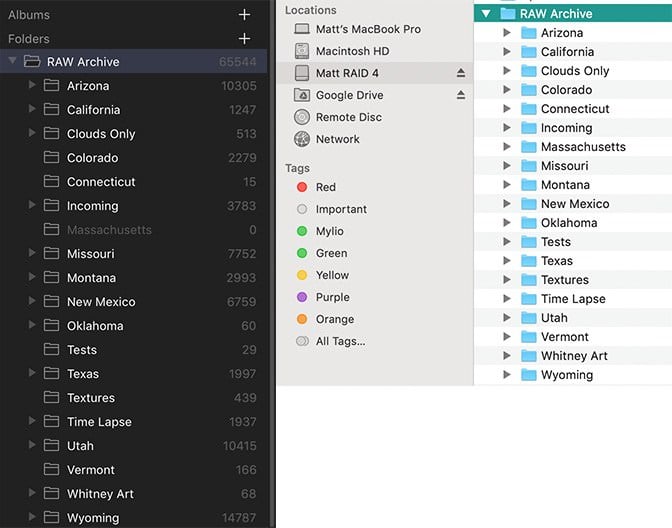
Enter Luminar 3 with Libraries. 1. Luminar 3 can now keep your photos organized with its new Library addition.
You can create multiple catalogs to organize just the photos you want
to keep organized by adding folders from your computer, external hard
drives, and even cloud storage. You can even import files from a card
reader and have Luminar 3 handle the organization.
It’s important to note that Luminar 3 exactly mirrors your hard
drive. If you move files outside of Luminar with your Finder or Windows
Explorer, Luminar will know about it and adjust its catalog accordingly.
Same as if you rename files or folders. This is unlike Lightroom, where
if you move a file in Finder/Explorer, Lightroom will have no idea
where it went. You can also use Luminar 3 to move/rename/delete files.
Your files will be moved/renamed/deleted in Finder/Explorer as well. 2. Adding photos to your Catalog is extremely fast.
Using my 2018 MacBook Pro with Mojave, a 2.6GHz i7 processor with 32GB
of RAM with my RAW files on a LaCie RAID external hard drive with a
Thunderbolt connection, I added 65,500 RAW files to my catalog. In just 4
minutes and 34 seconds I was able to start browsing and rating my
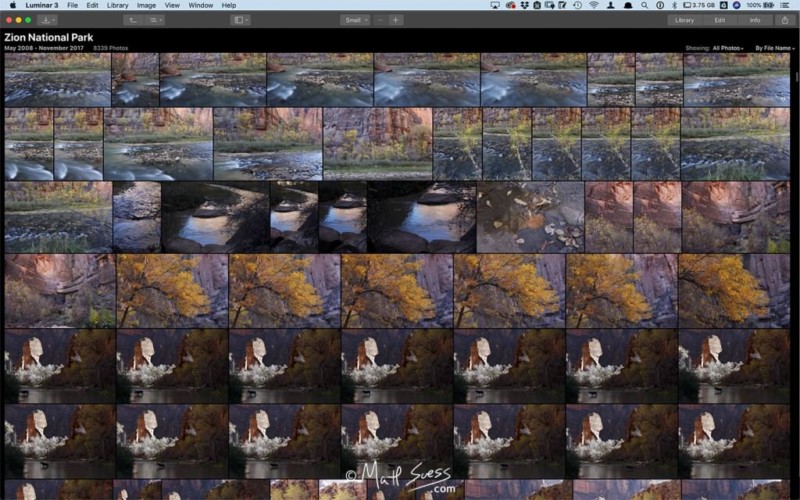
images! 3. Browsing your photos in thumbnail view is extremely fast as well.
Low-res thumbnail previews are viewable right away as you scroll
through a folder and almost instantly a sharper thumbnail preview is
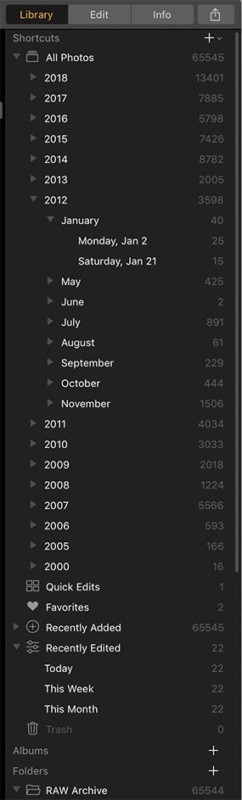
generated. 4. After adding your photos to your Catalog, Luminar 3 has some great shortcuts to find them.
You can instantly find photos organized by year, month, and day and at a
glance see how many photos are in each category. There is a shortcut to
Recently Added photos as well as Recently Edited. There is a shortcut
to Quick Edits too. Quick Edits are photos you open directly into
Luminar that for whatever reason you don’t want to have added to your
Library for Luminar to keep track of. 5. You can give photos a star rating from 1-5, give them a
Picked or Rejected tag, and give them a color label of either None, Red,
Yellow, Green, Blue, or Purple. You can use all of these tags
to sort your images in the Library for quick access. You can also sort
your images by Capture Time, Edit Time, File Name, Type & Size. 6. You can also create Albums. These are virtual
Albums that don’t take up any extra space on your hard drive and are
used to better organize your photos. You can add and remove photos at
will in and out of the Albums you create and your original files will be
safe in their original locations. 7. A really cool feature – my favorite – is that you can Sync Adjustments from within your Library.
Simply select one photo and Edit it, then select other photos you want
to sync the adjustments to and all of your adjustments will be applied
to the other photos. This could be a huge time saver! Originally if I
wanted to do this, I would have had to create a Preset (Now called Looks
in Luminar 3) and apply that preset to the other files I wanted to
adjust via Batch Processing. 8. And speaking of editing your photos, everything is done non-destructively and every edit you do is stored in the catalog. No save button to select. 9. Another great feature is the ability to have multiple catalogs and an easy way to back them up too. 10. As of this current release, Luminar does not yet save files in the proprietary .lmnr file format. I have however been able to successfully open them up from Luminar 2018 inside Luminar 3. 11. Windows users will be happy to hear of some new improvements. I haven’t had a chance to verify it on my Windows laptop just yet, but Skylum mentions the following improvements:
Color Management Improvements – Issue Fixed. You’ll be able to
properly manage colors between Luminar, monitor and 3rd part devices.
Various Improvements – Speed improvements, Image Export improvements,
more controls for filters, plug-in performance improvements, share
pop-over updated, drag & drop issue fixed and other.
The Bad
Adding a DAM database to a program is one heck of a challenge, I am
sure. With this being the first release, it is probably expected that
some things are not ideal and need to be worked on. Here are some of
those issues I am finding. 1. If you have multiple exposures and want to send those photos to Aurora HDR 2019, there is only one way to do that.
Select them in your Library and drag them onto your Aurora HDR 2019
icon in the dock. It will send all of the images over in their original
format (including RAW). If instead you choose the Open In shortcut icon
in the upper right-hand corner of the program, Aurora HDR 2018 opens up
and only one photo at a time is sent over and it isn’t the RAW file. So
you can’t merge files that way.
Same thing if you choose File/Open In. If you choose
Edit/Plugins/Aurora it will send it to Aurora HDR 2019 but again it only
sends photos over one at a time and it isn’t the RAW file. And until
Skylum updates Aurora HDR 2019, you can’t send files directly from there
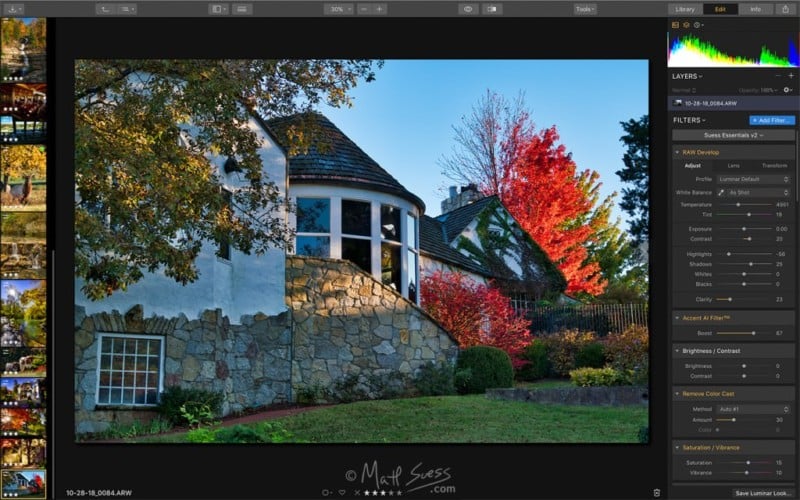
to Luminar 3 – they go to Luminar 2018 instead. 2.
Another thing that annoys me greatly is whenever you bring a RAW file
over to Edit, the Lens Distortion is automatically applied and there is
no way to disable this from happening. You have to manually
turn it off each time if you don’t want it applied. This annoys me
because for most of my shots I am cropping in-camera.
I shoot a lot of landscapes with a wide-angle lens and for the most
part, you can rarely tell if there is any distortion. It’s not as if I
am photographing a brick wall and can thus easily see the distortion in
the lines of bricks. So Lens Distortion ends up cropping into my photo
slightly – a problem when you are cropping tightly in-camera.
When ON1 first came out with ON1 RAW they too started doing auto Lens
Distortion and I noticed it when using a beta and suggested they give
us an option to turn it off in preferences. They ended up adding that
preference once the software shipped. I suggested the same here with
Luminar, but so far it remains… Please give us the choice Skylum. 3. Another minor annoyance is that you can only size your thumbnails in Small, Medium, Large, and Largest sizes. Most catalog programs give you a slider with a much larger size range to work with for thumbnails. 4. When you are working in Edit mode, you can opt to have a handy filmstrip of your images along the left side. Unfortunately, this filmstrip is too narrow and the size is not adjustable. 5. As cool as it is to select multiple files in the Library
to sync adjustments, you would think that the same would work for Bach
Processing. It doesn’t however. Selecting multiple images and
bringing up Bach Processing does not load them into it – you need to
drag & drop or navigate your hard drive to find them. 6. While Luminar 2018 can process RAW files from my very old (early 2000’s) Canon 1Ds, Luminar 3 can not. This is the first program I have found that can’t do this. 7. And lastly, there is no way to view filenames along with each of the thumbnails when in grid mode.
…And The Ugly
Ok, so I did already mention that building a database must be
extremely difficult. And I did mention that I love using Luminar to edit
my photos!
But…
There are some things in this very first release that I am not at all
crazy about and, as an educator, it is my responsibility to keep it
real and let you know about them. 1. Even with one of the currently fastest MacBook Pro’s
available thumbnail generation is painfully slow especially with RAW
files from a Sony a7R III. I am talking about 10 seconds slow!!
When you double-click on a thumbnail image in your Library to view it
super large, it takes on average 10 seconds for Luminar to finish its
preview. After an initial launch of it, Luminar makes 3 more passes at
improving the image – each of which is visibly noticeable. Even the
histogram slightly shifts between each pass. This is just way too much
time for each photo. 2. After the super large preview is built and you move on to
the next photo, if you use the arrow keys to go back to previously built
previews you can notice a little size/flicker adjustment of the image. Kinda hard to explain without a video of it – let’s just say it is not 100% smooth moving between cached files. 3. The caching of these files needs some serious enhancements!
Luminar stores these preview caches on a Mac in the following folder:
User/Library/Application Support/com.macphun.luminar3. And with each
file you look at in the super large view, a cached version is created in
that folder that is roughly some 15-20% bigger than your original file!
So I have a 43MB RAW file and when I preview it in the Library, I lose
51.7MB of hard drive space on my computer!
You can adjust the cache size in Luminar’s preferences, fortunately.
It does default to 10GB. And with 10GB, that means I can only store 196
files from my Sony camera in the cache at the default. When you reach
your set cache limit, the oldest previews generated in cache are
eliminated to keep the cache size at the set size. 196 photos isn’t even
close to a day’s shoot so most people are going to have to increase
that cache size in the preferences. There is also no way to change this
default cache location to another location, say an external hard drive.
Laptop users with limited hard drive space are going to be challenged. 4. The default location of your catalog is in your Pictures folder.
A good thing about the catalog files is that they can be stored on an
external hard drive. Another good thing about it is its initial size.
After adding 65,500 photos my catalog size was only 19.4MB to start out
with (remember that thumbnails/previews are stored elsewhere).
The catalog stores all of your ratings and edits and I have noticed
an issue here. There is a History folder that is made up of .state
files. Each and every time you make a slider adjustment, a new .state
file is created. Each averages about 200kb in size. That’s not a huge
file for sure, but again – each and every time you make a slider
adjustment a new file is created. Some files you work on might have
dozens if not hundreds of slider adjustments made to it.
What’s more, if you go back to the original version of your file via
the history and start fresh, those old history states disappear from
your photo but those original history .state files end up remaining and
don’t get deleted. These history states are what provides Luminar with
the ability for non-destructive adjustments. But I can definitely see
this starting to take up some significant hard drive space to save all
of this. Again it is good we can move this to an external drive with
more space. 5. No keywords, no captions, no .xmp file support, no IPTC, no geo-tags, no versions or stacks, no smart albums, etc.
This isn’t fun. When you import your files, the only info that gets
brought in is camera metadata. If you have keywords or star ratings or
anything else either embedded in your file or stored in an .xmp sidecar
file Luminar 3 won’t see it. This means you are starting all over with
your catalog organization and it could be a deal-breaker for a bunch of
photographers. In addition, if you export a file to Photoshop, your star
rating doesn’t get sent with the file. A lot of this is basic photo
catalog management and it is quite disappointing to not see any of this
yet in this first release.
Look Into the Future
Skylum fully admits that this first release is only just the start.
They know a lot of features are missing right now. And, they have even
been public about what their roadmap for the near future is.
In fact here are their plans for Luminar 3 with updates coming January through July 2019:
RAW + JPG (Luminar Libraries) – You’ll be able to work with Raw
& JPG versions of the same image in a more convenient way. View as a
single image, but switch between versions in real time.
Virtual Copies (Luminar Libraries) – You’ll be able to create
versions of a photo with different styles, adjustments, editing history,
etc. This is especially useful when you want to try different looks on
the same image.
IPTC edit & sync (Luminar Libraries) – You’ll be able to edit
core IPTC info. Plus create custom presets related to IPTC data and sync
these presets across multiple images.
Hidden Features (Powered by AI) – We are busy working on more smart
tools powered by Artificial Intelligence to give you more powers when
editing skin on portraits, architecture; removing objects or simply
applying masks on your images.
Lightroom Migration Tool – You will be able to move your data and images from Adobe Lightroom to Skylum Luminar.
Smart Search (Luminar Libraries) – You’ll be able to quickly find
the image you need, using keywords, EXIF information and file names.
Conclusion
So after all of this what is my opinion? What is my advice for you?
My initial reaction when I first started testing Luminar 3 the other
month – as far as the new Libraries are concerned – is that it really
isn’t much more impressive than a slightly enhanced image browser. I
definitely couldn’t take it as a serious DAM.
And unfortunately, my opinion remains.
There are some really good things to like here such as adjustment
syncing and super fast importing, but there are some very important
features currently missing that are required basics in today’s image
cataloging programs.
For photographers who never organized their photos before, who don’t
have a lot of photos, or whose organizational needs are very basic I
think people are going to be very excited right now with the new
Libraries in Luminar 3.
For photographers who have catalogs already in Lightroom or Capture
One or Mylio or elsewhere, well, I am not quite sure the version of
Luminar 3 shipping on December 18, 2018, is going to get you super
excited and allow you to easily move away from those programs.
Especially if you rely on keywords and captions.
Wednesday, December 5, 2018
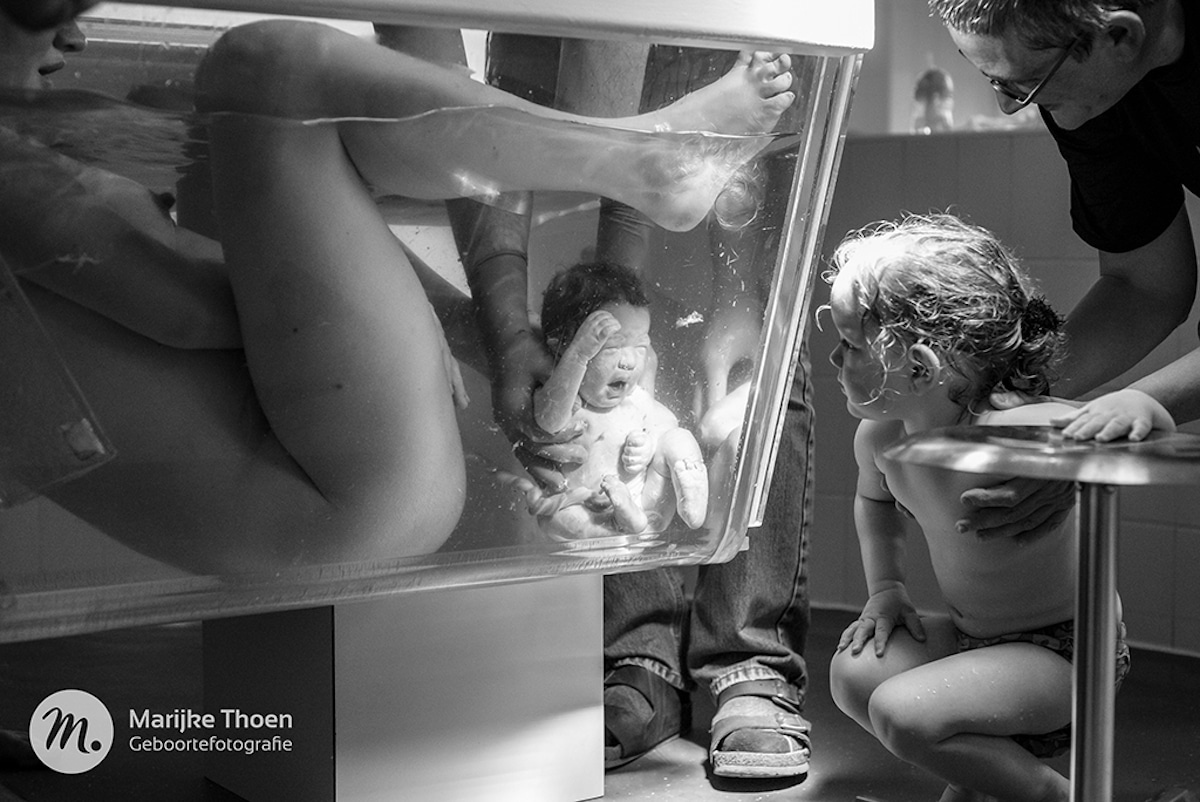
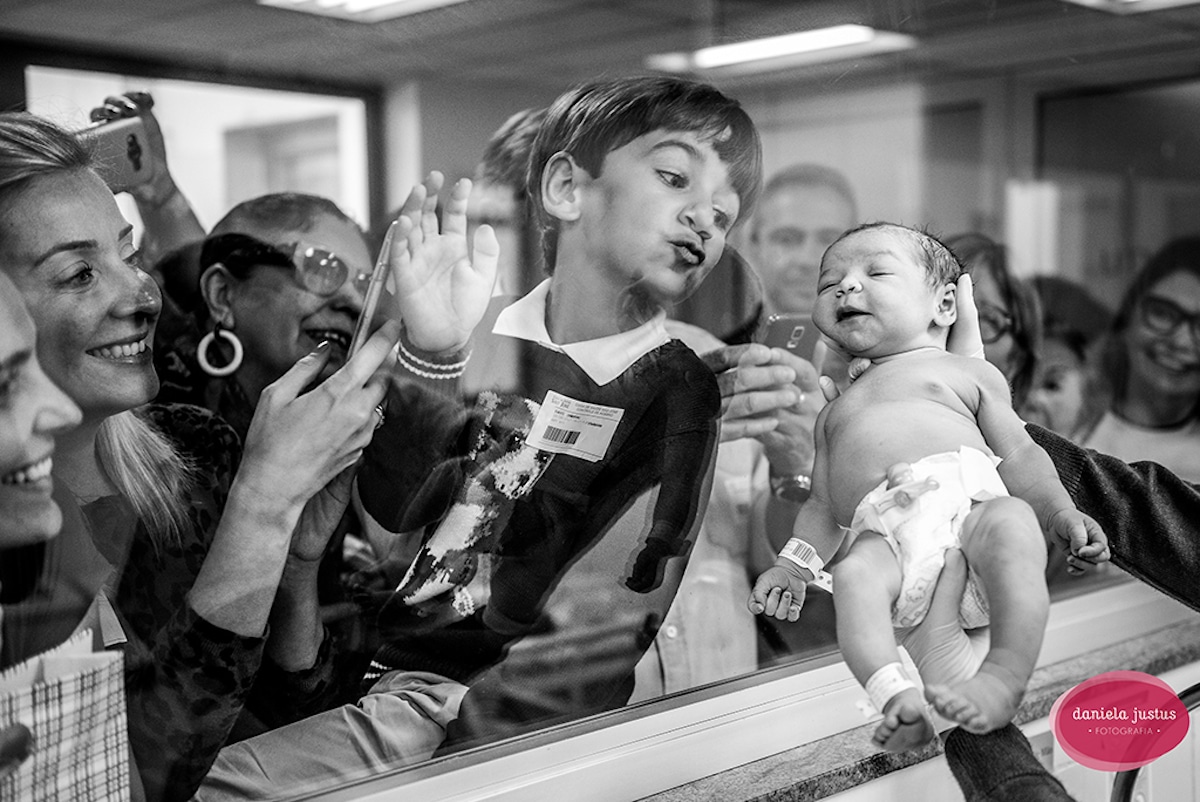
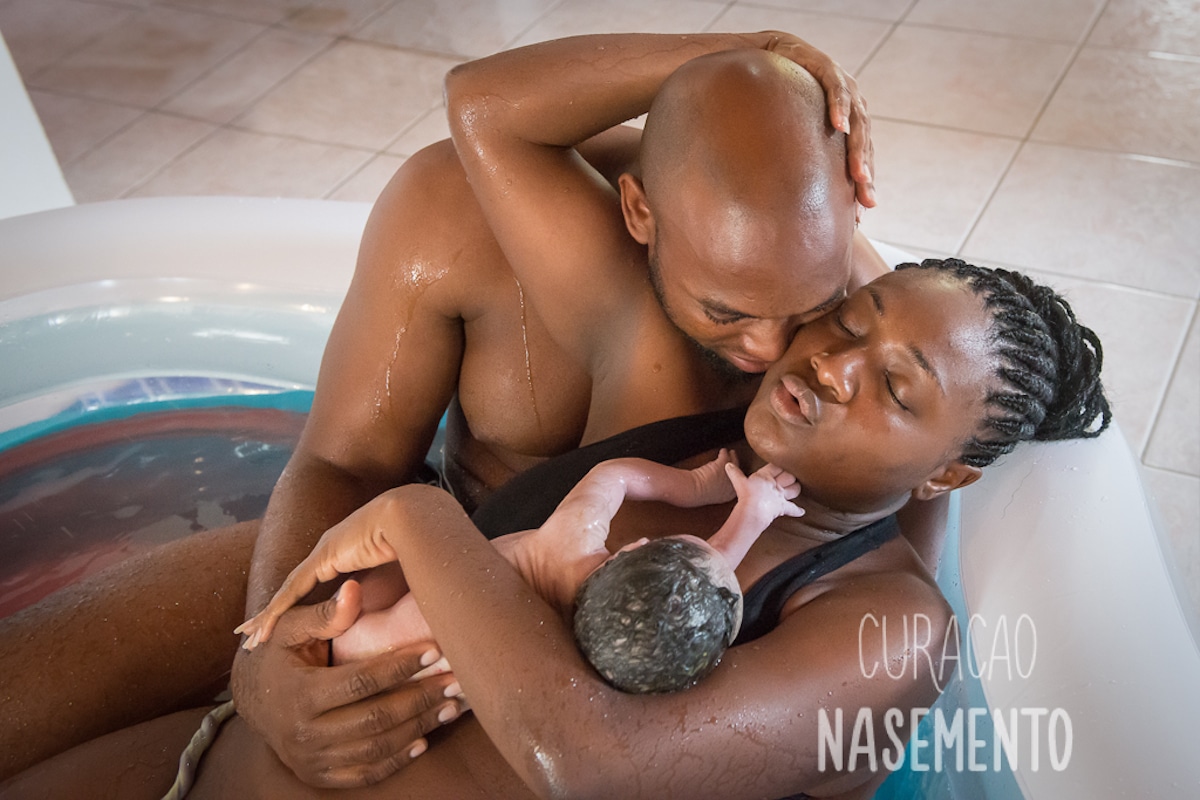
Winners of 2018 Birth Photography Contest Celebrate Magic Moments of Childbirth
The
2018 winners were recently announced, and within the scope of the
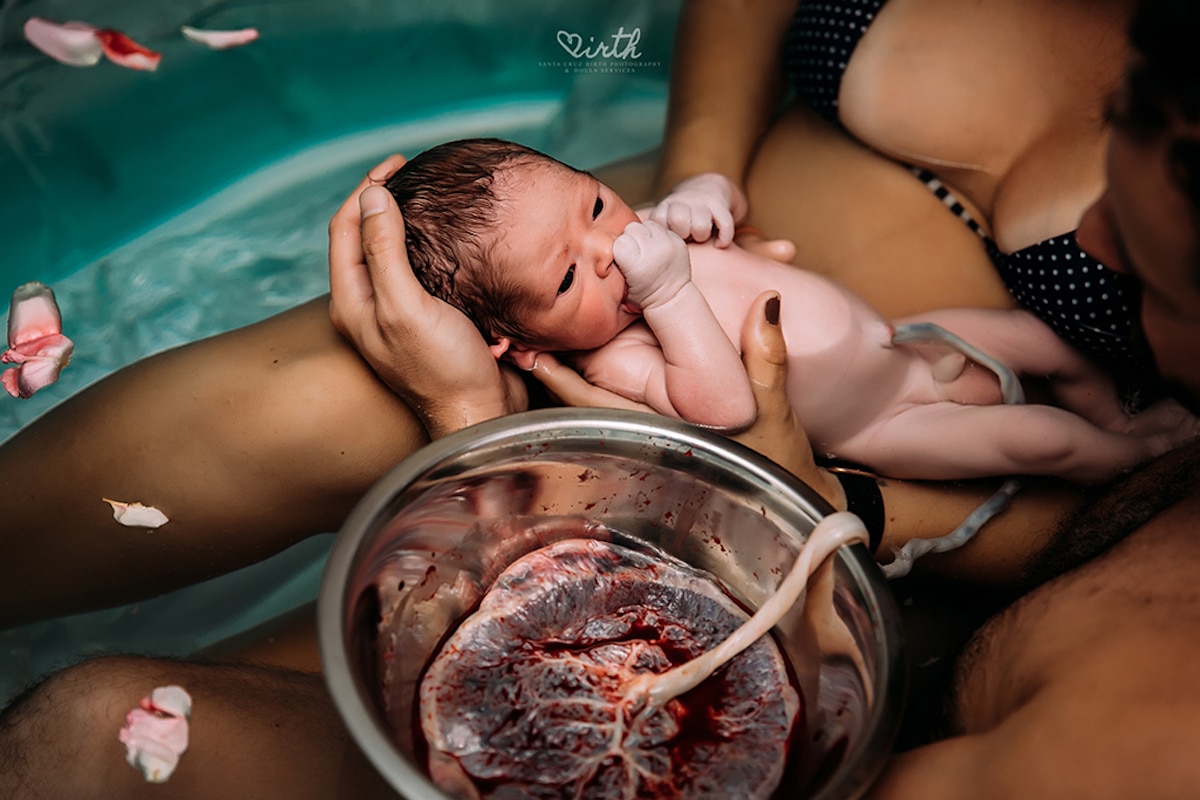
competition, history was made. In 2016, photographer Marijke Thoen
Geboortefotografie won the grand prize for her image of a water birth.
“The beautiful baby in that photo is now a big sister,” the competition
explains, “and [Geboortefotografie] has won the 2018 competition with an
image featuring the adorable siblings!”
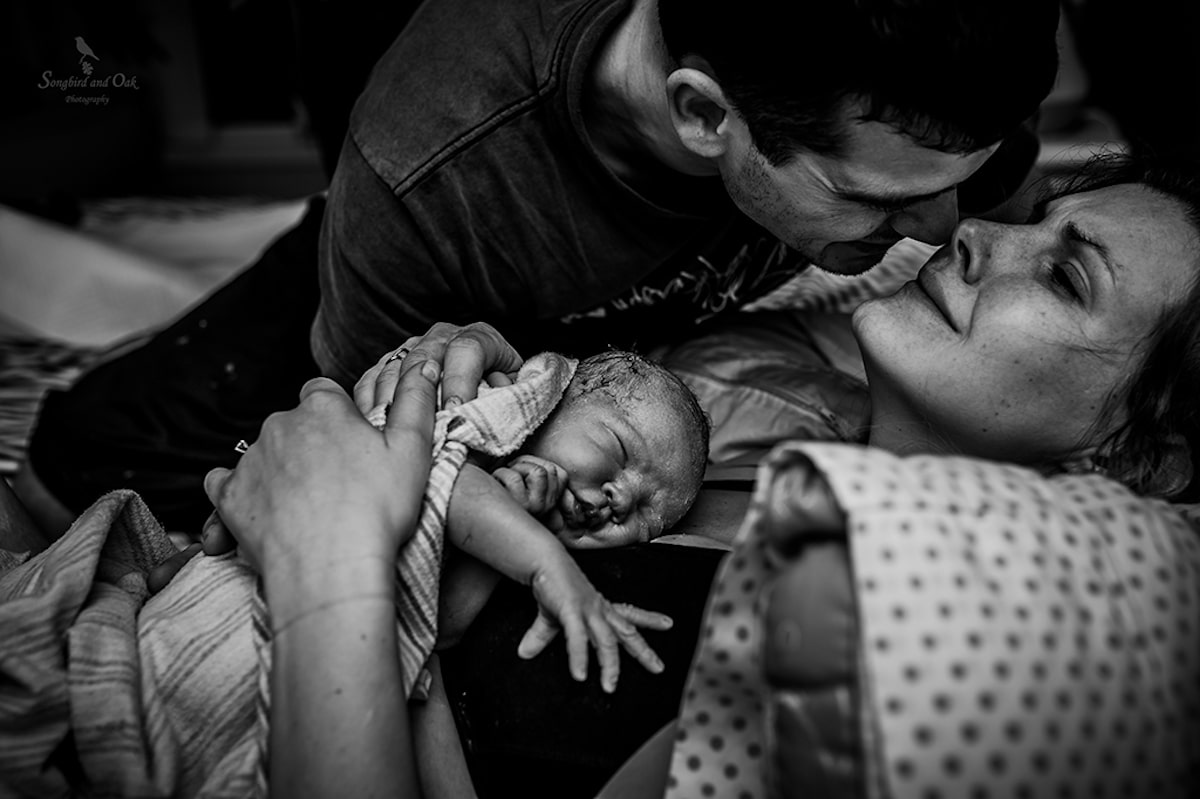
In
addition to Geboortefotografie’s awe-inspiring photograph, IAPBP has
selected winners in categories including Labor, Delivery, Postpartum,
and Birth Details, as well as the top portraits chosen by its members.
Each image represents its own incredible journey and is a testament to
just how amazing our bodies are. See the artful birth photos below.
Each
year, the International Association of Professional Birth Photographers
hosts an Image Competition featuring the best in birth photography.
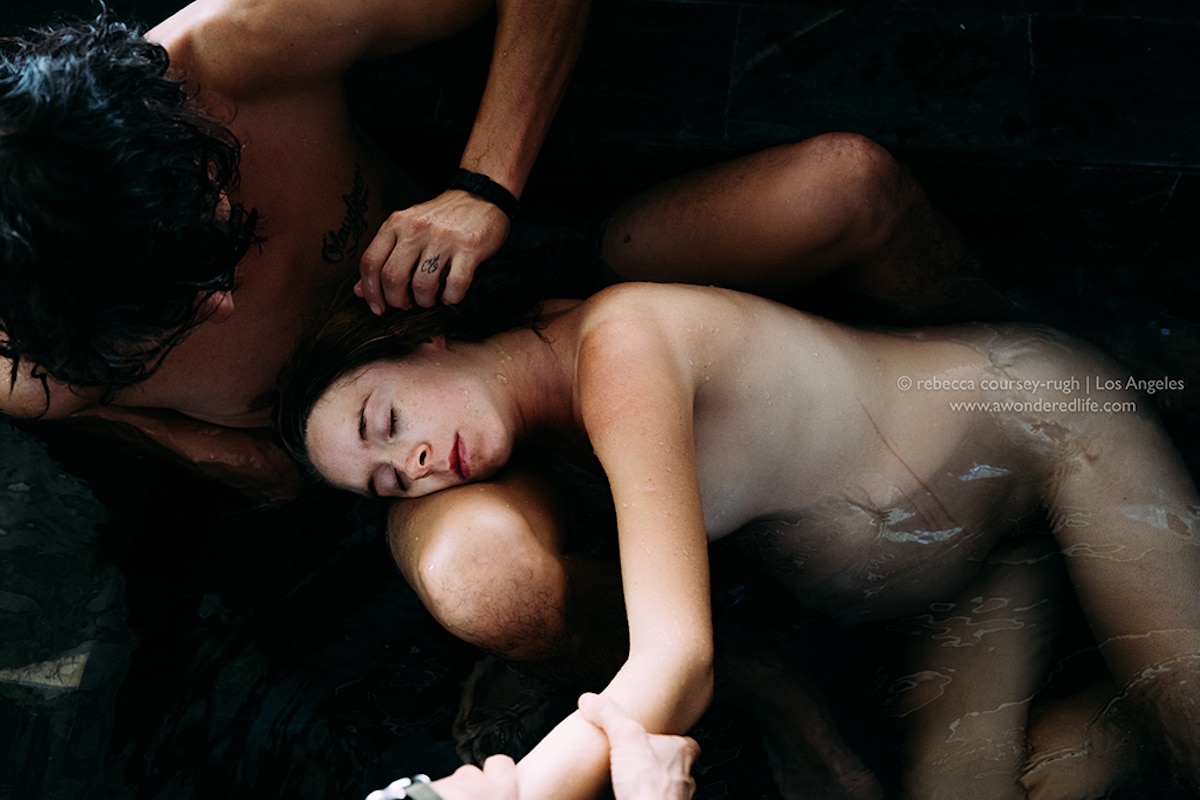
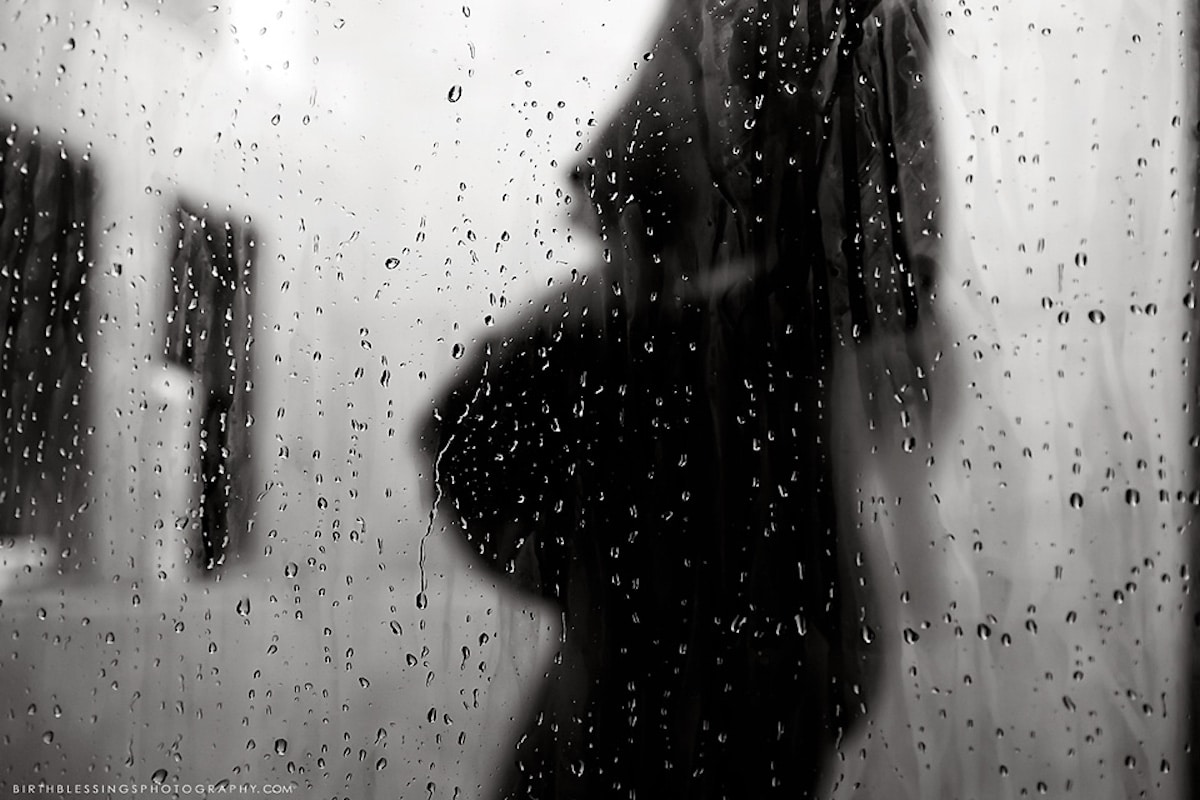
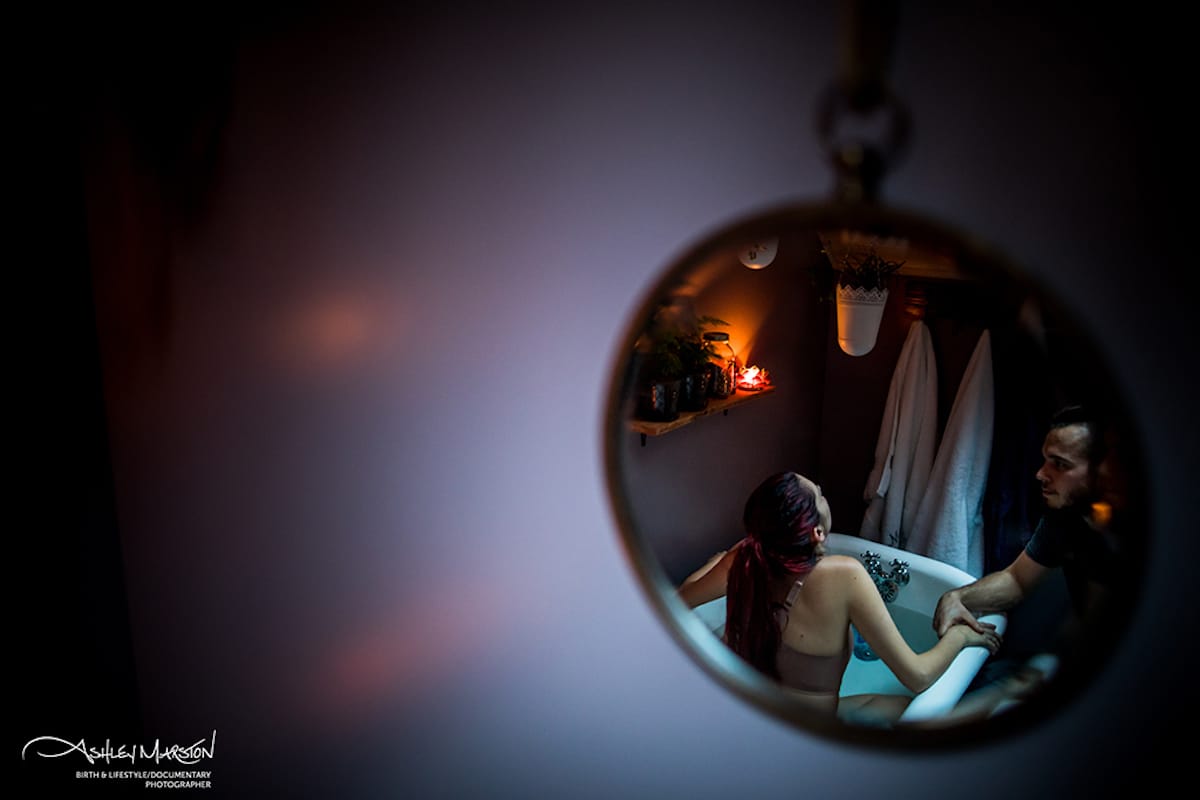
“Nowhere and Everywhere,” Best in Category: Labor, Photo: Rebecca Coursey
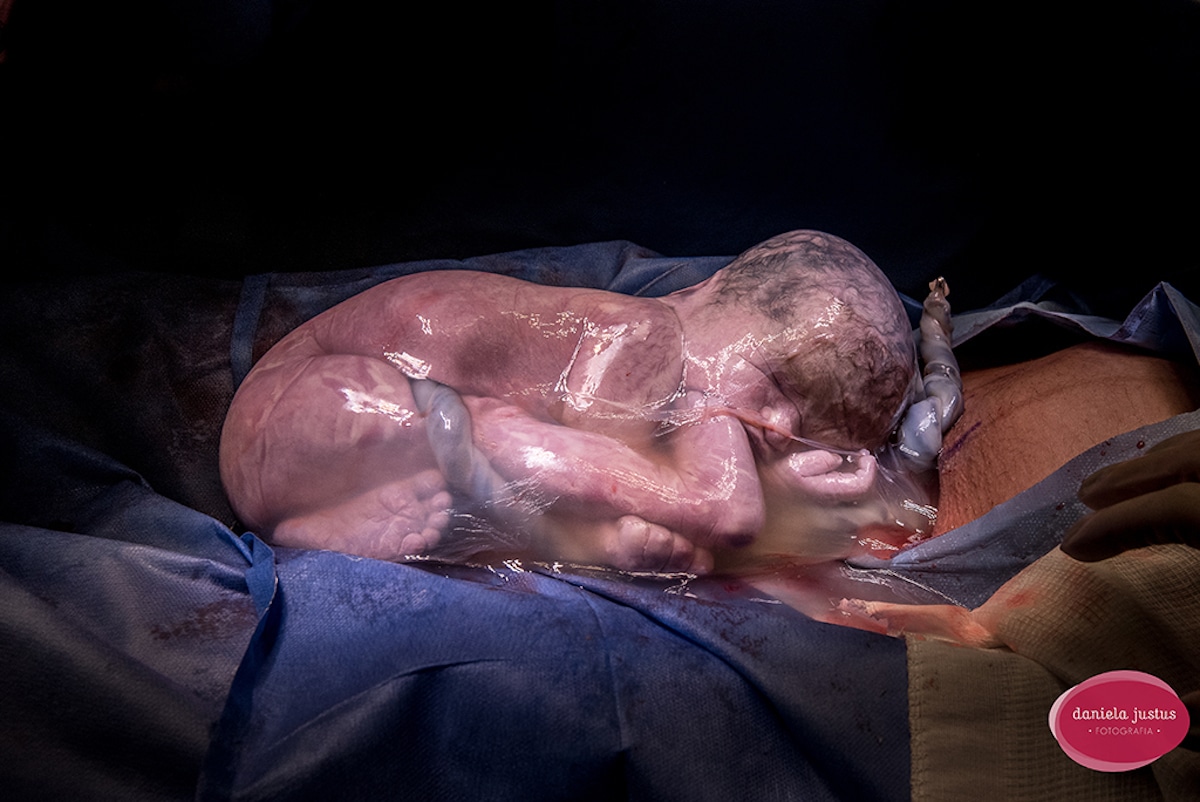
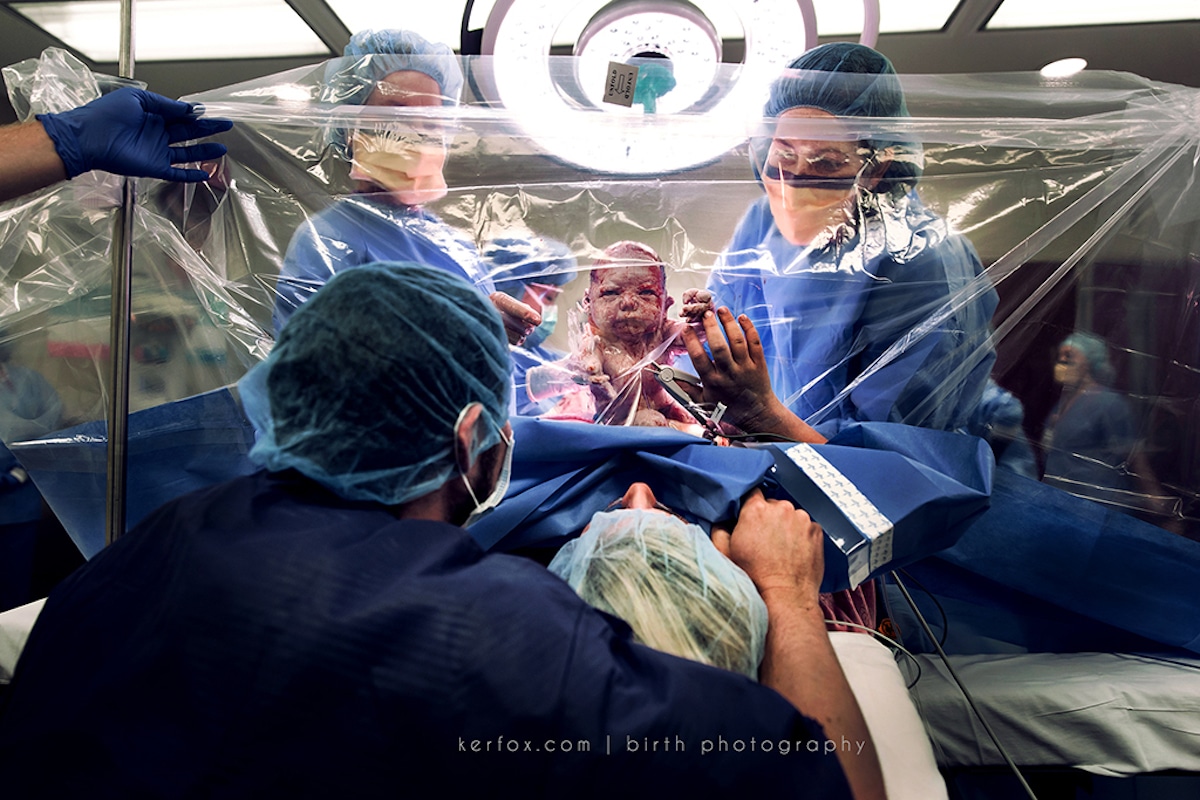
“En Caul Baby Birth,” Best in Category: Delivery, Photo: Daniela Justus
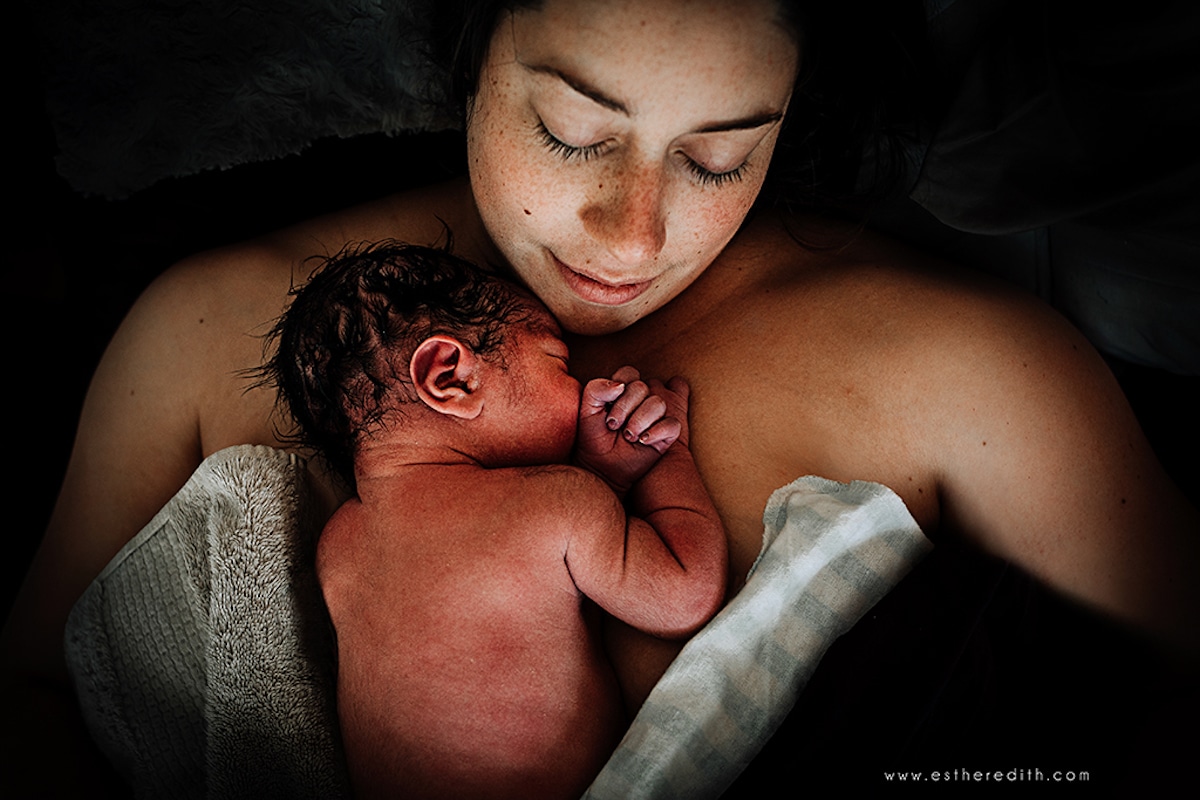
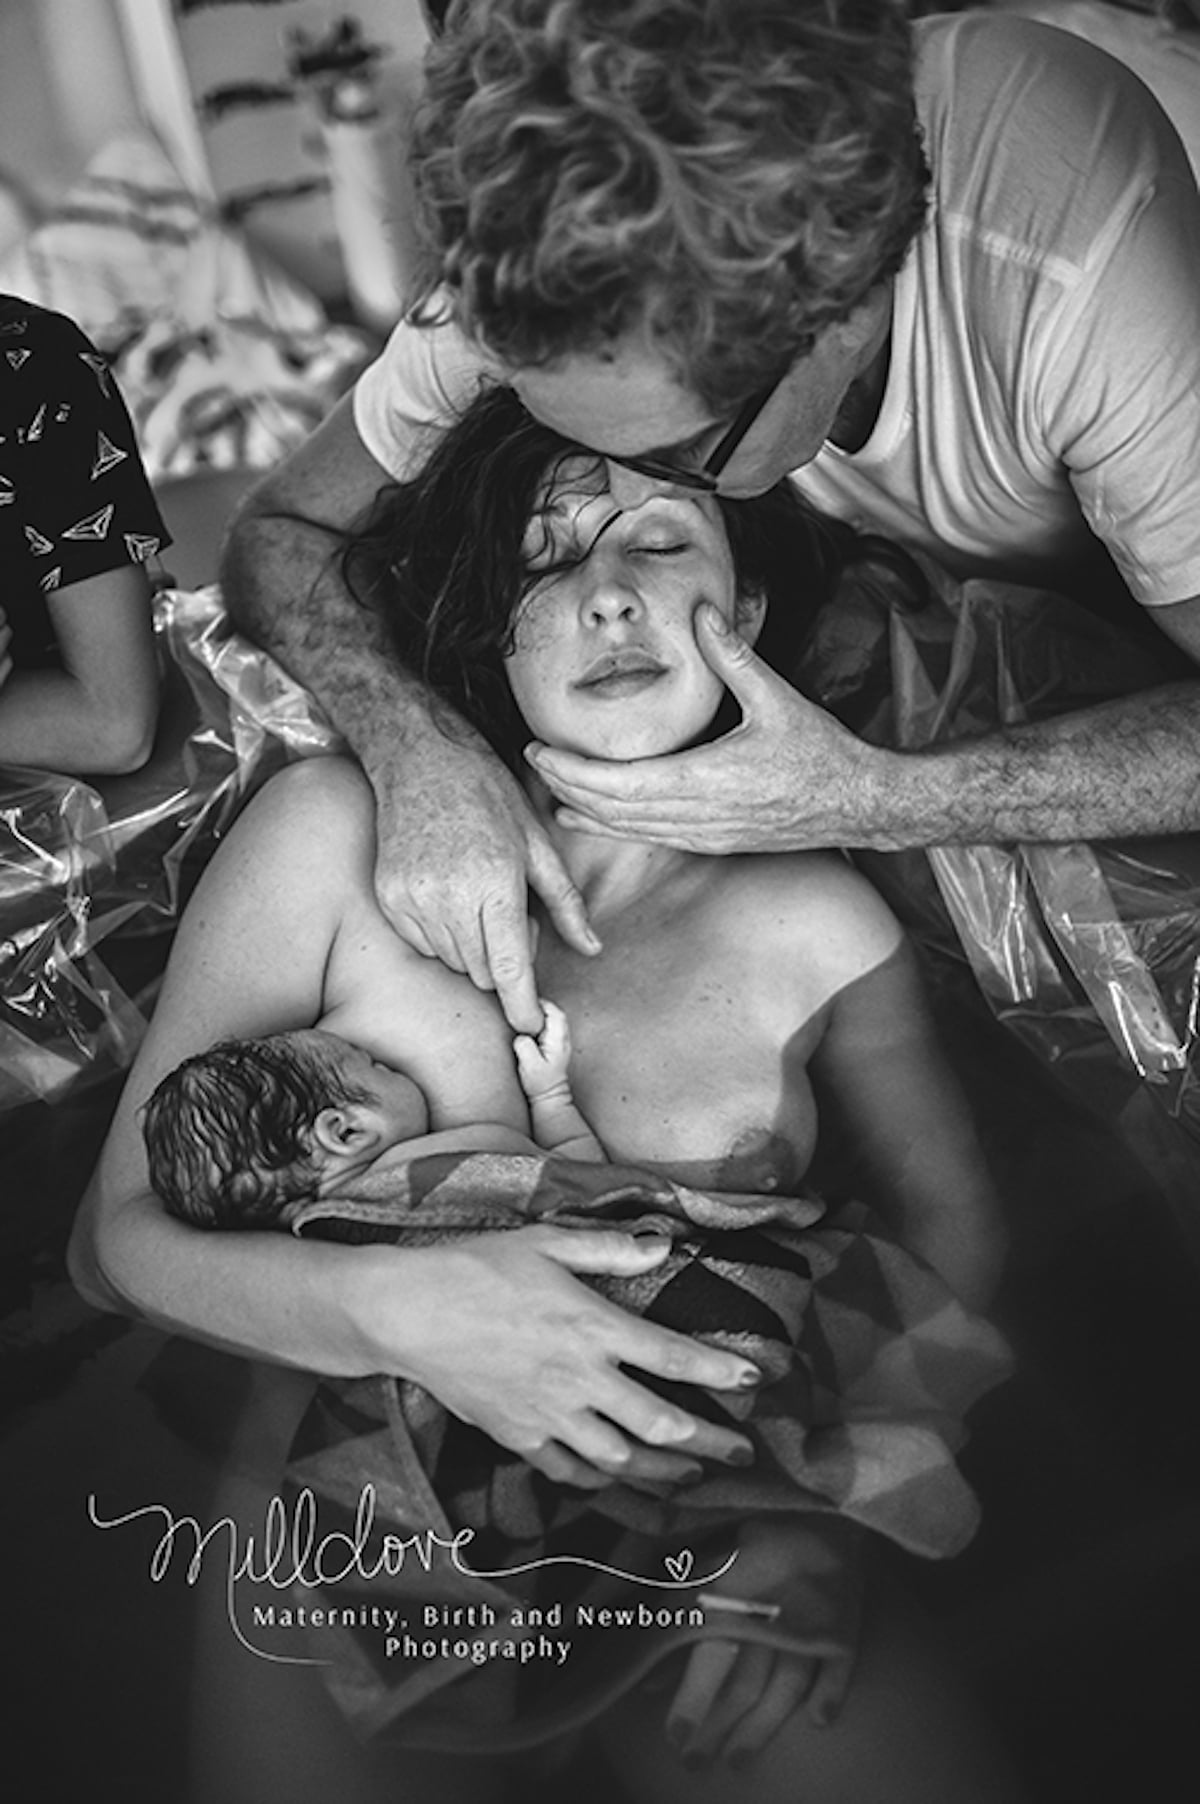
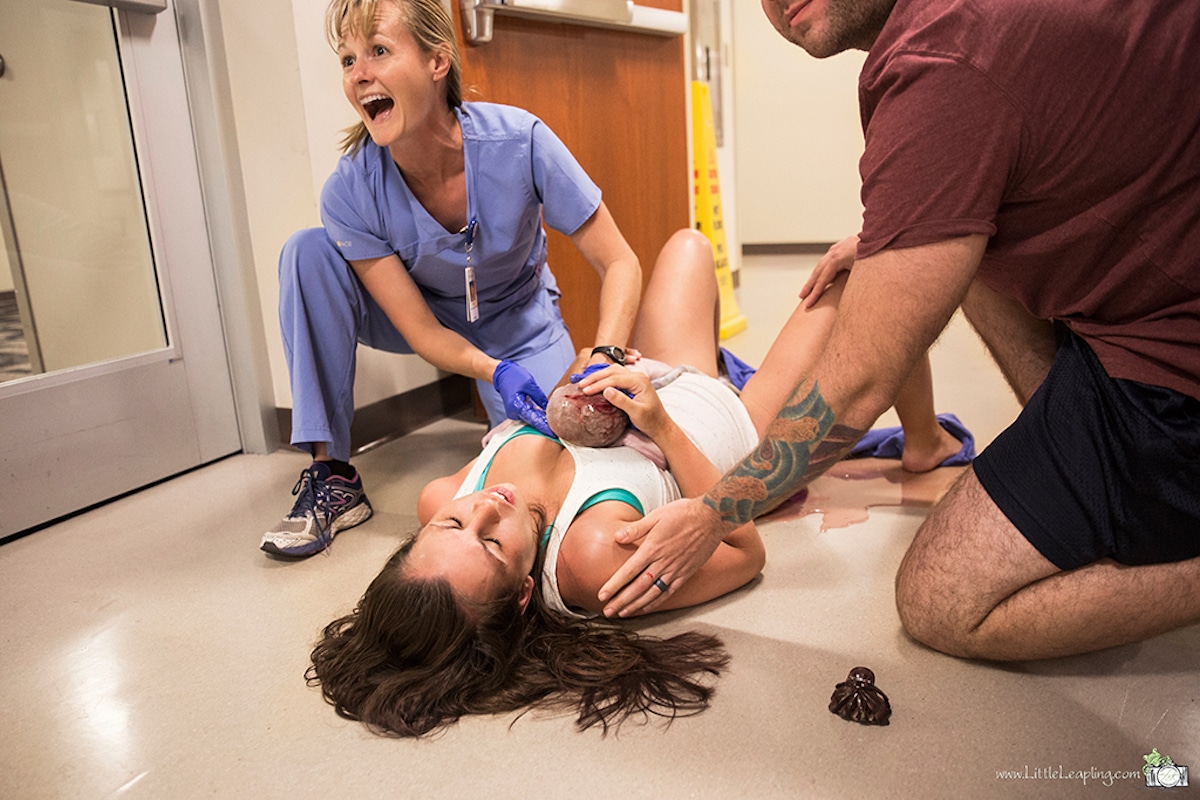
“Flesh of My Flesh,” Best in Category: Postpartum, Photo: Esther Edith
“Birth of a Brother,” Best In Category: Birth Details, Photo: Daniela Justus
“Three Become Four,” Members Choice Winner, Photo: Esther Edith
“Take My Hand, Hold My Heart,” Members Choice Best in Category: Postpartum, Photo: Tamara Milldove
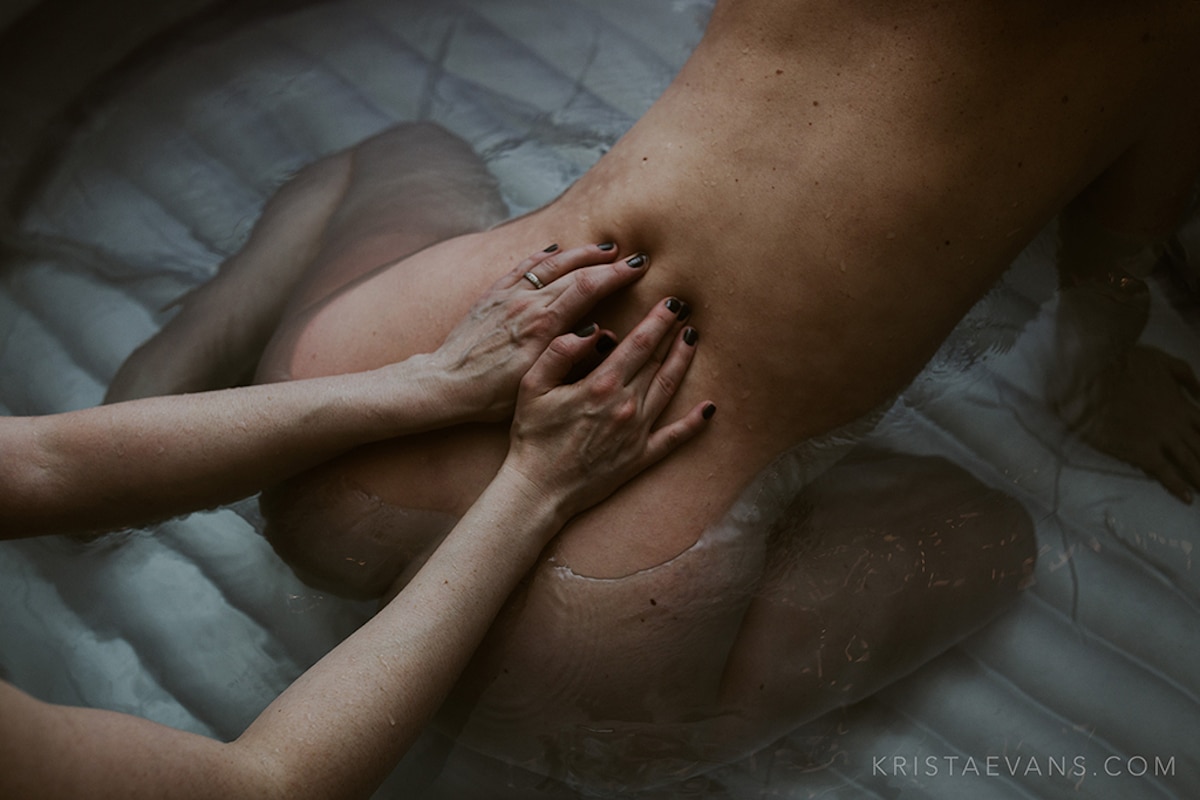
“Birthing Waves,” Honorable Mention, Photo: Robin Baker
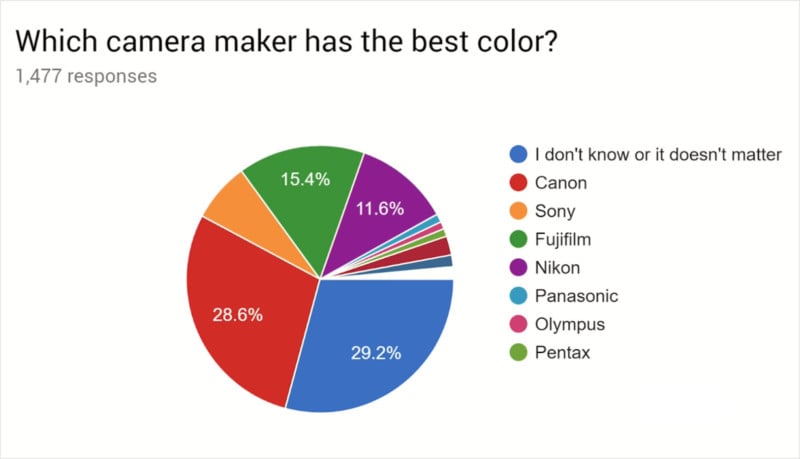
“Color science” is a term that’s thrown around a lot these days when
discussing the merits of various digital cameras and brands, but how
much of it is real color differences and preferences, and how much of it
is simply brand loyalty? Tony Northrup recently conducted a blind poll of 1,500 photographers to find out.
Northrup started by asking respondents which brand they believe has the
best color. About 70% of people had a preference, and the top brands
were Canon, Fujifilm, Nikon, and Sony, in that order.
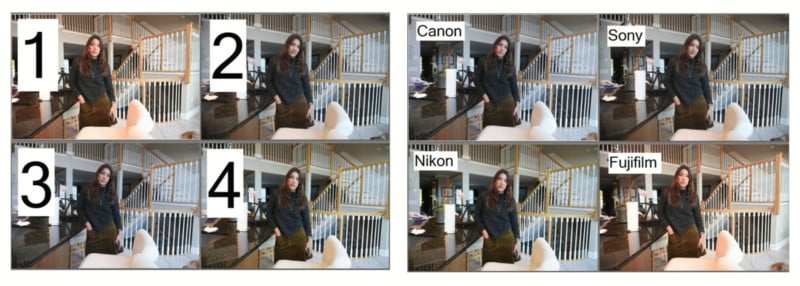
But to test for inherent bias and brand loyalty, Northrup included a
tricky question in the poll. He asked photographers to rank the same set
of four photos twice, once with number labels and once with a
rearranged order and meaningless brand labels (the brand labels didn’t
actually correspond to which camera shot which photo).
What Northrup found was that almost none of the photographers ranked
the same four photos in the same order both times. Only 8% of people
picked the same favorites between the two sets.
“It turns out people have really strong brand loyalties,” Northrup says. “You love your brand.”
Universally, the brand that people believed had the best color was
the one they also selected when provided fake labels. Canon users were
3.1 times more likely to pick the “Canon” labeled photo. Sony (2.2x),
Nikon (1.5x), and Fujifilm (1.4x) users also exhibited decreasing levels
of brand loyalty.
Northrup also found that proper white balance appears to be more
important than a camera’s “color science.” After applying the exact same
white balance to photos captured with the four cameras, preferences
instantly evened out between the four brands.
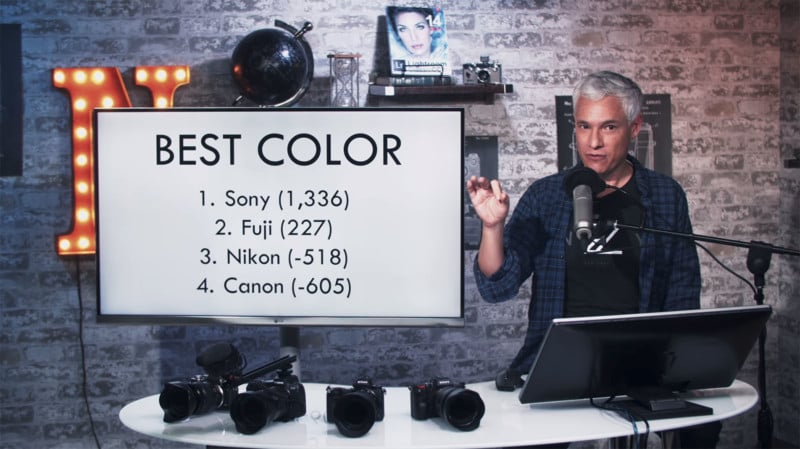
After aggregating all the responses, Northrup was surprised by the
results: photographers overwhelmingly preferred the photos captured with
a Sony camera, followed by Fujifilm, Nikon, and Canon, in that order.
So while Sony ranked last among the four brands in public perception,
it ranked first among the four in the results of the blind test.
“Color is like wine,” Northrup says. “People talk a lot about how
important color science is, but when I gave them a blind side-by-side
test and asked them to pick their favorites, the results were not at all
what they thought.”
Tuesday, December 4, 2018
Getting Started with Landscape Photography – 4 Easy Tips for Beginners
One of the things I like most about photography is that there is
always more to learn. It keeps the mind active and the creative juices
flowing. But the wealth of information out there can be overwhelming for
beginners in landscape photography. Where do you start?
There are a few easy things you can do that will have an immediate
impact on your photography so you can start making better images right
away. Let’s focus on those and leave the more technical stuff for later.
1. Pay attention to the light
There is no such thing as bad light. The key is to understand what
kinds of images are suitable under various lighting conditions.
During golden hour, the day’s last light makes the rocks glow.
The Golden Hour
This is the time right after sunrise and right before sunset when the
sun is low in the sky and casts beautiful golden light. Start here!
It’s hard to go wrong with golden light, which is the most popular time of day for photography.
The cactus in the foreground is in the shade while golden hour light reflects off the mountain in the background.
Bright Midday Light
The opposite of golden hour, the harsh direct light you find at
midday can be the most difficult to work with – unless you photograph in
the shade.
Just look for interesting subjects that are in the shade and leave
the sky out of the frame. The even soft light is great for close-ups and
flower photography.
Flowers photographed in the shade.
There are more types of light to work with and different times of day to photograph, but start with these for the quickest results.
2. Remove distractions
Pay attention to the things in the background
of your images and try to simplify the background as much as possible.
Sometimes there is an unwanted object, like a trash can for example,
that you might not notice unless you are looking for it. These things
can often be hidden behind your main subject simply by moving to one
side, photographing from a higher or lower perspective, or getting
closer.
Try to simplify your composition as much as possible with fewer items
in your scene. Find a way to photograph your main subject on a clean
background.
To
make this image, I had to change my perspective to eliminate debris on
the sand as well as other rocks and birds from the frame.
Beware of tree branches or other things that poke in to the edge of
your frame. Before you take your shot, try to remember to do an “edge
check”. Look around the edges of your frame and make sure it looks
clean.
3. Look for one thing
Your photograph cannot be about everything. You need to decide what is most interesting in your scene and make your photograph about that. Get closer to it.
One exercise that will get you in this habit is to go on a photo walk
with the purpose of looking for one particular element of design.
You’ll find that when you set your mind on one thing, you’ll start to
see it everywhere. Here are some ideas to get you started:
Textures and Patterns
Often beginning photographers will try to capture an entire vista in
one photograph and don’t notice the details. But the more you train your
eye to notice the details, the more interesting your photographs will
become.
The best thing about photographing textures and patterns is that you
don’t have to go far to find them. Your subject can be anything from
rocks to grass or peeling paint. I’m sure you can find subjects with wonderful textures close to home. Try to fill your frame with the pattern.
Filling the frame with the pattern of colorful rocks.
Lines
Look for horizontal lines, vertical lines or diagonal lines. Try to find lines that lead the way to some interesting subject.
Colors
Take a look at the color wheel and notice complementary colors. Those
are the ones that are opposites on the wheel such as blue and orange,
red and green, or yellow and purple. Any scene with complementary colors
is always striking (which is why so many photographers carry around a
red umbrella or a red jacket for their partner to wear in a grassy or
forest scene).
Complementary colors plus diagonal lines.
4. Make time to practice
It doesn’t take long to develop good habits and learn what makes an
interesting photograph. But it can be hard to remember if you only go
shooting once in awhile. Try to make a habit of doing it every day, even
if it’s only for fifteen minutes. By doing this, you’ll reinforce the
habit and find yourself seeing the potential for great images all around
you all the time.
Golden
hour – there is still enough light to photograph the depths of the
canyon while the last of the day’s light reflects off the top of the
highest rock.
Conclusion
There are more technical things that you’ll want to start learning
soon such as; how the exposure triangle works, understanding depth of
field, picking the right shooting mode, focus settings, and more. It’s
endless (which is a good thing).
But for now, these tips will get you on the right track so you are happy with your images right from the beginning. Have fun!
Anne McKinnell
is a photographer, writer and nomad. She lives in an RV and travels
around North America photographing beautiful places and writing about
travel, photography, and how changing your life is not as scary as it
seems.
You can read about her adventures on her blog and be sure to check out her free photography eBooks.
Pro Tips for Photojournalism at Protests and Riots
Ettore Chiereguini
My name is Ettore Chiereguini, and I’m a freelance photographer from
Brazil. Here are some things I’ve learned about photographing riots and
protests.
Gear
Consider two kinds of lenses: a wide angle and a telephoto. Why? wide
will show you the whole picture, the whole frame, the flags, the
slogans. It will put you in the scene.
The telephoto? Easy: you don’t want to be in there when s**t happens.
Trust me on this one. But keep in mind that even a 70-200mm won’t
guarantee your safety. What about a zoom lens? If you have it, bring it —
it will help you a lot. A 24-70mm and a 70-200mm can be your best
friends.
Rallies
These are almost calm. You can even spot a good number of children
having fun. Police may surround the area as a safety measure. Stay calm,
as almost nothing happens at these kinds of things. Focus on not being
in people’s way and do your job.
Protests
If
you’re covering a protest, always be awake. Most of the protesters are
nervous, and the police are nervous. A single isolated event can be the
trigger for anything. Same tactics, don’t be in people’s way, take your
photos, follow them by their side, in front, at their backs, whatever.
But here comes another tip: always be aware of your surroundings, be
aware of backpacks, stay aware of the police formation (lines of motor
and cars, lines of cops). People are stressed. Don’t participate, only
snap. Be quiet and try to not influence anything — this is their fight,
not yours!
Remember that you’re the photographer, not the person in the front
line, and, as I mentioned, any isolated event can be a trigger…
Riots
Are you at a riot? Are you happy? If yes, I have bad news for you:
people may get hurt, and just hope it isn’t you. Control your adrenaline
to not f**k up. As soon some rioter swings full force on the police,
police are going to use everything they have to control people and take
them out of the streets, so things like rubber bullets, bombs, stun
grenades, and water are all normal things you’ll have to deal.
Rioters are a danger too: things like glass bottles and Molotovs may
be thrown at the police. And remember that you’re not anyone’s friend —
you’re not the police’s friend and you’re not the rioters’ friend. You
are on your own, and you do you. Keep yourself safe, and try to avoid
risk areas where the confrontation is happening.
Thinking about shooting riots, I have to say something even sadder: a
helmet makes you an easy target. Be aware of what you’re using! Helmets
saying you’re ‘PRESS’ can be a target for both police and rioters. They
don’t respect you because of it — you’re their enemy now because they
don’t know if they can trust you or not. What a shame and very sad.
Dos and Don’ts
So now we come to my tips: #1. Be ready and don’t be afraid to get closer to your subject. #2. Front shots are always better than back shots
(though, of course, some back shots can give you more information about
who’s protesting). #3. If police are there, they can improve your safety, but do not stay too close as some objects thrown at the police can hit you. #4. If you feel safe at the protesters’ side, remember you be hit by things like stun grenades, debris, and rubber bullets. #5. Your gear must be resilient and weather-sealed at least. #6. Distance can be your enemy but also your ally. Just think about where you’re safest at any given moment. #7. When s**t happens, the only friends you’ll have are the other photographers. Stick with them, as they’re in the same boat. #8. Using a zoom or fixed lens is your personal
preference. Both will give you good results. What matters is your vision
of the subject matter. #9. Don’t be afraid. #10. If you want to show the truth, don’t pick sides.
I’ve been on the streets covering this kind of thing since 2016 as a photographer. I used to be a rioter back in 2013.
Everything I’ve shared here is only my opinion and views. The correct advice may be different from photographer to photographer. About the author: Ettore Chiereguini is a
freelance photographer from Santos who’s now based in São Paulo, Brazil.
The opinions expressed in this article are solely those of the author.
Chiereguini has been photographing the Brazilian political scene since
2016. You can find more of his work on his Instagram.


 #Photography
 Image Credit:
  Image Credit:
  Image Credit: