Sunday, November 11, 2018
Friday, November 9, 2018
How to Photograph Snow
By Christopher O'Donnell
Photographing snow has its own set of unique rules. The reflective
ability of the individual flakes make it an interesting subject to shoot
– not to mention all the fun things you can do with your shutter speed.
Combine that with the high-contrast scenes snow can provide and you
have a subject with unlimited potential.
Adjusting Your Focal Length
The
focal length you choose can impact your image greatly depending on the
kind of effect you’re going for. Longer focal lengths have the ability
to compact a scene, which works great for falling snow as it can give
you a very layered look with differently-sized snowflakes. If there are
only flurries falling from the sky and you're trying to capture many
snowflakes, a long focal length will work well as you can compact a
large distance into your image – flakes that are five, ten, or even a
hundred feet away can be visible.


Alternatively, a very wide focal length will exaggerate your distances, which is great when you want to encapsulate more of your surroundings. In terms of snowfall, it will need to be falling rapidly to get a layered look – when executed well, the result is a stunning blanket of white.
Aperture

Of course, aperture has a role to play here as well. The wider you go, more snowflakes will be out of focus. If you’re going for snowfall bokeh (sno-keh), this is a great way to create a soft and pleasing atmosphere.
Going back to my first image taken at 300mm, if I used a very small aperture (like say f/16), I’d get more snowflakes in focus instead of that out of focus bokeh. However, that means that the tree line in the background would be more in focus as well and I’d lose that softness – my snowflakes wouldn’t stand out as much as they would now be blended into the trees. Also, my shutter speed would slow down which would blur the snowflakes as streaks. So there are certainly a few things to consider, and finding the right balance between your settings is very important to create the image you want.
Also remember that sunlight combined with a wide aperture can create a beautiful bokeh background.


Shutter Speed

As I touched on briefly in the last section, your shutter speed can greatly affect your snowfall photography – just like with any moving subject. When using a long exposure, you can create an image with streaks rather than flakes, like in the photo below.
However, a fast shutter speed can freeze the action, giving you an image sprinkled with flakes.

Overcast Lighting vs. Sunlight
Sun and snow pose a particularly problematic combination for your light meter as sun can reflect off of snow in an overpowering way. That’s not to say you should never take photos of snow when the sun is out, but rather watch your histogram for blown highlights, or auto-bracket your image and do some HDR work.

Alternatively, snow can be captured well during overcast days as the lack of harsh sunlight allows you to photograph a scene without a spastic light meter. Personally I like photographing snow during cloudy days – especially black and white images – as it provides a moody sky to compliment the starkness of winter.

Snow provides you with many options for shooting awe-inspiring images – you don't have to wait for the “right” conditions. Instead, go out and tailor your technique to the environment and come back with something beautiful.
http://www.photography-jobs.net/?hop=darryl54
Thursday, November 8, 2018
http://www.photography-jobs.net/?hop=darryl54


How to Photograph Sunsets: 10 Tips for the Perfect Shot
By Ritesh Saini
We all love capturing sunsets. Not surprisingly, photographs of sunsets (including sunrise, for that matter) constitute a big portion of the photographs made around the world every day. Sunsets have a characteristic dynamism, but they are immensely pleasant at the same time, evoking feelings of peace and tranquility. Here are some tips to help you get that perfect sunset shot.
When Heaven Bends To Kiss.. by PRAVEEN VENUGOPAL, on Flickr
1. Reach the location in time
After you have scouted for a good location for photographing the sunset, reach the location well before the sunset hour. This way you can choose good vantage points from where to capture the scene and also look for interesting subjects to include in your photographs. Also keep a tripod handy.2. Photograph in the Golden Hour
The first and last hour of sunlight is called the Golden Hour. It is the most desirable time to photograph a sunset because the scene has a beautiful, golden glow and the sky is vibrant with different shades of colors. Photographing during the Blue Hour (the hour after the sunset, when the sky is rendered blue in the photos upon underexposure) extends your window of opportunity if you wish to utilize more time to photograph the scene.
end of the day by paul bica, on Flickr
3. Choose the Correct White Balance
To enhance the characteristic warmth of a sunset scene in your image, avoid using the Auto White Balance. Choose ‘Cloudy’ or ‘Shade’ setting, and faithfully reproduce the original colors and even enhance them to your liking. If you wish to use a custom Kelvin temperature for the White Balance, be sure to use something higher than 5500. The higher the color temperature setting, the ‘warmer’ your photograph will feel. (Of course, if you shoot RAW, you can adjust white balance in post production, but it's good form to get as much right in the camera as possible).4. Shoot in RAW
To be able to capture the light and the dark areas in the scene that are typical of sunset scenes, do photograph in RAW. It also serves to help you in post-processing in case you need to recover details in highlight or shadow regions of the shot. Also, use exposure bracketing if you are only shooting in JPEG to allow yourself an option to decide which exposure works best for you.
World's Favorite Sport by vramak, on Flickr
5. Pay attention to the composition
Utilize the Rule of Thirds as a guideline. Place the horizon along one of the two horizontal lines dividing the scene in three equal parts, keeping the horizon perfectly straight. Create a center of interest for your photograph by looking out for interesting elements to include in the shot. It could be anything from people to animals to trees. Try to capture a story by including a dynamic activity of some sort.6. Boost the Depth-of-Field
Because sunset scenes typically contain elements from near foreground to a far background, you would want to maximize the depth-of-field to keep everything in sharp focus. Use a narrow aperture and focus at the hyperfocal distance to get everything from foreground to background in focus.7. Utilize silhouettes and reflections
Silhouettes add another dimension to an otherwise empty frame. They also help in emphasizing color in the shot. Include interesting silhouettes in your photograph to add a context to the scene. If you are photographing the sunset along a beach or a river, you can include reflections in your image and make them echo the vibrant colors of the sky.8. Experiment with the zoom
You can shoot with a wide angle lens, or make use of zoom. By photographing at the telephoto end and including the sun in the photo, you can give it a more prominent role and make it appear larger. On the other hand, you can choose to shoot at the wide end to emphasize the grandness of the scene by including more of the scene in the shot. Play with both.
Creative independence by nattu, on Flickr
9. Change your vantage point
Sunsets are among the most popular subjects for photography. To lend a personal touch to your sunset photos and create unique shots, you need to go a step further. Find a different vantage point. Changing your location to a new one that is just a few steps away can sometimes completely change the composition of your shot. Explore all perspectives, and ask yourself which ones work for you.10. Be quick!
When photographing sunsets, you don’t usually have too much time before the sun goes down. You have to be quick and move around to photograph everything that you planned. Be aware of your surroundings and always keep your camera ready to photograph anything that you think would make an interesting subject in your sunset image. Good luck!
Sunset balloon flight by Axel-D, on Flickr
Wednesday, November 7, 2018
How to Photograph Food For Professional-Standard Shots
By Rob Wood
A great food photograph can do a lot of things – it can make a viewer hungry, it can convince a diner to order a dish and it can sell a hell of a lot of food and recipe books. But knowing how to photograph food to get great results requires a specific knowledge of what works best and what looks terrible. We have put together a few things you will need to think about when you photograph food if you want results like you see in glossy magazines and books.
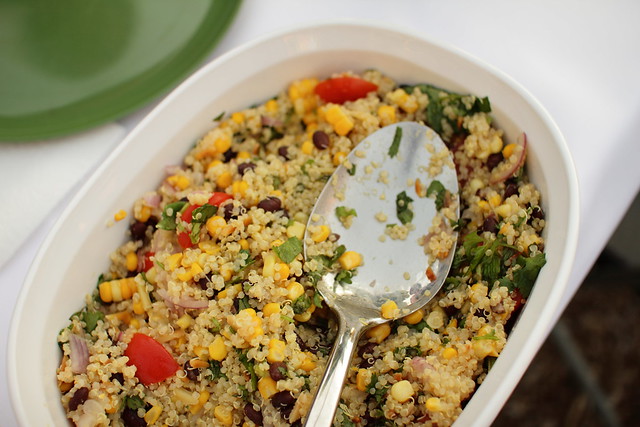
Peach Salad by ralph and jenny, on Flickr
How to Prepare Food for Look, Not Taste – A Short Guide to Food Styling
There are entire books (and careers) devoted to the topic of how to style food for a photography shoot (I don't mean photography, I mean STYLE it for a photographer). The food industry is huge and they understand the importance of great photography in selling their wares. Now, if you're serious about getting great shots (and not so much about just eating the food after the shot) then you need to prepare the food to look its best, not taste its best. So how do you do that?Are You Shooting Full-Bodied Food? In photographs, food usually looks best when it is full-bodied (as opposed to “big”). The problem is that often when you take something out of the oven, it usually loses its body in the cool air to a degree. Several photography tricks exist to account for this, but the simple ones are probably the best!
- Shoot the food while it's still very hot and fresh from being cooked.
- Build the dish so it looks full-bodied (sometimes this requires putting things on the plate but under the food to make it look fuller. Sometimes it requires piling the food on other food.)

massive attack:live with me by visualpanic, on Flickr

Chai-Kwon-Do by Kris Krug, on Flickr
Styling food also often relies on what is surrounding the dish as what is in the dish itself. Setting up the table and props can be a massive help (or hinderance) to getting a fantastic photograph of the food you are shooting in its own context. Here are a few things to think about.
Your Table Setting Can Make or Break Your Food Photographs – The surroundings that your food appears in are almost as important as the food itself. A well designed setting can give context and mood to your shot so think about it a little. What is in the background and foreground of the food? Do you want to exclude setting altogether and get an extreme close-up of only the food? Are your dishes matched to the colour of the food? Are the surroundings set up to give a balanced composition?
Elements that you would usually find in the context of a meal (condiment holders, cutlery, napkins etc) can be arranged by a stylist to help the composition. Usually you will want these elements to compliment rather than dominate the main subject – the food.
Think About Colours Outside of Your Dish – This goes back to the styling of the scene, but it's very important to consider the colours of the dishes, cutlery, table, table-cloth etc that surround your main subject as they have such an important impact on the end result.
Colours are usually very deliberately set as either contrasting or complimentary. Both can work very effectively.
On the other hand, some colours just don't work with food (light green is very tough to use if you're trying to make the food dish look appetising).
What You Need to Know About Lighting in Food Photography
Perhaps one of the biggest factors that affects the end result of a food photograph is the quality of light. The good news is that because your scene is usually portable you have a fair amount of control over the lighting situation.- Natural window lighting usually rules the roost in professional food photography. (If you can get natural window lighting on an overcast day, then you're even luckier). The soft, dispersed lighting usually given by natural window lighting that casts very soft shadows works beautifully with a lot of food photographs. Generally the best lighting is from the front side (ie coming over the shoulder of the photographer), but all angles of natural light can be made to work. Depending on how much light is available, you may need to consider a tripod.
- Reflectors – If you want to disperse the light even more or tone down some of the shadows, then reflecting natural lighting is also high on the scale of desirability. This can be done with a purpose-built reflector or you can improvise with light coloured material (white sheets/cloths) or reflective material (foil).
- Artificial Lighting – Sometimes, you're just not going to be able to get in a position to take advantage of natural lighting. Using strobes on food is a huge topic, but suffice to say that you will often need to soften and disperse the light as much as possible with the use of soft-boxes and reflectors.
- Dark Food Photography – a growing trend in some food photography is to go the low light style and a dark setting. This is more about using the dark colours of the food and its background and surroundings in combination with natural window lighting such as in the example below. It is very effective in creating mood. You can see some more amazing examples on Pinterest here.

Other Elements of Good Food Photography
Use Depth of Field Deliberately – Another key to effective food photography is knowing how to control your depth of field and doing so deliberately. As you can see with most of the examples in this article, photographers tends to use a shallow depth of field to draw the eye to a specific part of the photo (usually the main piece of food or part of it). Occasionally however, you might wish to close the aperture of your camera to capture a deeper depth of field. Both can work, but be aware of the trend towards narrow depth of field and make your decision on this to suit your own style.If you are not sure about how to do that, download our free guide to depth of field here.

banana bread by sajia.hall, on Flickr
Pick an Angle – In food photography, there are two common ways of composing basic shots. The first way involves photographing them from directly above the food – either getting a closeup of the food (like the example below) or showing the aerial map of the placement setting.
The second common angle is to shoot at an angle from the side so you can include either a foreground or background or both or the entire surrounds of the dish such as the example below. Obviously there are a thousand ways to skin that cat, but the examples on this article should give you a few ideas of the common compositions of food photography.

These little things that make our days by rennes.i, on Flickr
A Few Quick and Easy Tips for Better Food Photography
The following tips are for when you're in a bit of a rush and you just want to bash out a quick, but good food photograph. They are not set in stone by any means and there are plenty of times when you should in fact ignore them. But if you don't have too much time, following these few ideas will usually get you a better food photograph than you would have had otherwise.- Move the scene to take advantage of natural window lighting
- Limit the depth of field with a wide aperture setting (f/1.8 – f/5.6) and focus near the front edge of the food
- Either zoom right in on the food or arrange your background to give context
- Look for contrasting coloured garnish and put it on the food (bright colours like green (chives), red (chilli) and white (parmesan) tend to work well
- Keep the portions smallish so you have a definite center of interest in the photograph
- Photograph the food while it is as fresh as possible
- Print your images! It's the ultimate test for photographers. See our article on the best photo printer to see how.
Secret Food Styling Tricks
While there are a few photography tricks to getting great shots, there are also a few quick and easy food styling tricks to make sure the food looks as good as possible before you shoot it. Here are some to keep in mind.- Anything green (like lettuce leaves) will look greener and fresher by soaking it in ice-water for a few minutes before the shot. Shake them dry before you photograph them.
- Brush some oil on hot food to make it look fresher for the photograph, especially if it has been sitting around for a while
- Don't put too much dressing on salad for photographs – it makes the salad look limp.
- Fresh is best – for both taste and looks.
- Undercook the food – it looks fresher and brighter for the photograph.
- Make sure the plates and settings are really clean – spots of errant food on the tablecloth or where it shouldn't be can ruin a photo.
Tuesday, November 6, 2018
How to Capture Striking Silhouettes in 7 Easy Steps (With 10 Stunning Examples)
By Jason D. Little
Photographers exert an awful lot of time and anxious energy fretting over how to light a subject; specifically, we all tend to fear shadows. Harsh shadows can ruin nearly any photograph. Whether it’s a portrait, a macro, or a product shot, the aim is typically soft, even lighting.The fact is, however, we all need a break from the norm; we need to take advantage of opportunities to do things a different way. Those beautifully lit portraits that you’re obsessed with are important; they may even be the staple of your photographic repertoire, but there is another way to think about lighting — a way that is, perhaps, counter-intuitive but one that can be equally, if not more, evocative as any “perfectly” lit shot.

air time by sean, on Flickr
Portrait
photographers know of rembrandt lighting, split lighting, butterfly
lighting, all styles of lighting designed to light the front of the
subject. But what about backlighting?
The Beauty of a SilhouetteA silhouette: that dark, featureless subject outlined against a bright background — is a photographic phenomenon created by backlighting. A photographic phenomenon that is capable of conveying mood, drama, mystery, and emotion in ways unmatched by more conventional styles of portraiture. Silhouettes are incredibly simple in form, yet they possess a great deal of aesthetic and atmospheric power, and they impart that power to the viewer by giving us the freedom to further use our imagination as we interpret those images.
Fortunately, silhouettes are also relatively easy to create. The tips that follow will help you get started.

How to Photograph Silhouettes
1. Choose a Suitable Subject
– “Suitable” is admittedly a rather open-ended term; indeed, anything
can be made into a silhouette. But you will find that some things work
better than others. Bold, distinctly shaped forms separated from their
surroundings tend to work best.2. Set Up Your Lighting – If you’re using natural light — the sun — then there’s actually nothing to set up here. Your flash is useless in this capacity; in fact, all that stuff you learned previously in your photography education about how to light a subject is off the table. The goal is to put the light completely behind your subject. You don’t want any light falling on their frontside. The very best way to go about this is to position your subject in front of a rising or setting sun. Using the sun isn’t an absolute must, however; any light source that is large enough and bright enough will do…which means you can use a flash or two. Just set them up behind your subject.
3. Pose Your Subject and Frame the Shot – If you’re working with a person, be sure to pose them in an open area or in such a way that doesn’t cause them to blend in with surrounding objects. Furthermore, try to avoid photographing people straight-on; instead, photograph their profile. This will make their features more distinct, more recognizable.

4. Prepare Your Camera for the Shot –
Shooting in manual mode is the ideal method of creating a silhouette.
Again, you will probably find that the process goes against the grain of
what you’re used to as you expose for the background and not the
subject. Quite simply, this is how you get a dark foreground and a
bright background — a silhouetted image. If you find that light is
spilling over onto the front of your subject, just underexpose the
background a bit and your subject will become increasingly darker.
You
can accomplish this in auto mode as well. The trick is to keep the
camera from doing what it tends to do so well: metering a scene for even
lighting. To prevent this, point your camera at the brightest portion
of the sky and press the shutter button half way to initiate the
metering process. Then, with your finger still on the shutter button,
move the camera back to your subject and take the shot. This method
works the majority of the time, but if you want to be a bit more precise
you should use “spot metering” if your camera possess that feature.
Spot metering will allow you to meter for a very specific part of the
frame (the background in this instance), thereby increasing the accuracy
of your desired exposure.
Colombian Training Ship ARC “Gloria” by Luz Adriana Villa A., on Flickr
Either
approach can lead to successful silhouettes. Use the one that you’re
most comfortable with or whichever works out best for you. Given that
all you’ve got is a memory card to erase as opposed to rolls of film to
buy, you can experiment as much as you want or need to.
5. Focus
– The subject needs to be in sharp focus in order for your silhouette
to have definition. How to get the subject in focus may not be so
straightforward considering the metering steps discussed above. The
camera will have to focus on the background in order to take a meter
reading, which means that focus won’t be accurate when you move back to
your subject. There are a couple of ways to tackle this problem:- Use manual focus to re-focus on your subject after you’ve metered the shot, or pre-focus before you meter.
- Set a small aperture (larger f-number, f/8 or f/11, for example) to increase depth of field, which will increase the odds that your subject is clearly defined.

7. Optional Tools –
Making a silhouette really only requires your camera, your subject, and
a bright background. But if you happen to be working in a particularly
low light situation where a slow shutter speed is necessary, then a
tripod will certainly come in handy. And, if you like, you can use a
circular polarizer to create more contrast and saturation for the
background.

Conclusion
While
the basic process will remain the same, your specific camera settings
will probably be different for each silhouette you shoot because subject
and lighting conditions won’t be identical on each occasion; so again,
we see the luxury that digital photography has afforded us — we can
adapt and experiment with no limits.As you begin to think about and prepare for shooting shooting silhouettes of your own, I’ll leave you with some images to inspire you.


Color of Night by jDevaun, on Flickr


Monday, November 5, 2018
The Exposure Triangle and How it Affects Your Photos
By Rob Wood
Getting a new DSLR can be quite an overwhelming experience for a new photographer. All the knobs and buttons seem to do a thousand different things (and they do), but the dirty secret of photography is that at its core, knowledge of the exposure triangle is what will make your new DSLR really sing. If you know how the exposure triangle works, then you essentially know the basics of how your photographs will turn out and you can build your skills with the manual functions of your camera from that solid basis.The biggest benefit of having an advanced DSLR is that they allow manual control over most elements of the photographic process in terms of what's happening in the camera. But having that control means that it is of great benefit if you know what elements you need to control and what they do. Let's take a look at the three absolute essentials that make up the exposure triangle – ISO, Shutter Speed and Aperture.

Shutter Speed – This one is fairly self-explanatory. Shutter speed simply refers to the amount of time that the shutter on the camera opens for when you take a shot. A shorter shutter speed will result in less light hitting the sensor and will have the effect of “freezing” motion. A longer shutter speed will allow more light to hit the sensor and any movement in the scene will appear blurred in the direction it was moving (“motion blur”) which can often be a desirable effect depending on what you are trying to achieve. Each shutter speed setting doubles (or halves) the speed compared to the next setting. Don't forget to check out our beginner's guide to shutter speed priority mode on your camera.
Aperture – This refers to the size of the opening in the lens that lets light hit the sensor. Wider apertures obviously allow more light in and narrower allow less light in. The size of the opening is measured as f/1.4, f/2.8, f/4, f/5.6,f/8, f/16, f/22 etc (commonly referred to as “f stops”). The small the number, the larger the opening and each “stop” up from there effectively halves the size of the opening (and thus the amount of light entering the camera). Aperture also allows you to control depth of field. Also, check out our beginner's guide to aperture priority mode on your camera.

How Does That Work in Practice?

The three elements of the exposure triangle interact together. For example, reducing the shutter speed by a stop (increased light) and narrowing the aperture by a stop (decreased light) will result in an identical exposure. However it may result in motion blur (due to decreased shutter speed) or deeper depth of field (due to narrower aperture).
Together, ISO, Shutter Speed and Aperture are collectively referred to as the exposure triangle. This is probably one of the most important technical concepts you can know in photography and it's worth sitting down to learn (and standing up to practice) if you'd like to know how to use that shiny new DSLR (or any other camera, for that matter) to its potential.
Sunday, November 4, 2018
6 Poses You Can Use to Avoid Camera Shake
Camera shake is the bane of just about every photographer’s existence.
It makes us use shutter speeds that are too fast or apertures that are too wide for the subject.
We might even use a higher ISO to compensate for other exposure adjustments.
It causes our backs to ache because we carry tripods around everywhere we go.
We invest in remotes, use mirror lock-up, and even trigger
our shutters from afar with our smartphones, all in the name of getting
photos that are as sharp as possible.
But what if there was a way to minimize the blurriness of camera shake without any of the aforementioned tools?
No, seriously…
You can minimize camera shake without a tripod just by using your own body.
Here’s how.
The Heidi Klum

The simplest method is to simply tuck your elbows in, like
Heidi Klum striking a pose on the runway. Doing so improves your overall
stability while giving your camera additional support because its
weight is transferred from your hands to your arms to your elbows and
finally to your chest.
Additionally, camera shake can be induced by the action of
breathing. When using this technique, it’s important to exhale before
you press the shutter button. If you don’t, the movement of your chest
outward and inward as you breathe could cause your image to be blurry,
especially if you’re shooting at a large aperture or slow shutter speed.
The Scarlett Johansson

Next up is the simple “on the ground technique.” It’s reminiscent of when Scarlett Johansson fell on her face and set the internet ablaze with memes.
It’s simple in that it’s really a no-brainer - lie flat on
the ground and let your elbows and the ground form a tripod, as seen in
the image above.
Much like the previous tucked elbows technique, using the
ground beneath you as a support will help give your arms, and thereby
the camera, the stability they need to get a tack-sharp photo.
In some instances, you might simply rest your lens on the ground or extend your hand such that its flat beneath your lens.
The problem with that is the extreme low perspective, which
might incorporate too much of the foreground into the shot. However,
you can get around this by taking the position shown above.
The Matt Damon

If you aren’t keen to lie on the ground, there is an
alternative that allows you to stand up. As seen above, by bringing your
left elbow in (like the first pose) you give added support to your
camera and lens. Plus, it makes you look like tough guy Matt Damon in his new movie.
But, by locking your right arm in an upward and outward
position, you create added tension in your upper body that might allow
you to shoot handheld with a wider aperture, a slower shutter speed, or
both, without inducing camera shake. Shift the camera to your left eye
to create a tighter connection with your brow, and, like mentioned
before, completely exhale before pressing the shutter button.
Use Your Off Shoulder

This pose is probably the most unconventional of the bunch,
but trust me when I say, it works! By bringing your left hand back and
wrapping it around your chest, you give your left shoulder a great deal
of stability.
You can make use of that stability by resting the bottom of
your camera on your shoulder. Bring the camera firmly to your face,
using your brow as another point of support. Between your shoulder, your
brow, and your grip on the camera body with your right hand, you’ve got
three points by which to keep the camera nice and steady.
Use Your Knee

Using your arm and leg in tandem to create a sort of tripod is one of the most effective poses for stabilizing your camera.
Think about it - sitting on the ground with your knee
upward forms an incredibly stable base for your body. Pressing down on
your knee with your elbow transfers that stability upward, helping you
to maintain control over the camera and lens.
Note in the image above that, again, the camera is held
tightly to the face for further support, while there is a solid,
supportive grip on the camera from both above and below.
This pose might look silly, but as you in see in the video
below by Eventos Impresionantes, it’s certainly not the silliest pose
you can use to get a photo:
Get in a Tuck

In some instances, you might find that getting your body
into a tight tuck will be most advantageous for keeping camera shake at
bay.
Note in the image above that the photographer uses the tuck
in combination with the previous tip on utilizing the stability of the
knee meeting the elbow, only in this case, both knees and both elbows
are being used.
By getting into this position, you can counteract the
effects of a strong breeze, take a lower shooting position to create a
more unique point of view, and you avoid the displeasure of laying down
or sitting on the ground.
So, as you can see, there are plenty of options to give your camera more stability that doesn’t involve carrying a heavy tripod around or having to use a remote shutter release.
Sure, those options are preferable in terms of getting
images that are optimally sharp, but not every occasion will allow you
the time or the space to set up your camera on a tripod and fire the
shutter remotely.
For those occasions, give one of these shooting positions a try. I
think you’ll find - as I have - that they provide a surprising amount of
stability for minimizing the effects of camera shake.Courtesy of: Photography Talk
Friday, November 2, 2018
Thursday, November 1, 2018
Subscribe to:
Posts (Atom)