How to Use Program Mode on your Camera (Camera Settings)
The mode dial on a camera has many different options, but the “P” mode is often neglected. P or program mode is useful but often misunderstood.
Program mode is a mix between full auto mode and full manual mode. You can learn how to get off of auto using program mode.
So what is program mode on your camera, and how do you use it?
What Is Program Mode (P Mode) on the Camera?
P mode or program auto is a semi-manual mode. The camera makes the decisions, but the photographer has the power to override some of them. Shooting with program mode is like shooting on auto, with the option to quickly manually adjust the settings if needed.
Some photographers consider Program mode as an ISO-priority mode, but, you can do much more with it. You can also adjust the metering, white balance, focus modes, and exposure compensation.
Before you get started, get acquainted with these basics:
- Shutter speed is the length of time that the photograph covers. The shutter opens to take a photo and closes to stop; shutter speed is how long that shutter stays open. A fast shutter speed such as 1/1000 will freeze motion. A slow shutter speed like 1/30 or even 30 seconds will create motion blur. Read more in-depth about shutter speed here.
- Aperture is the size of the opening in the lens. A larger opening, designated by a smaller f-number such as f/1.8, lets in more light than a narrower opening, like f/8. Aperture also controls how out-of-focus the background and foreground is, or the depth-of-field. Read more in-depth about aperture here.
- ISO is the camera’s sensitivity to light. A low ISO such as ISO 100 is not very sensitive to light but offers the best image quality. A high ISO like ISO 6400 allows you to shoot in limited light, but the image quality isn’t as good.
In programmed auto, the camera will select those settings. If what the camera selected doesn’t work for the shot, you can choose different ones without switching into full manual mode.
Program shift is the option to adjust the settings the camera chooses. You can’t set the shutter speed and aperture individually. But you can use program shift to choose a different pair of settings than what the camera chooses.
How to Use P Mode or Program Mode on a Camera
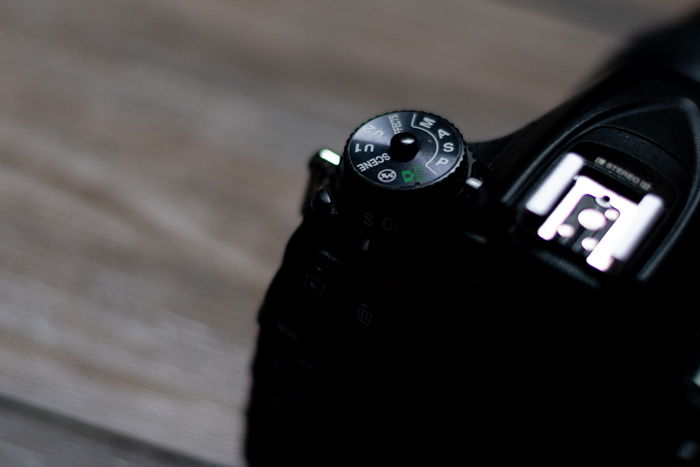
Turn the Camera Mode Dial to ‘P’
Turn the camera’s mode dial to the ‘P’. In smaller cameras without mode dial, you will need to locate the mode options in the menu or from a quick menu. From there, select the P mode or Programmed mode on the screen.
Point the Camera at the Subject and Use Exposure Compensation
Programmed auto only captures what the camera thinks is proper exposure. But, several things can throw the camera off. If the image has a lot of white, black, very bright or very dark areas, the camera’s metering system will likely be wrong. While you can change the camera’s settings, that won’t change the image’s exposure because P is still a semi-auto mode. The camera will still try to balance out the shot with the exposure it thinks is correct.
To correct how light or dark the image is in P mode, you need to use exposure compensation. Start by testing the exposure. Take a test shot of the subject. If your camera has an electronic viewfinder, it will show a live preview with the current exposure, so a test shot is unnecessary. View the photo and determine if you want to the image to be lighter or darker. If the exposure is already perfect, move on to the next step.
Use exposure compensation to dial the exposure up or down. The exact process varies by camera model, but you can adjust most by pressing and holding the button with the + – icon. You can then use the dial to turn the exposure compensation up or down.
If you need the image to be lighter, use a positive exposure compensation number. Each +1 will double the amount of light in the photo, so if the image is only a little bit too dark, a +1/3 or +2/3 setting may be enough.
If you need the image to be darker, go the opposite route with a negative number. A -1 will be half the amount of light, so, again, a -1/3 or -2/3 may be sufficient.

Set the ISO
Programmed auto is sometimes also referred to as ISO-priority mode. While there’s more to
the mode than that, it is a mode where you can set the ISO and leave everything else up to
the camera. Set your ISO based on the light in the scene. If you are shooting outdoors in
bright sun, use ISO 100, or the lowest setting on the camera. For shots after sunset, try a
higher ISO such as ISO 3200. For indoor shots, somewhere in between. Choose an even
higher ISO if you are working with fast-moving subjects and need to keep them sharp.
Auto ISO is still an option in programmed auto. Using Auto ISO in Program mode is an
option for shooting on auto mode. But you can gain access to settings beyond the exposure,
such as white balance, metering and focus mode.
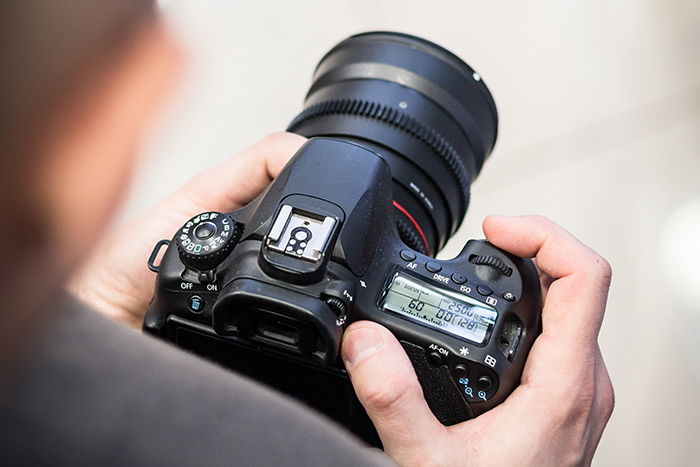
Frame Your Subject, Focus, and Adjust the Automatic Settings
Next, compose your photograph and focus with a half-press of the shutter button. Keep the
shutter half-pressed. This half-press of the shutter locks in the camera’s exposure settings and
allows you to adjust them. Once you let go of the shutter button or take a photo, the camera
will continue to adjust the settings if the light or scene changes.
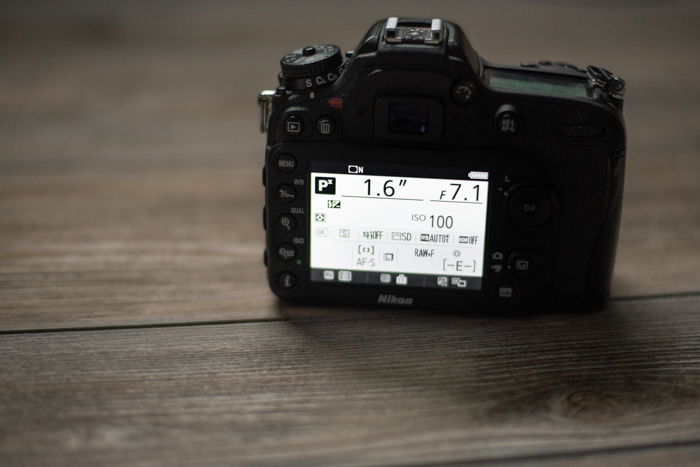
With the shutter half-pressed, check the settings that the camera has automatically selected.
On most camera models, the aperture value, shutter speed, and ISO will display at the bottom
or side of the viewfinder.
If these automatic settings are not quite right, use the control dial to flip through alternate
options.
Note that the camera may adjust both the aperture and shutter speed as you flip through the
options, or just one. This depends on the light in the scene and whether you’ve reached a
limit in the camera or lens’ capabilities. Continue using the control dial until you find the
settings that are more appropriate than what the camera has selected.
If any of the settings in the viewfinder flash, that means the photo is too bright or too dark.
The camera is at the threshold and cannot adjust the settings any further. Try turning the dial
the other way, or adding more light to the scene through other methods, such as flash.
With your settings dialed in, shoot the photo. Remember, once the photo is taken, the
camera will re-read the scene and select a new pair of settings. You may need to adjust using
the dial again. That inconsistency is one of the drawbacks of program mode.
Keep Shooting and Learning
Programmed auto allows you to shoot with the ease of auto but with some of the more
manual controls. It’s also a great way to learn. Practice shooting in P mode on the camera
and watch how the different settings change the image. Watching the settings adjust as
the camera reads the scene can be helpful to make that step to full manual mode.
After shooting with programmed auto, you should start to get an idea of how ISO, shutter
speed and aperture affect the image quality. Once you’re confident in P mode, try stepping
up to the A or AV mode, aperture priority, or the S or Tv mode, shutter priority. Remember,
you can always return to P mode if you need to shoot quickly and don’t have time to
fine-tune your settings.
Common Questions
What Is the Difference Between Program and Auto Mode?
In both modes, the camera selects the exposure settings. But, in program mode, you can
override those settings somewhat. You can access adjustments such as white balance
and exposure compensation that aren’t always available in auto mode.
What Is Program Mode on Canon?
Canon has some modes with a different name than most. But the P on the mode dial is
the same P that’s on a Nikon or Sony and stands for program mode.
What Does P Mode let you Control?
In P mode, you can set the ISO. You can also use program shift and choose pairs of shutter
speed and aperture settings. But you cannot control those settings individually. You also
have access to white balance, metering modes, and focus modes in this mode.
What Is the Best Mode to Shoot in?
The best mode to shoot in depends on your experience level and what you are shooting.
Program mode is good for beginners. Aperture priority and shutter priority is ideal for
intermediate photographers. Pro photographers can use it to shoot quickly. Manual is best
for shots that need full control over the different camera settings.
No comments:
Post a Comment
Note: Only a member of this blog may post a comment.