Thursday, February 17, 2022


Beginners Guide to Shooting Still Life Photography

Still life and tabletop photography is a great way to improve your photography skills. In this article, 

we will show you how to get those perfect still life photos!

So what constitutes a still life photo? Still life photography is the photographic counterpart 

of still life painting. Common subjects for still life photography include inanimate items — 

flowers, food, plants, rocks, etc.

Tabletop photography is a branch of still life photography that focuses on capturing items 

placed on a table. The most common photographic subjects of this genre are food and product photography.

A still life photo of fruit and flowers

Why You Should Try Still Life and Tabletop Photography

You can learn a lot from still life photography. For example, you are able to observe how the 

different kinds of light will affect the scene. Did you know that sidelight from a low light 

source is great to reveal textures?

With still life and tabletop photography, you are totally in control of every single 

aspect of your photo. From staging the scene, to firing the shutter—it is all your 

decision.

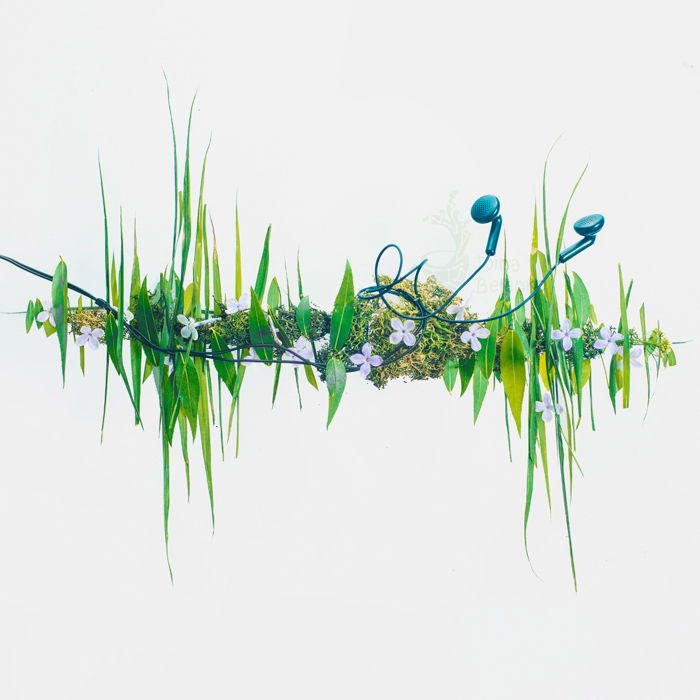
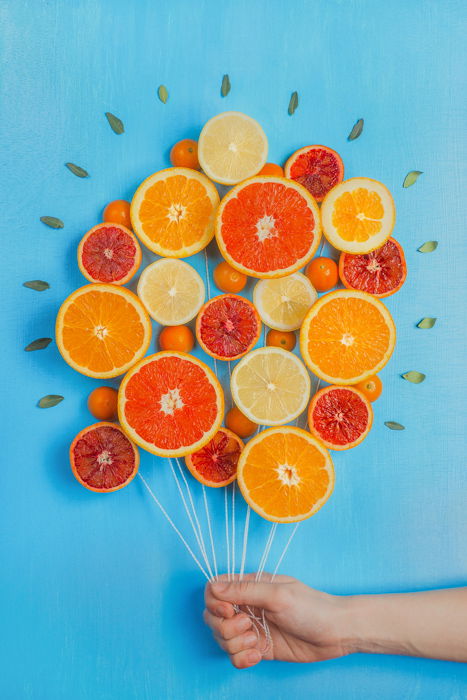
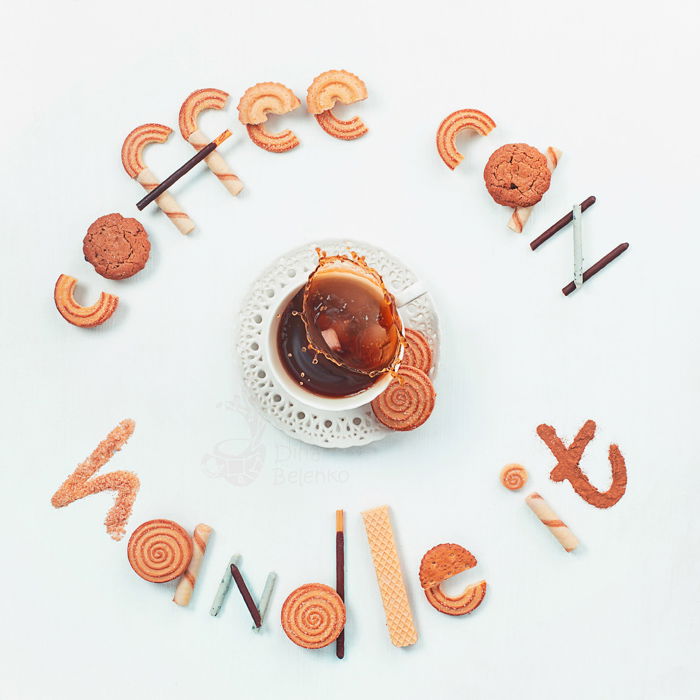
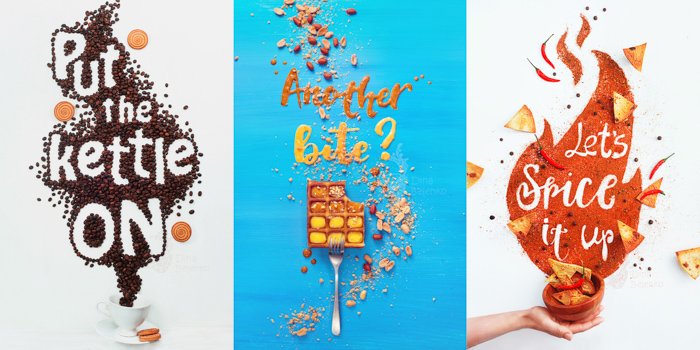
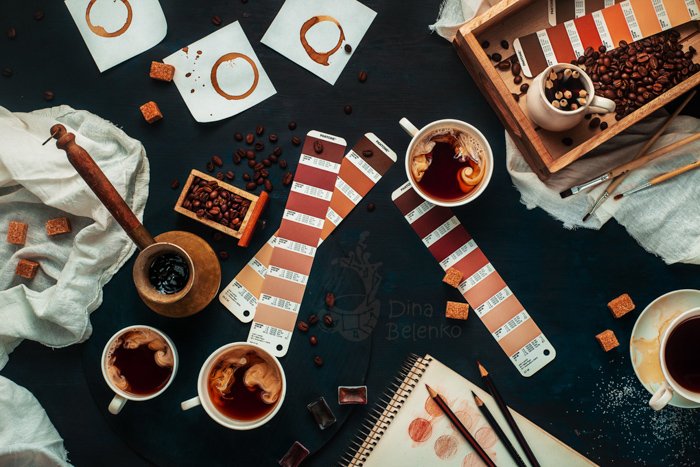
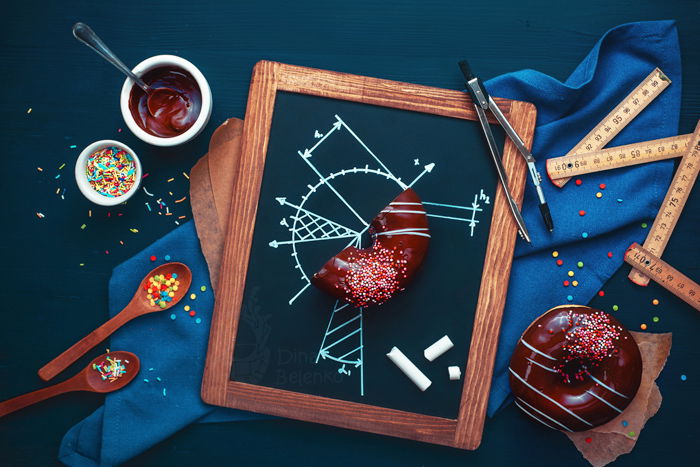
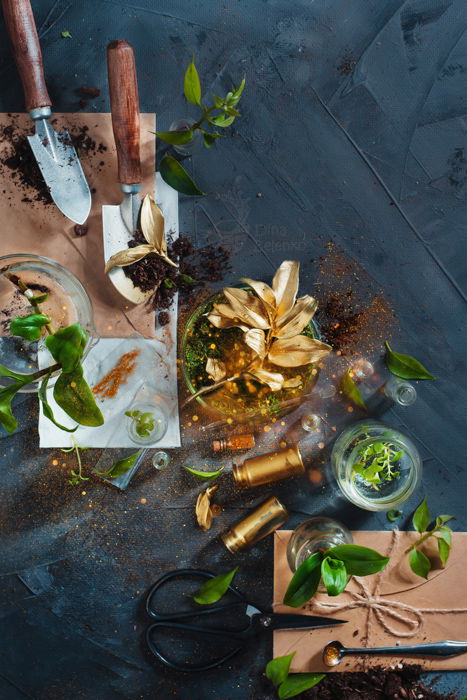
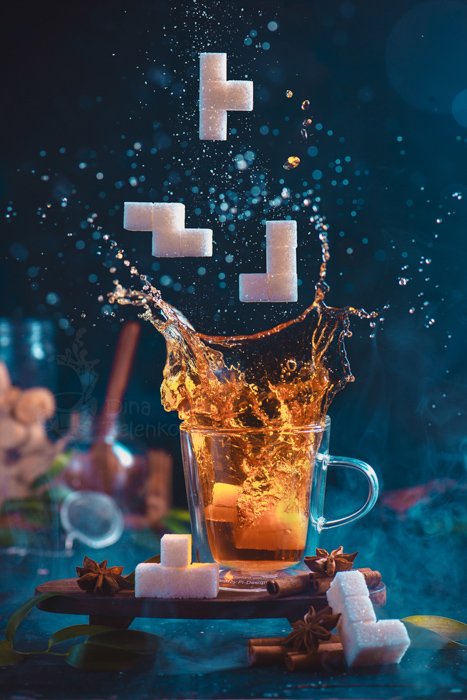
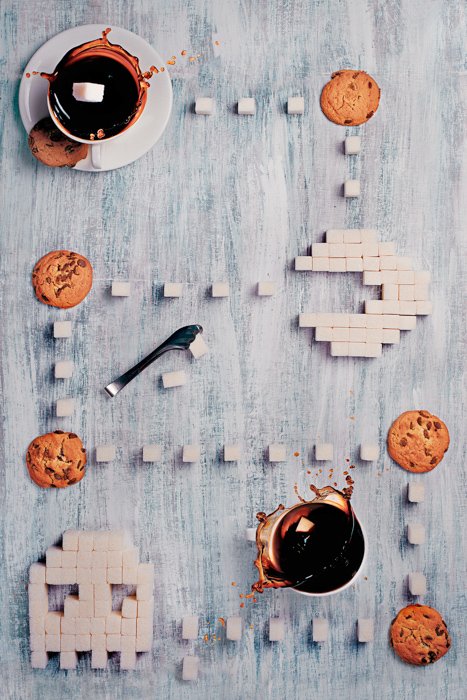
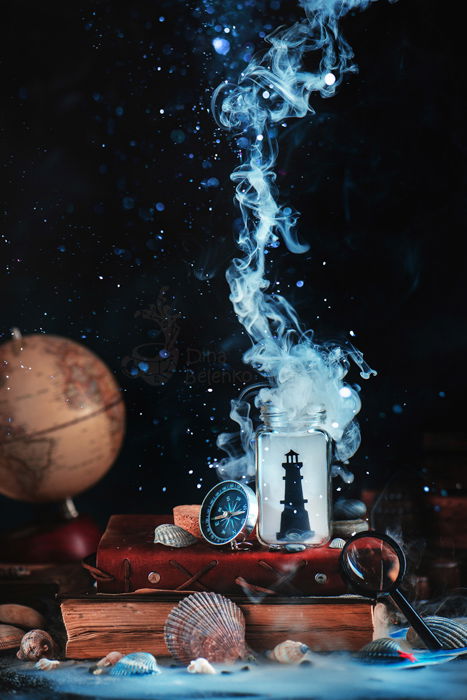
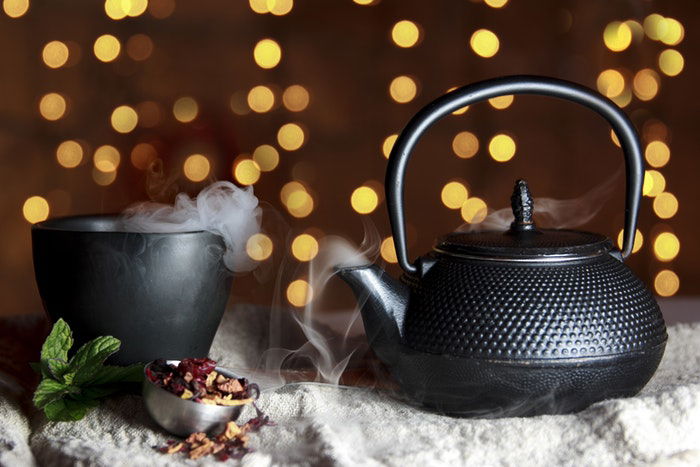
Despite the “commercial” nature of tabletop photography, you are not limited to 

photographing still life in a commercial way. You can always create a nice 

story-telling image 

like the one below.

Atmospheric still life photography shoot of a clarinet and bottle of Disaronno

What Do You Need for Your Still Life Project?

A professional may require a suitable set-up and expensive equipment. But you can still 

take amazing photos with basic equipment in the corner of your living room. Keep costs 

low by getting creative and crafting DIY accessories and solutions to get the shot that you 

want.

Below, I have provided a list of materials and equipment to begin tabletop and still life 

photography.

Required Equipment

  • Any kind of camera. A digital camera is cheaper to run, and you can have immediate
  •  feedback, but nothing prevents you from using your film camera.
  • Different materials to create the floor and background for your scene.
  • Small silver and white reflectors to bounce the light back into the scene. These 
  • can be easily built using tinfoil and cardboard.
  • Props: look around your house or visit a flea market for interesting, cheap 
  • props to +enhance the scene.

Recommended Equipment

  • At least one flashgun. Ideally, it can be used in manual mode and has adjustable power. 
  • I use a Metz 44 AF-2 digital. You will also need wireless triggers or a fairly long 
  • E-TTL cord—to enable flash off-camera.
  • A softbox for your flashgun: I use a Neewer Translucent Softbox, a compact, 
  • wonderful and affordable softbox.
  • One tripod. A second one can be necessary if you want to mount your flashgun 
  • instead of using it handheld.
  • A telephoto lens and a fast normal lens. Ideally, a macro lens is required, but you 
  • can get away with a set of close up lenses. Since I do not own a macro lens, I usually 
  • work with a +2 and/or +3 close up lens. It reduces the minimal focus distance of my 
  • lenses. Old, manual lenses are good and usually cheap.

I usually use an old, manual, Olympus Zuiko OM 50mm f/1.4 and the  

Sigma Art 30mm f/1.4 as they are super sharp and cheap. Note that I use those lenses 

on an m4/3 camera, with a crop factor for the sensor of 2x.

This means that those lenses are equivalent to a 100mm, 60mm and 120mm lens for 

full-frame cameras. Generally speaking, for still life and product photography, you are 

better off staying between the 50 and 120mm focal range.

Black tea pot and mug with bokeh background

How to Approach Still Life Photography

  • Keep it simple. Don’t get carried away trying to craft scenes with many different 
  • objects (or food) and materials. Take a minimalistic approach, where the main 
  • subject is easily identified. Work the scene to make the most of it.
  • Consider that glassy, shiny and reflective surfaces are the most difficult to work 
  • with. Try to avoid them in the beginning.
  • Keep it clean. Still life is all about perfection (even messy setups should be 
  • carefully staged) and nothing should be left unchecked. Be sure to clean your 
  • props and all visible surfaces of dust, smudges and fingerprints.
  • Be patient. Tossing objects into the scene will not give great results. Think about 
  • your composition, how the objects play together and consider leading lines and 
  • angles of view. Experiment with the light. Think about what you want to highlight 
  • in the scene, the feelings to convey, and the textures to reveal.
  • Write a logbook to note down the camera settings used for each shot. This is 
  • particularly useful if you are using manual lenses that do not communicate with 
  • the camera body. It is a great way to note how you staged the set and the light 
  • setup for future reference.

A still life shot of a bottle of whiskey arranged with rpops and flowers

Four Still Life Case Studies

If I was to tell you all that there is to know about still life photography, this post would 

never end. Instead, I want to show you what you can do with cheap and basic equipment 

in four case studies. From the simplest setup to a more complicated one.
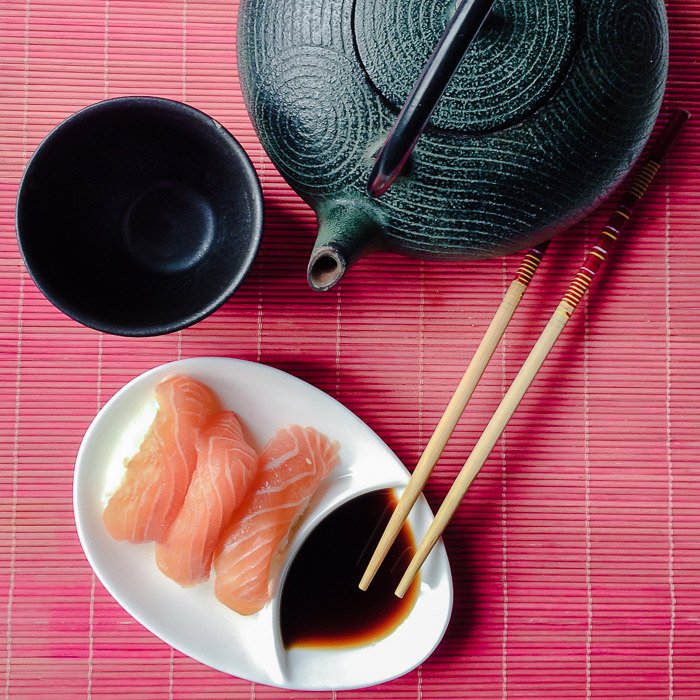
Case Study #1

Gear Used

  • Camera: iPhone 5S
  • Light source: natural light
  • Light modifier: circular reflector

Lighting setup

  • Setup: High Key
  • Key light: a window to the left of the scene
  • Fill light: circular reflector on the right of the scene

A classic lighting set up for still life photography

This is the simplest setup you can create. It is most suitable for food photos and small 

scenes.

As I had no macro lens for my iPhone, I was unable to fill the frame with the sushi. 

For this bird’s eye view, I had to stage a scene with some props. I used a pink 

bamboo placemat on which I placed a nice cast iron teapot with a cup.

The freshly delivered sushi was displayed using a small plate with some soy sauce, 

and a pair of chopsticks were a nice finishing touch.

An over head shot of sushi, teapot and tea cup for still life photography

Case Study #2

Gear Used

  • Camera: Olympus OM-D EM-10 Mark IV Micro Four-Thirds camera
  • Lens: Olympus Zuiko OM 50 f/1.4  (equivalent to a 100mm lens on full-frame)
  • Accessories: tripod and a +2 close up lens
  • Light source: natural lighting
  • Light modifier: circular reflector
  • White 100x70cm cardboard as background and white 50x70cm cardboard as stage

Lighting setup

  • Setup: High Key
  • Key light: a window to the left of the scene
  • Fill light: circular reflector on the right of the scene

diagram of high key lighting setup for still life photos

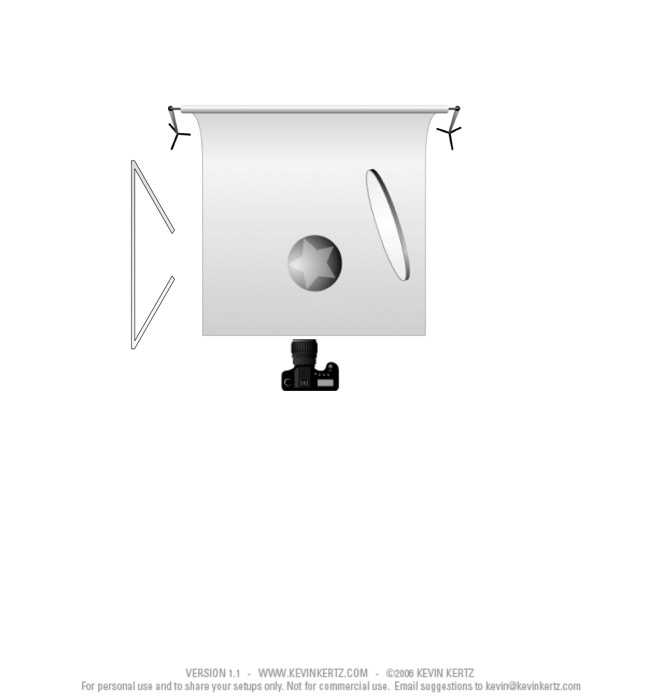
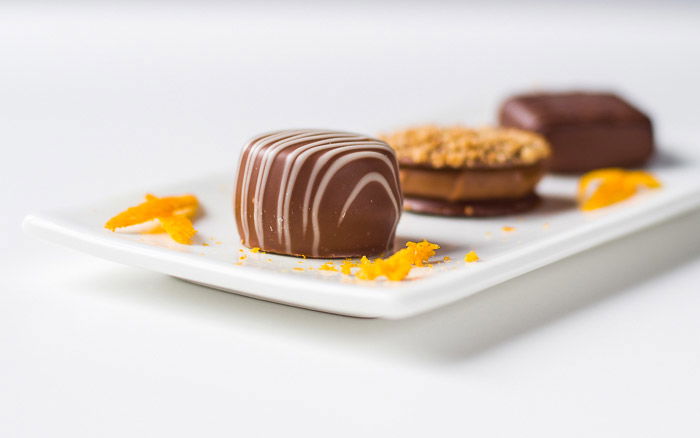
This is a classic setup in food photography. I decided to photograph  

dark chocolate pralines, creating contrast by choosing a nice High Key image.
I have used a long and narrow white plate, decorated with orange peel, to display 

the pralines. And then I focused on the first chocolate.

bright and airy still life photography of Belgian pralines decorated with orange peel.
Belgian pralines decorated with orange peel.

Case Study #3

Gear Used

  • Camera: Olympus OM-D EM-10 Micro Four-Thirds camera
  • Lens: Olympus Zuiko OM 50 f/1.4  (equivalent to a 100mm lens on full-frame)
  • Accessories: tripod and a +3 close up lens
  • Light source: iPhone 5S
  • Light modifier: circular reflector
  • Black (matte) 100x70cm cardboard as background and black (glossy) 50x70cm 
  • cardboard as stage

Lighting setup

  • Setup: Low Key Lighting
  • Key light: iPhone 5S running the pro version of the Soft Box Color app from 
  • above the scene on the right
  • Fill light: circular reflector on the front right of the scene

diagram of low key set up for still life photography

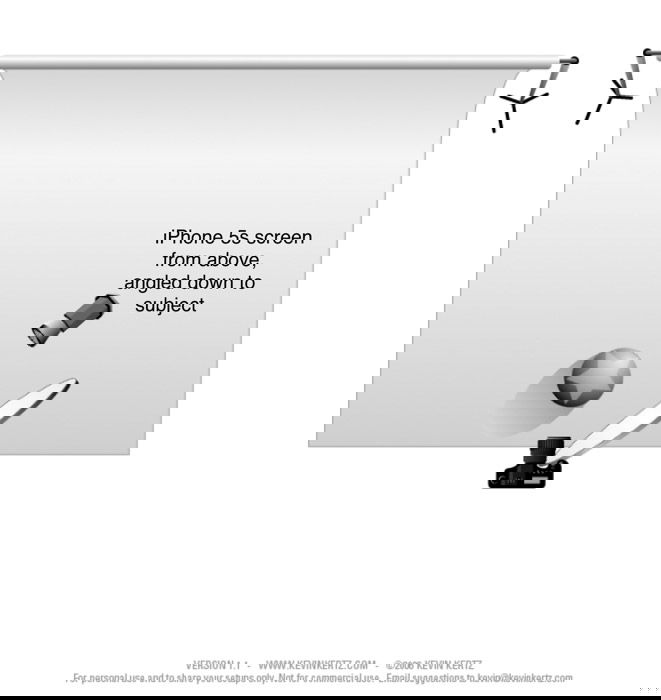
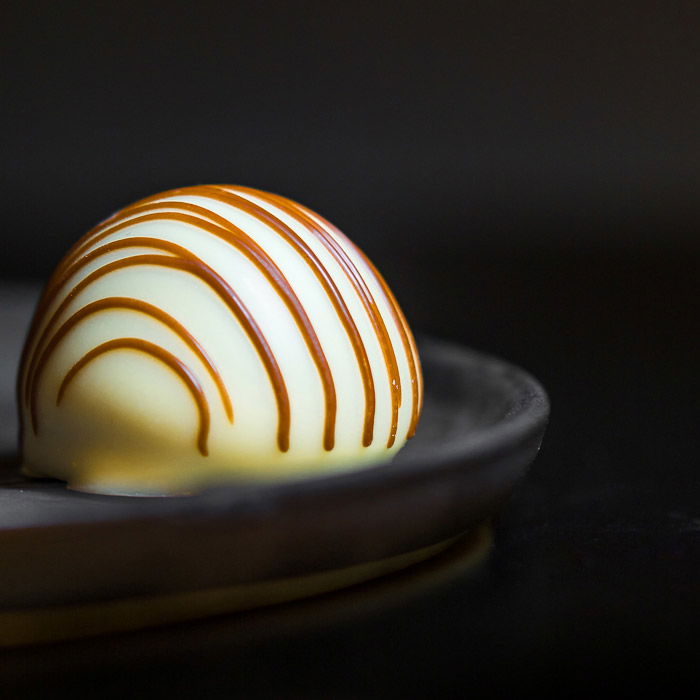
In order to stand out, white chocolate pralines call for Low Key images.  A dark grey 

plate was used to display a single white praline decorated with caramel.
The use of a +3 close up lens allowed me to get really close to my subject. I then decided 

to crop the image in square format, with the subject off-centre. It provides a better and 

even tighter composition.

close up food photography of Belgian white chocolate decorated with caramel.
Belgian white chocolate decorated with caramel.

Case Study #4

Gear Used

  • Camera: Olympus OM-D EM-10 Micro Four-Thirds camera
  • Lens: Sigma Art 30mm f/1.4 DN  (equivalent to a 60mm lens on full-frame)
  • Accessories: tripod, light stand (a simple lollipod tripod), 3m long E-TTL cord
  • Light source: flashgun Metz 48 AF-1 digital in manual mode, output power set 
  • to 1/16
  • Light modifier: circular reflector, softbox
  • Black (matte) 100x70cm cardboard as background and black (glossy) 50x70cm 
  • cardboard as stage

Lighting setup

  • Setup: Low Key
  • Key light: flashgun on the right side of the scene, a couple of meters away
  • Fill light: circular reflector on the left of the scene

diagram of low key lighting setup - still life photography

A Yashica-MAT LM TLR 6X6 medium format camera, on a black background
Yashica-MAT LM TLR 6X6 medium format camera.

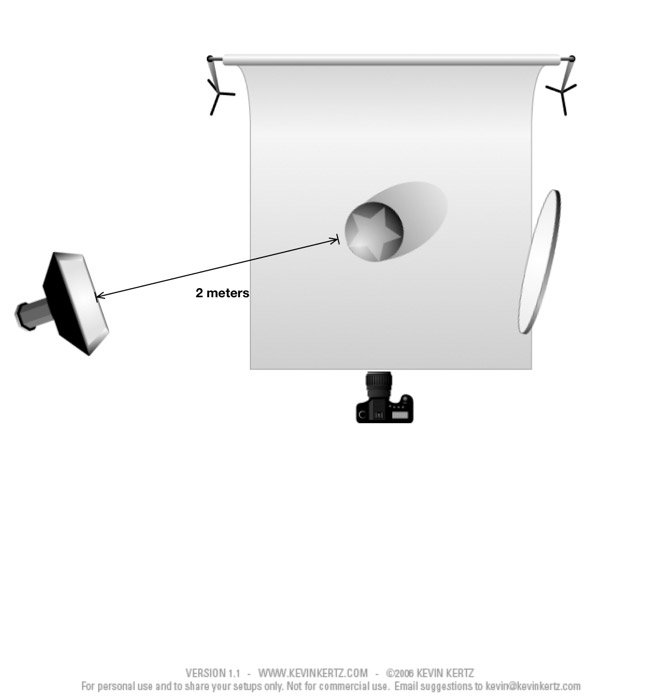
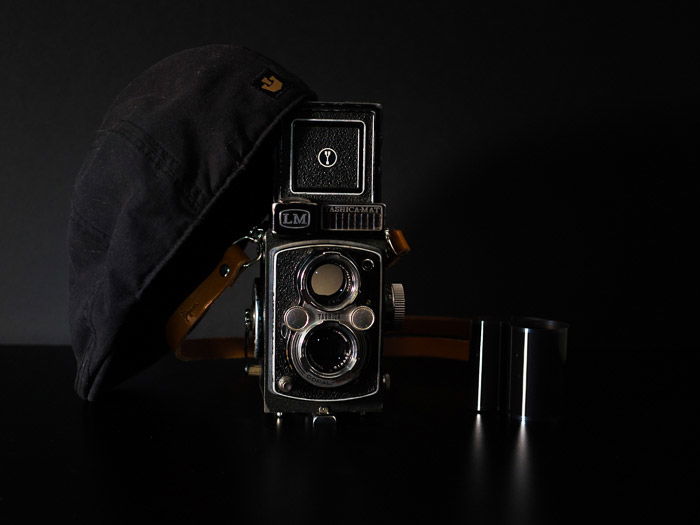
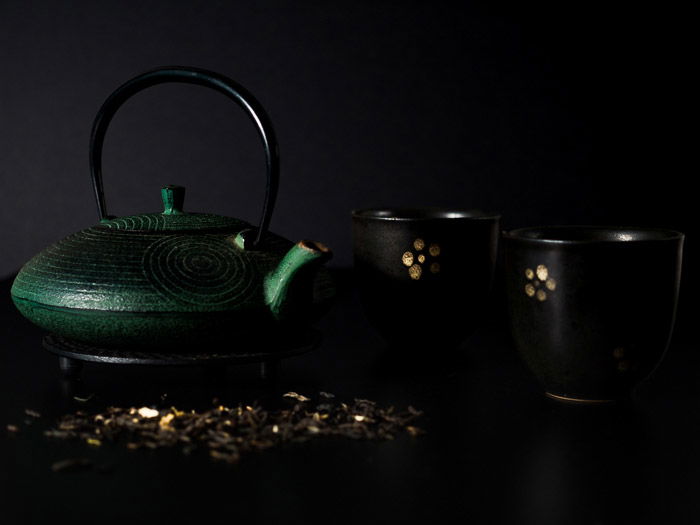
A more complex setup for this Low Key scene is showing my Yashica-MAT LM TLR 

medium format film camera from 1950 (still in working condition, by the way). The 

props used to fill the scene were a used roll of 120 film and my favourite hat. I also 

made sure the Figosa leather strap was clearly visible.

Note that you do not need to be in a pitch-black environment to do this kind of low key 

image. Actually, you can even do them in broad daylight, as long as you are ok with 

using very narrow apertures.

It is best to take a shot without flash to get a black image of the scene (e.g. using very 

fast shutter speeds, lowest ISO settings and narrow apertures). Then, connect the flash 

and take the real photo.

The scene will be illuminated by the flash only, regardless of the amount of  

ambient light. Remember, you can out power the Sun with a flashgun.
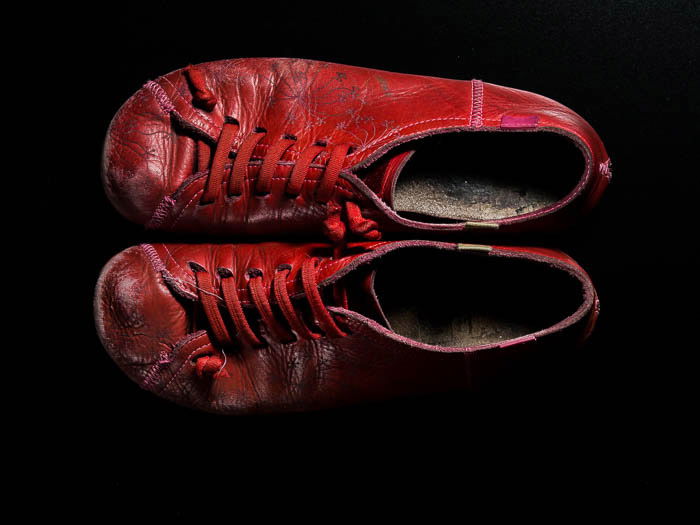
This kind of setup is great if you want to reveal textures and make your shot moody

This is what I did for the used red Camper Peu leather shoes shown in the photo below.

a pair of red camper shoes on black background
Red Camper Peu lady

Use Creativity for the Best Still Life Shots

As you have seen, you can do quite a lot with minimal equipment. You can photograph 

whatever you want, as long as you have the place to stage it and enough light power to 

light it. The main limit is your creativity. Until now, I presented you quite classic still 

life images, but you can go for completely different things.

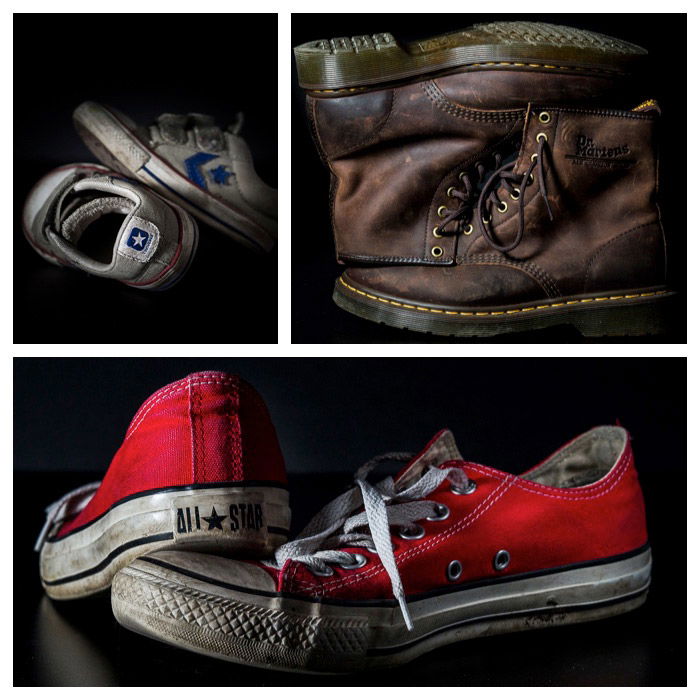
I love to use setups based on that of the case study #4 to photograph old, battered shoes. 

My favourites are old Converse All-Stars and leather shoes because of the texture.

Three photo grid showing still life photography of different shoes on black background
Some low key images from my Shoes Project.

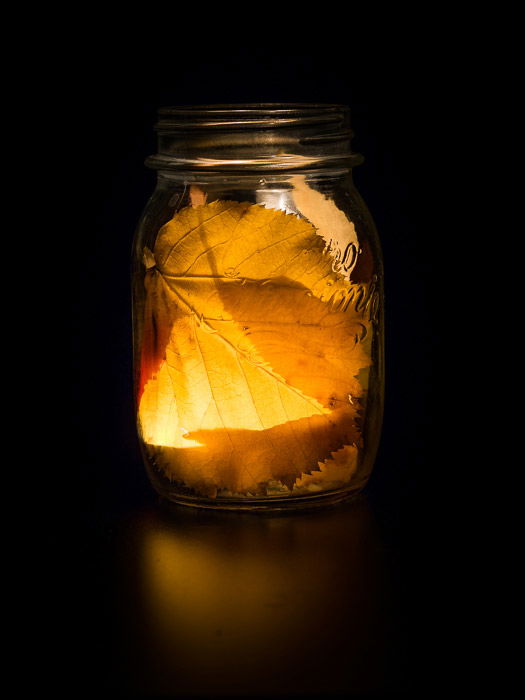
And what about Autumn in a vase? For this shot, I put some yellow leaves inside a jar 

and lit a candle inside.

A still life photography image of leaves and a light inside a jar

Technical Tips for Still Life Photography

Low Key Setup

For low key photography, I prefer to work in low light. I build my set with two pieces 

of black cardboard: the one I use as the stage (50×70 cm) has a glossy finish, while the 

one for the background (100 x 70 cm) is matte.

The flash is off-camera, on its light stand, and I usually place it on the front/side of the set.

This setup is very similar to the one used in the case study #4, and the resulting photo is 

shown below.

A dark, moody shot of a teapot and teacups for still life photography
Cast iron teapot with two cups and tea leaves sprinkled on the set floor. Note how 
clearly visible the texture and drawings in the cast iron teapot are.

High Key Setup

This is my typical setup for high key photography: Two pieces of white cardboard. The 

one for the floor stage (50×70 cm) is resting on a coffee table. The background 

(100×70 cm) is vertical and on a rest foot. The set up is next to a window to ensure 

a good amount of natural light to work with.
view of a high key set up for still life photography

It is best to avoid windows exposed to direct sunlight because of the harsh light that 

will land on your set. Overcast days are the best since the sky will act as a huge softbox.
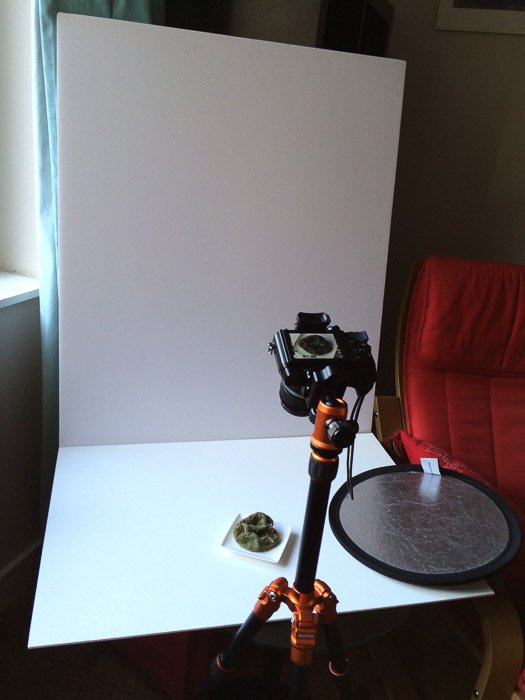
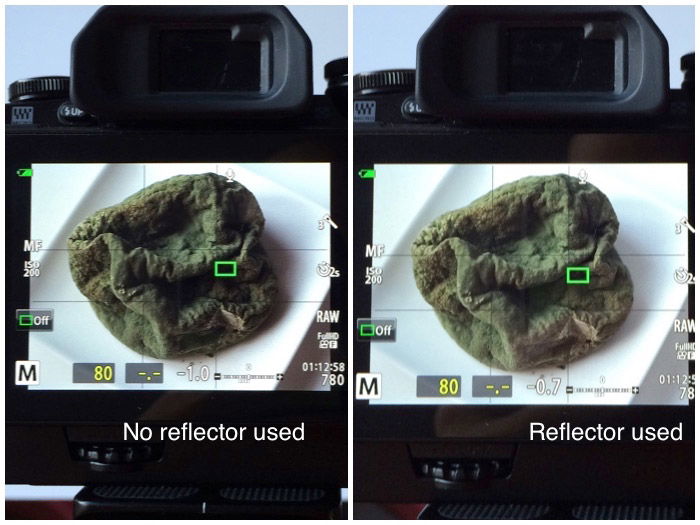
Fill Light

In the photo above, you can see my small, double-sided silver/white circular reflector 

(33 cm in diameter) from Lastolite.

I use it to soften the shadows by bouncing back some of the light into the scene. The 

photo below shows a comparison between a scene photographed with (on the right) 

and without (on the left) a reflector.

As you can see, the shadows in the right image are softer when the reflector is used 

and the scene is more pleasant.

An image of a rotten and moldy orange peel can make for interesting still life photography

A Few Words on Focusing and Focus Stacking

First of all, forget autofocus and go manual: you want to have absolute control of what 

is in focus and what is not. If your camera has it, use the live view and turn on any possible 

manual focus assisting function you have. Image magnification, focus peaking, or a 

combination of the two.

For this kind of shot, where you have a narrow depth of field, and you need to focus, 

have your camera mounted on a tripod. Use a remote shutter or the self-timer, to avoid 

camera shaking.

Be aware of one problem that you may have to face when working with macro or close 

up lenses; the very narrow DOF. Sometimes, even a small subject cannot be all in focus.
If stepping down your lens, (i.e. selecting a smaller aperture is not desirable) or the 

resulting DOF is still too narrow, the only solution left is to do focus stacking.

Focus stacking tends to happen in post-processing. But there are now some cameras that 

allow you to do in-camera focus stacking (e.g. the Olympus OM-D EM-1 with the 

latest firm update).

In Photoshop, focus stacking is done by selectively merging some photos where each 

photo is focused on a different part of the scene. This technique involves loading your 

images into Photoshop as layers. You then mask out the unwanted parts of the images 

before merging the layers to create the final image.

For example, consider the photo below: a bird’s eye view on some of the finest Belgian 

pralines. To get this final image, I had to focus stack three different photos to get all the 

different elements in focus. The first photo had the wooden board in focus, the second 

one focused on the coffee beans to the right. For the last one, I focused on the pralines.

A focus stacked bird’s eye view of Belgian pralines on a metal plate 

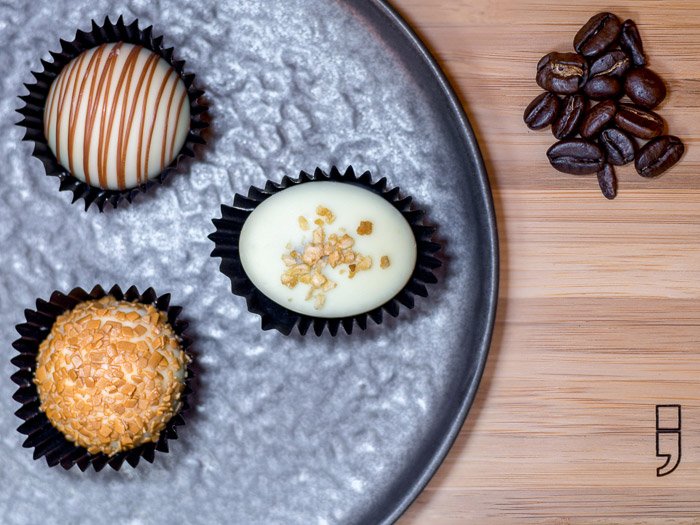
A focus stacked bird’s eye view of Belgian pralines.

Learn More With Useful Links

If you want to learn more about still life photography, here are a few interesting ideas that 

you may want to check out:

  • Cyrill Harnischmacker’s “Tabletop Photography” book, also available for kindle.
  • Lara Gelroks’ great articles on diyphotography.net about commercial photography.
  • Alex Koloskov’s post on Digital School Photography—if you want to see a 
  • professional setup for product photography.
  • Cristina Colli’s interview on how she takes amazing still lifes of flowers with her 
  • iPhone. Published on iphonephotographyschool.com

These are just a few links, but really, a simple query via google will find you plenty of 

interesting results.

Still life product photo with fruit and plants as props
Photo by ๐•๐ž๐ง๐ฎ๐ฌ ๐‡๐ƒ ๐Œ๐š๐ค๐ž- ๐ฎ๐ฉ & ๐๐ž๐ซ๐Ÿ๐ฎ๐ฆ๐ž from Pexels

You do not need to invest a great deal of money to wet your feet in still life and tabletop 

photography. I hope I have inspired you to give it a try!


--------------------------------------------------------------------------------------

Sponsored Ad - Digital Photography Complete Course: Learn Everything You Need to Know in 20 Weeks 


Photography Books

Monday, February 14, 2022

#World, Images, People

10 Easy and Fun Still Life Photography Ideas


1. Play with Shapes

A metaphor is a powerful tool in a photographer’s hands. Even if you’re not looking too closely, you can still find unusual connections between inanimate objects and make a beautiful picture out of it.
All you have to do is to compare dissimilar subjects that have one thing in common. That could be their color, shape, or any other formal resemblance.
For example, a globe is round. So is a CD. So you can shoot a CD in the wooden frame taken from the globe and say that the world is full of music. This is a very cool tool when you’re thinking of minimalist still life photography.
An interesting still life photography composition of leaves, flowers and earphones
Find a mundane object that reminds you of something more interesting. Make this visible in your still life setup.
Let’s get back to round objects. Oranges are round. What else is round? Bicycle wheels, the Moon, headphones, cups, vinyl records, tennis balls, darts targets, and camera lenses. Also, balloons.
Why not turn some oranges and lemons into a bunch of balloons? For this transformation, you will need only a few strings. For others, you can draw the key details with a marker right on the backdrop, cut them out from paper or bend from a string of wire.
A still life photography ideas arrangement of oranges made to look like a bunch of balloon, on blue background

2. Try Adding Words

Photos always have to say something. And, sometimes they can do it literally!

Here dimensional typography comes into play! Beautiful texts made from flowers, confetti, chocolate, wire, stationery clips, and spices!
The easiest way to get started is to find objects similar to letters and united by one theme. Pick a theme: sweets, flowers, outer space, toys, autumn, you name it.
Cool still life photography ideas arrangement of biscuits spelling 'coffee can handle it' framing a coffee cup
That’s your new alphabet now! Cookie with a bite is for C, a spiral of a peeled orange zest is for S. Write Y with carefully poured mustard. Use two crossed flower stems to form X. Create W from a broken slinky and make a specific button stitch is for Z.
Make a list of possible objects and find corresponding letters. Now you’re ready to write something witty and funny.
Another way to play with words is to work with a template. Print the text you want to use and cut it from a sheet of paper with a layout knife. Fill the template with something free-flowing like sugar, sprinkles or confetti.
Carefully remove the template with tweezers and photograph the letters.
4 photo still life photography ideas grid with the text 'future flowers' and various arrangements of a flower pot and flowers
Wish someone good morning, spelling it with bacon and eggs. Offer another waffle with letters made from syrup. Add some spice to your nachos with letters made from chilli paper.
Three photo still life photography ideas grid combining food photography and text

3. Have Fun with Patterns

Patterns always look good. There’s something soothing in rows of alternating objects. Even more, it’s the best way to make an impressive photo with limited props.
Pick a theme: sweets, fruits, leaves, embroidery tools, ceramics, accessories, anything you like. Collect your objects, set your camera on a tripod. Arrange a composition, starting with bigger items and moving to smaller details.
Take a shot from above, and voila!
Creative still life photography ideas with empty coffee cups, crumpled paper balls and pencil shavings on a colorful blue background. Minimalist inspiration concept.
The most important thing here is to keep your items similar, organized, but not boring. I have a sweet tooth, so naturally, I’m going to use my patterns of sweets, coffee cups, and cookies.
ะกookies in a checkerboard pattern make a boring picture. But add some lemon zest here, a chocolate swoosh there, and a couple of star anise to fill empty spaces. Now your pattern is pleasant to look at.
Overhead photo of cookies, nuts, leaves and chocolate on white background - still life photography ideas.
Avoid monotone! Don’t be afraid to break the rhythm and to experiment with different colors. That’s what keeps the music interesting.
Triptych of still life photography ideas on white background

4. Coffee Is Your Friend

One of my favourite creative exercises is choosing one object and trying to come up with at least 15 sketches with it as the main hero. Yeah, I know it may seem hard and even tedious, but in fact, it’s pretty fun. The key is finding an object with wide narrative opportunities.
For me, this object is always a cup of coffee.
Still life photography ideas clock composition made of coffee cups
You may think of an artist who got oblivious and put brushes and pencils in their espresso. Or you can imagine blimps and zeppelins flying in steam rising above hot coffee. Or you can have coffee cups competing with cinnamon sticks in a game of tic-tac-toe.
Take your time, and spend 5 minutes (have a countdown!) on each thought. Write every idea down without criticizing it. And don’t be afraid to sketch something stupid.
Look at a coffee cup and try to brainstorm at least 15 stories about it. You’ll be surprised at how swiftly your imagination can work once you give it some fuel.
Overhead shot of coffee paraphernalia on dark background - still life photography ideas.

5. Tell a Story

Things can tell a lot about their owners. Especially if you don’t look for random objects, but for tools of their trade. For me, desktops look not only intriguing but magnificent. All these interesting objects that belong to an artist, a ceramist, a silversmith, an embroiderer, or a writer!
All the details make these tabletops alive.
Overhead shot of a typewriter and messy paraphernalia on dark background, an outstretched hand holds a lit match - still life photography ideas.still life photography ideas
You can ask your friend with an interesting profession or hobby for permission to photograph their workplace (don’t miss the chance to include their hands in the frame!). Or you can try to recreate something more unusual by yourself.
What would a workplace of a botanist look like? A cartographer? A retired pirate, a witch, your favourite writer or, say, Hermione Granger?
Overhead shot of an artist painting a fantasy island map. Underwater still life photography ideas
Which items would they keep? Would their tables look neat or be a complete mess? Which objects are essential to their profession and which are just cute little details?

Answer these questions, pick an appropriate and good background and tell your story.  You can include a busy backdrop, a blurry background, a neutral background, or whatever background you fancy.
Overhead botanical still life photography ideas with copy space.

6. Include Chalk Drawings in Your Photographs

Combining a flat drawing with real objects is always a great trick. You can create a new reality for ordinary objects transforming them with a couple of chalk lines. Turn one thing into another or even create a whole new space!
All you need is chalk, drawing surface and sketch. I’m absolutely helpless at drawing, so I always find extremely simple subjects. I can’t make a cupcake or part of an elaborate castle, but I can draw a fiery tale and let it be a comet.
Overhead still life photography ideas triptych of fun food photography on dark background with chalk drawings
If you’re not drawing with a marker, but with regular chalk, keep it wet. Don’t use dry chalk. Dip it in water before drawing. At first, the lines will look a bit faded, but let them dry.
The drawing will dry bright white and the lines will look the same. But drawing with wet chalk is much easier. You can also draw on a wet board if you prefer.
Overhead still life photography ideas of fun food photography on dark background with chalk drawings
Spend 20 minutes on sketches. You’ll see that drawing a jam jar around fresh berries or adding a chalk teapot to sugar cubes, mint leaves, lemon slices and cinnamon is just a start.
Overhead triptych of fun food photography posed on a blackboard with chalk drawings - still life photography ideas.

7. Try Flower Photography

Flowers are a perfect subject for still life photography. It’s practically impossible to have flowers in the frame and get a dull image.
Especially if it includes a story you want to tell.
Overhead shot of a persons arms holding flowers on dark background - still life photography ideas.
Say, your character is a writer, who’s working on a sweet and romantic novel. Let’s get a bunch of pink flowers and arrange them around a typewriter adding some pencils and crumpled paper balls.
Or your hero may be a young botanist who’s collecting field flowers for his first herbarium. Then photograph a neat and accurate flat lay with papers and gardening scissors.
Or your character is a daydreamer who’s drying fern leaves between the pages of a fantasy book. In that case, shoot something light and airy in a high key.
Writer's workplace with typewriter, stationary, crumpled paper a still life photography ideas
You can even get a little destructive and paint flowers with metallic spray paint (choose golden ones for a Midas reference!). Why not drown them in water (wait for bubbles to form on the surface) or dip them in acrylic paint of matching color (and shoot falling drops of liquid).
You can even encase them in ice cubes (perfect for hot summers!).
Let your imagination run wild! With such a beautiful subject as flowers, there’s practically no chance for error.
Botanist workplace with herbarium, clipboard, field notes, gardening scissors and green plants in glass vases on a concrete background. Rare golden flower top view. Still life photography ideas

8.  Play with Your Food

Food photography is wide and versatile enough to talk about for days without stopping to draw a breath. Often, in order to take a shot, you need to be a good cook or a food stylist. Or at least to work with one. But there’s no need for that if you’re shooting raw ingredients.
Disintegrate your favourite meal, and show how it’s made. Make a pie chart from your breakfast cereal: this sector is for oatmeal, that one for berries, and that tiny one is for a pinch of vanilla.
Or take it a step further and photograph a comprehensive recipe. Arrange a flat lay composition with ingredients, paper arrows, and stickers with written instructions.
Overhead phot of fun food photography on white background - a pie chart of cereals and fruits
Another way is to fantasize how easy cooking could be with magic! How with one spell or one pentagram you can avoid all that fuss with cutting, roasting, sauteing, and blanching.
I can’t bake a proper doughnut to save my life. But I can imagine how I summon a tasty chocolate doughnut with help of transfiguration seals from Full Metal Alchemist.
Overhead shot of an outstretched hand in the middle of a fun food photography arrangement on dark background - still life photography ideas.
Food is one of the most promising themes to work with. So, if you’re struggling for ideas, just look at your plate.
Still life photography ideas of flying chocolate glazed donut summoned with an alchemical pentagram

9. Catch Retro Vibes

Remember old 8-bit video games? I’m very fond of them, so an idea of making them real seems fascinating! Take something resembling a pixel (a simple sugar cube would work perfectly) and recreate a scene from Space Invaders or Pack-Man.
Make it a fight not for completing the level, but for your breakfast or after lunch cookies.
Splash of tea in a double wall glass with sugar Tetris pieces. 8-bit video game in real life concept with copy space. Creative action food photography. Still life photography ideas
You don’t need to build an entire screen pixel by pixel. But note the key elements and make sure you have them in your scene. Sometimes just one element like one tetromino figure will do the trick.
My friend told me that the traditional name for the Tetris playing field is called the “well” or “matrix”, or the “glass”. My mind immediately produced an image of Tetris tiles filling a real-world glass.
Later, I transformed this image into a smalls series where Tetris figures fall into teacups and create beautiful splashes.
Now I’m really interested to see your take on this! Remember your favourite 8-bit game and bring it to life. Even if it’s going to destroy your breakfast.
Overhead still life photography ideas shot of a fun food photography arrangement on white background

10. Build Your Own Tiny World

What’s the absolute best thing about still life photography and still life images? It’s all about world-building and reality-warping. There’s a tiny world, full of petite adventures, hiding in plain sight.
Picture a conventional still life scene and populate it with tiny people. They could build a treehouse on your cacti, steal your cookies with a UFO or sail the length of your soup plate.
Mysterious still life photography ideas arrangement on dark background
Ideas for beautiful images are endless! Place a paper silhouette of a sailboat on a bookshelf, add some stones and seashells and you’re ready for a story full of storms and pirates!
Spill some ink, borrow a couple of police cars from your child or little brother, and add an obligatory yellow tape with POLICE LINE DO NOT CROSS. Here, you have a crime scene.
Put a teepee you made from paper and twigs on your table with glass jars full of clover and books about Indian Tribes. Light a bonfire with a match, look at smoke rising to the dark skies and take a picture.
Clover tribe still life photography ideas
Imagine your own tiny world, live in it, tell its stories. Check out our macro photography article for tips and advice!

This list of still life photography ideas, as any list of ideas, is useful only if you really try to do something with your photography work. Just making a mental note of ‘oh that’s really cool, I should try it sometime’ won’t work.
Actually drawing a sketch, arranging a composition and taking great photos, however, will work. So, choose one idea you like best, transform it to match your vision, style, skills, and props. Plan the shooting and then actually do it.

Post-Processing for Still Life Photography


Digital photography is really a two-part process. Isn’t it?

You put a lot of energy into creating the photograph.

If you don’t follow through with the second step… You are REALLY doing your images a disservice.

This is true even if you don’t like a lot of photo manipulation or special effects.

Digital photography needs that little “push” to become the best it can be!

Stacey Hill has written us a three-part series on how to produce professional level still life photography.

So far, you should have studied the “basic principles of setting up a still life photograph,” and, secondly, “how to light a still life photograph.”

In this third and final installment, she will guide you through the post-processing of your still life photographs.

In this eBook she will cover…

  • Image file formats
  • The basic edits for any digital still life photo
  • How to get creative, save time, and produce a variety of finished products using Lightroom presets
  • Adding the “Wow Factor” to a still life photograph by applying textures, text, and brush effects
  • Special finishing touches that will make your image standout

Why settle for the BLAND image on the left?

When you can read this FREE eBook and then produce the stylish image on the right!

Photo Credit: Stacey Hill

 
--------------------------------------------------------------------------------------------
 
We hope you're enjoying the free ebooks.  If you'd like to access additional, more in depth ebook information try the link below. 

Photography Books

  
---------------------------------------------------------------------------------------------
Lady Shutterbug White  T-Shirt Front 

Sunday, February 13, 2022

                                                               Advertisement


undefined    

Blue Lives

$19.99

iPhone Case 

Tired of all the negative press our First Responders are getting lately?  Want to do something about it but you're not quite sure what you can do to support them? Your cell Phone Case can speak volumes without you having to say a word.  Type this link into your web browser and click ENTER to show your support:  bit.ly/34DuBii