Thursday, September 16, 2021

# Store, Images, Black

10 Tips for the Solo Adventure Photographer


Many photographers choose to go on a solo adventure photography trip. This comes with its own set of challenges, from the type of photos you can take to the equipment you have to carry.
Here are 10 tips to make your solo adventuring a trip to remember.

10. Where Are You Going and How Are You Getting There

What is your solo adventure photography plan? Are you heading to a remote area? Are you photographing activities like climbing, canoeing, backpacking, or backcountry skiing?

A solo adventure photo of Root Glacier, Wrangell-St. Elias, Alaska
Root Glacier, Wrangell-St. Elias, Alaska

When planning a solo adventure photography trip, make a list of EVERYTHING you need. Include equipment, food supplies, camera gear, and safety equipment.
Then balance space and weight limitations to take only what you need. And what you can carry.

A solo adventure photography shot of Mt. Jefferson & Scout Lake, Oregon
Mt. Jefferson & Scout Lake, Oregon

9. How to Plan Your Solo Adventure Photography Trip

Researching your adventure is often a necessity to creating a solid plan. It’s important to establish where your destination is and your route. This will determine any potential obstacles along the way.
As an example, if you are taking a canoe trip, will there be a cascade or waterfall that requires a portage?
Topographic maps provide the fine details of your route. You can also use Google Earth to add a visual view of the route and terrain along the way.
The app Photo Pills is excellent for planning night sky photography. And it has many other features as well. You can use the app to determine the direction of sunrise and moonrise.
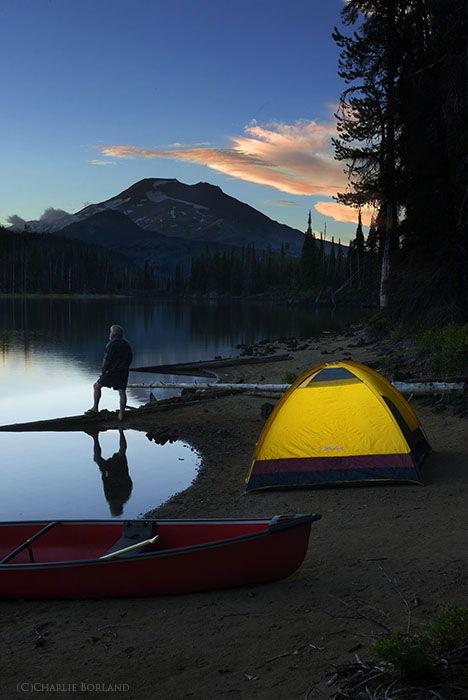
Let’s say you want to photograph a mountain deep in the wilderness, at sunrise and reflecting in a lake. The app will tell you what day the sun is at a specific angle to light the mountain the way you want.
Search online for any other photos that may be of the same area as your destination.
Also, check the weather to ensure you get the right conditions for the photos you plan to capture.
Research and planning are crucial to successful adventures. Not only for photography but safety as well.

8. What Camera Equipment Will You Need

The photography gear you take is related to the type of adventure. In some cases, you won’t be able to take much. For example, if you are going climbing or on a bicycle adventure through the Alps. There is only so much you can carry.
Other adventures allow more room for gear like the aforementioned canoe trip. A Pelican waterproof case will hold plenty of camera equipment.
Photographer, Utah
This list is a good starting point for most adventures. Depending on your particular trip, you might have to add or remove items.

  • At least one camera, and a second camera if space allows;
  • Lenses: from wide to telephoto;
  • Camera pack, bag, or hard case;
  • A wireless flash;
  • Tripod;
  • Gorilla Pod (optional);
  • Intervalometer or wireless shutter trigger;
  • Filters: polarising, graduated, ND;
  • Extra SD cards and batteries;
  • A solar battery charger (for longer trips);
  • A multi-tool, small roll of duct tape, and a knife;
  • A GoPro or any adventure camera.

A silhouette of a solo adventure photographer against a sunset sky
Two cameras are always better than one. Your camera can always break when you are in the middle of nowhere.
Your lens choice will be based on what your adventure entails. For example, it might not be practical to take a 600mm f/4 on the canoe trip. But it will be appropriate during a fly-in arctic base camp to photograph Caribou migration.

A photographers tent set up at Eagle Cap Wilderness, Oregon
Eagle Cap Wilderness, Oregon

A flash will come in handy on your adventure trip. From fill flash while photographing yourself, to illuminating your tent at night.
Besides a tripod, the Gorilla Pod allows you to place your camera in all sorts of locations a tripod might not fit. Like mounting your camera to the front of the canoe.

A female adventure photographer resting on a rock at Rainbow Falls, California
Rainbow Falls, California

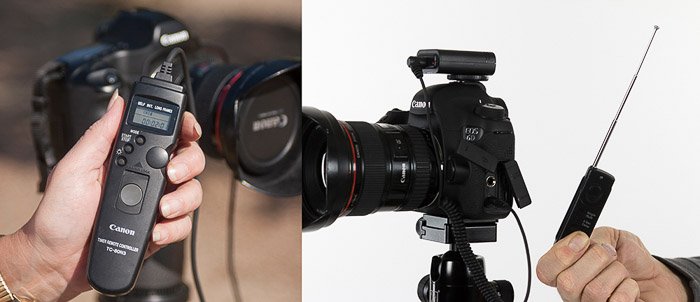
Since you will likely be photographing yourself, you need to trigger the camera. You can program an intervalometer to take a photo as often as you wish. For example, if you’re hiking away from the camera.
A radio remote trigger also works great. You can get far from the camera and then trigger the shutter when ready.

Intervalometer and Vello Freewave Radio Shutter Release

Sometimes your solo adventure will take you to a remote location for more than a couple days. You will need to charge your batteries.
A solar charger, like those from Goal Zero, will ensure you don’t run out of power.

Close up of a solo adventure photographer standing on a rock and holding a dslr camera
Mohamed Almari/Pexels

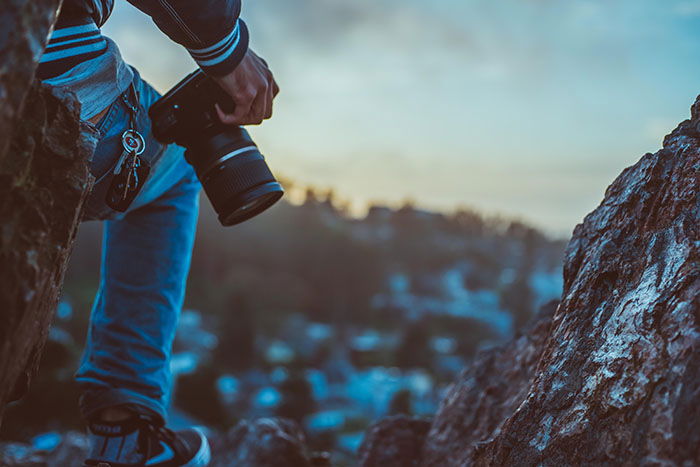
7. How to Always Have Your Camera Ready

No photographer likes to miss that perfect shot. One way to ensure that does not happen is to have the camera ready for easy access.
If you are backpacking, there are devices that attach to the pack itself, or to a belt. You’ll have the camera ready at a moment’s notice, like those from Peak Designs.
For water-related adventures, a Pelican case within easy reach will protect your camera gear from water while allowing quick access to the camera.

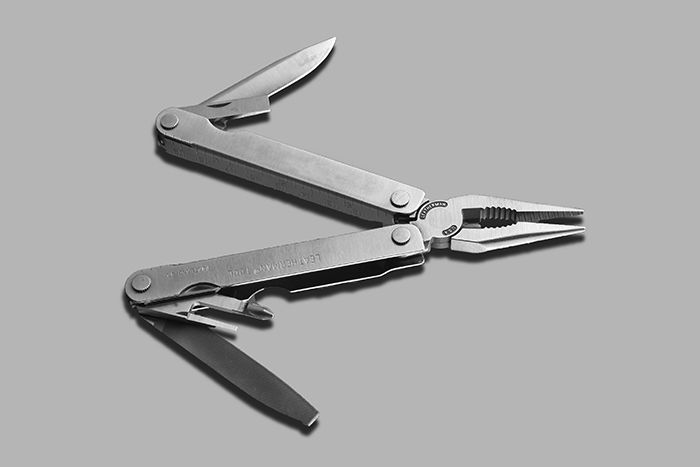
6. What Safety Precautions Should You Take

Safety items are just as important as food or camera gear. Pack a small first aid kit, foul weather gear, and safety items like a knife and multi-tool.
Sometimes the simplest things go wrong. Like the sole separating from a hiking boot. Or the shoulder strap on your backpack breaking loose.
A small roll of duct tape can often solve these problems.

Leatherman Multi-Tool

Route finding is also essential if you are heading straight into the wilderness. A GPS device can replace the map and compass and will track your route.
Units like the Garmin inReach, are small and easy to carry. They come in handy should you get lost, injured, or need to contact a family member.
A Garmin inReach for adventure photography
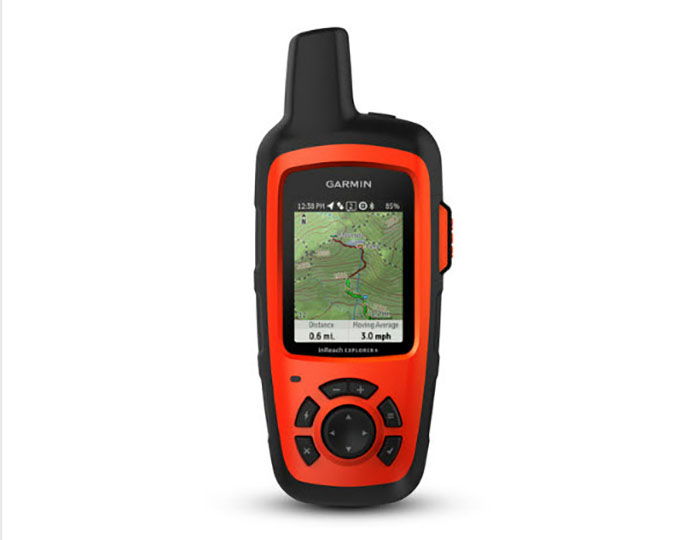
The inReach uses its satellite service to always know where you are. It provides up-to-date weather forecasts. And it has a feature to contact family and friends with your location through text messaging.
It also has an SOS emergency feature. When triggered, it sends an SOS message to GEOS 24/7 global monitoring center. You can then communicate your situation with them.

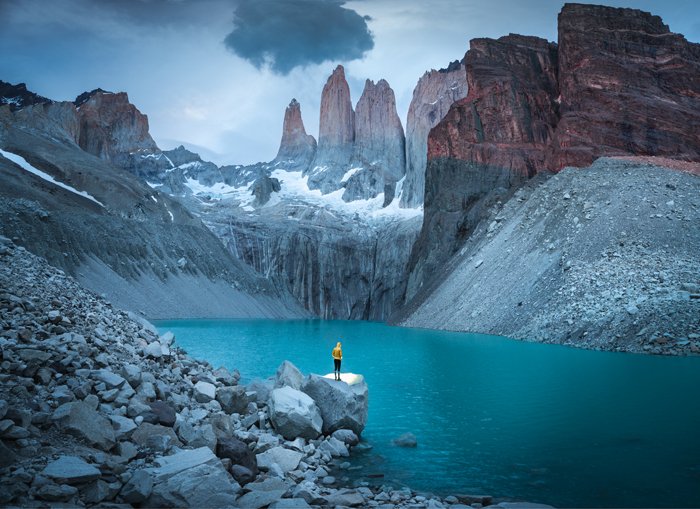
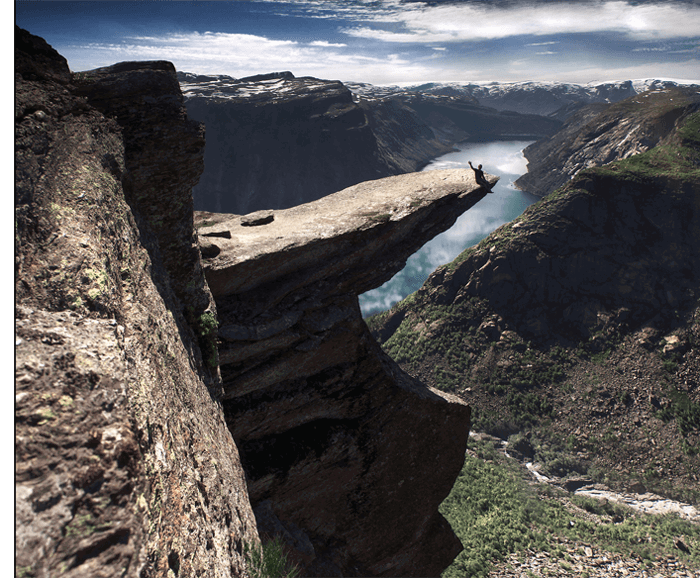
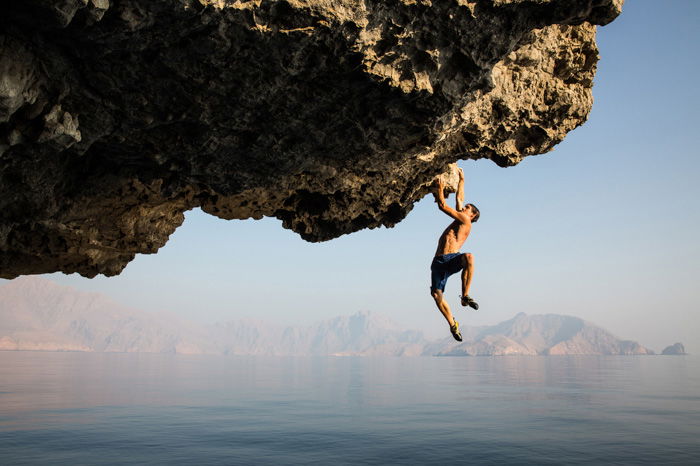
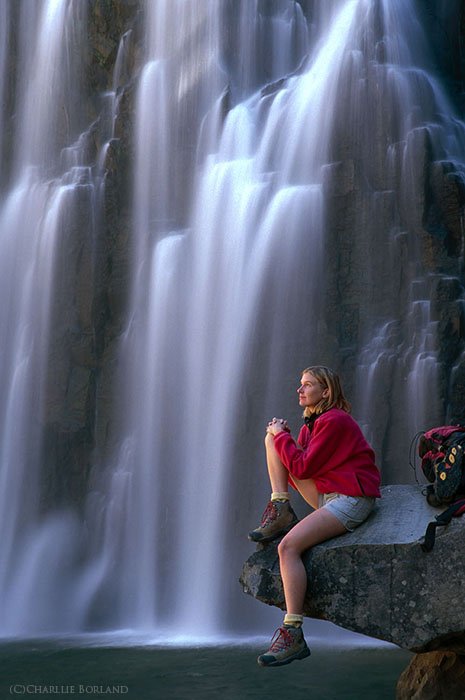
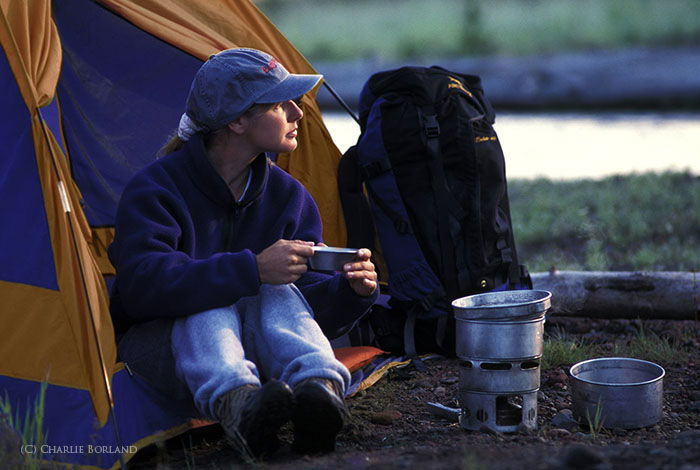
5. Take Photos With Yourself as the Subject

Now that we’ve got the safety and packing tips out of the way, let’s look at what you can photograph.
We all know what the Solo Selfie is. And they are important to all kinds of travels and adventures.
But simply holding your smartphone or pocket camera at arm’s length, is not enough.
An adventure photography triptych
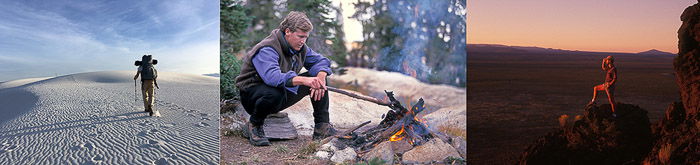
Instead, position your camera to capture you in various locations. This will give viewers a better idea of where you are.
Don’t just look at the camera and smile. Use your tripod or Gorilla Pod along with the wireless shutter release. Photograph yourself moving past the camera heading to the horizon. Or building a fire, watching the sunset, or cooking a meal.
Anything that shows you active in the adventure creates a stronger storytelling image.

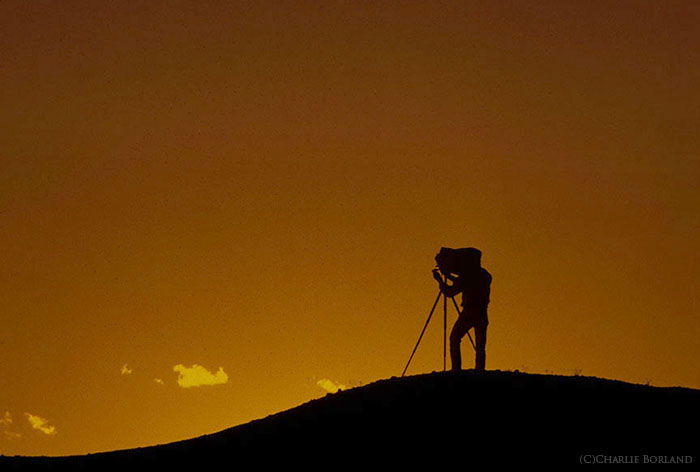
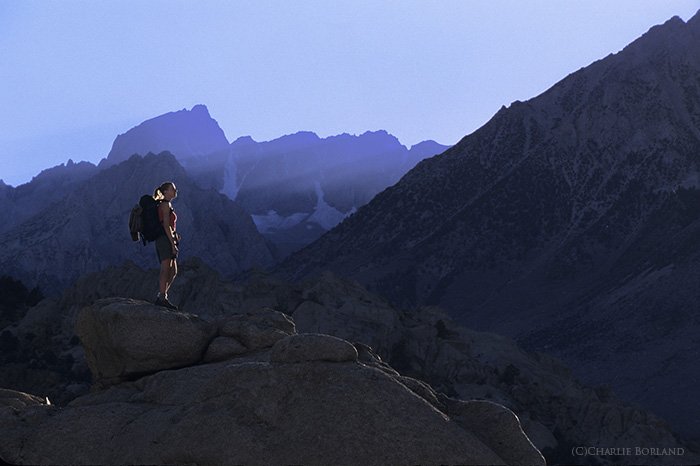
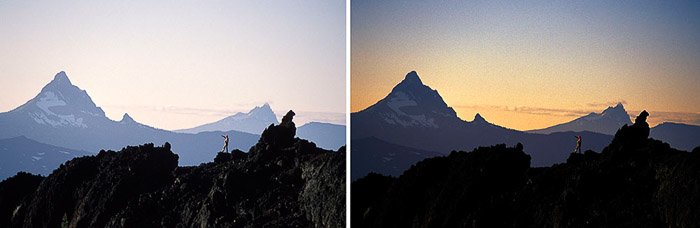
4. Composition and Lighting

Many of the composition and lighting techniques used for creating great adventure photography are usually the same as any outdoor photography.
You can set up everything the way you want to, and you’re only posing yourself. So plan ahead when you find a good location, so that you also have the best light.
In this photo, the sun peaks over the crest of the Sierra Nevada and creates rim-lighting right before sunset.
This quality of lighting really makes her stand out.

A female adventure photographer standing on rocks at the Buttermilks, Sierra Nevada, California
The Buttermilks, Sierra Nevada, California

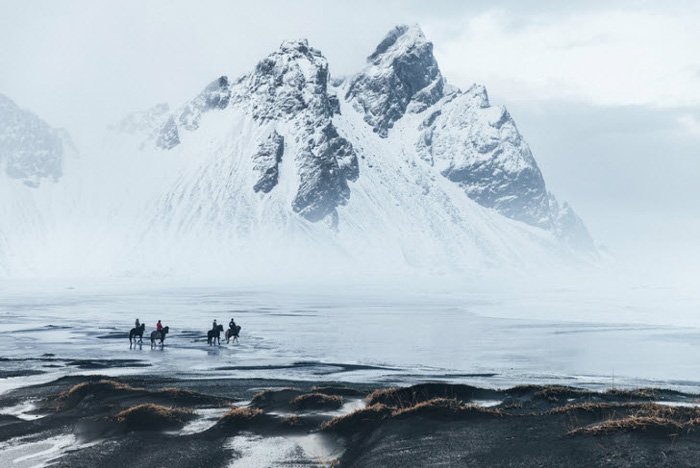
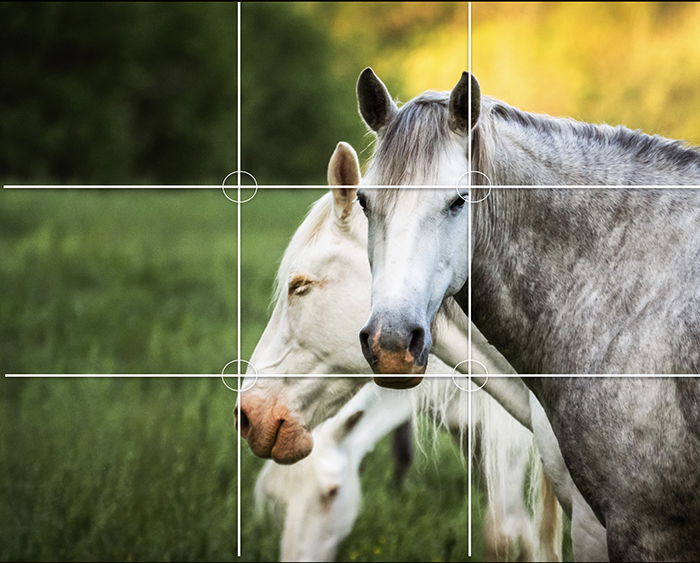
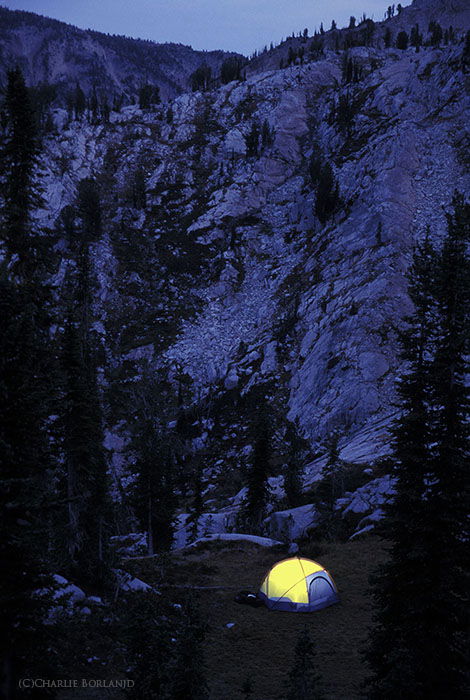
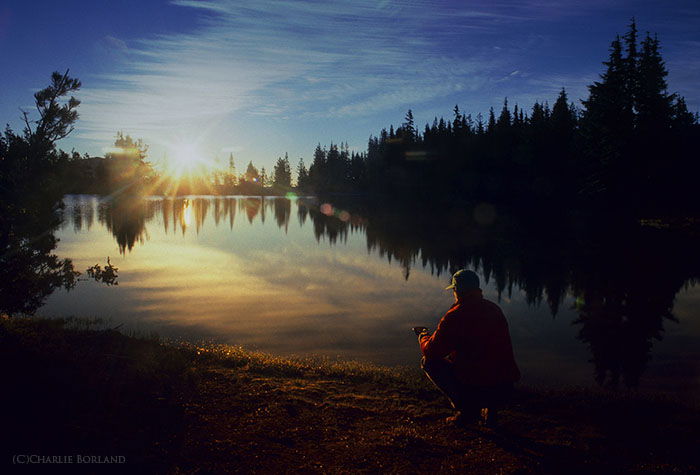
The composition is just as important in solo photos as it is in any photo. Guidelines like the Rule of Thirds or Forced Perspective work well for creating photos with impact.
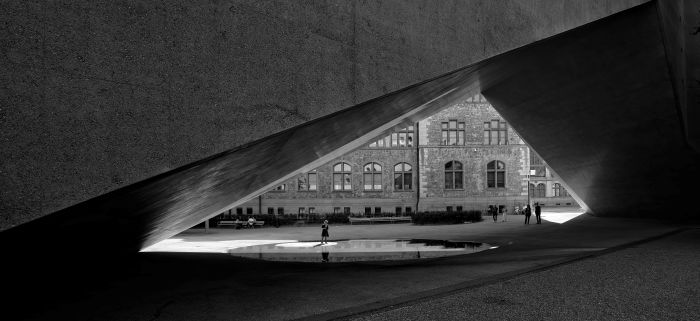
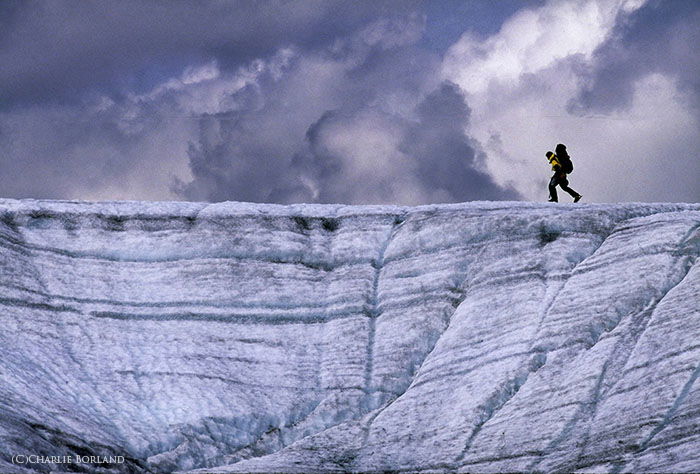
In this image from a wilderness backpacking trip, the composition uses the 1/3 Hot Spot, where the horizontal and vertical 1/3 lines cross.  It is a great place to position yourself.

A photographer by the lakes at Three Sisters Wilderness, Oregon
Three Sisters Wilderness, Oregon

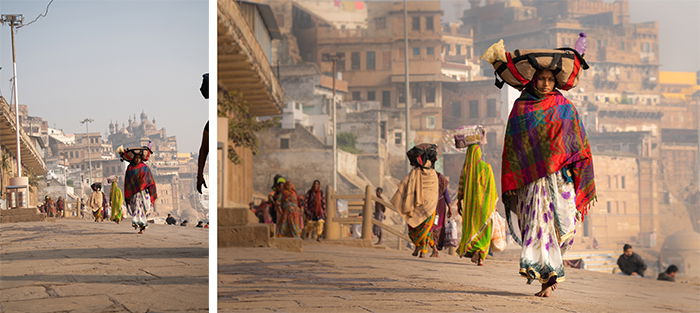
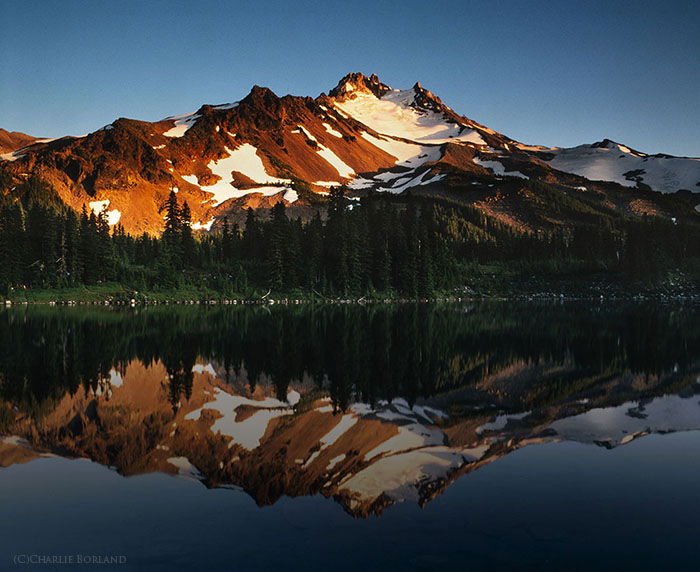
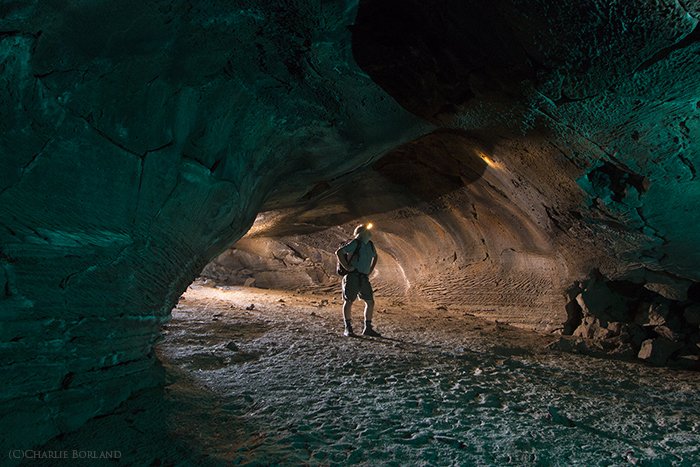
This photo below uses central composition to draw attention to the subject.

An adventure photographer cave Exploring, Central Oregon
Cave Exploring, Central Oregon

3. Why You Should Photograph With a Story in Mind

When I teach other photographers about strategies for telling an adventure story, I often say: “Plan your photos like you are on-assignment for National Geographic.”
Some of the greatest story-telling photographers shoot for National Geographic. Researching their work will give you an idea of how they tell a story from beginning to end.
As you plan your adventure, lay out the story in advance. Visualize what types of photos you’ll need. You can even make a shot list.
You want to create images that will make the viewer care about the story.
With each photo you plan, consider the light. What time of day should you photograph at?
Before snapping the shutter, explore all compositional options for the scene. Ask yourself with each photo, ‘will this photo make my audience care?’

A photographer resting in a tent at Three Sisters Wilderness, Oregon
Three Sisters Wilderness, Oregon

2. Focus on Your Intentions

It takes longer to capture photographs on a solo photography adventure.
When there are others around, you can move around, walk ahead or stay behind. You can photograph as your group pass by.
But when you are solo, you’re both photographer and model. And it takes time to set up your camera, and also figure out your posing.
Once you find a stunning or significant location, you should determine your pose before setting up the camera.
This will result in better planned and more striking photos.
Check if your camera is Bluetooth enabled. Then you can connect it with a smartphone using your camera’s app (like Canon’s Camera Connect).
This will let you view the picture you are posing for without walking back to the camera.

A solo adventure photography shot at South Sister Mountain, Oregon
South Sister Mountain, Oregon

1. Your Adventure Is Over. Now What?

Once you have completed your adventure, what do you plan to do with your photos?
I assume you you want to tell the world about your trip. Start by editing the images and selecting the best shots.
You want the best pose, best lighting, and best composition that accurately tells your story.

A mountainous landscape diptych at Mt. Washington, Oregon
Mt. Washington, Oregon

We already know RAW files need work to bring out the drama when processing. Like everything, a little goes a long way so be careful not to over-process.
Next, you want to get your images seen. There are many platforms that provide the opportunity to share your work with the world. From Facebook to Google Plus, where you can post anything you want. To National Geographic’s Your Shot competition.
Using slideshow software, you can also create a video documentary of your adventure. Narrate it and host it on YouTube.
Adobe Spark is another platform for creating visual stories to share with the world.
There are many things to consider when planning a solo adventure, from gear and equipment to safety and photography. Careful planning will help to ensure a successful solo photo adventure.
Finally, one thing is certain: ‘You will never know if you never go!’

------------------------------------------------------------------------------------------------------------------


Here's another Photography Freebie I want you to have as a "thank you" for taking the time to

visit my blog.

A Free Guide for The Best Night Sky Photography

 Night Photography

If you’re a photographer, then you must be familiar with the difficulty that comes with capturing the sky and its celestial elegance. Still, you want to try it. After all, the beauty of photography is capturing the best moments from the best possible angles.  So, are you wondering about the best way to go about night sky photography? 

The answers are right before you – Grant Collier’s Quick Tutorial on Night Photography.

In this night sky photography book, Collier’s Quick Tutorial on Night Photography, Grant Collier offers some insights to help you capture stunning images at night. You don’t need to worry about the cost as this resource is free.  Just copy & paste the link below into your browser, click enter and enjoy.


-------------------------------------------------------------------------------------------------------------------


Monday, September 13, 2021

20 Amazing Nature Photographers to Really Inspire You


20. Marco Grassi

Marco is a self-thaught and award-winning photographer from Italy. He is focusing on landscape photography.

He is great at using light to create breathtaking scenes. At the age of 23, he completed a trip around the world which turned him into a passionate traveller.

Media outlets such as CNN, The Telegraph, BBC, the National Geographic and GEO Magazine used his work.

Landscape photography by Marco Grassi

Website | Instagram

19. Guy Tal

Guy Tal is a professional artist, author, photographer and educator from the Colorado Plateau.

He is a landscape photographer who focuses on patterns and structures. He has been working in the high desert landscape of Colorado for more than two decades now.

Guy wants to express his familiarity with the nature he works at. He highlights details in his landscape photos.

Guy’s pictures show how much he belongs to the landscape. “The things I photograph are not just attractive models to me; they are also temples and sanctuaries and multi-dimensional characters in my own story, as I am (surely to a lesser degree) in theirs.”

A ram in a desert, photo by Guy Tal

Website

18. Mandy Lea

Mandy is living on the road in a small teardrop caravan. She is taking stunning nature photos on her adventures.

She was born in Colorado, where she developed her great love for nature. Mandy was working as a conventional photographer for almost 20 years.

Then she felt that the routine was ending in a burnout, so she quit her job and moved into a trailer. She was touring from Alaska down to Mexico and wrote a blog about the journey. She documented her travels with videos too.

Mandy met her partner on her journey and now they are travelling together in a teardrop trailer called Rocky.

A car pulling a teardrop shaped caravan in front of a beautiful landscape

Website | Instagram

17. Erin Babnik

Erin studied art history and took photos because of research and teaching. She fell in love with nature photography and started to focus on wilderness.

She likes to focus on details and how the landscape affects our senses. Babnik claims that she always wears shades of purple when she goes out for shooting photos.

A close up of coral

Website | Instagram

16. Cath Simard

Catherine is a Canadian self-taught travel and landscape photographer. She has a passion for wilderness and outdoors. Cath used to work as a model and fashion stylist in Quebec.

Then she quit her job and travelled for four years. During that time, she explored Hawaii, Australia, New Zealand, Indonesia and Peru.

Now she is a full-time traveller and wants to inspire people to get outdoors and admire our planet. She thinks that taking photos is great therapy. It helps to find purpose and a way for self-expression.

A man looking into a lake surrounded by mountains

Website | Instagram

15. Max Rive

Max was born in the Netherlands, but his nature photography shows how much he loves mountains. He gave up on being a student and started to pursue his passion. He conquered landscapes from Scotland to the Himalayas, always chasing mountainous scenes.

Max’s photos often feature one single person to provide a good sense of scale. His pictures convey the pure feeling of freedom. A state when a human becomes part of the astonishing nature.

A man waving from the ledge of a cliff

Website

14. Daniel Kordan

Daniel grew up in the beautiful lake region near Moscow. The landscape here fascinated him. He completed an art painting school as a kid. As time went by, Daniel drifted away from art and studied physics.

But his passion for nature remained and he became a guide for mountain climbing and hiking. Then he turned into a guide for photo-workshops and now he is leading groups from all around the world.

He received several awards for his art. His work appeared in media such as Photography week, Photography Master Class, and the National Geographic. Daniel is spending most of his time in the Lofoten Islands and in Tuscany.

High angle view of a stunning green landscape

Website | Instagram

13. Ted Gore

Ted is one of the best landscape photographers and lives in California at the moment. In 2015, he was the winner of USA Landscape Photographer of the Year.

His style combines the wilderness of the landscapes and seductive post-processing. He teaches workshops and creates useful videos on how he processes his images.

With his words: “My work extends beyond the boundaries of what a photograph can be and fully utilises the amazing technology that we have at our disposal in this day and age.”

Purple flowers in the foreground of a mountainous landscape, photo by Ted Gore

Website | Instagram

12. Joel Sartore

Joel is a photographer who first found himself fascinated by nature as a child. We can tell, judging by the passion found in his scenes. For twenty years, he’s been a contributor to National Geographic.

His photography range is wide. From all kinds of animals in their national habitat to using aerial shots to show conservational stories.

Joel is also no stranger to the media. Well-known publications feature his work regularly. And it’s also often presented on many national broadcasts.

If you like his images, you can join his 1.1 million followers. That’s right, a well-deserved 1.1 million.

A stormy sky, photo by Joel Sartore

Website | Instagram

11. Christopher Dodds

Christopher Dodds got his love for nature and wildlife during backpacking trips. He moved to Quebec, Canada, from England when he was a youngster.

Photography has taken him on many adventures. Here, he gets to pursue his passion for wildlife photos, as he has done since 1985.

Now, he travels all over the world. Photographing, leading safaris and teaching nature photo workshops. If that wasn’t enough, his work features in many prestigious publications, but we can all see why.

A polar bear walking through ice at sunset by Christopher Dodds

 Website | Blog

10. Will & Matt Burrard-Lucas

These two brothers are from the UK, shooting since 2004. Their travel gallery includes landscapes, ancient places, plants, and world cultures.

They even show their behind-the-scenes photos on some projects. They have a goal in mind, and that is “to inspire people to celebrate and conserve the natural wonders of our planet.”

A portrait of four meercats by Will & Matt Burrard-Lucas

Gallery | Website

9. Thomas Heaton

Thomas Heaton hails from the UK, northeast to be more exact. He makes his mark in outdoor photography by focusing on landscapes and nature.

His youtube channel is popular around the world. It’s full of tips and techniques to help the viewers capture better images.

His friendly and insightful approach to his work brings him many appreciative followers. The images you see in his portfolio are all about the outdoors and telling a story.

Website | Instagram

8. Joshua Cripps

Joshua Cripps trained as an engineer. He was focusing his sights on aerospace and working for NASA. All the work fried his brain, and he found comfort and solace in travel. Which he did extensively by travelling the world solo, around 20+ different countries.

The traveller was born, and soon after he combined it with photography. He works a lot with Nikon, and they don’t back poor landscape and outdoor photographers. Enjoy his work below.

The moon behind craggy mountains, photo by Joshua Cripps

Website | Instagram

7. Jon Cornforth

Jon Cornforth is a professional outdoor photographer. According to his website, he specialises in a dramatic landscape and exotic wildlife images.

By exploring the globe, he finds beautiful natural landscapes, epic or intimate. He says his favourite shooting locations are Alaska, Hawaii, and the South Pacific.

In most of his art, he likes to showcase the “natural beauty of birds, sharks, and whales“. His images also sell as stock photos to commercial and editorial clients. His work has won him many awards and international recognition.

Aerial landscape by Jon Cornforth

Website | Instagram

6. Marina Cano

Marina is a Spanish photographer, located in Cantabria. She has been photographing since she was a teenager. Her photographs are world-famous.

She already has many international awards in her pocket. She has published several books as well. Cabárceno with pictures from three years spent in the largest Wildlife Park in Europe.

The other two are Drama & Intimacy, and Inspiración + Naturaleza. She is an inspiration for outdoor and wildlife photographers everywhere.

A Canon ambassador since 2015, she represents the field of nature and wildlife photography. She has also held exhibitions and talks in Cape Town, London, La Habana and Korea, to name a few.

Three zebras with heads together on black background, photo by Marina Cano

Website | Instagram

5. Jamie Justus Out

It’s very easy to feel small when looking at the images of Jame Justus Out. He shows us the big and the bold, with a dash of people thrown in. Why? To give his images an even greater sense of scale.

He likes trekking and hiking, photographing water spots and scene from up on high. Paths and walkways are his biggest content, so it shows you how much he likes those leading lines.

Something else you will find within his shots of landscapes is those with his family. These make you want to jump on the road and just live life free. Thank you, Jamie!

Instagram

4. Simone Bramante

Simone Bramante’s list of clients is impressive. Marriott Hotels, Apple, Volvo, and Christian Dior are only a few out of many.

He has many different styles. They range from simple, stunning landscapes, to well thought out lifestyle shots. The stories he tells of our world make you not only want to travel but become an outdoor photographer too.

Iceberg seen through a ships porthole, photo by Simone Bramante

Website | Instagram

3. Jimmy Chin

Jimmy Chin is not only a famous adventure photographer. According to his website, he is a mountain sports athlete as well. The extraordinary imagery he captures happen while climbing and skiing in high-risk environments.

His professional photography career started in 1999. In 2002 his work aligned him with National Geographic. He joined their trek across Tibet’s Chang Tang Plateau. Jimmy has garnered many photography awards. They range from Photo District News (PDN), Communication Arts, to the American Society of Magazine Editors.

His years of experience bring an authentic and unique perspective to his storytelling. He’s also been one of the directors of Academy Award-winning documentary film ‘Free Solo’. The film captures Alex Honnold as he becomes the first man ever to climb El Capitan without any protection or external tools.

A man dangling from a cliff photo by Jimmy Chin

Website

2. Daniel Ernst 

Daniel is a German freelance nature and travel photographer, based in Frankfurt. He poses himself as “a photo-creator and story-teller”. He travels the world and shoots nature, adventure, and lifestyle images.

He says about his art: “With my photography and stories, I want to inspire people, causing a desire, a motivation to leave the rush behind, escape routine, go outdoors, explore and experience nature. We are fortunate to be presented with many opportunities in this world, it’s just about making them into reality.”

His passion comes across in his images. He offers day-to-day documentation of his travels on Instagram. This has made him very popular on the platform.

Horseback riders in an icy landscape, photo by Daniel Ernst 

Website | Instagram

1. Marc Adamus

Marc Adamus is a landscape photographer famous for his ultimate dedication and respect for nature. His photographic trips often take long weeks or months, and the photographs are absolutely worth it.

As an adventurer, he finds and shoots countless undiscovered locations. His ultimate commitment puts him on the first place of our list. His style is recognisable from miles away, yet he manages to create every single one of his images unique.

His colour palette comprises of slightly faded, but saturated and lively colours. And his photos show the dynamics of the landscape perfectly.

It doesn’t matter if you view his images from a distance or closely inspect them – his work is flawless. He’s based in Western North America, but he’s spent his career pursuing and capturing beautiful landscapes all over the world.

Mountainous landscape photo by Mark Adamus

 Website | Instagram


Outdoor photography includes landscapenature, and wildlife photography.

These photographers capture beautiful scenes, animals up-close-and-personalmouth-dropping weather. Get out there and try your hand at the outside world. The adventure starts with YOU.


---------------------------------------------------------------------------------------------------------- 

Photography Freebie

A practical guide to photography by Ian Middleton 


Take your camera off auto, learn how to take control and get better photos 

than you ever did before.

In this downloadable FREE photography ebook, I have put together all the basics in a 

simple, practical and jargon-free way.

Get your FREE copy: https://ianmiddletonphotography.com/free-photography-ebook/ 

Just copy and paste the link above into your browser, click ENTER, and enjoy. 


-------------------------------------------------------------------------------------------------------------


https://my-store-10149103.creator-spring.com/listing/kick-covid-19-s-butt?product=2

undefined


Tuesday, September 7, 2021

Camera Settings for Portrait Photography – Free Quick Guide

Tags:  Photography for Beginners, Newbie Photographer 


Are you ready to take the next big step with your photography?

Virtually everyone begins their photography journey photographing static unliving objects. You know we’re talking about – landscapes, barns, and such.

However, almost all of us catch the bug at some point to start photographing people.

Portraits are challenging and very rewarding.

However, if you’ve never done it before, where do you start?

That’s where this guide comes in.

Jo Plumridge has over twenty years of experience photographing portraits. She is going to lay out the basics of getting started photographing people.

You’ll get some suggestions on the following:

  • Equipment
  • Camera settings
  • Lighting
  • Posing
  • Backgrounds

If you are dreaming of photographing people, this is where you start!

Get it here:

 https://photzy.com/download/camera-settings-for-portrait-photography-free-quick-guide/

Just copy and past the link above into your browser, click ENTER and enjoy!


Sunday, September 5, 2021

2021 Labor Day Video


------------------------------------------------------------------------------------------------------------------

Happy Shutterbugging:


Thursday, September 2, 2021

21 Most Important Rules of Composition in Photography

Tags: Photography for Beginners, Newbie Photography

There are a number of important rules of composition in photography.

Composition in photography is about what to include or leave out of your frame. It’s also about how you decide to place the elements in the scene.

Rather than thinking of these as “rules”, think of them as guidelines for making your images more visually appealing and interesting.

Greyscale buildings forming a triangle frame
Photo by Ricardo Gomez Angel on Unsplash 

1. Use the Rule of Thirds to Add Interest

Composing using the Rule of Thirds means placing your main subject a third of the 

way into the image. Placing your subject off-centre is much more interesting than 

placing it in the centre.

Many cameras, including smartphones, can overlay a Rule of Thirds grid on the 

screen. It looks like a tic-tac-toe game. Two horizontal lines and two vertical lines 

divide the frame into thirds.

When photographing, place your main subject on one of the lines. Either horizontally 

or vertically.

“Crash points” are where the lines intersect. If you can, place your focus subject where 

the lines intersect.

Horses in a field with the rule of thirds composition grid overlayed
This image shows the Rule of Thirds grid lines with circled crash points. Notice 
how the horses take up 2/3rds of the image. The eye of the front horse is on a 
crash point. Also, notice there are three horses. This is also an example of the 
Rule of Odds (see Rule #2).

2. Simplify a Scene with the Rule of Odds

The Rule of Odds is a way of simplifying a complex scene with many possible subjects. 

In general, we find an odd number of subjects more interesting than an even number.

Three is a magic number, but five or seven also work.

The Rule of Odds helps us select our subjects thoughtfully. The rule guides us on what 

to include and what to leave out.

The Rule of Odds also reminds us to isolate our subject in a busy scene. One is an odd 

number.

photo of three stones placed in a line

3. Focus on Your Subject by Filling the Frame

Filling the frame is about getting close to your subject. Really close.

Make your main subject clear and distinct. Ask yourself, how much sky do you really 

need? How much background?

We can fill the frame by using a zoom lens and getting photographically close to our 

subject. But it’s often better to “zoom with your feet”. Get physically closer to your subject.

In post-processing, consider cropping tighter on your subject to fill the frame.

A street scene diptych before and after editing
The image on the left is the original. I cropped the image on the right much 
tighter eliminating much of the sky and the pavement. The original image is 
in portrait orientation, but I switched it to landscape orientation (See Rule #5).

4. Choose a Suitable Depth of Field

Depth of field is deciding how much of the image should be in focus. This isn’t so much 

a rule as a compositional decision you need to make.

A shallow depth of field means only a small part of the image is in focus, usually the 

subject. The background is blurred.

A deep depth of field means the image is in focus from the front to the back.

Use a shallow depth of field to blur distracting backgrounds. Sports photographers blur 

backgrounds so athletes stand out against a busy crowd. To get a shallow depth of field, 

use a wide aperture like f2.8.

Generally, use a deep depth of field for landscape photography. To get the entire scene 

in focus, use a narrow aperture like f16.

A close up of yellow flowers in a field
Shallow depth of field isolates individual flowers in a field.

5. Use the Best Orientation for the Scene

Orientation and aspect ratio determine how much of the scene you capture in an image.

Orientation refers to whether you’re holding the camera horizontally or vertically. Aspect 

ratio is the size of the image taken by the camera.

If there are a lot of vertical elements or height to your image, use portrait orientation. Hold 

your camera vertically.

If there are a lot of horizontal elements or width to your image, use landscape orientation. 

Hold your camera horizontally.

Don’t forget that you have a panorama option. We usually think of panoramas as long, 

horizontal images, but they can be vertical as well.

I often take the shot both ways and see what I like later. I often try different aspect ratios 

and crops in post-processing.

6. Straighten Lines for an Aesthetically Pleasing Image

Straighten lines that should be straight.

Not all lines in an image need to be straight, but there are some lines that are expected to 

be straight. For instance, the horizon line in a landscape. Horizon tilt in an image is 

immediately noticeable and distracting.

A diptych of a fireworks display before and after editing
I bumped my tripod during a fireworks display (left). The tilted horizon is easy to 
fix in post-processing (right).

Many cameras and tripods include a level. Use these tools to help orientate your camera. 

It’s also easy to correct a tilted line in post-processing.

Straight lines are also important in architecture. Using a wide-angle lens often distorts 

lines. Leave space on either side of a building so you can straighten lines in post-processing.

In an image with many different lines, choose one to be your main focus. Make this line 

straight even if the others are a bit off.

7. Create Depth with Leading Lines

Our eyes naturally follow lines through an image. Leading lines direct our eyes to the 

main subject. Used well, leading lines create a sense of depth.

Lines may be actual lines or implied by elements in the scene.

Sometimes the lines are straight and lead directly to the subject. Other times, the 

journey is roundabout. S-curves are a favourite of photographers.

Leading lines lead somewhere. If a line doesn’t lead anywhere or it leads the eye 

out of the frame, change your position. Move left or right or up or down.

A the cityscape of St. Louis and the Gateway Arch at sunset
This image is full of lines leading to the cityscape of St. Louis and the 
Gateway Arch. The clouds, the reflection of the clouds, and the bridge 
are all leading lines. This image also includes rocks as a foreground 
element (see Rule #19).

8. Use Diagonal Lines to Add Energy

Diagonal lines add interest and energy to photography composition. Try 

photographing lines on a strong diagonal rather than straight across the frame.

Make sure your diagonal is obvious. A little tilt to a line looks like a mistake.

Think about where lines intersect with each other. Converging lines draw the eye. 

Also, consider where lines enter or leave the frame. Photographers sometimes try 

to have a line enter or leave the frame in a corner.

Birdseye view of a spiral staircase
Rather than straightening out the lines of this spiral staircase, I shifted them to 
a diagonal.

9. Attract Attention Using Light

Our eyes naturally go to the brightest part of an image. Knowing this affects how 

we compose an image. The main subject should be the brightest part of the image.

Portrait photographers use flash or reflectors to highlight the faces of their models.

In post-processing, techniques like dodging and burning direct the eye. Dodging is 

selectively lightening certain parts of the image. Burning is selectively darkening 

certain parts of the image.

A close up of rain drops on leaves
I use a lot of dodging and burning in post-processing to guide my viewer’s eyes to important elements in the frame.

10. Use the Negative Space Around Objects

Negative space is the use of the space between or around subjects as an important 

element in the image. Negative space becomes its own subject with its own shape.

Negative space can show scale or imply an emotion like “emptiness.”

Sometimes it’s difficult to see negative space because we’re so used to focusing on 

a subject. Try flipping your images upside-down in post-processing. This will help 

you see space without being too focused on the details of your main subject.

Four swans in a lake
This photo of white swans in the fog is impactful mainly because of the 
negative space.

11. Balance the Subjects for Symmetry and Visual Balance

Visual balance is the relationship between two or more elements in your composition. 

The elements look balanced. One is not visually heavier than the other.

Composing symmetrically creates visual balance. The left half of the image matches the 

right, or the top half matches the bottom. Reflections in photographs work so well because 

they show symmetry.

Even non-symmetrical images need visual balance. Balance a large, visually heavy 

subject on one side of the frame with many smaller subjects on the other. Balance a 

foreground element with a background element.

Serene view of trees over a lake at sunset
This image shows symmetry through the reflections, but also another type of visual balance. The tree in the left foreground is balanced by two trees in the right background.

12. Chang Your Perspective

Perspective is about where you are in relation to your subject. Changing perspective 

means getting down low or going up high.

Everyone sees the world from about the same perspective – at eye level. You can make 

images more interesting by using a different perspective.

Photographing from a low angle makes the subject look more powerful.

A group of street protester holding placards and signs
This photo is more powerful because I’m photographing up at my main subject. 
She looks more powerful.

It’s also fun to change your perspective and go high. This is one reason drone photography 

is so interesting. We rarely get this bird’s eye view of our world.

Using a low perspective is important when photographing subjects close to the ground. 

It’s also important when photographing children. Get down to their eye level.

13. Emphasise Your Main Subject with the Golden Rule

The Golden Rule is about placing your main subject in an important part in your frame. 

This rule is like the Rule of Thirds. But the Golden Rule suggests a different arrangement 

of compositional elements.

The Golden Rule is based on the Golden Ratio. The Golden Ratio is a naturally 

occurring mathematical phenomenon. The natural world favours the ratio 1 to 1.618. 

Mathematically, this may mean nothing to you, but visually, you see it everywhere. 

The most common visual representation of the Golden Ratio is the spirals of a seashell.

In photography, the Golden Rule is represented either as a grid or a spiral.

Some cameras allow you to see an overlay of the Golden Ratio or the Golden Ratio

 on your viewfinder. Lightroom also has overlays to help you crop images using the 

Golden Rule.

A street shot with the golden spiral composition grid overlayed
In this screen shot, I’m using the Golden Ratio spiral overlay in Lightroom to 
help me place important elements in the frame.

14. Capture Movement from Left to Right

We read images like we read text, from left to right. Movement in a photograph should 

also move left to right in the frame. This compositional rule is particularly important for 

wildlife and sports/action photographers.

It’s not always easy to capture motion left to right in the real world. Flip your image 

horizontally in post-processing to create left to right movement. This often works as 

long as there is no text in the image.

Diptych of airplanes performing stunts
I flipped the image horizontally to show the difference when the planes are 
flying left to right or right to left.

Make sure to leave room in the frame for the subject to move into. This means leaving 

space to the right of the subject. Otherwise, it looks as if the subject is moving out of 

the frame.

15. Pattern and Repetition for Stronger Compositions

Our brains like pattern and repetition. We’ll even impose patterns on random elements. 

Think of the fun we have finding patterns in clouds. Incorporating repetition and 

pattern makes our photographic compositions stronger and more interesting.

Repetition and pattern are often found in shapes and colour.

You may have to change your perspective to make patterns pop. Notice how changing 

perspective alters spacing or hides the pattern.

A long hallway in the interior of a grand building
I often look for repetition in architecture. Architects know about the rule of repetition as well.

Adding contrast to repetition makes your photos even more dynamic. The contrasting 

element may be a different colour, shape or height. Breaking up the pattern emphasises 

the pattern.

16. Find a Relationship Between Elements

Look for interesting relationships between elements in your image.

For instance, look for tension. Two elements that appear to pull at each other create 

visual tension. The colours clash, or there is a size discrepancy.

Street photographers often juxtapose elements. Something in the environment conflicts 

with people on the street. This can create humour or suggest a deeper idea.

A woman playing accordion on the street with the text 'lovelier' above her head
I noticed the sign behind this street performer. This street performer’s smile is “lovelier”. Juxtaposing the sign and the person creates a deeper meaning.

Colour theory is about how colours in your image relate. Colour theory is often represented 

as a colour wheel. Colours across from each other on the wheel are complementary.

17. Simplify Images to Capture the Essence

Simplifying means including only what you need in the image. Take out everything you 

don’t need.

Simplifying an image doesn’t mean creating minimalist images. Simplicity is distilling 

the idea of a photograph into its purest form.

Decide what your photo is about. Then take out everything that isn’t about this idea.

18. Draw the Eyes with Framing

With framing, one element of your image sits inside another element. This creates a 

frame within your frame. For instance, you might shoot through a window or through 

an opening in the trees.

Frames add depth and draw our eyes into the image and to the main subject.

The Millennium Bridge over the Thames frames St. Paul’s Cathedral
The Millennium Bridge over the Thames frames St. Paul’s Cathedral. The lights on the 
bridge also provide leading lines (see Rule #7).

19. Use Layering for Depth and Dimension

Layering is looking for elements that stack from the front to the back of your image. 

Layering adds depth and dimension.

Layering includes adding a foreground element to a landscape. Rather than the scene being 

on the same flat plane, a foreground element leads the viewer into the scene. Rocks or flowers 

are natural foreground elements.

Layers should be visually distinct in colour or light. This helps avoid mergers and lets the 

eye easily distinguish the layers.

Stunning view of the Smokey Mountains at sunset
Photographers travel from far and wide to capture the layers of the Smokey Mountains.

20. Avoid Mergers

Mergers happen when elements in an image overlap in a way that makes it difficult for our 

eyes to separate. Our 3D eyes separate out things separated by distance. But in a 2D 

photograph, the objects pancake especially if they are similar in colour or shading.

Watch for background distractions. It’s easy to overlook a tree branch that appears to 

be coming out of someone’s head. Or people look like they have extra limbs.

Diptych portrait of a Cuban boxer demonstrating good portrait cropping
The rope behind this Cuban boxer creates a merger and is distracting (left). I had to 
remove it in post-processing (right). Notice where I’ve cropped the boxer’s 
arms (see Rule #21).

To create a clear composition, make sure your main subject has space around it. 

If objects or people overlap, step to the left or right. Changing the angle even slightly 

can often get rid of mergers.

21. Check the Edges for Distractions

Finally, before snapping a photograph, scan the edges of your frame. We’re often so 

focused on our main subject that we forget to look at the entire frame.

Look for trapped space. Trapped space happens when an object and the edge of the frame 

intersect to create an odd shape of light.

Also, look to see how objects or people are cut off by the edge of the frame.

Some photographers live by the rule: “Include everything or include nothing.” This means 

that rather than cutting an object or person off at the edge of the frame, it’s better to cut it 

out completely.

Other photographers are ok with cutting off an object or person as long as the crop looks 

natural.

Portrait photographers try not to cut people off at the joints.

Tuktuk bikes on a dusty street
The edges of this image are messy. For instance, there is trapped space in the upper 
right corner. A foot is cut off in the bottom right.
A tuktuk bike on a dusty street
I can crop in tighter in post-processing and avoid mergers and messy edges. This is 
also an example of movement left to right (see Rule #14).


Compositional choices make the difference between a snapshot and a great photograph

Following these photography composition rules is a great way to make more impactful images.

But there is no one right way of seeing the world. Once you master the rules of photographic 

composition, it’s time to bend or break them.

Use these photography composition rules as guides to help you decide what to include in your 

image and how to place the elements.


---------------------------------------------------------------------------------------------------------- 

Photography Freebie

A practical guide to photography by Ian Middleton 


Take your camera off auto, learn how to take control and get better photos 

than you ever did before.

In this downloadable free photography ebook, I have put together all the basics in a 

simple, practical and jargon-free way.

Get your FREE copy: https://ianmiddletonphotography.com/free-photography-ebook/ 

Just copy and paste the link above into your browser, click ENTER, and enjoy. 


----------------------------------------------------------------------------------------------------------------