Wednesday, November 27, 2019

Review of Metabones Adapter Mark V – Canon EF to Sony E-Mount

For Canon shooters thinking about switching to Sony mirrorless cameras, the Metabones adapter is often suggested to help with the transition. Lens mount adapters are often frowned upon as they historically have had limited functionality, such as no autofocus and simply not working well or consistently.
But this latest generation of lens adapters is pretty impressive, offering nearly all of the same features that you would get with a native Sony lens. Here’s my take on the Metabones Adapter Mark V, as used with select Canon EF lenses and a Sony A7rIII and Sony a6300.
Review of Metabones Adapter Mark V - Canon EF to Sony E-Mount

Product Specifications

The Metabones Canon EF to Sony E Mount Smart Adapter Mark V officially debuted in July 2017. It’s all black and made of metal. Compared to previous generation adapters, the Mark V adds three key features:
  1. A dedicated on/off switch for SteadyShot (IBIS)
  2. Rubber gasket weather seals to protect the E-mount connection
  3. An indicator light for basic/advanced modes
Other features offered by the Metabones V include:
  • Fast contrast-detection and phase-detect autofocus
  • Eye autofocus (!!)
  • Powered by camera body (no external power source needed)
  • Support of image stabilization lenses
  • Auto “APS-C Size Capture” on full-frame cameras
Currently, theMetabones Adapter Mark V can be purchased for $399 USD.
Review of Metabones Adapter Mark V - Canon EF to Sony E-Mount
Here you see the adapter mounting a Canon EF lens onto a Sony body.

Metabones V Compatibility

Since there are lots of different cameras and lenses out there, so it’s difficult to verify that the Metabones V adapter will work in every case. The Metabones website has a long list of cameras and lenses that should be compatible with this adapter. In this case, the Metabones V adapter worked with the following setups:
  • Sony A7rIII and Sony A6300 camera bodies
  • Canon 70-200mm f/2.8 II
  • Canon 24-70mm f/2.8 II
  • Canon 16-35mm f/1.8 II
  • Canon 50mm f/1.8
  • Canon 35mm f/1.4
  • Canon 85mm f/1.8
  • Canon 100mm f/2.8 macro
Metabones V Canon EF Sony E-Mount adapter

What works well

It works as advertised

I tested the Metabones V adapter primarily with the Sony A7rIII and Canon 24-70mm f/2.8 II, as this is my preferred shooting setup. For comparison with how autofocus would function on a native Sony lens, I also shot with the Zeiss 55mm f/1.8 and Sony 24-240mm lenses.
While testing the adapter, I was blown away by the autofocus system’s speed and accuracy when using my Canon 24-70mm. Not only could I use most of the autofocus settings on the camera (with the exception of Zone area focus), but eye autofocus also worked extremely well. Even when shooting in continuous burst mode at 10 frames per second, there was no lag when using a Canon lens and the adapter.
Metabones V Canon EF Sony E-Mount adapter - 70-200mm lens mounted
Generally speaking, it felt nearly the same as using a native Sony lens on the A7rIII. The same can’t be said for the cheaper FotodioX lens adapter that I was using previously. This other adapter worked with only half of my lenses and had inconsistent and slow autofocus. In that sense, you truly get what you pay for when it comes to camera gear (the FotodioX is $99 compared to the Metabones at $399).

Small and compact

Weighing in at 5.3 ounces (150g) and measuring 2.6 x 1.4 x 3 inches (6.6 x 3.6 x 7.6 cm), this slick adapter is compact and easy to stash in a camera bag. It feels about equivalent in size to the Canon 1.4X EF Extender. The Metabones V adapter comes in a plastic box that can you use for long-term storage, but unfortunately, there is no carrying case.
Metabones V Adapter

You can easily receive firmware updates

Besides a couple of buttons and indicator lights, there’s also a micro-USB port that can connect the adapter to a computer for firmware upgrades.
Metabones V Canon EF Sony E-Mount adapter

What needs improving

For all of the excellent qualities of the Metabones V adapter, there are two shortcomings worth mentioning.
First is the occasional freezing of the camera screen while trying to autofocus. You can fix the problem by simply turning the camera off and on. However, this lag slows down your workflow and makes you question reliability. This problem happens sporadically, mostly with my Canon 24-70mm f/2.8 II, but it never happens when using native Sony lenses.
Another shortcoming is the loss of touchscreen autofocus when using a Canon lens and the Metabones V adapter. One of the biggest selling points of new Sony cameras such as the A7rIII is touchscreen autofocus. While it’s a bit laggy and imperfect even when using Sony lenses, touchscreen autofocus seems to disappear altogether when using adapted lenses. Hopefully, this will be fixed with future a firmware update.
Review of Metabones Adapter Mark V - Canon EF to Sony E-Mount

If you’re transitioning from Canon to Sony, the Metabones Adapter Mark V is a must-have addition to your photography kit. It’s not perfect, but it is a solution that seems to get better over time. At $399, the Metabones V adapter isn’t cheap, but it seems to work more consistently than cheaper options such as the Sigma MC-11.
Have you tried the Metabones lens adapter before? What was your experience like? Let me know in the comments below!
Sample Photos Taken with Sony A7rIII, Metabones V adapter, and Canon lenses:
Metabones V Canon EF Sony E-Mount adapter

Share this article.
Advertisement


Landscape & Nature Photography Course

In this course you'll take a 4 hour video journey with Johny from the studio to the great Aussie outdoors,…
4 hr 41 min Intermediate


Learn How to Take Amazing Photos at Night Photographer Jim Hamel is a specialist in Night Photography and is here to teach in a…
7 hr 45 min Intermediate


Loving Landscapes

Stop taking scenery snaps and start creating breathtaking works of landscape photography art that people will fall in love with.…
 
To get your copy of these resources just visit:

https://resources.digital-photography-school.com/ref/937/


11 Ideas for More Unique Concert Photos

Musicians, magazines, fans, and record labels alike turn to skilled photographers to tell a story of a momentous performance and return unique concert photos.
11 Ideas for More Unique Concert Photos
Concert photographers are often on assignment for a publication that has sent them out to capture meaningful pictures that could very well go down in music history. Otherwise, music photographers are individually hired by the performing artists. Whatever brings you to the photo pit, your goal is to capture something wonderful.
That being said, the music photography industry has become surprisingly saturated in recent years. In order to stand out amongst the crowd, you have to take live music photographs that differ from others in your photo pit. Here are 11 tips on how to take more unique concert photographs.

#1 – Don’t Forget About the Detail Shots

still life concert image - 11 Ideas for More Unique Concert Photos
Band: Behemoth
Although you want to focus heavily on the musicians performing on the stage, the detail shots are just as important.
Many bands put in a significant amount of effort into their live show productions, from stage props to lighting schemes. A unique and effective statement to your live concert gallery are some close-ups of the epic stage props that the band uses.
At the very least, the artist who created the props or the instrument company will thank you!

#2 – Play with Art and Distortion Lenses

blue and pink concert lighting - 11 Ideas for More Unique Concert Photos
Band: MGT. Shot with the Lensbaby Burnside 35.
Though concert photography is often an assignment from a journalistic outlet, that doesn’t mean that you can’t have a couple of minutes to yourself to do something vastly different. You do not have to be afraid of using artistic or distortion lenses at a live show. If anything, they make the frame exceptionally cool!
The fish-eye lens became very famous by well-known concert photographers by being used at live shows. I, myself, love using the Lensbaby lenses at live concerts. The manual focus can oftentimes be much more effective than relying on autofocus.
Try using a copper tube to create very cool swirls around your subject.
art lenses - 11 Ideas for More Unique Concert Photos
Band: A Mirror Hollow. Shot with the Canon 16-35mm f/2.8 L IS USM lens.
You can submit the standard shots to the outlet, and the unique ones to the band. I am telling you, the musicians will love a new take on their live performances.

#3 – Tons of Flying Hair is Great

hair whipping - 11 Ideas for More Unique Concert Photos
Band: Cradle of Filth
Naturally, try to capture the facial expressions of the performers. However, you are dealing with rockstars here, and part of the cool factor of these rock gods is their wild style.
Take advantage of the flying hair and fun headbanging, they can sometimes make cooler shots than your standard singing portraits.

#4 – Perspective is Everything

band between legs - 11 Ideas for More Unique Concert Photos
Band: HIM
Although concert photography can be very limited, between shooting time restrictions and limitations on your shooting location, you can still play with perspective.
The key to being different is viewing life through a lens that is more diverse than those around you, no pun intended. Get low, low, low to the ground and shoot up or move yourself to the very far side of the photo pit and shoot from there! Photograph in between the heads of fans or get up on the balcony.
Whatever you do, find new angles, views, and compositions to take advantage of to create more unique concert photos.

#5 – The Musician Doesn’t  Always Have to Look at You

musician on stage - 11 Ideas for More Unique Concert Photos
Band: Nightwish
It is true that the viewer connects best when the subject is looking at or engaging with the camera.
However, you don’t always have to fight for that type of shot during a live concert setting. It’s okay for the musicians not to interact with you as a photographer. Shots of them looking away or down can be just as eye-catching.

#6 – Embrace the Light, Don’t Avoid it

stage lighting - 11 Ideas for More Unique Concert Photos
Band: IAMX
Having a good grip on lighting will aid you in your concert photography journey. Stage lighting can differ tremendously between shows, venues, and even what lighting is available for that evening. The lighting can range from bright white strobes to deep reds.
Understanding how lighting is photographed by your camera, how it reflects on the instruments and equipment, and how the bulbs affect the performer’s skin tones will change how you take the photograph.
11 Ideas for More Unique Concert Photos
Most incredibly safe and tame images come from the photographer being wary of taking advantage of the lighting situation at concerts. Don’t be afraid to jump right in there and take advantage of whatever bizarre lighting scheme the performers have cooked up for you.
At the end of the day, the lighting is a part of the concert experience, and your job is to capture that.

#7 – Lens Flares are Rad

lens flare musician performing - 11 Ideas for More Unique Concert Photos
Band: Epica
On the topic of lighting, lens flares can be very cool!
This is, of course, an aesthetic choice, but I personally find them to be quite fun. You can cause a flare in a similar fashion to photographing during sunset or golden hour. When the light hits the front glass element of your lens at a specific angle, a flare will appear.

#8 – Overexposing and Underexposing Can Work

moody concert lighting - 11 Ideas for More Unique Concert Photos
Band: The Misfits
To help accurately capture the emotion and feel of the show, it is alright to overexpose or underexpose your frame. This can also create a rather unique and uncommon type of photograph.
Use your best judgment and common sense here to determine when such exposures are appropriate.

#9 – Don’t Be Afraid to Get Close

close up of a band member on stage - 11 Ideas for More Unique Concert Photos
Band: Jyrki69
Guitarists don’t bite (not hard anyway)! Don’t be afraid to get close to the performers on the stage. Take a wide-angle lens, such as a 16-35mm lens, and get right up in there. The perspective distortion can make for a very cool shot.
However, that being said, be aware of your surroundings. I cannot reiterate this point enough. Absolutely be aware of your surroundings!
It is easy to get lost in the moment and fall into a creative bliss when shooting, but a live music event is not the place to lose yourself.
If you’re not growing eyes in the back of your head, you’ll most likely get clonked right in the temple by a crowd surfer, tangled in a microphone cord, or smacked by a flying guitar. This will help you avoid injury to yourself and others.

#10 – In-Between Moments Tell a Story

singer between songs - 11 Ideas for More Unique Concert Photos
Band: HIM
The band may have put their instruments down for a moment, but that doesn’t mean that the job of the photographer ends there.
Some in-between moments can become incredible iconic images through their powerful storytelling ability.

#11 – The Moment is More Important than Technical Accuracy

red concert lighting - 11 Ideas for More Unique Concert Photos
Band: IAMX
Let’s face the facts, we all pixel peep. I believe that over time, passionate photographers get a bit anxious about technical perfection in their images (I know I sure do sometimes). However, some niches such as event photography are not as fussed over technical mistakes as long as the moment captured is important.
There is be a fine balance between taking a good photograph by technique and taking a good photograph by design (aka a great and powerful moment). However, if you have to choose between capturing a fantastic story and ensuring equipment perfection, pick the story.
Many wonderful images are overlooked because the focus is too set on ensuring that an image is tack sharp rather than what the subject portrays.
Of course, this isn’t meant to be interpreted as disregarding technical proficiency. You should aim to take exceptional photographs, but don’t get lost in your pursuit and forget your purpose for photographing the event.

Your turn

Now that you have these tips in your photography toolbelt, go out there and take some wicked shots!
Image: Band: Epica
Band: Epica

Share this article.

5 Tips for Portraits of Musicians That Will Help You Hit All the Right Notes

I’d like to share a few tips for portraits of musicians that will help you avoid the awkward photos that make any musician cringe.
portraits of musicians
Sometimes we are lucky enough as photographers to be asked to photograph someone with one of their most prized possessions: their musical instrument. Most people that want to be photographed with their instrument really and truly love it, and it’s a part of who they are. As a musician myself, I love photographs with gorgeous instruments in them, and I am especially bothered by photos that don’t capture those instruments naturally. Sometimes I’ll come across a photo that makes me cry out, “Why?? Nobody would EVER hold their instrument like that!!” You can still be creative with your photos without making them awkward.
portraits of musicians

1. Trust the musician

If you aren’t familiar with the instrument you’re photographing, it is especially important to trust the musician. This isn’t the time to try every posing trick that you can come up with, ending up with flutes on top of the head, or cellos held under the chin.
Ask your subject how they hold their instrument naturally. You can ask how they hold their instrument while playing, or when they’re relaxing between songs. If it’s a big instrument, like a piano, ask them how they would stand next to it before they perform, or how they sit by it when they’re thinking about what to practice. Ask them to demonstrate how they carry their instrument from one place to another. These might seem like silly questions, but you can really get a sense of what positions and holds are natural, then you can build from there.
portraits of musicians
As an example, a violinist may tell you that she holds her violin under her right arm when resting. You could take that position, ask her to sit on a chair in a formal pose holding the violin under her arm and get a beautiful portrait of a girl and her violin. The key is to remember that they are much more expert at how to naturally pose with their instrument than you likely are. However, if you do happen to know their instrument well, feel free to use your knowledge to get beautiful natural poses.

2. Do your homework

portraits of musicians
Before a session with a musician, you could watch some videos on YouTube to see how people interact specifically with the instrument you’ll be photographing. Find a professional musician who plays the same instrument. Look at their website to see what kind of photos they have with their instruments. You may have a client who is very shy and need more guidance posing, so it’s helpful to have a few ideas ahead of time. Be prepared for challenges that an instrument might bring, such as unwanted reflections in brass, immobility of harps or pianos, sensitivity to temperature or weather, and have a plan.

3. Ask the musician to play for you

portraits of musicians
If you can get your subject to give you a little performance during the photo session, you will get some great action shots. It usually helps loosen them up a little bit too, and brings out some natural smiles. Remind them that it doesn’t matter if they make mistakes because your camera doesn’t catch any audio. It will only capture the perfect moments of their playing. Also, remind them that you aren’t there to judge their skill, you just want to capture the relationship they have with their instrument. Move around as they play, and catch the beautiful moment from every angle you can, close, and far.

4. Get close-ups of the action

portraits of musicians
Hands are the main part of playing most instruments. Get in close on the hands as they play. These shots often end up being some of my very favorites. Try focusing on the hands as you shoot down the neck of a guitar, the fingers on a flute, or hands that are frozen in mid-air during a drum solo. Getting in close on these details can create beautiful action photos that really tell the story. If their hands are moving too quickly for you to focus, ask them to freeze for a moment in that position while you get the shot.

5. Make the instrument the star

portraits of musicians
Take a few photos of the instrument by itself, too. Musicians love their instruments, and they will love photos that show their beauty. Make sure to ask permission to touch their instrument, and to set it down, move it, or anything you might want to do for the shot that could potentially harm it in any way. You can even ask the owner to do all of the touching and moving, and you can move yourself around to get the photo that you want.
Tell the musician what you have in mind, and they will most likely be on board, and be happy to help you get some amazing instrument photos. Instruments can be extremely expensive, and even more importantly, can have sentimental value that can never be compensated. Keep this in mind throughout the session, whether your subject is in the photo with the instrument, or not. Never ask them to do something that could harm or damage the instrument.
portraits of musicians

Every time I’ve been asked to create photos for album covers for musicians, head shots for websites, art to print and frame, or just to capture someone’s favorite hobby, my goal is to create a photo that they will love. One that will stay true to what they would naturally do with their instruments.
I hope these tips can help you create beautifully genuine musician portraits too. I would love to see your musician portraits in the comments!

Share this article.

Digital Photography For Dummies King

Photography Basics for Noobs | Beginner Guide

Tuesday, November 26, 2019

Free after Christmas Shopping $

Can you really get free, after holiday shopping $ honestly?  Can you then use this money to buy more, or better photography equipment (or anything else you want)?  Yes, You can!  Copy and paste the link below into your web browser, click ENTER, and you'll be taken to a web page that explains how easy it is to get this money for yourself and your friends.


https://bit.ly/2Olsuoo
Image result for Camera photos  Image result for Camera photos Image result for Camera photos
Image result for Camera photos
Share this page.


How To Find Your Lens’ Sweet Spot: A Beginner’s Guide to Sharper Images

How To Find Your Lens' Sweet Spot: A Beginner's Guide to Sharper Images
Are you tired of blurry images?
It’s time to learn how to capture sharper images by finding your lens’ sweet spot. This will give you more confidence, save time, and help you take better photos.
In this article you’ll learn:
  • How to find your lens’ sweet spot (for sharper images)
  • Why you should shoot in Aperture Priority mode (and how to use it)
  • How to perform a test to get your sharpest image every time
  • How important is your lens’ sweet spot? Notice the difference
Mid range aperture sharper than wide open
In the above images of the clock, the one on the right is sharper. Look closely at the words and at the leaves behind the clock. The f/9 image is sharper throughout because it was shot in my lens’ sweet spot. The f/3.5 one was not.

First, take a look at your lens

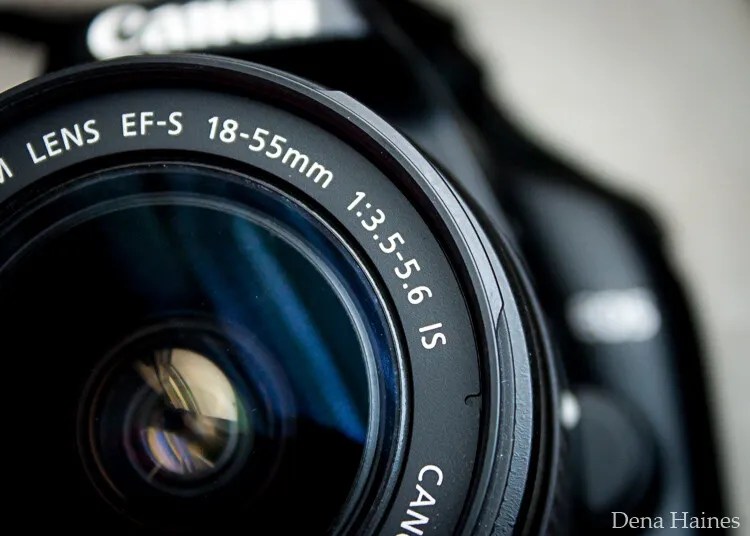
In this beginner’s guide, we’ll use an entry level zoom lens as our example. Most kit lenses (the basic lens that comes with a DSLR) generally shoot their sharpest at the mid-range aperture settings. To determine the mid-range of your lens, you’ll need to know its widest (or maximum) aperture setting. It is located on the side, or end, of the lens and will look something like this 1:3.5-5.6.
For example, here it is on my Canon 18-55mm zoom lens.
Lens aperture range
This means that when my lens is zoomed all the way out, its widest aperture is f/3.5. When zoomed all the way in, its widest aperture is f/5.6.
The rule to finding that mid-range sweet spot, is to count up two full f-stops (aperture settings are called f-stops) from the widest aperture. On my lens, the widest aperture is f/3.5. Two full stops from there would bring me to a sweet spot of around f/7.
Use this chart to count your f-stops
Robin Parmar
By Robin Parmar
There is some wiggle room in the mid-range, so anything from f/7 to f/10 will capture a sharp image. Once you know the mid-range of your lens, you can do an easy test to get your sharpest image. To perform the test you’ll need to shoot in Aperture Priority mode.

Take control with Aperture Priority Mode

Shooting in Aperture Priority allows you to choose the aperture setting you want, which gives you more creative control than Automatic mode. By controlling the aperture setting, it’s much easier to get a sharp image, and because your camera still chooses the ISO (if you are set to Auto ISO) and shutter speed automatically, it’s very easy to use.
You’ve probably heard that apertures like f/16 and f/22 are best for keeping everything in focus. While that can be true, focus does not always equal overall sharpness. Choosing a mid-range aperture will give you sharper images throughout. You can improve them even further by reducing camera shake with a tripod and a remote shutter release (or your camera’s self-timer).
Here’s an example of how shooting in your lens’ sweet spot will give you sharper images.
Sharp images shot in lens sweet spot
Mid range f stop sharper than small f stop
In the above split-image, the f/9 image is sharper than the f/22 one. The needles and shadows are not as soft or blurry as in the f/22 shot (look at the crispness and sparkles in the snow too).

Switching from Automatic to Aperture Priority Mode

To take your camera out of Automatic and put it in Aperture Priority, just turn the large Mode Dial to Aperture Priority. This is what that looks like on my Canon (on Nikon and other brans look for the A).
Aperture priority on canon mode dial
Automatic mode is the green rectangle; Aperture Priority mode is the Av (or A on a Nikon). Once your camera is in Aperture Priority mode, turn the smaller Main Dial (shown here on the top of my Canon) to choose your f-stop.
Main dial canon
As you turn that dial, you’ll see the f-number changing on your screen. In the next picture, it’s set to f/9.5.
Aperture setting on canon LCD screen

Perform a Lens Sweet Spot Test

Once you have your camera set up on a tripod, performing a sweet spot test only takes a couple of minutes. To begin, put your camera in Aperture Priority mode, then compose your shot and take a photo at varying apertures. Start out with the widest, then click that main dial a couple of times (to the right) and take another. Keep doing that until you’ve taken seven or eight photos.
Upload your photos to your computer and zoom in on them. You’ll quickly see which aperture settings gave you the sharpest overall image.
This next photo of my daughter was shot using natural light. Shooting in my lens’ sweet spot gave me a pretty sharp image, even in this low light setting.
Mid range aperture sharp image low light
Find your lens sweet spot for sharper images
The close up of the mugs shows the advantage of shooting in the lens’ sweet spot. Whenever you want to make sure you get the sharpest capture possible, take a shot at each mid-range setting f/7, f/8, f/9, and f/10.
Getting Your Sharpest Images
Now that you know your lens’ sweet spot, it’s time to practice. I hope you’re as pleased with the results as I’ve been!
Mid range aperture for sharper images
I love shooting in natural light, and learning how to capture sharper images in low light has made me so much happier with my photos.

Tips for capturing your sharpest images:

  • Shoot in Aperture Priority mode
  • Choose a mid-range aperture (usually f/7 to f/10)
  • Use a tripod and a remote shutter release (or your camera’s self-timer) to reduce camera shake
  • Take a series of shots at f/7 through f/10 when a sharp capture is especially important
But don’t stop here. Keep playing with settings in Aperture priority mode. It’s awesome to get images that are sharp throughout, but there’s a lot more to aperture than that.
Learn more about aperture and depth of field here.
Do you have any lens sweet spot tips to share? Please do so by commenting below.

Share this article.