Wednesday, November 27, 2019

5 Tips for Portraits of Musicians That Will Help You Hit All the Right Notes

I’d like to share a few tips for portraits of musicians that will help you avoid the awkward photos that make any musician cringe.
portraits of musicians
Sometimes we are lucky enough as photographers to be asked to photograph someone with one of their most prized possessions: their musical instrument. Most people that want to be photographed with their instrument really and truly love it, and it’s a part of who they are. As a musician myself, I love photographs with gorgeous instruments in them, and I am especially bothered by photos that don’t capture those instruments naturally. Sometimes I’ll come across a photo that makes me cry out, “Why?? Nobody would EVER hold their instrument like that!!” You can still be creative with your photos without making them awkward.
portraits of musicians

1. Trust the musician

If you aren’t familiar with the instrument you’re photographing, it is especially important to trust the musician. This isn’t the time to try every posing trick that you can come up with, ending up with flutes on top of the head, or cellos held under the chin.
Ask your subject how they hold their instrument naturally. You can ask how they hold their instrument while playing, or when they’re relaxing between songs. If it’s a big instrument, like a piano, ask them how they would stand next to it before they perform, or how they sit by it when they’re thinking about what to practice. Ask them to demonstrate how they carry their instrument from one place to another. These might seem like silly questions, but you can really get a sense of what positions and holds are natural, then you can build from there.
portraits of musicians
As an example, a violinist may tell you that she holds her violin under her right arm when resting. You could take that position, ask her to sit on a chair in a formal pose holding the violin under her arm and get a beautiful portrait of a girl and her violin. The key is to remember that they are much more expert at how to naturally pose with their instrument than you likely are. However, if you do happen to know their instrument well, feel free to use your knowledge to get beautiful natural poses.

2. Do your homework

portraits of musicians
Before a session with a musician, you could watch some videos on YouTube to see how people interact specifically with the instrument you’ll be photographing. Find a professional musician who plays the same instrument. Look at their website to see what kind of photos they have with their instruments. You may have a client who is very shy and need more guidance posing, so it’s helpful to have a few ideas ahead of time. Be prepared for challenges that an instrument might bring, such as unwanted reflections in brass, immobility of harps or pianos, sensitivity to temperature or weather, and have a plan.

3. Ask the musician to play for you

portraits of musicians
If you can get your subject to give you a little performance during the photo session, you will get some great action shots. It usually helps loosen them up a little bit too, and brings out some natural smiles. Remind them that it doesn’t matter if they make mistakes because your camera doesn’t catch any audio. It will only capture the perfect moments of their playing. Also, remind them that you aren’t there to judge their skill, you just want to capture the relationship they have with their instrument. Move around as they play, and catch the beautiful moment from every angle you can, close, and far.

4. Get close-ups of the action

portraits of musicians
Hands are the main part of playing most instruments. Get in close on the hands as they play. These shots often end up being some of my very favorites. Try focusing on the hands as you shoot down the neck of a guitar, the fingers on a flute, or hands that are frozen in mid-air during a drum solo. Getting in close on these details can create beautiful action photos that really tell the story. If their hands are moving too quickly for you to focus, ask them to freeze for a moment in that position while you get the shot.

5. Make the instrument the star

portraits of musicians
Take a few photos of the instrument by itself, too. Musicians love their instruments, and they will love photos that show their beauty. Make sure to ask permission to touch their instrument, and to set it down, move it, or anything you might want to do for the shot that could potentially harm it in any way. You can even ask the owner to do all of the touching and moving, and you can move yourself around to get the photo that you want.
Tell the musician what you have in mind, and they will most likely be on board, and be happy to help you get some amazing instrument photos. Instruments can be extremely expensive, and even more importantly, can have sentimental value that can never be compensated. Keep this in mind throughout the session, whether your subject is in the photo with the instrument, or not. Never ask them to do something that could harm or damage the instrument.
portraits of musicians

Every time I’ve been asked to create photos for album covers for musicians, head shots for websites, art to print and frame, or just to capture someone’s favorite hobby, my goal is to create a photo that they will love. One that will stay true to what they would naturally do with their instruments.
I hope these tips can help you create beautifully genuine musician portraits too. I would love to see your musician portraits in the comments!

Share this article.

Digital Photography For Dummies King

Photography Basics for Noobs | Beginner Guide

Tuesday, November 26, 2019

Free after Christmas Shopping $

Can you really get free, after holiday shopping $ honestly?  Can you then use this money to buy more, or better photography equipment (or anything else you want)?  Yes, You can!  Copy and paste the link below into your web browser, click ENTER, and you'll be taken to a web page that explains how easy it is to get this money for yourself and your friends.


https://bit.ly/2Olsuoo
Image result for Camera photos  Image result for Camera photos Image result for Camera photos
Image result for Camera photos
Share this page.


How To Find Your Lens’ Sweet Spot: A Beginner’s Guide to Sharper Images

How To Find Your Lens' Sweet Spot: A Beginner's Guide to Sharper Images
Are you tired of blurry images?
It’s time to learn how to capture sharper images by finding your lens’ sweet spot. This will give you more confidence, save time, and help you take better photos.
In this article you’ll learn:
  • How to find your lens’ sweet spot (for sharper images)
  • Why you should shoot in Aperture Priority mode (and how to use it)
  • How to perform a test to get your sharpest image every time
  • How important is your lens’ sweet spot? Notice the difference
Mid range aperture sharper than wide open
In the above images of the clock, the one on the right is sharper. Look closely at the words and at the leaves behind the clock. The f/9 image is sharper throughout because it was shot in my lens’ sweet spot. The f/3.5 one was not.

First, take a look at your lens

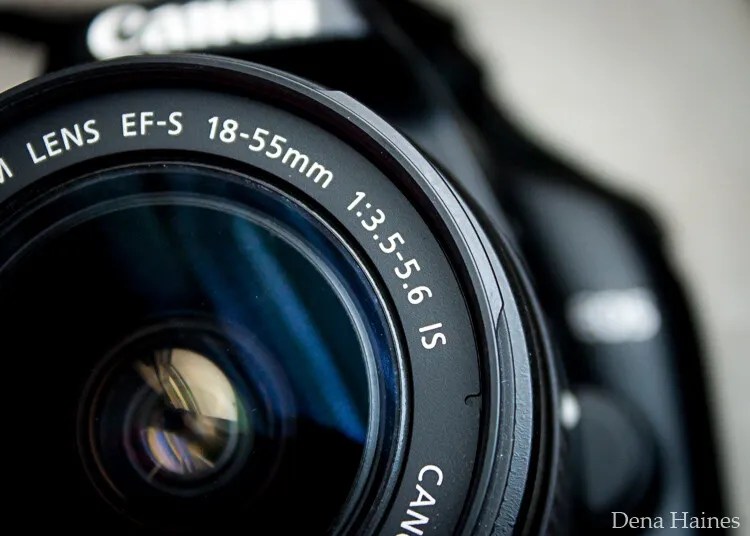
In this beginner’s guide, we’ll use an entry level zoom lens as our example. Most kit lenses (the basic lens that comes with a DSLR) generally shoot their sharpest at the mid-range aperture settings. To determine the mid-range of your lens, you’ll need to know its widest (or maximum) aperture setting. It is located on the side, or end, of the lens and will look something like this 1:3.5-5.6.
For example, here it is on my Canon 18-55mm zoom lens.
Lens aperture range
This means that when my lens is zoomed all the way out, its widest aperture is f/3.5. When zoomed all the way in, its widest aperture is f/5.6.
The rule to finding that mid-range sweet spot, is to count up two full f-stops (aperture settings are called f-stops) from the widest aperture. On my lens, the widest aperture is f/3.5. Two full stops from there would bring me to a sweet spot of around f/7.
Use this chart to count your f-stops
Robin Parmar
By Robin Parmar
There is some wiggle room in the mid-range, so anything from f/7 to f/10 will capture a sharp image. Once you know the mid-range of your lens, you can do an easy test to get your sharpest image. To perform the test you’ll need to shoot in Aperture Priority mode.

Take control with Aperture Priority Mode

Shooting in Aperture Priority allows you to choose the aperture setting you want, which gives you more creative control than Automatic mode. By controlling the aperture setting, it’s much easier to get a sharp image, and because your camera still chooses the ISO (if you are set to Auto ISO) and shutter speed automatically, it’s very easy to use.
You’ve probably heard that apertures like f/16 and f/22 are best for keeping everything in focus. While that can be true, focus does not always equal overall sharpness. Choosing a mid-range aperture will give you sharper images throughout. You can improve them even further by reducing camera shake with a tripod and a remote shutter release (or your camera’s self-timer).
Here’s an example of how shooting in your lens’ sweet spot will give you sharper images.
Sharp images shot in lens sweet spot
Mid range f stop sharper than small f stop
In the above split-image, the f/9 image is sharper than the f/22 one. The needles and shadows are not as soft or blurry as in the f/22 shot (look at the crispness and sparkles in the snow too).

Switching from Automatic to Aperture Priority Mode

To take your camera out of Automatic and put it in Aperture Priority, just turn the large Mode Dial to Aperture Priority. This is what that looks like on my Canon (on Nikon and other brans look for the A).
Aperture priority on canon mode dial
Automatic mode is the green rectangle; Aperture Priority mode is the Av (or A on a Nikon). Once your camera is in Aperture Priority mode, turn the smaller Main Dial (shown here on the top of my Canon) to choose your f-stop.
Main dial canon
As you turn that dial, you’ll see the f-number changing on your screen. In the next picture, it’s set to f/9.5.
Aperture setting on canon LCD screen

Perform a Lens Sweet Spot Test

Once you have your camera set up on a tripod, performing a sweet spot test only takes a couple of minutes. To begin, put your camera in Aperture Priority mode, then compose your shot and take a photo at varying apertures. Start out with the widest, then click that main dial a couple of times (to the right) and take another. Keep doing that until you’ve taken seven or eight photos.
Upload your photos to your computer and zoom in on them. You’ll quickly see which aperture settings gave you the sharpest overall image.
This next photo of my daughter was shot using natural light. Shooting in my lens’ sweet spot gave me a pretty sharp image, even in this low light setting.
Mid range aperture sharp image low light
Find your lens sweet spot for sharper images
The close up of the mugs shows the advantage of shooting in the lens’ sweet spot. Whenever you want to make sure you get the sharpest capture possible, take a shot at each mid-range setting f/7, f/8, f/9, and f/10.
Getting Your Sharpest Images
Now that you know your lens’ sweet spot, it’s time to practice. I hope you’re as pleased with the results as I’ve been!
Mid range aperture for sharper images
I love shooting in natural light, and learning how to capture sharper images in low light has made me so much happier with my photos.

Tips for capturing your sharpest images:

  • Shoot in Aperture Priority mode
  • Choose a mid-range aperture (usually f/7 to f/10)
  • Use a tripod and a remote shutter release (or your camera’s self-timer) to reduce camera shake
  • Take a series of shots at f/7 through f/10 when a sharp capture is especially important
But don’t stop here. Keep playing with settings in Aperture priority mode. It’s awesome to get images that are sharp throughout, but there’s a lot more to aperture than that.
Learn more about aperture and depth of field here.
Do you have any lens sweet spot tips to share? Please do so by commenting below.

Share this article.

Monday, November 25, 2019

3 Things Aperture Mode is Perfect For in Photography

By: Mat Coker Mat Coker
Many new photographers are overwhelmed by all the settings on their camera. But what if you could ignore most of the settings on your camera and just choose one to experiment with? Where would you begin?
I suggest you begin by experimenting with the aperture because this setting has a huge effect on your photos.
Once you know the things Aperture Mode (or Aperture Priority) is perfect for, you’ll have increased your creative possibilities and simplified the camera setting problem.
Here are three things you can do with Aperture Mode.

But first, how to put your camera on Aperture Mode

For most cameras, to put your camera on Aperture Mode you need to turn the dial to A in order to take control of your aperture (Av for Canon).
things aperture mode is perfect for
This is a Nikon camera. On Canon, you’re looking for Av

When you look at the screen on your camera, you’ll notice a number with an F beside it. This is your aperture value. Use the scroller on your camera to change that number. Experiment and see how high and how low you can make that number go.
things aperture mode is perfect for
When that number is smaller (1.8, 3.5, 5.6) the aperture is wider or more open.

things aperture mode is perfect for
When the number is larger (11, 16, 22) the aperture is narrower or more closed.
As we move through the tips, you’ll see how opening or closing your aperture affects your photo. When you’re intentional about setting your aperture, it will drastically change your photo.

1. How to create background blur (or keep the background in focus if you prefer)

Think in terms of opposites for a moment.
Normally, when we take a portrait, we only want the person to be in focus. But when we photograph a landscape, we want the whole photo to be in focus.
I’ll show you how you can use aperture to create background blur for portraits. I’ll also show you the opposite; how to keep the whole scene in focus for landscapes.
The principle is as simple as this: open your aperture for portraits, close it for landscapes.
PS – the technical term for background blur is bokeh (like a bouquet of flowers).
Image: Remember to open your aperture to create background blur in your portraits. Opening your aper...
Remember to open your aperture to create background blur in your portraits. Opening your aperture 
means setting it to the smallest number possible (probably 1.8 or 3.5 or 5.6). I set the aperture to 
F/2.5 for this portrait.

Image: F/1.2 using the 56mm Fuji prime lens
F/1.2 using the 56mm Fuji prime lens

things aperture mode is perfect for
Remember to close your aperture to keep the whole scene in focus for landscape photos. Closing 
your aperture means setting it to a larger number such as 11, 16, or 22. I set the aperture to F/11 
for this landscape photo.

things aperture mode is perfect for
The aperture is set to F/11 for this landscape photo.

How to achieve better bokeh (background blur)

The first thing I told you about bokeh is that you need to open your aperture all the way. That means that you need to set it to the smallest number possible. That number might be 5.6, 3.5, or even 1.8, depending on your lens.
However, opening your aperture all the way isn’t always enough. So I’ll show you a formula for getting an even better bokeh.
My goal for the following portrait of Batman is to have him in focus with a nice blurry background.
There are four simple steps involved; let’s look at them one at a time.

1. Open the aperture

Image: The aperture is set to 3.5
The aperture is set to 3.5
Now, I opened the aperture all the way, but the building isn’t really out of focus. The back part of the building is out of focus, but the part directly behind Batman is still pretty crisp.
The biggest problem is that he is too close to the background, so the second step will make a huge difference.

2. Bring Batman away from the background

Image: Batman has been moved away from the background.
Batman has been moved away from the background.
Now the building is out of focus, but let’s make it even more out of focus.

3. Zoom in

So far, I set my lens to its widest angle of 18mm. When I zoom all the way to 55mm, the background will go more out of focus.
things aperture mode is perfect for
The aperture has closed a little bit to f/5.6 because I zoomed in. This will happen with most lenses.
As well as blurring the background, zooming in also gave the photo a more compressed look.
Would you like the background to be even more blurry? Is it even possible?

4. Get closer

Yes, it is!
The closer you get to Batman, the more out of focus the background becomes.
things aperture mode is perfect for
I used my Olympus Tough TG-6 for this photo. The microscope mode allows me to get very close. 
The aperture is set to f/6.3 because I zoomed in.
For great bokeh just remember:
  • Open your aperture
  • Step away from the background
  • Zoom in
  • Get closer
Controlling your background blur is just one of the things Aperture Mode is perfect for. Now let’s see what else it can do.

2. Starburst effect

The starburst effect adds interest to your photos because we don’t normally see this with our eye.
To achieve the starburst effect, it’s as easy as closing your aperture.
things aperture mode is perfect for
For this landscape photo, I closed the aperture to F/8.

Image: For this photo, I set the aperture to F/8. I thought that it would be interesting to capture...
For this photo, I set the aperture to F/8. I thought that it would be interesting to capture this bridge 
using the starburst effect. But I’m disappointed with the angle or perspective. When the river freezes 
over, I’m going to come back and photograph the bridge from a different perspective. I consider this 
to be a “sketch shot.” I tried it out, and I know that it’s worth pursuing another photo later on.
The starburst effect is one of the more creative things Aperture Mode is perfect for. Now let’s see one of the biggest problems that Aperture Mode will help solve.

3. Low light photography

One of the biggest problems with dim light is that your photos become blurry from motion.
Image: A typical blurry photo caused by dim light and a slow shutter speed.
A typical blurry photo caused by dim light and a slow shutter speed.
Photos become blurry because there is not enough light and the camera takes more time to capture the photo. Technically, it’s a slow shutter speed issue.
The important thing to know is that you need to get more light into the camera. You can get more light in by opening your aperture all the way.
You should also raise your ISO higher (1600, 3200, or 6400).
Your shutter speed may still be a little bit slow, which could lead to motion blur in your photos. But if you hold still while taking the photo, and wait for your subject to hold still, you’ll get a pretty crisp photo.
things aperture mode is perfect for
I captured this candlelight portrait at F/2.0, ISO 4000, shutter speed 1/60 sec

things aperture mode is perfect for
F/2.0, ISO 2500, shutter speed 1/60 sec

Image: An extreme low light photo captured at f/2.0, ISO 5000, shutter speed 1/15 sec
An extreme low light photo captured at f/2.0, ISO 5000, shutter speed 1/15 sec
Sometimes you have no choice but to have a slow shutter speed. Why not get creative and make the most of it?

You’ve increased your skill as a photographer!

You’ve learned four things aperture mode is perfect for. These creative effects are achieved by simply opening or closing your aperture:
  • Blur your background by opening the aperture
  • Keep a landscape in focus by closing your aperture
  • Create a starburst effect by closing your aperture
  • Improve dim light photos by opening your aperture
Focusing on this one camera setting will help improve your photography and simplify camera setting confusion.
Try these out, and let me know how you go in the comments!

Share this article.
Why You Should Prioritize Spending on Experience Before Gear

By: John McIntireJohn McIntire

So, why should you prioritize spending on experience before gear? Yearning for new equipment is something that almost all of us, as photographers, go through. For some of us, that desire for the newest and shiniest camera body or lens is near-constant. By now, you should know that new equipment will have little effect on improving your photography. This is, after all, one of the most talked-about subjects in photography circles. Most of that talk, however, tends to suggest that you shouldn’t spend any more money on your photography. I disagree with that.
You should spend money on your photography. I would even go as far as to say that you should spend every penny you can afford. With a few exceptions (what’s a macro photographer without a macro lens?), your money is better spent elsewhere than it is on new equipment.

Fancy equipment

Why-You-Should-Prioritize-Spending-on-Experience-Before-Gear
New toys with lots of features are fun, but they are not the be-all, end-all; nor should they be the goal.
I’m not one to say that new and shiny equipment should be out of the question. Sometimes it’s a must.
That new and wonderful camera body, lens or light might:
  • Give you more options in how and what you can shoot.
  • Make certain techniques easier, or open up some techniques altogether.
  • Give you certain technical gains such as sharpness, low light performance and dynamic range.
  • Give you a temporary boost in motivation and excitement for your photography
  • Impress people that don’t know any better.

What new equipment will not do is:

  • Make you a better photographer.

The only way to get better

Why-You-Should-Prioritize-Spending-on-Experience-Before-Gear
Experience. The act of getting out and putting your skills to use over and over again is far more 
valuable than any new piece of kit.
The only tried and true way to become a better photographer is to get experience in being a photographer. It’s really as simple as that. Go out, boots on the ground, batteries charged, memory card loaded, and take photos. Evaluate, go out, and take some more. Rinse, lather, and repeat ad infinitum.
Sure, along the way, you will need to take on new information and learn new skills that you will then add to your repertoire through (you guessed it) experience.

Spending money

This is where my thought process diverges from those who tell you that you don’t need to spend money at all. If the only way to get better at photography is through experience, then where do you reckon I would suggest that you put the money you might have spent on that new lens that you don’t really need? Experience. It’s always experience.
Do you want to get good at landscapes? Pick a location and go on an extended camping trip and design the experience so you can do little else but concentrate on your photography.
Image: For landscapes, sometimes just a trip a couple of hours away is all you need and it won...
For landscapes, sometimes just a trip a couple of hours away is all you need and it won’t cost you much.
Do you want to get good in a studio environment? Go out and hire a studio.
I can’t speak for all areas, but in my area, most photographers who hire out their studio are more than happy to lend a hand to beginners who hire their space.
Image: Studio photography requires a lot of practice. To get better, you need to be practicing as mu...
Studio photography requires a lot of practice. To get better, you need to be practicing as much as 
possible. When you’re renting/hiring a space, you often don’t have to have the equipment yourself.
Do you want to be a travel photographer? Use the gear you have and spend as much as you can on traveling to the places you need.
Why You Should Prioritize Spending on Experience Before Gear
Do you want to be a fashion photographer? Spend as much as you can on hiring  stylists, makeup artists and models.
Repeat that formula for any genre of photography that you’re interested in.
If you want to fast track the process, you always have the option of workshops or one-to-one tuitions. Do you need to do this? No, absolutely not, but sometimes it is a lot more effective to get the first-hand experience with someone who is already able to get the results that you are after.

But, things cost too much

Why-You-Should-Prioritize-Spending-on-Experience-Before-Gear
Careful planning meant that I was able to spend eight days on a camping trip to work on landscapes 
for around $100.
Sure, some things that you may want to photograph will cost a lot more than that $3000 camera body that you desperately want.
For example, travel can be expensive. As long as we’re not talking African safaris though, you can still do a lot of travel with that kind of money.
I once flew from Reykjavik to Baltimore for $90. As long as you hedge your expectations and plan meticulously, you might be surprised by what you can achieve within a limited budget.

Do you want to be a better photographer?

Yes? Good. Close/put down the spec sheet for the new offering from Canon/Sony/Nikon/Fuji, book a studio, book a trip or just go outside and start taking photos.
They’re probably going to be bad.
Good. Figure out why, then start the process from the beginning, over and over again. Maybe, eventually, you’ll find yourself in a situation where you absolutely have to have that fancy lens that costs more than a good used car, but probably not. So prioritize experience before gear!

Share this article.

Sunday, November 24, 2019

Photographic Inspiration or Copying? Where does the line blur?

By: Charlie MossCharlie Moss

As photographers, we take inspiration from everywhere. Pictures we see on the internet, things our friends say to us over coffee, magazines, galleries and museums, even the advertising we see at the bus stop. All of it gets stored away inside our heads for later, even if we don’t realize it. All this visual information we have consumed throughout our lives becomes a part of the new photographs that we create in some way. It influences us to make certain choices about the way we style or shoot images or the way we post-process them. So if we’re all taking inspiration from the things we see around us, even without realizing, when is it photographic inspiration or copying?
Why is copying seen as such a bad thing in the photographic world? Moreover, is there a clear line between taking photographic inspiration, or is it fuzzy and open to interpretation?
photographic-inspiration-or-copying

Imitation or inspiration?

It’s often said that imitation is the most sincere form of flattery (a nineteenth-century English art collector originally said it). And in many ways, I agree with this.
If you’re imitating a picture by another photographer or you’re imitating their technique, then you must think it’s going to be worth putting in time and effort to learning more about what they do. And that’s where we get the idea that this process is flattery.
But it doesn’t always feel like flattery when you’re on the receiving end of being imitated. Instead, it feels like someone is just copying the hard work that you put in, without any creativity on their part.
Of course, in the commercial world, there can be real financial implications if another photographer copies your work. But perhaps it’s time, in the rest of the photographic world, to worry a little less about copying and to focus more on learning new skills and developing a voice.
photographic-inspiration-or-copying

Turning imitation into inspiration

We’ve all imitated others, I’m sure. Maybe a pose borrowed from one image, the lighting from another, or the setting from somewhere else. It’s so hard to be truly original when it comes to the creation of photographs. We can’t just close ourselves off from the world and stop looking at the imagery that surrounds us.
So how do you move from imitating another artist to using their work as inspiration?
I think that the difference happens when you start to bring your own experience to the images you create. If you allow the work to reflect your own view of the world and the things that have happened to you, then that’s when the originality starts to happen.
Photographic Inspiration or Copying? Where does the line blur?

Is originality of subject as important as originality of voice?

Let’s face it – you’re unlikely to hit upon a genuinely original subject or concept for your next photograph. Most things out there have been photographed thousands of times before.
I’m not sure that having a totally original subject is that important, as long as you’re bringing your own voice to the photograph. If you’re saying things in your way with your viewpoint, then that is something truly original.
Think about many of the celebrity portrait photographers, or the well-known landscape photographers. Those photographers don’t usually have original subjects that have never been photographed before. But what they do have is originality in voice, an ability to find something unique about their subject, and the skills to show that uniqueness to the world.

Finding your voice

It sounds so easy, doesn’t it? “Just find your voice and make your images unique!” I guess you’re sitting there wondering how you find your voice and stop copying? Here’s a few pointers with that in mind.
photographic-inspiration-or-copying

1. Bring your own experiences

Nobody else has led your life and had your experiences. If you bring these elements of you to your image-making, you will automatically be creating something different from everybody else. Nobody else is you, no matter how much they imitate your work.
Of course, your own experiences could also be showing up at the right time and place to create a unique shot.

2. Critique your photos

For every photo that you think is great, write down five ideas that would improve it if you took that photo again. Even the daftest ideas are worth writing down. Put a small print of the image in a notebook and record your thoughts there if you can. Then you can revisit it when you want ideas of new things to try.

3. Keep shooting

Don’t give up. It takes most people a long time to find their unique voice and viewpoint when they’re making images. You have to shoot quite a few photographs before you start discovering what makes your images unique. The longer you shoot, the more likely you are to hit on something that makes your work truly your own.

How bad is copying really?

So, photographic inspiration or copying? In the grand scheme of things, in my opinion, copying isn’t really that big of a deal.
Artists have always copied other artists. Going back hundreds of years, artists have sat in front of the work of another artist and made sketches from what they see. It’s a way of learning and improving your skills, and photographers can (and perhaps even should) consider doing the same – photographically speaking.
Photographic Inspiration or Copying? Where does the line blur?
If copying is being done for practice, learning, and curiosity, it should be encouraged. As long as nobody is claiming the ideas that they’ve copied as their own, then does it really matter?
The difficulty comes when people are using ideas and presenting them as their own, without taking the time to develop them fully and put an individual spin on the work.
So as long as you’re bringing something new to the work you present as being authentically yours, then I don’t think there’s any problem. And even if you are copying to learn technical or creative skills – so what? Does it even matter?
I’d like to know what you think about photographic inspiration or copying. What do you have to do to stop copying and start being inspired by other people’s work? How do you find your voice and make your own photographs unique? Share with us in the comments!

Share this article.