Wednesday, September 4, 2019


How To Photograph Waterfalls And Rivers Creatively


#photographyeveryday #photographyislife #photographylover

By JasenkaG  

Waterfalls, rivers, and streams can be wonderful subjects for landscape photographers. Photos of moving water are utterly magical if done properly and luckily you won’t need a whole load of expensive equipment.  However, you might need some practice until you get it right, because moving water photography requires advanced technical knowledge.
No matter if you plan to shoot gorgeous tall waterfalls or small mountain streams, the following tips and tricks will help you snap some amazing pictures!

The Right Equipment

As previously mentioned, the equipment you’ll need for shooting moving water is fairly simple:

  • Camera
  • Wide-angle zoom lens
  • Polarizing filter
  • Neutral density filter (optional)
  • Tripod
You should know how to use manual mode on your camera when you shoot waterfalls and streams because you won’t be able to achieve great photos if you stick to default settings (automatic mode).
Photo by Robert Lukeman

Don’t Stick To Sunny Weather

Even though shooting moving water in pleasant weather seems like a nice and safe option, the results tend to be mediocre at best.  If you want to get some truly memorable photos of landscapes and rivers, try to get out of your comfort zone and shoot in cloudy, windy, rainy or even stormy weather.
Rainy or overcast days will give you a softer and more appealing quality of light, while stormy weather with turbulent water and unusual clouds can make your photographs really splendid The same goes for shooting rivers in wintertime  – it can be tricky, but capturing an enchanted winter wonderland is surely worth efforts.
Photo by Raphael Koh

Choose The Right Timing

You should photograph waterfalls in even light and avoid harsh and contrasty light which can easily lead to overexposed or underexposed images. It’s also important to mention that shooting during blue or golden hour doesn’t always work when it comes to waterfalls and rivers because they are often in deep canyons or dark forests.
For instance, if a waterfall or cascade is in a canyon or surrounded by mountains, sunrise or sunset won’t work for you as the sun may be completely blocked. In that case, you can still get creative images, but you will have to bring a flash too.
Photo by Daniel Wallace

Alter Between Slower And Faster Shutter Speeds

When you think about waterfall photography, the first thing that pops in your mind is probably those silky water shots that capture the motion blur of moving water.  While such shots look magical (without doubt!), there are also times when it’s great to capture a frozen moment of action.
If you want to capture a motion blur, you should choose a slower than normal shutter speed to blur the water – something like 1/15 or 1/8th of a second is a good starting point. If you want more blur, shutter speeds in the range of 1 to 5 seconds should work.  On the other hand, to capture a frozen moment, you will need something like t 1/100th of a second. In that case, you’ll be able to see individual splashes and water drops.
If you want to create something truly unique, you can take two exposures with different shutter speeds and then blend them in Photoshop to create an interesting mixture of frozen and blurred motion!
Photo by Jon Flobrant

Quick Tips – here are 3 tips for long exposure to get those ethereal soft photographs of moving water:
  • Use the lowest ISO possible to reduce noise in your photos
  • Choose an aperture between f8 and f11 for sharper images.
  • Experiment with different shutter speeds.  Try speeds from a few seconds to a few minutes to get the right effect.
These tips are a great place to start, but if you'd like to take your long exposure waterfall and river photographs to the next level, then you should take a look at the excellent Complete Guide To Long Exposure.
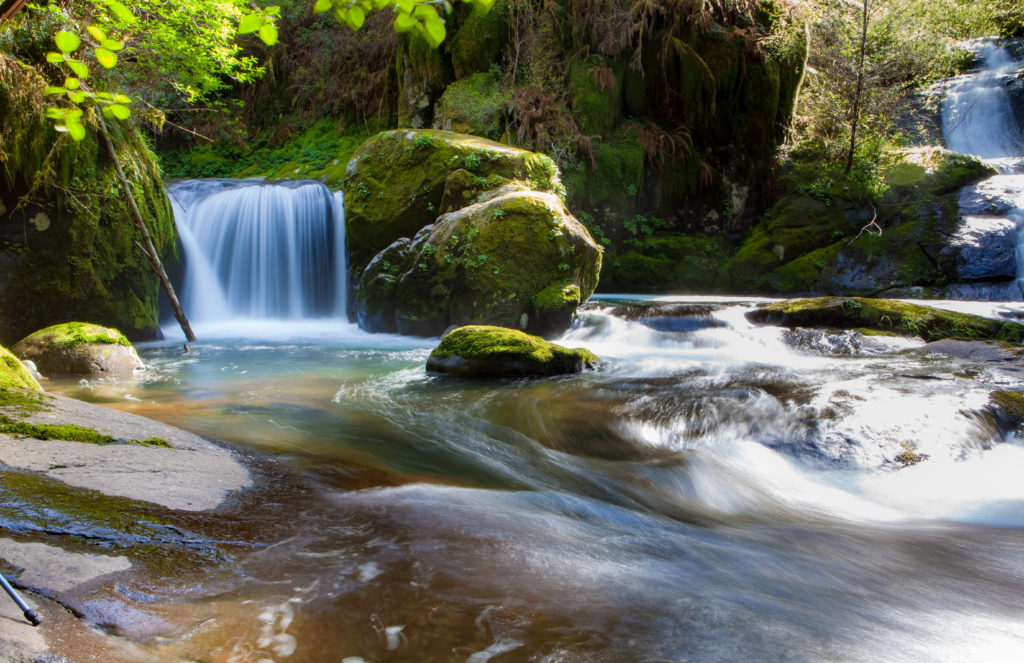
Photo by Carl Larson

Explore Dark Canyons For Mystical Shots

If you have a penchant for adventure, you should definitely find and explore dark canyons with waterfalls  – such locations usually yield the most beautiful scenes. You need to be armed with a sturdy tripod if you choose to shoot at such locations because it may be hard or impossible to catch the direct sunlight even at midday.
You should also pay attention to interesting rock formations that surround waterfalls in dark canyons and use them to strengthen the composition of your photos.
Photo by Levi Morsy

Use Polarizing And Neutral Density Filters

Even though these two filters aren’t really mandatory,  they can make a huge difference when you need to deal with wet rocks and reflections caused by water.
If you decide to purchase these filters for your waterfall photography (and landscape photography in general), they will allow you to use longer shutter speeds, reduce reflections and make colors in your images more vibrant.
Photo by Sergey Pesterev

Avoid Shooting The Sky

We tend to think (almost automatically) that all landscape images must have skies.  However, by omitting the sky completely in your river or waterfall photographs you’ll be able to create a more powerful composition that dedicates the entire frame to what matters most.
Omitting the sky has one more benefit  –  it will help you get the exposure right because overblown skies are usually the most problematic part of moving water photographs.
Photo by Milada Vigerova

Think Abstract

You don’t have to fit the entire scene into your frame when you’re shooting rivers and waterfalls. In fact, it can be interesting to get closer and shoot only a small portion of a waterfall – this will remove the sense of scale and direction and make your image abstract in an unexpected way.
If you decide to take the abstract approach, you’ll be able to focus solely on motion, colors and various shapes that appear in your photograph. In this way you can create an abstract scene powerful and surprising enough to hypnotize the viewer.
Photo by Samuel Scrimshaw

Experiment with HDR

If you’re into HDR, you should know that it can work wonders for waterfall photography.  HDR is an effective way to bring out details in the shadows of the rocks or to creatively change the appearance of the water as it cascades.
You don’t have to make your image obviously HDR – even some slight alterations can improve the tonal range of your image and make details truly pop. You can combine multiple exposures in either Photoshop or HDR-specialized software such as Photomatix.
Photo by Jeffrey Wegrzyn
In case you want to learn more about taking creative photos of waterfalls and rivers, feel free to check out the following link!

 https://resources.digital-photography-school.com/ref/937/


Nikon’s New D6 Powerhouse DSLR is Imminent

By Kehl Bayern  


Everyone loves new gear, and Nikon heads are particularly known for being the first passengers on the hype train.
D6
from Nikon.
But it looks like the hype surrounding Nikon’s new DSLR, the D6, is very real and it is going to make more than a few photographers excited.
Word began leaking on the net about this camera’s upcoming debut and it looks like Nikon decided to take the lead today and confirmed that, yes, the company’s most powerful DSLR yet, the professional-grade D6, is coming and, even better, there’s a bonkers lens option premiering alongside it: a 120-300mm f/2.8 VR lens according to PetaPixel.
In a press statement from Nikon, the company said, “Nikon released the D1 digital SLR camera in 1999, making 2019 the 20th anniversary of the single-digit D series. Thanks to the imaging know-how cultivated over Nikon’s long history in camera development, Nikon’s professional DSLR cameras have continued to evolve by introducing some of the industry’s most advanced technologies and responding to the strict demands of professional photographers with the ultimate in performance and reliability, even in the most severe conditions.”

 AF-S NIKKOR 120-300mm f/2.8E FL ED SR VR F-mount lensAs for the AF-S NIKKOR 120-300mm f/2.8E FL ED SR VR F-mount lens, the company said, “This year also marks the 60th anniversary of the Nikon F mount…The new AF-S NIKKOR 120-300mm f/2.8E FL ED SR VR F mount lens […] will provide professional photographers in fields such as sports photography with even greater support.”
No word on the most critical information yet such as the camera’s release date and its price. Whenever we get word on that, we’ll let you know.
You can watch a presentation on the Nikon D6 by clicking here.
What do you think? Let us know your thoughts of Nikon’s upcoming D6 in the comments below.

Share this article.

Tuesday, September 3, 2019

Tips for Aviation Photography with a Canon EF 24-105 f/4L Lens

The Canon EF 24-105mm f/4L IS USM (and its upgraded version the Canon EF 24-105mm f/4L IS II USM) are great lenses. Like many photographers, the versatility of the EF 24-105mm f/4L IS USM makes it my go-to lens.
Tips for Aviation Photography with a Canon EF 24-105 f/4L Lens
But while its reach is generous, the EF 24-105mm f/4L IS USM doesn’t quite cut it where a dedicated telephoto configuration is considered the norm. In aviation photography, for example, a long telephoto lens is the accepted approach to capturing airborne aircraft.
Nevertheless, there are plenty of ways to make up for the Canon EF 24-105mm f/4L IS USM’s lack of ultra-telephoto capabilities. Here are some tips for aviation photography with the Canon EF 24-105mm f/4L IS USM.
Tips for Aviation Photography with a Canon EF 24-105 f/4L Lens

Amazing airshows

My first recommendation for anyone looking to get into aviation photography is to head to your nearest airshow. Airshows have an amazing array of interesting aircraft on display. In the air, airshow pilots operate nearer to the crowd with photogenic low n’ slow passes. This allows for closer, more comprehensive photography with the EF 24-105mm f/4L IS USM.
On the ground, taxing aircraft are a good subject for panning shots. Static displays allow photographers to get up close and personal with flying machines. They provide opportunities for the unique detail and environmental shots with which the EF 24-105mm f/4L IS USM excels.
tips-for-aviation-photography

Hang out at airports

Airports are another great option for aviation photographers. I have fond memories of wandering around airport hangars with my Dad as a kid. Unfortunately, those days are gone, with heavy security and fencing lining the perimeters of most airports nowadays.
However, the good news is that many airports do have designated plane spotting areas that can be located with the help of Google, Facebook or airport websites. Depending on the airport and conditions, you may even be able to position yourself under the path of aircraft landing or taking off. This is ideal for closing the gap between airborne aircraft and the maximum reach of the EF 24-105mm f/4L IS USM. As long as you stay outside fenced-off areas, photographing under the flight path is perfectly legal.


https://resources.digital-photography-school.com/ref/937/


While planning your shoot, check airport arrival/departure times and apps like Flightradar24 to track aircraft movements. Some airports accommodate mainly GA (general aviation) aircraft which may fly low enough for the Canon EF 24-105mm f/4L IS USM to capture. Other, larger airports see hundreds of aircraft from mid-sized Dash 8’s to enormous A380’s coming and going within operational hours.
Image: The Flightradar24 app is free and simple to use to track aviation traffic
The Flightradar24 app is free and simple to use to track aviation traffic
If you are going to photograph at an airport, familiarize yourself with security precautions. Don’t use flash. Have your ID with you. Don’t enter into restricted areas and never operate drones in the vicinity of aircraft. If police or security do approach you, they usually just want to make sure of your intentions. Be polite and comply with any instructions they may give.
In addition, keep an eye out for specific airport open days, which can often include flyovers and static displays.
Tips for Aviation Photography with a Canon EF 24-105 f/4L Lens

Fun with flyovers

Flyovers are aviation events conducted for occasions like memorials and anniversaries. Operating over landmarks of significance, the public is usually notified about upcoming flyovers through social media and relevant websites. Depending on the aircraft, flyovers are usually conducted at a reduced speed and a low altitude. They are a spectacular opportunity to get close-up shots of aircraft with the Canon EF 24-105mm f/4L IS USM.
Flypast announcements usually specify the route that participating aircraft will take. If you get the heads up about a flyover, plan to be as close to the aircraft as you can. Many aviation photographers position themselves on nearby hills to be as near to the action as possible.
tips-for-aviation-photography

Look for larger aircraft

Depending on the airshow, airport or flyover, small airborne aircraft like the Cessna 172 can be difficult to photograph with the EF 24-105mm f/4L IS USM. If you can’t get close enough to a smaller aircraft to photograph it adequately, try focusing on larger aircraft instead.
At airshows and flyovers, aircraft like the C-17 (seen in the image below) demonstrate their vast abilities in impossibly slow passes – a perfect subject for the EF 24-105mm f/4L IS USM.
tips-for-aviation-photography
For civilian aircraft, regional airliners frequent airports globally. If you get a good position at an airport (especially under the flight path), Dash 8, ATR 72 and Saab 340-sized aircraft and up will prove large enough to fit the EF 24-105mm f/4L IS USM’s capabilities.
Image: A Bombardier Dash 8 on finals
A Bombardier Dash 8 on finals

Get in formation

Another way to fill the camera frame is to photograph several aircraft in formation. Here in Australia, a fleet of RAAF aircraft called the Roulettes make appearances at occasions all across the country. They perform precision maneuvers in hair-raising tight formations which make for great photography. Equivalent display teams around the world are sought after by aviation photographers because they photograph so well. If you’re shooting with an EF 24-105mm f/4L IS USM, these teams are fantastic subjects.
tips-for-aviation-photography

Remember composition

Aircraft may be the main subject in aviation photography, but composition is key to creating an engaging photograph. For example, leading lines can be expressed through smoke trails, aircraft design, and the horizon. You can apply the rule of thirds to offset the key components of an image, creating dynamic momentum in a photograph. Color sets the tone of an image and texture illuminates the tactility of aircraft construction.
Aviation photography (and all photography really) is comprised of infinite combinations of the principals and elements of art and design. Composition brings order to these combinations, creating a comprehensive narrative. The EF 24-105mm f/4L IS USM may not have as greater reach as a dedicated telephoto, but conscientiously applying composition techniques can make up for the lens’ shortcomings considerably.
tips-for-aviation-photography
A panned shot of a Mustang taxiing to the main runway of an airshow

Take a minimalist approach

If you’re looking to photograph an aircraft at a distance with the EF 24-105mm f/4L IS USM, you can always take the minimalist approach. By photographing an airborne aircraft in an environment made up of minimal detail, the subject of interest is emphasized. In the example below, the minimal nature of the background accentuates the focal point of the image.
Tips for Aviation Photography with a Canon EF 24-105 f/4L Lens

Move around

When everything is unfolding before you at an airshow or an airport, its easy to get into the habit of staying in one position. However, moving around is a vital aspect of aviation photography. By adjusting your perspective, you have a much greater chance of capturing something unique.
At airshows, there are plenty of interesting vantage points to make use of. Away from the main runway, taxiways and static aircraft provide great opportunities for interesting perspectives. Crouching, or holding the camera above your head to take a shot can also provide a viewer with an engaging point in which to enter a photograph.
At airports, change perspective as much as possible, altering your point of view under the flight path or positioning yourself at different spots around the airport perimeter. Make use of dedicated plane spotting facilities, but don’t be afraid to experiment a little.
Tips for Aviation Photography with a Canon EF 24-105 f/4L Lens

Go abstract

Artistic renderings of aviation are well within the capabilities of the EF 24-105mm f/4L IS USM. Abstract photography is a field of photography that removes the literal aspects of a photograph. Instead, abstract photographers rely on composition elements such as form and texture to create intriguing imagery. For many people, aviation is viewed from afar. Taking an abstract approach to aviation photography can create a fascinating insight into the artistic geometry of aircraft.
Tips for Aviation Photography with a Canon EF 24-105 f/4L Lens

Capture the environment

Incorporating environmental elements such as the landscape, sun or clouds into your aviation photography adds drama and separates aircraft from a standard blue backdrop. In addition, including man-made features such as fence lines, hangars, runways and approach array into your images provides context, scale, and interest.
Golden and blue hour photography emphasizes shape and form and reiterates the ever-changing nature of the atmosphere in which aircraft operate. If you’re at an airshow, be sure to stay the whole day so you can take advantage of lighting conditions into the evening. If you’re at an airport, try a session around golden and blue hour to capture the effect of the setting sun.
tips-for-aviation-photography
A Bombardier Challenger during golden hour

Join the club

Joining a plane spotters group on Facebook is a great way to keep updated with interesting aviation movements around a particular area. The groups are also full of valuable information on how to get the best (and closest) shots possible. There are heaps of Facebook groups for thousands of different airports around the world. Those with info can update aviation-enthused photographers on flight movements. Plus, everyone is free to contribute their photographs to the group for discussion and advice.
Tips for Aviation Photography with a Canon EF 24-105 f/4L Lens

There’s no doubt that the EF 24-105mm f/4L IS USM (and it’s big brother the EF 24-105mm f/4L IS II USM) are assets to any photographer’s kit. While aviation photography tends to center around the intimate shots that a dedicated telephoto lens affords, a little research and creativity mean that the EF 24-105mm f/4L IS USM is a great tool for capturing the unique spirit of aviation.
We’d love you to use some of these tips for aviation photography, and share your images with us in the comments!

What is Kirlian Photography? Aura Photography Revealed

 #photographyeveryday #photographyislife #photographylover


By Rachael Towne


If you’re a curious photographer who likes the explore the lesser-known realms of photography, you have probably heard about Kirlian photography. The Kirlian photography technique is a genuinely unusual way to shoot various subjects – many believe that it shows the auras of people or animate objects. Because of this, Kirlian photography is a mystery, especially for those who are amateur photographers.


In this article, we’ll try to explain how Kirlian photography works and separate fact from fiction.

What Is Kirlian Photography?

Kirlian photography, although the study of which can be traced back to the late 1700s, was officially invented in 1939 by Semyon Davidovitch Kirlian. The Kirlian photographic process reveals visible “auras” around the objects photographed. These photographs have been the subject of much myth and controversy over the years. Interestingly, much of which was initially used to explain the Kirlian photography phenomena was put forth by the inventor himself, along with his wife.
The process of taking a Kirlian photo is a relatively simple one and does not even require the use of a camera. First, a sheet of photographic film is placed on top of a metal plate. Then, the object that is to be photographed is placed on top of the film. To create the initial exposure, a high voltage current is applied to the metal plate. The electrical coronal discharge between the object and the metal plate is captured on the film. The Kirlian photograph, which shows a light, glowing silhouette around the photographed object, becomes visible as a result of developing the film.
Although the Kirlians invented this photographic process in 1939, they didn’t publicly release information about their experiments until 1958. Then, Kirlian photography didn't become a well-known phenomenon to the general public until 1970.

Discovery Of Kirlian Photography

The way Kirlian photography was discovered is fascinating. Semyon Davidovitch Kirlian was famous as a rather skilful electrician, and he was regularly called upon to fix the lab equipment in various institutions. In 1939 he saw a demonstration of a high-frequency electrotherapy device, and he noticed that there was a small flash of light between the machine's electrodes and the patient's skin.


He was curious about this small flash of light, and he wanted to photograph it. He started to experiment with similar equipment at home, but he replaced glass electrodes with metal substitutes so that he could take photographs in visible light. Even though this was a dangerous procedure and he burned himself a few times, he was able to get unusual pictures of an energy discharge around his hand.

Development Of Kirlian Photography

Over the next ten years, Semyon and his wife developed a machine for Kirlian photography. This machine was using a high-frequency oscillator or spark generator that operated at roughly 75 kHz.
This machine became popular among professional scientists at the time because Kirlian claimed that the images produced by this machine captured the aura of living entities. Semyon and his wife made many photographs of the leaves of various plants via this process. They believed that Kirlian photography could detect plant diseases that weren’t otherwise detectable. This claim also led to unsupported assertions that Kirlian photography could provide an insight into a person's physical health.
By the early 1960s, Kirlian photography had attracted widespread recognition – everyone was reading about it in newspapers and magazines. The Kirlians were even awarded a pension and given a well-equipped laboratory. In 1961, the first scientific paper on Kirlian photography was published, and many institutions around the Soviet Union wanted to collaborate with Semyon Davidovitch Kirlian. The popularity of his invention was unstoppable – an educational film about Kirlian photography was shown in American elementary schools in 1964.

Kirlian Photography Setup

If you’re wondering how to make your own Kirlian photography setup, we’ll explain the process in detail so that you can experiment with it on your own.
This type of setup consists of a few components that you can buy separately and put together. You don’t have to believe in any parapsychological claims about Kirlian photography to enjoy experimenting. You can experiment with this genuinely unusual photographic technique regardless of your beliefs related to chakras, auras, and similar terms not recognized by official science.
This is the list of things you will need to purchase to make your own Kirlian setup:
  • Plasma photo plate
  • High voltage insulators such as plastic cups
  • A syringe for the electrode plate
  • Electric conductive solution (salt and water solution)
  • High voltage spark coil
  • Power pulse modulator
  • The object you will photograph (for instance a leaf)
  • Piece of wire
  • Tape
You should use transparent electrodes because the electric field around the subject will become visible to the naked eye and quite easy to photograph.

DIY Kirlian Photo Project

Once you have managed to build your own Kirlian setup (it shouldn’t be too hard), you should test if it works. If you have followed all the steps in the video tutorial (listed below), you’ll be able to get your first Kirlian photograph!

1. Prepare The Photo Plate

You need to fill the electrode or plasma photo plate with an electrically conductive solution. This solution is a simple mix of salt and tap water.

2. Place The Subject (Leaf) On The Plate

You should make sure that the plate is dry and clean – if it’s dirty, it will affect the clarity of your image. However, the moisture of your subject is an essential factor – the higher the moisture content, the more vibrant the final image.

3. Connect The Subject To The Electrode Plate

It’s best to do this with transparent tape.

4. Make Sure To Ground The Connection

You need to attach a piece of wire to your subject with transparent tape and connect the other end of the wire to ground.

5. Put The Entire Setup On Plastic Cups

You should place the plate on insulators – plastic cups are great because they are cheap and you can’t break them.

6. Connect The High-Voltage Coil

Now you’re ready to connect a high-voltage coil directly to the electrode.

7. Turn the Power On & Lights Off

You should turn off the lights and turn on the power. Also, make sure to keep the electric current flowing for several seconds at the time.

8. Finally, Take The Photo

Once everything is ready, you can finally use your camera. Ideally, you should use a lens with a large maximum aperture so that you can take great photographs in the dark. You can experiment with shutter speed to discover the best settings for your Kirlian photography. The exposure can be anything between 10 and 30 seconds – feel free to try various combinations!

The Great Myth Of Kirlian Photography

The Kirlians themselves suggested the first mythical explanations put forth about Kirlian photography. They concluded that these photographs were depicting the actual life-force or “aura” that many people believe surrounds all living things. New Age spiritualists attribute significant importance to the aura. They believe that specially trained aura-readers can provide essential insights into a person’s spiritual, emotional and physical state. The Kirlians were convinced that these photos could accurately predict emotional and physical states and could be used to diagnose illnesses.
Energy practitioners quickly adopted the assertion that Kirlian photographs could depict emotional and physical states. The use of Kirlian photography has mostly fallen by the wayside as a diagnostic tool. However, there are still alternative practitioners who believe it is an accurate way to heal all kinds of conditions, emotional and physical.
Kirlian photography has been a staple of paranormal research for some time as well. In the 1960s and 1970s, paranormal researchers connected it to many types of unexplained phenomena, one of which was telepathy. Researchers proposed that telepathy was the result of people's auras communicating together.
The American parapsychologist, Thelma Moss, popularized Kirlian photography as a diagnostic tool. It featured prominently in with her books The Body Electric (1979) and The Probability of the Impossible (1983). Similarly to Semyon and his wife, Thelma was convinced that the Kirlian process was the result of the “bioenergy” of the human body.

The Science Of Kirlian Photography

So is there a scientific explanation for the aura? It can be hard to separate fact versus fiction with Kirlian photography. You should understand that these shiny auras present around non-living objects as well as living objects. So thinking of them as a “life-force” is contradictory. If the glowing images that Kirlian photography produces aren’t something spiritual, paranormal, or a “life-energy” then what are they? There is an explanation. 
The answer is water.
The high-voltage frequency applied to the metal plate rips the electrons off atoms. The air around the photographed object becomes ionized. If that air contains any water, the resulting image will show a glowing silhouette around the object, which scientists call a “corona plasma discharge”.
Kirlian photographs taken of sweaty hands show a more substantial, more intense glow. A more vibrant aura is due to increased moisture. Conversely, cold, dry hands will produce an image which shows a weaker glow. Proponents of Kirlian photography still argue that a person whose hands showed a brighter glow is a natural healer; when, in fact, they are just sweaty.
Factors which can influence the final image include humidity, the pressure and angle of your hand touching the metal plate, as well as the amount of voltage. Kirlian photographs taken of the same person can be very different taken only minutes apart due to these variables.
A very well-known Kirlian photography experiment documents a leaf as it slowly dies. The initial photograph was taken when the leaf was freshly cut, and it showed a prominent glow. As the leaf got older, more photos were taken, which showed the glow weakening. This outcome was used to explain the life-force theory. However, what the weakening of the glow shows is simply the result of the leaf losing water and drying up over time.
In another experiment, which was used to support the “life-force” theory, a leaf was photographed showing a strong aura. Then, part of the leaf was torn away. Surprisingly, a ghostly glowing trace of the missing piece of the leaf showed up on the film. For years this result was considered more proof of the existence of a “life-force”. In reality, it was merely a result of some moisture residue left on the glass. If the residue is completely removed before photographing the leaf again, the phantom glow does not appear.
One final scientific observation to point out is that the Kirlian effect doesn’t happen in a vacuum since there is no water vapour, which prevents ionization.

Aura Photography & Instagram

If you have a fascination for aura photography, you can still get your fill. Even though Kirlian photography isn’t as popular as it used to be in the 70s and 80s, nowadays you can find ’’aura photography’’ on Instagram. The New Age has been reimagined and repackaged for the Instagram age.
For instance, The Aura Dome claims to be an interactive photographic exploration of energy and colour. Interestingly, the Aura Dome camera uses a discontinued Fuji film, which makes the photos even more alluring, especially to those who are interested in vintage cameras. The Aura Dome founders offer their services in pop-up form at various events and festivals, such as Lollapalooza.
If you’d like to see more aura photography on Instagram, check out the following profiles:
There’s also a website, AuraPhoto, that sells a product line related to aura imaging, such as digital aura cameras and aura imaging machines. They also offer aura colour interpretations.

Kirlian Device Mobile

Another interesting device related to Kirlian photography is called Kirlian Device Mobile. This one isn’t associated with any New Age practices – in fact, it’s pretty straightforward when it comes to its function.  

Share this article.

Monday, September 2, 2019


       If you're visiting this blog and you live in America, we hope you're enjoying your holiday!


Image result for labor day clipart free

6 Reasons Your Photos Might Be Lacking Sharpness

Capturing sharp photos needn’t be difficult. Most amateur photographers who struggle to capture sharp photos make one of the common mistakes listed below. The good news is that with a little bit of practice and knowhow, you will be able to take sharp photos most of the time. At the very least, you should accept that you will make mistakes and have blurred photos from time to time when starting out. Instead of getting frustrated, try to analyze each blurred photo to understand why it might be lacking in sharpness. In the meantime here are 6 reasons your photos might be lacking sharpness.
Reasons-Your-Photos-Might-Be-Lacking-Sharpness

Reasons your photos might be lacking sharpness

1. Shutter speed too slow

Often this is the number one culprit for photos lacking sharpness. There are three potential mistakes when it comes to shutter speed. The first is simply the question of are you using a fast enough shutter speed for what you are photographing? For example, a cheetah running will need a much faster shutter speed to freeze the action. Whereas, a statue doesn’t. So the first thing you should do is understand what shutter speed you need for the subject you are shooting. As an example, you might be able to get away with something like 1/60th sec when taking a portrait. But for someone running, you will need a shutter speed of something like 1/200th sec.
The second issue is around the lens you are using. As a general rule, your shutter speed should at the least be the same as your lens focal length. So for example, if you are shooting with a 200mm lens, your shutter speed should be at least 1/200th sec. However, there is a slight caveat to this rule. Image stabilization in modern lenses is very good. It can allow you to shoot below the minimum required. But, to be safe, stick to this rule.
Lastly, how fast you need for your shutter speed also comes down to you. If you have steady hands, then you may be able to shoot sharp photos at a slower shutter speed than someone else. Test this out by photographing a scene at different shutter speeds to determine how slow you can go.
Image: Closer inspection of this photo reveals that there is a lack of sharpness.
Closer inspection of this photo reveals that there is a lack of sharpness.

2. Not using the correct aperture

Your aperture determines your depth of field. This also has a major impact on the sharpness of your photo. For example, if you are photographing a landscape scene with a shallow depth of field like f/2.8, then only a small part of your scene will be sharp. Depending on where you focused, only things along that distance will be sharp. So in this scenario, where you want more of your image to be sharp, you need to use a smaller aperture (i.e., higher f/number).
For something like landscape photography, you need to use an aperture of f/8 or smaller.
Reasons-Your-Photos-Might-Be-Lacking-Sharpness

3. ISO is too high

Even though modern-day DSLRs have hugely improved in the amount of noise that appears in photos at high ISOs, unfortunately, it still does affect sharpness. If you set your ISO too high, your image will begin to look soft and as a result lack sharpness. Always remember only to raise your ISO as high as you need to.
Better still, if you can, use a tripod and keep your ISO low.
Image: This photo was taken at 6400 ISO. When zoomed in, as you can see the noise is making it feel...
This photo was taken at 6400 ISO. When zoomed in, as you can see the noise is making it
feel soft.


https://resources.digital-photography-school.com/ref/937/ 


4. Haven’t locked up mirror

A lot of amateur photographers may not be aware of this potential issue when using a tripod. Every time that you click the shutter button, the mirror inside the camera flips over to allow light to hit the sensor.
When you are using a fast shutter speed, this process doesn’t cause any problems. But when you are photographing using a long exposure where your shutter speed is very slow, when the mirror flips over, the vibrations can cause a lack of sharpness in your image. You can either use the function in your DSLR menu to “lock mirror” or shoot in live view mode for the same effect.
Image: An example of the lack of sharpness even when using a tripod when the mirror hasn’t bee...
An example of the lack of sharpness even when using a tripod when the mirror hasn’t
been locked.

5. Poor quality tripod

Just like anything else, there are good quality tripods and poor quality tripods. Of course, buying a better and more sturdy tripod might be expensive, but isn’t that a price worth paying for sharper photos?
A poor quality tripod will put your expensive equipment at risk because it may not be sturdy enough even to withstand a gust of wind. However, cheap material can also be prone to vibrations, which, in turn, can mean a lack of sharpness in your photos.
So don’t take the risk. Ideally, invest in a good quality carbon fiber tripod.
6 Reasons Your Photos Might Be Lacking Sharpness

6. Not using a remote or self-timer

Even the faintest of touches can cause camera shake when photographing at long exposures. This means that even when you press the shutter button to take a photo, you are causing movement. The only way to be sure that your photos will not suffer from camera shake is to use a remote release or the self-timer on the camera. This will ensure you will not have to touch the camera when you take the photo.
Reasons-Your-Photos-Might-Be-Lacking-Sharpness
By far the best way to ensure that your photos are sharp is to use a tripod. But whilst that is not always possible or convenient, by following the advice above you can still ensure that your photos will be sharp.
We hope these tips help you achieve sharper photos! Do you have any other tips to add to the reasons your photos might be lacking sharpness? Share with us in the comments!

Share this article.

How to Shoot a Self Portrait to Support your Brand Identity

Personal branding has become more and more important over the last few years. As photographers, we often carefully curate the image that we present to the world, even as amateurs. Our brand and image are usually closely linked to the kind of photographs we shoot.
Photographers will often carefully curate the look of their website. They’ll spend hours contemplating the images and text that they use to express their photographic hopes and dreams. They want their websites and online portfolios to give people an insight into their creative working process and the kind of photos that they intend to take.
How-to-Shoot-a-Self-Portrait-to-Support-your-Brand-Identity
I often start with natural light when shooting self-portraits. It’s how I prefer to shoot most
of the time!
And yet, I often look at the ‘about me’ page on a photographers website, portfolio page, or social media, and front and center is a photograph of them taken by someone else. The image on your “about me” page, or your portfolio profile picture, is a great piece of marketing real estate. You can use this space to express yourself and tell a story. So why let someone else take that photo?
So what’s the solution? Shoot a self portrait! Put your own work in that valuable space, and express yourself and your photographic style clearly and coherently – even on your “about me” page.

What is a brand identity?

Now more than ever, photographers are the face of their brand. Almost everywhere you go on the internet, you’ll have the option to upload an ‘avatar’ image that represents you in digital format. This avatar image is a space to tell the world something about you and your photography.
A brand identity is the way you present your work to the world. It’s the visual and textual elements that differentiate you from other people in the minds of your audience. Since photographers are usually the main (and often only) person in the creative process when it comes to image-making, they are often the embodiment of their brand.
Image: A single large beauty dish for this portrait reflects one of my usual lighting styles.
A single large beauty dish for this portrait reflects one of my usual lighting styles.
Generally, for a photographer, their brand identity will be heavily tied up with their style in which they usually work. A photographer who creates beautiful fine art portraits inspired by the Old Masters may have a brand identity that embodies timelessness, heritage, and classical values. On the other hand, someone creating cutting edge contemporary portraits may embody qualities such as innovation, diversity, and courage.
The key is to get your values into the images you’re shooting. You’ll probably find it happens naturally once you’ve been shooting a while and have developed a style. However, creating a self-portrait for your “about me” page and avatars is a good time to brainstorm what your work is about. The challenge is to see if you can capture these ideas in a single shot.

Got a fear of shooting self-portraits?

Self-portraits are hard. They’re hard technically, creatively, and emotionally. It’s no surprise really that photographers often shy away from self-portraiture. Portraits can be hard enough to get right when you’re shooting other people, let alone when you’re photographing yourself!
How-to-Shoot-a-Self-Portrait-to-Support-your-Brand-Identity
Experimental tricks like this shallow depth of field combined with fairy lights can add an artistic 
side to a self-portrait while covering up any perceived flaws in the way we look.
That aside, a self-portrait or two is also a great way to improve your skills, try new things, and make sure that the entirety of your personal branding works together coherently. You are likely to be your most patient subject, and if you set aside a day to create your self-portrait then you have time to get it exactly right – even if you’re trying something new.
Go light on the retouching. When you’re working on a self-portrait in post-processing, it’s easy to be super-critical of everything you don’t like about yourself. Stick to your usual workflow and only retouch as much as you normally would.


https://resources.digital-photography-school.com/ref/937/


Start simple

If all else fails, start like you would any other portrait. If you’d usually start with a simple two-light headshot in your studio, then give that a go first. Review your images and then make adjustments. Once you’ve found a shot that works then try something a bit different. You might find a completely new direction for your work!
Image: This self-portrait was shot with natural light against a grey paper background. Often simple...
This self-portrait was shot with natural light against a grey paper background. Often simple 
pictures can be really effective!
It’s easy to think about self-portraits in the context of a studio, but don’t limit yourself! Take your camera outside into natural light if that’s a place you enjoy taking portraits usually. You can even buy stands to hold reflectors so that you can take advantage of all the usual light modifiers that you’d use.
But if you’re going out on location to shoot self-portraits, consider taking someone with you. It’s easy to get distracted while shooting self-portraits out and about. Having an extra pair of eyes can help protect you and your equipment. You can also get your assistant to hold the reflector or a flashgun too!
And if you want to really show off what you do, consider an environmental portrait in your own studio and surrounded by your tools of the photographic trade.

Think about the context

Where is your self-portrait going to be placed? Will it be on your own website or will it be on social media?
In traditional media, you usually want to have the subject facing the viewer or looking towards the center of the book or magazine. There’s a reason for this. It helps direct the readers focus back to the content rather than off the edge of the page into the wider world. It’s a simple trick to help keep the readers’ attention where you want it.
Image: The “about me” page on my portfolio website showing my self-portrait in relation...
The “about me” page on my portfolio website showing my self-portrait in relation to the
text block.
You can apply this to your website too. Think about the placement of your self-portrait on the page of your website. Does it fit better on the left or the right of the “about me” text? When you’re working out your poses, keep this in mind and make sure you’re either looking straight ahead or towards the text block.
It’s possible to break the rules, of course, but make sure you shoot both options if you’re going to be adventurous!

What about the practicalities of self-portraits?

If your camera connects to a phone app that can assist with exposure and focusing, then make sure you take full advantage of that. Self-portraits used to be a lengthy process that involved sitting my mannequin on a chair in my studio to get the focus and lighting right.
Now I can see everything in real-time, including exposure and focus adjustments, using the Fujifilm Cam Remote app that connects to my camera.
Image: Using the Fujifilm Cam Remote app to set up the lighting and exposure, and the resulting self...
Using the Fujifilm Cam Remote app to set up the lighting and exposure, and the resulting
self-portrait a few minutes later. (Lighting was a single large beauty dish).
If you don’t have a camera that connects to your phone, get yourself a remote trigger and consider shooting tethered to a laptop so that you can see the images as you trigger the camera. You can look at software such as Lightroom or Capture One Pro for tethering. That way you can make small adjustments to your pose and settings as you go along to make sure that you really nail everything and create your best work.
Using a good tripod will also save you some frustration when you’re shooting portraits. Balancing the camera on a stack of books can work (believe me, I’ve done it before), but a tripod will help you compose a shot more effectively. Don’t forget to try unusual compositions too. Raising the camera up above your eye level can be very flattering while shooting from down low can create a powerful pose.
How-to-Shoot-a-Self-Portrait-to-Support-your-Brand-Identity
A profile self-portrait recalls the kinds of images that you often see historically on coins and 
medals. Don’t be afraid to experiment with unconventional poses when photographing
yourself.

Keep your standards high

And lastly, be as thorough and rigorous with your standards as you would when shooting a portrait of anyone else.
Make the effort to do your hair, press your clothes, and get a great expression. Just because it’s a self-portrait it doesn’t mean it’s an excuse to be lazy and “fix it in post.”
I’d love to see how you get on with shooting your self-portrait to support your brand and expressing your values through them. Drop a comment below with the results, and don’t forget to update your avatar with your new portrait!

Share this article.