Monday, October 22, 2018

When and how to Photograph

1. “When in doubt, click.”


Seoul, 2009
Seoul, 2009

One of the biggest regrets I often have in my photography is not clicking the shutter.
For example, I might see a good scene, but I might hesitate. I let fear get the best of me.
For example, I get worried if the subject might get angry at me. I get worried if the photo I am taking is a “cliche” photo. I worry about my technical settings, focusing, and the light.
However my suggestion is whenever your heart tells you, “Take that photograph!” — listen to that voice.
Don’t let your brain and rational mind dictate your shooting style. Let your gut, intuition, and emotions control your shooting process.

2. Be selective about what you decide to photograph; but once you find something good, shoot the heck out of it

1-la-sweat-contact
One of the biggest lessons I wish I knew if I started photography all over again is this — to be more selective about the scenes that I find interesting. But once I find a scene that is interesting, take as many photos of that scene as humanly possible.
For example, when I started photography, I took 1–2 photos of everything I saw in a day (around 300 photos). However often none of these photos were interesting.
However I recommend doing the opposite — only look for 1–2 interesting situations or scenes or “photo opportunities” in a day. Once you find that situation, then take 300 photos of each of those scenes/situations.
Why is this a better tactic?
In photography, it is rare that we find a good scene which makes us excited, and our hearts beat. Once that moment is gone, it is gone forever.
So once you find that scene that really speaks to your heart, “work the scene” and take as many photos of the scene as possible. That can be 3 photos, 5 photos, 10 photos, 30 photos, 50 photos, or even 300 photos.
The difference between beginner photographers and master photographers is this — the beginner photographer is satisfied with “good enough.” The master photographer seeks perfection.

3. Big cameras are overrated


Downtown LA, 2015
Downtown LA, 2015

One of the big myths in photography is that the bigger your camera, the more “professional” you are, and the better photos you will take.
I take the opposite approach — I say that big cameras are overrated, and small cameras are underrated.
I am a huge fan of small and compact cameras, because the smaller your camera, the more likely you are to take it with you everywhere you go, and the more likely you are to make photos.
In my personal photography journey, I started off with a small Canon digital point-and-shoot camera. It fit in my front pocket, and was easy for me to take it with me everywhere I went.
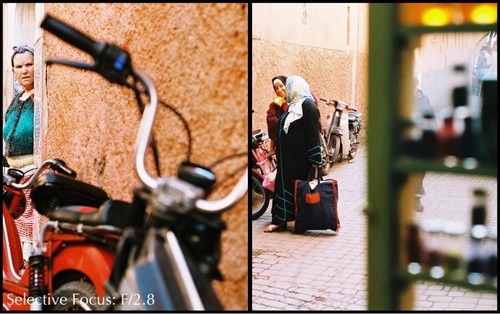
However as time went on, I wanted to make more “professional” photos that I saw online. I saw people shooting with photos with shallow depth-of-field (later figure out this was “bokeh”) and I was enamored. I invested all of my meager savings into buying a Canon 350D (Rebel XT), and soon got suckered into buying a “full-frame” camera (Canon 5D) or else I wouldn’t be taken as a “serious” photographer by others.
The problem was as I acquired more gear, the bigger my camera got (and the lighter my wallet got). And the bigger my camera became, the less likely I was to carry it with me everywhere I went.
I used to carry my point-and-shoot camera with me constantly in my front pocket, and and it brought me so much joy — because I was making photos constantly. Once my camera got too big, it started to collect dust on my shelf. I would never take it with me, because it was too much of a bother.
If anything, the ideal camera to shoot with is a smartphone. Why? It is small, invisible, and always with you. Sure the image quality isn’t as good as a high-end digital camera, but I feel the trade-off is worth it.
If anything, photographers focus too much on the quality of a photograph in terms of sharpness. They never focus on the quality of a photograph in terms of emotion and composition.
So when in doubt when buying a new camera remember: the smaller the better.

4. Don’t “take” photos, “make” photos


Paris, 2015
Paris, 2015

Probably the biggest breakthrough I made in my photography is when I learned the difference between America and Europe — Americans usually say “take” photos, while Europeans tend to say “make” photos.
What is the difference?
For me, “taking” a photo implies you are stealing something from someone. It sounds forceful, aggressive, and unfriendly.
Whereas “making” a photo implies you are collaborating with your subject, that you are making art, and you are doing something altruistic.
Even as a tip, whenever I approach strangers that I want to photograph, I will ask them, “Excuse me sir, do you mind if I made your photograph?” (instead of asking them to “take” their photograph).
Generally this question gets a lot better response. Why? Because it implies that I want to work with my subject to make something artful.
A small change in terminology can drastically change how you approach photography, creativity, and collaboration as a photographer.

5. Focus less on technical settings; focus more on composition and framing


Provincetown, 2015
Provincetown, 2015

One of the regrets I have in my photography is worrying too much about technical settings, trying to master “manual” mode, and trying to brag how all my photos were shot fully-manual.
I do believe that having some technical knowledge of photography is important— it can help you make the photos that you want to make.
However knowing technical settings for the sake of knowing it is a bit of a waste of time. Furthermore, if you can use an easier camera setting that creates the photos you desire, go for the easier route.
If you have an exhibition, nobody will care whether your photo was shot fully-manual or in a more automatic mode. What matters more than technical settings is emotion, soul, and creativity.

6. “Set it and forget it”


Santa Monica, 2009
Santa Monica, 2009

I’m a big fan of using “P” (program) mode in photography.
Why?
99% of the time when I am shooting in “P” mode, I get the photos I want.
To take it a step further, I try to simplify my technical settings as much as possible in my camera. For my ISO I set it relatively high (ISO 800–1600) which prevents me from getting blurry photos. As for autofocus, I just use the center point, which tends to be the quickest and most accurate.
While these aren’t the best settings for every situation, they work for 99% of the situations for me (especially when shooting street photography).
I think that the less you have to worry about your technical settings, the more mental energy you will have to focus on composition, framing, and capturing emotions in your photographs.
Furthermore, if your camera can make your life a little easier— why don’t you let it? Insisting on shooting fully-manual for the sake of it on your camera is like insisting only on sending handwritten letters (and never using email).
So once again, with technical settings— think of the classic American Rotisserie Chicken commercial: “Set it and forget it.”

7. What you subtract from a frame is more important than what you add to a frame


Tokyo, 2012
Tokyo, 2012

Having a good composition in photography is more about what you decide to subtractfrom the frame, rather than what you decide to add to the frame.
For example, many beginner photographers have the issue of making a photo that is too cluttered. Not only that, but they are generally too far away from their subject.
So instead of trying to add more information to your frame, seek to subtract distractions, noise, and superfluous elements.
If you are a beginner photographer, the best composition advice I can give is to start off with a simple background. Start off by looking for a white, grey, or neutral background if possible. Then add in your subject.
Furthermore, focus on framing by looking at the edges of your frame. If you have clean edges in the frame of your photograph, the less likely you are to have a poor composition. And the less likely you will need to crop a photograph.
So the next time you’re making a photograph, think to yourself: “Is this element in my frame adding or distracting to my image?” When in doubt, subtract from the frame.

8. The most important question to ask yourself in photography: “Why do I make photos?”


SF, 2016
SF, 2016

The common questions we are asked in photography include:
  • What camera do you shoot with?
  • What lens do you have?
  • What do you like to take photos of?
Very rarely do people ask us, “Why do you make photos?”
The why of photography is probably the most important question you will ask yourself.
To start off, ask yourself these questions:
  • Why did I first pick up a camera?
  • Why did I first start taking photos?
  • Why does photography bring me joy?
By answering these questions, you will better discover who you are as a photographer and human being.
One of the lessons I’ve also learned in photography is that the point of photography isn’t to become a great photographer. The point of photography is to enjoy your life.
Photography should be a tool which enriches your day-to-day life, and your living experiences. If photography becomes a chore or a burden to you, why do you make photos?
And once you figure out why you make photos, you will have a better insight in terms of what camera to shoot with, what to make photos of, and how to share your photos.

9. Buy books, not gear


Kyoto, 2015
Kyoto, 2015

I’ve spent thousands of dollars on camera equipment over the years. I regret about 90% of my purchases.
However I’ve also spent thousands of dollars of photography books over the years. I regret 0% of my purchases.
Any camera you buy today will be redundant or outdated in about 5–10 years.
Any photography book you buy today will probably still be relevant 5–10 years from now. If anything, many of your photography books (if you buy art books) will increasein value.
The mistake I made in photography is that I thought my photos weren’t good enough because my camera wasn’t expensive enough. I thought if I bought this new camera, this new lens, this new tripod, or whatever— I would suddenly become more “creative” and “inspired” in my photography.
The effect lasts a week, then you are back to square 1.
The only lasting effect to improve my photography was to invest in photography books — especially photography books from the masters of photography.
Think about it— a master photographer will probably spend his/her entire working life (30–50 years) to create a body of work. And that photographer will invest thousands of dollars to produce this book, market the book, and share it with others.
A photography book is a well-curated, well-considered, and well-edited collection of images. In today’s social media society, we are drowning in cat photos and selfies by sunsets. The more time we spend on social media, the more we are eating “visual junk food.”
You are what you eat. Therefore if you look at great photography (especially in the form of photography books), you will aspire to make great images. You will learn what makes a great photograph, what great composition is, and how to make a body of work that lasts through the years and decades.
Don’t get me wrong, I am still suckered by G.A.S. (Gear Acquisition Syndrome). I still have moments where I doubt myself, and think by investing in a new camera system I will suddenly make better photos.
But in those situations when I have an urge to buy a new camera, I will spend $50 on a book instead. And that urge will go away, and I will be inspired to make greater photos.
Never forget, #buybooksnotgear

10. Photography workshops are a better “bang-for-the-buck” experience than attending photography schools


Provincetown, 2015
Provincetown, 2015

I have never been to photography school, but I have many friends that did. While they had a great experience, many of them are $200,000+ in debt.
Was it worth it? I don’t think so.
Honestly, all of the information you need about photography can be easily learned on the internet and YouTube. And if you want feedback and direction in your photography, it is much better to attend photography workshops or hire a photography tutor.
I attended a photography workshop by the Magnum photographers Constantine Manos and David Alan Harvey — and had nearly a decade-worth of photography knowledge from both of them in a week. I regret not taking one of their workshops earlier on when I started photography. I would have saved tons of time, money, and effort.

11. Aim to make 1 good photo a month, and 1 great photo a year


Portugal, 2015
Portugal, 2015

One of the biggest challenges I had in my photography starting off was how easily disappointed I was. I had the wrong idea that every time I went out, I had to make a great photograph.
However upon studying the work of the master photographers, I discovered that they rarely got good shots. The only difference between us and the master photographers is that they are more selective in terms of which photos to share (and which photos notto share).
Upon studying many master and contemporary photographers, most of them only admit to making 1 good photo a month, and 1 great photograph a year.
And think about it— if you can make 1 good photo a month, that is 12 good photos in a year. 12 photos is good enough for a nice little coffee shop exhibition, or website gallery.
If you make 12 good photos in a year, then in 3–4 years you can easily put together a photography book of 36–48 good images. You can either self-publish your work, or approach a publisher.
If you make 1 great photograph a year (depending on how old you are), you can aspire to at least make 5–10 great photos before you die.
I feel that if a photographer is even remembered for 1 photograph, he/she has done their job as a photographer.
And think about the master photographers from the past— very few photographers are remembered for more than 1 memorable shot.
So set your expectations low, but work hard. This way you will never be disappointed in your photography.

12. More megapixels, more problems


Prague, 2015
Prague, 2015

This goes back to the G.A.S. (Gear Acquisition Syndrome) point. We think our photos aren’t good enough, and we need better cameras with more megapixels, better sensors, etc.
However what I’ve discovered in my photography is this — more megapixels, more problems.
When you upgrade your camera, you often need to upgrade your lenses (let’s say if you’re going from a crop-sensor to a full-frame sensor). Not only that, but you will probably need to upgrade your computer (to handle the bigger megapixels of the files). And not only that, but you will probably need more hard drives or invest in more storage to house all your files.
Also consider— beyond a certain point (let’s say 8 megapixels) you don’t need any more. Unless you are a commercial, studio, or fashion photographer and plan on printing your photos as big as billboards.
An 8-megapixel photo is good enough for a quite big print (12×18 inches, or even 20×30 inches). And to be honest— 99% of our photos are just going to be shown on our mobile devices and computers. How many megapixels do you need to see an image on a 5–6’’ screen?
So nowadays, whenever I see cameras with more megapixels, I feel leery. I like to stick to cameras with fewer megapixels whenever possible.
Fewer megapixels = less stress = more time and energy to enjoy photography.
By Eric Kim

Sunday, October 21, 2018

7 SIMPLE photography TIPS I wish I knew EARLIER

HOW I LEARNED PHOTOGRAPHY - Tips & Advice For Beginners

11 Tips for Beginner Photographers

Tips-Beginner-Photographerssubmitted by CSS from www.heretocreate.com
As a new photographer, these are some of the ideas that have helped get me going. Update: Also check out our Digital Photography Tips for Beginners Page.

1. Don’t go crazy buying the most expensive equipment right away.

It’s possible to get very nice photos with an inexpensive point and shoot. See these examples on Flickr. The more photos you take, the more you’ll know about what kind of camera to get when it’s time to upgrade.

2. Consider a tripod.

On the other hand, an inexpensive tripod is worth getting, especially if you have shaky hands like mine. When I got a tripod, my satisfaction with my shots skyrocketed. For even more stability, use your camera’s timer function with a tripod (read our introduction to tripods).

3. Keep your camera with you all the time.

Photo ops often come when you least expect it. If you can keep your equipment relatively simple – just a small camera bag and a tripod – you might be able to take advantage of some of those unexpected opportunities. Or, if your phone has a camera, use it to take “notes” on scenes you’d like to return to with your regular camera.

4. Make a list of shots you’d like to get.

For those times you can’t carry your camera around, keep a small notebook to jot down places you’d like to come back and photograph. Make sure to note any important details, like the lighting, so you can come back at the same time of day or when the weather’s right. If you don’t want to carry a notebook, send yourself an email using your cell phone with Jott.com.

5. Don’t overlook mundane subjects for photography.

You might not see anything interesting to photograph in your living room or your backyard, but try looking at familiar surroundings with fresh eyes. You might catch an interesting trick of the light or find some unexpected wildflowers in your yard. Often a simple subject makes the best shot.

6. Enjoy the learning process.

The best part of having a hobby like photography is never running out of things to learn. Inspiration is all around you. Look at everything with the eyes of a photographer and you’ll see opportunities you never noticed before.

7. Take advantage of free resources to learn.

Browse through Flickr or websites like the GIMP a try.

8. Experiment with your camera’s settings.

Your point and shoot may be more flexible and powerful than you know. Read the manual for help deciphering all those little symbols. As you explore, try shooting your subjects with multiple settings to learn what effects you like. When you’re looking at your photos on a computer, you can check the EXIF data (usually in the file’s properties) to recall the settings you used.

9. Learn the basic rules.

The amount of information about photography online can be overwhelming. Start with a few articles on composition. Be open to what more experienced photographers have to say about technique. You have to know the rules before you can break them.

10. Take photos regularly.

Try to photograph something every day. If you can’t do that, make sure you take time to practice regularly, so you don’t forget what you’ve learned. An excellent way to motivate yourself is by doing the weekly assignments in the DPS Forum.

11. Don’t be afraid to experiment.

If you’re using a digital camera, the cost of errors is free. Go crazy – you might end up with something you like. You’ll certainly learn a lot in the process.

http://app.autoaffiliatemachine.com/pro/pdf/PhotographyJobs1539496451.pdf


Saturday, October 20, 2018

Depth of Field for Beginners

Ahh depth of field… aka DOF. This term strikes fear into the hearts of young aspiring photographers everywhere, both film and digital. They know it deals with optics and math - two things that most creative people are not really into. My first instinct is to say that depth of field is not that complicated… but then again I had to take an optics class in college which made me want to stab my eyes out with metal darkroom tongs… and then pour stop bath in them. I believe this class had a very deceptive name, along the lines of “Principles of Photography” or something like that. It was, in fact, all math. Ewww.

But as usual I digress, so let us get back to the task at hand - which is understanding the glorious principles of depth of field and how they apply to your film photography. Let me just say right now that I am about to do a basic overview “for dummies” style, so please do not write to me claiming that I did not explain such and such complicated principle. You can grab a copy of Ansel Adams’ “The Camera” for that. Here we go:

In über-simple laymen’s terms, depth of field refers to the part of your photograph that is in focus. If all or most of your photograph is in focus, you have a deep depth of field (also called deep focus.) If only a part of your photograph is in focus, you have a shallow depth of field (also called shallow focus and selective focus.) And that’s what depth of field is. Seriously.

The tricky part is figuring out how your aperture relates to your depth of field, and your beloved (or hated) exposure triangle. What is an exposure triangle, you say? You best be reading my Exposure 101, I answer. Several factors affect depth of field, including your distance to your subject, the focal length of your lens, your selected aperture (f-stop) and the format you are shooting. This means that a photo taken with a 50mm lens at f/1.8 from the same distance will not have the same depth of field when taken with a 35mm camera and 4x5 field camera.

A general rule to guide you: the smaller the f/stop number (so the larger the opening), the shallower the depth of field. F/1.2 has a shallower depth of field than f/1.8, which has a shallower depth of field than f/2.8 and so on. F/5.6 and F/8 tend to give medium focus, depending on your distance from the subject (and the format you shoot, of course.) If this confuses you, have a look at What is aperture/f-stop?.
Side-by-side examples:
image
{Selective Focus: F/2.8 - This is pretty shallow, but not to the point where it creates a complete bokeh effect and the background is indistinguishable. Both of these were shot at F/2.8 with a 50mm lens in 35mm.}
image
{Deep Focus: F/16. -These two, on the other hand, have deep focus - meaning that the foreground and background are in focus. Both were shot at F/16, but the left image is medium format and the right is 35mm.}
image
{Shallow and medium side-by-side: The background in the left shot is completely blurry with zero detail. It was shot at f/1.8, approximately 12 feet from the subject with an 80mm portrait lens on 35mm film. The right shot has a blurry background, but you can still tell what it is. It was shot at f/8, approximately three feet from the subject with a 50mm lens on medium format film.}

F/32 is most commonly the highest number on lenses that don’t cost a bajillion dollars, but you can definitely come across field cameras with an f/64. In fact, in the early 1930s, a bunch of photographers (including Ansel Adams) got together to form Group F/64. Their principal belief was that photographs should be  perfectly exposed, profoundly sharp and completely in focus (in contrast to the Pictorialist era, for the History of Photo buffs.) An aperture of f/64 was the best way to achieve this, as far as they were concerned.

Some of you may be saying, “Hey, but f/32 really doesn’t let a lot of light in….” No, it doesn’t. This is where mastering your exposure knowledge truly helps you create the photograph you want. If you absolutely have to shoot 100 ISO and need a very deep DOF, you’ll have to lower your shutter speed. If you want to use a specific shutter speed at f/32, you’ll have to pick a film with a high enough ISO.  For those who shoot digital, this doesn’t prove as much of a constraint, considering you can change the ISO. For my beloved kittens who shoot film, your ISO is your ISO and you can’t change it. Even if you decide to push or pull to fit the situation, you still have to shoot at that ISO for the entire roll. For more on that, please check out  What is ISO? in the Beginner’s Guide to Film Photography.
All of this information can seem confusing, but your lens actually tells you the depth of field if you really look at it:
image
See how it’s on F/2.8? And there’s a little white diamond on the middle ring? And more numbers on the third ring? Voila your DOF indicators. We can understand that the manufacturer says that this lens at F/2.8 has a DOF range of 1.5 to 2 meters, or 5 to 7 feet. Meaning that anything in between that range will be in focus. The manufacterer is most often, but not always, right. (Side Note: Mastery of using these numbers to focus without looking is known as “Zone Focusing” in fancy photographer talk.)
Many SLR film cameras have a depth of field preview button; it’s usually located on the front near the button to release the lens or the self-timer. When you hold the depth of field preview button and look through the viewfinder, you’ll notice it is significantly darker but accurately displays your complete depth of field. For a great explanation of this button, check out Ken Rockwell’s The Depth of Field Preview Button.
Let’s sum up the major points:
  • Depth of field refers to the areas of the photograph in focus.
  • Small f-stop numbers produce shallow depth of field, or selective focus. This is when the background is blurry. Great for portraits.
  • Medium f-stop numbers produce a medium depth of field, still with selective focus, but with significantly more definition in the out-of-focus areas. Good for portraits and specific landscapes. 
  • Large f-stop numbers produce a deep depth of field, meaning the foreground and background are in focus. Ideal for landscapes.
If you want to get more in depth on depth of field (sorry, couldn’t resist), I highly recommend Understanding Depth of Field in Photography from Cambridge in Color. They’ve got loads of fancy diagrams to confuse you ;)

                                                                                                                           istillshootfilm.org

Wednesday, October 17, 2018

Studio In A Small Space; Big Studio Effect Without The Cost


Much of my portrait and fashion photography is done on location, but living in a place like Colorado the models (and the photographer, too) just aren’t always in the mood to stomp around in the cold weather and snow. That’s when a studio comes in handy. Some photographers just prefer having complete control over the lighting. Instead of the hassle and cost of renting a studio, why not create one using a room you already have? The real secret, if there is any, of making portraits in limited spaces is having the right equipment with gear that doesn’t have to be expensive.


© 2008, Joe Farace, All Rights Reserved
© 2004, Joe Farace, All Rights Reserved
Space: A Final Frontier In Lighting, Too
The first thing you need for an in-home (or in-apartment) studio is space. You don’t need much, but more is always better than less. You can put a studio in a basement, if you have one, garage, spare bedroom, or just use the living room, as Mary and I did when we were getting started many years ago. Back then, we set up the lighting equipment and background for each shoot and then had to knock it down and pack it away afterward. That’s not the best way to shoot but it worked because in creating a studio from existing space you need to be both inventive and flexible. Some of the images accompanying this article were made in my basement using an 8x9-foot space sandwiched between my model train layout at (what would be) camera right and an old sofa on the left. In the illustration showing my original setup (top, left), you’ll even see a water drainpipe on the left edge of the frame.

No matter where and what kind of space you use, some compromises are inevitable. Using the basement the way I do now means the gear can remain set up from shoot to shoot, saving time, but it also means I have to deal with low ceilings. Shooting in the garage (photo top, right), which I’ve also done, offers high ceilings, providing more flexibility in lighting setups, especially the ability to use booms and hairlights, but that is not a viable option for me because of the local weather in the winter. In more temperate climates, this could be an ideal solution, if your cars don’t mind being put outside. (You can see some of my garage shots in “Quantum’s Leap,” December 2004 issue of Shutterbug or online at: www.shutterbug.com.)

Another ceiling-related issue is its color. In my basement studio, I have joists and subfloor above the subject that creates a light trap, avoiding reflecting any unwanted light falling on the subjects. Some photographers who have finished drywall ceilings in their studios paint them black to avoid reflections, but that may not be a permanent solution if you occasionally have to convert that space back for living. In that case, you might consider using Westcott’s (www.fjwestcott.com) Scrim Jim (see the “What’s a Scrim Jim?” sidebar) covered in Black Block fabric and strategically placed to avoid unwanted reflections that would ordinarily be caused by a light-colored ceiling.

This year, I decided that I wanted to shoot full-length shots and the answer was to clean up some of the junk on the opposite side of my basement from my original studio and pose the models in the space where I used to stand. This produced a clear space of 10x10 ft. Not a huge increase in space but bigger than my first try and one that will have to work for a long, long time. I am using that space to test lighting products for Shutterbug as well as shooting glamour photographs for my 2010 book on the subject from Amherst Media. Full-length poses require wider-angle lenses than I might prefer or would have used outdoors, but when working in smaller spaces, as I said, compromises are required.

Tip: Making wider-angle lenses work requires more close attention to camera height and sometimes I find sitting in a chair to photograph the model works best. You can use whatever contortionist trick works for you as long as you are not shooting down on your subject with a wider-angle lens. If you do, it will create unflattering foreshortened and distorted portraits with disproportionate head sizes.

Putting It All Together
Here’s a list of all of the gear I’m currently using for portrait sessions in my 10x10-foot basement studio:
Lighting
In my basic setup, lighting is provided by three monolights. The main light is a Flashpoint II 620A (www.adorama.com) monolight that produces 300 ws output. It has continuously variable power that lets me tweak exposure by adjusting the flash power instead of my camera’s aperture so I can control depth of field. Fill light is another Flashpoint II 620A that produces 150 ws that also features stepless power output control from Full down to 1⁄8 power. A Flashpoint II 320A monolight is used as a hair or background light. If you’re just getting started, Flashpoint offers a lighting kit that includes a 320A monolight, umbrella, and stand for only $129.95.
Light Modifiers
Umbrellas and light banks can have a big effect on the quality of the light produced in your temporary studio. For the later portrait sessions shown in my 10x10 studio, my main light was fitted with a Plume Ltd. (www.plumeltd.com) Wafer light bank whose slim profile makes it practical for use in small spaces and on location, yet produces amazing light quality in a compact package. Plume does not make a speed ring to attach the Wafer to the Adorama monolights, but does for many other brands. The one I use was custom made by sawing off the mount of a Flashpoint II’s reflector and adapting a Photogenic speed ring. I use a 45” Westcott Optical White Satin Umbrella for fill and an inexpensive Flashpoint II Snoot ($39.95) on the hairlight.
Light Stands
One old studio rule of thumb is that you can never have too many light stands. Most of the heavy lifting in my 10x10 basement studio is done with two Flashpoint Heavy Duty Pro 10-foot ($54.95) and two Flashpoint Heavy Duty Pro 9-foot Air Cushioned light stands ($49.95). I have probably another half-dozen stands that I use to hold reflectors and scrims but the Flashpoint stands are my workhorses because of their rugged construction—even though I can rarely extend any of these stands to their full height because of the low basement ceiling.
Backgrounds And Stands
I use Adorama’s affordable Belle Drape backdrops. For a background stand that perfectly complements Belle Drape muslins, JTL’s (www.jtlcorp.com) $139.95 B-1012 stand is perfect. It expands to 12.6 ft wide using the four extension poles provided. For the 70” wide scenic background shown in the setup photograph, only two of the support sections were required. When I set up a 10x12 or 10x24 Belle Drape, I use three or four sections.
Digital Darkroom To The Rescue
Many problems of shooting full-length poses in my basement studio were partially solved when I cleaned and flipped my basement studio space, but not all of them. While muslin backgrounds can be softly shaped to fit the available space, seamless paper backdrops firmly resist such treatment, so while a 53” paper background fits my space, the 107” version won’t. I could shoot on the narrow background but the images would have to be rescued later in the digital darkroom. So, here’s what I did:

Step 1: I photographed Haley standing in front of a Savage Soft Gray seamless paper background using three of Adorama’s Flashpoint II monolights. Because of her full-length pose and the narrow 53” seamless paper, I was unable to capture a full background in the same frame as the model.


1
Photos © 2008, Joe Farace, All Rights Reserved

Read more at https://www.shutterbug.com/content/studio-small-space-big-studio-effect-without-cost#iyCG5XuJHbPi1igs.99