Monday, August 4, 2014

Best Focal Length for Portraits

One of the most important things to consider when shooting portraits is selecting a lens with an appropriate focal length. Changing the focal length can have a dramatic impact on the look and feel of an image, so we’ll sort through some of the nuances in this article to help you decide which lens will work best for your situation.

Wide to Normal Focal Lengths (10-25mm)

Wide lenses are typically a bad choice for shooting portraits. They allow you to get close to your subject when space is limited,  but they will distort your image, stretching out your model’s features.
This photo was taken with a 24mm lens at f5.6 on a full frame Canon 5D Mark III. The wide angle makes the model’s features appear wider than they actually are which is usually not flattering. Wide angle lenses should only be used for portraits when your space demands it unless you are trying to intentionally produce a distorted effect for artistic purposes.
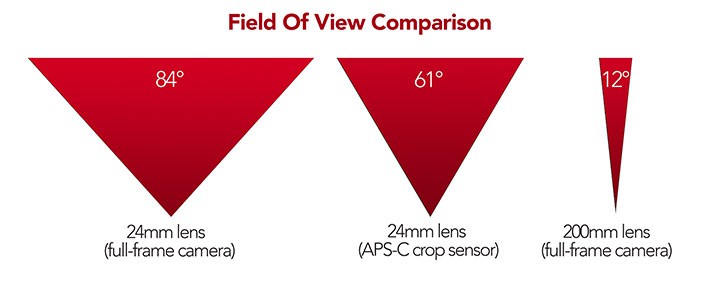
Wide angle lenses can also diminish the potential for pleasing background bokeh because of the ample amount of depth of field they provide. Even though this photo was taken at a relatively fast aperture of f5.6, the trees in the distance are easily distinguishable. While this doesn’t pose a problem here, it would if we did not have an attractive backdrop to work with. The wide angle of view also requires that your background be quite large relative to your subject. At 24mm on a full frame camera, our field of view is rather wide at 84° (note: your field of view will be reduced to 61° if shooting with a cropped APS-C sensor.) The angle of view describes a lenses viewing capacity, while the field of view describes the maximum viewing angle of your complete camera set-up.
angle-of-view
Throughout this article, keep an eye on how the background and foreground change in each photo as the focal length increases. All camera settings were the same in each shot, as was the exact position of the model in the field.
24mm lens at f5.6 on a full frame Canon 5D Mark III

Short to Medium Telephoto Lenses (40-135mm)

Shooting within the short to medium telephoto range is probably the most common choice among portrait photographers. This focal range allows you to step back from your subject giving them the space they need to loosen up and feel more comfortable in front of the camera.
This photo was taken at 135mm with all other settings remaining the same as in the first example. The model is laying in the same spot as before yet the composition has changed dramatically.
Using a longer focal length required that I take a few steps back which brought more foreground into the shot. And, while the aperture is the same, we’ve achieved a much shallower depth of field. The birch trees are now framing her nicely, and the tree line in the distance has softened, making the model pop out of the scene more. This blurred effect can be particularly useful when trying to mask any unsightly elements in the background.
The other obvious improvement here is the compressed features of the model. While the wide angle lens stretched the subject’s face, a telephoto lens will appear to compress the subjects features because it has a narrower angle of view. The narrow angle of view is also responsible for making the trees appear closer to the subject.
Note: Not everyone will want to achieve the compressed effect of a telephoto lens. A documentarian for instance may prefer to shoot with a 35mm or 50mm prime lens to give a more realistic depiction of their subject, whereas a fashion photographer will generally opt for the flattering effects that compression has on a model. 
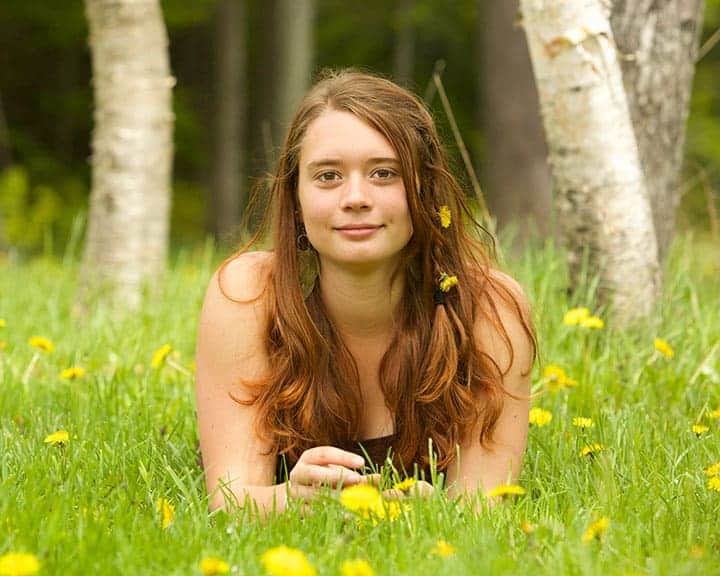
135mm lens at f5.6 on a full frame Canon 5D Mark III

Long Telephoto Lenses (135mm-300mm)

When circumstances allow, long telephoto lenses are great for shooting portraits. They require a lot of distance between you and the subject, which can be problematic in the studio but often beneficial in an outdoor setting.
In this situation the model is a comfortable fifteen feet from the camera. The camera settings are the same and the model still hasn’t moved from her spot in the grass, yet the shot has a completely different look at 200mm. On a full frame camera, a 200mm lens will reduce the angle of view down to about 12.3°. This can offer several advantages when shooting portraits.
One obvious benefit of a narrower angle of view is that its much easier to find a pleasing backdrop for your shot. Notice how much more background is exposed in the first photo—the 24mm shot—versus the portrait taken at 200mm. When taking a headshot with a 200mm lens you’ll only require a couple feet of pleasing background, meaning that you can get great shots just about anywhere.
Once again we can see the flattering effect of increased compression which is even more pronounced at 200mm. While you could reduce the distortion effect of your wide angle lens by stepping back from your subject a bit and cropping the photo in post, zooming in before the shot will spare your pixels. You will also achieve a shallower depth of field with the telephoto lens, creating a pleasing effect to both the foreground and the background. I like to incorporate a blurred foreground in portraits to create an added sense of depth. I was able to do so in this photo by laying in the grass, exposing the dandelions between the camera and subject. Another way to achieve this, is by shooting down a fence line or wall, creating a gradient of sharpness. While the model is in sharp focus in each of these shots, the contrast of soft to sharp focus at longer focal lengths calls more attention to the subject. The surroundings transform to a soft periphery of color, and the focus stays on the model.
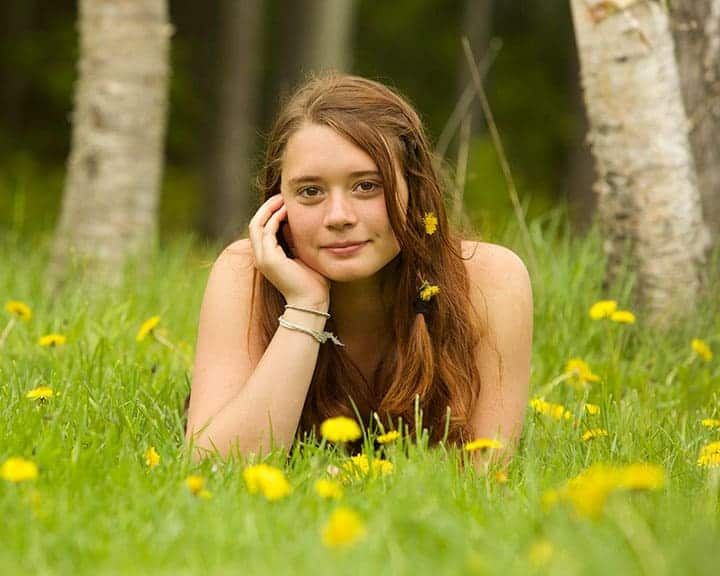
200mm lens at f5.6 Canon 5D Mark III

Which Lens To Choose?

There are many good options out there for portrait lenses. What’s most important when you select a lens is that you understand the effect that distortion, compression, angle of view, and depth of field have on your image. If you’re shooting in a tight space or in low light you may decide that a very fast 35mm or 50mm prime lens is the best choice for you. A more versatile option is a 24-70mm f2.8 zoom lens. This lens works well for shooting both groups and individuals. My personal favorite however is the 70-200mm f2.8 for its beautiful bokeh and pleasing compression, particularly when zoomed all the way in. Hopefully these tips and images will help you decide the best lens for your tastes and circumstances.

Chris Mazzarella

Film Photography by Jai Long

Jai Long is a 27 year-old Australian wedding photographer, based-in Melbourne. He loves shooting film and has been shooting on it for 2 years, also has still used film more than digital for his work. "I shoot a Canon EOS-3 and a Mamiya 645 Pro TL. My favourite films are Kodak Portra 400 and Fuji 400H. I also love Kodak TRI-X 400 and T-MAX 100." He says.

Jai loves travelling and has some shots with his friends and one of his newest travels was from Australia to the USA for 3 months ago. Some analogue photos of this journey that he would like to share with us were shot by a Mamiya 645 Pro TL.

undefined

undefined

undefined

undefined

undefined

undefined

undefined

undefined

undefined

undefined

See more of his work at his Website.

Sunday, August 3, 2014

The Cinematic Look – How To Make Your Photographs Look Like Films

The Cinematic Look – How To Make Your Photographs Look Like Films
I recently noticed that a handful of photographers were producing images that had a look as if they were stills captured from films. A couple of the most well known photographers of this genre are based here in New York so I got them together and challenged them to not only come up with a dynamic personal project on the fly incorporating this cinematic look, but to share with us how it is achieved. Read on to find out how it all went down...
The power of the Fstoppers community is IMMENSE. I wanted to try and utlize it to do two things for this article. First, see how a number of experts who produce the “cinematic” look do it, and share that learning for the community. The interesting thing about this look is you can apply this look to any image, from a street portrait to a landscape shot. The content is far less important than how the image is processed or “treated” (color correction and grading, much like film footage is processed before we see it in theater). 
Regardless of your love or hate for this look, I really enjoy the intersection between stills photography and motion, so this was something I found interesting to look and thought others might too.
Secondly, I wanted to use the power of the community to bring some photographers together for a unique project and challenge.
I came across the work of local New York City based cinematic shooters Dennis Cacho and Andrew Mohrer. If you have any doubt about the type of work I’m describing when I talk about cinematic style shooting, check out some of their work here:
Some of Andrew's shots:
Andrew, a Brooklyn native born and raised, and widely regarded cinematic shooter, explained how he got started with this look, “After wanting more and learning how to compose a better frame, I really got interested in the process of coloring my pictures and making these scenes look like frozen frames out of movies”.

For more info on Andrew, you can watch this short interview that was recently put up by Notion Boulevard:
Dennis, a native of the Bronx, also demonstrated a knack and eye for cinematic style shooting as can be seen in his shots here:
Andrew and Dennis both share a love of story telling. When I asked about their motivation to shoot this look, Dennis chimed in, “I loved seeing how much a single image could convey and tell a story that doesn't exist.  The thing that caught my attention with cinematic photography was the framing and the dramatic lighting in most of the images.”

So How Did It Work On The Day?

Dennis and Andrew both shot with similar cameras on the day, but in very different ways. Andrew shot mainly with a fixed Zeiss lens, manually focusing using his LCD. Dennis switched up lenses and shot much more traditionally, through hthe viewfinder. 
I was curious to see if I could build (even a some small way) something new in the photographic community. So our story began.
I set out with Andrew and Dennis and we spent a couple of hours walking together while they shot the streets. The challenge was to basically tell the story of the city, but interpreted through their own eyes and to see if we could tell a cohesive story with both sets of images.
This was a friendly challenge to them both to see how two photographers could work together, inspire each other and use their own vision and style to interpret the same scenes in different ways. While the results might not be fully cohesive, it was great to see them working together and inspiring one another.
Here are some shots of the guys on the day of the challenge:
Andrew (left) and Dennis (right) set off to capture the city
Zeiss manual focus with the LCD is Andrew's preferred style
Sam "The Tailor", a veritable Lower East Side institution. After posing for some street portraits, he promptly tried to invite us into his store to try on suits.
Helen was a character. She'd lived in the neighborhood for more than 50 years. She had a story or two!
Andrew shares his shots of Helen with her as Dennis steps in to shoot
Chinatown, where our challenge ended
As Dennis notes it’s way more than just picking an interesting subject. “It’s not just the person but the environment too.  You sometimes have to study a person’s movements for a while before you take a shot.  A good starting point is definitely knowing how to frame a shot”.
Andrew shared a similar view point. I asked him about the challenges of shooting like this. “Giving the viewer an interesting point of view is important as well. Composing an interesting shot can be difficult on the street. You hope your subjects fall in to place and sometimes they don't. It's out of your control but maybe that's part of the fun when it all comes together.
Some of Dennis’s shots from the day:
Sam poses while trying to sell us about 3 suits a piece.
Helen captured while talking about how the neighborhood used to be back in the day
And a few shots from Andrew:
Helen poses for Andrew
Andrew grabs portraits of Sam while he scans the street to see if there is anyone he might be able to sell a suit or three to
Did the guys tell a cohesive story? You can decide. Regardless of how successful or not this challenge was, it definitely brought three strangers together and allowed us to have fun and bond over photography for a few hours.

The Benefits To Client Work

Interestingly this look to his images had really helped both their client work too. Andrew explained:
“I have met some of my favorite photographers from around the world who have come to visit me in NYC. Got to be a part of ad campaigns for the gear I shoot with (Canon - Asia), (Carl Zeiss Lenses - Germany). Iv'e done commercial work for major hotels and businesses across NYC. Currently I'm working with Dj Premier on a video series called "Bars in the booth".
Dennis has also used this cinematic look in his client work:
“This style has helped me land a few paid gigs. I just was asked to do an engagement shoot which was different from most traditional engagement shoots.”

How To Achieve The Cinematic Look

I asked both Dennis and Andrew how they approached achieving this look. While they both agreed there is no one magic formula for every shot, as each shot has it’s nuances, there was a general approach.
Andrew explained his approach as follows:
I start in DPP (Digital Photo Professional) this is where I process the RAW file. I correct tones and I play with the curves then I import to Lightroom. When in Lightroom I do more coloring and correct the perspective and crop. Off to Photoshop where I do some final touches and polishing, that's where I add the letterbox.

Dennis prefers to use Lightroom for his color and grading work, then like Andrew, uses a few simple steps to apply the widescreen look and details his way of achieving his look through these steps, making global adjustments to the image:

Step 1 – Take the RAW image and import to Lightroom
Step 2 – Play with split toning to achieve the start of a color look (see example where the warmth adds to the feel of Fall)
Step 3 – Adjust color saturation and luminace to suit
Step 4 – Adjust blacks, color temperature, shadows and saturation
Step 5 – Add a slight vignette and grain, to make it more “film-like”, less digital and clean
Step 6 – Export out to PS. Click the padlock to Unlock (Option (Mac) or Alt (Windows) on the padlock.
Step 7 – Add a black solid layer underneath the background layer
Step 8 – Use the Marquee tool to choose a fixed ratio for width and height. Enter 16 for width and 9 for height to geneate a 16:9 widescreen image. Drag the marquee to cover the 16:9 crop area. The go to Image > Crop in the menu
Step 9– This time select a fixed ration of 2.35:1 for an anamorphic fee. Don’t crop – rather, add an Adjustment Layer and click the small "link" symbol between the image and the adjustment layer to Unlink them from one another
Step 10 – Back to Layers panel. Right click on mask and select Apply Layer Mask to apply the mask to the image
Step 11 – To align the image perfectly inside the black letterboxes, hit Cmd (Ctrl in Windows) and A to select the entire document, then right click on the Adjustment Layer and Apply Layer Mask to apply mask the image.
Step 12 -  Select the entire document, then Go to Layers menu and select Align Layers to Selection and then select Vertical Centers to align the layer vertically
More details and a full walk through for the cropping can be seen in this video courtesy of Brodie Butler:

Final Thoughts

Hopefully this article has been useful for you to see how you could apply another look to your images. I find it fascinating look to have still photographs look like they could have been taken from a film. As the worlds of ultra HD and cameras that can shoot at ever higher frame rates continue unabated, I’m sure we’ll be seeing more of this sort of look on other projects in the future.
This exercise was also testament to this website and the community. Whether you’re a reader or a writer, all of us have the power to connect with one another in new ways, I can highly recommend it, we had a great time and all made some new friends. If we all take some small step to reach out and bring other members of our community together, we’ll all be a lot better off for it.
Special Thanks to Both Andrew and Dennis. More of their work in the links below:
Andrew:

Dennis:
undefined
The camera maker we know as Leica, officially known as Leica Camera AG, is now 100% privately owned. The main shareholder, Lisa Germany Holding GmbH, announced earlier this week that it had successfully bought out the 2.44% of stock still in the hands of third-party shareholders, paying a set price of €30.18 (~$39) for each of the shares.
The stock will also be removed from the Frankfurt Stock Exchange as a part of this plan, a move designed to save the company time and money — the management will no longer need to worry about all the hassle that comes with being a publicly traded company.

We got a chance to chat with a department head at the company during Photokina 2012 last month. Here are some of the interesting things we gleaned from the conversation:
undefined
First off, Leica is doing well financially; the digital age has treated it well. After years of bleeding money in the 2000s, the company is now profitable. Its books have been in the black for two straight years now.
Sales of the company’s cameras have been strong, particularly in the M-series lineup, where much of the money is made.
For those of you who bemoan the fact that Leica charges so much for its M-series cameras and has committed to doing so for all eternity, just know that it’s for good reason. The prices are what they are simply because Leica spares no expense when it comes to materials and manufacturing. To lower the prices would be to lower the quality of the cameras — something that Leica has no plans of doing.
undefined
The company’s margins are actually absurdly low compared to certain other major players in the electronics industry. According to the department head, for a $8,000 camera, less than 30% of that figure is profit; the rest is cost.
Compare that to Apple’s new iPhone 5. Analysts have concluded that the phone costs Apple between $200 and $230 to manufacture. The company then turns around and sells the devices for between $650 to $850 (customers can pay less due to carriers chipping in with subsidies). We’re talking about ridiculous profit margins, which is why Apple is now the most valuable company that has ever existed.
If Leica tried to mimic Apple’s profit margins, M-series cameras would be priced like mid-level family sedans.
This latest move to become a 100% privately owned also reflects the cultural mindset of the company. Leica wants to do its thing — creating the highest quality cameras and an iconic brand — without having to worry about anyone or anything else.
When we asked about competitors, namely Fujifilm and its X-Series lineup, the response was simple: “We don’t care.”
undefined
Leica doesn’t care what its competitors are doing, because the company’s roadmap isn’t drawn on the competitive landscape. Even if Fujifilm ends up dominating the consumer market for relatively low-priced, full-frame, rangefinder-esque cameras, Leica won’t even bat an eyelash. It’ll happily continue making high-end gear carrying high-end price tags… because that’s the company’s DNA.
This can also be seen in the company’s marketing strategy. Look around on the web; you won’t find a single banner advertisement for a Leica camera. It’s just like what Edwin Land said about his strategy with Polaroid decades ago: “marketing is what you do if your product is no good.”
Instead of banner ads, Leica chooses to do things like partner with renowned photographers — Magnum photographers for example. The company teams up with the prestigious cooperative by providing its photographers with cameras and funding 5 photographic projects per year.
Magnum members can pitch their ideas, and if Leica thinks the images are worth making, it’ll cut the photographers checks to bring the photos into existence.
undefined
Despite what the brand’s wide recognition suggests, Leica is actually a pretty small company. Canon has hundreds of thousands of employees around the world. Leica has less than a thousand at its headquarters in Solms, Germany, and just hundreds more internationally. The vast majority of the employees at HQ work in production. The marketing team? 10 people.
Leica cameras are often praised for their design: classic, simple, clean, compact. The same can be said of the surprisingly small company behind them: this international brand is built upon its simple vision of quality.

A great way to get inspired is to listen to other people who are serious about photography talk about their work and things they’ve learned. Here’s a short video in which photographerDaniel Milnor talks about capturing stories through film photography. After getting into the “fast lane” by switching to digital, Milnor hit a wall and rediscovered his passion for photography by going back to shooting film with Leica rangefinders.