12 Cool 35mm Film Cameras to Buy
Whether
you're a professional photographer, camera buff, or just want to
capture special moments on film, traditional film cameras produce crisp
images and rich colors to last a lifetime. Unlike digital cameras, film
cameras won't require any computer upgrades or special software. Here's a
list of 12 cool 35mm film cameras to buy. Remember that this list isn't
exhaustive. There are plenty of other great cameras out there hungry
for film. This is simply a sampling of some cameras that may work best
for someone just getting into film.
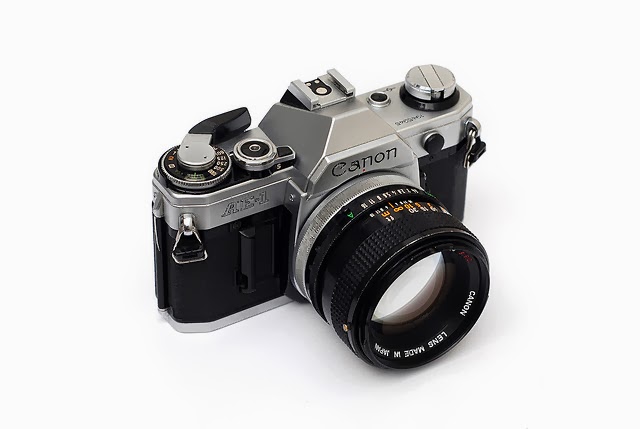
Canon AE-1
 |
| Photo by by Guillermo |
First
manufactured in Japan in 1976, the Canon AE-1 uses an electronically
controlled, electromagnet horizontal cloth focal plane shutter, with a
speed range of 2 to 1/1000 second plus Bulb and flash X-sync of 1/60th
second. Most of the camera bodies are black with chrome trim, but some
are all black.
After its introduction in 1976, the Canon AE-1
quickly became a very popular camera worldwide. Backed by a major
advertising campaign, the AE-1 sold over one million units, which made
it an unprecedented success in the SLR market. The AE-1 was replaced a
few years later by the AE-1 Program.
The AE-1 has a Canon FD
breech-lock lens mount and accepts any FD or New FD (FDn) lens. It is
not compatible with Canon's later Canon EF lens mount, though adapters
made by independent manufacturers can be found. Original FD lenses,
introduced in 1971, did not rotate in the mounting process; instead, a
locking ring at the base was turned to attach the lens. This was often
criticised as being slower than the bayonet mounts of competing cameras.
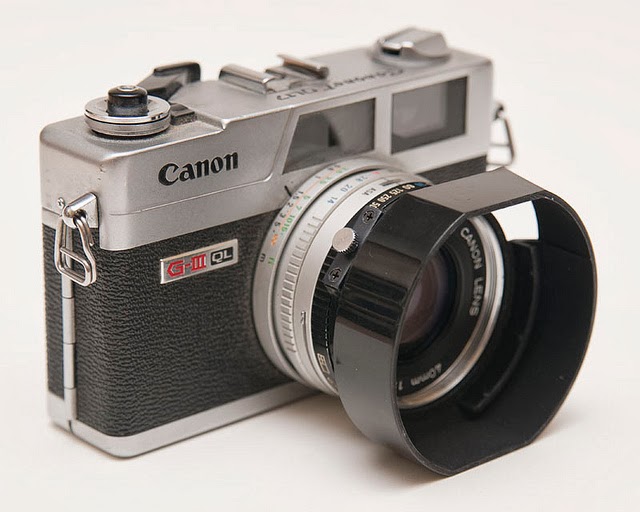
Canonet G-III QL17
 |
| Photo by Symon Chow |
The
Canonet G-III QL17 is a coupled-rangefinder, leaf-shuttered,
fixed-focal-length 35 mm camera first manufactured by Canon in 1972. It
features fully shutter-priority automatic exposure and fully manual
shooting modes.
The Canonet G-III is the third generation of
Canonet, following the original Canonet and the New Canonet. The Canon
website goes on to explain that the "G" stood for "grade up" in quality
improvement, and the "III" for the third of the Canonet series. The
G-III features a 40 mm f/1.7 with six elements in four groups. The
integrated lightmeter provides shutter priority and manual modes. The
sensor is located on the forward part of the lens, which allows use of
filters without manual compensation of exposure. The Canonet can use
standard flashes, or the Canonlite D which was custom-designed for the
Canonet.
The Canonet G-III is one of the nicest of the '70s
compact Rangefinder genre. It became a best-seller with over 1.2 million
sold from 1972 to 1982.
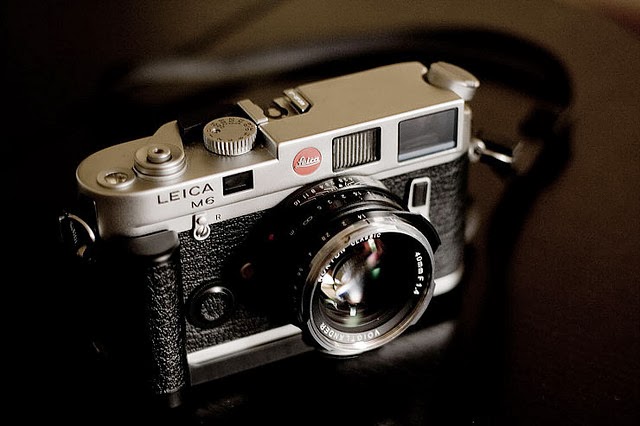
Leica M6
 |
| Photo by by Brian Bantog |
The
Leica M6 is a rangefinder camera manufactured by Leica from 1984 to
1998. It's a successful model of Leica's famous M-series of rangefinder
camera bodies for the Summicron lenses. Professional photographers
prefer these cameras especially for usage with wide-angle lenses.
The
M6 combines the silhouette of the Leica M3 with a modern,
off-the-shutter light meter with no moving parts and LED arrows in the
viewfinder. Informally referred to as the M6 "Classic" to distinguish it
from the "M6 TTL" models, and to indicate its "Classic" M3 dimensions.
The top and bottom plates were made from lighter, cheaper magnesium
alloy rather than the heavier machined brass of the M3. The M6 and M6
TTL are mechanical cameras; all functions save the light meter work
without batteries, unlike the succeeding M7, which needs electrical
power to operate properly.
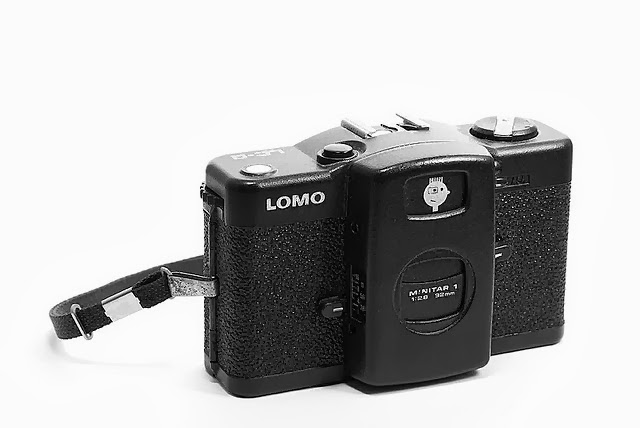
Lomo LC-A+
 |
| Photo by Amarit Opassetthakul |
If you love Lomo's colors or its style
"Don't think, Just shoot"
then this compact point and shoot camera is your best choice. In 2005,
production of the original Lomo LC-A was discontinued. Its replacement,
the LC-A+, was introduced in 2006 and production moved to China. Some of
the features include the Minitar 1 lens which gives it the shadowy
vignetted look and the options for multiple and extended exposure.
The
LC-A+ captures the hearts of Lomographers the world over with the same
look and feel as the original LC-A, but with a whole host of new
experimental features also thrown in. Whether you’re an analogue
newcomer or a seasoned Lomographer, the LOMO LC-A+ is a must-have in any
photographer’s arsenal.
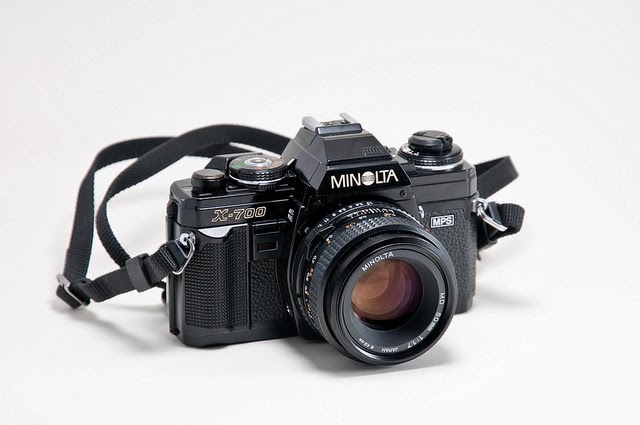
Minolta X-700
 |
| Photo by Daniel |
The
Minolta X-700 is a 35 mm single-lens reflex film camera introduced by
Minolta in 1981. It was the top model of their final manual-focus SLR
series before the introduction of the auto-focus Minolta Maxxum 7000. It
featured manual, aperture priority and programmed automatic exposure
modes when used with MD lenses. MC lens could be used in aperture
priority and manual modes. The body was made with a plastic frame and
encased in metal. The shutter was a horizontally-travelling cloth
shutter with a top speed of 1/1000 sec.
The X-700 was awarded the
European "Camera of the Year" award in 1981, and its competitive
pricing resulted in its becoming the most successful Minolta camera
since the SRT line.
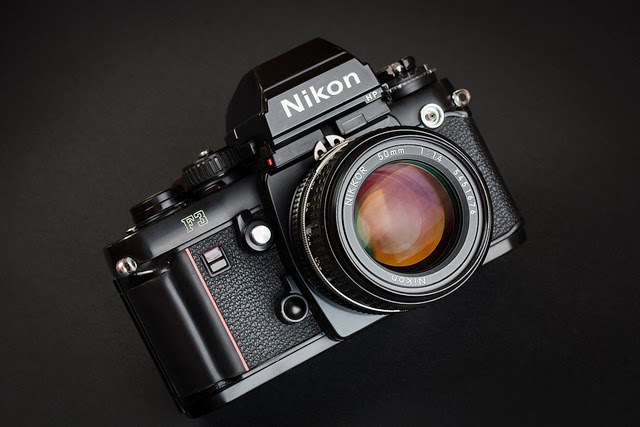
Nikon F3
 |
| Photo by Gábor Dobrocsi |
The
Nikon F3 was Nikon's third professional single-lens reflex camera body,
preceded by the F and F2. Introduced in 1980, it had manual and
semi-automatic exposure control whereby the camera would select the
correct shutter speed (aperture priority automation). The Nikon F3
series cameras had the most model variations of any Nikon F camera. It
was also the first of numerous Nikon F-series cameras to be styled by
Italian designer Giorgetto Giugiaro, and to include a red stripe on the
handgrip – a feature that would later become (with variants of stripes
and various other shapes) a signature feature of many Nikon cameras.
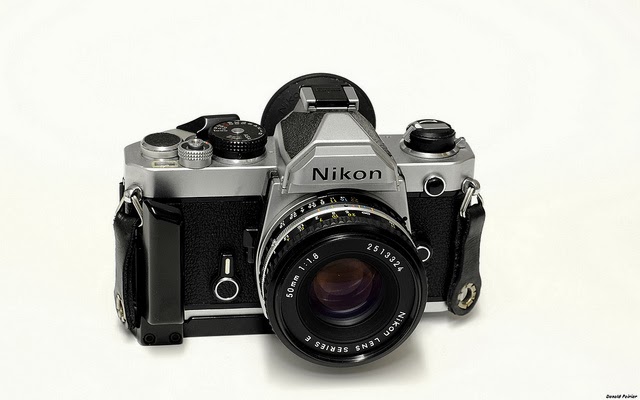
Nikon FM
 |
| Photo by Donald Poirier |
The
Nikon FM, introduced in 1977, was constructed almost entirely from
metal and used a mechanical shutter. It was manual-focus-only, with
manual exposure control. Being mechanical the FM needs no batteries to
operate. The metering system comprised a gallium-arsenide-phosphide
photodiode that metered through-the-lens at maximum aperture. The FM
utilized a modern titanium-bladed, vertical-travel focal plane shutter
capable of speeds from 1 second to 1/1000 of a second, plus bulb. Flash
X-sync was at speeds up to 1/125th second.
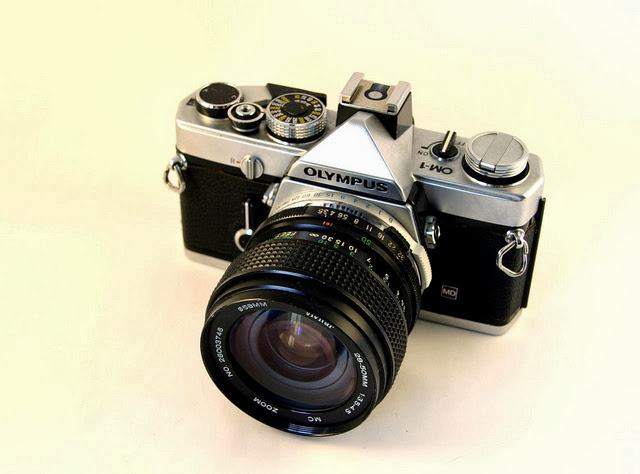
Olympus OM-1
 |
| Photo by Andreane Fraser |
The
Olympus OM-1 is a manually operated 35 mm single-lens reflex camera
forming the ground of the OM system introduced in 1972, at first called
the Olympus M-1, Leica disputed this designation and it was changed to
OM. It was designed by a team led by the late Yoshihisa Maitani with a
through-the-lens exposure meter controlling a needle visible in the
viewfinder. It was noted for its reduction of size, weight and noise.
These features were essentially retained on later models. One feature
unique to the OM1 compared to the rest of the OM system was its manual
mirror lock-up making it ideal for astrophotography and
macrophotography.
The OM-1 is an all-mechanical SLR. It has a
very large viewfinder with interchangeable screens but a fixed prism. It
also has a through-the-lens exposure meter controlling a needle visible
in the viewfinder. It has a very compact body, essentially retained on
later models. One novel feature was the decision to locate the shutter
speed dial around the lens mount, rather than on the camera's top plate.
A significant advantage of this layout is that the camera can remain at
the eye far more easily, between shots, than some other SLRs, it also
makes it far easier for "left-eyed" users and enables exposure values to
be more rapidly adjusted as the shutter operates in the same plane
(effectively around the lens) as the aperture ring. It also less fussy
to use than a conventional shutter dial, and easy to sense what shutter
speed is being set. With practice both aperture and shutter speed can be
adjusted at the same time, made easier by their being reasonably close
together but distinct in use.
Originally, the bottom plate needed
to be modified to mount a motor drive on the OM-1. In 1974, Olympus
launched the OM-1MD (MD standing for Motor Drive), to which a motor
drive can be attached without need for modification. This new version
has a small plate marked 'MD' on the front, and a small circular cover
with a coin slot (covering the motor drive coupling) on the underside of
the body.
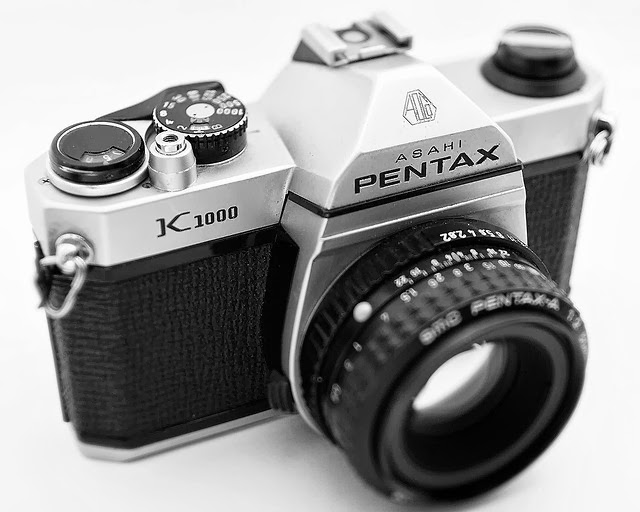
Pentax K1000
 |
| Photo by Justin |
K1000
is a 35mm film SLR camera made by Pentax and produced between 1976–97.
Its design descends from the original Spotmatic series of screw-mount
SLRs introduced in the 1960s.
An affordable camera for the
amateur photographer, it was a fully mechanical, manual camera designed
without any program modes. It survived much longer than originally
intended and became the archetypal "student's camera." The K1000 was
equipped with all features required for manual photography: a TTL
metering system, wide-ranging shutter speeds from 1/1000 to 1 second,
and the ability to use all the available K-mount lenses made by Pentax
and licensees such as Ricoh and Cosina. The K1000 omitted some features
found on more advanced models, such as depth-of-field preview,
self-timer, and separate meter on/off switch.
Despite its great
popularity and longevity of the same basic design, Pentax finally ceased
production of the K1000 after more than 20 years in 1997.
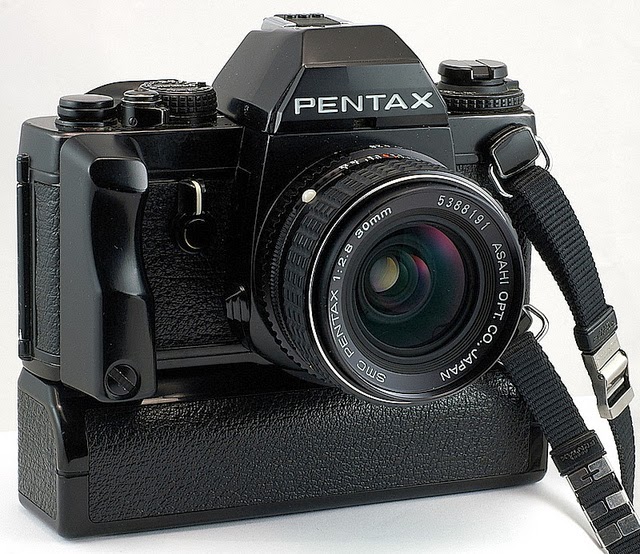
Pentax LX
 |
| Photo by ebelbeb |
The
Pentax LX was Pentax's most advanced manual focus camera, and only
attempt at entering the professional segment of the 35mm SLR camera
market. When introduced in 1980 it comprised from the start a series of
accessories such as interchangeable viewfinders and viewfinder screens
in addition to the vast range of SMC lenses.
As expected of a
professional camera at the time, the LX provides mechanical shutter
speeds, ranging from the flash synchronization ('X') speed of 1/75
second to 1/2000 second and bulb ('B'), permitting manual operation
without battery power. The slow speeds from 1/60 second to 4 seconds, as
well as the exposure meter, are battery dependent. Construction is
strong and durable, with a solid cast metal frame and metal covering
plates. All buttons and dials are weather and dust sealed, a unique
feature not found on other professional cameras of the day.
Underneath
the satin black finish is black chrome, so that even as the surface
finish inevitably wore through in hard professional use, the underlying
metal would not look brassy. Both the viewfinder and the focusing screen
are interchangeable to suit the task at hand, a large choice of
alternatives were available. The camera has a somewhat uncommon frame
counter, being able to keep track of the frame number in either
direction, whether advancing or rewinding the film; this feature
dramatically adds to the flexibility of the camera. The camera supports
mirror lock-up, multiple exposures, and depth of field preview. Both a
winder and motor drive were available, and a full complement of other
professional accessories.
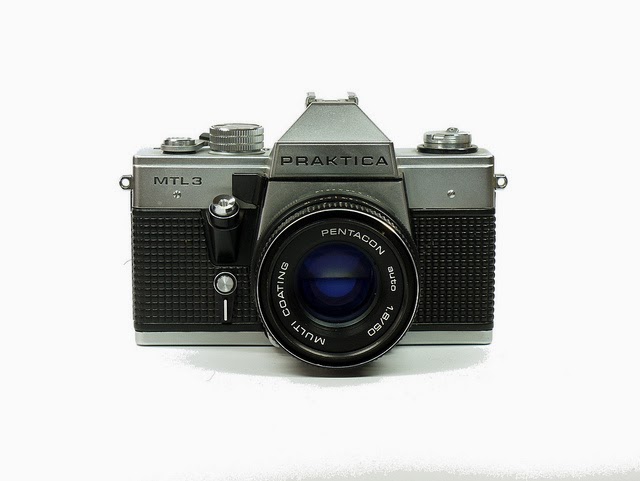
Praktica MTL 3
 |
| Photo by photo_foto1 |
The
Praktica MTL 3 is an East German SLR made by Pentacon, using the 42mm
screw mount. It was produced in high numbers between 1978 and 1984. It
is said to be based on the LTL 3. It's a solidly made camera with some
rather crude and some advanced features.
The MTL 3 has a metal
curtain shutter. This is the best part about this camera. It moves
vertically and is likely to work some 25 years after its production.
Speeds are B, then from 1 to 1/1000 sec. It has a separate position for
use with electronic flash units; this is "about" 1/125 sec according to
the camera's manual. Its metal curtains are not known to get punctured
easily as do cloth shutters.
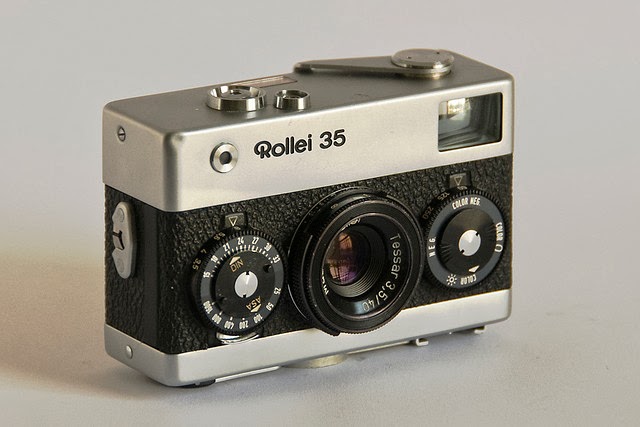
Rollei 35
 |
| Photo by Robin Claw |
The
Rollei 35 is a 35mm miniature viewfinder camera built by Rollei. The
original Rollei 35, when introduced at Photokina in 1966, was the
smallest existing 135 film camera. Still today, the Rollei 35 series
remain the second smallest 35 mm camera after the Minox 35. In 30 years,
about 2 million Rollei 35 series cameras were manufactured.
 The
aroma of chemicals emanates from the La Entrada classroom occupied by
Janet Gregori. It’s that distinctive smell of developer, stop bath and
fixer known to people who are partial to film photography, which she
teaches to her middle school students in spite of the digital camera
revolution.
The
aroma of chemicals emanates from the La Entrada classroom occupied by
Janet Gregori. It’s that distinctive smell of developer, stop bath and
fixer known to people who are partial to film photography, which she
teaches to her middle school students in spite of the digital camera
revolution.


