- Buy a camera and lens cheaply. Check eBay
or other online auction sites to find a used camera. There are several
things you can do to find the best camera at a good price:
-
Buy a cheap plastic autofocus SLR if you already have compatible lenses for it (if you have a digital SLR, for example). Plastic consumer cameras like the Nikon F55 and Canon EOS 300 sell for absurdly low prices. You may look silly shooting them, but the results you will get from these little cameras will be identical to those you would get from a much bigger and heavier professional SLR costing thirty times as much.
Beware, however, of lenses that are specifically designed for digital SLRs, which usually have smaller sensors than 35mm film. They either won't mount on your camera (like with Canon lenses marked EF-S), or they won't cover the full 36x24mm frame (Nikon's DX lenses). - Basic autofocus zoom lenses a few years old are also inexpensive used. They are not good for low light, and not great in the moderately low light their maximum apertures permit, but about as good as any others at f/8 to f/16 (past that, diffraction limits the resolution of all lenses) except in trivial cases such as with brick walls. Autofocus lenses can help you save money from wasted pictures if you have trouble focusing manually, and are much better for moving subjects (which autofocus film SLRs can track and predict, though digital SLRs are much better for capturing single decisive moments reliably through bursts of photos, such as in sports).
-
Buy into an obsolete system. Demand for lenses from obsolete camera systems, meaning those completely incompatible with today's digital SLRs, is much lower, because nobody is buying them for use with digital. A couple of examples are Canon FD mount cameras (like the Canon A-1 and T90) and Minolta manual-focus cameras.
Cameras and lenses from obsolete camera systems, like this Canon A-1 and 50mm f/1.8, sell for absurdly cheap prices.
-
Buy simple prime lenses. "Prime" means a lens of a fixed focal length (i.e. not a zoom). "Simple" means lenses that are easy to manufacture. Very wide, and/or very fast, lenses cost more because they need very complex optics; lenses of sensible speed in normal focal lengths don't require complex optics and, consequently, are much cheaper. Best of all, these will permit you to shoot in less light and get sharper pictures than you would with a slower, more expensive, and heavier zoom lens. Look around for a 28mm f/2.8, 50mm f/1.8 (or f/2 if you're looking at Pentax), and 135mm f/2.8.
- Alternatively, don't buy a camera. You probably already know several people who have an old, unused film camera or two whom you might be able to convince to lend one to you, or even give it to you.
-
- Shoot colour negative film. Colour negative film can be developed very cheaply just about anywhere; slide film requires a very different process called E-6, which only a very small number of photo labs do. You won't get the same punchy colours that you can get on slide film (though some negative films, like Kodak Ektar 100, come close), but then you won't need to take out a bank loan to pay for each roll to be developed, either. On the other hand, the slides only need processing and then can be directly seen on a projector but with film you might want prints, which can be expensive. (If you intend to scan to digital, you only need the negatives.)
If you like the look of black-and-white film, there are a couple of films that can be developed in the standard C-41 process used for colour negative films. Look for Kodak BW400CN (relatively low-contrast, great for people photos) and Ilford XP2 (high contrast).- Slide film has a much smaller exposure latitude and thus a much greater failure rate than print film except where one is consistently very precise, which doesn't suit many kinds of subjects. Projecting slide film destroys it in a matter of hours; regular slide shows do gradually consume the pictures' longevity.
- Stick to 35mm. While other film formats will offer more surface area (and, consequently, more resolution, and less grain at a given enlargement), many minilabs will not be able to develop and/or scan it, which means you'll have to go to a much more expensive lab to get it developed.
- Proper technique with a slow film such as Fuji Velvia or Kodak Ektar, correct exposure, a moderate aperture, and a moderate shutter speed or tripod, can produce very sharp, fine-grained photos with an old 35mm SLR or even a nice point-and-shoot (which should choose a moderate or small aperture and a moderate to high shutter speed on its own in bright light).
- Buy lots of film. Buy as much as you can afford. Like everything else, buying things in bulk works out much cheaper. Also, if you buy film that is close to the expiration date it's cheaper. Wrap it tight in plastic and throw it in the freezer. It will keep for years. Just make sure you defrost it in the plastic--otherwise you'll get condensation on the film.
- Even kept in a freezer, film eventually deteriorates and high-speed film - ISO 400 and above -- deteriorates faster. Long-expired film isn't worth the trouble of shooting and the cost of developing unless one wants special effects technically poorer than a cheap digital camera's photos.
- Don't buy a scanner. Your lab owns some incredibly expensive equipment and nearly all of them will have a scanner built into their minilab. Most labs will get great results with their automated scans. Shop around.
- Shoot film for what it's best at. Film is ill-suited to action (sports, moving wildlife, and so on) that require split-second timing and usually need several shots taken in a second. That gets expensive; get a digital SLR for that kind of thing. On the other hand, film is great for stills, like landscapes, statues, and plants.
- Get out when the light is good. Meaning, don't shoot in boring midday sunlight. Great light happens in the early morning and late evening, within about a one-hour window before and after sunset and sunrise. The better the light, the fewer mediocre pictures you'll take, which means more winners per roll, which means you're not blindly shooting tons of film in the hope of getting one or two good ones, which saves you money!
- Think before you shoot. Rather than blindly shooting, learn to see. Spend a few minutes refining and simplifying your composition. More winners per roll means you'll be spending less on film.
- Shoot a frame at a time. If you've got a motor-driven camera, set it to its single-frame mode. If you've got an add-on motor drive, leave it at home (or keep it on your camera but turn it off, because they look seriously cool). You can easily find yourself taking several shots of the same thing if you have some film-burning motor-driven monster. Your roll won't go as far, which means you'll be wasting money.
- If you are unsure about exposure, such as with a backlit subject, err toward overexposure with color print film (unless the shutter speed would have to be so slow as to cause blur). If you want a darker picture you can adjust it on a computer, but you can't add detail that isn't there. Two or three stops over shouldn't blow out most of the highlights badly. (You could bracket exposure, but this is an article about how to get decent results for cheap.)
- Don't get prints. If you're looking to show off your work on the Internet, the following process usually works out quite a bit cheaper: Just get your scans toasted to a CD, and if there are some you really like you can always get them printed later at a very reasonable price. The pharmacy CVS, the warehouse store Costco, and the mail-order processor Dwayne's Photo will inexpensively process and scan film without printing it. Costco and Dwayne's Photo tend to have multiple knowledgeable staff at any given time and use higher resolution.
- Go for a longer development time. Unless you're terminally impatient, rather than go for one-hour developing, get it developed next-day, or maybe over a few days if you're extremely patient.
On the other hand, some labs will give you a free film if you go for one-hour developing. Sometimes these give superb results, so take one for a spin.This article courtesy of: WikiHow
Wednesday, July 17, 2013
Film Photography on a Tight Budget
Edited by Lewis Collard, Maluniu, Krystle, Flickety and 6 others


Tuesday, July 16, 2013
Effectively using a Polarizer
When noted outdoor photographer and author Darwin Wiggett
writes about filters, he speaks from his own years of successful
experience. His series of stories featured on this blog have become a
trusted reference source for many visitors. Now Darwin reviews the basic
topic of polarizers, and offers us his personal perspective based on his own methods, experience and equipment.
"I use a polarizer for almost every landscape and nature image I make," says Darwin Wiggett. "In fact, I always start off with a polarizer on my lens. It's only if the filter has no effect -- or a negative effect (which is rare) -- that I will take it off the lens. And if you think you can replicate the effect of a polarizer in software, you can’t -- plain and simple. Below are my Seven Rules for using a polarizer.
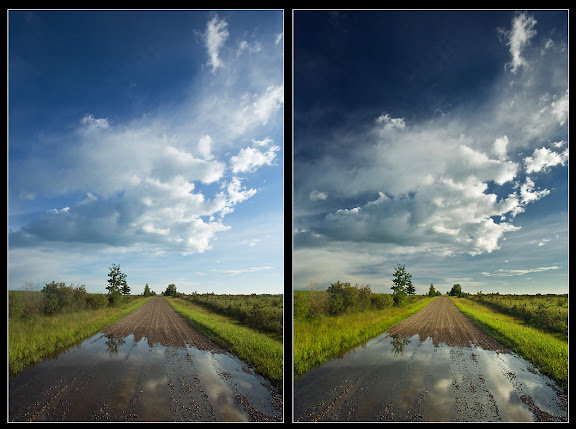
Rule 1: Use a Polarizer for Side-Lit Landscapes
 "Whenever
I am shooting at sunrise and sunset and the landscape is side lit, a
polarizer will have an enormously beneficial effect. The filter reduces
the scattered light in the scene, effectively darkening the sky and
adding saturation to the ground elements by removing glare from the
reflected highlights. Compare the two images in Photo 1. The left image
was taken without a polarizer and the right was taken with one (a
Singh-Ray LB Neutral Polarizer). The right image has more saturation of
colour in the foreground because the filter removed reflective glare.
The sky in the right-hand image is also more saturated and richer in
tone.
"Whenever
I am shooting at sunrise and sunset and the landscape is side lit, a
polarizer will have an enormously beneficial effect. The filter reduces
the scattered light in the scene, effectively darkening the sky and
adding saturation to the ground elements by removing glare from the
reflected highlights. Compare the two images in Photo 1. The left image
was taken without a polarizer and the right was taken with one (a
Singh-Ray LB Neutral Polarizer). The right image has more saturation of
colour in the foreground because the filter removed reflective glare.
The sky in the right-hand image is also more saturated and richer in
tone.
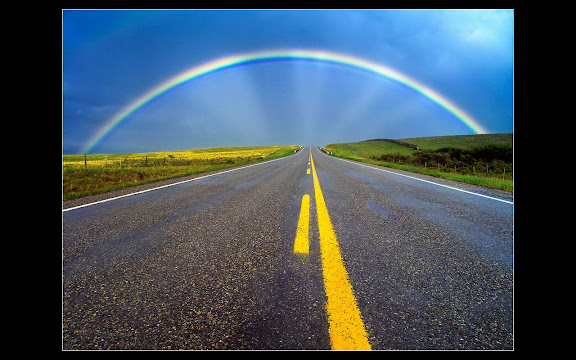
Rule 2: Use a Polarizer to Enhance Rainbows
 "Any
time you see a rainbow, immediately slap a polarizer on your lens! Spin
the polarizer around and you’ll see the rainbow disappear totally and
then reappear with great intensity. Obviously you want to rotate the
filter to give you the best intensity in the rainbow. A rainbow is
polarized light so a polarizer either kills the rainbow or it pumps up
the colours enormously, depending on how you rotate it.
"Any
time you see a rainbow, immediately slap a polarizer on your lens! Spin
the polarizer around and you’ll see the rainbow disappear totally and
then reappear with great intensity. Obviously you want to rotate the
filter to give you the best intensity in the rainbow. A rainbow is
polarized light so a polarizer either kills the rainbow or it pumps up
the colours enormously, depending on how you rotate it.
"As soon as I saw this rainbow in Photo 2, I knew I had a winner. But by the time I got my gear out and the composition set up, the rainbow was already fading. To recover the intensity in the rainbow, I simply used my handy polarizer. A side benefit to the polarizer is that it removed reflective glare from the road and saturated the colour in the yellow line.
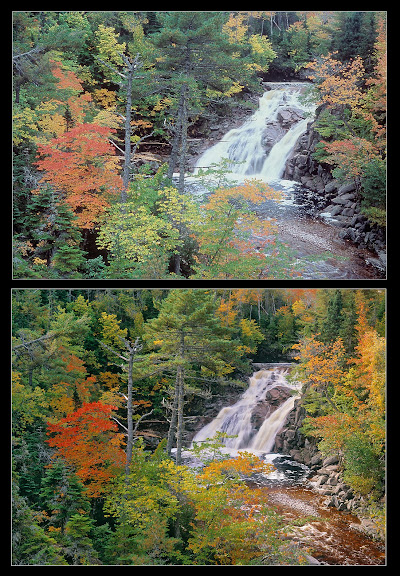
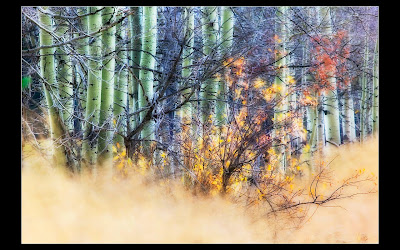
Rule 3: Use a Polarizer for Intimate Landscapes on Overcast and Rainy Days
 "One
of the cardinal rules in landscape photography is 'in overcast light
shoot tight.' Bald white skies in a landscape photo really jar the eye
so most photographers concentrate on more intimate landscapes and
exclude the sky when it is overcast. A polarizer won’t darken an
overcast sky but it will eliminate reflective highlights off leaves,
rocks and water to help saturate the colours in the photo.
"One
of the cardinal rules in landscape photography is 'in overcast light
shoot tight.' Bald white skies in a landscape photo really jar the eye
so most photographers concentrate on more intimate landscapes and
exclude the sky when it is overcast. A polarizer won’t darken an
overcast sky but it will eliminate reflective highlights off leaves,
rocks and water to help saturate the colours in the photo.
"Just how much effect does a polarizer have on an overcast day? See for yourself in Photo 3 (top image with no polarizer; bottom image polarized with a Singh-Ray LB Warming Polarizer). I think you’ll agree polarizers have their place on grey days!
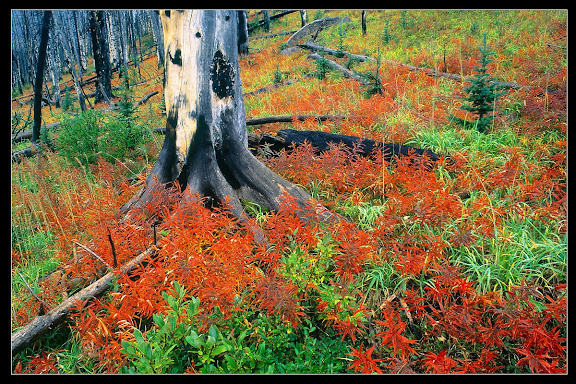 "On
overcast days after a rain, it is even more important to use a
polarizer. When everything is wet, there will be a lot of reflected
light coming off the wet surfaces and this glare reduces the quality of
tones and colour. In Photo 4, I used a Singh-Ray LB Warming Polarizer to
supersaturate the colours. Who needs the hue and saturation slider in
Photoshop when you can capture colours this good in-camera?
"On
overcast days after a rain, it is even more important to use a
polarizer. When everything is wet, there will be a lot of reflected
light coming off the wet surfaces and this glare reduces the quality of
tones and colour. In Photo 4, I used a Singh-Ray LB Warming Polarizer to
supersaturate the colours. Who needs the hue and saturation slider in
Photoshop when you can capture colours this good in-camera?
"Many people ask me why I use a warming polarizer when I could just change the white balance on the camera to get the same warm effect. The warming filter in the LB Polarizer is subtle -- just enough to offset the effects of UV light -- and the result is a cleaner file captured in-camera than if I just used a polarizer plus a warmer white balance setting. The better the information captured by the sensor, the better the final image. So on grey days, in particular, I always use a Singh-Ray LB warming polarizer.
Rule 4: Use a Polarizer to Remove Reflective Highlights on Glass, Metal and Water
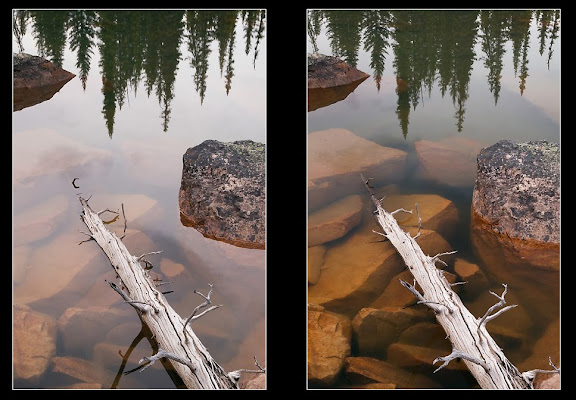 "If
you want to pierce through the reflective surface glare of water, see
through glass and remove the glare from metal, be sure to use a
polarizer. In Photo 5 you can see how the addition of a polarizer (right
side) gives you views underwater that are not possible in the
un-polarized photo (left side). With reflective surfaces, the reflection
is sometimes the most important element and sometimes the subsurface is
more important. Just rotate your polarizer until you see the precise
effect you like best.
"If
you want to pierce through the reflective surface glare of water, see
through glass and remove the glare from metal, be sure to use a
polarizer. In Photo 5 you can see how the addition of a polarizer (right
side) gives you views underwater that are not possible in the
un-polarized photo (left side). With reflective surfaces, the reflection
is sometimes the most important element and sometimes the subsurface is
more important. Just rotate your polarizer until you see the precise
effect you like best.
"In Photo 6 the image is improved by using the polarizer (right side image) because it allows the viewer to see the interesting rocks under the water which could not be seen well in the non-polarized version (left side image).
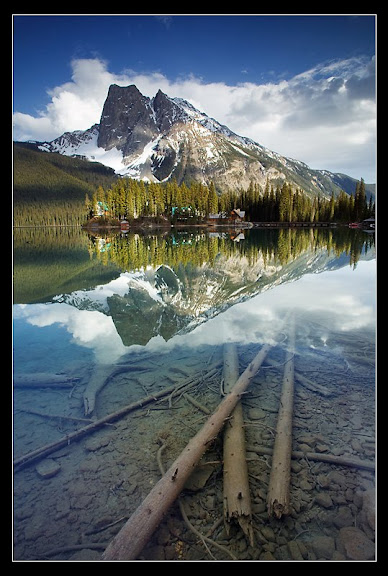 "In
Photo 7, my LB Warming Polarizer allowed my to reach under the surface
of the lake for my foreground interest. The polarizer not only let me
see underwater, it also darkened the sky above and increased the warm
colour saturation of the forest around the lodge. And it was all done in
the camera.
"In
Photo 7, my LB Warming Polarizer allowed my to reach under the surface
of the lake for my foreground interest. The polarizer not only let me
see underwater, it also darkened the sky above and increased the warm
colour saturation of the forest around the lodge. And it was all done in
the camera.
Rule 5: Avoid Uneven Polarization of Blue Skies When Using Wide Angle Lenses
 "One
of the classic mistakes when using a polarizer is to rotate the filter
to create the maximum effect when shooting blue-sky scenes with
wide-angle lenses. In Photo 8 the upper center of the sky is much darker
than the rest of the sky and for some viewers this uneven polarization
is unacceptable. There are several solutions to this problem. Sometimes
just rotating the filter slightly will reduce the uneven effect. Often
if you move back a bit from the scene and use a little longer focal
length setting on your zoom lens you will take in less sky and thereby
reduce the problem. And finally you can make two exposures of the same
scene, one with the polarizer rotated to maximum for the greatest
benefit to the foreground and one exposure with the polarizer turned to
minimum effect for a more even, ‘natural’ sky. Then you can blend the
two exposures together in Photoshop.
"One
of the classic mistakes when using a polarizer is to rotate the filter
to create the maximum effect when shooting blue-sky scenes with
wide-angle lenses. In Photo 8 the upper center of the sky is much darker
than the rest of the sky and for some viewers this uneven polarization
is unacceptable. There are several solutions to this problem. Sometimes
just rotating the filter slightly will reduce the uneven effect. Often
if you move back a bit from the scene and use a little longer focal
length setting on your zoom lens you will take in less sky and thereby
reduce the problem. And finally you can make two exposures of the same
scene, one with the polarizer rotated to maximum for the greatest
benefit to the foreground and one exposure with the polarizer turned to
minimum effect for a more even, ‘natural’ sky. Then you can blend the
two exposures together in Photoshop.
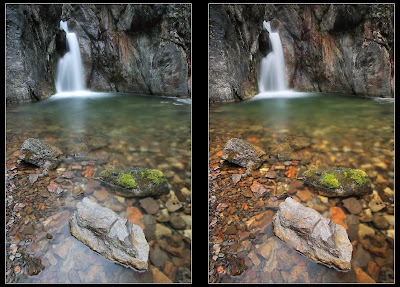
Rule 6: Combine an ND Grad Filter with a Polarizer for the Ultimate in Contrast Control
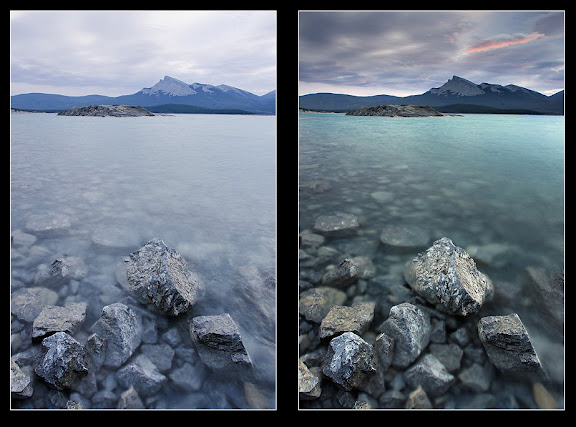 "One
of the major hurdles to leap over in landscape photography is the
problem of high contrast between the sky and the land. In many cases
skies are so much brighter than the landscape that if we expose properly
for one, the other is either washed out or is too dark. In Photo 9, the
image on the left was made without any filters. Notice how the sky is
overexposed without detail and how the water has a pale ghostly sheen.
By adding a Singh-Ray LB Warming Polarizer, I not only removed the sheen
from the water (caused by reflective glare and UV haze) but the
polarizer also allowed me to see the underwater rocks much better and
added colour saturation to the above water rocks (right image). The use
of a 2-stop hard-edge Graduated Neutral Density
filter over the sky and mountains darkened this overexposed area of the
image revealing all the detail that was there that day. Whenever I have
a bright sky in a landscape scene you can bet I’ll pull out both my
polarizer and my grad for contrast control. To understand how to stack a
grad and polarizer together see my previous blog article: Filters, holders and vignetting: building a filter system that works with your lenses
"One
of the major hurdles to leap over in landscape photography is the
problem of high contrast between the sky and the land. In many cases
skies are so much brighter than the landscape that if we expose properly
for one, the other is either washed out or is too dark. In Photo 9, the
image on the left was made without any filters. Notice how the sky is
overexposed without detail and how the water has a pale ghostly sheen.
By adding a Singh-Ray LB Warming Polarizer, I not only removed the sheen
from the water (caused by reflective glare and UV haze) but the
polarizer also allowed me to see the underwater rocks much better and
added colour saturation to the above water rocks (right image). The use
of a 2-stop hard-edge Graduated Neutral Density
filter over the sky and mountains darkened this overexposed area of the
image revealing all the detail that was there that day. Whenever I have
a bright sky in a landscape scene you can bet I’ll pull out both my
polarizer and my grad for contrast control. To understand how to stack a
grad and polarizer together see my previous blog article: Filters, holders and vignetting: building a filter system that works with your lenses
Rule 7: Combine a Polarizer with a Solid ND Filter or use the Singh-Ray Vari-N-Duo for Creative Motion Effects
"One of my favorite techniques in nature photography is 'Painting with Time.' This technique is created by combining a polarizer with a solid ND filter (e.g. 5 f-stops or more) to create long exposures to record movement in nature. Anything that moves -- rushing water, swaying grass, flitting clouds -- takes on a surreal, painterly look when recorded with a long exposure. The polarizer gives all the benefits we have seen with the filter (reduced glare, increased colour saturation) while the solid ND filter allows us to record nature’s movement over time.
"Often I like to use the Singh-Ray Vari-N-Duo because it is a polarizer and variable solid ND filter (2-8 stops) built into one convenient filter. But you can also use filter holders to combine a polarizer and a 5-stop solid ND filter like I described in Filters, holders and vignetting. To learn more about other benefits of using a polarizer, a grad and a solid ND filter together see The Terrific Triple Threat.
"Remember when you use a polarizer and a solid ND filter together -- or if you use the Vari-N-Duo -- that your exposure times will be long (from 4 seconds to several minutes), so a solid tripod and cable release are mandatory. There are other things to consider in terms of getting proper exposure and I cover these in detail in my Paint with Time download for anyone interested in detailed specifics.
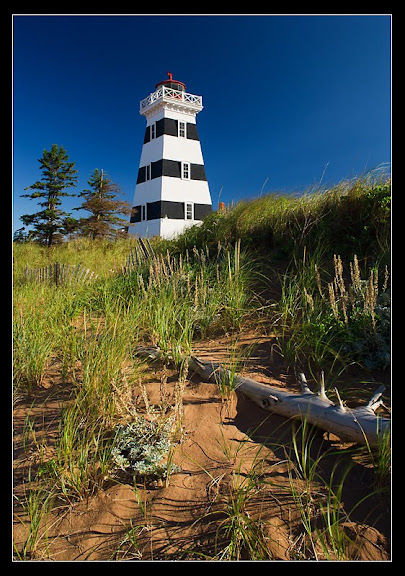
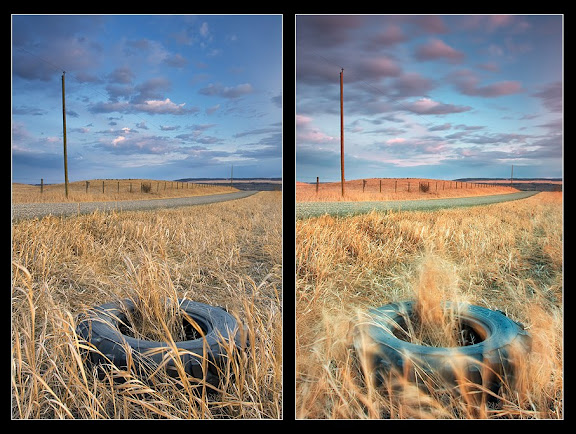 "In
Photo 10, the left side image was taken on a windy day using a
Singh-Ray LB Warming Polarizer to get a better colour and tonality in a
side-lit scene (Rule 1). The exposure was 3 seconds at f16 at 100 ISO.
In the photo on the right, I used the Singh-Ray Polarizer combined with
the Singh-Ray George Lepp 5-Stop solid ND
filter to give me a 121 second exposure at f16. Notice how the grass in
the right-hand photo shows a much greater range of movements, like a
brush stoke painting. As well the clouds streaked across the sky in the
longer exposure and painted more colour and movement into the sky. I
really love the effects of long exposure and combining a polarizer with a
solid ND filter was all I needed to make these images happen.
"In
Photo 10, the left side image was taken on a windy day using a
Singh-Ray LB Warming Polarizer to get a better colour and tonality in a
side-lit scene (Rule 1). The exposure was 3 seconds at f16 at 100 ISO.
In the photo on the right, I used the Singh-Ray Polarizer combined with
the Singh-Ray George Lepp 5-Stop solid ND
filter to give me a 121 second exposure at f16. Notice how the grass in
the right-hand photo shows a much greater range of movements, like a
brush stoke painting. As well the clouds streaked across the sky in the
longer exposure and painted more colour and movement into the sky. I
really love the effects of long exposure and combining a polarizer with a
solid ND filter was all I needed to make these images happen.
 "In
Photo 11, a polarizer gave me great colours on a grey day (Rule 3) and a
solid ND filter gave me a long exposure to record the windy day in
sweeps of tones.
"In
Photo 11, a polarizer gave me great colours on a grey day (Rule 3) and a
solid ND filter gave me a long exposure to record the windy day in
sweeps of tones.
"Rather than use a UV filter for protection of the front element of my lens, I use a polarizer instead. For my photography, a UV filter has very little effect, but a polarizer does. I simply leave a polarizer on my lens all the time, because for me, this filter is essential to help me capture the images I see in the world."
To learn more about Darwin's photography and check his other educational resources, stop by his website or visit his blog for the latest information.
"I use a polarizer for almost every landscape and nature image I make," says Darwin Wiggett. "In fact, I always start off with a polarizer on my lens. It's only if the filter has no effect -- or a negative effect (which is rare) -- that I will take it off the lens. And if you think you can replicate the effect of a polarizer in software, you can’t -- plain and simple. Below are my Seven Rules for using a polarizer.
Rule 1: Use a Polarizer for Side-Lit Landscapes
 "Whenever
I am shooting at sunrise and sunset and the landscape is side lit, a
polarizer will have an enormously beneficial effect. The filter reduces
the scattered light in the scene, effectively darkening the sky and
adding saturation to the ground elements by removing glare from the
reflected highlights. Compare the two images in Photo 1. The left image
was taken without a polarizer and the right was taken with one (a
Singh-Ray LB Neutral Polarizer). The right image has more saturation of
colour in the foreground because the filter removed reflective glare.
The sky in the right-hand image is also more saturated and richer in
tone.
"Whenever
I am shooting at sunrise and sunset and the landscape is side lit, a
polarizer will have an enormously beneficial effect. The filter reduces
the scattered light in the scene, effectively darkening the sky and
adding saturation to the ground elements by removing glare from the
reflected highlights. Compare the two images in Photo 1. The left image
was taken without a polarizer and the right was taken with one (a
Singh-Ray LB Neutral Polarizer). The right image has more saturation of
colour in the foreground because the filter removed reflective glare.
The sky in the right-hand image is also more saturated and richer in
tone.Rule 2: Use a Polarizer to Enhance Rainbows
 "Any
time you see a rainbow, immediately slap a polarizer on your lens! Spin
the polarizer around and you’ll see the rainbow disappear totally and
then reappear with great intensity. Obviously you want to rotate the
filter to give you the best intensity in the rainbow. A rainbow is
polarized light so a polarizer either kills the rainbow or it pumps up
the colours enormously, depending on how you rotate it.
"Any
time you see a rainbow, immediately slap a polarizer on your lens! Spin
the polarizer around and you’ll see the rainbow disappear totally and
then reappear with great intensity. Obviously you want to rotate the
filter to give you the best intensity in the rainbow. A rainbow is
polarized light so a polarizer either kills the rainbow or it pumps up
the colours enormously, depending on how you rotate it."As soon as I saw this rainbow in Photo 2, I knew I had a winner. But by the time I got my gear out and the composition set up, the rainbow was already fading. To recover the intensity in the rainbow, I simply used my handy polarizer. A side benefit to the polarizer is that it removed reflective glare from the road and saturated the colour in the yellow line.
Rule 3: Use a Polarizer for Intimate Landscapes on Overcast and Rainy Days
 "One
of the cardinal rules in landscape photography is 'in overcast light
shoot tight.' Bald white skies in a landscape photo really jar the eye
so most photographers concentrate on more intimate landscapes and
exclude the sky when it is overcast. A polarizer won’t darken an
overcast sky but it will eliminate reflective highlights off leaves,
rocks and water to help saturate the colours in the photo.
"One
of the cardinal rules in landscape photography is 'in overcast light
shoot tight.' Bald white skies in a landscape photo really jar the eye
so most photographers concentrate on more intimate landscapes and
exclude the sky when it is overcast. A polarizer won’t darken an
overcast sky but it will eliminate reflective highlights off leaves,
rocks and water to help saturate the colours in the photo."Just how much effect does a polarizer have on an overcast day? See for yourself in Photo 3 (top image with no polarizer; bottom image polarized with a Singh-Ray LB Warming Polarizer). I think you’ll agree polarizers have their place on grey days!
 "On
overcast days after a rain, it is even more important to use a
polarizer. When everything is wet, there will be a lot of reflected
light coming off the wet surfaces and this glare reduces the quality of
tones and colour. In Photo 4, I used a Singh-Ray LB Warming Polarizer to
supersaturate the colours. Who needs the hue and saturation slider in
Photoshop when you can capture colours this good in-camera?
"On
overcast days after a rain, it is even more important to use a
polarizer. When everything is wet, there will be a lot of reflected
light coming off the wet surfaces and this glare reduces the quality of
tones and colour. In Photo 4, I used a Singh-Ray LB Warming Polarizer to
supersaturate the colours. Who needs the hue and saturation slider in
Photoshop when you can capture colours this good in-camera?"Many people ask me why I use a warming polarizer when I could just change the white balance on the camera to get the same warm effect. The warming filter in the LB Polarizer is subtle -- just enough to offset the effects of UV light -- and the result is a cleaner file captured in-camera than if I just used a polarizer plus a warmer white balance setting. The better the information captured by the sensor, the better the final image. So on grey days, in particular, I always use a Singh-Ray LB warming polarizer.
Rule 4: Use a Polarizer to Remove Reflective Highlights on Glass, Metal and Water
 "If
you want to pierce through the reflective surface glare of water, see
through glass and remove the glare from metal, be sure to use a
polarizer. In Photo 5 you can see how the addition of a polarizer (right
side) gives you views underwater that are not possible in the
un-polarized photo (left side). With reflective surfaces, the reflection
is sometimes the most important element and sometimes the subsurface is
more important. Just rotate your polarizer until you see the precise
effect you like best.
"If
you want to pierce through the reflective surface glare of water, see
through glass and remove the glare from metal, be sure to use a
polarizer. In Photo 5 you can see how the addition of a polarizer (right
side) gives you views underwater that are not possible in the
un-polarized photo (left side). With reflective surfaces, the reflection
is sometimes the most important element and sometimes the subsurface is
more important. Just rotate your polarizer until you see the precise
effect you like best.
"In Photo 6 the image is improved by using the polarizer (right side image) because it allows the viewer to see the interesting rocks under the water which could not be seen well in the non-polarized version (left side image).
 "In
Photo 7, my LB Warming Polarizer allowed my to reach under the surface
of the lake for my foreground interest. The polarizer not only let me
see underwater, it also darkened the sky above and increased the warm
colour saturation of the forest around the lodge. And it was all done in
the camera.
"In
Photo 7, my LB Warming Polarizer allowed my to reach under the surface
of the lake for my foreground interest. The polarizer not only let me
see underwater, it also darkened the sky above and increased the warm
colour saturation of the forest around the lodge. And it was all done in
the camera.Rule 5: Avoid Uneven Polarization of Blue Skies When Using Wide Angle Lenses
 "One
of the classic mistakes when using a polarizer is to rotate the filter
to create the maximum effect when shooting blue-sky scenes with
wide-angle lenses. In Photo 8 the upper center of the sky is much darker
than the rest of the sky and for some viewers this uneven polarization
is unacceptable. There are several solutions to this problem. Sometimes
just rotating the filter slightly will reduce the uneven effect. Often
if you move back a bit from the scene and use a little longer focal
length setting on your zoom lens you will take in less sky and thereby
reduce the problem. And finally you can make two exposures of the same
scene, one with the polarizer rotated to maximum for the greatest
benefit to the foreground and one exposure with the polarizer turned to
minimum effect for a more even, ‘natural’ sky. Then you can blend the
two exposures together in Photoshop.
"One
of the classic mistakes when using a polarizer is to rotate the filter
to create the maximum effect when shooting blue-sky scenes with
wide-angle lenses. In Photo 8 the upper center of the sky is much darker
than the rest of the sky and for some viewers this uneven polarization
is unacceptable. There are several solutions to this problem. Sometimes
just rotating the filter slightly will reduce the uneven effect. Often
if you move back a bit from the scene and use a little longer focal
length setting on your zoom lens you will take in less sky and thereby
reduce the problem. And finally you can make two exposures of the same
scene, one with the polarizer rotated to maximum for the greatest
benefit to the foreground and one exposure with the polarizer turned to
minimum effect for a more even, ‘natural’ sky. Then you can blend the
two exposures together in Photoshop.Rule 6: Combine an ND Grad Filter with a Polarizer for the Ultimate in Contrast Control
 "One
of the major hurdles to leap over in landscape photography is the
problem of high contrast between the sky and the land. In many cases
skies are so much brighter than the landscape that if we expose properly
for one, the other is either washed out or is too dark. In Photo 9, the
image on the left was made without any filters. Notice how the sky is
overexposed without detail and how the water has a pale ghostly sheen.
By adding a Singh-Ray LB Warming Polarizer, I not only removed the sheen
from the water (caused by reflective glare and UV haze) but the
polarizer also allowed me to see the underwater rocks much better and
added colour saturation to the above water rocks (right image). The use
of a 2-stop hard-edge Graduated Neutral Density
filter over the sky and mountains darkened this overexposed area of the
image revealing all the detail that was there that day. Whenever I have
a bright sky in a landscape scene you can bet I’ll pull out both my
polarizer and my grad for contrast control. To understand how to stack a
grad and polarizer together see my previous blog article: Filters, holders and vignetting: building a filter system that works with your lenses
"One
of the major hurdles to leap over in landscape photography is the
problem of high contrast between the sky and the land. In many cases
skies are so much brighter than the landscape that if we expose properly
for one, the other is either washed out or is too dark. In Photo 9, the
image on the left was made without any filters. Notice how the sky is
overexposed without detail and how the water has a pale ghostly sheen.
By adding a Singh-Ray LB Warming Polarizer, I not only removed the sheen
from the water (caused by reflective glare and UV haze) but the
polarizer also allowed me to see the underwater rocks much better and
added colour saturation to the above water rocks (right image). The use
of a 2-stop hard-edge Graduated Neutral Density
filter over the sky and mountains darkened this overexposed area of the
image revealing all the detail that was there that day. Whenever I have
a bright sky in a landscape scene you can bet I’ll pull out both my
polarizer and my grad for contrast control. To understand how to stack a
grad and polarizer together see my previous blog article: Filters, holders and vignetting: building a filter system that works with your lensesRule 7: Combine a Polarizer with a Solid ND Filter or use the Singh-Ray Vari-N-Duo for Creative Motion Effects
"One of my favorite techniques in nature photography is 'Painting with Time.' This technique is created by combining a polarizer with a solid ND filter (e.g. 5 f-stops or more) to create long exposures to record movement in nature. Anything that moves -- rushing water, swaying grass, flitting clouds -- takes on a surreal, painterly look when recorded with a long exposure. The polarizer gives all the benefits we have seen with the filter (reduced glare, increased colour saturation) while the solid ND filter allows us to record nature’s movement over time.
"Often I like to use the Singh-Ray Vari-N-Duo because it is a polarizer and variable solid ND filter (2-8 stops) built into one convenient filter. But you can also use filter holders to combine a polarizer and a 5-stop solid ND filter like I described in Filters, holders and vignetting. To learn more about other benefits of using a polarizer, a grad and a solid ND filter together see The Terrific Triple Threat.
"Remember when you use a polarizer and a solid ND filter together -- or if you use the Vari-N-Duo -- that your exposure times will be long (from 4 seconds to several minutes), so a solid tripod and cable release are mandatory. There are other things to consider in terms of getting proper exposure and I cover these in detail in my Paint with Time download for anyone interested in detailed specifics.
 "In
Photo 10, the left side image was taken on a windy day using a
Singh-Ray LB Warming Polarizer to get a better colour and tonality in a
side-lit scene (Rule 1). The exposure was 3 seconds at f16 at 100 ISO.
In the photo on the right, I used the Singh-Ray Polarizer combined with
the Singh-Ray George Lepp 5-Stop solid ND
filter to give me a 121 second exposure at f16. Notice how the grass in
the right-hand photo shows a much greater range of movements, like a
brush stoke painting. As well the clouds streaked across the sky in the
longer exposure and painted more colour and movement into the sky. I
really love the effects of long exposure and combining a polarizer with a
solid ND filter was all I needed to make these images happen.
"In
Photo 10, the left side image was taken on a windy day using a
Singh-Ray LB Warming Polarizer to get a better colour and tonality in a
side-lit scene (Rule 1). The exposure was 3 seconds at f16 at 100 ISO.
In the photo on the right, I used the Singh-Ray Polarizer combined with
the Singh-Ray George Lepp 5-Stop solid ND
filter to give me a 121 second exposure at f16. Notice how the grass in
the right-hand photo shows a much greater range of movements, like a
brush stoke painting. As well the clouds streaked across the sky in the
longer exposure and painted more colour and movement into the sky. I
really love the effects of long exposure and combining a polarizer with a
solid ND filter was all I needed to make these images happen. "In
Photo 11, a polarizer gave me great colours on a grey day (Rule 3) and a
solid ND filter gave me a long exposure to record the windy day in
sweeps of tones.
"In
Photo 11, a polarizer gave me great colours on a grey day (Rule 3) and a
solid ND filter gave me a long exposure to record the windy day in
sweeps of tones."Rather than use a UV filter for protection of the front element of my lens, I use a polarizer instead. For my photography, a UV filter has very little effect, but a polarizer does. I simply leave a polarizer on my lens all the time, because for me, this filter is essential to help me capture the images I see in the world."
To learn more about Darwin's photography and check his other educational resources, stop by his website or visit his blog for the latest information.
Monday, July 15, 2013
Nature Photography
Text and photography Copyright Darwin Wiggett
All rights reserved.
Technical Perfection
In the not too distant past, to be a ‘good’ nature photographer only required technical mastery of the craft. I remember my early days in a camera club, the most respected and awed member was the fellow who photographed nesting birds using sophisticated, custom-built, high speed flash. To get his amazing images, he required not only extensive knowledge of bird behavior, but also technical mastery of artificial lighting. He shot everything on a Hasselblad and his 30 by 40 enlargements were mouth-watering in detail. For many members, his work was the pinnacle of achievement, but it could be reached (or should I say, replicated) by simply learning the details of his techniques.
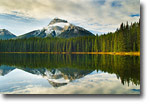
 Photo 1 |
 Photo 2 |
 Photo 3 |
I believe we have reached a similar place in the field of nature photography. No longer is technical excellence enough to make you stand out in the field. Almost everybody has technically excellent photos (just check out the NPN galleries for proof). Now we are longing for something more….
Personal Style or… Gimmick?
For me technical mastery of photography came easy. But, I noticed that among those photographers whose work I admired there was an individual ‘flavor’ to their photos that went beyond pure technical quality. There was a little something that immediately told me when I was looking at a Tim Fitzharris, a Galen Rowell, or a Frans Lanting shot.
What was that little ‘extra’? “Ah”, I thought, “it is about the subtle use of a special technique or point of view, that others are not using”. For example, Tim Fitzharris’ waterfowl portraits of the 80’s were all shot from right at the water level (in a special floating blind) and he was careful to capture wonderful moments of intriguing behavior. Nobody else at the time seemed to be able to do with waterfowl what Tim did. The same could be said for Galen Rowell’s work. At the time, his landscape imagery stood apart. His pioneering work with grad filters, lightweight photographic gear, and dramatic light changed the possibilities of what could be captured on film.
While working in a camera store in the eighties, I discovered a Cokin P173 filter (today commonly known as a blue-yellow or blue gold polarizer). According to the instructions, you were to use the filter in combination with another polarizer to get special color effects. I spun the filter around and was dazzled by what the filter did by itself. I bought the filter and spent much time photographing landscapes with this ‘new secret weapon’. No other photographer I knew owned one of these filters, and I could find no reference to their use in the photo magazines of the time. Soon I was producing imagery, which looked like no one else’s. Gee…I had found personal style!
Well… not really, I had found a gimmick that for a short time set my photos apart. Once I told friends about the filter and published articles in Canada and the US about the filter, I was no longer alone in using it. Now the filter or versions of it are in many nature photographers’ bags. For me, the filter has lost much of its impact (because it is too familiar and ‘boring’). Same thing goes for the Tim Fitzharris ‘eye level, bird behavior’ portraits. Now everybody seems to have a pile of these kinds of images (see the NPN Avian gallery) and they have become ‘run of the mill’, especially for those of us with a history of viewing bird photography. Fortunately Fitzharris wasn’t a one trick pony but continues to provide fresh alternative nature imagery see www.timfitzharris.com.
My point here is that you can’t rely solely on technique, no matter how unique, to set your images apart. Sooner or later someone will figure out how you do things and copy the effect. Style isn’t so much about technique as it is about vision.
Personal Vision: Is Immersion the Key?
What is photographic vision? I define it as a ‘personal’ way of looking at the world. A presentation of photography that resonates with other viewers but that also reveals something of the personality behind the lens.
How do we develop personal vision? On NPN, one critic offered that the best way to get unique imagery is through total immersion and specialization in one subject matter. He states -
“The more time you spend with a particular subject, or at a particular locale, the less often the truly significant images become a matter of "chance" images. If you are spending time traveling from one location to another you are not giving yourself the time to immerse yourself in your subject so that you are there when truly significant events unfold. The best volumes of work have been produced by those photographers who eat, breathe, and exist with their subjects, day to day, week to week, month to month. Those photographers are "there" when a truly significant event occurs.”First of all, there is an assumption here that remarkable imagery can only be made of ‘truly significant events’. Under this assumption the best photographers (the most creative and unique) would be those who managed to capture the most significant events. Here photographic greatness would be about being or putting yourself in the right place at the right time.
I studied the social behavior of Columbian Ground Squirrels for ten years of my life. I accumulated thousands and thousands of observational hours in the field. In ten years I probably witnessed maybe a dozen ‘significant’ events. If I had a camera I might have been able to capture half of these events on film. So, in the end, I might have six ‘truly significant’ images to show for my immersion. Would you call me a photographer with vision and creativity? I think not (see Photo 1 of Richardson’s Ground Squirrels for a sample of a ground squirrel behavior shot).
 Photo 4 |
 Photo 5 |
 Photo 6 |
The other problem with total immersion in one area of photography is that it leaves you with a narrow vision of the possibilities of the whole of photography as an art form and craft. By shooting a wide variety of subject matter, and using a wide variety of techniques; the photographer is exposed to many visual ideas and experiences and only then can these experiences be merged into a vision that goes beyond a simple technique, a gimmick, or a ‘lucky’ moment.
The most interesting people I know are not those who totally immerse themselves into one thing but who have had experiences in many arenas in life. The same for photography, the most creative imagery seems to come from those who have dabbled and played in the whole spectrum of image making. I believe the most exciting photographers are not the ‘specialists’ but rather the ‘generalists’ because the latter are not ‘blinded’ by the rules and narrow vision that so oft develops in the former.
Let me give an example. I think one of the most talented and creative photographers in North America is Daryl Benson. Here is a fellow that no matter what subject he tackles (landscape, wildlife, still-life, industry, business, people etc.), he puts a trademark ‘Daryl’ spin on it. Over the course of many years Daryl has used all sorts of techniques (specialty grad filters – see www.singh-ray.com, alternative lighting, light painting, and Photoshop magic) in his imagery. The techniques were never a means to an end but rather were used as tools to create a mood, an ambience, and an emotion to Daryl’s photos. The results give us a view into Daryl’s mind and Daryl’s world. No one but Daryl can offer us his view. And copying his techniques can’t replicate what Daryl can give us. Many photographers have tried to be a ‘Daryl clone’ and they all fail. Benson is a versatile and evolving artist who has found his own photographic path. He has achieved his vision by immersing himself, not in one subject or one approach but in the whole world of photography and into life itself. A photographer sitting in a blind for months waiting for a ‘remarkable’ moment will have much less to offer us in personal vision.
Developing your Vision
There is no simple formula for creating ‘unique’ imagery. Getting there is an evolutionary process. The new and wonderful wildlife and macro panoramics that George Lepp is creating is a result of a merging of years of accumulated photography experience.
If you ‘try’ to be different for the sake of being different, you will fail, or will rely on a gimmick (as I did), that will be short lived. Your vision can only come from within. This takes time, let it develop on its own, don’t force it. In the meantime, keep shooting, try different techniques, experience different subjects, break the rules, and worry less about what others think of your photos.
Most importantly, shoot for yourself. If the end result really pleases your eye you have succeeded.
The critics are bored with nature imagery because it has gotten stale for them. That’s their problem. No one can be creative and produce inspirational imagery if they are bored. Excitement breeds inspiration, it is just that simple. If you are excited by what you are doing, you are on the right path to personal vision.
About the images...
Photos 2 and 6 were created through the collaborative efforts of my wife and I. We were very pleased with these images and we think they are a little different than the standard frog and mountain imagery. Best of all these images were fun to create.
Photos 3,4, and 5 are images I created at different times over the course of my evolution as a photographer and represent images that I still enjoy and that are ‘different’ from my standard ‘formula’ nature work. Often your most memorable images are the ones that break from your ‘comfort zone.’
Darwin Wiggett - NPN 343
Editor's Note - Natural Moments Photography is comprised of the husband and wife shooting team of Anita Dammer and Darwin Wiggett. Anita has 17 years experience as staff photographer for the Glenbow Museum in Calgary and is currently doing freelance stock photography. Darwin has been shooting stock since 1990, and has two books published by Whitecap in Vancouver ("Darwin Wiggett Photographs Canada" and "Seasons in the Rockies"). Currently Anita and Darwin are Editors-in-Chief of Canada's Photo Life magazine. In addition to their editing duties they specialize in landscape, nature, animal, humor and kid photography.
Sunday, July 14, 2013


Saturday, July 13, 2013
Bears, Bullies, and Boogeymen
|


We are into the hiking season (finally) and with the warm weather, the urge to get outside into fragrant nature hits the urbanite family hard. Thousands of weekend warriors flood the mountain parks, dragging their overloaded trailers into crowded campgrounds. Children, dogs, bikes, toys and coolers spew from the trailer doors, and the valleys are full of the sounds of buzzing traffic, barking dogs and human voices.
Living only an hour or so away from mountain parks, each summer I witness this transformation from tranquil ecosystem to overloaded environment. Needless to say, I usually avoid the parks during July and August because they are chokingly busy. The downside of this, as I recently discovered when looking back over images taken in the last couple of years, is a dramatic lack of green landscapes in my collection.
As a photographer, this just won’t do! When the long winter months close down on us, we want to be looking at blue-sky, summer scenics to get us through. There is only one problem: unlike President Roosevelt, I keep getting distracted by the source of my fears. A nasty encounter with a bear is one nightmare, for example, or choosing the trail that has the axe-murderer lurking behind the next bend. In daylight at my computer, these fears seem silly and trivial. In the woods hiking alone…well, that is when knowing the fears are disproportionate or irrationality does not alleviate the tension I feel.
I have, over the years, attempted to overcome my fears. This past winter, I ventured out alone one Sunday into a world of fresh, soft wet snow to take pictures. That day, the weather was still coming in; the snow seemed to be the air rather than fall through it. The whole world was an unrelenting white. The night before, a stinging rain had fallen, turning the pavement around our house into the wet, cold skin of a breaching whale. Overnight, though, the rain turned to fat flakes of sleet. I knew when I set out that Sunday morning that driving conditions were less than ideal. In fact, in my little Corolla with all-season tires, it was a questionable decision to head out at all.
My natural inclination is to avoid roads in such soft, slippery conditions, but I decided photographers were obviously made of sterner stuff, climbing cliffs, hanging out of planes, hiking miles in driving sleet. And don’t we as a society admire their tenacity and willingness to push limits? I resolved not to miss out on opportunities from overly cautious evaluations of my chances in the snow. I had to be out too—especially because conditions for photography (if not driving) were perfect! I determined that I was being a silly, scared person and that a truly passionate photographer would have set out without this evaluation in his or her head first.
Of course, I got stuck within minutes of stopping to take my first picture.
The asphalt was so slick underneath my car’s tires that the slightest pressure on the tires resulted in lateral rather than forward movements. Little did I know, but as soon as I stopped on the side of the road, I was doomed. Perhaps other more seasoned drivers would know my vehicle could not handle those conditions, but I did not because usually I stay home! I am not ashamed to say that in the end a nice hunter towed my car away from the side of the road.
But the point of this embarrassing story is the thought process I went through before I set out. This is the same process I go through before I ever head out to shoot on my own: not only do I think about where I’m going and what I’m going to take pictures of, but I also run through a mental checklist of potential dangers I may encounter on the way. How many people are likely to hike this trail? Will it be dark for any part of my trip? Do I have a cell phone? Have I notified someone of where I am going and when I plan to be back? I evaluate my risk of running into bears and rapists with about the same amount of gravitas. And sometimes I decide the place I wish to go is just too risky to go alone.
I do not think I am the only person who habitually thinks about safety from both the four- and two-legged variety of animal; we are bombarded with horrific stories of abduction, rape and murder and the sensationalism of the reporting eradicates any sense of proportion in the audience. I tell myself all the time that I am far more likely statistically to die in a car accident on the way to the trailhead! Even men aren’t so safe anymore it seems, although I would be surprised if many have that extra sense out for the campground bully or the boogeymen in the woods when hiking alone.
Part of this cautiousness is good risk evaluation: most people would agree that women are more likely to be accosted than men. But the problem arises when fears of possible dangers are out of proportion to the possibility of such things happening causing a person never to leave home. The trick is to do a healthy evaluation of the dangers, make your decision, and head out if it is within your “safe zone.” Here, knowledge is power. Read up on bears and learn something about their behaviours. Carry bear spray and know how to use it. Study the trail map and be prepared for your hike by bringing a compass (that you can use!), emergency supplies and appropriate clothing. Many people gain confidence by taking a self-defense course or studying a martial art.
And in the end, if you just feel better hiking with a pal, I think that is ok too. The main danger is when you stay home because of your fears and miss out on amazing photographic opportunities. As for me, the creativity and joy I feel when I’m out in nature on my own is powerful enough that I will put up with the crowds and risk an encounter with a boogeyman to come home with some images of our beautiful summers in the mountain parks.
Comments on NPN nature photography articles? Send them to the editor. NPN members may also log in and leave their comments below.
Samantha Chrysanthou was born in Lethbridge, Alberta. After moving for a period of time to northern Alberta, she returned in 2000 to southern Alberta to pursue a law degree in Calgary. After becoming a lawyer, Samantha began to realize her heart was more engaged in capturing the beauty of the landscape around her than debating the nuances of legal arguments in court. She has since left law to pursue writing and photography full-time. She particularly enjoys shooting the prairies, foothills and Rocky Mountains within an hour or so of her home in Cochrane, Alberta. Visit Samantha’s website to view more of her work at www.chrysalizz.smugmug.com.
Friday, July 12, 2013
Ebay Deals on Film Cameras
If you're considering taking up film photography as a hobby, or taking a photography class as an elective subject this fall during the coming school year, you've gotta take a look at the deals you can find on Ebay. All of these cameras are listed (at the time of this posting) at either an auction price, or "Buy it Now" price of $20 or less. If you're new to photography, you'll obviously want to buy a camera that comes complete with a lens. For those of you who are a little more experienced and possibly already a own a lens or two, the camera body might be of more interest to you. Either way, I really can't emphasize adequately how good the deals are right now.
One reason prices are so good, is because a lot of people are taking their vacations. Kids are out of school enjoying the summer break, or working part time jobs to earn money for the coming school year. In other words people are busy. Fewer people are paying attention to internet shopping opportunities currently available to them. High supply and low demand. The summer months nearly always cause a shortage of buyers because people are enjoying the nice weather. I speak as a Buyer and a Seller on Ebay. My best sales months are always between October 1st and March 1st. After that sales plummet until the following fall season, when people are once again back into their fall season routines. So now is a great time for you to get a good deal. I've deliberately chosen to focus on Nikon brand equipment because of the quality associated with the name. But Nikon isn't the only brand available. Pentax, Minolta, Yashica, Fuji, Praktika, Canon, Kodak, & just about any brand you can think of can be found on Ebay.


 This lot (below) of camera bodies is of particular interest to me because I collect cameras. Some of these are auto focus, while others are the older manual focus variety. Believe it or not this entire lot of cameras has an opening bid auction price of under $20. If you've read my previous articles on "sniping" you're aware that a good way to get a good price on this entire lot (or anything else you might want to buy via an Ebay auction ) is to snipe it.
 If you've read my article this far, I hope you'll take a few minutes to see for yourself the deals available to you. Until next time...happy shutter bugging!
by: Darryl Turner
One reason prices are so good, is because a lot of people are taking their vacations. Kids are out of school enjoying the summer break, or working part time jobs to earn money for the coming school year. In other words people are busy. Fewer people are paying attention to internet shopping opportunities currently available to them. High supply and low demand. The summer months nearly always cause a shortage of buyers because people are enjoying the nice weather. I speak as a Buyer and a Seller on Ebay. My best sales months are always between October 1st and March 1st. After that sales plummet until the following fall season, when people are once again back into their fall season routines. So now is a great time for you to get a good deal. I've deliberately chosen to focus on Nikon brand equipment because of the quality associated with the name. But Nikon isn't the only brand available. Pentax, Minolta, Yashica, Fuji, Praktika, Canon, Kodak, & just about any brand you can think of can be found on Ebay.
by: Darryl Turner
Subscribe to:
Posts (Atom)