Tuesday, July 16, 2013

Effectively using a Polarizer

When noted outdoor photographer and author Darwin Wiggett writes about filters, he speaks from his own years of successful experience. His series of stories featured on this blog have become a trusted reference source for many visitors. Now Darwin reviews the basic topic of polarizers, and offers us his personal perspective based on his own methods, experience and equipment.

"I use a polarizer for almost every landscape and nature image I make," says Darwin Wiggett. "In fact, I always start off with a polarizer on my lens. It's only if the filter has no effect -- or a negative effect (which is rare) -- that I will take it off the lens. And if you think you can replicate the effect of a polarizer in software, you can’t -- plain and simple. Below are my Seven Rules for using a polarizer.

Rule 1: Use a Polarizer for Side-Lit Landscapes

"Whenever I am shooting at sunrise and sunset and the landscape is side lit, a polarizer will have an enormously beneficial effect. The filter reduces the scattered light in the scene, effectively darkening the sky and adding saturation to the ground elements by removing glare from the reflected highlights. Compare the two images in Photo 1. The left image was taken without a polarizer and the right was taken with one (a Singh-Ray LB Neutral Polarizer). The right image has more saturation of colour in the foreground because the filter removed reflective glare. The sky in the right-hand image is also more saturated and richer in tone.

Rule 2: Use a Polarizer to Enhance Rainbows

"Any time you see a rainbow, immediately slap a polarizer on your lens! Spin the polarizer around and you’ll see the rainbow disappear totally and then reappear with great intensity. Obviously you want to rotate the filter to give you the best intensity in the rainbow. A rainbow is polarized light so a polarizer either kills the rainbow or it pumps up the colours enormously, depending on how you rotate it.

"As soon as I saw this rainbow in Photo 2, I knew I had a winner. But by the time I got my gear out and the composition set up, the rainbow was already fading. To recover the intensity in the rainbow, I simply used my handy polarizer. A side benefit to the polarizer is that it removed reflective glare from the road and saturated the colour in the yellow line.

Rule 3: Use a Polarizer for Intimate Landscapes on Overcast and Rainy Days

"One of the cardinal rules in landscape photography is 'in overcast light shoot tight.' Bald white skies in a landscape photo really jar the eye so most photographers concentrate on more intimate landscapes and exclude the sky when it is overcast. A polarizer won’t darken an overcast sky but it will eliminate reflective highlights off leaves, rocks and water to help saturate the colours in the photo.

"Just how much effect does a polarizer have on an overcast day? See for yourself in Photo 3 (top image with no polarizer; bottom image polarized with a Singh-Ray LB Warming Polarizer). I think you’ll agree polarizers have their place on grey days!

"On overcast days after a rain, it is even more important to use a polarizer. When everything is wet, there will be a lot of reflected light coming off the wet surfaces and this glare reduces the quality of tones and colour. In Photo 4, I used a Singh-Ray LB Warming Polarizer to supersaturate the colours. Who needs the hue and saturation slider in Photoshop when you can capture colours this good in-camera?

"Many people ask me why I use a warming polarizer when I could just change the white balance on the camera to get the same warm effect. The warming filter in the LB Polarizer is subtle -- just enough to offset the effects of UV light -- and the result is a cleaner file captured in-camera than if I just used a polarizer plus a warmer white balance setting. The better the information captured by the sensor, the better the final image. So on grey days, in particular, I always use a Singh-Ray LB warming polarizer.

Rule 4: Use a Polarizer to Remove Reflective Highlights on Glass, Metal and Water

"If you want to pierce through the reflective surface glare of water, see through glass and remove the glare from metal, be sure to use a polarizer. In Photo 5 you can see how the addition of a polarizer (right side) gives you views underwater that are not possible in the un-polarized photo (left side). With reflective surfaces, the reflection is sometimes the most important element and sometimes the subsurface is more important. Just rotate your polarizer until you see the precise effect you like best.
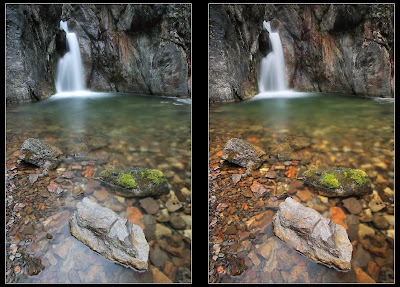

"In Photo 6 the image is improved by using the polarizer (right side image) because it allows the viewer to see the interesting rocks under the water which could not be seen well in the non-polarized version (left side image).
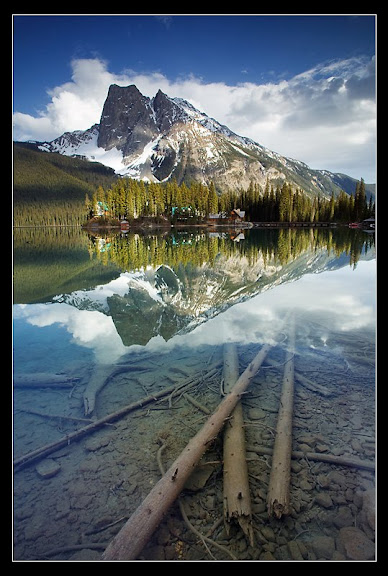
"In Photo 7, my LB Warming Polarizer allowed my to reach under the surface of the lake for my foreground interest. The polarizer not only let me see underwater, it also darkened the sky above and increased the warm colour saturation of the forest around the lodge. And it was all done in the camera.

Rule 5: Avoid Uneven Polarization of Blue Skies When Using Wide Angle Lenses
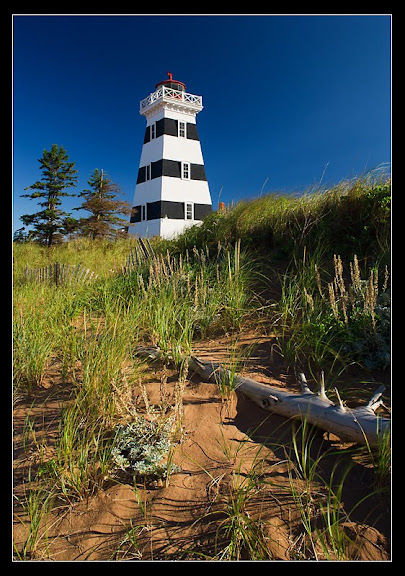
"One of the classic mistakes when using a polarizer is to rotate the filter to create the maximum effect when shooting blue-sky scenes with wide-angle lenses. In Photo 8 the upper center of the sky is much darker than the rest of the sky and for some viewers this uneven polarization is unacceptable. There are several solutions to this problem. Sometimes just rotating the filter slightly will reduce the uneven effect. Often if you move back a bit from the scene and use a little longer focal length setting on your zoom lens you will take in less sky and thereby reduce the problem. And finally you can make two exposures of the same scene, one with the polarizer rotated to maximum for the greatest benefit to the foreground and one exposure with the polarizer turned to minimum effect for a more even, ‘natural’ sky. Then you can blend the two exposures together in Photoshop.

Rule 6: Combine an ND Grad Filter with a Polarizer for the Ultimate in Contrast Control
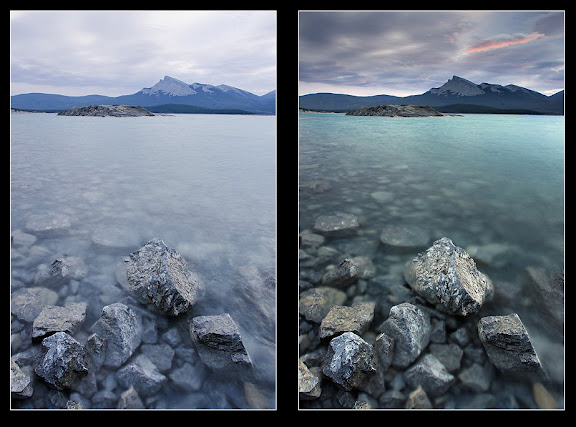
"One of the major hurdles to leap over in landscape photography is the problem of high contrast between the sky and the land. In many cases skies are so much brighter than the landscape that if we expose properly for one, the other is either washed out or is too dark. In Photo 9, the image on the left was made without any filters. Notice how the sky is overexposed without detail and how the water has a pale ghostly sheen. By adding a Singh-Ray LB Warming Polarizer, I not only removed the sheen from the water (caused by reflective glare and UV haze) but the polarizer also allowed me to see the underwater rocks much better and added colour saturation to the above water rocks (right image). The use of a 2-stop hard-edge Graduated Neutral Density filter over the sky and mountains darkened this overexposed area of the image revealing all the detail that was there that day. Whenever I have a bright sky in a landscape scene you can bet I’ll pull out both my polarizer and my grad for contrast control. To understand how to stack a grad and polarizer together see my previous blog article: Filters, holders and vignetting: building a filter system that works with your lenses

Rule 7: Combine a Polarizer with a Solid ND Filter or use the Singh-Ray Vari-N-Duo for Creative Motion Effects

"One of my favorite techniques in nature photography is 'Painting with Time.' This technique is created by combining a polarizer with a solid ND filter (e.g. 5 f-stops or more) to create long exposures to record movement in nature. Anything that moves -- rushing water, swaying grass, flitting clouds -- takes on a surreal, painterly look when recorded with a long exposure. The polarizer gives all the benefits we have seen with the filter (reduced glare, increased colour saturation) while the solid ND filter allows us to record nature’s movement over time.

"Often I like to use the Singh-Ray Vari-N-Duo because it is a polarizer and variable solid ND filter (2-8 stops) built into one convenient filter. But you can also use filter holders to combine a polarizer and a 5-stop solid ND filter like I described in Filters, holders and vignetting. To learn more about other benefits of using a polarizer, a grad and a solid ND filter together see The Terrific Triple Threat.

"Remember when you use a polarizer and a solid ND filter together -- or if you use the Vari-N-Duo -- that your exposure times will be long (from 4 seconds to several minutes), so a solid tripod and cable release are mandatory. There are other things to consider in terms of getting proper exposure and I cover these in detail in my Paint with Time download for anyone interested in detailed specifics.
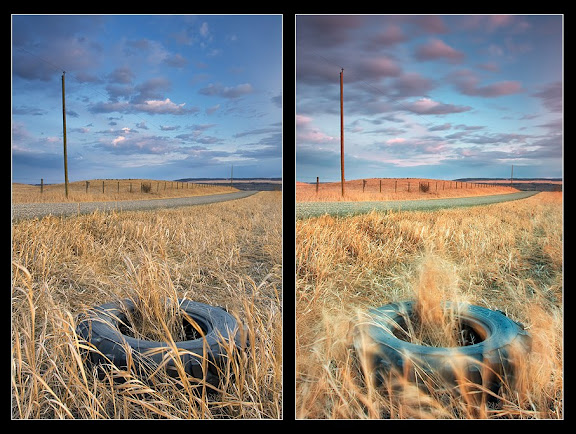
"In Photo 10, the left side image was taken on a windy day using a Singh-Ray LB Warming Polarizer to get a better colour and tonality in a side-lit scene (Rule 1). The exposure was 3 seconds at f16 at 100 ISO. In the photo on the right, I used the Singh-Ray Polarizer combined with the Singh-Ray George Lepp 5-Stop solid ND filter to give me a 121 second exposure at f16. Notice how the grass in the right-hand photo shows a much greater range of movements, like a brush stoke painting. As well the clouds streaked across the sky in the longer exposure and painted more colour and movement into the sky. I really love the effects of long exposure and combining a polarizer with a solid ND filter was all I needed to make these images happen.
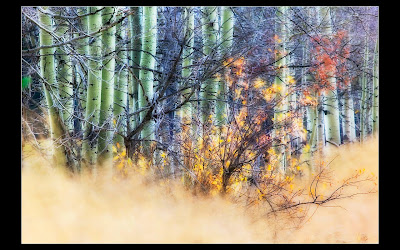
"In Photo 11, a polarizer gave me great colours on a grey day (Rule 3) and a solid ND filter gave me a long exposure to record the windy day in sweeps of tones.

"Rather than use a UV filter for protection of the front element of my lens, I use a polarizer instead. For my photography, a UV filter has very little effect, but a polarizer does. I simply leave a polarizer on my lens all the time, because for me, this filter is essential to help me capture the images I see in the world."

To learn more about Darwin's photography and check his other educational resources, stop by his website or visit his blog for the latest information.

Monday, July 15, 2013

Nature Photography

Same Old, Same Old…Why does all Nature Photography Look the Same?
Text and photography Copyright Darwin Wiggett
All rights reserved.
There has been much discussion and debate on NPN and other online photo forums about the predictable and ‘boring’ repetitiveness of nature photography. The critics point out that nature photography has become a ‘cookie cutter’ genre with all photos looking essentially the same. “You’ve seen one waterfall photo, you’ve seen them all…. Same goes for flower shots, butterfly images, lake reflections, and bird portraits – most everything nature shooters do is clichéd and trite. There is little that is new and exciting in nature photography,” says one particularly vocal critic. I tend to agree, a lot of nature photography does look the same, but I don’t think that’s so bad. The homogeneity of images is more a result of large numbers of shooters at a similar stage of development in photography rather than a lack of creativity by nature shooters.
Technical Perfection
In the not too distant past, to be a ‘good’ nature photographer only required technical mastery of the craft. I remember my early days in a camera club, the most respected and awed member was the fellow who photographed nesting birds using sophisticated, custom-built, high speed flash. To get his amazing images, he required not only extensive knowledge of bird behavior, but also technical mastery of artificial lighting. He shot everything on a Hasselblad and his 30 by 40 enlargements were mouth-watering in detail. For many members, his work was the pinnacle of achievement, but it could be reached (or should I say, replicated) by simply learning the details of his techniques.

Photo 1

Photo 2

Photo 3
Although his images were technically perfect, they seemed to lack emotion and after viewing 20 or 30 of his images, they all started looking the same. They were formula images. They soon got boring. Familiarity bred contempt.
I believe we have reached a similar place in the field of nature photography. No longer is technical excellence enough to make you stand out in the field. Almost everybody has technically excellent photos (just check out the NPN galleries for proof). Now we are longing for something more….
Personal Style or… Gimmick?
For me technical mastery of photography came easy. But, I noticed that among those photographers whose work I admired there was an individual ‘flavor’ to their photos that went beyond pure technical quality. There was a little something that immediately told me when I was looking at a Tim Fitzharris, a Galen Rowell, or a Frans Lanting shot.
What was that little ‘extra’? “Ah”, I thought, “it is about the subtle use of a special technique or point of view, that others are not using”. For example, Tim Fitzharris’ waterfowl portraits of the 80’s were all shot from right at the water level (in a special floating blind) and he was careful to capture wonderful moments of intriguing behavior. Nobody else at the time seemed to be able to do with waterfowl what Tim did. The same could be said for Galen Rowell’s work. At the time, his landscape imagery stood apart. His pioneering work with grad filters, lightweight photographic gear, and dramatic light changed the possibilities of what could be captured on film.
While working in a camera store in the eighties, I discovered a Cokin P173 filter (today commonly known as a blue-yellow or blue gold polarizer). According to the instructions, you were to use the filter in combination with another polarizer to get special color effects. I spun the filter around and was dazzled by what the filter did by itself. I bought the filter and spent much time photographing landscapes with this ‘new secret weapon’. No other photographer I knew owned one of these filters, and I could find no reference to their use in the photo magazines of the time. Soon I was producing imagery, which looked like no one else’s. Gee…I had found personal style!
Well… not really, I had found a gimmick that for a short time set my photos apart. Once I told friends about the filter and published articles in Canada and the US about the filter, I was no longer alone in using it. Now the filter or versions of it are in many nature photographers’ bags. For me, the filter has lost much of its impact (because it is too familiar and ‘boring’). Same thing goes for the Tim Fitzharris ‘eye level, bird behavior’ portraits. Now everybody seems to have a pile of these kinds of images (see the NPN Avian gallery) and they have become ‘run of the mill’, especially for those of us with a history of viewing bird photography. Fortunately Fitzharris wasn’t a one trick pony but continues to provide fresh alternative nature imagery see www.timfitzharris.com.
My point here is that you can’t rely solely on technique, no matter how unique, to set your images apart. Sooner or later someone will figure out how you do things and copy the effect. Style isn’t so much about technique as it is about vision.
Personal Vision: Is Immersion the Key?
What is photographic vision? I define it as a ‘personal’ way of looking at the world. A presentation of photography that resonates with other viewers but that also reveals something of the personality behind the lens.
How do we develop personal vision? On NPN, one critic offered that the best way to get unique imagery is through total immersion and specialization in one subject matter. He states -

“The more time you spend with a particular subject, or at a particular locale, the less often the truly significant images become a matter of "chance" images. If you are spending time traveling from one location to another you are not giving yourself the time to immerse yourself in your subject so that you are there when truly significant events unfold. The best volumes of work have been produced by those photographers who eat, breathe, and exist with their subjects, day to day, week to week, month to month. Those photographers are "there" when a truly significant event occurs.”
First of all, there is an assumption here that remarkable imagery can only be made of ‘truly significant events’. Under this assumption the best photographers (the most creative and unique) would be those who managed to capture the most significant events. Here photographic greatness would be about being or putting yourself in the right place at the right time.
I studied the social behavior of Columbian Ground Squirrels for ten years of my life. I accumulated thousands and thousands of observational hours in the field. In ten years I probably witnessed maybe a dozen ‘significant’ events. If I had a camera I might have been able to capture half of these events on film. So, in the end, I might have six ‘truly significant’ images to show for my immersion. Would you call me a photographer with vision and creativity? I think not (see Photo 1 of Richardson’s Ground Squirrels for a sample of a ground squirrel behavior shot).

Photo 4

Photo 5

Photo 6
I think it takes far more talent, vision, and creativity to portray with mood, emotion, and impact the mundane and everyday. If you can move a viewer with a photograph of something they see day in and day out, then you have really accomplished something. I think Edward Weston’s green pepper shot would serve here as a classic example.
The other problem with total immersion in one area of photography is that it leaves you with a narrow vision of the possibilities of the whole of photography as an art form and craft. By shooting a wide variety of subject matter, and using a wide variety of techniques; the photographer is exposed to many visual ideas and experiences and only then can these experiences be merged into a vision that goes beyond a simple technique, a gimmick, or a ‘lucky’ moment.
The most interesting people I know are not those who totally immerse themselves into one thing but who have had experiences in many arenas in life. The same for photography, the most creative imagery seems to come from those who have dabbled and played in the whole spectrum of image making. I believe the most exciting photographers are not the ‘specialists’ but rather the ‘generalists’ because the latter are not ‘blinded’ by the rules and narrow vision that so oft develops in the former.
Let me give an example. I think one of the most talented and creative photographers in North America is Daryl Benson. Here is a fellow that no matter what subject he tackles (landscape, wildlife, still-life, industry, business, people etc.), he puts a trademark ‘Daryl’ spin on it. Over the course of many years Daryl has used all sorts of techniques (specialty grad filters – see www.singh-ray.com, alternative lighting, light painting, and Photoshop magic) in his imagery. The techniques were never a means to an end but rather were used as tools to create a mood, an ambience, and an emotion to Daryl’s photos. The results give us a view into Daryl’s mind and Daryl’s world. No one but Daryl can offer us his view. And copying his techniques can’t replicate what Daryl can give us. Many photographers have tried to be a ‘Daryl clone’ and they all fail. Benson is a versatile and evolving artist who has found his own photographic path. He has achieved his vision by immersing himself, not in one subject or one approach but in the whole world of photography and into life itself. A photographer sitting in a blind for months waiting for a ‘remarkable’ moment will have much less to offer us in personal vision.
Developing your Vision
There is no simple formula for creating ‘unique’ imagery. Getting there is an evolutionary process. The new and wonderful wildlife and macro panoramics that George Lepp is creating is a result of a merging of years of accumulated photography experience.
If you ‘try’ to be different for the sake of being different, you will fail, or will rely on a gimmick (as I did), that will be short lived. Your vision can only come from within. This takes time, let it develop on its own, don’t force it. In the meantime, keep shooting, try different techniques, experience different subjects, break the rules, and worry less about what others think of your photos.
Most importantly, shoot for yourself. If the end result really pleases your eye you have succeeded.
The critics are bored with nature imagery because it has gotten stale for them. That’s their problem. No one can be creative and produce inspirational imagery if they are bored. Excitement breeds inspiration, it is just that simple. If you are excited by what you are doing, you are on the right path to personal vision.
About the images...
Photos 2 and 6 were created through the collaborative efforts of my wife and I. We were very pleased with these images and we think they are a little different than the standard frog and mountain imagery. Best of all these images were fun to create.
Photos 3,4, and 5 are images I created at different times over the course of my evolution as a photographer and represent images that I still enjoy and that are ‘different’ from my standard ‘formula’ nature work. Often your most memorable images are the ones that break from your ‘comfort zone.’
Darwin Wiggett - NPN 343
Editor's Note - Natural Moments Photography is comprised of the husband and wife shooting team of Anita Dammer and Darwin Wiggett. Anita has 17 years experience as staff photographer for the Glenbow Museum in Calgary and is currently doing freelance stock photography. Darwin has been shooting stock since 1990, and has two books published by Whitecap in Vancouver ("Darwin Wiggett Photographs Canada" and "Seasons in the Rockies"). Currently Anita and Darwin are Editors-in-Chief of Canada's Photo Life magazine. In addition to their editing duties they specialize in landscape, nature, animal, humor and kid photography.

Saturday, July 13, 2013

Bears, Bullies, and Boogeymen

Bears, Bullies and Boogeymen
Text and photography copyright © Samantha Chrysanthou. All rights reserved.


“…the only thing we have to fear is fear itself….” - Franklin D. Roosevelt
We are into the hiking season (finally) and with the warm weather, the urge to get outside into fragrant nature hits the urbanite family hard. Thousands of weekend warriors flood the mountain parks, dragging their overloaded trailers into crowded campgrounds. Children, dogs, bikes, toys and coolers spew from the trailer doors, and the valleys are full of the sounds of buzzing traffic, barking dogs and human voices.
Living only an hour or so away from mountain parks, each summer I witness this transformation from tranquil ecosystem to overloaded environment. Needless to say, I usually avoid the parks during July and August because they are chokingly busy. The downside of this, as I recently discovered when looking back over images taken in the last couple of years, is a dramatic lack of green landscapes in my collection.
As a photographer, this just won’t do! When the long winter months close down on us, we want to be looking at blue-sky, summer scenics to get us through. There is only one problem: unlike President Roosevelt, I keep getting distracted by the source of my fears. A nasty encounter with a bear is one nightmare, for example, or choosing the trail that has the axe-murderer lurking behind the next bend. In daylight at my computer, these fears seem silly and trivial. In the woods hiking alone…well, that is when knowing the fears are disproportionate or irrationality does not alleviate the tension I feel.
I have, over the years, attempted to overcome my fears. This past winter, I ventured out alone one Sunday into a world of fresh, soft wet snow to take pictures. That day, the weather was still coming in; the snow seemed to be the air rather than fall through it. The whole world was an unrelenting white. The night before, a stinging rain had fallen, turning the pavement around our house into the wet, cold skin of a breaching whale. Overnight, though, the rain turned to fat flakes of sleet. I knew when I set out that Sunday morning that driving conditions were less than ideal. In fact, in my little Corolla with all-season tires, it was a questionable decision to head out at all.
My natural inclination is to avoid roads in such soft, slippery conditions, but I decided photographers were obviously made of sterner stuff, climbing cliffs, hanging out of planes, hiking miles in driving sleet. And don’t we as a society admire their tenacity and willingness to push limits? I resolved not to miss out on opportunities from overly cautious evaluations of my chances in the snow. I had to be out too—especially because conditions for photography (if not driving) were perfect! I determined that I was being a silly, scared person and that a truly passionate photographer would have set out without this evaluation in his or her head first.
Of course, I got stuck within minutes of stopping to take my first picture.
The asphalt was so slick underneath my car’s tires that the slightest pressure on the tires resulted in lateral rather than forward movements. Little did I know, but as soon as I stopped on the side of the road, I was doomed. Perhaps other more seasoned drivers would know my vehicle could not handle those conditions, but I did not because usually I stay home! I am not ashamed to say that in the end a nice hunter towed my car away from the side of the road.
But the point of this embarrassing story is the thought process I went through before I set out. This is the same process I go through before I ever head out to shoot on my own: not only do I think about where I’m going and what I’m going to take pictures of, but I also run through a mental checklist of potential dangers I may encounter on the way. How many people are likely to hike this trail? Will it be dark for any part of my trip? Do I have a cell phone? Have I notified someone of where I am going and when I plan to be back? I evaluate my risk of running into bears and rapists with about the same amount of gravitas. And sometimes I decide the place I wish to go is just too risky to go alone.
I do not think I am the only person who habitually thinks about safety from both the four- and two-legged variety of animal; we are bombarded with horrific stories of abduction, rape and murder and the sensationalism of the reporting eradicates any sense of proportion in the audience. I tell myself all the time that I am far more likely statistically to die in a car accident on the way to the trailhead! Even men aren’t so safe anymore it seems, although I would be surprised if many have that extra sense out for the campground bully or the boogeymen in the woods when hiking alone.
Part of this cautiousness is good risk evaluation: most people would agree that women are more likely to be accosted than men. But the problem arises when fears of possible dangers are out of proportion to the possibility of such things happening causing a person never to leave home. The trick is to do a healthy evaluation of the dangers, make your decision, and head out if it is within your “safe zone.” Here, knowledge is power. Read up on bears and learn something about their behaviours. Carry bear spray and know how to use it. Study the trail map and be prepared for your hike by bringing a compass (that you can use!), emergency supplies and appropriate clothing. Many people gain confidence by taking a self-defense course or studying a martial art.
And in the end, if you just feel better hiking with a pal, I think that is ok too. The main danger is when you stay home because of your fears and miss out on amazing photographic opportunities. As for me, the creativity and joy I feel when I’m out in nature on my own is powerful enough that I will put up with the crowds and risk an encounter with a boogeyman to come home with some images of our beautiful summers in the mountain parks.
Comments on NPN nature photography articles? Send them to the editor. NPN members may also log in and leave their comments below.
Samantha Chrysanthou was born in Lethbridge, Alberta. After moving for a period of time to northern Alberta, she returned in 2000 to southern Alberta to pursue a law degree in Calgary. After becoming a lawyer, Samantha began to realize her heart was more engaged in capturing the beauty of the landscape around her than debating the nuances of legal arguments in court. She has since left law to pursue writing and photography full-time. She particularly enjoys shooting the prairies, foothills and Rocky Mountains within an hour or so of her home in Cochrane, Alberta. Visit Samantha’s website to view more of her work at www.chrysalizz.smugmug.com.

Friday, July 12, 2013

Ebay Deals on Film Cameras

If you're considering taking up film photography as a hobby, or taking a photography class as an elective subject this fall during the coming school year, you've gotta take a look at the deals you can find on Ebay.  All of these cameras are listed (at the time of this posting) at either an auction price, or "Buy it Now" price of $20 or less.  If you're new to photography, you'll obviously want to buy a camera that comes complete with a lens.  For those of you who are a little more experienced and possibly already a own a lens or two, the camera body might be of more interest to you.  Either way, I really can't emphasize adequately how good the deals are right now.

One reason prices are so good, is because a lot of people are taking their vacations.  Kids are out of school enjoying the summer break, or working part time jobs to earn money for the coming school year.  In other words people are busy.  Fewer people are paying attention to internet shopping opportunities currently available to them.  High supply and low demand.  The summer months nearly always cause a shortage of buyers because people are enjoying the nice weather.  I speak as a Buyer and a Seller on Ebay.  My best sales months are always between October 1st and March 1st.  After that sales plummet until the following fall season, when people are once again back into their fall season routines.  So now is a great time for you to get a good deal.  I've deliberately chosen to focus on Nikon brand equipment because of the quality associated with the name.  But Nikon isn't the only brand available.  Pentax, Minolta, Yashica, Fuji, Praktika, Canon, Kodak, & just about any brand you can think of can be found on Ebay.  


 This lot (below) of camera bodies is of particular interest to me because I collect cameras.   Some of these are auto focus, while others are the older manual focus variety.  Believe it or not this entire lot of cameras has an opening bid auction price of under $20.  If you've read my previous articles on "sniping" you're aware that a good way to get a good price on this entire lot (or anything else you might want to buy via an Ebay auction ) is to snipe it. 
If you've read my article this far, I hope you'll take a few minutes to see for yourself the deals available to you.  Until next time...happy shutter bugging!


by: Darryl Turner

Wednesday, July 10, 2013

How To Choose the Perfect Tripod

By: Darwin Wiggett and Samantha Chrysanthou We are always amazed when instructing workshops and seminars at the array of terrible tripods our poor students lug around with them. How can you make great photos when you are frustrated with your gear? Answer: you can’t. Choosing the best tripod for YOU and the best you can reasonably afford is more critical than choosing your camera. Unfortunately, many landscape photographers do not know this and are wandering around in the wilderness with heavy, clunky, outdated gear that at best detracts from their enjoyment of photography and at worst even preempts them from taking a picture. If you want the full range of creative control over your gear, then a good tripod is a must. But what is good for one shooter may not be best for you. As with many things in life, you must balance different factors in order to arrive at the equation of considerations that tells you which is the best brand for you. But to make your task easier, here are four critical factors to consider when looking for that perfect tripod. 1. Usability This is the most important of the four factors. If you don’t like working with something, then it does not matter how light, cheap or pretty it is; you won’t be taking it out and you will have wasted your money. The ergonomics of the tripod dictate just how enjoyable the ‘sticks’ are to use. You want to look for a tripod that extends at least to eye-level when the legs are spread evenly: this will give you a little more play on sloped land and avoid ‘photographer’s back’ which is a burning sensation caused by stooping for hours to a viewfinder on a short tripod. Depending on how high your ball head is, you have some wiggle room with this factor, but ensure that you can make vertical and horizontal images without having to stoop! The second component of usability is how quickly and easily you can use the tripod. Does it take you forever to extend or compress the legs? Are you unable to open a twist-lock, leg extension mechanism wearing mittens in the dead of winter? If you like to shoot macro, can you open the legs from the hinge where they join such that they will extend straight out horizontally or do you have a limited angle of extension? If you like to get close to your subjects, then this can be an important consideration. Finally, do you need a tripod that compresses in on itself so that you can fit it into your backpack or luggage and travel with it? In the end, the only way to determine how usable a tripod will be is to take it on a test drive before you buy. 2. Stability A tripod’s only purpose is to stabilize your camera, so make sure that it is doing just that! Everything else being equal, the heavier the tripod the more stable it will be. Long lenses and heavy cameras require more stability. Stability can be increased to a degree by using strong materials like carbon fiber and rigid leg locks. Also, many tripods offer a center column hook so that you can add a weight like your camera bag or sling of rocks to increase stability by increasing weight. Another consideration is the balance between height and stability: the fewer the leg sections you have on your tripod, the more stable the tripod becomes. For example, a three leg section tripod tends to be more stable than a four leg section tripod. Another consideration is the material of the tripod feet. Soft rubber transmits less vibration through the legs and grips well on slick surfaces. Adding the option of a screw-out toe spike increases traction although at a small increase in weight. And, on some models, the toe cap can come off with use and lost so do your research before buying. A final consideration is the height/stability problem. Using a centre column to achieve height with less weight results in much less stability overall. Either buy a tripod without a centre column or a removable column so that you can customize your tripod according to your needs. Finally, the lower the tripod is to the ground, the more stable it is. Look for a tripod that allows you to get as low as possible for those close up subjects. 3. Weight If you enjoy breaking away from roadside shooting, or if you need to meet weight requirements for luggage, then weight is an important consideration for you. You will need to evaluate the optimal point between how much you can carry and how much stability or flexibility you require out of a tripod. For example, the heavier the tripod the more stable it tends to be but also the harder to travel with. Tripods can be made with different materials including aluminum, magnesium, basalt and carbon fiber. Carbon fiber tripods are the lightest of the bunch without sacrificing stability and strength; but they also cost more! Remember to add in the weight of your camera and heaviest lens when deciding how heavy and stable your tripod needs to be! Check the load capacity of the tripod before you buy. For backpackers, a tripod that weighs less than 2.27 kilograms (5 pounds) – including your ball head – is often a good weight for camera and lens combinations that are not on the heavy side. 4. Durability Beware the steal of a deal! Tripods that are basically knock-offs of reputable brand names may look similar on the outside but compromises in material quality are often made in less visible parts of the gear. Tripods with plastic components seem especially susceptible to breakage. For photographers who spend a great deal of time battling the elements outdoors, resistance to rain, snow, salt and sand is also of concern. Can you take the tripod apart for ease of cleaning, service, and replacement of parts? Are the leg locks robust and resistant to sticking or gumming up in frozen temperatures, sand and mud? Are loose components liable to fall off or snag in vegetation? Is the tripod rustproof? We prefer tripods that require minimum maintenance that we can perform ourselves at home. Ask around to get inside information from photographers on what brands and styles of tripods work for them and why. In the end you need to balance usability, weight, stability, and durability to find a tripod that comes closest to your ideal. There is no perfect tripod for everyone, but by comparing spec sheets and trying out a few tripods in the store, and asking other photographers about their own preferences, it will soon become clear which tripod might be best for your needs.

Tuesday, July 9, 2013

Great Abstract Wintery Photos

While I am, and always will be a 35mm film "purist" photographer at heart, I realize that even some of us "purist" are tempted to digitize and tinker around with our photos from time to time. So, for the tinkerers among us I'm including this article by Darwin Wiggett. Winter is the season of hibernation for photographers; the time of year when we hunker down at the computer and process images from the summer and fall; the season when dust collects on our camera gear and trips outdoors mostly involve shoveling the driveway or boosting our car battery. But for photographers willing to brave cold fingers and toes (not to mention dripping noses), winter is the single best season to create one of the highest forms of photographic art – the abstract. What is an abstract photo? Abstraction is about getting to the essence or details of a subject, telling the truth about the subject in a non-contextual manner, and seeing the subject without definitions. In abstraction we are presenting the subject purely in terms of shape, line, texture, colour, or pattern. In fact, total abstraction bears no trace or reference to anything recognizable. Abstract photography doesn’t strive to portray something realistically but instead uses components of the subject (shapes, lines, textures or colours) to create visual design and emotional impact. For nature photographers not used to seeing in the abstract, winter does all the heavy lifting for us covering and simplifying the world with a quiet blanket of white. Winter has smoothed nature’s complex, visual palette and presents to us graphic opportunities in the purist form possible. For us, winter is an exciting time to capture artful images. Below are a few tips and techniques to help you create winter abstracts. Shoot with a telephoto zoom One of the easiest ways to gather abstracts is to attach a telephoto zoom to your camera (e.g. a 70-300 or 100-400mm lens) and start hunting for shape, line and texture in snow drifts and ice formations. Remember, your goal is to frame up portions of your subject and not show the subject in a documentary manner. Telephoto lenses make isolating graphic sections of the subject easy. Sunny, winter days with low light skimming across the landscape are perfect for capturing the detailed and crisp lines, shapes and textures in the snow. We like to go out to areas where the snow is not a uniform blanket but instead is undulating where it covers bushes or rocks. Here we hunt for patterns of shadow and light skimming across snowy mounds. We especially like side and back lighting because these qualities really highlight the shape of snow mounds. We use our telephoto zooms to pull in the alternating patterns of blue shadow and white light. Try to fill the frame with shape, line or texture that pleases the eye and creates a rhythmic pattern across the frame. Use depth-of-field to define your subject Aperture choice can really affect the final look and feel of your photograph. For example, if you want to focus your viewer’s attention on just a portion of your subject, then use a small number like f2.8 or f4. Small aperture numbers give you a small slice of focus and, when used in conjunction with a telephoto lens, you will get just a sliver of focus. Pick what you want to be sharply focused, get precise focus on that point, and then use a small aperture number to keep that thin slice of focus in your photo. Small aperture numbers often leave you with a dreamy ethereal look that works well with abstracts. If you want a large slice of focus in your winter abstract, then pick a large aperture number like f22, focus 1/3rd of the way into the image frame and you will get the most depth of field (amount of apparent focus) possible so that your abstract is sharp from foreground to background. If you want to learn more details about how to use aperture for creative expression see our eBook, The Creative Use of Aperture. Get close for more detail Another easy way to get more abstract images is simply to get close to your subject. We like to make abstracts of ice patterns and to do this we use a macro lens or a telephoto zoom lens at its closest focus. To get close enough with a macro lens means getting down onto the ice. We wear padded snow pants so we can comfortably get down on the ice to make abstracts. We also use a tripod with legs that splay out so we can get our cameras close to the ground for low level abstraction. The shorter the focal length of the macro lens, the closer you will need to be to the ground to capture your detailed image. We prefer 100mm or longer macro lenses so we can shoot the ice patterns from a more comfortable position (kneeling or standing). With short macro lenses we had to lie on the ice (very cold!) Turn your abstract into a black & white You can make your image even more abstract and less representational by eliminating all colour from the scene. Winter scenes are often mostly monochromatic to begin with so why not enhance what you are provided? We always shoot our images in raw format so that after the fact, even though we have a colour image captured, we can easily turn it to black & white in post-production. Our favorite black & white conversion tool is to use Nik Silver Efex in either Lightroom or Photoshop. Silver Efex is an easy to use black & white conversion program that we recommend although there are many methods of converting an image to black & white. Using live view for black & white abstraction You can pre-visualize how your subject will look in black & white even before you press the shutter. First, you need to have a camera with live view. Go into the menu on your camera and find ‘picture styles’ (Canon) or ‘picture controls’ (Nikon) and set it to monochrome. Now, when you take a photo and playback the image on your LCD, the displayed image will be black & white. But wait – there’s more! If you want to see the black & white effect before you take the photo, simply turn on live view and displayed on the LCD will be your scene in black & white! You can see everything you frame as a black & white even before you take the photo. Ansel Adams would love it! While in monochrome live view mode, simply see if the shapes and tones work well as a black & white and, if they do, then take a photo. If you set your camera to JPEG, then the resulting photo collected by your camera will end up being a finished black & white image. But if you shoot raw, the LCD will display a black & white image, but the actual image captured by your camera will be a colour photo (very useful to make creative monochrome conversions). So if you shoot raw you can visualize in black & white but have all the colour information available to you to make any kind of black & white conversion you want. This is a very powerful creative tool. Be brave So get out and go hear the crunch of the snow beneath your winter boots. Snap a few frames and see how easily winter provides photographers with opportunities for abstraction. We are constantly thrilled with nature’s art and in particular with winter’s simple renditions. For us, winter is a time for internal expression and looking at the world with a painter’s eye. We may get frosted ears and rosy cheeks but that’s a small price to pay for the gift of winter abstracts. Happy shooting! - See more at: http://oopoomoo.com/2013/02/how-to-make-great-abstract-photos-of-wintery-scenes/#sthash.q6tCBopA.dpuf This article courtesy of Darwin Wiggett.

Monday, July 8, 2013

Andy Murray

 Andy Murray winning at Wimbledon.  This photo has been added for you tennis fans.
 Disclaimer: I absolutely did NOT take this photograph.  I am in no way claiming credit for this picture.

Saturday, July 6, 2013

Composing a Portrtait

Film Photography


This article merely aims to highlight the key "rules" of composition, and focuses primarily on a head and shoulders portrait of a single sitter.
Principle point of interest
Any image requires a principal point of interest, and in a portrait this is usually the subject's eyes.
The principal point of interest should not be dead centre in the frame: this is too static and symmetrical. Imagine a line running through the subject's eyes, and another at 90° running through their nose and chin to form a cross. The best position for this cross is slightly above the horizontal middle of the frame, and slightly to the left or right of the vertical middle.
Whether the cross is slightly to the left or right depends on which direction the subject is looking. If they are looking to the left, there should be more background to the left, so the cross is placed the the right of centre. Conversely, if they are looking to the right, the cross should be placed to the left. This helps prevent the viewer's eye from being drawn out of the picture when it follows the subjects sight line.
When the subject is facing directly towards the camera, consider the direction of the shoulders. Here the aim should be to have a little more space in front of the subject rather than behind them. So, if the right shoulder is nearest the camera, frame the shot so their eyes are also right of centre.
Returning to our imagined cross on a face, if this is upright, the portrait will appear very formal. This is often a good option for more mature subjects. Tilting the cross to either side creates a diagonal axis to the features, which suggests movement an vitality, and is often best for younger subjects.
Triangles
Composition is always improved by the creation of triangles. When composing a portrait, try to visualize the outline of the subject fitting into a triangle.
Tall triangles in an upright format suggest height and dignity. In a landscape format they hint at confinement or struggle. Low triangles in a landscape format imply stability. In an upright format they give an impression of weakness. Triangles tilted forward suggest movement, and titled backwards they imply liveliness. Tilt too far in any direction, and stability will be lost unless a second stabilizing element is introduced. If someone looks like they are about to fall over, it should tell you that the composition of the shot is wrong (e.g. A head tilted greatly to one side may need a hand to support it. Introducing an arm bent at the elbow creates another triangle and so restores stability).
Lines can be broken so long as the eye can easily skip them. Lines can also be imaginary, or implied. For example, a viewers eye will always tend to follow the subject's line of sight.
Tones
Our eyes are always more attracted to light tones than dark tones. Directional tendencies can be created by tones, so for example, if there are two or more adjacent light areas, the eye will travel from one to the other.
In a portrait, the face should be the principal attraction, and therefore lighter. Any other light area (clothing, hands) need to be subdued in tone, Avoid strong patterns (e.g. clothing), as these can compete with the face for attention.
A portrait needs to be tonally balanced. This means not having all the dark tones on one side, and all the light tones on the other (Unfortunately, this is what we see in a typical wedding photo of the Bride and Groom!).
Backgrounds
Working as a portrait artist, I rarely reproduce the background in a reference photo, for good reasons, and choosing the background for a portrait is probably worthy of a dedicated article (see Backgrounds).
All I am going to say here is that the simplest consideration is either a light or dark background. Dark backgrounds are commonly see in classic portraits. Light backgrounds are currently trendy in modern photography. For my purposes, a light background works best, because it is makes the outline of the subject easier to see.
Colour
Colour harmony and behaviors are an important element of composition. Colours convey mood and depth. Cool colours appear to recede (blue-greens, blues, purples), while warm colours appear to advance (yellows. oranges, reds). Cool or neutral colours work best for backgrounds, while warm colours in clothing help give a portrait depth.
Colour choices depend on the subject. Blondes and brunets have differing requirements; blue works well with the former, while blue-greens/greens better suits the latter. Somber colours suit older subjects, while vibrant colours go well with young subjects.
The key aim should be to choose colours that compliment, and are sympathetic to, the subject's colouring.
Footnote: There are circumstances when these "rules" may be broken, but the intention of this article is to convey simple guidelines applicable to most situations.
Portrait photography from a Portrait Artist's perspective. Portraits by John Burton

Wednesday, July 3, 2013

Infant Photography


Film Photography

Child Photography Tips - Capturing That Special Moment in Time


As soon as a couple finds out they're pregnant, the first thing they do is to go buy a camera for recording the first precious moments of their baby. The first time their baby opens their eyes, the first time they smile-those moments are fleeting and gone forever, unless captured and preserved for all time because they grow up so quickly. It is important to document the innocence of youth by capturing it in a picture, to anchor the memories around happy times.
Professional photography, while good for documenting growth and change, never seems to capture the real child, that playful little spirit that inhabits your day. You have to do that yourself, immediately when it happens and in the moment that it occurs. So how to do you do that? Well, it's not as difficult as it may sound. You don't need to be a professional photographer. With a little forethought and a ready camera and you too will be able to freeze frame those specials times for you and your child.
A simple point and shoot digital camera is really all that you need. Most cameras made today have automatic focus so that you won't have to fiddle with the settings. And many of the inexpensive cameras give good results, similar to their more expensive cousins. Pay attention to the pixel count as this will determine how well you can enlarge your shots, should you choose to do so. The more pixels, the bigger you can make the picture and better the resolution.
Four Child Photography Tips:
1. Capturing the Moment - Kids are natural actors and clowns, approaching life as adventure, because for them it is. They really don't know what's around that next corner, so it's best to hang back and watch them discover. Don't try to pose them or stage them in front of something. That's when they get stiff, trying to please you. Let them play. Let them experience. Have your camera at the ready for when magic happens.
2. Shoot Like a Pro - Look Later-One of the secrets of photography is that capturing the one special moment may take more than one shot. Sometimes it takes several shots and you don't see the best one until later when looking back at the pictures. Shooting digitally allows you to immediately look at your shots, so that you can delete or save the good ones. If you do that, however, you might miss the great one because the kids don't stop playing, they keep moving.
So here's a suggestion, rather than shoot one picture and look at it, just shoot and shoot and look later. You can always delete the ones you don't like, but you can never recapture the moment missed while you looked at the pictures one at a time. If you're always waiting for that magic shot, it will never come, so just fire the shutter and you will find the magic.
3. Step into Your Shot - Most people have a tendency to pick up a camera and then immediately to step back from their subject. That is not a good idea when taking pictures of your children. You don't want to be on top of them to squelch their spontaneity. But you do want to be close enough so that "they" are the subject of the shot. In other words fill you viewfinder with the action or the head and shoulders of the child. Lose the background, the statutes, the playground equipment. These are only distractions inside the frame. Remember you're taking pictures of your kids, not the tree behind them, so cut it out your viewfinder. This is called viewfinder editing.
4. Shooting Manually Rather Than Automatically - After looking at your pictures and after becoming familiar with your camera, you may decide that you want to try some hands on manual adjusting rather than to rely on your automatic settings. Most digital cameras allow for manual adjustment and come with easy to understand instructions. However, some things about cameras, old or new are forever.
For instance, if you're attempting to capture action, then you have to have a fast shutter speed. Most cameras refer to it as "stop action." Shutting speeds above 1/250 will stop action. The faster the shutter speed the better. You will also have to adjust the aperture setting, too. The aperture determines how much light is let into the camera. Bright sunny days require less light than dull overcast days. Practice shooting in various light conditions to familiarize yourself with the way to adjust your equipment.
Don't be intimidated by your equipment. Following these four child photography tips and have fun with the camera as well as enjoy the kids as they play. Snap away while they play and you will find those special keepsake moments, guaranteed.
I hope you have found these child photography tips useful.
Jonnie Blaylock is a hobbyist photographer that helps new photographers learn the fundamentals with his child photography tips and more.

Tuesday, July 2, 2013

Travel and Scenic Photography

Film Photography When you're driving through the mountains somewhere, and you notice a car parked half off the road and some guy leaning to the left to avoid a branch with his Rebel 2000 camera in the act of focusing, you've met me. I do this because, to me, a trip isn't fulfilling unless I've preserved that beauty for posterity. I'd like to share some of the techniques that make scenic photography such a wonderful artform - simple, yet elegant.
First off, equipment. As much as the cheapo disposable camera beckons, get real. These cameras have fisheye lenses which I call "spam" lenses. They cram everything in, with equal blurriness and boringness. Good photos are sharp, unless you use blur for artistic effect. Sharp comes from an adjustable lens. It can be a fixed lens or a zoom, but it must focus specially for each picture. Fixed lenses are limiting for scenic pictures, where to frame the shot you may need to move long distances. Imagine using a fixed lens on the Washington Monument, when you're half a block away! Zooms get my vote, even though they often don't have as wide an aperture, which limits their capabilities in low light situations.
Practically speaking, an SLR is the absolute best. They are lightweight, and can be used with top quality lenses. Film SLRs tend to be less expensive, but have the limitations of film, meaning you have to get it developed and so forth. Digital SLRs are VERY expensive, so for the budget conscious either go with a film SLR or a high quality basic digital camera. With digital, resolution is also a critical factor, so look at the specs before you buy.
OK, we've got the camera, emotions are running high, and that's great, but not too great! Sometimes I find a spot that is so wonderful, I start shooting like a madman, only to be disappointed by the pictures. What happened? Emotions. When you experience a place, there are sounds, aromas and breezes as well as the visuals of the spot. Needless to say, you can't photograph all of these elements, only the visual. When overwhelmed by the spectacle of a scenic hotspot, we are often overwhelmed by all of these elements.
So what to do? Look through your camera. The viewfinder does not lie (usually). Try to see what you are looking at as the finished picture. Most people perfunctorily take pictures, hoping that somehow the shot will come out great. If you wonder how the pictures came out when you are on the way to the drug store to get them, you're doing something wrong. At the moment you click the pic, you should know exactly what you will get. (Of course with digital, that's not a trick!).
Now, I was a tad dishonest in saying that you can't capture all of the elements of a scene. You can hint at them. For starters, motion. Yes, even in a still picture, there is motion. Something happened before, during and after your picture. In a mountain vista scene, you may find something that hints at motion, whether it be a branch of a tree that has been swaying in the breeze, or a river flowing through the valley below. These add a sense of motion.
Then there's the "rule of thirds." When you place the main object of the picture smack-dab in the middle, it is static and boring. Place it one third of the way from either side, and you IMPLY motion. Put the horizon in a landscape photo a third of the way up or down, not across the middle.
Remember, when a person looks at a picture, their eyes move. You want to frame your photo to help that movement. If you can find some lines in the scene, such as a skyline, cloud formation, path through the forest, etcetera, use it interestingly, and with the rule of thirds to draw your viewer's eyes into the picture.
Avoid "summit syndrome." You get to the top of Mount Washington and shoot the majestic vista. Great. The pictures come out ... boring! How? No PERSPECTIVE. Big vistas will be flat unless you have an object in the foreground, such as a rock or a tree, to give them perspective. Then the eye really grasps how big this scene is. People enjoying the view is a real winner, because the viewer may identify with their emotions, giving the image real impact.
Cheese! Yes, you do have to take the family photos. It's obligatory. But when you do, make sure that they show the LOCATION of the photo. Otherwise, you might as well do it on your driveway. Frame the scene in context, with landmarks as part of the picture. Find a way to tell as story in the picture, such as little Sara climbing up the rocks by the waterfall.
Finally, any element in the picture that hints at more senses than just the visual will make it remarkable. Actor headshots for example, tell a story about the subject. You can almost hear them saying their next lines. If you photograph a garden, the viewer may experience the aroma of the flowers. A tourist street with an accordion player on the corner may have your amazed friends whistling "Dixie."
In summation, picture taking on travel is recording the experience in a satisfying way. Use motion, perspective, sensory, storytelling and so forth, to bring your photos to life. Oh, and needless to say, make your job easy and go to great places! See you at the overlook!
Seth Lutnick is a photographer, composer, and performer. He has taken thousands of scenic photos, recorded two albums of original music, and appeared on stage, TV and film. Visit his website - www.getitdone.biz - for more detailed plans on photography, music, health and education, and extensive product links for the resources to fulfill your goals.

Cowboys

Film Photography

Shooting Cowboys

By: Phyllis Coletta
Photographers love a challenge and there’s nothing more exciting than trying to capture motion on film. In this arena, there’s hardly a venue more exhilarating and powerful than cowboys running horses through the Western wilderness. In Colorado, there are two kinds of “Cowboy Action Shooting.” The first involves guns; the second is a kinder, gentler form of shooting that simply places the photographer in front of the rustling cowboys.
Taking action photos of America’s frontier is the newest rage in photography. It’s as if we want to remember our roots, the great bold Western terrain and the men that run on and tame it. A working horse or cattle ranch offers a wealth of material for the artistic eye…everything from still life photos in a dark barn to the full moon setting over the Rockies. When cowboys work, they move, and all hell might bust loose as a herd of 50 horses comes pounding through the pasture on round up. The color, light, movement, and excitement provided by ranch photography is unparalleled. It is uniquely American and provides something we appear to be craving: remembrance of strength, embodied in the cowboy spirit.
A quick google search of the internet reveals that so-called “cowboy photography” is big, and growing. There are many professionals offering such photographs for sale and a few who provide workshops and mentoring in this special arena. Whether amateur or professional, working cowboy ranch photography offers the kind of challenge that will light your fire. You’ll bring home with you a product that will make you proud: real life scenes of the Old West, where folks today remain true to the spirit that built this country.
Article Source: http://www.ArticleJoe.com
Phyllis Coletta and her partner offer three to five day photography workshops at Bear Basin Ranch in the beautiful Sangre de Cristo mountain wilderness of Colorado. In conjunction with one of Colorado’s premier wilderness photographers, Andy Cook (rockymtnrefl.com), KB Mountain Adventures provides a complete package for the would-be cowboy shooter. Visit http://www.kbmountainadventures.com/

Wednesday, March 13, 2013

Photographic Art

  Photographs Everywhere, But Is It Really Art?  


I once heard a lady say to a photographer that she would have bought his work if it had been a painting. She liked the image, but for whatever reason didn't consider the medium suitable for her “it's just a photo”.
I am sure that some share her thoughts, whilst others would be quite happy either way, but a growing number of people do recognise photography as an Art form. And collect it.
“There are three fundamental components of what we call art. First, is the artist; second, is the medium; and third is the artwork. All three, clearly are interrelated.' --- Tad Beckman ---


Defining Photographic Art

It is true many people do regard photography as merely a reproductive medium, and the photographer as simply the technician. And if this were just about your holiday snaps then it would be a valid point.
So let's start with my definition of photographic art. I say my definition because there is no stock answer it means different things to different people.
For me it's about creating a beautiful image that is an interpretation of the scene that I saw in my mind captured on film, rather than just a recording of what is already there.
It's about the photographer being the choreographer of the various components; the composition is critical, as is the lighting, weather conditions and the colours at play.
It's not just about pressing the shutter release, although timing is everything. Patience comes into play too, as you wait for all the components to be perfect all at the same time.
Some things you can control, but the weather well that constantly throws out surprises that can add that hint of drama to a picture or send you home disappointed.
It's these uncertainties that add the challenge, and this results in creativity as you respond to the situation. Other photographers will have their own criteria, but we all are producing very personal pieces of work that we feel passionate about and that are a representation of our interpretation of the world.

A Photograph - More Than Just A Sheet Of Paper With An Image On It?


Oh yes! Typically a photographer will capture an image that pleases their eye. They will create something that is close to their heart, and therefore give a little of themselves in the image.
Effectively they are allowing you to see how they perceive the world to be, one moment at a time. Add into the fact that many photographers print their own work (once they have an order!), and sign it then you could say you are buying a piece of history - or designer art!
In other words you are not buying a mass produced print, and naturally the price reflects this. You are buying into the reputation of that photographer and you will expect to pay more. When someone is starting out and building reputation then you are investing in the potential of that person.
You won't pay as much, but you'll be backing your own instinct and demonstrating your belief in that person's talent. Contemporary photography is affordable art.
Subject Matter - Does It Matter?
Personally I don't believe it does, and I mean this in the sense that people will be drawn to your work because they have seen something of yours and liked your style, and typically that means they like your choice of subject matter too.
My preference is for landscapes and increasingly flowers, whilst other photographers prefer sport, people or a more abstract approach to name but a few.
I think the key to preserving artistic integrity is to shoot for your own personal satisfaction, although naturally as your reputation builds you will develop an understanding of what collectors want, but for me I always have to love the image myself to want to share it with the world. Anything less and it stays in the drawer!
I still experiment, and search for new subject matter, but my photographic style is what it is. It just keeps evolving.
A New Language
Understanding the language of the image is something quite individual to the viewer, it does not explain itself in the same way to each person. It is subjective. And although some may view photography as easy, believing that there own point and shoot cameras can produce similar results to a master photographer are confusing the issue.
After all most of us have made paintings at some time in our lives, and may still own paint brushes, but wouldn't necessarily look at a painting by a master and not consider it to be art would we?
It is the heart and hand of the author behind the brush, camera or pen that executes the creative vision not the tools used.
Copyright © 2004, Sue Kennedy
About the author: Sue Kennedy, LRPS & LBIPP Sue Kennedy is an UK based photographer specialising in outdoor photography and works on commission for companies & individuals as well as shooting for picture libraries. To purchase from Sue’s current print and card selection visit her Website: http://www.blueeyesphoto.com

Sunday, March 3, 2013

Basic Tips on Using Your Camera

By: Yvonne Volante


Film Photography It's true that taking photos is as simple as running out and grabbing a cheap five dollar camera. But taking good, quality photos has never been easier. So lets explore some quick ideas that can help you take photos that you will be happy to share with friends and family.
Photography as an art has never been more exciting or enjoyable. Todays photography enthusiast has many styles, topics, and tools open to them. Plus, the blending of digital with print makes the craft of taking photos very versatile.
Here are four tips to help.
1. Get a little closer, don't be shy. One of the biggest mistakes most beginning photographers make is shooting from so far away. They leave too much distance between themselves and their subjects. Instead, get up close and personal. Fill up as much of the camera frame, with your subject, as you can. You can always reshape, trim, and resize a good quality shot. But you can't continue to blow up a distant subject and hope that it will come into focus. It just won't happen.
2. This tip springs directly from #1(above)... focus your shot on only one subject. Determine what the main subject of the photo will be, and catch that image. Try and find the one key subject, person, or event that accurately portrays the feeling you are trying to capture.
3. In addition to getting one subject, in your photos, you will want to make the background of the photo as simple as possible. Busy, distracting backgrounds pull the attention away from the central theme of your photo. The subject of your photo is absolutely the most important element, and anything that detracts from the subject can ruin your shot.
4. Finally, you want to take your subject out of the exact center of the frame. You do this by using the rule of thirds. Imagine having a camera lens split into 9 equal sized boxes, 3 across and 3 down (like having a tic-tac-toe game printed right on your camera lens). Where those "tic-tac-toe" lines cross, should become the focusing point of your subject, when you are arranging to take your photo.
Based on this tip, every time you compose a shot, the main subject of your photo should be located primarily on one of these "third" lines.
These are just four very basic tips and strategies to help improve your photos. As you know, photography skills can always be improved. In fact, most professional photographers exhibit a life long passion for learning new techniques, photography angles, and photo inspirations.
Article Source: http://www.ArticleJoe.com
Yvonne Volante is an author, webmistress and camera junkie. She has a site at http://www.ylcamera.com/ which is a great source for camera information. Please be sure to visit http://www.ylcamera.com/