Saturday, August 8, 2020


Posing Guide: 21 Sample Poses to Get You Started with Photographing Groups of People

Previously in the posing guide series articles we looked at posing female subjects, posing male subjects, posing children and posing couples. It is now time for posing groups of people.

There are usually three kinds of group shots. First are just formal shots with a large number of people. Second are more informal shots with a group of friends. And finally, photographing a group or family members. In this order, let’s look at some sample poses and posing ideas.

1. When working with a large group of people you won’t be able to control each individual’s pose or expression. This is fine as long as you pay attention to the overall composition. Imagine the whole group to be a single object. Principally, make sure that all people in the group are visible.

posing-guide-groups-of-people01.png

2. When photographing large groups, quite often the only possible composition in order to get everyone into the frame will be to compose in full height. These kind of shots are usually formal and documentary so again, your primary objective here would be to get everyone in the group clearly visible.

posing-guide-groups-of-people02.png

3. If possible, search for ways to shoot from an elevated angle. Using a balcony or climbing on a car to get a higher viewpoint could work perfectly. It will definitely be worth the effort, because instead of an ordinary and common group shot you will get more interesting and inviting perspective.

posing-guide-groups-of-people03.png

4. There are occasions when standing separately for the members of a group will be more appropriate than “keeping heads together”. Maybe it’s not the best way to take a “friendly group”, but might work very well for a small team shot, e.g. music band or co-workers in a project. If a group has a known leader, put him or her in front for even stronger composition.

posing-guide-groups-of-people04.png

5. This is pretty much a standard way to photograph a group of friends. Yes, it’s easy, ordinary and common way to pose for snapshots, but it really works, so – why not?

posing-guide-groups-of-people05.png

6. This is a fun composition which comes across as a quite friendly pose. Ask everyone to stand very close together. Then make them lean their heads slightly closer to each other and towards the camera.

posing-guide-groups-of-people06.png

7. Ask the group to form a circle while lying in the grass outdoors or on the ground indoors while you shoot from above.

posing-guide-groups-of-people07.png

8. Very fun and rewarding way to set up a small group of people. Choose a “group leader” and put him or her in front. The others should then join one by one. Each of them is supposed to stand behind the previous person peeking towards the camera over the shoulder etc. Supporting themselves a little on the person directly in front adds to the cordiality of the composition.

posing-guide-groups-of-people08.png

9. A slight variation of the previous one. Put a “group leader” in front and the others to appear behind each other. Take shots with different aperture settings and choose later if you prefer only the first one or all of the group members to be in focus.

posing-guide-groups-of-people09.png

10. Very fun way for informal picture of group of friends. For the best results, ask a group to make a jump after a short run.

posing-guide-groups-of-people10.png

11. Very rewarding and interesting composition is to shoot group of people in a row. Check that everybody is clearly visible and shoot from a close distance with a wide aperture and focus on the first person. Yes, people farther away will be blurred, but they will still agree that a result is a very interesting and unusual looking group shot.

posing-guide-groups-of-people11.png

12. Now, let’s look at some family samples. The most common way to photograph all the family members is sitting on a couch in the living room. It is not the most creative way for a family shot, but it can be done quite fine. The easiest way to improve these standard compositions is simply to crop real tight. Don’t include that lovely couch and room’s furniture in the shot. Fill the frame with and only with all the family members.

posing-guide-groups-of-people12.png

13. Another good idea for family shots is to simply get outside. Sitting in the lawn, in a local park or on a beach – all of these are excellent places to take some family shots. Just remember – when subjects are sitting, don’t remain standing – get low and shoot from your subjects’ eye level.

posing-guide-groups-of-people13.png

14. A family lying close together on the ground. Make them lift their upper bodies a bit by using their arms as supports. Shoot from a low angle.

posing-guide-groups-of-people14.png

15. A beautiful composition for a family shot. Might be done outdoors on the ground or indoors in a bed. Works absolutely fine with any number of kids.

posing-guide-groups-of-people15.png

16. Cozy pose with a family sitting comfortably on their favorite couch.

posing-guide-groups-of-people16.png

17. For an unusual and interesting family picture, turn the traditional couch photo setting around. Simply take your shots from the back side and see what a huge difference it can make.

posing-guide-groups-of-people17.png

18. Just a slight variation when taking a picture from the couch’s back side.

posing-guide-groups-of-people18.png

19. Absolutely beautiful way to make shots of a group of family members. Just ask the kids to hang onto the adults’ backs.

posing-guide-groups-of-people19.png

20. Very easy pose for a full height shot. As you can imagine, works well with any number of persons.

posing-guide-groups-of-people20.png

21. Take shots with the family walking hand in hand. Shoot in continuous mode and select the photos with the best leg movement and positioning. Keep in mind to control a focus, while subjects are approaching from a distance.

posing-guide-groups-of-people21.png

And finally, be creative and come up with different variants on your own. Think of ways you can transform the corresponding pose for your particular shooting scenario and subjects. Use these initial sample poses as a source for your own creativity!


Friday, August 7, 2020

How to Turn Your Living Room into a Photo Studio

Have you ever wished to have a studio space where you could bring clients in and photograph all types of portraits and ideas? You can! Your living room, or any room in your home for that matter, can be quickly converted so that you can photograph your studio ideas in your home!

Image: Setting up backgrounds on a plain wall can help you take great portraits in your own living r...

Setting up backgrounds on a plain wall can help you take great portraits in your own living room.

Finding the right space

Your living room might be the room with the biggest space for you to get the best angles and set up your lights. As long as you have about 10 feet of blank wall space, you can use it for your at-home studio.

Choose a wall where you can mount backgrounds. Put up studio paper, or any background paper. Alternatively, use a painted wall for your photos. It doesn’t have to be anything special, and you could use the existing wall as the main background as well.

Image: A bedroom with big windows can be used as a studio for portraits.

A bedroom with big windows can be used as a studio for portraits.

Why 10 feet? The wider your wall space, the more room you’ll have to the sides of your photos. This will enable you to photograph both horizontally and vertically. You will also have room for more than one person.

How to Turn Your Living Room into a Photo Studio

If you’re photographing headshots or only individuals, a smaller wall space would work. A wall with 5 feet would be sufficient enough for headshots and individuals.

Other spaces in your home that could work

The living room doesn’t have to be the only space that you can use. For example, if you don’t have studio lights, but want to create beautiful portraits with creative direction on backgrounds and don’t want to go on location, your home can still work!

How to Turn Your Living Room into a Photo Studio

You can photograph in a covered patio with lots of wall space, in your garage, in the bedroom, or on a balcony. All of these spaces work if you have the wall space to place your subject and space to photograph them from a distance.

This makes it much simpler to choose the right location for your at-home studio in the event that you don’t have studio lighting equipment or a special look to your photographs.

Creating the best set up for studio/flash  set up

You don’t necessarily need to use studio lights for your at-home studio, however, if that is what you’re going to use then let’s go through what you’ll need in the space for the best outcome.

Image: Use flash bouncing off the ceiling to light portraits in your living room or in the space you...

Use flash bouncing off the ceiling to light portraits in your living room or in the space you want for 

your at home studio.

You’ll need to choose a wall space that is in a darker or not-so-brightly-lit room. You can also use shades or curtains to block out light so that your off-camera lighting can correctly light your scene.

Image: Using a flash to light these portraits to simulate the sun. Plain wall background in the bedr...

Using a flash to light these portraits to simulate the sun. Plain wall background in the bedroom.

Living rooms offer the most space but make sure you can get it dark enough to set up the lights exactly where you want them.  You could also use external flashes to set up your at-home studio.

Image: You can light portraits creatively when you have control of the space and lighting.

You can light portraits creatively when you have control of the space and lighting.

Have a lamp nearby so that you can use it as a modeling light. You can also use a light dimmer so that the light doesn’t affect the outcome or interfere with the white balance, exposure, or look and feel that you’re trying to achieve.

Best set up for natural light at-home studio

If your living room or any other room in your home has great natural light, you can definitely set up your studio there. The same tips apply as far as wall space so that you can pose your subject and have enough space in the frame in case cropping is necessary. It also gives you the option to photograph vertical or horizontal.

Image: This was shot with all natural light using a silver reflector with a 3×3 grey background...

This was shot with all natural light using a silver reflector with a 3×3 grey background taped to the wall.

 Edited to bump up the contrast and desaturate the colors.

Choose a room that has great window light or light coming into the space. For example, a garage space with the garage door open is a good option. Another good option is a living room with big sliding doors where light floods the room. Make sure that the sunlight isn’t coming directly into the room or through the window where it casts weird shadows on your subject.

To diffuse the light, you can hang translucent curtains. This will help with harsh lighting, shadows, and the temperature of the room. Of course, you don’t necessarily need the window open unless it adds more light to your scene – if that is the look you’re going for.

Image: If your home has textured walls, you can use them as backgrounds for the portraits as well!

If your home has textured walls, you can use them as backgrounds for the portraits as well!

Use a reflector and bounce cards to help bounce light in the direction you want. Black flags  (black boards that help darken the light) and are great for creating shadows and can help to give you more dramatic lighting.

Be aware of the floor

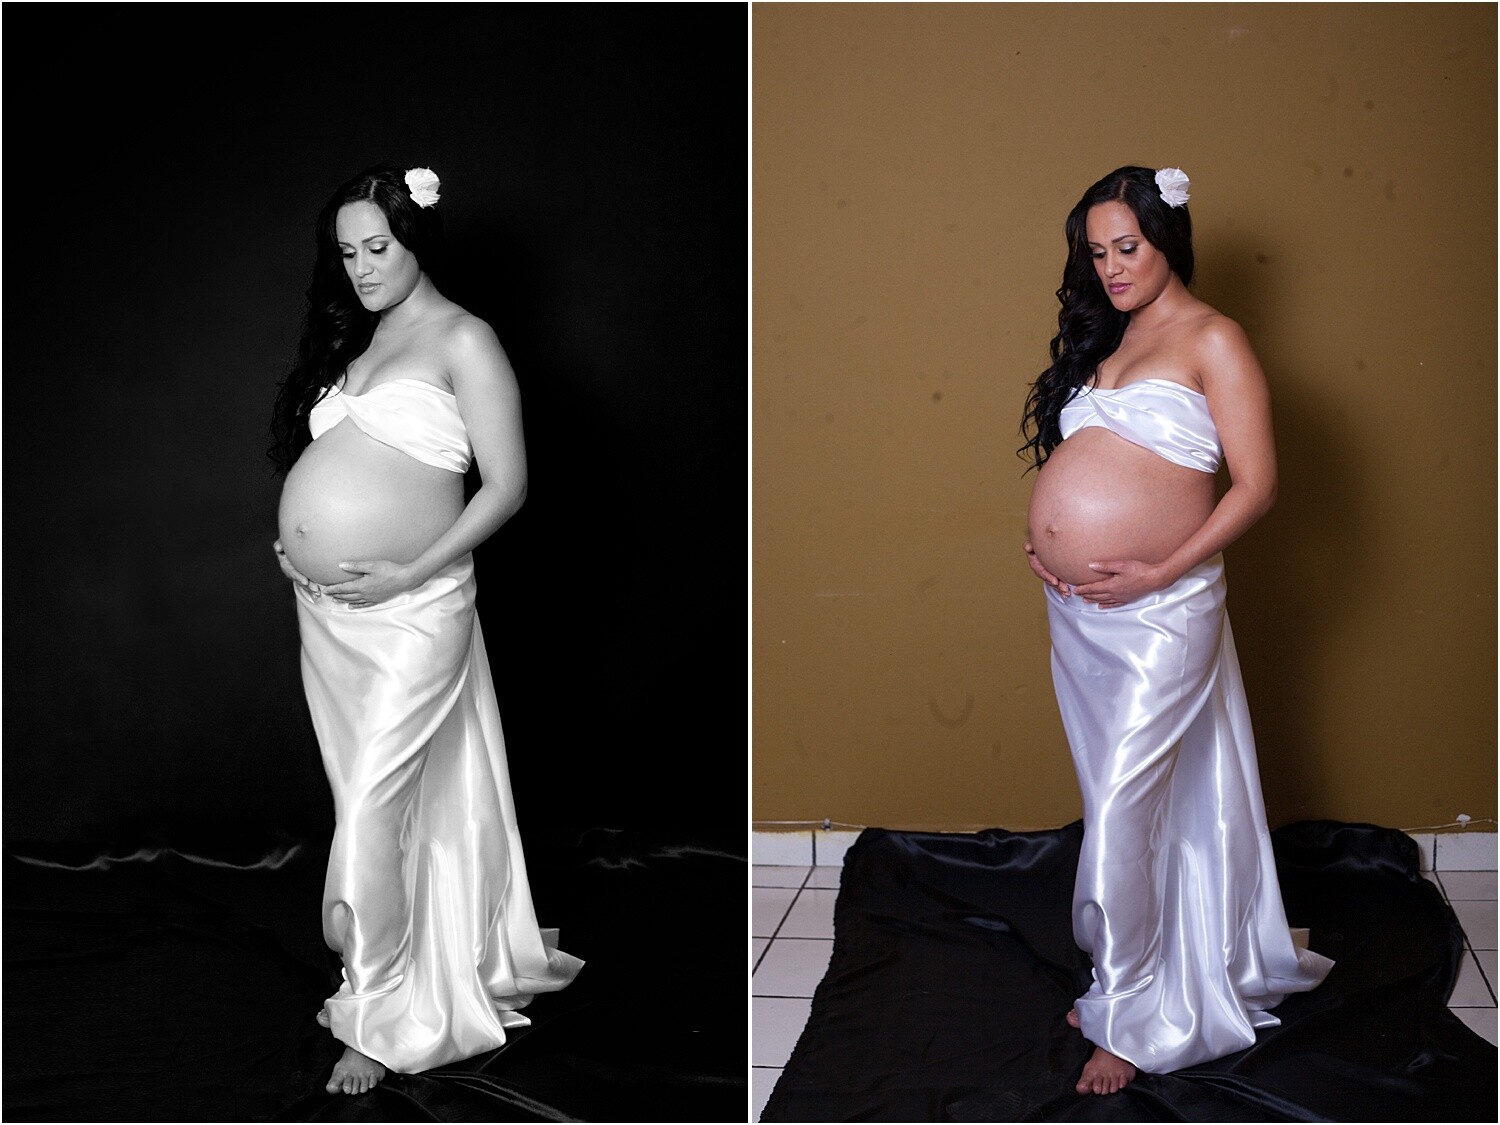
In your home, your floor is already installed and this can present a problem if you’re photographing full-length portraits. Take a look to see if the floor is what you’ll want for your photos. If it isn’t, you can use paper and place it from the wall all the way to the floor. This will create a seamless look to your photos like a real studio.

Image: In the before photo, we covered the floor with a black sheet so we could photoshop the black...

In the before photo, we covered the floor with a black sheet so we could photoshop the black 

background in and create a seamless look.

You can also get cheap wood floor-looking laminate flooring and create your portable floor. If the trim base to the floor isn’t distracting, you could even possibly photoshop that out to create a more seamless look with the wall and the floor.

Just be aware of your floor so you know what to do before you start photographing in your new home studio.

Backgrounds for in-home studios

There are a lot of great backgrounds that you can use for a home studio. Given that it’s completely your space and you can get really creative. The simplest one is the one you already have available! Use the existing wall color and texture to create interesting portraits.

Image: You can use existing decor to create beautiful portraits or tape a paper background to the wa...

You can use existing decor to create beautiful portraits or tape a paper background to the wall for a 

seamless background.

Other backgrounds you can use can be:

  • A sheet that covers the wall and onto the floor for a seamless fabric background.
  • Paper either rolled onto the floor for seamless or a piece of paper taped to the wall for up-close portraits
  • Any fabric or paper with a print on it
  • Different colored paper for headshots

Pretty much anything you can think of you can create as a background! You can get really creative with balloons, tissue paper, hanging strings, lights, paper flowers, artificial flowers, string or hanging garlands either made by you or already made newspaper or even plants.

How to Turn Your Living Room into a Photo Studio

The options and ideas are limitless and will give your photos a unique look no matter what your style is.


Your living room can be the perfect space for you to create beautiful studio work. You don’t need fancy equipment just nice wall space and the light you love to photograph with. Add in some music and you’ve got the perfect comfortable studio right in your home!

Do you have other suggestions to make a great living room studio?  Share with us and our readers in the comments below.


Posing Guide: 21 Sample Poses to Get You Started with Photographing Couples


In individual person portraits the main subject was a single person and her or his personality. In comparison, couple photography is more about connection, interaction and above all – feelings between two people. And most probably those are very deep and passionate feelings, which makes couple photography so delightful and positive.

Generally a couple should be easy to engage in a photo shoot. If they are initially a bit shy or feeling uncomfortable, just ask them to show you how they felt and looked when they met for the first time. You will invoke them on an emotional level, providing you with natural and loving expressions in their portraits

1. Easy starting pose standing face to face (but looking to the camera) and her holding an arm on his chest. Take both close-up as well as vertical shots.

Posing Guide: 21 Sample Poses for Photographing Couples

2. Ask the couple to stand very close to each other to catch intimate close-up portraits. Don’t be afraid to zoom in and crop real tight!

Posing Guide: 21 Sample Poses for Photographing Couples

3. Very easy and cordial pose with him holding her from behind. The couple may look straight into the camera or at each other. They might even kiss for a more emotive shot.
Posing Guide: 21 Sample Poses for Photographing Couples

4. Fun and loving pose with her holding onto his back and shoulders. Pay attention to hand positioning: It should be simple and natural.

Posing Guide: 21 Sample Poses for Photographing Couples

5. Just a variant with her holding him from behind. Remember that the couple doesn’t necessarily have to look in the camera. For better results, make them interact with each other by talking, flirtatious looks, laughing etc.
Posing Guide: 21 Sample Poses for Photographing Couples

6. Creates a very romantic mood. Works best outdoors with some open space in the background. Shoot only slightly from a back. Remember that you have to be far enough to the couples side to be able to capture each person’s closest eye, otherwise you will create an impersonal, “empty” shot.

Posing Guide: 21 Sample Poses for Photographing Couples

7. Find some elevation and shoot your subjects from above. A common pose shot from an unusual angle is always creative and will often reward you with surprisingly good results.

Posing Guide: 21 Sample Poses for Photographing Couples

8. Another romantic pose. Works best outdoors with some open space in the background. Works also very well as a silhouette against a bright background, in front of a sunset, for example.

Posing Guide: 21 Sample Poses for Photographing Couples

9. Easy to realize pose for a full height shot. Creates a calm and affectionate mood.

Posing Guide: 21 Sample Poses for Photographing Couples

10. A fun pose. Don’t presume this to be appropriate only with younger people. If an older couple feels fine with it, this pose will work absolutely superb with them as well. Try different framings, take full height shots, half height ones and close-ups.

Posing Guide: 21 Sample Poses for Photographing Couples

11. Very nice way to show the affection when meeting each other. Works very well in crowded places, such as a famous meeting point in a city, trains or metro stations etc.

Posing Guide: 21 Sample Poses for Photographing Couples

12. A pose with a little bit of fun. The crucial part is her leg positioning, each leg should be bent in different angles. While he is still lifting her, take a close-up portrait shot as well.

Posing Guide: 21 Sample Poses for Photographing Couples

13. Take shots of the couple walking hand in hand approaching from a distance. Shoot in burst mode only! However, the majority of your shots will look awkward because of the leg movement. Therefore, the second part of your job is to select the photos with the best leg movement and positioning afterwards.

Posing Guide: 21 Sample Poses for Photographing Couples

14. Another variant with a walking couple. This time couple walks close together and holds onto each other. Again, take several shots and choose those with the most elegant leg positioning.

Posing Guide: 21 Sample Poses for Photographing Couples

15. Never forget that there often are good opportunities simply shooting from the back.

Posing Guide: 21 Sample Poses for Photographing Couples

16. A couple lying close together on the ground. Make them lift their upper bodies a bit by using their arms as supports. He might embrace her gently. Shoot from a very low angle.

Posing Guide: 21 Sample Poses for Photographing Couples

17. Another variant with a couple lying on the ground. This time with a little interspace.

Posing Guide: 21 Sample Poses for Photographing Couples

18. A good example to show that two persons can very well be positioned asymmetrically.

Posing Guide: 21 Sample Poses for Photographing Couples

19. Informal and fun way to pose for a couple lying on their backs.

Posing Guide: 21 Sample Poses for Photographing Couples

20. A cordial pose, ask the couple to sit comfortably on their favorite sofa.

Posing Guide: 21 Sample Poses for Photographing Couples

21. Sometimes shooting a couple may mean maternity photography. Some poses from this couples series work also pretty well for such an occasion. Simply adjust a posing accordingly to show the couple’s feelings about and interactions with the unborn new life.

Posing Guide: 21 Sample Poses for Photographing Couples

Here’s 16 of our favorites for you to print and take with you on your next couple shoot:

Posing Guide for Photographing Couples

Allow me to repeat the previously stated – look at these sample poses as a starting point only. That’s the reason why they are rough sketches instead of real photos. You can’t and should not repeat the pose exactly, instead adjust the pose creatively according to your shooting environment and scenario.

Check out other Posing Guides at:

https://bit.ly/2JzXFdk