Sunday, August 2, 2020


Reflecting on Old Photographs: Nathan’s Famous Since 1916


When I was maybe six years old, my father introduced me to Nathan’s. We had dropped off his mother at her what was to me dreary apartment. That woman never seemed happy to me, and it wasn’t until I became an adult, I understood why.

When I tell you that Nathan’s has the best hot dog in the entire world, you better believe me. Whenever I come across a hot dog place, I have to check it out. It’s kind of turned into a thing with my sons too. I’ve been many places on this earth and have never found a tube steak that tasted as good. I became addicted to Nathan’s as a very young child, and I still am.
The fries at Nathan’s are nothing to sneeze at either. Especially now with our spiffy new pandemic. The flavor is unlike any other french fry or really crinkle-cut fry in the world. My mother told me once they tasted the way they did because the potatoes were blanched in sugar water.
I think my dad had a good time with me at Nathan’s. I remember him smiling a lot. He must have enjoyed showing me the world, his world, the world of his youth. I did the same with my boys.
I’m not exactly sure why, but in my old age, memories I didn’t know I had suddenly and with clarity appear in my mind. Maybe it’s pre-dementia or something, but so far, I am enjoying it. Nathan’s was one of those memories, as well as one about my grandmother.

I was not very nice to her. As a child, she bothered me. She never seemed to laugh, and she seemed to my young mind to be world-weary and tired.
My family used to celebrate both Chanukah and Christmas because my father was Jewish, and my mother was not. It went like this: 8 days of Chanukah 8 crappy presents. Like a jigsaw puzzle or those awful chocolate coins. Maybe a box of tissues. I didn’t think it was much fun being Jewish. And I knew I wasn’t Jewish. I was on Team Santa Claus since the first time I saw those colored lights. I had a crush on Clarise, the girl reindeer in that Burl Ives Christmas cartoon too. It had not occurred to me that reindeer-human relations would most likely be frowned upon.
Christmas just blew my little mind. I couldn’t sleep Christmas Eve night, and my brain would be racing over all the things that I thought Santa was going to bring me. So, morning came, and I bolted from my room to see what was under the Christmas tree for me, me, me.

My Father and his Mother Circa 1940
My grandmother was already awake at what must have been the crack of dawn sitting in the living room in the dark. I didn’t know she was there, and when I turned the lights on and saw her, I almost plotzed. Yeah, Yiddish, woohoo.
I started to unwrap the one present I was allowed to open before the others woke up. It was heavy and about the size of 2 shoe boxes. When I saw what it was, I couldn’t believe my eyes. At 6 years old, I had decided that I would be a scientist, and what does a scientist need? A microscope, of course! I was so happy. My grandmother, who had been sitting on the couch not saying much of anything, asked me if I liked it. Of course, I did. Then she asked me, “Do you know who gave it to you?” Sure I did. “Santa Claus,” I responded.
In not the most pleasant tone, my grandmother told me that she had given me the microscope and then informed me that “Of course it wasn’t Santa Claus, don’t be ridiculous. There is no such thing as Santa Claus.” I tearfully disagreed with her and repaired to my room. So yeah, there was that.
Once and only once, she babysat my sister and me while my parents went to Montreal for a few days. That was right before my dad got sick. So there I was stuck with the Santa killer for a long weekend.
I’m not sure what the exact circumstance was. It might have been using a bathroom towel that my grandmother had set aside for her own use. It could have been my taking an egg salad sandwich that I thought had been made for me but turned out to be hers. Whatever it was made her angry with me and that… well, that is all I could stanz, I could stanz no more. Thanks, Popeye. That’s something Popeye the Sailor used to say. You had to be there.
My mother said that I was a quiet child. That I didn’t say a word until I was 16 and then she couldn’t stop me. But at 8 or 9 years of age, I tended to keep my mouth shut. Now, not so much. I launched into the loudest nastiest swear filled sentences my young mind could put together. “Why are you here, you old fart, nobody want’s you here.” I’m sure I said that I hated her a few times. That’s when my sister stepped in and dragged me off to my room. It felt fucking great.
My father died 6 months later, and years later, I found out that my mother never told his sister or his mother he was sick. So when he died, it must have been unbearable for my grandmother. Hey, I was his son, and I didn’t get to go to the funeral. Oh, Mom.
I didn’t speak to that side of the family again until my first son was born. My grandmother was long dead, but my aunt was very much alive, living in San Diego. We visited her while she was in the city, but after that, I didn’t stay in contact.
When my mother died a few years ago, my aunt sent me an email. I was so happy that she did. All my adult life, I’ve felt guilty about ignoring my father’s family. I found out that she lived in a semi-care facility in Ardsley about 45 minutes away. She was 93 and sounded great to me. She invited me to visit, and I told her I would bring my sons.
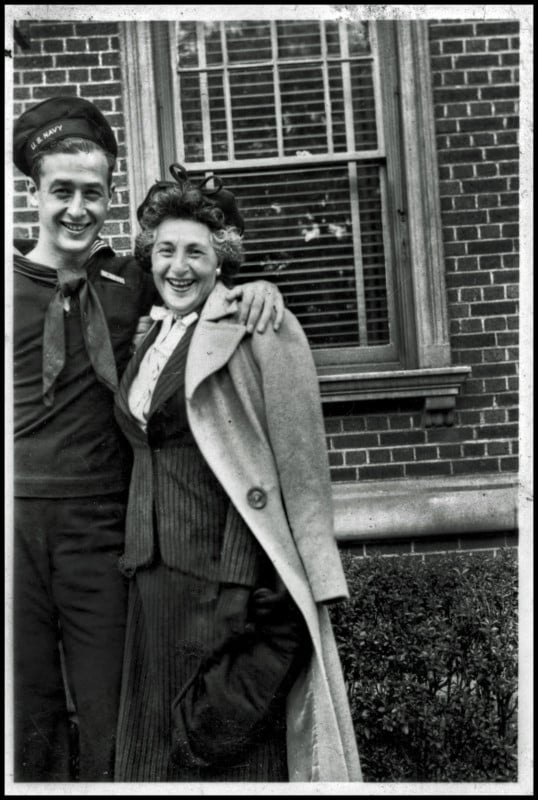
It was a pleasant visit, and my sons enjoyed it very much. It felt a little awkward at first, but once we started talking, all sense of discomfort was gone… I got to see photographs of my father growing up, and I learned about his teenage years. I found out that he used to get into a lot of trouble, and he really loved the women. Then World War II came, and everyone grew up fast.

Hirsch’s Knishes and Owner Boardwalk Coney Island Brooklyn NY 1976
I asked my aunt why her mother always seemed so dour, and this is what she told me:
Her parents and her sister emigrated from Eastern Europe, most likely just ahead of a pogram. They lived on the lower east side of Manhattan, and life was very hard. She and her sister worked as sewers making shirtwaists. Her sister died in the Triangle Shirtwaist Factory fire. She married a gentleman who had his own business and was quite successful. He died while my grandmother and her 2 children were on vacation to the Grand Canyon. She was married for 7 years, and it was the only time in her life when she was happy and comfortable. She was a single mom doing whatever work she could. She raised my aunt and hellraiser of a father with no help from anyone. World War II happened, and any family she had back in the old country were murdered. My father came home one afternoon and announced he had joined the Navy, and that’s where he was for the duration. 15 years later and unknown to her, my father was sick for 6 months, and she only found out about it after he was dead. He was 40 years old.
And now I understood, and I regret the relationship that I had with her.
She was the first of many strong women in my life. I just didn’t know it at 9 years old. I was shocked to find out that she had a wicked sense of humor until her son died.
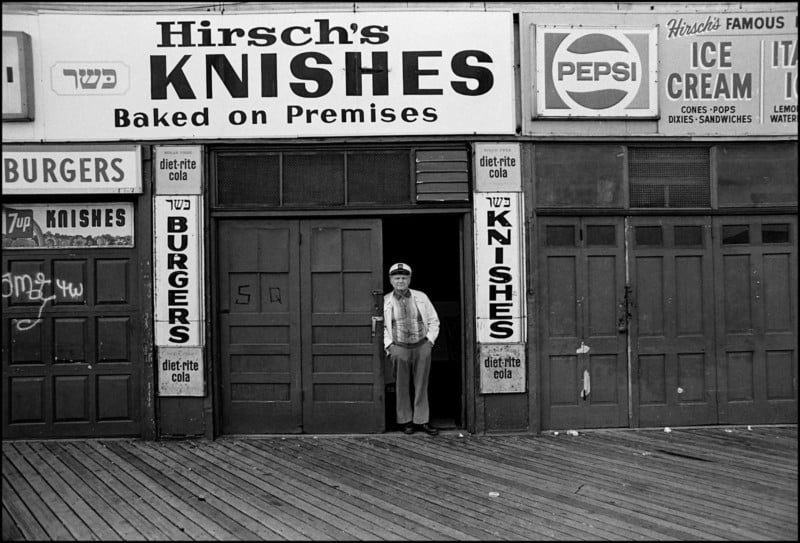
I asked my aunt if she could remember something, any little thing that she, her mother and brother did together that was fun. “There is one thing that stands out.” my aunt said. “Sometimes on the weekend as a special treat, my mother would take us to Coney Island. We would walk in the sand and on the boardwalk. If we were well behaved, she took us to her favorite place at Coney Island, Nathan’s. She and your father couldn’t get enough of those hot dogs.”

 https://bit.ly/2JzXFdk  .

How to shoot beautiful abstract photography 


by: 500px


In 1951, the photographer Edward Steichen, serving as the director of MoMA’s Department of Photography, organized an exhibition devoted entirely to abstract photography. The 150 images featured in the show ranged from fine art pieces to scientific studies to light drawings, including meticulously planned compositions and works made by happy accident.
Today, the individuals included in that exhibition read as a veritable “who’s who” in photographic history: Eugene Atget, Harry Callahan, Laszlo Moholy-Nagy, Alfred Steiglitz, Paul Strand, Edward Weston, and many more. At its heart was a simple question: was photography, as an art form, truly as realistic and literal as many believed, or was it far more experimental than some imagined?
All these years later, it seems that question remains to be answered. If popular social media hashtags like #stayabstract, #abstractnature, #bluronpurpose, #photoimpressionism, and #urbanabstractions are anything to go by, our taste for abstract photos hasn’t faded over the generations. Abstract photography continues to fascinate, perplex, and surprise us, whether we’re visiting a museum or browsing 500px.
When we talk about abstract photography in this piece, we’re referring to pictures that aren’t literal. Instead of showing us easily identifiable figures (a person, a building, an object), they break them down into colors, shapes, textures, and forms. Abstract photos are the ones that make you stop and ask, “What is that?” before realizing the answer was in front of you all along. Read on for our tips for making the most of this timeless genre.

Look at your everyday surroundings

Some of the most powerful macro photos are also the simplest and most accessible; they take something banal and commonplace and make them seem strange and otherworldly. The best place to start is close to home; a chipped paint job, an old table with a warm patina, an architectural or industrial detail, leaves in your backyard, or even a canvas you’ve painted yourself can all become subjects for practicing and refining your abstract photography.
The more you “train” your eye to see things outside of their original contexts, the better your abstract photos will be. Strip everyday objects of their meaning and purpose, and they become colorful forms for you to use and reinterpret.

Experiment with your settings

In most contexts, the photographer’s instinct might be to avoid apertures that are too wide, shutter speeds that are too slow, and ISOs that are too high. These steps are important to maintaining the highest possible image quality, but in the case of some abstract photos, perfect sharpness and focus aren’t necessarily the goal.
Extremely shallow depths of field and bokeh, motion blur, and grain—seen as “mistakes” by most—can become creative tools for the abstract artist, who prefers the experimental over the literal. Whether you’re playing with intentional camera movement in a split second or creating abstract, minimal landscapes over several hours, there are many different ways to incorporate a long exposure.

Bring out the macro lens

No discussion of abstract photography would be complete without mention of macro lenses; extreme close-ups of almost anything, from soap bubbles, oil in water, and snowflakes to rocks and crystals to the human eye and hand, are inherently abstract. If you don’t have access to a dedicated macro lens, you can take your manual lens, reverse it, and attach it to your camera with extension tubes for a DIY solution.

Use crystals or prisms

Prism photography has skyrocketed in popularity in recent years—and for good reason. Placing a prism in front of your lens will help you control, bend, and wield any available light according to your vision, and it’ll also produce those dreamy rainbows and glass reflections for an abstract twist on your surroundings.

Take to the skies

Aerial photography is more accessible than ever, and a birds-eye-view can transform even the most familiar places, from beaches to parking lots, into abstract tapestries of texture and color. Be sure to read our guide on drone photography to get started.

Explore black and white

As the world-renowned photographer Joel Sternfeld famously said, “Black and white is abstract.” What he meant was this: monochrome photos mark a departure from what we’re used to seeing and experiencing, so they’re already abstracted from our reality. Of course, that’s not to say that color photos can’t also be abstract; it’s just that black and white can heighten the strangeness of your subject, obscuring its familiar context and transforming it into something new.

Highlight textures

Remember when we said a shallow depth of field can create soft, abstract shapes? To bring out the textures of a surface, whether it’s bark from a tree or layers of paint, you’ll need to do the opposite and close down that aperture so everything is razor-sharp. Keep your ISO low, and consider using a high-power light source to reveal all those details. In this case, a high-megapixel camera is your best asset. Keep that macro lens and a tripod handy!

Look for reflections

Reflections are natural tools for abstraction, whether they’re found on the rippling surfaces of water or the shiny sides of buildings. Instead of photographing “ the thing itself,” look for ways to find its reflection. Even an old broken mirror or piece of wrinkled aluminum foil you have lying around the house could work. Capture a street photo with a person’s reflection in a puddle? Flip it vertically for an abstract portrait.

Watch the shadows

Like reflections, shadows can be just as intriguing as the object casting them. To get those strange, abstract shapes, head out at the golden hour just before sunset when the shadows are longer and more “stretched out.”

Feel free to crop

You won’t get it right in-camera every time, and that’s alright. As long as you’re shooting with a high-quality, high-resolution camera and saving your RAW files at full size (this is important), you should be able to crop any extraneous details. Many artists refer to abstract photography as a process of “subtraction” for that reason. If, for example, you’ve shot a recognizable landscape, but when you get home, you notice an uncanny reflection on the surface of a pond, it’s okay to crop it and focus on the close-up details while removing the context of the entire photo.

Shoot “through” something

Rainy day windows are popular photography subjects because they abstract whatever’s behind them; you can do the same thing with a piece of plastic, glass, plastic wrap, mesh, or anything else you have on hand—even water! Filters and gels are also perfect for this purpose.

Go cheap

As we’ve mentioned, top-of-the-line, high-resolution cameras can be perfect for abstract photography, but cheap cameras can also work if you want to get those bizarre distortions or effects. Pick up a toy camera or a disposable one and see what happens; you won’t be able to adjust your settings as you would with a DSLR or mirrorless camera, but you might capture some experimental photos you couldn’t get otherwise.

Play with film

Film photography is more unpredictable than digital, and depending on your outlook, that could be its appeal. In recent years, photographers have been creating abstract photos with expired film or deliberate light leaks. Others have intentionally soaked their film in strange solutions, like lemon juice or coffee, which “destroys” the film to produce surreal colors and effects. You won’t have complete control over how the images turn out, but that’s part of the fun.
Another way to use film is to shoot abstract multiple exposures, though you can also do this if you shoot digital.

Nail your composition

The “rules” of composition are important in any genre, but they’re especially significant in abstract photography; without context or a traditional narrative, the eye will rely on colors, shapes, lines, balance, and patterns to create meaning. That’s not to say you have to use the rule of thirds in every abstract photo you make, but it does help to understand what makes for a pleasing composition.
Your composition doesn’t have to be complicated; on the contrary, it’s often the subtlest and cleanest images that leave a lasting impression. Explore different ways of using negative space, and try “filling the frame” with forms and colors.

Change your perspective

Don’t be afraid to move around and change your angle or perspective; look up, look down, and see if you can use your vantage point to create an unexpected view of something ordinary and familiar. Something we’re used to seeing from one direction could look completely different from another, so take a bunch of photos of the same thing to see what works.

Lose the camera

We’ve spent much of this article discussing cameras, but some of the most iconic abstract photographers from the past, including Anna Atkins, Laszlo Moholy-Nagy, and Man Ray, didn’t use a camera at all. Instead, they made photograms using light-sensitive paper. You can do the same thing today, especially during sunny summer days. Just order sun-sensitive paper, create your composition with any opaque objects you have at home, expose it to light, develop it, and let it dry.

Get the mood right

Abstract photography, like all abstract art, is subjective. It doesn’t follow the normal technical rules or guidelines of what makes a photo “good” or “bad.” Instead, abstract photos are often judged by how they make us feel, so consider the emotion behind your shot.
For example, a macro photo of a flower can inspire hope, while a reflective body of water on a cloudy day might inspire wistfulness or melancholy. Think about the mood you want to convey, and then use all the tips above to bring that emotion to life. If the photo makes you feel something, you’re on the right track.  Share this article.


Photography Freebie 


How to Photograph Dragonflies (free eBook!)


This weeks' Ebook is yours FREE of charge.  Get your copy here:

https://photonaturalist.com/how-to-photograph-dragonflies-free-ebook/


Friday, July 31, 2020

How to Buy a Digital Camera – A 9 Step Guide

Buying-Digital-Camera-Guide
Yesterday I asked ‘when is the best time to buy a digital camera?‘ Today I want to turn our attention to how to buy a digital camera.
I’m not going to talk you through all the different features on a digital camera or tell you which models are best (something that is really quite individual and which changes regularly over time) however there are a few questions and factors to keep in mind when making the decision of which camera is best for you.
When searching for a digital camera there are a few factors that I encourage people to keep in mind when they buy a digital camera (while there are 9 ‘steps’ they are not necessarily a sequence you follow)
So lets get onto some tips for buying digital cameras:

How to Buy a Digital Camera

1. Determine what you need

A mistake I see some digital camera buyers making is that they get sucked into buying cameras that are beyond what they really need. Some questions to ask yourself before you go shopping:
  • What do you need the camera for?
  • What type of photography will you be doing? (portraits, landscapes, macro, sports)
  • What conditions will you be largely photographing in? (indoors, outdoors, low light, bright light)
  • Will you largely stay in auto mode or do you want to learn the art of photography?
  • What experience level do you have with cameras?
  • What type of features are you looking for? (long zoom, image stabilization, large LCD display etc)
  • How important is size and portability to you?
  • What is your budget?
Ask yourself these questions before you go to buy a camera and you’ll be in a much better position to make a decision when you see what’s on offer. You’ll probably find the sales person asks you this question anyway – so to have thought about it before hand will help them help you get the right digital camera.


2. Megapixels are NOT everything

One of the features that you’ll see used to sell digital cameras is how many megapixels a digital camera has.
When I first got into digital photography, a few years back, the megapixel rating of cameras was actually quite important as most cameras were at the lower end of today’s modern day range and even a 1 megapixel increase was significant.
These days, with most new cameras coming out with at least 5 megapixels, it isn’t so crucial. In fact at the upper end of the range it can actually be a disadvantage to have images that are so large that they take up enormous amounts of space on memory cards and computers.
One of the main questions to ask when it comes to megapixels is ‘Will you be printing shots’? If so – how large will you be going with them? If you’re only printing images at a normal size then anything over 4 or so megapixels will be fine. If you’re going to start blowing your images up you might want to pay the extra money for something at the upper end of what’s on offer today.

3. Keep in mind the ‘extras’

Keep in mind as you look at cameras that the price quoted may not be the final outlay that you need to make as there are a variety of other extras that you might want (or need) to fork out for including:
  • Camera Case
  • Memory Cards
  • Spare Batteries/Recharger
  • Lenses (if you are getting a DSLR)
  • Filters (and other lens attachments)
  • Tripods/Monopods
  • External Flashes
  • Reflectors
Some retailers will bundle such extras with cameras or will at least give a discount when buying more than one item at once. Keep in mind though that what they offer in bundles might not meet you needs. For example it’s common to get a 16 or 32 megabyte memory card with cameras – however these days you’ll probably want something at least of 500 megabytes (if not a gigabyte or two).

4. Do you already own any potentially compatible gear?

Talking of extra gear – one way to save yourself some cash is if you have accessories from previous digital cameras that are compatible with your new one.
For example memory cards, batteries, lenses (remember that many film camera lenses are actually compatible with digital SLRs from the same manufacturers), flashes, filters etc.

5. DSLR or Point and Shoot?

Dslr-Point-And-ShootWhile digital SLRs are getting more affordable they are not for everyone. Keep in mind that they are usually bigger, heavier, harder to keep clean (if you’re changing lenses) and can be more complicated to operate than point and shoot. Of course there are some upsides also.
If you’re trying to make a decision between a point and shoot and DSLR you might want to read my previous posts titled Should you buy a DSLR or a Point and Shoot Digital Camera? and it’s companion piece How to Choose a DSLR.

6. Optical Zooms are King

Not all ‘zooms’ are created equal.
When you’re looking at different models of digital cameras you’ll often hear their zooms talked about in two ways. Firstly there’s the ‘optical zoom’ and then there’s the ‘digital zoom’.
I would highly recommend that you only take into consideration the ‘optical zoom’ when making a decision about which camera to buy. Digital zooms simply enlarge the pixels in your shot which does make your subject look bigger, but it also makes it look more pixelated and your picture ‘noisier’ (like when you go up close to your TV).
If you’re looking for a zoom lens make sure it’s an optical zoom (most modern cameras have them of at least 3x in length – ie they’ll make your subject three times as big – with an increasing array of ‘super zooms’ coming onto the market at up to 12x Optical Zoom).

7. Read reviews

Before buying a digital camera take the time to do a little research. Don’t JUST rely upon the advice of the helpful sales person (who may or may not know anything about cameras and who may or may not have sales incentives for the camera they are recommending).
Read some reviews in digital camera magazines or online to help you narrow down the field. There are some great websites around that give expert and user reviews on virtually every camera on the market – use this wonderful and free resource.
A little self promotion here – one such site is my Digital Photography Blog which is a site that collates the reviews of many sites from around the web. To use it best enter the camera’s model name that you’re looking for a review on in the search feature in the top right side bar. It’ll give you a link to a central page that has information on the camera as well as links to any reviews published online on that camera from around the web.

8. Hands On Experience

Once you’ve narrowed down your search to a handful of cameras head into your local digital camera shop and ask to see and play with them. There’s nothing like having the camera in your hands to work out whether it suits your needs.
When I shop for a camera I generally use the web to find reviews, then I head into a street in my city with 4 camera shops side by side and I go from shop to shop asking for recommendations and seeing the cameras live in the flash. In doing this I generally find the same camera or two are recommended in most shops and I get to see them demonstrated by different people (this gives a more well rounded demo). I also get to play with it and get a feel for which one I could see myself using.

9. Negotiate

After you’ve selected the right digital camera for you it’s time to find the best price.
Once again, I generally start online (on a site like our store) and do some searches to find the most competitive prices on the models I’m interested in. With these in hand I’m in a good position to be able to negotiate in person with local stores and/or with online stores. I generally find that retail stores will negotiate on price and will often throw in freebies. Online stores are more difficult – most bigger ones don’t give you the ability to negotiate but smaller ones often will if you email them.
Don’t forget to ask for free or discounted bonuses including camera cases, memory cards, extra batteries, filters, free prints, cases etc. I even know of a couple of stores that offer camera lessons that you can ask to be included. Some stores will also consider giving you a trade in on older gear.
I generally do negotiating from home on the phone and only go into a store to pick up the camera after a price is agreed upon.

10. Your Tips

The above is my advice on buying a digital camera and comes from my own experience of buying numerous cameras, but I’m sure others will have useful tips to add. Feel free to add your suggestions on how to buy a digital camera in comments below!  Share this article.


https://bit.ly/2JzXFdk  .

When is the Best Time to Buy a Digital Camera? 3 Questions to Ask

Canon-Powershot-A700-TmIf the emails that I get from readers asking for advice on Digital Cameras are anything to go by – there is currently a digital camera buying frenzy going on.
With Christmas looming and many shops having end of year sales there is obviously a lot of interest in digicams.

However is now the best time to buy a digital camera?

The answer to this question will depend upon your specific situation. Here’s three different ways of deciding if now is the best time for your purchase:

1. Do You Need a Digital Camera Now?

I’ll get the most obvious one out of the way first – do you need a digital camera now? I was in a digital camera shop recently and got chatting to a sales guy that I know and he said to me ‘ the best time to buy a digital camera is when you need one’. Sounds pretty obvious – but I think there’s something in it. You see many people in the market for a digital camera get into the ‘waiting game’. First they wait for the new models to come out, then when they are released they wait for them to come down in price, but then rumors start circulating on new models around the corner and so they wait for the new models…. you get the picture.
If you need a new digital camera now (maybe you’re going on a trip, maybe there’s a wedding coming up that you want to photograph etc) then now is probably the best time to buy. Do some shopping around, read some reviews, negotiate a good price and actually make a decision.
Buying Advice: If you need a digital camera now – buy it now.

2. Do you want ‘the latest’?

If you’re not in such a hurry for a digital camera but instead want the latest model it might be worth waiting a couple of months.

Digital camera manufacturers have an annual cycle of announcing and releasing new cameras and there are two main times of the year when they all come out.
The majority of digital cameras are announced early in the new year (January to February) and will actually make it to stores in February to March. There is a second round of announcements in September with those cameras hitting stores usually in November in the lead up to Christmas.
In my experience of covering the digicam market – there is generally less new cameras released at the end of the year and they tend to be more of a ‘tweak’ nature than real updates (although in the last year or two even many of the start of year releases are ‘tweak’ updates too).
While you could go out and get a fairly newly released camera today – it could be worth waiting a couple of months for the new range of digital cameras.
Of course when a new camera comes out you tend to pay a premium for it – which leads us onto our third question.
Buying Advice: If time and price isn’t an issue then wait for the next round of cameras to be released in February – March next year.

3. Is Price a Major Consideration?

Ok – so if the need for a camera isn’t urgent and you don’t mind if you don’t have the very very latest released camera – you might be more interested in getting a good deal.
If price is what you’re more interested in than features now could be a good time to start shopping around. This will probably vary a little from place to place but here in Australia the lead up to Christmas and the week or two after Christmas is a great time for shopping. We tend to have our biggest sales between Christmas and New Year while in the US there tends to be a lot of great sales after Thanksgiving (right now).
There are a lot of great sales online also. I’ve seen some real discounting happen around the web over the last week or two. Check out our digital camera shop which aggregates deals from a number of online sellers for a guide to prices. Amazon also has a ‘Today’s Deals Page for Digital Cameras‘ that is worth keeping an eye on.
The other reason that now is a good time to buy if price is your main consideration is that stores will be wanting to clear stock for the new releases to come out in the new year. Right up until all the new cameras hit the stores (and particularly in the days following them arriving) there can be some great deals to be had as retailers try to clear stock. Share this article.


https://bit.ly/2JzXFdk  .

Thursday, July 30, 2020

5 Tips for Photographing Street Portraits

Street Portraits, Digital Cameras, Portraits, Toddlers, Photoshop, Wide Angle, Canon, Pentax, Nikon, Raw format, JPG format, Lightroom, Outdoor Photography, Portrait Photography, Printing and Framing, Nikon, Travel Photography, How to avoid photography problems, bad mistakes, photography, video. Photography tutorial for beginners, photography, photography tips,
Isn’t it always the way that the most daunting things in life are usually the most rewarding? It takes a certain amount of backbone to shoot street portraits. Whether it’s walking up to a total stranger and asking their permission, or taking a more candid, reportage style approach, many photographers get put off through lack of confidence.
It’s a great shame because there is no more fascinating photographic subject than people.
Street portraits Thailand
If you follow the Humans of New York project, you’ll know that every single person has a story to tell; sometimes uplifting, often heartbreaking, occasionally hilarious. The very best street portraits give us a glimpse at those stories in a single frame.
If you’ve always wanted to give it a go but have yet to summon up the courage, hopefully, the following tips will give you all the motivation you need.

The approach

The first time you approach a potential subject is going to be the hardest. It can sometimes feel like an insurmountable hurdle. But try and think about it from your potential subject’s point of view. He or she is going about their daily routine, possibly doing the same thing they have been for years and finding it all a little boring. Then, out of nowhere, someone has judged them interesting enough to want to take their picture. Chances are, you’ve just made that person’s day. At the very least, you’ve given them an anecdote to tell their friends.
He or she is going about their daily routine, possibly doing the same thing they have been for years and finding it all a little boring. Then, out of nowhere, someone has judged them interesting enough to want to take their picture. Chances are, you’ve just made that person’s day. At the very least, you’ve given them an anecdote to tell their friends.
street portraits photography China

Different methods

So, what’s the best way to approach someone? Different photographer’s stand by different techniques. Some just come straight out and ask if they can take a picture. Others want to try and make a connection first in a more roundabout way, striking up a conversation or asking questions.
One psychological technique favored by many salesmen is to first ask for a small, unrelated favor, such as directions or whether they have the correct time. Studies have shown that once someone has done you one favor, they’re much more likely to say yes to another, bigger one. Don’t ask me why—people are complex!
In any approach, confidence is obviously vital, but enthusiasm is just as important. Enthusiasm is contagious. Be genuinely interested, listen carefully to what they’re saying and be respectful. Also, if you can make them laugh, or at least smile, you’ll find all their barriers will start to lower.

The environment

Street portraits market London
Where you find your subject (i.e. their environment) can sometimes tell you as much about them as what they look like.
Finding an impeccably groomed city trader striding around the financial district is to be expected. But finding him in a crowded flea market hints at a story. If the environment adds to the portrait, include as much of it as you need to enhance the photograph.
If you want your portrait to be all about the person, if they have an interesting face or you want to highlight the way they dress, try and find a background that won’t distract from them. A busy background can confuse the eye and take away from the impact you’re trying to make. If you need to, open up your aperture to throw the background out of focus and bring attention back to where it should be.
Street portraits photography East Timor

The eyes have it

The most important part of your portrait will always be the eyes. The eyes tell us everything; how the person is feeling, what they’re thinking, if they’re happy or anxious, and even if they would rather you stopped taking their picture.
street portraits photography China

Eye contact

Eye contact is incredibly powerful in real life. If you’re talking to someone and they maintain a natural, unwavering eye contact, there’s something primeval that makes you trust them and creates a connection. It’s the same with a portrait. You need that eye contact to make a successful shot.
If you photograph a subject who’s not looking directly back at you, the natural instinct is to follow their gaze to see what they’re looking at. You can sometimes use this to your advantage to draw the viewer’s eye towards an element of the picture you want them to focus on. For example, in this shot of a man carrying baskets full of rabbits, the eye line of the two children always brings us back to the cages.
street portraits candid photography China
On a technical note; as I’m sure you’ve noticed, people tend to blink. Try to take a quick burst of shots of your subject to ensure you capture at least some with their eyes open. Autofocus systems can also tend to hunt around, and taking more shots increases your chances of grabbing a pin sharp image.

The candid street portrait

If you’re looking for a way to ease yourself into this genre, shooting candid street portraits holds some definite advantages. You do away with the whole nail-biting business of asking permission and perhaps suffering a rejection. You capture people as they really are rather than the front they put up when a camera’s pointed at them.
But that’s not to say candid street photography is easy. If anything, it’s more difficult (or, at least, a different kind of difficult) and can be just as nerve-wracking.
street photography portrait candid Jerez
Your timing has to be split second in order to capture the spontaneous moments that occur all around you. You need to know your equipment inside out in order to be able to frame a great composition and adjust settings as needed quickly.
Capturing great candid street pictures takes a great deal of practice and a lot of luck. Whatever your personal feelings are on the ethics of taking someone’s photo without permission, there are people who really don’t appreciate it.
It would be very unlikely you’d get into any serious trouble, but it’s worth using your street smarts and common sense. As a personal rule of thumb, if a certain person looks too mean for me to even consider asking permission to photograph them, there’s no way I’d try and sneak a shot.

The technicalities

Whatever type of street portraits you’re taking, the one thing you don’t usually have on your side is time. With candid shots, you’re constantly reacting to the world as it unfolds in front of you at its usual breakneck pace, and with the more posed approach, you’re still cutting into someone’s, probably busy, day.
You need to be able to work quickly, without fussing over settings or lens changes or tripping over bags. Keep your equipment as simple as possible—a single camera body and a zoom lens that covers all eventualities. I put a lot of trust in my Canon 24-70mm f/2.8L. It might not have the widest aperture in the world, but I’m happy to trade that for the versatility.
I generally shoot in Aperture Priority as well. So I only really need to think about the depth of field I want in a shot and let the camera’s far superior brain work out the rest of the details for me.
street portrait photography China
One area where you do need to stock up is memory cards. Make sure you have plenty of storage space with you, you’ll be taking a lot of images—especially if you’re heading out for a day of sneaky candid shooting. Throw in a couple of freshly charged batteries as well, just in case.

Like every area of photography, shooting street portraits has challenges all of its own. By far the most difficult thing to overcome is finding the courage to approach your subjects.
The good news is, if you’ve always felt too intimidated to attempt this genre of photography, you’re in esteemed company. Legendary names such as Diane Arbus and Elliott Erwitt have said they’ve used their cameras as both a kind of license to take photos and to act as a barrier between them and their subject. There’s still something mysterious about a camera that intrigues people—even more so these days when most photos are taken on phones.
street portrait photography candid Jerez
All it takes is a little daring, a projected air of confidence, and you can capture some unique moments and great street portraits. Share this article


https://bit.ly/2JzXFdk  .

4 Ways To Make Better Street Portraits While Traveling

Travel Photography, Digital Cameras, Portraits, Toddlers, Photoshop, Wide Angle, Canon, Pentax, Nikon, Raw format, JPG format, Lightroom, Outdoor Photography, Portrait Photography, Printing and Framing, Nikon, Travel Photography, How to avoid photography problems, bad mistakes, photography, video. Photography tutorial for beginners, photography, photography tips,
One of my favorite things about travel photography is the opportunities it provides to meet interesting people in the street and make portraits of them. Here are some of the things that I have learned that you can put into practice when you are traveling and make street portraits.
Street portraits and travel photography

1. Ask people for permission

It’s surprising how you often get the best results when you ask people for permission to make their portrait. This doesn’t apply all the time – you might see somebody interesting who doesn’t notice that you are there and you get the opportunity to make a great candid portrait.
But more often than not you can get a better result by approaching people and asking permission. The good thing about this approach is that it gives you a great excuse to go up to somebody and ask if you can make their portrait. A good way to phrase it is to explain that you are undertaking a project asking interesting people to pose for you.
Problems can arise with this approach if you don’t speak the local language. But that doesn’t stop you communicating with good body language and a smile. You can point to your camera to indicate you are asking for permission to make a portrait.

It’s worth overcoming the challenges

An alternative approach is to work with a local person who can translate for you. This may be a local photographer who you have made contact with and who is interested in helping you out. Or it may be a fixer who you pay to help you communicate with local people and find photo opportunities that you are unlikely to come across by yourself.
Once you have somebody’s permission you have an immediate advantage that you can spend some time with them to work on creating a good street portrait. For example, let’s say you see an interesting person who is standing in the sun and as a result, the light is too harsh to make a good portrait. If you approach them to ask for permission you can then ask them to stand in the shade so you get the best light.
Street portraits and travel photography
That’s the approach I took with the portrait above, created in a mosque in Delhi. The man approached us in the mosque and explained a few things to us about what we were seeing. When we met him he was standing in the sun. After a few minutes of conversation, we asked if we could make a portrait of him and he said yes. It was easy to find a shady place for him to stand.

2. Photograph character, not beauty

It may be tempting to look for beautiful or handsome people to photograph. And who could blame you? But you’ll create more interesting street portraits full of character if you find interesting people. This means people of both genders and all ages (except children, see next point).
For example, I made the portrait below in the town of San Antonio de Areco in Argentina. This town is famous for its atmospheric bars and gauchos. While taking photos in one of the bars somebody told me there was an elderly couple down the road who loved talking to people and having their photo taken. We went to check out the situation and found the couple sitting out on the street. We had an interesting conversation and I made this portrait.
Street portraits and travel photography
This also shows how you should be open to opportunity. If people are friendly and make suggestions like this, go with the flow and see where it takes you. Interesting things often happen this way.

3. Don’t take too many photos of children

A few years ago I traveled to the town of Tupiza in southern Bolivia. We were walking through the town’s main square and noticed there was a lot of children. It turned out that it was a national sports day and as part of that event, local school children were in the square to participate in sporting activities.
Eventually one of the children noticed that I had a camera and started jumping up and down in front of me, asking me to take his photo. Of course, then other children joined in and soon I had a mob of kids in front of me who all wanted their photos taken. Which I did, and I have a nice memory because of it.
Street portraits and travel photography
Luckily a teacher came along and shooed the kids away. The point of this story is that kids are often easy to photograph, especially in places where they get excited whenever they see a foreigner. But they are not likely to feature in your most interesting or memorable photos.
As a subject, they are too easy. Plus, you have to consider that in some countries local people may view strangers photographing children as suspicious. You’ll get better results by avoiding kids and finding interesting adults.

4. Look for interesting backgrounds

My final tip is to look for interesting backgrounds or places and wait with your camera to see what happens. Have you noticed how some photographers walk rapidly from one place to another, taking photos of anything that catches their eye? The aim of this exercise is to get you to slow down and become attuned to the rhythm of the place you’re in.
If the background is interesting enough, you can wait for somebody to pass by and add an element of human interest. People will usually think that you’re photographing whatever’s in the background and probably won’t even realize they are in the photo.
Here’s an example of that. I found this beautiful scene in Guatemala and waited to see what would happen. Eventually, a man cycled by and I was able to make this photo.
Street portraits and travel photography

When you are traveling with the intention of creating street portraits it takes some work to get the best results. Following the tips in this article, and getting used to approaching people to ask if you can make their portrait will help you a lot with the process. Share this article.

https://bit.ly/2JzXFdk  


Wednesday, July 29, 2020

Beach Photography and Digital Camera Maintenance

Digital Cameras, Portraits, Toddlers, Photoshop, Wide Angle, Canon, Pentax, Nikon, Raw format, JPG format, Lightroom, Outdoor Photography, Portrait Photography, Printing and Framing, Nikon, Travel Photography, How to avoid photography problems, bad mistakes, photography, video. Photography tutorial for beginners, photography, photography tips,
Beach PhotographyIn our post with tips on taking digital images at the beach I mentioned that taking photographs at the beach is not only a place of wonderful opportunity but one of challenges.
One of the major challenges of a place that has lots of sand, salt and often wind is keeping your digital camera protected from the elements.
Following are a few tips on how to care for your digital camera in the extreme conditions that a beach can throw at it.

Protective Filters – If you’re using a DSLR use a UV filter – in addition to the optical benefits it might offer a UV filter (or any other type in actual fact) offers another layer of protection to your lens both in terms of sand, grit and salt but also if it’s bumped or scratched. I’d much rather scratch a $50 filter than a $1000 lens!
Protect your Digital Camera’s Insides – Changing Lenses, batteries or memory cards should be done with incredible care. Try to keep the times that you open your camera up in any of these ways to a minimum while on the beach and if you have to do so make sure you’re well away from the water and if possible away from others in a sheltered place where sand will not find it’s way into the innards of your camera.
Clean Your Hands – After swimming try to rinse your hands in fresh water – salt from the ocean isn’t a good thing to introduce your camera to.
Clean Your Camera – After you day at the beach carefully clean your camera. At a minimum give it a good wipe down with a soft cloth (I use a micro fiber one which means I don’t need any cleaning fluid) to wipe any residue from the day and to get rid of any salt, sand, dust etc. It is probably worth investing in a camera cleaning kit for this purpose to utilize the different tools they give you (soft brushes, compressed air etc). Be very very careful in cleaning your cameras to use quality cleaning products because you can end up making them worse by spreading dirt around – especially when you do any cleaning on the inside. Be especially wary of anything that blows air – while this can get dirt out it can also blow it in!


Camera Bag – Obviously one of the main things to think about is how you’ll cary and store your camera when it’s not in use. On the one hand you want it to be secure and leaving it in a car might not be a wise move (partly for the security but also for the high temperatures in cars on hot days) but on the other hand you don’t want you camera sitting out on a beach all day, even in a bag, as sand tends to get into everything. Ideally a camera bag that allows you to seal your camera in will be ideal. Zip lock bags can also be useful for storing some of your gear (batteries, memory cards, filters etc). My motto for packing a camera bag when heading for the beach is to ‘pack light pack right’. Choosing to take a few useful items and leaving the rest at home can really save you problems later on.
Battling Condensation – My last trip to the tropical northern parts of Australia where it was incredibly humid presented me with the problem of condensation. The majority of the time my camera was in the air-conditioned, cool and dry confines of our hotel room (where it was inside it’s bag – even cooler) but this meant that when I took it outside to shoot that the lens and view finder immediately fogged up. It’s very difficult to combat this – although I found that the best strategy was simply to let the camera acclimatize before shooting. Some people suggest putting it in a sealed plastic bag when moving between temperatures – this might work well but is not particularly practical in many situations, especially when you have a large camera. Ideally you want to warm your camera up naturally and slowly – taking it out of it’s bag and allowing it to naturally warm up tended to fix the issue most times while I was away. I also travelled with a soft cloth which I used once the condensation had mainly gone to clean any marks it had left and to remove any last moisture that remained. One strategy that I have seen friends use is to use when visiting humid places where their camera can be exposed to condensation is to use little silica gel packs in their camera bags. These little packs absorb any moisture in your camera bag.
Set aside time for Photography and Fun – One last tip that I often do these days when I’m on holiday, especially to places like the beach where there is always the worry of camera damage. Often in these situations I take special visits to the beach just for taking photos and keep the ‘fun trips’ with family separate (and quite often leave my main camera at home). This way I have defined periods for photography where I can keep track of my gear and make sure it’s ok and then can truly relax when I head to the beach for fun. Of course when I go to the beach for fun I take my point and shoot with me for those fun shots – but I leave my more expensive gear at home where I know it won’t be damaged. I find this also means less frustration for those around me who can get sick of me always off taking photos when they want to relax with me.

Should I use the LCD or Viewfinder on my Digital Camera?

Digital Cameras, Portraits, Toddlers, Photoshop, Wide Angle, Canon, Pentax, Nikon, Raw format, JPG format, Lightroom, Outdoor Photography, Portrait Photography, Printing and Framing, Nikon, Travel Photography, How to avoid photography problems, bad mistakes, photography, video. Photography tutorial for beginners, photography, photography tips,
One of the things about digital cameras that makes them so appealing is the little LCD screen display on the back of them.
When I used a film SLR I used to take meticulous notes of the settings that I used when taking photos – noting frame number, aperture and shutter speed down after most shots so that a week or two later when I got my photos back from the lab I could compare my notes with the shots and work out how I might improve my photography.
The LCD screen on digital cameras cuts out the need for this process as images can be viewed immediately after they are taken and adjustments can be made to improve your shots straight away.
If you like to record your images settings for future analysis, most digital cameras will do this for you – to be viewed later either on your camera (using the ‘info’ function when in playback on many cameras) or on your computer.

LCD as a Viewfinder?

One question I get asked a lot by readers is whether they should use their digital camera’s LCD screen or viewfinder to frame their shots. I suspect that the majority of camera owners do use the LCD but there are a number of arguments both for and against it. Let me explore a few:

Why to use the LCD to frame shots

  • Convenience – Perhaps the main reason that people use the LCD is convenience. Rather than having to fire up the camera, raise it to your eye, squint through it (on many point and shoot models it’s quite small) etc… using the LCD means you simply switch the camera on and from almost any position you can snap a shot.
  • Size – As I hinted above – many models of digital cameras have very small view finders and when compared with the LCD (usually between 1.5 and 2.5 inches these days) there is really not that much of a comparison.
  • Instant Playback – shooting with the LCD means that after you take your shot you will immediately see the shot you’ve taken flashed onto the screen. You can see this if you use the viewfinder too by lowering the camera but it adds another action to the process.
  • Creativity – using the LCD opens up all kinds of creative opportunities for your photography by meaning that you don’t have to have the camera at eye level to be able to get your framing right. You can instead put it up high or down low and still be able to line things up well.
  • Framing Inaccuracy of Optical Viewfinders on Point and Shoots – one of the most common complaints about using the viewfinder on digital cameras is that what you see through it is slightly different to what the camera is actually seeing as the view finder is generally positioned above and to the left of the lens which means it is slightly different (a problem called parallax). Most viewfinders that have this will give you a guide as to where to frame your shot but it can be a little difficult – especially when taking close up/macro shots. (note that not all point and shoot cameras have optical viewfinders – some have electronic ones (see below).
  • Obstructed View – on some models of point and shoot digital cameras a fully extended zoom can actually obstruct the view from your viewfinder. This can be quite frustrating.
  • Glasses Wearers – if you wear glasses you might find using the viewfinder of your Digital camera more difficult. Many these days do come with a little diopter adjuster to help with this.
Lcd-Back

Why not to use LCD to frame shots

  • Battery Killer – the LCD on your camera chews up battery power faster than almost any other feature on your camera. Use it not only for viewing shots taken but lining them up and you’ll need to recharge a lot more regularly.
  • Camera Shake – when shooting with the LCD as a viewfinder you need to hold your camera away from your body (often at arms length). This takes the camera away from your solid and still torso and into midair (only supported by your outstretched arms) – this increased the chance that your camera will be moving as you take the shot which will result in blurry shots.
  • Competing Light – one problem that you will often have with framing your shots using the LCD is that for many cameras, shooting in bright light will make it difficult to see the LCD – leaving it looking washed out. Digital camera manufacturers are trying to overcome this with brighter and clearer screens but using the viewfinder instead of the LCD will generally overcome the problem.
  • DSLRs – most DSLRs do not give you the opportunity to use the LCD as a viewfinder at all. I suspect that this feature will become more available however as I hear it being asked for quite a bit. I’m not sure I’d ever use it though as DSLR view finders are generally larger and are a WYSIWYG (what you see is what you get) meaning you can be sure that what you’re looking at through the view finder is what the image will be when you shoot.
  • Electronic View Finders (EVF) – another type of view finder that is found on some point and shoot digital cameras is the EVF one. This overcomes the problem of your viewfinder and camera seeing slightly different things by giving you an exact picture of the scene you’re photographing in the viewfinder. This happens simply by putting a little LCD in the viewfinder.
Ultimately the choice in using the LCD or viewfinder will come down to personal preference. I have used a variety of digital cameras over the past few years and find myself using both methods depending upon the shooting situation and the camera. Some cameras have large and clear viewfinders (like my DSLR) and so I use them. Others have tiny viewfinders (in fact my latest point and shoot, the Fujifilm Finepix F10, doesn’t have one at all).
Given the choice between a great viewfinder and great LCD I’d probably opt for the viewfinder – call me a traditionalist but it just feels right for me.  Share this article.

https://bit.ly/2JzXFdk  

Tuesday, July 28, 2020

Posing Tip for Portraits – Which Way Should Your Subject Lean?

I once took some body language classes in a previous job to help me learn both how to read people and how to present myself. One of the tips that stuck with me from it was that when you lean towards a person that you’re interacting with you present yourself as interested and engaging. Similarly – if someone else is leaning towards you they are probably listening to you and are engaging with what you’re saying.
A similar thing can be conveyed in portrait photography.
When taking an upper body portrait a simple way to make your subject more engaging and friendly is to have them lean in towards your camera a little.
You don’t need them to lean in or bend over too far – but even having them do it just a small bit can help. Another way to give the impression of your subject leaning in is to photograph them from slightly above (as in the image on this post).
Alternatively if you are wanting a more formal portrait you’ll probably want to post your subject in a more upright position with them sitting up straight.
Lastly, if you’re feeling like experimenting with leaning your subject back away from the camera it’s possible to create a feeling of joviality as if they are leaning back for a belly laugh. Of course leaning back can also make your subject look quite uncomfortable and even defensive and it’s a pose that I tend to avoid.


 https://bit.ly/2JzXFdk