Thursday, July 9, 2020

Try this DIY Neutral Density Filter for Long Exposure Photos

Neutral Density Filter, Photography Backdrop, Nikon, Cannon, Shutter speed, photography techniques, bad habits of photography, 
photographer habits, mistakes photographers make, new photographer mistakes 
photography problems how to avoid photography problems bad mistakes photography, 
video. photography tutorial for beginners, photography, photography tips, photography tricks, 
photo tips and tric
Image: You could buy an expensive ND filter to make a long exposure image like this. Or, you could d...
You could buy an expensive ND filter to make a long exposure image like this. Or, you could do 
it “on the cheap” with the trick you’ll learn in this article. 162 seconds f/8, ISO 100
You’ve seen those landscape photos where the water has been rendered silky smooth, ocean waves look more like fog, or the clouds have streaked motion effects?  How are they done?  They are long exposure photos. The shutter speed often measured in full seconds rather than fractions of a second.  Some even measured in minutes of exposure.  In low light, you can sometimes slow your shutter speed by decreasing the aperture size and setting the ISO as low as it can go.
Of course, if you’re working in bright light, you may find that even with the smallest aperture and lowest ISO you still can’t get the shutter speed slow enough to produce the effect you want while still maintaining proper exposure.  What can you do then?  It’s time for a Neutral Density Filter.
So what are they, how do they work, and how can you achieve a similar effect without immediately laying down about $100 U.S dollars for one?  Read on my friend.
Image: This one was done with a variable ND filter. With a 30-second exposure, whatever moves will b...
This one was done with a variable ND filter. With a 30-second exposure, whatever moves will 
blur. Note the water and clouds.

What is ND and why use it?

On a bright sunny day, you may reach for a pair of sunglasses to reduce the amount of light coming into our eyes.  A Neutral Density (ND) Filter is much the same for your camera.  The “density” part of that term refers to how dense or dark the filter might be.  The “neutral” portion of the term refers to the coloration the filter might add to the image.
If we’re making color images, we’d like a filter that would help reduce the amount of light while remaining neutral in color and not putting a color cast on our images.  So we want a neutral filter that can cut the light in situations where the ambient light is too bright to get a slow shutter speed beyond that obtainable with a combination of the lowest ISO and smallest aperture.
Image: A 6-stop ND filter was used here. 30 seconds, f/20 ISO 100
A 6-stop ND filter was used here. 30 seconds, f/20 ISO 100

Types of ND filters

The DIY approach to long exposure photography to be discussed here uses a method never initially designed for photography but will allow you to give this technique a try “on the cheap.”  Rather than spend around $100, it’ll cost you a tenth of that.  Before I reveal the “secret,”  let’s first talk about the commercial photographic ND filters you might buy.

Camera filters typically fall into two types:

Screw mount – Those that screw into the filter threads on the front of your lens
Square filters – Those that are mounted to the lens with a filter holder.
Both are available in varying degrees of density.  How dark the filter is, is typically described in how many “stops” of light it reduces compared to an exposure without the filter.
For example, if you made a proper exposure at ISO 100, f/5.6, 125 seconds, and then after the filter was mounted, you needed to slow the shutter speed to 1/2 second to get the same exposure, (assuming you left the ISO at 100 and f-stop at 5.6), that filter would be a 6-stop ND filter.  (1/125 – > 1/60 -> 1/30 – 1/15 -> 1/8 -> 1/4 -> 1/2 second ).  The density of the filter would have reduced the amount of light by 6-stops.
You can purchase both screw mount and square filters in various “strengths” or number of stops they reduce the light.
For example, this 77mm screw-mount 6-stop ND filter made by B&W runs about US$71, while this popular 10-stop square mount ND filter, the Lee “Big Stopper” is at this writing US$129.00.
Image: A variable ND might work, but take it too far…
A variable ND might work, but take it too far…
Image: …and you’ll get weird artifacts.
…and you’ll get weird artifacts.
Variable ND Filters – Another type of ND filter uses two polarized filters mounted together so they can be rotated in a way that produces variable density.  One might think this is a better solution than a fixed ND filter, allowing the photographer the means of adjusting the desired stops of reduction.
That would be ideal, and it works – to a point.
The problem with variable ND filters is sometimes they can produce nasty “artifacts” that spoil the image, especially on wide-angle lenses at higher density settings with less expensive variable ND filters.
More expensive variable ND filters will be better, but of course, cost even more.

The “One Weird Trick” ND filter

You’ve seen that “one weird trick” phrase used on the web before, right?  Usually, it’s for a gimmick that is less than a quality product.  I confess, what I’m going to suggest here is a bit of a gimmick and no, won’t deliver the results of the pricier dedicated photography ND filters.  You have to perform a few workarounds to get it to produce decent results and mounting it to your camera will be a little… “funky,” shall we say?  The upside is, it will probably cost about 1/10th of what a true photographic ND filter.
So, it could be a nice introduction to long exposure photography, while allowing you to explore this technique on a budget to see if it’s for you.
So here’s the big reveal…
What you are going to use is a piece of welder’s helmet glass.
You’ve seen welders wearing helmets while they work and perhaps noted a glass “window” they look through to observe their work?  The intensity of arc welding is so great that without a way to darken the welding spark the welder would be blinded.  So, a piece of very dark glass, a “density filter,” is what they have in their helmets.  The common denominator is the welder wants to darken the welding arc and you, as a photographer, want to darken the light coming into your lens.
Image: These aren’t spacemen. They are welders and that piece of glass you see in their helmet...
These aren’t spacemen. They are welders and that piece of glass you see in their helmets is what 
you need for this “weird trick.”

What and where to get it

What you are looking for is a piece of welding glass used in a helmet.  Pieces can be purchased alone, (as replacements for the helmets) and in various sizes and “grades.”  You might have a local welding supply shop where you can get these or purchase them online.  Here is a link to an example. The glass measures 4.5″ x 5.25′ (114.3 mm x 133.35 mm) which is large enough to cover most camera lenses.  It comes in grades 4, 5, 6, 8, 10, 11, 12, and 14 with the higher numbers being darker/denser.
This chart may help you in determining the conversion from “grade” to the amount of f-stop reduction:
Try this DIY Neutral Density Filter for Long Exposure Photos
To keep it simple, most often you will use a 6-stop or a 10-stop ND filter.  One popular brand of ND filters is Lee. Their “Little Stopper” is a 6-stop filter, and their “Big Stopper” is a 10-stop filter.  So consulting the chart, if you wanted a 6-stop welding glass filter, get a Grade 6, and for a 10-stop reduction, get a Grade 8.
Image: The left half of this shot shows how the uncorrected image looks due to the heavy green color...
The left half of this shot shows how the uncorrected image looks due to the heavy green color of the 
welder’s glass. The right has been white-balanced using the custom white balance method discussed.

Density Yes, Neutral… not even close

This is probably the biggest drawback to using a piece of welding glass as an ND filter.  You can get very dark pieces of welding glass, so density isn’t a problem.  The problem is that most welding filters have a very pronounced green, or in some cases, gold color cast.
Dedicated photography ND filters may have a little coloration, but try to come as close to neutral as possible.  You will pay more for more neutral filters as you’d prefer to get darkening without coloration.  So what to do when using a welding glass filter?

Three options to dealing with the color cast

There are three things you can do to help reduce the distinct coloration a welding glass filter causes:
  • Shoot in Raw, (which you do anyway, right?) and adjust your white balance when editing to compensate.
  • Set an in-camera Custom White Balance
  • Plan to make your images monochrome where color casts won’t be a problem.
Let’s discuss these options.
The first is simple enough.  Yes, when you review your images after shooting on the camera LCD they will look very green.  (I’ve only used the green welder’s glass, not the gold).  Just know you will be adding lots of magenta, (the opposite of green), to your white balance when you edit.  Even then, good color may be a struggle.
Image: Rather than fight the color cast, maybe monochrome is the ticket when using the welder’...
Rather than fight the color cast, maybe monochrome is the ticket when using the welder’s glass 
ND trick.
The second option, setting a custom white balance, is a good idea.  To do so, mount your welding glass filter, (more on that in a minute) and make an exposure of the sun or bright sky.  Then, using the custom white balance function of your camera, (consult your manual on how to do this), store that image and white balance on it, creating a custom white balance you can use to shoot with when using your welding glass filter.
The advantage of this is image playback on your LCD will be closer to a normal color.
Additional tweaking will likely be needed in post-processing, but this may help you a bit when shooting.
The third option, (and to me maybe the best) is not to fight the color cast and plan to make your welding glass filter shots monochrome.  Long exposure images have an “ethereal” look often enhanced in a monochrome image.  So, rather than fight trying to restore good color from that alien green image, embrace monochrome.
If you decide you love long exposure photography, you will then likely buy a photographic ND filter which will make much better color shots.

Calculating your exposure

Before mounting your welding glass on your lens, you will want to compose your shot as usual.  You will also want to obtain good focus.  Do this first, because you won’t be able to see much of anything with the welding glass mounted.
Once focus has been obtained, switch the focus to manual.  Consider putting a piece of tape on the focus ring so it won’t move later.
Now make a shot with good exposure without the filter.  You will be changing your shutter speed once the filter is mounted, so choose an aperture and ISO.  What setting you choose will depend on the depth of field you require and also how long you’d like your exposure to be.  The slower the shutter speed you set here (while still getting a proper exposure), the longer your exposure can be with the filter.
Your subject will largely dictate your desired exposure length and the look you are trying to achieve. A silky waterfall might only require a 2-second exposure while smoothing ocean waves could take 30 seconds and streaking clouds in the sky a couple of minutes.  There is no formula here – trial and error will help you learn what works right.
Image: The monochrome version of this shot above was done with the welders’ glass and an expos...
The monochrome version of this shot above was done with the welders’ glass and an exposure 
time of 1.6 sec. This shot was taken later when the last rays of sun lit the turbines and also used 
1.6 seconds. Too short a shutter speed and the blades were frozen. Too long and they disappeared. 
1.6 seconds was the “sweet spot.”

Using an app to calculate shutter speed with the filter

Your meter will likely be useless once you mount the welding glass ND filter so you will need to calculate shutter speed yourself using the previous exposure information as a starting point.  There are numerous smartphone apps available to help you.  I like the one made by Lee Filters (Android / iOS ). Made for use with their Little (6-stop)/Big (10-stop)/Super (15-Stop) filters, you will need to tweak a bit when using it with your welding glass. However, it will get you in the ballpark, and you can adjust from there.
Let’s use an example:  You’ve made a shot without the filter and with the ISO set at 100 and the aperture at f/22 you can get the shutter speed down to 1/15th of a second and make a proper exposure.  You bought both a Grade 6 (6.67-stops) and Grade 8 (10-stops) pieces of welding glass.  What will your new shutter speed need to be with each filter installed?  Using the Lee app, we can see the 6-stop reduction would put us at between 4 and 8 seconds and the 10-stop reduction at 1 minute.
Again, plan on using these adjusted settings as starting points.  Try them and adjust your shutter speed (or possibly other settings) as needed.  Definitely plan on taking multiple shots as you get things dialed in.  Long exposure photography is not something you do in a hurry.
Image: It’s funky, but it works. Reverse the lens hood and use rubber bands to attach the weld...
It’s funky, but it works. Reverse the lens hood and use rubber bands to attach the welder’s glass filter.

Attaching the welding glass filter

You’ve set up the camera, composed, focused, locked everything in, calculated your new shutter speed and are ready to mount the welding glass ND filter.  I think I used the word “funky” earlier in the article to describe how you will attach your DIY ND filter to your lens.  The photo here, showing how reversing the lens hood on your lens and then using rubber bands pretty much depicts the technique.
Something to improve it a bit – put some black gaffer tape on the edges of your piece of welders glass.  This will give the rubber bands a surface with more friction to grab onto.  (It also helps you in hanging onto the glass).  I’m not sure if the edges of the glass would transmit light onto the image, but the tape will also prevent that should it occur.  If your lens doesn’t have a hood to reverse, try larger bands which will allow you to stretch them back around the camera body.
Try not to disturb the focus ring as you mount the filter.  You will not be able to check focus again once the filter is in place.
Image: Set your focus BEFORE mounting the filter and turn the switch to Manual focus (MF)
Set your focus BEFORE mounting the filter and turn the switch to Manual focus (MF)

Making the shot

With the welder’s glass filter mounted, you will pretty much be “flying blind.”  You will not be able to see anything through the viewfinder, and maybe, if your filter isn’t too dark, you might be able to see just a little bit using live view if your camera supports that.  You better have composed and focused before mounting the filter as you can’t see to do it now.  Your meter will also not work with such low light.
While you could use the 2-second timer to trip the shot, I’d suggest a remote release.  You will also definitely need one if you’ll be making exposures over 30-seconds (on most cameras) in which case you will be putting your camera in Bulb-Mode.
A release that allows you to lock the shutter open during the exposure will help a lot here.  The Lee exposure calculator app also has a countdown timer.  Activate it when you open the shutter and it will countdown and beep at the end of the calculated exposure time telling you when to close the shutter.
Image: If your shutter speed will exceed 30-seconds, you will probably need to use bulb mode. A remo...
If your shutter speed will exceed 30-seconds, you will probably need to use bulb mode. A remote 
release is a good idea in such cases.
You may also want to consider using the noise reduction feature of your camera.  Noise can be a problem with long exposures.  The noise reduction feature will make a second black frame image the same length as your first shot and then subtract any random noise or hot pixels from your image using the black frame as a reference.
Keep in mind, however, that the black frame exposure will be as long as the original shot so if you are, for example, making a 2-minute exposure, your camera will be busy for four minutes.  I told you, you don’t do long-exposure photography in a hurry.
Image: No filter. A straight shot – 1/25 sec. f/8 ISO 100
No filter. A straight shot – 1/25 sec. f/8 ISO 100

Back in post-production

You edit your long exposure images much as you do with any regular shot with the big exception of that crazy color cast.  There are lots of web resources that tell you how to help correct for that cast so I won’t spend time on that here.  Just know that with this welding glass technique you will never get the color as good as you would without the filter.  I still believe that monochrome is the way to go here.
Image: Using the welder’s glass ND. Custom white balanced in the camera, color corrected again...
Using the welder’s glass ND. Custom white balanced in the camera, color corrected again in 
Lightroom and Photoshop. 162 seconds, f/8 ISO 100. The monochrome version is at the top of 
this article.

Frustrations and limitations

I’ve since bought a real ND filter, the 6-stop B+W I mentioned, so my welding glass hasn’t seen much use until I got it out to make this article.  In making the wind turbine shots, I found what I think, (after some comparison testing), is a Grade 10 glass, very dark but still not dark enough to make even a short 1.6 second shot, (the shutter speed I determined was best to get the hint of motion I wanted on the turbine blades.)  Longer exposures simply caused the blades to disappear entirely.
A side note here: long exposures can be a great way to make a crowd disappear when photographing a busy cityscape.  The people move and so disappear during a long exposure while the static buildings and such stay put and show up in the photo.
Trying to darken the shot further, I put a polarizer on the lens, (dropping the exposure 2-stops), and then stacked the welder’s glass ND over that.  It wasn’t a good combination.  Too much, as the British say, “faffing about,” and I likely knocked my focus off slightly.  Also, shooting through both the polarizer and the welding glass put too much “cheap glass” between the camera and the image, so the sharpness suffered.
Image: A straight shot with no filter. 125/sec. f/22 ISO 100
A straight shot with no filter. 125/sec. f/22 ISO 100
A second trip to the Boise River provided an opportunity to see how a long exposure would depict the fast-moving spring runoff.  I was able to use much longer exposures here, a few just over two minutes.  I also made a 30-second exposure with the sun in the shot, something that wouldn’t have been possible with no filter even with the minimum ISO of 50 and the smallest aperture of f/22.  Shooting long exposures in bright light is a big reason for using an ND filter.
Image: A shot directly into the sun, and a shutter speed of 20 seconds, probably isn’t possibl...
A shot directly into the sun, and a shutter speed of 20 seconds, probably isn’t possible without a 
strong ND filter. I calculate the Grade 10 welder’s glass used here to give about 13-stops of light 
reduction. 20 seconds f/14 ISO 100

When to buy a real ND filter

You may find the welder’s glass technique a fun way to dip your photographic toe in the waters of long exposure photography.  If you find you enjoy it and like the kinds of images you can make, save up and buy a good ND filter.  However, if the technique is interesting, but not really your bag, then you will have discovered that having only spent a few dollars on your welder’s glass DIY version.
Either way, you will learn much more about creatively using your camera controls to make exciting photos and that’s what it’s all about.  Learn and enjoy!

Share this article.

5 DIY Macro Photography Hacks for Stunning Macro Photos (on a Budget)

Do you want to take stunning macro photos…
…on a budget?
In this article, I’m going to show you exactly how you can capture amazing macro photos (without breaking the bank). You’ll discover 5 DIY macro photography hacks which you can use for consistently gorgeous images.
5 DIY Macro Photography Hacks for Stunning Macro Photos (on a Budget)
Sound good?
Let’s dive right in, starting with:

1. Use a board for a stunning macro photography background

First things first:
In macro photography, the background matters almost as much as your main subject. Because the background is what makes your main subject stand out.
One of my favorite backgrounds is a solid, uniform color:
Dark black.
Black backgrounds allow you to capture somber, moodier macro photography. Like this:
5 DIY Macro Photography Hacks for Stunning Macro Photos (on a Budget)
Now, achieving a natural black background in nature can be tough. Which is why this DIY hack is so valuable. Because you can use it to create a deep black background in all of your macro photos.
Here’s what you do:
Step 1: Go to your local hardware store and purchase a plywood board. I’d suggest something ultra-thin (because wood can get heavy, fast). I’d also go for a decent size: at least two feet on all sides.
Step 2: Purchase black paint and primer. I recommend getting a sample paint pot (one should be more than enough). These are cheap and work just fine. The primer is to prevent the wood from tainting the color.
Step 3: Add the primer and paint the board. I’d recommend two coats of black paint for that ultra-dark look.
Step 4: Let the board dry.
Now comes the fun part:
Actually taking the photos!
You should choose a main subject that’s fairly light (e.g., yellow and white flowers). Position your main subject so that it’s in the sun, with the black board in the shade, a foot or so behind it. You want to create as much contrast as possible between the board and your subject. That is, you want a light subject on a dark board.
DIY-macro-photography-hacks
The goal is to lose absolutely all detail in the background. If you don’t fully achieve this in-camera, you can use an editing program to drop the blacks in your images.
You can still make this work with diffused (i.e., cloudy) light. But you’ll need to do a bit more work in post-processing to bring down the blacks.
Bottom line?
You can work some serious magic with just a board and some paint.
Try it yourself! And watch as you capture amazing macro images.

2. Use a lightbox for a stunning high-key, transparent look

Have you ever wanted to capture macro photos that look bright and high-key? Maybe even transparent?
With this DIY hack, you can!
All you need is a basic lightbox, often used by artists for tracing. You can purchase one for around 20 dollars on Amazon. While a bigger lightbox is generally better, anything A4 and above should work fine.
Once you have your lightbox, you’ll need to choose a main subject. Flowers with translucent petals work best. And the flatter the flower, the better.
You’ll want to work in a room that has only diffused ambient light. You want your flowers to have a soft, even look.
Then turn on the lightboard, and place your flowers on top of it.
DIY-macro-photography-hacks
I recommend shooting parallel to the lightbox from above. While you can do everything handheld, I don’t recommend this, especially if your flowers are more three dimensional. Instead, mount your camera on a tripod and use a narrow aperture (i.e., f/8 and above) to ensure perfect sharpness.
Once you have your shots, you’ll probably need to do a bit of post-processing. I recommend increasing the whites, to give a slightly brighter, airier look.

3. Shoot with one flower in a vase for powerful compositions

There’s no doubt about it:
The way that flowers are positioned can make a macro shot look amazing…or terrible. If several flowers are overlapping, your photo may fall flat.
But if you can isolate a single flower
…that’s when things start to look really compelling.
Now, when you’re shooting in nature, you don’t have much control over this. You have to work with what you’ve got.
But if you use this DIY macro photography hack, you can capture a gorgeous set of macro flower photos.
Guaranteed.
Here’s how it works:
Go to your local grocery store, and purchase a bouquet of your favorite flowers. I like to work with tulips, but you can really use anything!
When you get home, check over the flowers for blemishes and other issues. Find the biggest, best-looking flowers of the bunch.
And then put them all in separate vases (or cups).
5 DIY Macro Photography Hacks for Stunning Macro Photos (on a Budget)
Note: You want the flowers to extend pretty far over the top of the vase, which is why I suggest you avoid taller vases.
The next time the light is good, take all the vases outside. Place them in front of a gorgeous background.
(I often use an orange sky at sunset.)
And then photograph all the flowers, individually. Because they’re in separate vases, they’ll all be perfectly isolated. And this will allow you to easily capture powerful compositions.
Try it.
You’ll love the final product.
5 DIY Macro Photography Hacks for Stunning Macro Photos (on a Budget)

4. Detach your lens for an artistic macro look

If you’re bored of getting the same macro look over and over again, then this DIY macro photography hack is for you.
It’ll help you capture photos with brilliant light leaks, like this:
macro-photography-DIY-hacks
If you’re familiar with the concept of freelensing, it’s like that, but with a twist.
Here’s how you do it:
Choose a backup camera body and a cheap camera lens in the 50mm range. (There’s a slight risk of exposing your camera sensor to dirt.)
Focus your lens to infinity.
Then turn off your camera, and detach the lens.
Next, turn the camera back on, and pull the lens just slightly away from the camera (it should still be detached!).
This will actually magnify your subject, while often giving you some amazingly artistic light leaks.
DIY-macro-photography-hacks
And while the technique may require a bit of experimentation, you’ll get the hang of it pretty quick, and you’ll capture some gorgeous macro photos.

5. Use fairy lights for amazing background bokeh

Here’s your final DIY macro photography hack (and it’s one of my favorites):
Use fairy lights for gorgeous macro backgrounds. They’ll get you photos like this:
DIY-macro-photography-hacks
To start, grab a set of fairy lights on Amazon (for around 10 dollars). I recommend a neutral or warmer color.
Go out to shoot around dusk, when the light is really starting to fade.
Find a nice subject, and position the fairy lights directly behind it. You can dangle them from surrounding vegetation, or you can hold them with your left hand.
Now, you don’t want to position the fairy lights too close, or else you’ll capture the wiring in your photos. Instead, you want them to show some nice bright light without being prominently featured.
You should also make sure to use a shallow aperture, in the area of f/2.8 to f/5.6. That way, the fairy lights will be fully blurred, creating some stunning bokeh.
The trick is an easy one, but it’ll get you amazing macro photos!
DIY-macro-photography-hacks

DIY macro photography hacks for stunning macro images: Conclusion

You’ve now discovered five DIY macro photography hacks.
And you can use them for stunning macro photos all the time.
So go ahead and start. Make your black board. Grab yourself some fairy lights.
And take some amazing macro photos!
Do you have any DIY hacks of your own for beautiful macro shots? Share them in the comments!

Share this article.

Tags: 


Macro Photography, Photography Backdrop, Nikon, Cannon, Shutter speed, photography techniques, bad habits of photography, photographer habits, mistakes photographers make, new photographer mistakes, photography problems, how to avoid photography problems, bad mistakes, photography, 
video. photography tutorial for beginners, photography, photography tips, photography tricks, 
photo tips and tricks


Wednesday, July 8, 2020

DIY Photography Backdrops for Still Life and Product Photography

Your choice of backdrop can have a big impact on the final look of your photos.
You may have purchased expensive professional photography backdrops because you know this. 
But whether you’re a hobbyist or pro, you probably already spend enough on your photography that you don’t want to shell out the big bucks for your props. Luckily, with a bit of creativity, you don’t have to.
Here are some of the best ways to create beautiful DIY photography backdrops for still life and product photography.
diy-photography-backdrops

Painted canvas backdrop

For a magazine-quality look, my top pick for a still life photography backdrop is painted canvas.
Professional canvas backdrops are expensive, but you can make your own for a fraction of the retail price.
Go to your local hardware store and buy a canvas painter’s drop cloth.  These are pieces of canvas you use to protect the floor when painting interiors.
Canvas drop cloths are usually large, so you can cut them into four pieces to get four backgrounds out of one stretch of fabric. Make that eight if you go double-sided. 
While you’re at the hardware store, purchase two or three paint samples in a similar tone for each backdrop. Note that the canvas soaks up a lot of the paint, so you may need to purchase primer as well, or use more paint than you thought. 
Layer the paint onto the canvas with a small, good-quality roller, moving the roller in different directions.
To add more texture, scrunch up a rag or use a large sea sponge and dip it into the paints. Randomly press the rag onto the canvas.
Your backdrops will have a natural texture that enhances but doesn’t compete with your subject. The canvas also has a great subtle texture, too. 
diy-photography-backdrops

Ceramic flooring tile

Another beautiful yet simple background is porcelain or ceramic tiles. You can get them from your local home improvement store. These are inexpensive and look great. They’re easily wipeable, which is a bonus if you’re dealing with food or liquid products.
Just make sure that any tiles you pick aren’t shiny, so you don’t get glare.  Good colors to choose are grey, black, white, or cool brown tones like taupe. These neutrals will enhance and complement a wide variety of products or still life subjects. They are better for smaller subjects because they tend to not be very large.
diy-photography-backdrops

Painted wooden backdrops

These days, there are a lot of suppliers selling painted custom backdrops for still life photography, but painting some yourself can be a lot less costly, and you don’t need any special skills. 
To make your own, buy thin plywood sheets at the home improvement store. Pieces that are at least 2×3 feet should accommodate most of your set-ups. The bigger stores like Home Depot can also cut larger pieces into smaller ones for you, so you can get more mileage out them.
You can purchase paint samples from the hardware store as well, or use craft paints. Just make sure that any paints or varnishes you use are matte. Even some of the satin types can cause unwanted shine in your images. 
Choose three or four colors in a similar color family and pour them together in the middle of the board. Take a large sea sponge and dab the paint all over the board to create a blended and subtle, mottled effect.
Finish with a thin coat of matte, water-resistant sealer. 
DIY Photography Backdrops for Still Life and Product Photography

Linens

Having a variety of linens on hand will make your life a lot easier as a still life photographer
Depending on what you shoot, these can run the gamut from natural fabric like linen to lightly patterned damask tablecloths.
You can use the fabric as the entire backdrop, as shown in the image below, or just to cover a portion of another backdrop.
When covering your entire surface with a piece of linen or tablecloth, place another layer of fabric underneath. This will plump it up and make it look more attractive.
Again, when choosing your colors, stick to neutrals. Shades of blue also look good, especially in dark and moody images. You can choose a pastel or brighter color depending on what you’re shooting and your desired result.
The key is that you don’t want your photography backgrounds competing with and drawing the eye away from your main subjects.
DIY Photography Backdrops for Still Life and Product Photography

Vintage Tray

Don’t get rid of any old or vintage trays you may have kicking around. They also make great photography backgrounds for still life. 
Depending on the metal, they will often have a lovely patina that will add something special to your shots. They look great close up or at a distance, or can be used as an element in telling your story.
You can often find vintage trays for an affordable price at secondhand or antique stores.
As with any backdrop, it should not be reflective. 
Note that in the images below, the tray doesn’t look overly shiny, even though I backlit my subjects. It has a nice and subtle texture. 
diy-photography-backdrops

Colored papers

Colored or textured craft or construction paper can make pretty and inexpensive photography backdrops that are light and easy to store.
Source large pieces of craft paper or construction paper at your local craft supply store, or check out sites like Amazon for packages of paper offering a variety of colors.
In the image below, I used a large piece of yellow construction paper as my background. To recreate this look, distance your paper a fair bit away from your set. This will help you get a blurred out horizon line and so your subject doesn’t look “stuck” to your background.
diy-photography-backdrops

Wooden cutting boards

Depending on the size, a wooden cutting board can function as a nice backdrop or be used as a layering piece in some types of still life shoots, like food photography.
Be careful about purchasing boards with a warm, orange, or yellowish tinge. Since most food is quite warm in tone, an image that is warm throughout can end up looking dated.
Also, the camera tends to exaggerate this orange tone. I find that I have to decrease the orange saturation in all of my images to start with.
Look for light boards like pine, or boards in deep espresso for darker shots. You can also paint these in whatever color you want. In the image below, I painted mine white and distressed it with fine sandpaper.
Be sure to keep painted boards for photography purposes only, because they won’t be food safe.
DIY Photography Backdrops for Still Life and Product Photography

To sum up

There are so many different ways to create stunning still life and product photography backdrops without the expense of buying and shipping wooden backdrops from specialist suppliers.
These are just a few ideas, but also look at contact paper, wallpaper, burlap, and old pieces of wood.
Experiment with the items you already own before spending a lot of money on costly photography backdrops. 
Do you have other tips?  Share with us in the comments section!


Tags: 


Photography Backdrop, Nikon, Cannon, Shutter speed, photography techniques, bad habits of photography, 
photographer habits, mistakes photographers make, new photographer mistakes 
photography problems how to avoid photography problems bad mistakes photography, 
video. photography tutorial for beginners, photography, photography tips, photography tricks, 
photo tips and tricks, 5 bad photography habits, quick photography, video help, 
new photographers.

Nikon Dropped the Term ‘Slave’ 20 Years Ago Due to ‘Negative Context’


Author: DL Cade


Last week, Canon confirmed that they had stopped using the contentious terms ‘master’ and ‘slave’ in their flashes and triggers three years ago, but it looks like Nikon beat them to the bunch… by a lot. In a new statement, Nikon claims they stopped using the term “slave” in the early 2000s because of “the term’s negative context.”
The original report came from Jason Parnell-Brookes over at Fstoppers, who got in touch with Nikon UK about the use of the terms “master” and “slave” in Nikon’s speedlights.
As a reminder, the terms “master” and “slave” have been used in lighting equipment for decades as a way to indicate which device (master) is controlling or triggering a secondary device (slave). However, as protests against systemic racism gained traction around the world over the past month, some photographers have called for an end to their use, pointing out that the terms are derogatory by nature.

“Master” and “Slave” seen on the Canon Speedlite 600EX II-RT flash.


In response to the uproar, Canon recently confirmed that they’ve been “phasing out” use of
these terms since 2017, and won’t be using them moving forward. Now Nikon is coming
forward to say the same thing, except they apparently changed their policy almost two decades
ago.
“These terms were removed from Nikon products in the early 2000s — in the context of the
negativity around their connotations,” Nikon told Brookes. “We no longer feature these terms
in/on products.”
Further clarifying their position, Nikon UK tells Brookes that the only time you’ll still see the
terms today are in reference to end-of-life products like the “Wireless Slave Controller SU-4.”
All more recent products and all products moving forward should refer to this same function
as “Remote” according to Nikon.
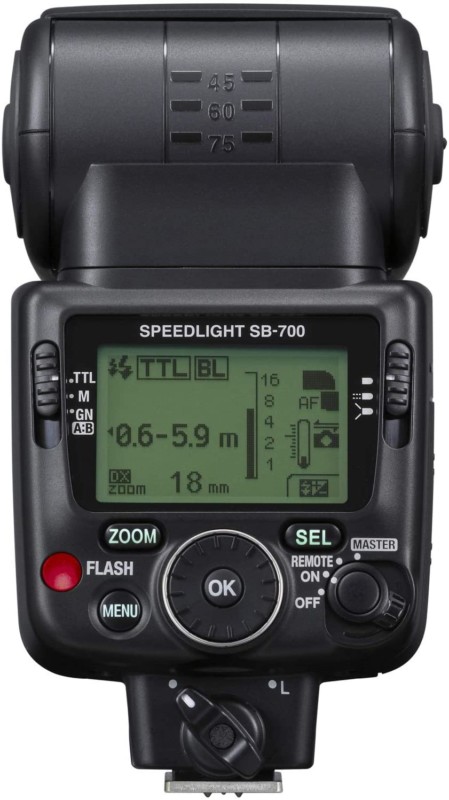
However, Nikon’s dates still seem a bit off. The Nikon SB-700, first available in September of 
2010, still has Master written prominently on the back:

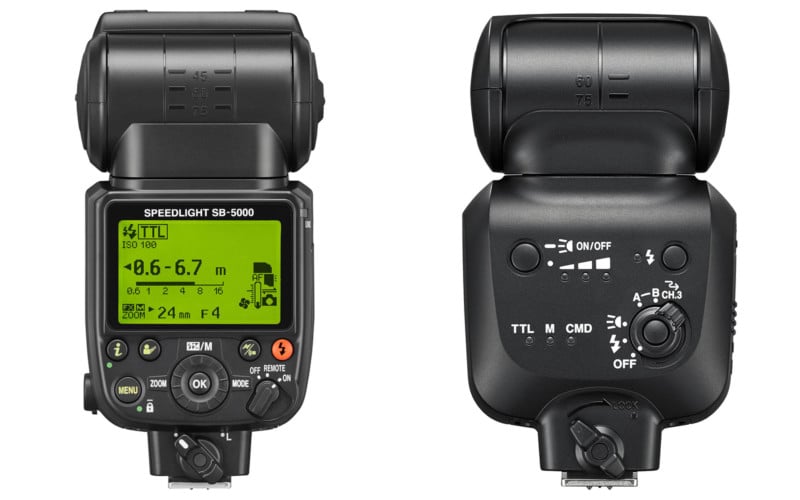
While slightly newer flashes like the SB-5000 (released in 2016) and the SB-500
(released in 2014) seem to omit it:
Nikon’s newer flashes replace “Master” and “Slave” with “Remote” or “CMD” 
(Commander)
When we reached out to Nikon Inc. about this matter, a spokesperson shared the following
statement with PetaPixel:
At Nikon, we removed the conventional electronics and technological terminology

of “Slave” from our products in the early 2000s in consideration to the term’s negative

context. All current products refer to the function as “Remote”.
As you can see, Nikon Inc. was a bit more careful about their wording: “slave” was phased
out in the early 2000s. We’ve followed up about the company’s policy regarding the term
“master” and will update our coverage if and when we hear back, but it seems that term has
also disappeared, albeit more recently.
Either way, it seems the recent calls to remove the terms may have already been heard and
heeded years ago. While you’ll still find the terms on some lighting equipment—Profoto,
for example, still uses the term in even their newest monolights—given the recent uproar,
it seems likely they’ll be phased out by all companies moving forward.

Tags: 

Nikon, Cannon, Shutter speed, photography techniques, bad habits of photography, 
photographer habits, mistakes photographers make, new photographer mistakes 
photography problems how to avoid photography problems bad mistakes photography, 
video. photography tutorial for beginners, photography, photography tips, photography tricks, 
photo tips and tricks, 5 bad photography habits, quick photography, video help, 
new photographers.
 

Tuesday, July 7, 2020

How to Make the Most of Creative Shutter Speed in Photography


Image: This photo is all about the moment of capture. I used a fast shutter speed to capture it.
This photo is all about the moment of capture. I used a fast shutter speed to capture it.
One of the most important settings on your camera is shutter speed, and it’s just as important to master this as it is to master aperture. If anything, shutter speed control allows you to become even more creative with your photography. Exciting techniques like light painting and panning both rely on the photographers’ use of this setting. In this article, you’ll learn techniques that need a creative shutter speed, and how you can apply this to your photography. So let’s begin with what shutter speed is, and why it’s important.

What is shutter speed?

A photograph relies on light to become exposed, and shutter speed controls how long that light sources can expose the photo. That means in general, lighter conditions mean fast shutter speeds, and dark conditions mean slow shutter speeds. Shutter speed is also controlled by opening or closing the aperture on your lens, adding filters to your lens, and, in some cases, adding external lighting to your scene. In DSLR camera’s it means the mirror locks up, and in mirror-less cameras, the shutter is merely open. Now, various techniques rely on shutter speed to work. Let’s sub-divide them by the how fast the shutter speed needs to be.

Fast shutter speed

Using super-fast shutter speeds allows you to freeze things that might be faster than the eye can appreciate. That may mean raindrops, wildlife, or photographing sport.

Freezing the action

The shutter speed you’ll need to freeze the action very much depends on what you’re photographing. Concerning creative imagery, you’re looking at freezing things that are too fast for the naked eye, and hence, you’ll get some unusual detail in the photo you’ve taken. Next is a simple guide to the type of creative shutter speed you’ll need to freeze the following types of action:
  • A waving hand – A shutter speed of 1/100th is fast enough to freeze this motion, to be sure use 1/200th
  • A flying bird – 1/2000th will get you a sharp photo of a flying bird.
  • Raindrop splashes – Look to use a shutter speed of 1/1000th or faster to freeze moving water. It’s possible to take water drop photos at slower speeds, but those often use a strobe flash to freeze the water rather than the shutter speed itself.
Image: Freezing droplets of water require a fast shutter speed.
Freezing droplets of water require a fast shutter speed.

Moment of capture

Getting the right moment is what makes or breaks a photo. It is possible to take good moments of capture at slower shutter speeds, but generally, you’ll want to freeze the action. That means a fast shutter speed, and capturing that moment a baseball player swings their bat, or the archer loses their arrow. In both cases, these need a fast shutter speed to capture that moment.

Handheld photography

While not related to creativity in your photo, shutter speed is all important when it comes to avoiding camera shake. There is a nice rule of thumb that correlates your focal length to the slowest speed you can use handheld. Of course, there are those with steadier hands, and image stabilization helps too. That said, the correlation works like this and is easy to remember. If your focal length is 300mm, you’ll need to use a shutter speed of 1/300th second to avoid camera shake. You can use a much slower shutter speed at wider focal lengths though, so at 50mm 1/50th is adequate.

Creating motion.

Ahead of getting into long exposure, there are the shutter speeds that you can get away with handheld, but slow enough to move the camera and produce motion blur.
Image: Panning is a popular technique, that needs a slower shutter speed.
Panning is a popular technique, that needs a slower shutter speed.

Panning

This is a great technique and is a good example of how creative shutter speed can be used.
The technique requires a steady hand because it uses shutter speeds that wouldn’t usually get taken handheld. The idea behind this technique is that you follow a moving object with your camera, and take the photo with a slow enough speed to blur the background. You can follow any moving object from a pedestrian walking to a Formula 1 racing car. Amongst the easiest objects to pan with is a cyclist moving at a steady speed. Those new to the technique should practice panning with a cyclist first. A shutter speed of around 1/25th is a good starting point to blur the background while keeping the cyclist sharp.

Motion blur

An alternative strategy is to allow the moving object to blur, and keep the static object sharp. While panning is primarily done handheld, using a tripod for this type of photo achieves better results. In this case, you’ll be looking to show the background motion of things like cars, trains or buses against static objects. That might be people waiting to cross the road, or someone waiting for a bus or train. Once again, a shutter speed of 1/25th is often slow enough to blur the moving object in your frame.
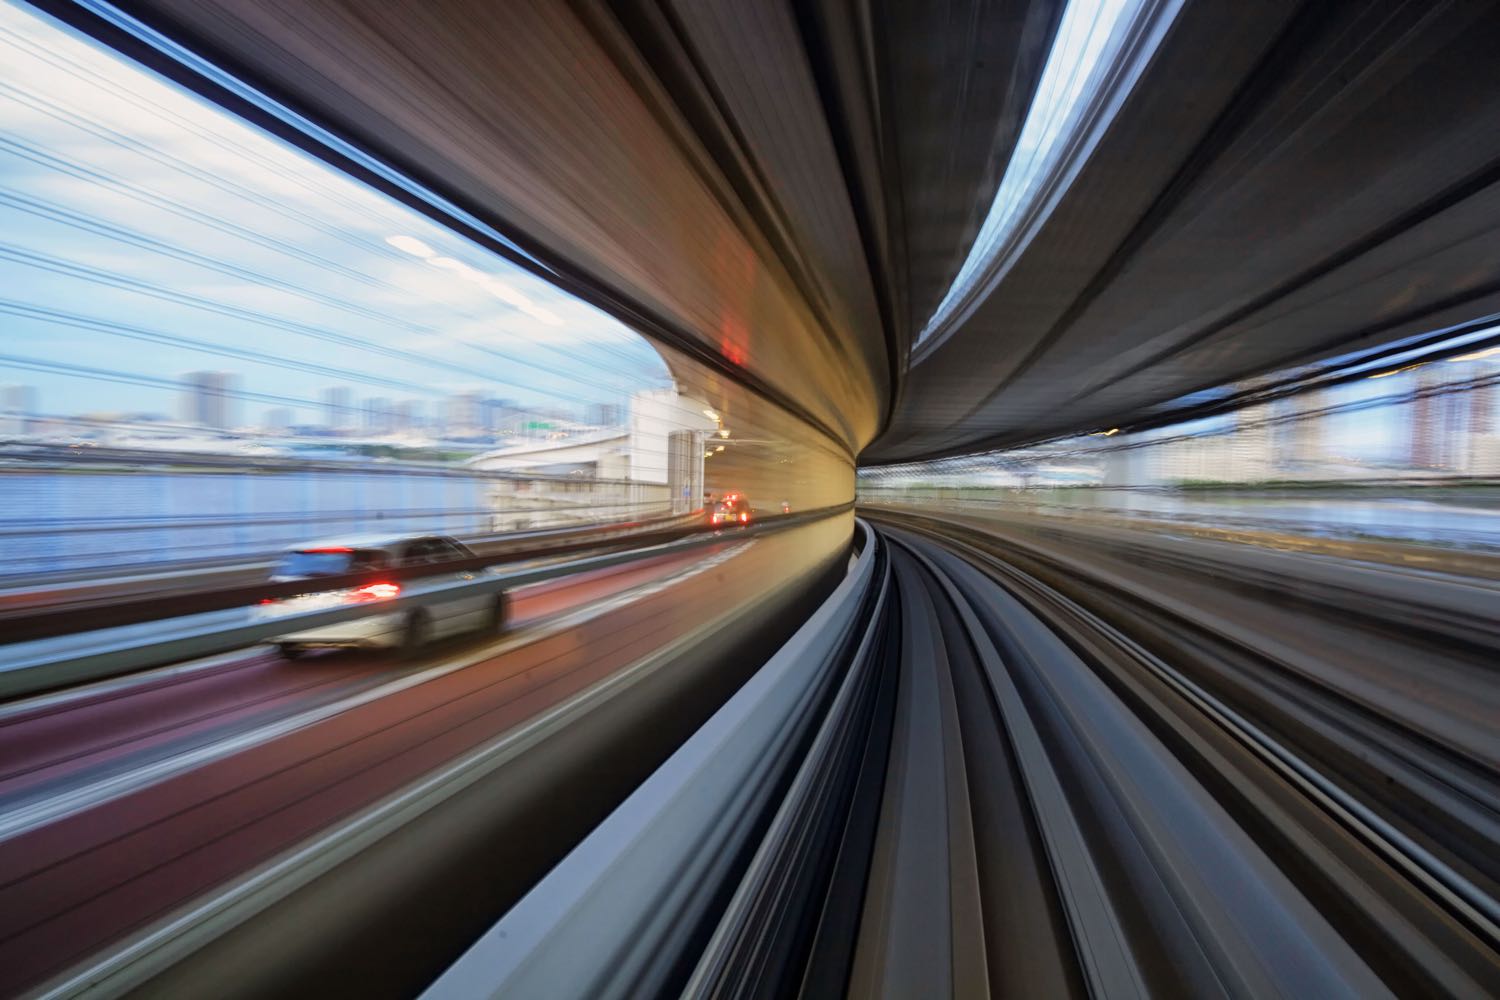
Image: This photo was taken from a moving train. The slower shutter speed created motion blur.
This photo was taken from a moving train. The slower shutter speed created motion blur.

Camera rotation

It’s still possible to give a photo a more dynamic feel, even when everything in your frame is static. You can achieve this feel by moving the camera with a slow shutter speed of around 1/25th. With wide-angle lenses, you can experiment with even slower shutter speeds. However, this may impact your ability to keep a portion of your photo sharp. The idea behind camera rotation is to twist the camera around a central point in your photo while taking the photo. This technique can be used for kinetic light painting when even longer exposures are needed. It can be tricky to achieve because it is a difficult technique to do handheld, and most tripods won’t allow you to rotate around a central point in the way this technique needs. It’s also best to use a wide-angle lens when taking this variety of photo.
Image: Zoom is a good way of giving a photo a more dynamic feel.
Zoom is a good way of giving a photo a more dynamic feel.

Zoom

A zoom burst is another popular way to use creative shutter speed. It is possible with any lens that allows you to change the focal length. So, a kit lens works very well for this technique. With the zoom burst it’s possible to take the photo handheld, but using a tripod gives you better results. While you’re moving the lens and not the camera body, any tripod helps with this type of photo. The aim is to produce motion by zooming into your primary subject matter during an exposure roughly 1/25th in length. Not all locations work well for this photo. For example, a location with lots of sky may not produce much blur. On the other hand, a tunnel with differing levels of light, such as a line of overhanging trees, works great.
Image: Camera rotation can produce interesting effects.
Camera rotation can produce interesting effects.

Creative shutter speed for long exposures

At the extreme end of creative shutter speed usage is the long exposure. Here you’re looking at exposure times in excess of one second. There is an awful lot of creativity to be had in this area, so let’s look at what you can do.

Light painting

Light painting is a lot of fun, and among the most creative techniques you can use in photography. There are essentially two ways you can create light paintings. The first is where the light source is turned away from the camera, and you use it to light up an object within the frame. To do this use the light source like a brush, and shine it only on the area’s you wish to light up. The alternative to this is pointing the light source towards the camera. Light painting can be as low tech as using your torch. However, more ambitious forms of light painting include the use of wire wool, or LED light sticks. Light painting photos typically begin at two-second exposures, and if you use bulb mode they can last into the minutes.
Image: You can use light painting to add more interest to a scene.
You can use light painting to add more interest to a scene.

Kinetic light painting

The difference between kinetic light painting and light painting is that you move the camera, whereas, with light painting, you move the light source. Of course, it’s possible to use random movements of the camera for this. However, the best way is for more controlled movement, and that means camera rotation and zoom.
  • Camera rotation – Very similar to the above technique, but this uses longer exposure times. You’ll need a tripod this time. The technique involves rotating the camera in a nice smooth motion while attached to the tripod.
  • Camera zoom – Once again, following on from handheld zooming, are longer zooms at night taken using a tripod. To learn more about the experimental potential of zoom you can read this article.
Image: This is an example of kinetic light painting. The camera was rotated around the tripod head.
This is an example of kinetic light painting. The camera was rotated around the tripod head.

Landscape long exposure

Using long exposure in landscape photography gives you a great way of interpreting a scene in a different way. This is most easily achieved at night, but daytime long exposure is also possible.
  • Neutral density filter – The use of a neutral density filter allows you to take daytime long exposures. This has the potential to transform your scene with moving clouds, and silky water. You will need a strong filter, so an ND110 or ND1000 is needed.
  • Blue hour – As most landscape photographers will know, this is one of the best times to photograph. You’ll be using long exposure because the light levels dictate that. That long exposure allows you to experiment with traffic light trail photography.
  • Astro-photography – Finally, and at the extreme end of long exposure photography, is astro-photography. Those wishing to photograph the Milky Way will need to use exposure times of around 20-30 seconds depending on the equipment you’re using. Another popular technique is to photograph star trails. This can be a sequence of 30-second exposures stacked together. The alternative is to use bulb mode, and exposure for at least 10 minutes!
Image: Long exposure on days with fast-moving cloud creates dramatic skies.
Long exposure on days with fast-moving cloud creates dramatic skies.

It’s time to hit your shutter!

There are lots of ways to use creative shutter speed. Have you tried any of the above techniques? Are there any techniques you use that are different? As always, we want to hear your opinions. Likewise, we’d love to see any photos you have that showcase the creative use of shutter speed. So go out and try using shutter speed in different ways, and then share your experiences with us in the comments section.

Share this article.
Tags: 

Shutter speed, photography techniques, bad habits of photography, photographer habits, mistakes photographers make, new photographer mistakes photography problems how to avoid photography problems bad mistakes photography, video. photography tutorial for beginners, photography, photography tips, photography tricks, photo tips and tricks, 5 bad photography habits, quick photography, video help, new photographers.