Tuesday, March 10, 2020

20 More Photography Tips Every Travel Photographer Must Know

Traveling is fun and rewarding, but sharing memories of your journeys with friends, family, and the world through your own beautiful images can be even better.
Traveltips Georgia 2
Georgia (the country)
Here are 20 more tips for great travel photography:
(You can read Part One 20 Photography Tips Every Travel Photographer Must Know here)

Before you go:

1. Make the visual decisions

For most of us, deciding where and when to go is based on many decisions, not necessarily related to photography. But there are some small decisions you can make to turn an ordinary trip into a photo-worthy one. For example, let’s say you are going on a business trip. You can squeeze a few hours of photographing between meetings. But a much better option would be to take a day or two off and spend this extra time photographing on location.
Or when planning your next family vacation, add a little visual research before the trip. Is there a nice festival or a market worth visiting at your destination? Is there something unique like an interesting ethnic group or unusual landscape that’s worth documenting? These small visual decisions can make a huge difference in your photographic experience during your trip.

2. Build a shot list

A “shot list” is a term from the movie industry. It’s a list of shots that are planned for a specific day. Want to come back home with better travel photography results? Then the shot list is your tool for the job.
Traveltips thailand 2
Thailand
First, make a list of visual ideas as your “I won’t come home without” image list. Combine the iconic images with more creative ideas. For example, if you’re going to Paris, don’t skip the Eiffel tower. As a true symbol of Paris, it should be on your list. But make sure to add creative visual ideas, such as boutique wine shops, farmers markets, or anything to your liking. The shot list is there to help you, not restrict you. When you’re on the road, with so many new sights and smells competing for your attention, the shot list will keep you organized and be a continual inspiration for creating the next shot.

3. Smart gear choice

Don’t take all of your equipment with you! Match the gear to the destination. Do you really need that flash on the beaches of Thailand? Or that 50 mm prime lens for the safari trip to Tanzania? Choose wisely and you’ll worry (and carry) a lot less.

4. Photo boot camp

If you’re not making images on a daily basis, it will probably take you a few days on location just to “get in shape”. Get a jump-start by warming up at home by creating a daily photography routine at least one week before departure. This will make sure you’re at your best as soon as you step off the plane.
Traveltips thailand 1
Thailand

5. Coordinate expectations

Apart from our photographer’s “hat”, we all wear other hats, such as “father,” “spouse,” or “friend”. When traveling with others, we must wear many other “hats”. You must coordinate expectations with your travel partners to make sure the importance you’re placing on your photography during the trip won’t cause problems. Think and plan together about places you all can visit that would be great for even those who don’t take pictures: vantage points with scenic views, colorful markets, religious centers, etc.

When you get there

6. Location scouting

This is another movie industry term. It means that before even taking out your camera, it is wise to get familiar with your surroundings. Take at least a few hours to learn the area. Understand if there are any interesting places around your hotel, visit one or two places that are on your shot list and adjust it accordingly.
Traveltips Uzbekistan
Uzbekistan

7. Get up early

Yes I know, this one is a crazy ratings downgrade. But hey, travel photography is not for the lazy! The most precious thing on a trip is your time. Do not waste the hours of golden light of morning (or afternoon) on sleeping. Especially if you are traveling with non-photographers, it’s your time to do your best shots. You can save sleeping in for weekends at home.

8. Markets first!

Colors, food, local people, culture; markets are a photographer’s paradise. It’s always better to visit open markets (for the daylight) rather than covered ones. Some of the best markets I visited happen only once a week, be sure to be there.
Traveltips china
China

9. Diversify your shoots

You took a landscape photo with a wide lens? Excellent, now do it again with a telephoto lens.
You’ve got the main square in daylight? Wonderful! Come back at night with a tripod and shoot long exposures. Make the most out of your once-in-a-lifetime trip as your diversify your shoots and portfolio.

10. Get out of your comfort zone

We all have places that are less comfortable for us, but visiting a new place is an excellent opportunity to get out of your comfort zone. Do you not have the courage to approach strangers in the street in order to take their portrait? This is an excellent opportunity. You might be surprise how easy and fun it is to do this with strangers.
Traveltips thailand 3
Thaliand

11. Go iconic – but from a different point of view

We all know how Times Square, The Taj Mahal, and the Eiffel tower look. Don’t come back with the same, “we’ve seen it all before” images. You don’t have to skip those iconic places, they usually are truly worth the visit. But think of new and fresh ways to feature them. Try using a fish-eye lens, creative editing process, or reflections – the sky is the limit.
Traveltips Uzbekistan 2
Uzbekistan

12. Get inspired!

When I’m on a photography assignment, I always try to pay a short visit to a local gallery. Yeah, it sounds bit snobbish, but seeing the photography, paintings, or any other local art forms acts as a huge inspiration for my travel photography. We all want to create different and unique images. This is great way to do just that.

13. Setting a trap

I love this technique. Instead of jumping from place to place, looking for interesting subjects to photograph, I suggest to stay put and start building your frame with the background. Find an interesting vantage point on the street. You can even do this sitting at a sidewalk café. Establish your frame by determining the composition and exposure setting. Then wait for something interesting to enter your frame.
Traveltips Dominican Republic 4
Dominican Republic

14. Join forces with a local

From experience, in travel photography, there is nothing like working with a local photographer. Use a social platform (Facebook, Flickr, couchsurfing) and find a local photo enthusiast like yourself, who can show you all the best places to photograph. Of course, there are always risks when meeting strangers from the internet. Use your common sense and don’t meet them somewhere secluded at first.

Coming back home

15. Backup

I cannot stress how important this tip is. Don’t wait until it’s too late. Laptop, hard drive, cloud storage, you name it. Backup your images on more than one source.

16. Clean your gear

Before you store your stuff, you should clean it. Sea salt, sand, or even just fingerprints on the lens, can damage your gear. Keep your equipment in good shape and you will enjoy it for many years.
Traveltips Kyrgyzstan 3
Kyrgyzstan

17. Have a successes and misses notebook

In the past, I was recording a notebook of all my “almost got it” frames. Those fuzzy, overly bright, and “what the heck is this thing in the background” images.
I kept this notebook in order to learn how to not repeat my mistakes (and because we photographers like to be angry at ourselves from time to time). Then, I realized that it is just as important to understand why I failed as it is to understand why I succeeded. So, even today, after every assignment, I write ten things to keep and ten things to work on until the next trip.

18. Rest from it

I know it’s tempting, but resist the urge to filter, edit, and post-process your images the minute you get home. Give yourself at least a week before you do so. We tend to emotionally connect to our images, usually by the degree of investment and hard work we put into creating them. Give yourself time to disengage yourself from the experiences of your journey. This will help you see your images with less bias.
Traveltips laos 2
Laos

19. Get feedback

After learning from your successes and mistakes by yourself, use the help of someone else. Choose a friend, (preferably one with tact) and get his/her opinion on the images. It doesn’t matter if they’re a photographer or not. They should be honest, sincere and non-competitive with you.

20. Get it out to the world

Now, after resting from it, seeing it again with a new perspective, and hearing someone else’s advice, it’s time to get your art out to the world.
Choose up to 15 photos (not more). It is important to pay careful attention to the opening and closing images. Each image must stand on its own and together as a set. Add some text and post it to the world.
Note: the author would like to thank Nicholas Orloff for his help in writing this article.
Traveltips India
India

Share this article.

How to Overcome Fear and Create Better Travel Photography Portraits

Traveling is fun and rewarding, but sharing memories of your journeys with friends, family and the world through your own beautiful images can be even better. Especially rewarding are images of the interesting people you meet along the way, because creating travel photography portraits can be an amazing addition to your portfolio.
But, if taking pictures of strangers while interacting with them makes you uneasy, maybe even feeling a bit of fear? GOOD! Then this article is for you.
How to Overcome Fear and Create Better Travel Photography Portraits
The world of photography is divided between two groups of people: those who enjoy creating portrait photography and those who do not. Through discussion with my own students I have realized that only about ten percent of those who avoid portrait photography actually do not like it.
The remaining ninety percent, so I discovered, are hiding, deep down inside, a photographer who really desires to shoot portraits, especially when he or she travels to interesting and distant places, meeting people from other cultures. But it is not that easy. Let’s be honest, sometimes it’s super hard. So what we do is we wrap ourselves with excuses like: “I do not feel comfortable with this”,”I do not want to invade a person’s privacy” and as the “golden excuse” we used that one story of someone who shouted at us at some market in Morocco.
Blue guy
First, from my experience, getting yelled at (and all kinds of other problems) only starts when you take photos of someone from a distance and they catch you in the act. Paprlika princeBut here is another fact: there is nothing like photographing someone from a close distance.
The eyes, the feelings and the huge visual story potential within. Besides, when we work from a close distance while interacting with the person, we gain control of our tools as photographers: composition, background, the “decisive moment” and we also have that amazing ability to tell the photographed person: “you know what, let’s take one more shot”.
In 99% of my travel photography work with magazines, I photograph portraits from a close distance, without hiding myself or hiding the fact I am taking a photo. Now, some will say that when a person sees a camera, it affects the authenticity of the moment. I will address this issue later.

First rule: tell, do not just show

This is the # 1 mistake of bad travel photography: trying to show a story, instead of telling it. Creating a diary instead of evoking feelings. Here is the unpleasant truth; apart from our family and close friends, no one cares where we travel and who we meet along the way. If you want to succeed in exciting your viewers, you need turn to a different approach.
How to Overcome Fear and Create Better Travel Photography Portraits
Before the digital era, it was enough if you traveled to the other side of the world and came back with images of people from some exotic tribe. You know, those “colorful” images, of people with a bone stuck in their nose. Today, when almost every corner of our planet has been photographed, this is not enough anymore and we have to return to the basics; to that one element that hasn’t changed since the beginning of time – a story. We are just obsessed with stories.
A person is not only clothes, a Cuban cigar or colorful sari; a person is an entire story. A story is a complex thing to create, so for the first step I will ask that your images be able to answer this question: how does the person in the image feel? Is it a comedy or a tragedy? Has he just finished a day of hard work or is he enjoying a vacation? Look at the person’s body language and listen to his voice. Try to convey the type of feeling you had while meeting this person.
How to Overcome Fear and Create Better Travel Photography Portraits

Choose the right equipment

Remember the following equation – if you have a telephoto lens, you will to use it, because that is the easiest way of shooting people, from a distance. Instead, go with a wide lens (up to 50 mm for full frame, 35mm for cropped sensor). Also, try to avoid complicated and sophisticated equipment like flash and tripods. This will attract unwanted attention in the streets and you will be busy handling the gear instead of focusing on the story in front of you.
How to Overcome Fear and Create Better Travel Photography Portraits How to Overcome Fear and Create Better Travel Photography Portraits

Read about the culture

Yes, in India they wear sari and in Cuba they smoke cigars. To get a more in-depth story of the culture, you have to learn about it first. Prior to your trip, do a brief study of the place you are about to visit. View images, read material and mainly, answer important questions like:
  • How will people react to the camera?
  • Do I need to pay for taking a picture?
  • Are there things that I should not photograph?
In order to answer these questions you can ask someone who visited the destination or look for information on the web. If you do not know anything about the culture, you will fall into the cliche of photogenic tourist traps. But if you come with knowledge, it will affect your photography.
My editor at the National Geographic Traveler magazine calls this “photographic intelligence”. Go the extra mile and read about the history of the place, the religious system, the food and the local music, which leads me to our next tip.
How to Overcome Fear and Create Better Travel Photography Portraits

Use the local music to your advantage

Recently I photographed a story on the Dominican Republic. It was the first time I worked on this side of the world and suddenly I felt as if I almost forgot how to take pictures. I did not approach anyone and at first, my photography did not come out well at all. So, I just listened to some local music on my headphones.
I do not recommend staying with headphones all the time, because it cuts you off from the environment. But for the first day, it’s a great tip; it puts you in the groove and makes you feel good. In conclusion, on the first day of your trip, do not trouble yourself with approaching strangers. Relax, listen to the local music, get into the groove and warm up with easier image making: buildings, landscape, food, etc.
How to Overcome Fear and Create Better Travel Photography Portraits

Get outside when the lighting is right

The meaning of “Photography” is drawing with light. Even the most photogenic person will not look good in unsuitable light. There are no rules about lighting, no “good” or “bad”. There is appropriate and inappropriate lighting, because light has varying qualities: color, direction, strength, softness, etc.
According to most photographers, the best light for most situations is within the “golden hours”: around sunrise and sunset. If this is your first time approaching people in order to photograph them, let the light be on your side. Try adjusting the correct time to go outside. If you cannot control the time (like when on an organized tour) try to photograph people in the shade.
How to Overcome Fear and Create Better Travel Photography Portraits

Force yourself – get out of your comfort zone

After a day of listening to the local music, getting the groove and warming up with easy shots, it is time to start working. Do not delay it, even if it is very hard for you. Just fake it until you make it:
  1. How to Overcome Fear and Create Better Travel Photography PortraitsChoose: choose a person you would like to photograph. Don’t use excuses like: “I can’t find anyone special”. Just make the shot, even if it’s only for practice. It is very important that you choose a person who is not on the move, because you need to get ready BEFORE approaching him, so it will be easier in a static situation (a seller in market stand, or someone relaxing at the park)
  2. Get ready: know your lens and exposure. Think about the composition and background.
  3. Approach: ask the person if you can take their photo. You can ask verbally or just by lifting the camera and smiling, waiting for a smile back.
  4. Explain: it doesn’t matter if you are in NYC or Tibet; people want to know why you are taking their photo. You can tell them how much you liked their shop, pet, hair, etc., or just mention that you like portrait photography and you would like to take their photo. Usually this kind of good feedback will be enough.
Now, you might get a NO for an answer. That’s okay! Say “thank you” and then just “get back on the horse”, move on to the next person. You might get a YES. That’s wonderful! Relax, think about the framing and make the image.
How to Overcome Fear and Create Better Travel Photography Portraits

So what about the authenticity of the moment?

It’s True. Usually when a person is asked to be photographed, they will put on a “mask”. You can call it their pose. Sometimes this pose might be the thing you are looking for. When photographing two men for a story I did in India for the National Geographic Traveler magazine, that pose (image below), which is so typical for the Rabari tribe men, was perfect for the story I wanted to tell.
How to Overcome Fear and Create Better Travel Photography Portraits
If you don’t want the pose, my solution – give your subject time and space. Do not stop him or her from making that pose. Give them a positive feedback and show them how nice the first photo came out. From my experience, after a minute or two, the masks fall. That is because someone eventually will enter your subject’s shop, or they will receive a phone call or anything that might make your subject forget you are still there. This is the moment of magic. This is when the best pictures happen.

Share this article.

Monday, March 9, 2020


Viral video - Cell Phone video.  Inspiration for all you videographers considering your next project.


 The Smartphone Filmmaking Handbook: Revealing the secrets of smartphone movie making
   Get your copy here:  https://amzn.to/3b76mGJ


  (Pssst...as good a deal as this is at only $7.99, how would you like to have access to the Smartphone Filmmaking Handbook absolutely FREE?  Just scroll down to the bottom of this page and click on the Amazon Kindle Unlimited Access offer)

5 Simple Secrets To Sharper Photos

Many factors play a part in image sharpness, not the least of which is the lens.  Most of us who ever pick up a camera judge our images, at least in part, on overall sharpness.  Before you go out and plunk down some hard earned cash on that top of the line pro-level lens you’ve been drooling over, think about these steps you can take with the lenses you already own to get sharper images.

1. Pay attention to the basics 

Hold the camera properly.  Your right hand should grip the camera with your finger ready to press the shutter button. Your left hand should cradle the lens. Tuck your elbows firmly against your side. Press the eye cup of the camera firmly against your head.  This three-point stance stabilizes the camera and holds it steadier than holding the camera out and away from your face, with your arms extended.
Learn More: Here’s how to hold a camera well.

2. Use a polarizing filter

Polarizers are famous for darkening blue skies on sunny days, but they are just as useful in other situations. In misty or hazy situations, polarizers can help cut through that haze.  Haze has the effect of softening an image, so using a polarizer to eliminate the haze enhances sharpness. So don’t hesitate to put the polarizer on your lens, even when darkening a blue sky isn’t the reason.
5 Simple Secrets To Sharper Photos
Learn More: Learn More about Polarizing Filters

3. Use the “sweet spot” of your lenses

Most lenses are at their sharpest when stopped down 2 or 3 stops from maximum aperture. However, even if for depth of field reasons it’s not possible to stop down that far, closing the aperture 1/3 to 2/3 of a stop will still increase sharpness.  By the same token, when a lot of depth of field is required, shooting one or two stops open from minimum aperture will provide the best sharpness. This is because at minimum aperture, lenses begin to exhibit diffraction. Diffraction happens when light is forced through a small hole, and begins to disperse. At larger apertures, this light is a small percentage of the total light hitting the sensor.  At smaller apertures, this diffracted light is a much greater percentage of the total light hitting the sensor.  Diffracted light causes images to appear softer.  By shooting at f/16, rather than say, f/22, you can minimize diffraction and thus get sharper images.
Learn more: Here’s how to find your lens’ sweet spot
Image: The above finished and edited image was shot at f/11. Beneath are two crops. The crop on the...
The above finished and edited image was shot at f/11. Beneath are two crops. The crop on the left shows the same scene, shot a few moments later at f/22. The crop on the right is from the same file as the completed image, shot at f/11, but unedited. In the shot at f/22, you can clearly see the effects of diffraction, as the windows on the building are just not as sharp as those shot at f/11.

4. Select the AF point you want to use, and put it where you want to focus

Many photographers I talk to like to use the center AF point and use the “Focus and Recompose” method of focusing to create their images.  Unfortunately, while easier in many ways, this method can contribute to less sharp photos.  This is especially apparent when shooting at wider apertures and depth of field is shallower. When you do this, the focal plane shifts, moving it away from where you originally focused. It’s not a big deal when shooting at smaller apertures, but when shooting near wide open, it will be noticable. A better technique is to choose the AF point nearest where you want the sharpest focus.  This reduces focal plane shift, thus keeping the sharpest focus where you want it in your photo.
Learn More: Here’s more on creating Sharper Images but Understanding Focus Modes

5. When using zoom lenses, focus at the focal length you plan to shoot at

In the past, in the manual focus days, lenses were parfocal, meaning that you could zoom the lens and the focus would stay the same. Many of today’s lenses, however, are not parfocal.  So changing the focal length by zooming causes focus drift, and the lens is no longer focused where it was before it was zoomed.  The better bet is to zoom the lens where you want it for your composition, and then focus the lens.
There is obviously much more to getting sharper images, but these five basic tips are a good start to keeping your images sharp.

Further Reading on Taking Sharp Photos

Share this article.

How To Find Your Lens’ Sweet Spot: A Beginner’s Guide to Sharper Images

How To Find Your Lens' Sweet Spot: A Beginner's Guide to Sharper Images
Are you tired of blurry images?
It’s time to learn how to capture sharper images by finding your lens’ sweet spot. This will give you more confidence, save time, and help you take better photos.
In this article you’ll learn:
  • How to find your lens’ sweet spot (for sharper images)
  • Why you should shoot in Aperture Priority mode (and how to use it)
  • How to perform a test to get your sharpest image every time
  • How important is your lens’ sweet spot? Notice the difference
Mid range aperture sharper than wide open
In the above images of the clock, the one on the right is sharper. Look closely at the words and at the leaves behind the clock. The f/9 image is sharper throughout because it was shot in my lens’ sweet spot. The f/3.5 one was not.

First, take a look at your lens

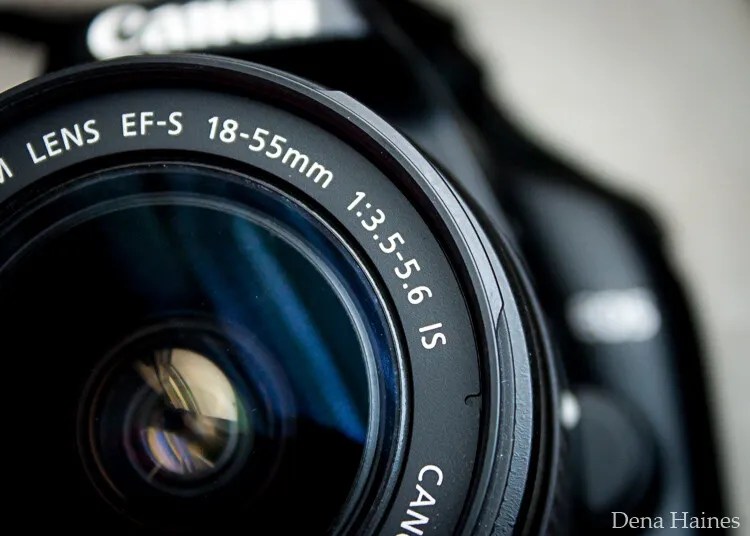
In this beginner’s guide, we’ll use an entry level zoom lens as our example. Most kit lenses (the basic lens that comes with a DSLR) generally shoot their sharpest at the mid-range aperture settings. To determine the mid-range of your lens, you’ll need to know its widest (or maximum) aperture setting. It is located on the side, or end, of the lens and will look something like this 1:3.5-5.6.
For example, here it is on my Canon 18-55mm zoom lens.
Lens aperture range
This means that when my lens is zoomed all the way out, its widest aperture is f/3.5. When zoomed all the way in, its widest aperture is f/5.6.
The rule to finding that mid-range sweet spot, is to count up two full f-stops (aperture settings are called f-stops) from the widest aperture. On my lens, the widest aperture is f/3.5. Two full stops from there would bring me to a sweet spot of around f/7.
Use this chart to count your f-stops
Robin Parmar
By Robin Parmar
There is some wiggle room in the mid-range, so anything from f/7 to f/10 will capture a sharp image. Once you know the mid-range of your lens, you can do an easy test to get your sharpest image. To perform the test you’ll need to shoot in Aperture Priority mode.

Take control with Aperture Priority Mode

Shooting in Aperture Priority allows you to choose the aperture setting you want, which gives you more creative control than Automatic mode. By controlling the aperture setting, it’s much easier to get a sharp image, and because your camera still chooses the ISO (if you are set to Auto ISO) and shutter speed automatically, it’s very easy to use.
You’ve probably heard that apertures like f/16 and f/22 are best for keeping everything in focus. While that can be true, focus does not always equal overall sharpness. Choosing a mid-range aperture will give you sharper images throughout. You can improve them even further by reducing camera shake with a tripod and a remote shutter release (or your camera’s self-timer).
Here’s an example of how shooting in your lens’ sweet spot will give you sharper images.
Sharp images shot in lens sweet spot
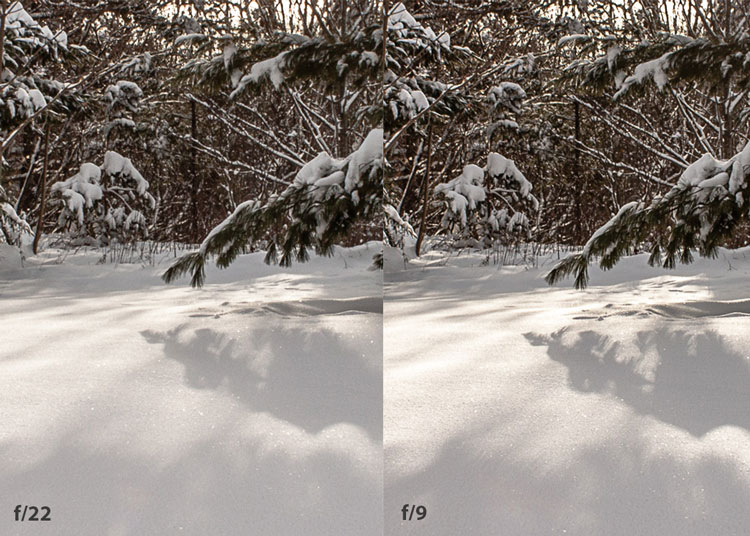
Mid range f stop sharper than small f stop
In the above split-image, the f/9 image is sharper than the f/22 one. The needles and shadows are not as soft or blurry as in the f/22 shot (look at the crispness and sparkles in the snow too).

Switching from Automatic to Aperture Priority Mode

To take your camera out of Automatic and put it in Aperture Priority, just turn the large Mode Dial to Aperture Priority. This is what that looks like on my Canon (on Nikon and other brans look for the A).
Aperture priority on canon mode dial
Automatic mode is the green rectangle; Aperture Priority mode is the Av (or A on a Nikon). Once your camera is in Aperture Priority mode, turn the smaller Main Dial (shown here on the top of my Canon) to choose your f-stop.
Main dial canon
As you turn that dial, you’ll see the f-number changing on your screen. In the next picture, it’s set to f/9.5.
Aperture setting on canon LCD screen

Perform a Lens Sweet Spot Test

Once you have your camera set up on a tripod, performing a sweet spot test only takes a couple of minutes. To begin, put your camera in Aperture Priority mode, then compose your shot and take a photo at varying apertures. Start out with the widest, then click that main dial a couple of times (to the right) and take another. Keep doing that until you’ve taken seven or eight photos.
Upload your photos to your computer and zoom in on them. You’ll quickly see which aperture settings gave you the sharpest overall image.
This next photo of my daughter was shot using natural light. Shooting in my lens’ sweet spot gave me a pretty sharp image, even in this low light setting.
Mid range aperture sharp image low light
Find your lens sweet spot for sharper images
The close up of the mugs shows the advantage of shooting in the lens’ sweet spot. Whenever you want to make sure you get the sharpest capture possible, take a shot at each mid-range setting f/7, f/8, f/9, and f/10.
Getting Your Sharpest Images
Now that you know your lens’ sweet spot, it’s time to practice. I hope you’re as pleased with the results as I’ve been!
Mid range aperture for sharper images
I love shooting in natural light, and learning how to capture sharper images in low light has made me so much happier with my photos.

Tips for capturing your sharpest images:

  • Shoot in Aperture Priority mode
  • Choose a mid-range aperture (usually f/7 to f/10)
  • Use a tripod and a remote shutter release (or your camera’s self-timer) to reduce camera shake
  • Take a series of shots at f/7 through f/10 when a sharp capture is especially important
But don’t stop here. Keep playing with settings in Aperture priority mode. It’s awesome to get images that are sharp throughout, but there’s a lot more to aperture than that.
Learn more about aperture and depth of field here.
Do you have any lens sweet spot tips to share? Please do so by commenting below.

Share this article.

Sunday, March 8, 2020


Viral video - Cell phone video, Inspiration for you videographers considering a topic for your next project.  323,875 views on Facebook. Your video may receive more. 
You want to make your own cell phone movie, but don't know where to start?  Where do you find a good clamp clip tripod?

Sunnylife Metal Universal Smartphone Holder Clamp Clip Tripod Holder Clip Adapter for iPhone Samsung Huawei Xiaomi on Sale
Try this link:https://bit.ly/31Y7Obh
...then post your video on social media.

2 Years with the Sony A7R III – Was it Worth Switching from Canon DSLR ?


It’s been almost two years since I purchased the Sony A7R III mirrorless camera as a second body to my Canon 5D Mark III DSLR. Since then, I’ve used the two cameras side-by-side to shoot a wide variety of professional events, from concerts to food to corporate conventions. There have been pluses and minuses to using both systems simultaneously, which I thought I’d share for those of you considering the switch.
Canon versus Sony

Why go mirrorless?

Prior to the A7R III, I had been using the Sony a6300 and was thoroughly impressed with its autofocus capabilities and video features. On both fronts, this tiny camera seemed lightyears ahead of my DSLR, so I was curious about how much better Sony’s full-frame cameras could be. I was also expanding my photography business to include video services and needed a camera that could shoot in 4K video resolution, which the 5D Mark III could not do.

Why keep both systems?

So why keep the Canon DSLRs at all?
I have a large library of Canon L glass that I intended to use on the Sony via a lens adapter. This worked with mixed results, but long story short, lens adapting did not work with my style of photography (more on that below). Given the significantly higher prices of Sony lenses, it made more financial sense to keep the DSLR kit and simply purchase a couple of Sony lenses to use. In the end, here’s what my resulting camera kit looked like:
*The overlapping 24-70mm lenses might seem like overkill, but there is such a HUGE size difference between the two.
Canon V Sony

What was worth it

1. Video features

The Sony A7R III and A7 III are packed with video features including the ability to shoot in 4K resolution, 120 fps slow motion, in-camera timelapse, and in-body-stabilization (IBIS), to name a few. Since this is a photography site, I won’t go on more about the video features. But the specs are more than what the newer Canon 5D Mark IV offers. So from a video perspective, the Sony A7R III was completely worth it.

2. Having an Electronic Viewfinder (EVF)

One of the ways mirrorless cameras differ from DSLRs is that they tend to have an electronic viewfinder (EVF), while DSLRs have optical viewfinders (OVF). An OVF shows you what the camera lens sees, while an EVF shows you what the camera sensor sees. An EVF shows you almost exactly what your final image will look like before you press the shutter button.
There are pros and cons to using an EVF over an OVF, and most people prefer one over the other. For me, the EVF is preferred mainly because it allows for composing and shooting still photos with the LCD – something that is still hard to do with a DSLR.
Shooting with a tilting LCD has been a complete gamechanger, allowing me to find creative compositions that I wouldn’t have been able to do with a DSLR.

3. A truly silent shutter

Another advantage of mirrorless cameras is that they can have truly silent shutters. For the effort that Canon makes to offer a “silent shutter” on its DSLRs, it’s still a jarring sound compared to a mirrorless camera’s silent shutter.
The only thing to note is that silent shutters on mirrorless cameras can produce banding in images where LED lights are present, so be wary of that.
Sony A7R III with Sony 55mm f/1.8

4. Insane and Accurate Autofocus

My experience with the Sony a6300 taught me that Sony autofocus was truly on another level compared to DSLRs. That’s still true on the Sony A7R III. Not only do you have phase detection and contrast detection autofocus with 5 focus modes, but you also get Sony’s acclaimed face detection and eye autofocus.
To be fair, Canon has upped their autofocus game with dual pixel autofocus, something that isn’t on the Canon 5D Mark III and thus isn’t a feature I can compare. However, there are reports that a recent firmware update to Canon’s new EOS R includes “Sony-like eye autofocus,” so that much seems to have always been in Sony’s favor.

5. Rapidly developing lens library with lots of third-party options

Compared to the Canon and Nikon mirrorless camera systems, Sony, by far, has the biggest lens library for both its full-frame and mirrorless cameras. Even third-party brands like Sigma and Tamron have latched on, currently offering high-quality lens options at a fraction of Sony’s prices.
Better yet, lens adapters, such as the excellent Metabones V, allow you to pull from Canon’s EF and EF-S lens library as well. So when it comes to lens options, the Sony mirrorless is hard to beat.
Sony A7R III with Sony 24-70mm f/4
Sony A7R III with Sony 24-70mm f/4. Look at the height of that stage – I couldn’t get this shot 
without the tilting LCD.

What wasn’t worth it

1. Size and weight savings

The argument of switching to mirrorless cameras to have a smaller and lighter system compared to DSLRs isn’t completely true. Sure, the Sony A7R III is smaller and lighter than any of the Canon 5D cameras. However, the fast Sony lenses that I would need to replace my DSLR equivalents are just as heavy and bulky. When it comes to full-frame cameras and fast glass packed with features such as image stabilization (IS), there’s not much of a size and weight difference.

2. Adapting lenses isn’t for every scenario

There are some great lens adapters out there, such as the Metabones V that I was initially sold on. In practice, the lens adapter worked 90% of the time, which was okay when shooting things like food or portraits. But that 10% failure rate wasn’t acceptable for the fast-moving concerts and events when it could mean missing THE shot of the night.
If you choose to adapt lenses, give yourself ample time for testing to make sure it works for your photography style.
Canon 5D Mark III with 24-70mm f/2.8

3. Realizing they aren’t completely dead yet

While many photography news sites publish headlines proclaiming the death of DSLRs, Nikon and Canon prove otherwise. Both camera brands are rumored to be releasing new DSLRs in 2020, and there’s even supposed to be a 5D Mark V on the way! So if you shoot with DSLRs, there’s no pressure to make the switch yet.

4. Canon could make a mirrorless camera comeback

Actually, this part could already be true if you look at Canon’s crop-sensor mirrorless camera line.
Even though Canon seemed late to the mirrorless camera party, they are making big gains with their popular EOS M-Series APS-C mirrorless cameras, and the EOS R full-frame cameras continue getting better.
They are also developing innovative RF lenses (have you seen the RF 70-200mm f/2.8?!) and allowing Canon shooters to use DSLR lenses via their own lens adapter. It’s questionable if they will be able to catch up to and surpass Sony’s cameras and ever-growing lens library, but it is a good thing to see Canon continue to innovate.
Canon 5D Mark III with 16-35mm f/2.8.

In conclusion

So two years later, do I regret adding the Sony A7R III to my kit? Absolutely not.
The photos and videos that I’ve captured and the overall elevated experience of shooting with this camera have been worth it. However, I’d be lying if I said I wasn’t quietly rooting for Canon and hoping that they beef up their full-frame mirrorless line. When they do, it might be worth making yet another switch.
Sony A7R III with 24-70mm f/4
Canon 5D Mark III with 16-35mm f/2.8

Share this article.

News: Inexpensive Canon RF Lenses are in the Works, Including a 50mm f/1.8


Last month, Canon announced its intention to produce RF lenses over EF lenses. A Canon Europe spokesperson indicated that the imaging giant would continue to support the EF mount, but that we can expect to see only new RF lenses for the foreseeable future.
For longtime Canon users who haven’t jumped on the mirrorless bandwagon, this is a blow. But for Canon’s mirrorless users, this is excellent news. One of the main reasons to switch to a company like Sony over Canon is the mirrorless lens lineup; Sony’s mirrorless lens development has had a big head start over Canon’s, and Sony now offers dozens of full-frame and APS-C mirrorless lenses.
But with Canon focusing on its RF lenses, we might get to see it close the mirrorless gap.
In fact, it looks as if Canon is already making good on its commitment to the RF mount, especially in the budget lens category. Up until now, Canon has offered very few cheap RF lens options.
Over the twelve months, we might see that change.
According to Canon Rumors, we can expect to see several new low-priced RF lenses announced in the near future, including “at least one…this year.”
This should include some type of pancake lens with an f/2.8 maximum aperture, as well as the possibility of an RF 50mm f/1.8.
While it’s unlikely that Canon’s 50mm f/1.8 could rival the price of the current EF 50mm f/1.8 STM, its good to know that we might have some strong options for consumers.
Thus far, anyone looking for a 50mm lens option (which is great for shooting portraits, street images, and more) would have to settle for the Canon RF 50mm f/1.2L, which currently costs over $2000 USD.
But with a cheaper 50mm option, the Canon RF lens lineup should feel much more accessible, even for beginners.
And with some luck, we should see both these new RF lenses before the year is out.


Saturday, March 7, 2020

Photography Freebie Ebook

Free download.
Get Your FREE copy here: https://www.pdfdrive.com/how-to-become-a-photo-expert-e157678291.html

How to Become a Photo Expert

How to Become a Photo Expert

 148 Pages 

 by Daniel Lezano & DSLR Photography


This ebook is FREE and yours for the taking.  We routinely post one "freebie" per week.  But, maybe this weeks' selection doesn't quite cover your particular interest in photography.  Maybe Landcapes, Portraiture, or Travel photography are your preference.


The Landscape Photography Book: The step-by-step techniques you need to capture breathtaking landscape photos like the pros      The Natural Light Portrait Book: The step-by-step techniques you need to capture amazing photographs like the pros   Complete Digital Photography: 9th Edition

If so, just click on the link at the bottom of this page,  "Amazon Kindle Unlimited Access".  They have a 30 day FREE trial.  You can access any of the Titles above (and more) free of charge for 30 days.  Enjoy! 


Viral video - Cell phone video, Inspiration for you videographers considering a topic for your next project. 130,250   views on Facebook. Your video may receive more. 
You want to make your own cell phone movie, but don't know where to start?  Where do you find a good clamp clip tripod?

Sunnylife Metal Universal Smartphone Holder Clamp Clip Tripod Holder Clip Adapter for iPhone Samsung Huawei Xiaomi on Sale
Try this link:https://bit.ly/31Y7Obh
...then post your video on social media.