Wednesday, January 1, 2020

Everything you Always Wanted to know about a Career in Photography but were Afraid to Ask

Before I get into this article, I want to set the stage by saying that the objective here is not to diminish or make light of the concerns and questions that novice photographers have. In fact, at some point in our careers, we have all asked similar questions – sometimes out loud, and sometimes just in the solitude of our own minds. There is no wrong or silly question, and there are no right or wrong answers. These are in no particular order, and the views expressed here are solely based on my own experiences.
Memorable Jaunts DPS Article What you want to know - Beach sunset photos
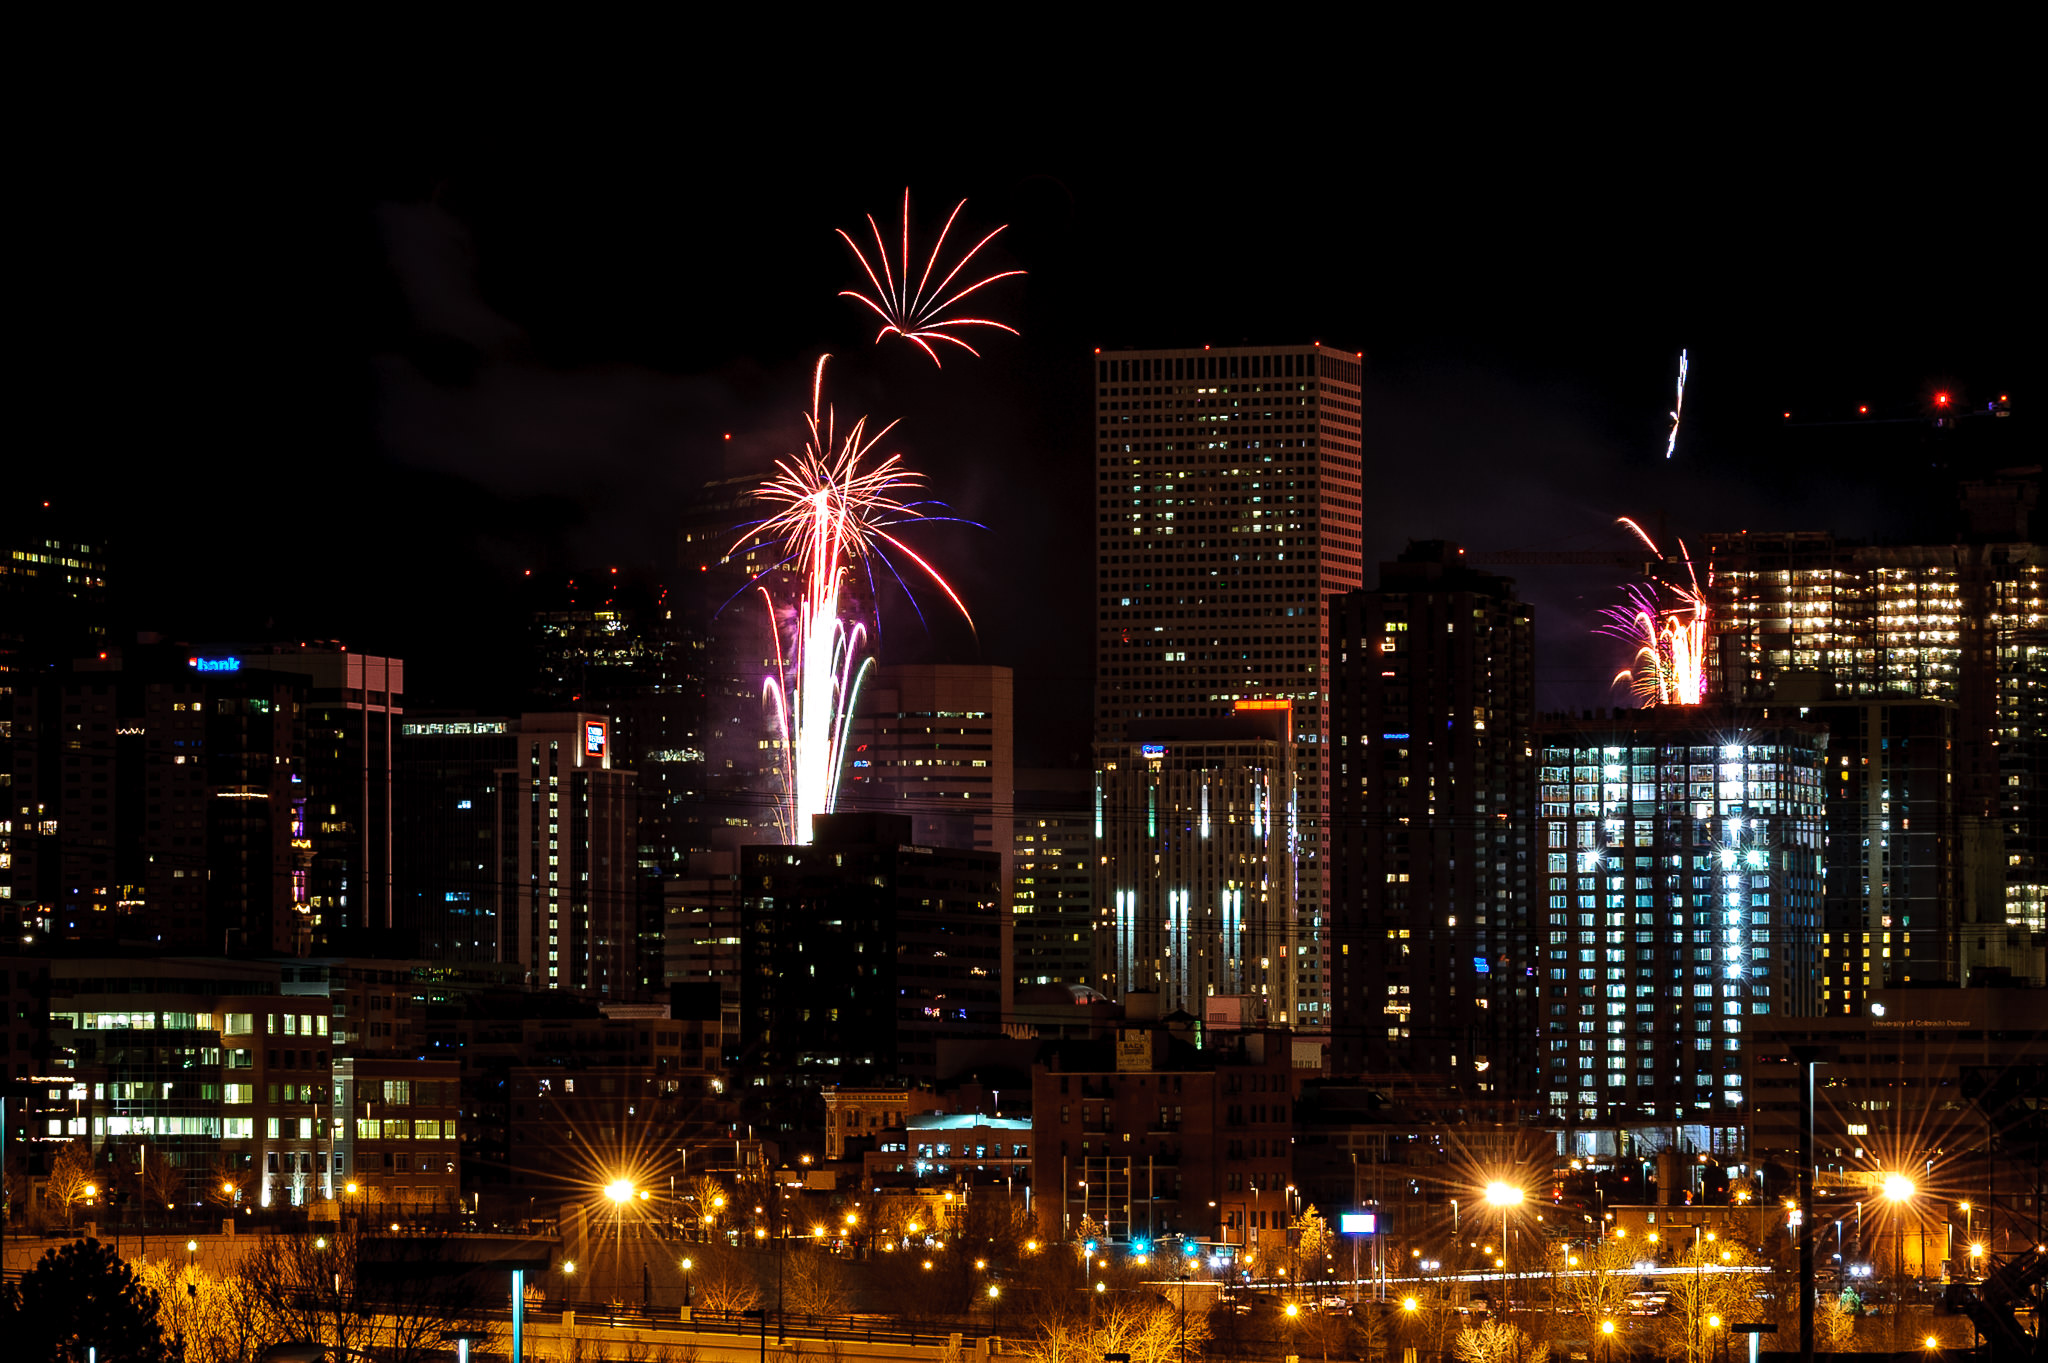
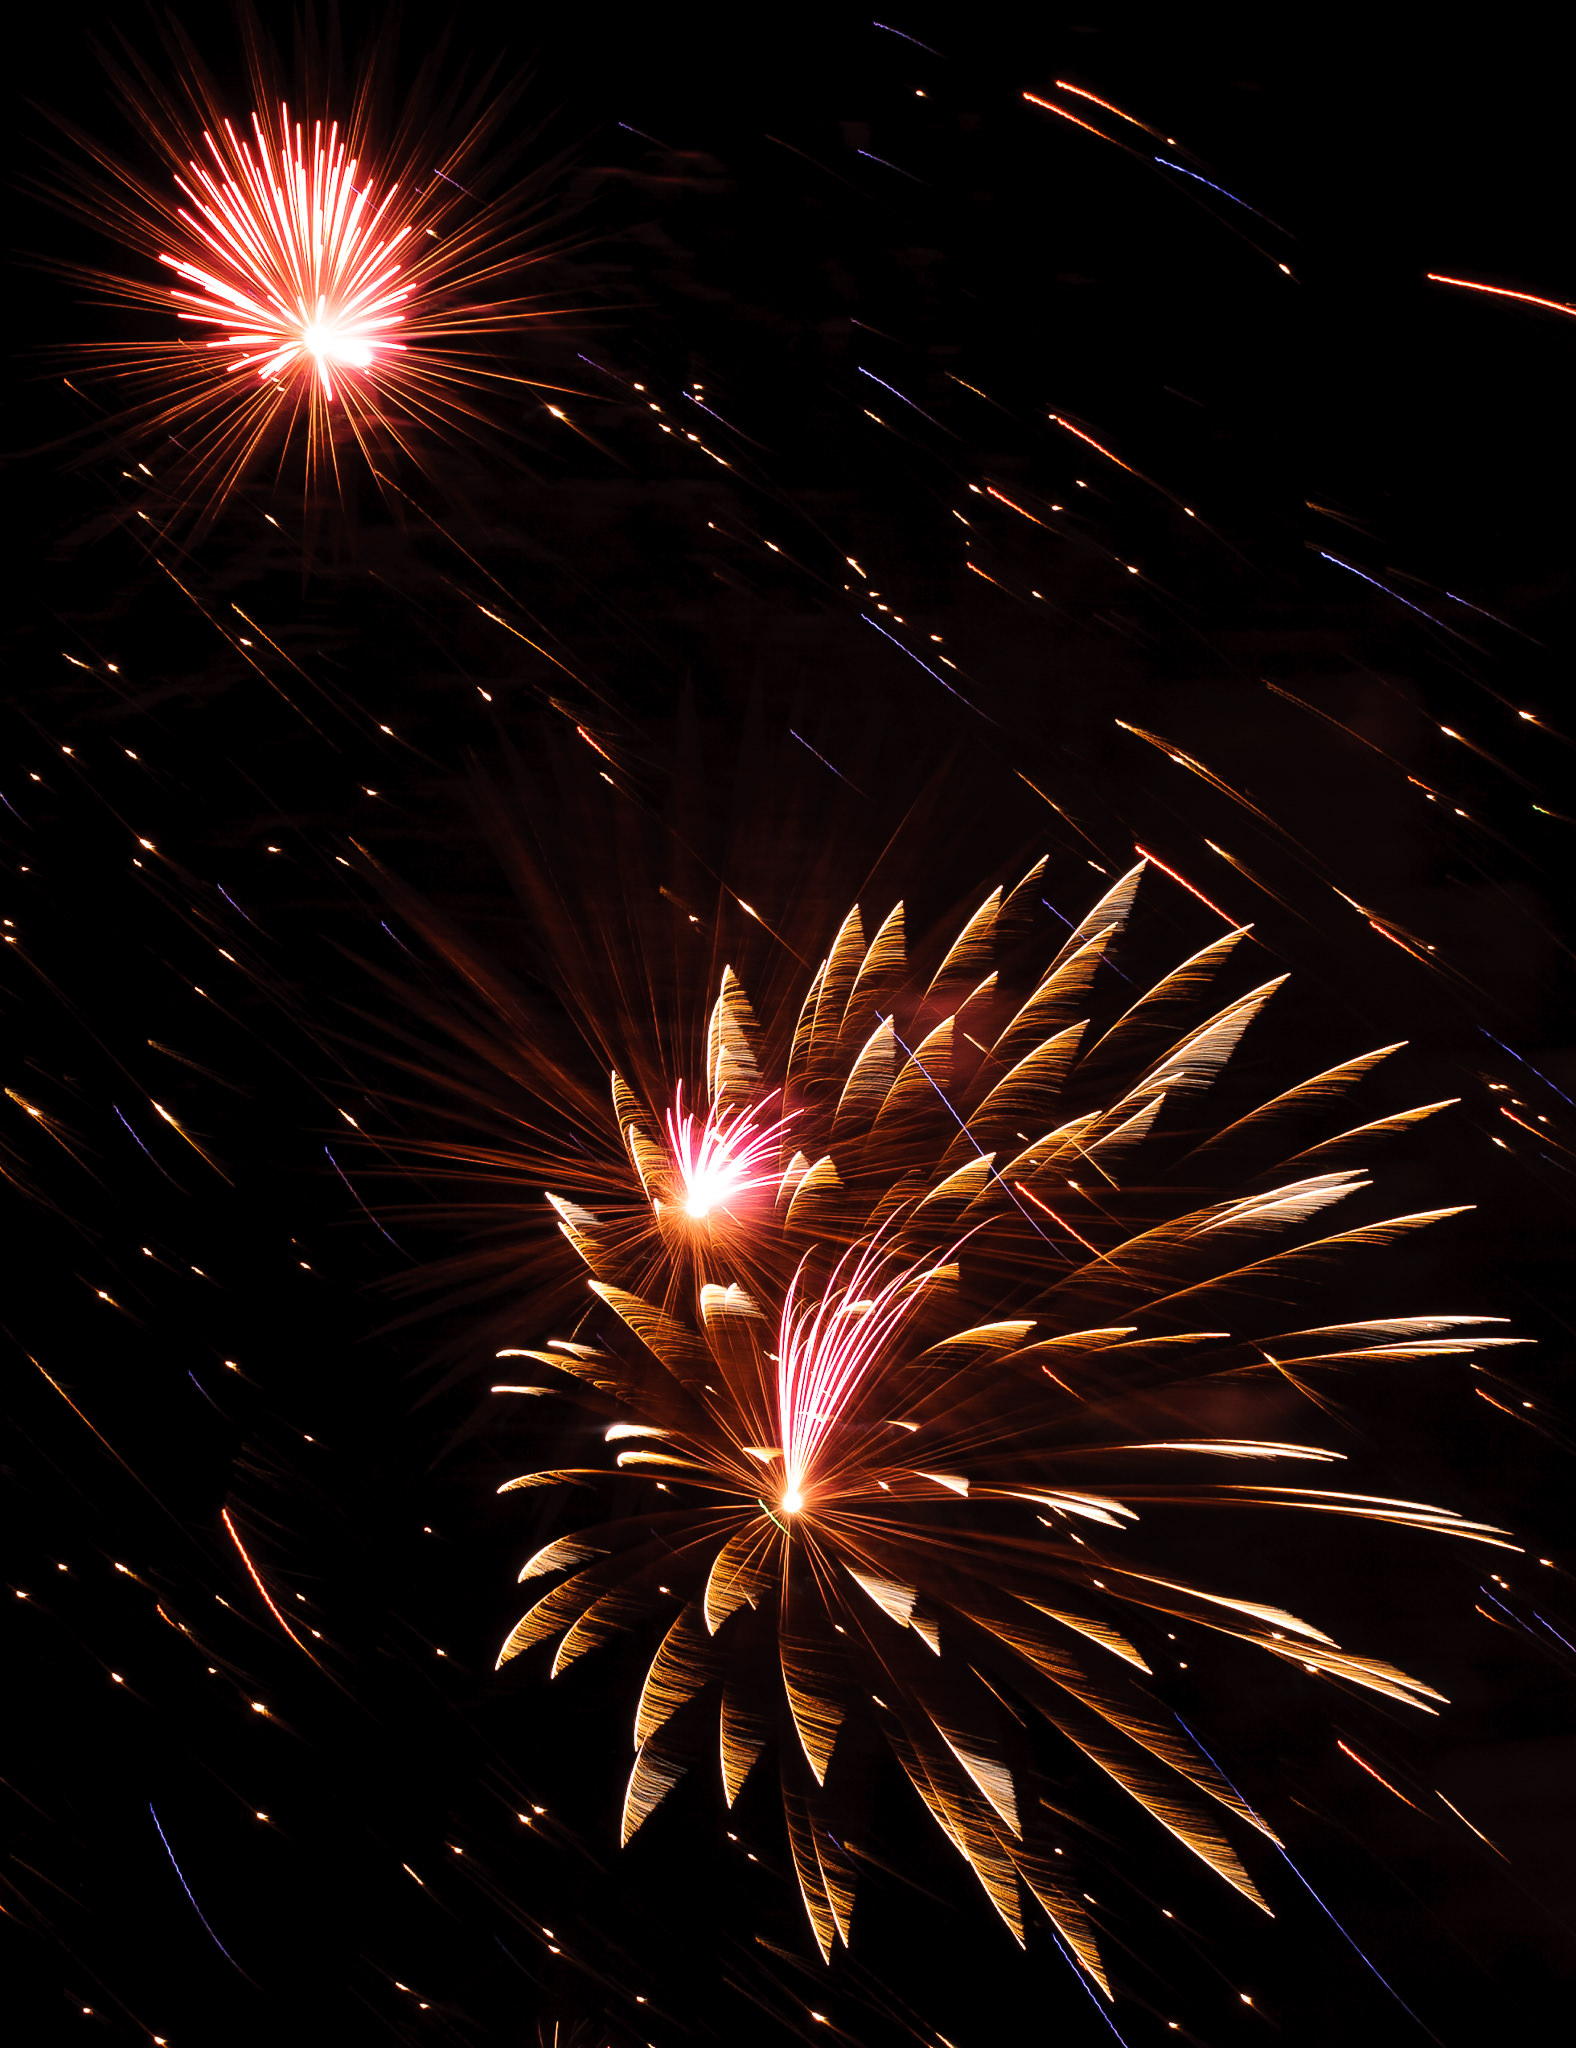
One of my favorite images to date happened by pure accident – I saw the image in my mind even 
before I took a single frame.

Where can I learn about everything related to photography for FREE?

We are both lucky and unlucky to live in the era of the Internet. Any google search, on average, yields thousands of pages, articles, and YouTube videos. If you have a burning question about anything and everything, the easiest way to learn is via the Internet.
Sites like our own Digital Photography School are a great resource for almost any topic related to photography, from a beginner to an experienced photographer. Other sites like Creative Live offer many classes on various aspects of photography, as well as other creative genres. While most sites provide a great overview of a particular topic, any in-depth research requires time and money. There are number of virtual, as well as live workshops, all over the world covering all aspects of photography. A few that come to mind are The Design School and Clickinmoms (I have used both services and am very happy with the level of instruction provided there – this is just my personal experience).
You could also check out our dPS ebooks and online courses.
Memorable Jaunts DPS Article What you want to know - Chicago Wedding Photos
I learn a lot online, in the comfort of my own home, but every once in while, I like to take a live 
workshop – not just to update my portfolio, but also to learn from and meet others in the industry!

How do I shoot in manual mode?

Shooting in manual mode is one of the most intimidating things that most amateur photographers face. If you have a DSLR camera that has a manual mode, it is really not that hard once you get the hang of it. The best thing you can do in learning to shoot in manual, is to understand the exposure triangle and how the three key components of photography – shutter speed, ISO and aperture work – independently and with each other. Here is a good article that digs deeper into photographing in manual mode. Remember this too take time and practice. There is another interesting article here in the Digital Photography School archives that explains all three shooting modes and is worth a read.
Memorable Jaunts DPS Article What you want to know - Understanding backlight
Mastering manual mode is important, especially for images like this – backlit golden hour 
images…this is SOOC (straight out of the camera).

What lens will give me a blurry background?

If I had a penny for the number of times that I get asked this question from other photographers, as well as my clients who are looking to upgrade their DSLR cameras, I would have an overflowing piggy bank! Blurry backgrounds, or bokeh as it is know in the photography space, is actually a function of aperture (i.e. f-stop), focal length, and distance of the subject from the background. Check out How To Achieve Nice Bokeh [In Plain English] from the dPS archives that addresses this issue specifically.
Memorable Jaunts DPS Article What you want to know - Lilacs in the rain-1
A wide aperture on 50mm lens gives a shallow depth of field where most of the background is blurry.

How much money do I need to spend to get started with a photography business?

There are again any different ways to answer this question. You can essentially spend as much, or as little as you want, to get started. At a bare minimum you will need a good camera system (good is a very relative term here, there are several prosumer cameras on the market today, at various price levels). In many places in the world, particularly in the US, there are several rental companies that offer various cameras and lenses for rent. Borrow Lens, Lensrental and LensProToGo are a few that come to mind. You can also check with your local camera shop to see if they offer rental services.
You do not need the latest and greatest camera system to be a professional photographer. While gear is definitely a plus, skill and the ability to work with what you have to get the results you need are far more important, especially when you are just starting out. Once you develop your own shooting style as well as what you want to focus on, you can slowly build up your gear by adding equipment based on your current needs.

How can I make money from my photography, and do it fast?

Sorry to burst your bubble, but the short answer here is that you cannot make money in anything fast. Everything takes time, practice, and patience. Just like any other career, the more time and effort you invest in your photography, the more experience you will gain. With experience comes confidence and recognition. So if your end goal is to be a internationally recognized photographer, treat it like a career and a business and invest in yourself, your education, and your experience. Don’t be afraid to roll up your sleeves and do the hard work – and in time, you will reap the benefits.

How much should I charge for my photography?

This is again something that is very subjective. What you charge for your services depends on many factors like your skill level, the value of photography in the area that you live in, and the buying capacity of the clients that you are targeting. Another thing to understand is the monetary value of your time. Remember your time is not just the amount of time you spend photographing the client – also take into account any travel to and from the location, editing time, and backend work like backing up photos, uploading galleries, and other administrative tasks. Once you have a handle on all these factors as it relates to your situation, charge an amount that makes it worth your while to photograph your clients. If you are looking to earn a living through your photography, then treat it like a business and not just a hobby. Read: 7 Things That Keep You From Charging What You’re Worth (and how to get over them).

What kind of photography should I focus on?

The easiest way to answer this question is to ask yourself what you enjoy photographing. Write down all the genres of photography that interest you, and try them all out if possible. Ask family and friends to model for you, if you are interested in portraits. Photograph different locations at different times of day if you are interested in landscape photography. Experiment with different types of food and styling if you are interested in food photography. Once you have a reasonable amount of experience in these categories, pick one or two to focus on, and give it your best. Don’t be afraid to experiment once in awhile in other genres, just to flex your creative muscles.
Memorable Jaunts DPS Article What you want to know - Bridal Portraits
I am a wedding and lifestyle photographer – that is what I enjoy doing the most. But mixed in my 
portfolio will be a bit of travel and editorial images that help me flex my creative muscles.

How can I get clients?

This is another big one that I get asked a lot, and I wish there was an easy answer. In fact, this is something that even I still struggle with, six years into my business. Getting new clients, and keeping a steady stream of clients is hard work. You have to constantly market yourself and your services at every opportunity you get. When you meet new people, don’t be afraid to say what you do. It took me a long time to introduce myself as a professional photographer, but once I said it often enough, I realized that I got more confident in not only my photography skills, but also in my business skills. Network and connect with your competitors, as well as other businesses in your area. Do a trade for images if appropriate, and remember not everyone you meet will be interested in getting pictures taken, and that is totally okay.
Memorable Jaunts DPS Article What you want to know - Lifestyle Portraits
A casual conversation at a networking meeting led to an epic family photoshoot and I gained a 
good friend too.

How can I build a portfolio of my work?

The length of time you invest in yourself and your photography skills is directly proportional to how long you will take to build your portfolio of work. If you constantly focus on learning and improving yourself, the more confident you will become, and the more opportunities you will find to create work that you are proud of. I have a few general rules that I follow in my photography journey
  • Photograph something every week if not every day – the objective here is to learn new techniques and perfect things I already know with respect to my gear.
  • 10:1 ratio – for every 10 minutes I shoot, I want to produce at least one image that I am proud of.
  • Spend time on personal projects – my mantra here is create for the sake of creation.
For me, this is an easy way to constantly update my portfolio with work that I am proud of, and which also represents my creative style.
Memorable Jaunts DPS Article What you want to know - Wedding Styled Shoot
Creating for the sake of creation is a great way to update your portfolio as well as connect with 
other vendors and creatives in your space.
This is just a small set of questions that I found helpful when I was starting off on my career in photography. If you have others that have helped you navigate the photography waters, feel free to list them in the comments so others can benefit as well.
If you have different questions that you’ve been wanting to ask, this is the place to do it. Let’s see if we can’t get them answered for you as well.

Editor’s Note: This is one of a series of articles this week that are Open for Discussion. We want to get the conversation going, hear your voice and opinions, and talk about some possibly controversial topics in photography.
Give us your thoughts below on the article above and watch for more discussion topics.
See all the recent discussion topics here:
Share this article.

10 Ways to Make a Living from Photography


It has never been harder to make a living from photography than it is in this day and age. But that doesn’t mean the game is over for you as a photographer. There are still plenty of ways to make money from photography if you are willing to make the effort and have a well-thought-out plan. So here are 10 ways to make a living from photography.
10 Ways to Make a Living from Photography

Portrait photography

Portraits can be a great little money earner for any photographer. There is even more opportunity for those photographers in smaller towns. Yes, there may not be as many potential customers but the competition will also be much smaller. From the initial shoot fee to prints (digital or analog) and frames, there is an opportunity to make additional sales on top of just the portrait shoot. So any portrait photographer has a few potential steady income revenues.
The overheads to start with are also fairly minimal as you can offer location shoots or even set up a small studio in your home to keep you going until you can get a proper space to work.
10-ways-to-make-a-living-from-photography

Event photography

Event photography is another good genre of photography that offers great opportunities for earning money. Events can be anything from birthday parties to trade events or even company events like Christmas parties.
The advantage of this genre of photography is that there is always going to be a demand for it. So if you can get a good reputation, then word of mouth can spread and get you more and more work.
10-ways-to-make-a-living-from-photography

Photojournalism

Similar to other genres of photography, there is always a steady supply of work for a photojournalist. Being a photojournalist is hard work, both physically and, more importantly, emotionally. But it can also be one of the most rewarding genres of photography as it has the power to change the world.
If you are willing to make the sacrifices needed and are good at capturing photos that tell stories, then this genre of photography could be for you.
10 Ways to Make a Living from Photography

Wedding photography

A few years ago, weddings would have been one of the top earners in this list of 10 ways to make a living from photography. But like most genres of photography, things have changed.
Less than a decade ago, an average wedding photographer could command $2000 plus per wedding and easily shoot 30-40 weddings a year. Unfortunately, the influx of photographers who undercut each other in price has had a detrimental effect on wedding photography. There are photographers now offering to shoot weddings for a few hundred dollars.
Nevertheless, wedding photography is still a market that has lots of opportunities to make money.
10-ways-to-make-a-living-from-photography

Product and food photography

As long as people are making things to sell or eat, they will need images of their products to help sell them. Product and food photography is a great source of income and a steady stream of work for any photographer.
It can be a little mundane for some, but I actually enjoy the process. I really like that I can shoot at my own pace and control every aspect of the shoot. This is not something anyone who works as an outdoor photographer gets to experience. From local restaurants to design companies, there is an endless amount of work available if you can find it.
10-ways-to-make-a-living-from-photography

Commercial photography

Commercial photography can consist of things like:
  • Shooting lifestyle campaigns or adverts for tourist boards and companies.
  • Photographing hotel rooms and venues.
  • It can consist of both interior and exterior shots with or without people.
I find it works really well combined with my editorial work as I often find myself getting an audience with someone in a position of power in these areas through my various commissions.
10-ways-to-make-a-living-from-photography

Editorial photography

Editorial photography was a great source of revenue for photographers.
This changed with the introduction of digital photography all those years ago, which led to the slow demise of staff photographers. It is cheaper and easier to use stock images than it is to send a photographer out to photograph a feature. The other benefit of using stock photos for an editor is that they can see exactly what images they are purchasing.
There are still higher-end magazines like National Geographic and agencies that will commission a photographer for an editorial feature, but they are few and far between.
10 Ways to Make a Living from Photography

Stock photography

Gone are the good old days of being able to make a living solely from stock photography. But all is not lost.
Assuming you are getting work from one of the other aspects of photography on this list, you will be accumulating a body of images that you can more than likely put with a stock agency. Whilst this won’t make you rich, it could provide a nice additional income. Just make sure to get model release forms where possible, and find the right agency for your style of photography.
10 Ways to Make a Living from Photography

Prints

Selling prints is another good revenue stream, whatever your genre of photography is. Big names aside, most of us photographers are not going to be lucky enough to sell prints for thousands of dollars. But, again, like stock photography, if you have a body of work, you might as well try to earn an income from it.
10 Ways to Make a Living from Photography

Sports photography

Sports photographers will always be in demand as long as our love for the various sporting games continues. If you can get yourself in with a good agency or accreditation and get those awesome shots that are grace the pages of newspapers and websites worldwide the next morning you can make a very good and steady living. To get to that level will take time and a lot of hard work.
But there are also lots of opportunities at the local level of photographing such as school sports days or even local sporting events. These are much easier to get into and can provide a steady income to supplement your other photography work.
10-ways-to-make-a-living-from-photography

10 Ways to Make a Living from Photography:

Whilst many photographers specialize in one specific area of photography these days, most photographers have to be willing to offer a few of these services. I shoot a lot of editorial and food photography and some commercial projects. I then use stock and print sales to increase that revenue stream.
Whatever genre of photography you specialize in, it’s important to diversify your work. Not only because of the income but also because you might make contacts that will lead to other jobs within your chosen genre.
Remember to price yourself accordingly and try not to work for free. Always keep in mind that if you don’t respect your work enough to be paid for it, why should someone else?
Do you have any other ways to make a living from photography that you’d like to add to this list? Share with us in the comments!
10 Ways to Make a Living from Photography

Share this article.

11 Tips for Shooting Travel Stock Photography to Make Money

Stock photography is a tough industry to master. The competition is fierce and prices have been falling over the last decade. But if you are willing to put the effort in and have a long term plan, you can certainly reap the rewards. As a photographer who has been involved in stock photography for over a decade, I have certainly seen the highs and lows. So here are my top tips for shooting travel stock images and how to make money from it.
shooting-travel-stock-photography

1. Include people

Picture buyers are always looking for something new and fresh. Including a person can often be what makes your images unique to the thousands of others that already exist. Including a person in the shot also gives the image some context and shows more of an experience rather than just documenting a place.
Some scenes are busy enough that you don’t need someone to pose. But if you do need someone, don’t be afraid to ask a stranger. Rarely have I found that anyone says no. I always offer to send them a copy of the image to sweeten the deal. This doesn’t mean you shouldn’t take the more generic-type shots. It more about maximizing your sales potential by shooting a variety of different images.
shooting-travel-stock-photography

2. Get a model release

So once you have included a person when shooting travel stock photography, it is a good idea to get a model release. If the person or people are mainly unrecognizable, or if you intend to sell your shot for editorial purposes only, you won’t require one. But be aware that some stock agencies will require a model release even if it is someone’s hand showing in a photo. Of course, there are times where it simply isn’t feasible, for example, if you are photographing a crowd of people. Getty Images have a great model release form that you download here.
shooting-travel-stock-photography

3. Shoot portrait and landscape

When shooting travel stock photography, you should always shoot a landscape and portrait version. Not all scenes work in both landscape and portrait, so sometimes it might not be possible. But if you can, it will come in really useful.
But not only portrait and landscape, try to capture some different compositions. For example, place your point of interest on the left or right. Leave room above and below. You are already at the location so you might as well cover as many possibilities as you can. You never know when a buyer will ask if you have that image in a different crop. Doing this will mean that for example, your image may get used as a double-page spread or a front cover.
11 Tips for Shooting Travel Stock Photography to Make Money

4. Leave space for copy

It is important to shoot images with dead space to allow for copy or headlines to be put in. Sometimes this can mean breaking those all-important rules of composition you have spent years perfecting. But it’s worth it to make those sales.
As mentioned above, you can always shoot multiple versions of the same shot. Try to imagine where and how your image will be used in a publication (or even a website), and compose your shot with that in mind.
There was plenty of free space at the top of this image for the copy to be placed.

5. Choose the right agency

This might be pretty obvious, but it’s important to submit your images to the correct stock photography library. If you shoot travel stock photography, then a specialist travel site is best. If you shoot still life, then an agency that specializes in this would be more successful.
Beyond that, spend some time researching the agency that you are thinking of submitting to. For example, are you happy to see your images sold for a few cents? Consider what your commission rate will be as well as they vary greatly from one agency to another.
shooting-travel-stock-photography

6. Think carefully before submitting to Microstock

Every single person I have ever spoken to who submitted to microstock sites regrets doing so down the road. Of course, there are probably some photographers out there who are very happy with their returns. The problem is that you will need such a huge collection of images with a wide coverage to see any returns that will be worth your time. This is because microstock sites sell images for cents. Ask yourself, would you prefer to sell one image at $25 or 250 at 10 cents?
11 Tips for Shooting Travel Stock Photography to Make Money

7. Find fresh angles

If you really want to make your images stand out and catch the buyer’s eye, photograph it differently! Every picture buyer has seen the classic shot of the Eiffel Tower, and it has been on the cover of hundreds, if not thousands, of publications. So the same is not likely to catch many prospective client’s attention. It’s not always easy, but if you can capture something different or unique, you might end up with a few sales from it. This could be as simple as photographing something from lower down or higher up.
11 Tips for Shooting Travel Stock Photography to Make Money

8. Unique location

As well as finding fresh angles, find new locations. Iconic locations such as London or New York, are constantly changing, so there are always potential new places from which to capture photos. This could be from a new rooftop bar with a unique view of Manhattan or new art installation on the streets of London. Even if your location isn’t ever-changing, finding somewhere with a view that not everyone photographs can be very useful.
shooting-travel-stock-photography

9. Quality over quantity

This is often a bit of a contradiction when it comes to stock photography because stock photography is a numbers game. The more images you have, the better your chances of making a sale. However, the key is that they have to be quality shots that people would be willing to pay for. This is the reason that it will take most stock photographers a few years to get a wide enough coverage of images to see a decent return.
Try to always shoot the best locations at the best possible time of day. More often than not, this will be sunrise or sunset, but you will need to assess each scene individually. Your aim should be to capture each shot in a way that you can sell it.
11 Tips for Shooting Travel Stock Photography to Make Money

10. Stay local

Shooting good travel stock photography doesn’t always mean jetting off to far-flung locations. You can often produce great travel stock images a lot closer to home. If, like me, you are lucky enough to live near an iconic place (for me it is London), then you already have endless photo opportunities.
Shooting locally has other benefits as well.
You can revisit locations easily if the weather wasn’t great. You don’t have to worry about the additional travel expenses that eat into your profits. In fact, you will probably find that your local shoots end up having a far better ROI (return on investment) than traveling to other places.
11 Tips for Shooting Travel Stock Photography to Make Money

11. Do something different

Another way that you can try to capture different types of images is to use different technology. For example, drones have now been around a while and can offer a completely new and unique view of something that may have been photographed a lot. But there’s no denying it’s getting harder and harder to fly drones in many places. So if it’s something you are interested in, it’s probably a good idea to get a license. But drone images do sell pretty well, so it is worth considering.
shooting-travel-stock-photography

For most people stock photography will never be the main source of income. However, with some preparation and planning, you can certainly make some extra money from your hobby or profession. The key to being a successful travel stock photographer is to treat it like a business as much as possible. Keep your costs as low as you can, and shoot as often as you can.
Do you have any other tips you’d like to share? Do you make money from shooting travel stock photography? Share with us in the comments!

Share this article.

Tuesday, December 31, 2019

How to Photograph Fireworks in 8 Easy Steps


Related course: Wow Factor Photography
Fireworks are essentially streaks of light that are moving in the dark. But how to photograph fireworks for best results? Firework photography isn’t an easy task. And it often results in blurry shots and inaccurate exposures.
So how do photographers snap those amazing fireworks photographs you see online? With the right gear, the proper settings, a few shooting tricks, and some patience.
This straightforward guide on how to photograph fireworks will help you take your fireworks images from blah to awesome.
Amazing fireworks photography of yellow burst over water in the distance

What You Need: Gear For Photographing Fireworks

A fireworks display is spectacular to watch. But photographing them without the right gear or proper techniques is anything but. Your fireworks photographs won’t be anywhere near dazzling.
You don’t need a specialised camera for photographing fireworks. The smaller accessories can make all the difference.
For fireworks photography, you’ll need the following:
  • Camera – A model equipped with manual modes is ideal.
  • Lenses – A wide-angle lens will capture the entire scene with some context. And a telephoto can capture isolated images of fireworks against a night sky (both work well).
  • Tripod – Stabilising the camera is an absolute must. Without a tripod, you’re going to end up with blur. You don’t need the most expensive tripod out there. Look for something steady enough that your camera won’t shake in the wind.
  • Memory card – Don’t forget to put a card in your camera. A faster card will help you capture fireworks that happen one right after another.
Those are the essentials, but there are a few more things that make the experience a bit more comfortable:
  • Remote release – Anytime you are using a tripod, a remote release can help get an even steadier shot. Remote releases aren’t necessary, but it’s a helpful tool to bring along if you’ve already invested in one.
  • Chair or blanket – Some fireworks shows can last for quite some time. Setting up your tripod in front of a folding chair might make for a more enjoyable experience.
  • Flashlight – If you can’t adjust your camera settings with your eyes closed, bring along a flashlight. That way you’ll see your camera’s controls in the dark.

How to Photograph Fireworks, Step By Step

8. Arrive Early and Scope Out Potential Locations

The first thing is to plan ahead on when the fireworks are taking place. The Fourth of July or New Years are the two best examples I can think of. It will depend heavily on where you are located.
Plan to arrive at least half an hour before the fireworks are scheduled to start. Spend that extra time scoping out locations while there’s a little bit of light left.
Also, use this time to set up your fireworks photography settings. Also, think about your prime or zoom lens’ focal length, as that will decide on where to place yourself.
Identify where the fireworks will be launching from. Then imagine what the composition would look like ahead of time at different potential locations.
Look for neat features that would add interest to the scene. These include a reflection off water or fireworks photographs over a cityscape.
These are things that will strengthen the composition. You should also look out for potential pitfalls. These would be power lines in the way or tall trees obstructing the view.
A fireworks explosion with bystanders on shore - how to photograph fireworks

7. Do You Need a Tripod

Fireworks photography is an extension of the long exposure technique. This means that a tripod is a must. Especially if you are capturing an environment under the fireworks shots.
Once you’ve spotted your composition, set up the tripod for that view. Whether it is a Nikon or Canon DSLR or one of the mirrorless cameras, having a tripod is one of the best photography tips.
Tripod or not, consider using a cable release for your shutter to minimise camera shake. Failing that, use a self-timer. The important part is gaining the best vantage point to capture the firework photos.
A multicolor mine firework erupting, fireworks photography tips

6. How to Set the Right Exposure for Fireworks Photography

Some fireworks are quick bursts. Others maintain an impressive streak across the sky for several seconds.
The trick to getting the firework’s entire movement across the sky is to use Bulb Mode. Don’t use a preset shutter speed.
In ‘Bulb’ Mode, you control the shutter speed by holding down the shutter release. The camera continues recording until you let go of that button.
The in-camera ‘Bulb’ setting makes it possible to shoot fireworks without knowing how long that next burst is going to last.
To use ‘Bulb’ Mode, turn your camera to manual mode. Turn the shutter speed all the way down until you see B or Bulb near the shutter speed display.
You are using a long shutter speed and fireworks are actually pretty bright. So you should start with the lowest ISO available on your camera. A low ISO is typically ISO 100 or 200.
The exact exposure values are going to vary. This is based on whether there are any other lights in the scene and how many fireworks bursts are going off at once.
Start with an aperture of f/11. As you shoot, check your exposure and adjust as needed. Choose a larger f-number (a smaller opening) if the shots are too light.
You can include several fireworks or choose a smaller f-number (a wider aperture) if the shots are too dark.
For the most control in post, change the file type to RAW, but stick with JPEG if you don’t plan on editing the images.
Note: While shooting in manual mode is best, some compact cameras have a fireworks mode. If you don’t have manual modes, try shooting in the fireworks scene mode. You’ll still need a tripod, but you won’t need to manually set the exposure and focus (in steps three and four).

5. Use Manual Focus

Cameras can’t focus on the dark. And they can’t focus on a firework that hasn’t even exploded yet.
Photographing fireworks requires manual focus, but it’s not as tough as it sounds.
Turn your camera to manual focus. Then adjust the focus dial on the lens until the distance meter shows the infinity symbol.
Since the fireworks are far away and you aren’t using a very narrow depth of field, this works most of the time.
But, once the fireworks start, be sure to preview your first shot and zoom in. If the fireworks are a bit soft, you may need to pull the focus back in a bit closer.
A coconut firework bursting against deep blue sky - fireworks photography tips

4. Should You Use a Remote Release

If you have a remote release, make sure to use it for shooting. Many newer cameras have WiFi, which also allows you to use your smartphone as a release.
You’ll get sharper results with a remote release, but I’ve shot many fireworks shows without one. Move your hand as little as possible while holding the shutter release.
Shooting fireworks photography is about the timing. I release the shot as soon as I hear the screech that indicates the firework is on its way up into the sky.
I hold the shutter release until the sparks fizzle out, then I release and start over again with the next burst. Remember, in Bulb Mode, the shutter speed is how long you hold the shutter release for.

3. How Often Should You Review Your Shots

Even after shooting fireworks every summer for the past few years, I usually don’t get it perfect on the first shot. I make sure to do the following to ensure I’m starting out with good settings:
  • Pull up a preview on the LCD screen;
  • Zoom in and check that manual focus;
  • Check the exposure and adjust the aperture as needed. Smaller f-numbers if it’s too bright, lower f-numbers if it’s too dark.
Checking the shot is important when you first start the shoot. Don’t check every shot. You’ll take your eyes off the sky and miss another opportunity. But check back ever so often.
If the fireworks show starts at dusk, you may lose some light. You’ll need to brighten up your aperture to account for the low-light.
Fireworks shows tend to be long. This gives you plenty of chances to capture great shots—and get some variety. This length will help you set the aperture and exposure time correctly.
Cool fireworks photography shot of a small red, yellow, and blue willow fireworks cluster

2. Adjust—Then Add Variety

After you’ve got a few shots that you are happy with, try for some variety. Switch between a wide-angle view and a close-up of the sky by zooming or swapping lenses.
For longer firework photography shows, try moving to another viewing spot. Make sure you’re still respecting other spectators as you move.
Instead of holding the shutter down for one whole burst, try capturing more than one at a time. You do this by holding the shutter until multiple bursts are completed.
If your exposure was good for a single firework burst, use a narrower aperture. You should still get an accurate exposure with the extra light coming in from multiple bursts.
Most fireworks shows are long enough to allow you to get several different shots. By the show’s finale, I’m usually ready to put the camera down. And I can watch the rest of the show without looking through a viewfinder.
At that point I’ve already gotten quite a few shots. Plus the number of fireworks exploding at once in the finale makes it tougher to get a good exposure. It also leaves the sky filled with more smoke.
If you want to photograph the finale, stop that aperture down even further.
Fireworks photos: blue plume from mine firework

1. Editing Fireworks Photography

Shooting in RAW gives you complete control over the way the final image looks. Take advantage of that, open up those fireworks photos in your favourite photo editor, and start post-processing.
Fireworks photos can benefit from a contrast adjustment. I do that by controlling the individual exposure channels first.
Start by pulling up the highlights and whites. Then pull down the shadows and blacks to darken the sky and surrounding scenery.
I might also pull the highlights down. This minimises the smoke created by the fireworks.
If the shot still needs a boost, use the contrast adjustment. It’s best to create contrast by adjusting highlights, whites, shadows and blacks first.
Bring out the colours by tweaking the saturation and vibrance. Watch any surrounding landscape for odd hues—saturation is very easy to overdo.
Finally, make sure to sharpen the image before finishing up. A RAW file doesn’t get the same sharpening treatment that a JPEG automatically receives.
Fireworks photos: multiple large bursts over Budapest parliament building

Photographing fireworks is either a difficult disappointment, or a fun challenge.
With this guide, you’ll be able to capture fireworks photos that are as dazzling as the actual show.

Share this article.

How To SHOOT FIREWORKS: 7 SECRETS to photograph fireworks LIKE A BOSS

How to Photograph Fireworks – Everything You Need to Know

Photographing fireworks is a challenging, but worthwhile experience

Photographing fireworks can sometimes work in horizontal orientation, but you will find vertical compositions to give you more headroom.
NIKON D700 + 70-200mm f/2.8 @ 90mm, ISO 200, 5 sec, f/10.0
Wondering about how you can photograph fireworks on 4th of July, New Year or some other event / occasion? In this article, we provide detailed information on how to best capture fireworks, what type of equipment to use and what camera settings to use during the process. Although the process is relatively simple, there are some things that might be worth considering, as outlined below.

How to Photograph Fireworks

What to Bring

Although you can certainly photograph fireworks with very minimal gear, you might want to go over the list of the recommended gear and accessories below while packing for a fireworks show:
  • Camera – any point-and-shoot, DSLR or mirrorless camera will do, as explained in camera considerations step below.
  • Lens(es) – ideally, you might want to bring two zoom lenses with you, such as a 24-70mm and 70-200mm equivalent, as explained in lens considerations step below.
  • Tripod – a must-have piece of gear to take camera shake-free images of fireworks.
  • Remote Shutter Release – while not required, a remote shutter release will allow you to take pictures in “Bulb” exposure mode, as explained in step #10 below.
  • Memory Card(s) – don’t forget to pack at least one empty memory card (preferably more if you end up taking lots of images).
  • Spare Battery – just in case, you might want to take a spare battery, especially if you are going to be shooting in cold weather, since low temperatures drain camera batteries quickly.
  • Flashlight – you might need a flashlight not just to see the buttons and dials of your camera, but also to be able to properly focus on a foreground subject.
Some of the fireworks shows are so stunning that they are absolutely worth photographing with your camera.
NIKON D700 + 70-200mm f/2.8 @ 95mm, ISO 200, 3 sec, f/20.0

Find the Best Location to Photograph Fireworks

The first thing you need to determine is where exactly you are going to stand to photograph fireworks. I would not recommend standing too close to fireworks, because you will be constantly looking up and you might not be able to find a suitable and interesting foreground to incorporate in your shots. In addition, if you are too close, you might need a wide-angle lens to fit the action into the frame. This might present another problem – you might end up including unwanted objects like buildings and trees into the frame (unless, of course, it is your plan to do so).
Therefore, the best thing to do is to stand further away in an open area (with short or no trees obstructing the view). Ideally, you should stand at a spot that gives you a maximum of 45 degrees view angle relative to the ground, as shown in the diagram below:
Standing at roughly 45 degrees works best while photographing fireworks
The further you stand when you photograph fireworks, the lower the angle and the more focal length you might need. Obviously, each situation is different, so just try to find a good spot with clear views of the sky in an open, unobstructed area that can give you a nice angle to photograph the fireworks.
Ideally, you should be at the spot early on. It is helpful to know exactly where the fireworks will be shot from, so that you can frame and compose your shot exactly the way you want. Don’t forget that fireworks draw a lot of people, so even if you pre-plan and work on your composition, you might need to adjust it later on. I personally have found that unless I am standing at a higher elevation, with no potential of anyone standing in front of me, I am always better off excluding the foreground completely. Once the fireworks start, you will have a hard time asking people to move just because they are in your shot.

Choose the Right Camera

Manual Camera Mode 
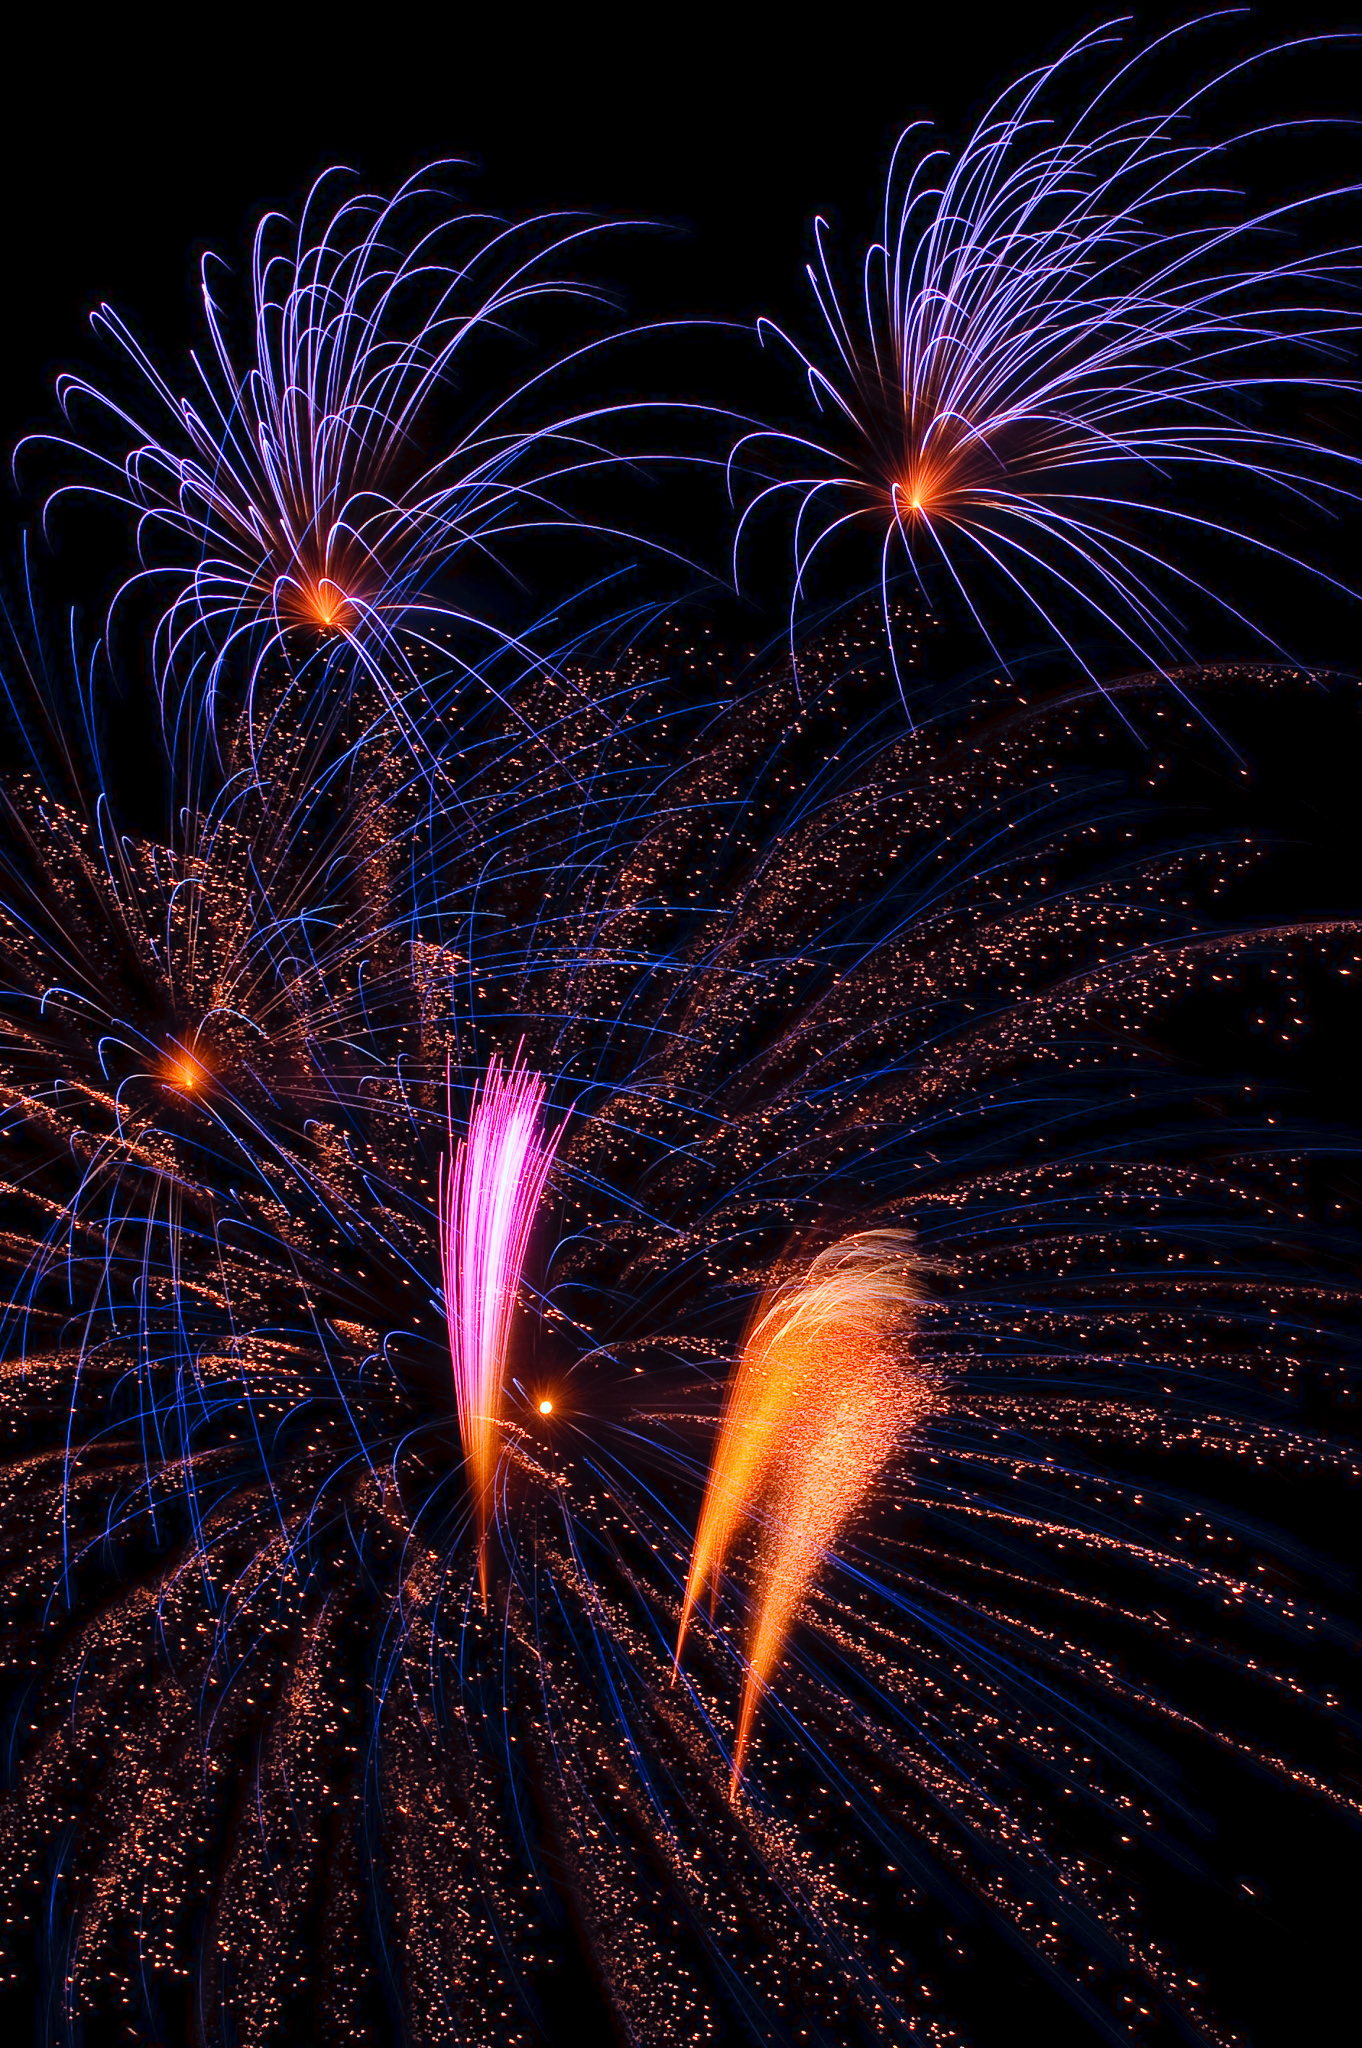
The good news is that you don’t need an expensive camera to photograph fireworks. Any camera that allows shooting in manual mode will work perfectly fine! Many of the point and shoot cameras do, so double check your manual and see how you can switch to manual mode.
Another good thing about shooting fireworks, is that you will be most likely shooting at the lowest ISO levels, which means that there will be very minimal amounts of noise in your images. So you don’t have to worry about your camera’s capabilities, besides being able to switch to manual mode and lowering your ISO to 100. If you have a DSLR or a mirrorless camera, you are all set, because you can do all this quickly and painlessly. Some cameras even have a “Fireworks Mode”, which works great and does not require you to change any settings on the camera.

Choose the Right Lens(es)

If you have a point and shoot camera, make sure that its lens can do at least 5x optical zoom (not digital). Optical zoom means that the camera lens will physically move to get more reach, while digital zoom means that the camera will simply cut out the image corners to make it seem like you are closer. With optical zoom, you are not compromising image resolution, whereas with digital you are.
If you have a DSLR or a mirrorless camera, you might wonder what lens to take with you to photograph fireworks. I have shot fireworks for many years and I find that telephoto zoom lenses such as 70-200mm or 70-300mm equivalent work best for fireworks, especially if you are going to be shooting from a nice vantage point, with fireworks exploding in the distance. If you are going to be shooting up from a relatively close distance, then a wide to telephoto lens, such as a 24-70mm or a 24-120mm equivalent is going to work best. You don’t need a large aperture prime lens to shoot fireworks – a zoom lens is ideal, since you can fine tune your framing without having to physically move anywhere. Personally, whenever I plan on shooting fireworks, I typically bring two such zoom lenses with me.
Here, I used buildings in Denver Downtown as my background.
NIKON D700 + 70-200mm f/2.8 @ 200mm, ISO 100, 25 sec, f/10.0
The above exposure was pretty long – a total of 25 seconds. That’s obviously a bit too long of an exposure for fireworks, but the idea here was to start capturing the scene before the fireworks fired, so that I could get some of the foreground exposed. If you are more advanced in terms of your post-processing skills, you will be better off taking two exposures – one for the fireworks, and one for the foreground. You can then blend the two together in Photoshop in order to avoid cluttering up your shot with too many fireworks and potentially overexposing them.
A telephoto zoom lens proved to be useful to have for the above shot. Initially, I captured the image at a shorter focal length of 105mm, which allowed me to include a bit more of the foreground:
Another photograph of Denver Downtown, but this time I zoomed out with my lens.
NIKON D700 + 70-200mm f/2.8 @ 105mm, ISO 100, 8 sec, f/10.0
That’s why a zoom lens is a versatile option – you can try different framing options and have a better control over your composition.

Use a Tripod

It goes without saying that in order to properly capture fireworks and frame your shots, you will need to have a tripod. You will be taking shots that will be several seconds long, so having your camera on a tripod is going to be ideal for best results. The good news is, you won’t need a fancy tripod to take great shots of fireworks. Since exposure times are going to be rather long, make sure to grab a remote shutter release as well to keep your hands off your camera.
A beautiful display of fireworks with a 4 second exposure
NIKON D700 + 70-200mm f/2.8 @ 90mm, ISO 200, 4 sec, f/10.0

Use Proper Camera Settings

First, set your camera on the tripod and connect the remote shutter release (if available). Then, change the following camera settings:
  • Flash – make sure to turn flash off, as it won’t have the necessary power to illuminate the foreground anyway.
  • ISO – start out by setting your camera ISO to its base ISO level (100 on most cameras) and turn off “Auto ISO“, if you have it turned on.
  • Image Format – if your camera has the capability, shoot in RAW format instead of JPEG. This way, you can make adjustments to your photograph later on and do a lot of highlight / shadow recovery.
  • White Balance – if you shoot in RAW, set your White Balance to “Auto” (you can change it later in post-processing). If you shoot in JPEG, set your White Balance to “Daylight” – it works well in most cases.
  • Long Exposure Noise Reduction – turn it off (if available). Keeping it on will double your exposure time, which is unnecessary.
  • Metering – I find matrix / evaluative metering to work the best, especially when shooting wide and including foreground elements.
  • Camera Mode – switch your camera mode to “Manual Mode”.
  • Shutter Speed and Aperture – set your shutter speed to 3 seconds and aperture between f/5.6 and f/8.
  • Image Stabilization – if you are shooting with a camera body or lens that has Image Stabilization (or Vibration Reduction in the Nikon world), you need to turn it off – it is of no use when shooting on a tripod.
Since it is probably going to be pretty dark at the time you will be changing your camera settings, you should not forget to bring a flashlight as well. If you forgot a flashlight, your smartphone’s flashlight will work just fine as well.

Properly Frame Your Shot

If you have not figured out your framing in advance, don’t worry about it before the fireworks begin, especially if you don’t know exactly where fireworks will be shot from. Just observe the sky and once the show begins, start working on framing / composition. You might have to constantly zoom in / out and re-frame your shots, so there is really no set rule for this. If there are brightly lit objects in the scene such as buildings and lights, it might be a good idea to include them as part of your composition. If the foreground is unattractive, it is best to exclude it completely and just focus on the firework explosions.
When traveling, it is a good idea to look at local celebrations to see if there are any fireworks shows taking place. I was in Jerusalem during independence day, so I was able to capture fireworks with my camera.
GFX 50S + GF63mmF2.8 R WR @ 63mm, ISO 200, 1 sec, f/5.6
If the foreground looks good, but appears a bit too dark in your images, then try increasing your exposure time, or wait for a very bright sequence of fireworks to illuminate the foreground details. The fireworks might look too washed out and overexposed because of this, but as long as you don’t change your framing, you could use a more advanced technique to blend two different images together later on in post-processing. Make sure to capture at least one shot with a properly exposed foreground.
Make sure to straighten the horizon as well when including foreground elements. Lastly, consider both horizontal and vertical framing for your shot. While a horizontal shot often works great, a vertical shot might be necessary to fit both the fireworks and other elements of the scene in a single shot.
Lastly, watch out for distracting elements while framing. You do not want trees, power lines and other distracting subjects crossing the primary elements of your composition.

Acquire Precise Focus

This part is tricky, because you need to make sure that your focus is correctly acquired, no matter what you are shooting with. Focusing options with point-and-shoot cameras might be limited, so make sure to practice this beforehand. If you have a bright object that you can focus on, zoom in to that area via live view (make sure not to zoom in optically, or it will mess up your framing and your focusing) and try to focus manually. If there is no bright subject that you can focus on, it is best to wait until the fireworks start, since fireworks are very bright and your camera should not have a problem focusing accurately. As soon as your focus is acquired, make sure to turn off autofocus. Once you capture a shot or two, play back and zoom in to make sure that the fireworks appear sharp.

Focus and Turn off Autofocus

If you are shooting a DSLR or an advanced mirrorless camera, start out by setting your lens focus to infinity and then take a picture. Many modern lenses allow focusing “beyond infinity”, which might screw up the focus on your images. What I typically do to make sure that my focus is 100% accurate, is focus on a bright explosion using the camera’s autofocus system (by half-pressing the shutter release button or pressing the “AF-ON” button), then once the focus is properly acquired, I turn autofocus off completely. Turning off autofocus should be very simple – many lenses will have a focusing switch on their side that allow you to easily turn AF on and off. Since I do not move, my focus from that point on will be accurate and won’t change, unless I zoom in / out with my lens to change my framing.

Include Foreground Elements

If you are trying to incorporate interesting foreground elements in your shot and your foreground elements are very close, you might get disappointed to see that you cannot get both the foreground and the fireworks in perfect focus. The first recommendation would be to properly calculate hyperfocal distance, so that you have both the foreground and the background in focus.
However, if it is too dark and you do not have a flashlight that you can use to properly calculate the hyperfocal distance, or if all this sounds too complex for you, simply focus on your foreground elements and take a shot. Just make sure that you properly expose the foreground – don’t worry about the fireworks in the distance. After you take one or two shots where the foreground looks good, re-acquire focus on the fireworks without changing your composition and keep on shooting. This way, you will have two separate exposures – one for the foreground and one for the background, which you can blend later on in post-processing.

Control Shutter Speed

When the fireworks show begins, take a picture during a bright explosion and see if the image is underexposed or overexposed. If the image is too dark or too bright, use your camera’s shutter speed to change the exposure length. Since you are shooting in manual mode, it should be pretty easy to do that. Your aperture does not matter for the most part – it is the shutter speed that will be controlling how much light enters your camera. For some fireworks, you will find that it is better to have shorter shutter speeds, while for others, a longer shutter speed might be necessary to capture the trails coming from each explosion.
Make sure to control shutter speed when photographing fireworks and vary the shutter speed between 1 to 30 seconds to get different displays of fireworks action.
NIKON D700 + 70-200mm f/2.8 @ 90mm, ISO 200, 3 sec, f/10.0
Start out with a shutter speed of 1 second and experiment changing it between 1 to 6 seconds. This way, you will have plenty of different shots with different effects. Keep in mind that the longer your shutter speed, the more action your camera will capture. This is not necessarily what you might want – too long of an exposure might make fireworks look too blurry, especially when it is windy. I generally try to keep the shutter speed below 3-4 seconds when there is plenty of action.
In some cases the fireworks shows will take place over a long period of time, so you can try different compositions with or without subjects.
NIKON D700 + 70-200mm f/2.8 @ 86mm, ISO 200, 5 sec, f/14.0
You don’t want the exposure time to be too long, because the sky will brighten up and the smoke might become too visible (ideally, you want the sky to look pitch black).
As the fireworks show gets closer to its “culmination” phase, you will notice that it is going to get very bright. Make sure to adjust your shutter speed accordingly (sometimes to a fraction of a second) to avoid overexposing your images.

Use “Bulb” Mode

If you have a remote shutter release and your camera supports “Bulb” in Manual Mode, try it out by opening up the shutter at the beginning of the explosion and then release it as soon as it ends. This is the preferred method over the manual method above, as it allows you to precisely control when the shutter opens and closes as you photograph fireworks. Since firework sequences and their lengths vary by a great deal, you are going to be better off with the “Bulb” mode, since you are in full control of the exposure time and you can visually see what’s going on.
If you do not have a remote shutter release, you can still use the bulb mode by holding on the shutter release of your camera and then releasing it at the end of the sequence. However, since you are shooting at slow shutter speeds, you have a very high chance of introducing camera shake. Therefore, it is ideal to use the “Bulb” mode with a remote shutter release, so that you keep your hands off your camera.
Here are the basic steps for using the “Bulb” mode:
  1. Connect remote shutter release to your camera.
  2. Frame your shot and set desired focal length on the lens.
  3. Properly acquire focus using step #8 above.
  4. Set your camera to “Bulb” mode (changing exposure time beyond 30 seconds usually reveals the “Bulb” mode).
  5. Take a picture by holding the shutter release button on the remote shutter release. Keep holding until the firework sequence ends and release the button right after.
  6. Play back the image on the camera’s LCD and make sure that the fireworks are properly focused and exposed.
Take plenty of images and don’t forget to occasionally review your images on the camera’s LCD.

Watch Out for Wind Direction

Fireworks generate quite a bit of smoke and you do not want too much of it in your images, or your fireworks images will look quite bad. Believe it or not, but the ideal condition for photographing fireworks is a slightly windy night! If there is a little bit of wind, find the direction of the wind and try to stand in parallel direction, so that the smoke moves out of your frame and doesn’t end up behind the fireworks or in front of you.
If it is a calm day and there is no wind, then try to focus on the initial explosions – they are probably going to give you the best results. Towards the end of the show, you will probably deal with way too much smoke everywhere, so your best bet might be to shoot shorter exposures and just focus on parts of the explosion. With shorter exposures, you will end up with less smoke in your images.

Photo Challenge

Here is a photo challenge for you – using the above tips, go out and photograph fireworks at a local fireworks show. Pick your best photo of the day, then post a link to it in the comments section below.
Don't forget to share your best photographs of fireworks with other people.
NIKON D700 + 70-200mm f/2.8 @ 90mm, ISO 200, 2 sec, f/7.1
Hope this helps.