Fashion
is one of the most creative and artistic niches of photography. Over
the past several decades, the world’s best fashion photographers have
paved the way and defined this industry with their own style and vision. The Best Fashion Photographers & What We Can Learn From ThemIf you’re an aspiring fashion photographer, it’s important to learn from iconic fashion photographers.
Not only will their work inspire you, but it will also provide you with immense knowledge and insight into this creative field.
So,
if you’re looking to learn more about fashion photography, read on.
We’ll look at some of the best fashion photographers and what lessons
they can teach us.
The Best Fashion Photographers
Richard Avedon
An American fashion and portrait photographer who started out as an advertising photographer in 1944. Avedon was quickly scoped out by individuals in the fashion industry.
Richard is a pioneer of the fashion niche, with works that are both timeless and recognizable.
In his New York Times obituary, it read that:
“His fashion and portrait photographs helped define America’s image of style, beauty and culture for the last half-century.”
For some of his fashion-focused campaigns, he photographed:
Kate Moss and Aya Thorgren for Versace
Stephanie Seymour for Comme des Garcons
Suzy Parker for Dior
Audrey Hepburn for Maxim’s Paris
So, what can we learn for the work of Richard Avedon?
Avedon’s
work is unmistakable. His visual eye and composition skills are
exhibited when he captures his subject in front of the lens. Avedon’s
images are full of emotion, personality and movement. All in all, when
you look at Avedon’s work – it makes you feel connected and compelled by
what he has created.
Avedon once said, “My portraits are more about me than they are about the people I photograph.”
This perfectly describes what we can learn from him as a fashion photographer.
Rather
than just focusing on what your subject brings to the image, think
about how you can showcase your identity in your work. Use your subject
as a blank canvas and capture an image that is a reflection of who you
are.
The best images have deeper meanings and purpose. So you
should use Avedon’s internalization as inspiration and apply your own
thoughts, emotions and experiences within your fashion photography. Related Post: Best Cameras for Fashion Bloggers
Helmut Newton
Born in 1920 in Berlin, Germany, Newton was an Australian-German photographer.
As
a fashion photographer, Newton went on pushing societal boundaries,
opting for more erotic imagery and capturing nudity. Despite this,
Helmut Newton’s work was frequently published in publications like
Vogue, among others.
Newton’s
work defied conventionality. He never played it safe. Instead, he
created images that tested limits and provoked the world.
By
incorporating nudity, sexuality and femininity, Newton showcased women
in a liberating light and redefined the standard of models. His black
and white images are complex and beautiful – just like his subjects.
From
him, we can learn that with fashion photography, it’s okay to take
risks. By that, we mean that it’s okay to go beyond set boundaries. You
should always have your own style.
He also teaches us that edge
and mood can change the entire concept of an image. By daring us to look
past the simplicity of our subjects, we can find a picture worth
creating. A snapshot with an emotion worth crafting through our visual
viewpoint. Related Post: Boudoir Photography (History, Photographers, and Tips)
Annie Leibovitz
Someone active in our current era, Leibovitz is an American portrait photographer. She is known for her portraits of celebrities and works with several high fashion magazines including Vanity Fair.
Her notable fashion images include subjects such as:
Kate Moss for American Vogue
Sophia Loren
Alice in Wonderland, Donatella Versace
Demi Moore
Jennifer Lawrence for Vogue
Kirsten Dunst for Vogue
What can Annie Leibovitz teach us?
Everyone
wants to be able to shoot and capture images like Annie Leibovitz. So
much so, that young photographers have attempted to emulate her style
for many years. Yet, despite this push for similarity – the most
important thing we can take away from Annie’s work is the pursuit of
originality.
It can be hard to determine your own aesthetic and
style. Especially in today’s world of saturated media. But, Leibovitz’s
work teaches us that it’s possible to find your own voice and identity
through your subjects. And that, no matter what, your own representation
will surpass any form of imitation.
Leibovitz’s work is her own.
This is something that we, too, should work towards. An individual
identity. For this, we need to identify and utilize our unique style and
perspective in every single image.
Tim Walker
Tim Walker
is a photographer who pushes the definitions of fashion photography,
opting for more surreal images. He regularly shoots for magazines such
as Vogue, W and Love.
Some of his most memorable images include subjects such as:
Rhea Durham
Elizabeth Moses
Codie Young
Karen Elson
Edie Campbell
Walker’s images are marked with a heightened sense of imagination and whimsicalness. In other words, his works represent an alternative viewpoint on the world. One that gives us a feeling of nostalgia and curiosity.
What can we learn from Walker?
The
out of the ordinary nature of Walker’s images provides us with a key
teaching. We can’t be afraid to produce bigger, stranger and more
complex images.
His work represents creativity at its finest. And
this is something that should inspire us to go out and craft photographs
that defy the limits.
His work shows us that vision is rewarded in the photography world.
Walkers
style teaches us to break the mold. So, be the artist you want to be.
Go and develop a truly unique perspective and you will be applauded for
your ingenuity.
Steven Meisel
Born in 1954, Meisel is an
American fashion photographer. Known for his images for both US and
Italian Vogue as well as photographs of Madonna in her book, Sex.
His notable works include:
Venus in Furs
State of Emergency
The Discipline of Fashion
Face the Future
During
his career, he has worked with names such as Naomi Campbell and Laura
Mercier. His numerous covers for Vogue and W magazine have earned him a
spot of one of the most famous fashion photographers, today.
In his fashion images, Meisel is not only creative but conversational. He aims to capture images that speak to a higher meaning.
From
this, we learn that we can use fashion photography as an outlet for
expression. We can draw attention to larger ideas and causes. And, in
effect, utilize our images as a catalyst for awareness.
He pushes
us to understand that fashion photography is more than just beauty and
glamour. But, is about the way we understand and experience our society
and culture.
Patrick Demarchelier
Demarchelier is a French
fashion photographer who captures more clean-cut images of his fashion
subjects, both in the studio and out on the streets.
Patrick’s works are published in the following:
His
style is very clean and crisp, with an attention to composition and
framing. He truly understands how to capture his subjects creatively.
What can we learn from Demarchelier?
It’s
apparent that Demarchelier’s style is versatile. He understands how to
capture his subject in the studio as well as on location and within
society.
His photographs are a representation of fierce females
with beauty and grace. By mixing portraits and full-body compositions,
his spreads are a representation of the editorial design.
From his
work, we can learn how to capture and create the best possible fashion
spread. This involves taking notes of his perspective, editing and
framing. Through this, we can understand the style of today’s magazines.
His work is the perfect mix of both mood and style – making him a fashion photographer worthy of recognition and praise.
Best Fashion Photographers: Closing Thoughts
As
you can see, these photographers have defined the fashion world with
their unique vision and creativity. From published editorials to
advertising campaigns, their work is admired around the world.
By
analyzing and better understanding their work, we too can learn a few
key tips on how to elevate our images and become creative, successful
fashion photographers.
Tuesday, November 19, 2019
Tips for Doing Fine Art Underwater Bubble Photography
Doing underwater bubble photography is both fun and challenging! Read
on for easy-to-follow techniques, tips, and tricks for you to try no
matter which underwater environment you’re in!
Safety
For your safety, have someone on land, in a boat or in the water with
you to act as a spotter. Have them keep a floatation device with them
at all times too. Underwater photography can be tiring, and you might
feel the need for assistance from time to time.
Have drinking water accessible regardless of the weather. Be sure to
have sunscreen on and beware of the sun reflections off the water:
sunburns hurt!
Equipment
There are many devices you can use, including a GoPro,
underwater phones, and the disposable ones they sell at the drug store.
However, the best way to achieve shots like these is to have an SLR
camera within a professionally-made underwater housing. You can still
try these types of shots with whichever device you do have, but it is
easier to take them with a lot of control going in.
I achieved these shots with a Nikon D7100 and a custom Ikelite housing.
You can shop for professional underwater equipment from a variety of places, but Ikelite – www.ikelite.com has a strong reputation internationally, and for good reasons. You can also check out Mozaik Underwater Camera – www.housingcamera.com
Both
websites sell camera and housing packages for underwater photography
and also individual housing cases. You definitely want reliable,
trustworthy equipment to achieve consistent, sharp images.
Equipment check
Please note that human error causes most floods (where water breaches
the housing compartment, and you risk losing your camera and every
photo you’ve taken). Common causes of floods are sand, hair, or dust in
the O-ring (which you should lightly lubricate every so often) and
improperly secured latches.
With a professional underwater housing, you have the same
capabilities underwater as you do on land. This saves much time if
you’re in deep water – no need to climb in and out of the boat or in and
out from the beach. Same for scuba diving – sometimes coming up from a
deeper depth is simply not an option. For those using other devices, be
sure to know the depth limit of the device, or you risk losing
everything!
Camera settings and taking the first few shots
Make sure the lens on both the camera and the housing is clean. There
is nothing worse than getting underwater, taking some fantastic bubble
photos, and then seeing a sunscreen finger smear in the corner of each
shot.
In underwater photography, your body will be moving, so too is the water and the bubbles. So if in doubt, use your camera in Auto Mode the first few times. Alternatively, try setting your camera to F22 and F20 at 1/2000th, 1/4000th, and rely on natural light.
Next, you are ready to get into the water and don’t forget to defog
your goggles before putting them on (spit or a defogging spray work
great).
Bring your equipment in and determine if it’s working underwater with
a few test shots (aim at your feet) and then check the image on your
viewfinder. Make any adjustments necessary.
Water and weather
Take into consideration the appearance of the water. You are looking
for water clarity. Sometimes, the bottom can be churned up by a recent
storm, and there can be a lot of debris. Debris can cause low visibility
and definitely with underwater photography, the clearer the water, the
better.
If you are in a controlled setting such as a pool, the clarity of the
water will depend on the chemicals added. If the water is cloudy due to
improper chemical balance, there will be a hazy quality in all of the
photographs.
The weather affects the light
in your photographs. A cloudy day will allow you to use a flash if you
have one. Only add a small amount of flash, or you run the risk of
blowing out the bubbles entirely.
If you don’t have a flash,
keep shallow and try taking photos in the top two feet or so as the
light will only decrease the further down you go. If it’s raining, you
can still take photographs. It is fun to get the water droplets falling
on the surface of the water while bubbles are rising towards them.
When
it’s a sunny day, light streams through the water surface and lights up
the bubbles from behind. Try to take a few pictures with the sun in the
shot as well.
How to create bubbles with containers
Use a variety of containers for different sized bubbles. Try sand
buckets, Tupperware, or other plastic bowls. Children’s stacking cups
are great too, as long as they don’t have a hole or holes in the bottom.
Anything can work (re-usable drinking bottles are great too) but avoid
all breakables like glass.
Bring them one by one into the water, so they don’t float away. You
would benefit from a helper to pass them to you, so it’s easier to
juggle your camera and the buckets.
Start with the smallest, easiest to manage container, and work up to the largest as they are the hardest to maneuver underwater.
Take the container underwater by holding the opening directly over
the surface and pushing it down underwater to catch the air inside.
Practice tilting the cup slowly underwater to let the air trickle out in
a trail of bubbles and practice tilting the cup quickly to let all the
air out at one time.
Now take a few test shots of the air escaping the container. You
might have to practice a few times not to catch your hand or the
container in the shot.
Try taking the container deeper. Be patient until you get the right
balance of speed of the bubbles versus shutter speed. Check your
viewfinder and make any necessary adjustments regarding shutter speed,
focal length, or the strength of your flash if you’re using one.
Try taking a series of images of bubbles using multi-shot (continuous shooting) for a better choice of images later.
Move into another section of the water for a variety of images. If
you’re using the sun as a backlight, you may also have to angle your
camera up towards the surface of the water to get a better shot.
How to create bubbles without containers
Take the containers out of the water and try kicking your feet and making lots of tiny bubbles.
Editing
Once you have downloaded your images, you are ready to edit.
Adobe Lightroom will make editing easy – though, you can use any editing software of your choice. Cropping
will be your most used tool as you eliminate any hands, containers, or
debris. Cropping is also necessary to zoom in on a section as you
attempt to create the most aesthetically pleasing bubble photograph.
Occasionally, you may want to adjust the color of the photograph by
making it bluer or taking all color away to see the bubble shapes in black and white.
Fine art underwater bubble photography takes a lot of patience, so
relax and have fun. Bubbles are fragile, finite, and often hard to
predict. Your best shots may be a string of bubbles, a cloud of little
ones, or a single, large one. Let’s see what you can do! Please share your underwater bubble photography with us in the comments!
Few of us get to see first hand the beauty of nature in our oceans
and seas. For many our introduction to the beauty of the underwater
world can be credited to Jacques Cousteau.
Thanks to his pioneering work generations of new underwater naturalists
have taken to the water and a select few, cameras in hand, are able to
do so with a great deal of artistry. One such photographer is Jim
Patterson who is today’s guest on “3 Minutes with…” 1. Describe your photography in 100 words or less.
I approach nature photography with a love and passion for the subject and an artful eye. When out in
the field, I strive for compelling compositions as I feel composition is the foundation for a great image.
Color and light don’t mean much if the composition does not engage the
viewer. That being said, I do love strong color and contrast and try to
incorporate that into my imagery. 2. What gear/software do you use?
Over the years, my underwater kit has included Nikon camera bodies and
lenses, Aquatica housings and ports, and Sea & Sea and Ikelite
strobes. My go-to lenses are the Tokina 10-17mm fisheye for wide
angle and the Nikkor 105mm f2.8G for macro. My current digital workflow
includes organization with Lightroom 3 and Photoshop as my main editing
software. The cloning tools in Photoshop are drastically better for fine
control over backscatter, the arch nemesis of underwater photographers
worldwide. 3. What’s one quick tip that you’d give people interested in underwater photography?
If you want to get into underwater photography, I highly recommend becoming a competent and safe
diver first. And be prepared to spend a LOT of money. 4. What 3 Photography Sites or Photo blogs do you recommend?
For all thing underwater photography, I go to wetpixel.com.
For thoughts on photography with
an artistic approach, I highly recommend Guy Tal’s blog at guytal.com.
And finally, for image editing tutorials I personally use in my digital workflow, I recommend Tony Kuyper’s site http://goodlight.us/.
Photo composites – it used to be said that “the camera never lies.”
We used terms like “photographic evidence,” and “photographic memory.”
We believed whatever cameras captured were literal representations of
fact depicting exactly what you would have observed had you been a
witness to the scene.
Then, as editing techniques improved, photographers learned ways to enhance and even alter images.
Well before the days of digital photography, dodging, burning,
airbrushing, layering of negatives, hand-painting, and a host of other
“analog methods” were used by skilled photographers seeking to enhance
and manipulate their images. Sometimes this was in the name of art,
other times to fool the viewer.
“Father
McKenzie wiping the dirt from his hands as he walks from the grave.”
Assignment – depict
a Beatles song title or lyric. I used a photo of a
Vermont graveyard, made a shot of myself in the
backyard, and with some
creative compositing depicted the lyric from “Eleanor Rigby.”
Enter the world of digital photography and desktop editing programs.
It wasn’t long before we used the term “Photoshop”
not only as a noun as the tradename of an editing program but as a verb
describing the manipulation of an image using that tool. When we now
say an image has been “Photoshopped,” we are saying it has been
digitally altered. The camera might not lie, but the photographer can
if they choose.
It took a while to clone out all the footprints from this shot of Bandon Beach, Oregon.
The ethics of photo alteration
So, is altering your image a bad thing? Unethical?
I’d say that depends on your intent and the context in which you’re
using the image. We’ve all heard the term “fake news.” If you are a photojournalist
whose job it is to depict a scene truthfully, then the rest of this
article is not for you. Move along… “creative photo editing” is totally
taboo for you. Enough said.
For the rest of us, is photo manipulation acceptable? How much? What kind? Under what circumstances?
Let’s come back to those questions a little later after we’ve looked at some kinds of photo “enhancements.”
A balloon over Boise, Idaho landmarks. One is composited the other a straight shot. Can you spot
the fake?
Bad magic
Have you ever had the misfortunate of watching a really bad magic
show, the kind where the unskilled magician clearly doesn’t know his
craft and the illusions are obvious? You know, without question, there
really was something up his sleeve? Bad photo manipulation is like bad magic; neither should be performed for an audience.
If your techniques aren’t convincing, if the substituted sky doesn’t
look right for the scene or the person composited into the group shot
looks like you cut him out and pasted him onto the photo, you might not
be ready to perform your photo magic. Learn how to do the “trick.”
Practice, practice some more and show the result to a single critic.
When you finally pass muster, only then show your creation to the
masses.
SOOC?
Most of us do at least some standard photo editing. I always smile at
those photographers who say with pride their images are
“Straight-Out-Of-Camera” (SOOC), unedited. That they always “get it
right in the camera.” Really?
Unless
you’re making only .jpg images (where the camera itself is doing some
editing using the built-in .jpg algorithm), you have a Raw image that needs at least basic editing even to be presentable.
Sure, make the best exposure you can in the camera, frame your shot
so no cropping will be needed. Pick a white balance appropriate for the
scene – those are all good habits. But having to edit your shot to bring
out its best? – That’s only logical, IMHO.
I had nice shots of a storm over a wheatfield and a good windmill silhouette. Creative photo
composite at work.
Creative photo composites
Now we get to what is clearly photo manipulation, the creation of an
image from multiple pieces. This is the assembling of a final photo
composite from separate shots carefully crafted to make something better
than you could make with a single exposure.
Do it well, and you can make scenes that depict your creative vision.
Create things of beauty that never were but should have been; landscapes with great clouds, gorgeous sunsets, or maybe portraits
done in fields of flowers. Do it well, and people will marvel over your
creation, unaware of your magic. Do it poorly, however, and you’ll wind
up with a Frankenstein monster, a badly-stitched horror assembled from
unmatched pieces and parts.
So let’s look at some things to consider when creating convincing photo composites.
I
think the scale looks correct here, but a pilot might say a jet
wouldn’t come in like this on final
approach. Both planes are composited
into the sunset shot.
Light and shadow
Let’s use an example where we might add a person to a scene they were not originally in.
You have the image of the scene, and you have a separate image of the
person. The first question to ask yourself is, does the light direction
match? Look at where the light and shadows fall in both images. If the
light in the person image is coming from the left, the light in the
background scene must come from the left too. Fail to check this, and
even the untrained observer will look at your photo composite image and
know something isn’t right, even if they can’t put their finger on it.
Sometimes you can flip the person or the background image so the
light direction matches; it depends on the scenes you’re working with.
Other times you’ll have to look for a different background with a better
match.
The scale may not be correct, but creative compositing is a new fun
way to play with your grandson.Pay close attention to the direction and
quality of shadows.
Compositing images where the light in one piece is harsh with hard
shadows and the other where the light is brighter, darker, softer, or in
some other way different will be a giveaway of something fishy.
Sometimes you might have to add a shadow manually. Say you’re adding an image of a car
to another image of a road. Consider where the shadow of the car would
fall relative to the light in the scene. Then blend in some shadows if
necessary to make a more convincing photo composite.
Angle
The camera angle and focal length
of the lenses used to make the separate shots should match as closely
as possible if you want to make convincing photo composites.
A high or low angle background with a differing angle composite
overlay isn’t going to look right. This even applies to sky
substitutions.
If you want to make photo composites of a landscape and change out
the sky for perhaps one that has a nice sunset or better clouds, take a
look at the angle of both shots and the focal length of the lenses used.
You’ll be able to tell if something just doesn’t look right.
A
gray rainy day at the Portland Head Lighthouse in Maine. The lighthouse
needed a light beam,
no? Easy to add one. Convincing? You tell me.
Color
Sometimes this can be the toughest one in getting good convincing
photo composites. Images at different times in different locations are
almost guaranteed to have slightly different white balances. Mix a
cooler piece into a warmer scene, one where the tint is slightly
different, or other subtle differences exist, and once again, your
viewer will detect that card up your sleeve.
See if you can set a white balance in Lightroom
for your base image and then, using the Sync feature, apply that same
white balance to your inserted image. Then take both into Photoshop for
your compositing work.
Sometimes the best option for avoiding a fight with color differences is to avoid color altogether and go monochrome
with your image. A monochrome composite is far easier to pull off than a
color one. It’s a good place for beginning “photo magicians” to start.
The moon was in the original shot, but tiny. I enlarged it a bit, but not so much as to be unbelievable.
Scale
Pay attention to match the relative size of images in your photo
composites. Unless you’re trying to make the model in your shot look
like a fairy on that forest log, matching size counts.
The
student who missed the group shot of his class, but you later composite
him in, probably won’t appreciate it if you make him look like he has a
giant head relative to the others in the shot.
Whatever multiple pieces you use to make your image, consider how their relative sizes match.
Fake moon composited in? Not this time. This was a telephoto shot which made the already large
full moon look even bigger.
Anything funny here?
After working to create a convincing photo composite, it can be hard
to be objective. You’ve worked hard to get it just right but sometimes
may have misgivings about whether everything looks natural.
Or it could be the other way; you’re convinced you’ve created the
perfect composite, but have overlooked what to someone else is obvious
fakery. This is the time to bring in someone else, someone who has no
idea what you’ve been working on, to look at your creation.
Simply ask, “How’s this look?”
Don’t immediately tip them that you did something to the image – see
if they detect anything. If they don’t, drill a little deeper.
“See anything unusual?” Pay attention to their answers.
If this is someone who knows your skills, they may suspect you
switched out the sky, put that cute bunny in the forest scene, or
digitally shaved some pounds from the model. However, even then, they
should be able to tell you if your creation is convincing.
Because you can…
The second part of that saying, “…doesn’t always mean you should.” Or as Uncle Ben told Peter Parker, (aka Spiderman), “With great power comes great responsibility.”
With practice, you may become highly skilled at photo composites. Alter a photo, replace the sky,
make it jaw-droppingly beautiful, and no one thinks twice. Even fellow
photographers marvel over the sunsets you always seem to catch, the
great light, the pristine beaches with no footprints, litter, or people.
They chalk up your beautiful images to stellar photo skills, hard work,
sacrifice, and a healthy dose of good luck. They don’t realize you made
your own luck, as well as that incredible ocean sunrise, with creative
photo compositing.
Until one day, the truth comes out…
You’re just an average photographer but a great Photoshop artist.
One guy who understands where to draw the line is noted landscape
photographer, Nick Page. I once had a chance to interview Nick on the
subject of swapping skies in landscape photography.
In addition to being an exceptional landscape photographer, Nick is
also a gifted editor. If anyone could fool you with a creative
composite, Nick could do so easily.
He could, but he doesn’t.
He could, but he doesn’t. His amazing photos are the real deal. Photo by/courtesy of Nick Page.
“With my Landscape photography, I have drawn the line in the sand,
(in my head anyway), that I will not composite or swap skies. For me
this comes down to two things,” Nick said.
“My favorite part of landscape photography is trying to chase the
light, and have that great light line up with a great location. This
takes tons of planning and effort, and I love that aspect of
photography. If I were to start dropping skies into my landscape
photos, I would be robbing myself of the joy of “the Chase.”
And the second thing? “I want people to know and believe the photos I
take are real,” said Nick. “So many of the photographers I follow, I
can’t always trust that amazing light they always have in their photos.
Yes, it is an art, but I really enjoy the extra effort of trying to get
it for real, and I want people to know and trust that I put in that
extra effort.”
Creative photo compositing is a fun way to help tell the story.
As easy as a click – the rise of the robots
We’re headed for a major change in photo editing as we enter the dawn
of the Artificial Intelligence (AI) age. For some time now, computers
have been able to “recognize” images. Tell Google Photos to search the
entire internet for photos of even something improbable, green dogs, and
it almost instantly finds many. This is not a keyword search; it
“recognizes” the image of a dog and the color green and finds the
photos.
Facial recognition? Lightroom can do that.
We already see better and better implementations of AI photo editing
tools too. How long will it be before an AI editing program can do a
better job than you? Maybe that day is almost here.
Sky substitution. Soon you’ll do this with one click with the Luminar 4 Sky Replacement AI tool.
Skylum Software recently announced its new Luminar 4 editing software with “AI Sky Replacement.”
Not only can it replace the sky in a photo, but it also does it with no
selections, layers, or masking. It claims to handle even detailed
images such as fine tree branches extending into the sky. And, it goes
even a step further, using the colors of the replacement sky to better
match the scene.
Mixed emotions
I must confess, I have mixed emotions about software editing tools
that better the skills I’ve learned after hundreds of hours slaving over
a hot computer [Me too – Editor]. Or that don’t require I earn that
great shot by setting the alarm for 4:30, shivering in the pre-dawn
cold, and hoping the clouds and color are just right only to be
disappointed. One-click to a beautiful shot?
Could I, in good conscience, enter a contest with such a shot and
accept an award for “my” image? The one made with artificial
intelligence instead of just my intelligence and skills?
The
Yellowstone Bison endure harsh winter conditions. Think this one was
originally a part of this
shot? You’ve been “buffaloed.” Added with
compositing.
Photography and “real” art
I have to think that when photography first entered the scene,
traditional artists, painters, sketch artists and those who created
their art from scratch by hand had to scoff. Photographers had no
artistic skills, and they weren’t “real artists.”
Later, we transitioned from purely mechanical cameras to automatic
ones and from film to digital. Autofocus? Auto exposure settings? Auto
white balance? Pshaw!
How about processing negatives and film in chemical baths, working
with negatives and enlargers, dodging and burning with real tools and
real photographic paper? Do you say you do that all now in a computer
with a few clicks of a mouse? That if you make a mistake, you can simply
undo it and not have to throw away your work and start all over?
You call yourself a “real photographer?”
Experiencing the 8/21/17 total eclipse was amazing. I used creative photo compositing to sequence
my shots for this image.
I
made a shot of the forest near Crouch, Idaho the day before the
eclipse. The next day I capture
the “diamond ring” image of the eclipse.
It did look like this, but I’m not sure I could have captured
this in
one shot. Creative photo compositing.
Conclusion
You get the point. As technology marches on our tools change, we
find easier ways of doing things and more people are able to become
involved, not having to spend years learning complex skills. More
people can, with some technological assistance, produce better images.
One last thing to remember however, the human touch, the “soul” of
your photography, your personal vision will never be replaced by
“artificial” intelligence. Wise photographers still appreciate the
special skills of artists who create beautiful images by hand. Wise
digital photographers still appreciate the skills of analog film
photographers who created great photos with very basic equipment. And,
perhaps one day, you and I will appreciate the skills of a robot
photographer and an AI editor. Or maybe not.
Share this article.
Photoshop Layers for Beginners – What, When and How to Use them Best
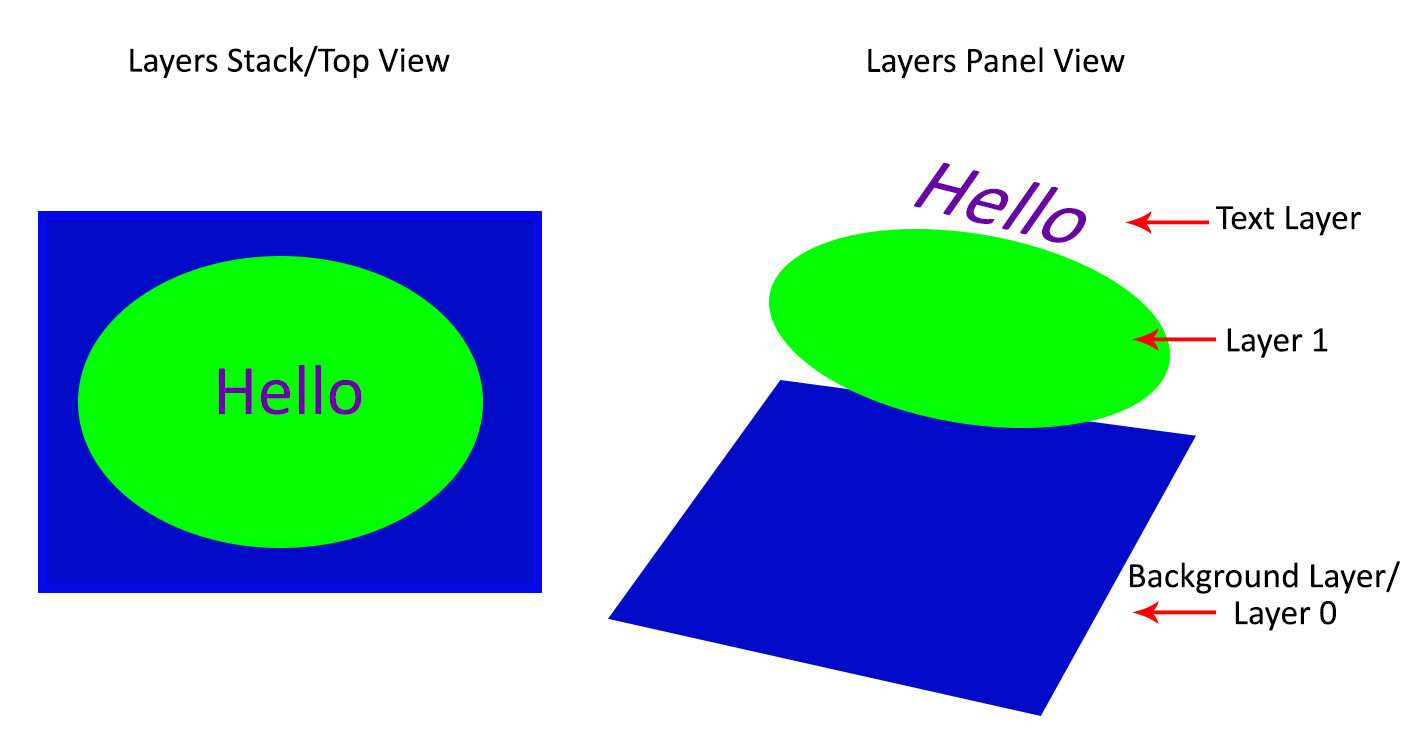
his introduction to Photoshop Layers for beginners
will help you learn a great editing habit. So, what exactly is a
Photoshop layer? Quite simply put, if you imagine a stack of transparent
paper, each sheet is equivalent to a Photoshop layer. When you add/change/remove any of the layers, what you see at the top of the stack forms your entire image.
The first time you open Photoshop, by default, the layers panel is on
the right side of your screen and your image opens as a layer named
“Background”. Keep this in mind as you read on.
Why use Photoshop Layers?
Now that you have an idea of what a layer is, here is why you should use them:
1. It is a way to work non-destructively
Destructive editing occurs when you move and change the pixels
directly in your original image. This happens if you edit your original
image/background layer when working in Photoshop. While you can undo
your changes, if you exceed the number of “undos”
you can apply, those changes commit. Also, you may like some changes,
but not others, and there is no way to go back to just that change
without undoing other changes you have made too.
Alternatively, when you edit your image on separate layers, both the
edited image and the original save (they are saved to a .psd file and
this maintains all your layers). This allows you to go back to your
original image at any time, simply by hiding layers, or deleting them
entirely. This is a form of non-destructive editing.
One thing to remember, however, is that if you resize your entire
document (via menu->image->image resize) at any point, that is a
form of destructive editing, and you will lose image quality if you try
to resize it back to the original size later.
As your editing style evolves, you will appreciate the option of going back to original images at a later date.
Easily add text without affecting your original image
2. It allows organized and flexible editing
Photoshop is usually a great option when you want more control over
your editing process. While you start off with a certain end result in
mind, you may change your mind, during (or even at the completion of)
your process. Surely there are better ways than undoing multiple changes
or starting over from scratch right?
Enter, layers.
Since your original image is unaffected, you can change the text at a later date
Layers allow you to work with your vision without
affecting/destroying the original. Since you can work on each layer
separately, you have major flexibility. With layers, you can also
combine several images into one (composite), These include (but is not limited to), swapping out elements from your image, changing color, tones, and lighting, adding text and resizing, replacing or rotating an object independent of everything else in your image.
You can use layers to replace a plain sky
This non-destructive editing style allows you to undo a change at any
point in time, and you have control over each individual layer. This
means you can work with different objects and elements of your image
without affecting anything else.
How to use Photoshop Layers
If you do not see the Layers Panel on the right-hand of your screen,
you need to turn it on. To do so, go to Menu->Window->Layers.
As mentioned before, when you open an image in Photoshop, it opens as
a background layer. You will notice that there is a small lock icon on
the right side of the background layer. This lock is intended to prevent
inadvertent changes.
The first step is usually to duplicate this layer. That way, the background layer remains untouched (original).
To start, duplicate your background layer:
Open an image in Photoshop
Right-click on the thumbnail image in your layers panel named “Background,” and choose the duplicate layer option
Click OK. A new layer will appear above your original layer with the
default name “Background Copy” – you can rename it to anything you
want. I suggest renaming it to something that relates to the changes you
are making. This makes it easier to find later if you have many layers.
As you become comfortable working with layers, you will find yourself
making new layers for each change you want to make e.g. if you are retouching an image or replacing a sky. This comes with the knowledge that, later on, you can adjust the intensity of any of those changes independently.
I used Layers for Sky Replacement, with a Layer Mask to recover the top branches
Adjustment Layers
Photoshop also has another layer type called Adjustment Layers. These
layers are not a duplicate of other layers; instead, they adjust the
information of the layer directly beneath it. Thus you can simply use an
Adjustment Layer to effect change on the image without changing the
original layer image. For example, you can increase/decrease the
contrast or brightness of your layer.
Notice how adjustment layers look different from other layer types. These adjust the layer below them.
Adjustment layers do not actually contain any pixels but instead are a
series of instructions for Photoshop on what changes you ask it to
make. You can access the Adjustments Layer menu at the bottom of the
Layers panel or choose Windows and check the Adjustments option.
Layer Masks
A Layer mask
is another non-destructive editing technique in Photoshop, used to
control the transparency of the layer you apply it to. An even simpler
definition is that a layer mask can make a layer visible or invisible.
This is done by painting either white (to make it visible) or black (to
make it invisible).
Blending Modes
At the upper left corner of the Layers panel is the blend modes
drop-down menu. These “modes” are set to Normal by default and control
how pixels on the different layers interact with each other. An easy way
to understand what the different blending modes do is to duplicate your
image (as described above) and cycle through them.
An
example of how different blend modes change the look and feel of your
image: 1. Normal
When there are several layers, your changes only affect the layer
that is active or selected. This is why it is a good practice to name
your layer (Step 3 above) based on what you are using the layer for.
You can save the edits as a Photoshop (PSD)
file, close it and open it at a later date to find all your layers (and
changes) as you left it. Of note, saving it this way increases the size
of your file. If you are finished with your edits and don’t need a
large PSD file, you can merge all the layers (or flatten the file) and
save it to a smaller, more compressed file type, such as a jpeg. Of course, in doing so, you will no longer have the ability to access those individual layers later.
Layers work in order. This means that the layer on top “covers”
everything below it. You can, however, reorder your layers by moving
them up or down by simply dragging them. Keep in mind that the layer on
the top will be most visible.
Conclusion
The key thing to remember as a beginner is that Photoshop layers are a
recommended non-destructive way to work. It is flexible, which allows
you to organize your work, effect change in selected areas, and undo
changes easily.
When you do not merge your layers, you can open your Photoshop file
years later and make changes, all without affecting your original image. I hope you can utilize these Photoshop Layers for Beginners tips,
and if you have any tips on this topic, please share in the comments
below.