Monday, November 18, 2019

Photoshop Layers for Beginners – What, When and How to Use them Best


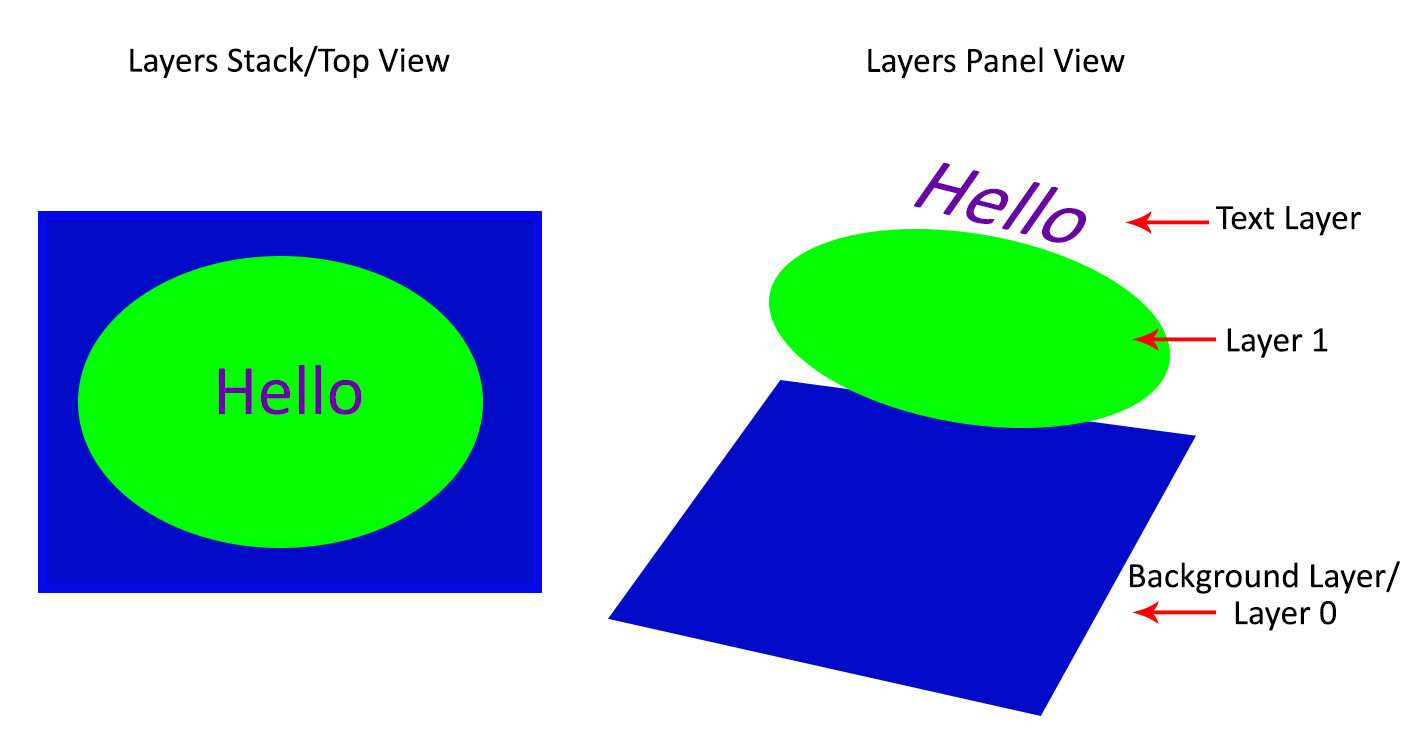
his introduction to Photoshop Layers for beginners will help you learn a great editing habit. So, what exactly is a Photoshop layer? Quite simply put, if you imagine a stack of transparent paper, each sheet is equivalent to a Photoshop layer. When you add/change/remove any of the layers, what you see at the top of the stack forms your entire image.
The first time you open Photoshop, by default, the layers panel is on the right side of your screen and your image opens as a layer named “Background”. Keep this in mind as you read on.
Photoshop Layers for Beginners – What, When and How to Use them Best

Why use Photoshop Layers?

Now that you have an idea of what a layer is, here is why you should use them:

1. It is a way to work non-destructively

Destructive editing occurs when you move and change the pixels directly in your original image. This happens if you edit your original image/background layer when working in Photoshop. While you can undo your changes, if you exceed the number of “undos” you can apply, those changes commit. Also, you may like some changes, but not others, and there is no way to go back to just that change without undoing other changes you have made too.
Alternatively, when you edit your image on separate layers, both the edited image and the original save (they are saved to a .psd file and this maintains all your layers). This allows you to go back to your original image at any time, simply by hiding layers, or deleting them entirely.  This is a form of non-destructive editing.
One thing to remember, however, is that if you resize your entire document (via menu->image->image resize) at any point, that is a form of destructive editing, and you will lose image quality if you try to resize it back to the original size later.
As your editing style evolves, you will appreciate the option of going back to original images at a later date.
Image: Easily add text without affecting your original image
Easily add text without affecting your original image

2. It allows organized and flexible editing

Photoshop is usually a great option when you want more control over your editing process. While you start off with a certain end result in mind, you may change your mind, during (or even at the completion of) your process. Surely there are better ways than undoing multiple changes or starting over from scratch right?
Enter, layers.
Image: Since your original image is unaffected, you can change the text at a later date
Since your original image is unaffected, you can change the text at a later date
Layers allow you to work with your vision without affecting/destroying the original. Since you can work on each layer separately, you have major flexibility. With layers, you can also combine several images into one (composite), These include (but is not limited to), swapping out elements from your image, changing color, tones, and lighting, adding text and resizing, replacing or rotating an object independent of everything else in your image.
Image: You can use layers to replace a plain sky
You can use layers to replace a plain sky
This non-destructive editing style allows you to undo a change at any point in time, and you have control over each individual layer. This means you can work with different objects and elements of your image without affecting anything else.

How to use Photoshop Layers

If you do not see the Layers Panel on the right-hand of your screen, you need to turn it on. To do so, go to Menu->Window->Layers.
As mentioned before, when you open an image in Photoshop, it opens as a background layer. You will notice that there is a small lock icon on the right side of the background layer. This lock is intended to prevent inadvertent changes.
The first step is usually to duplicate this layer. That way, the background layer remains untouched (original).
Photoshop Layers for Beginners – What, When and How to Use them Best
To start, duplicate your background layer:
  1. Open an image in Photoshop
  2. Right-click on the thumbnail image in your layers panel named “Background,” and choose the duplicate layer option
  3. Click OK. A new layer will appear above your original layer with the default name “Background Copy” – you can rename it to anything you want. I suggest renaming it to something that relates to the changes you are making. This makes it easier to find later if you have many layers.
photoshop-layers-for-beginners
As you become comfortable working with layers, you will find yourself making new layers for each change you want to make e.g. if you are retouching an image or replacing a sky. This comes with the knowledge that, later on, you can adjust the intensity of any of those changes independently.
Image: I used Layers for Sky Replacement, with a Layer Mask to recover the top branches
I used Layers for Sky Replacement, with a Layer Mask to recover the top branches

Adjustment Layers

Photoshop also has another layer type called Adjustment Layers. These layers are not a duplicate of other layers; instead, they adjust the information of the layer directly beneath it. Thus you can simply use an Adjustment Layer to effect change on the image without changing the original layer image. For example, you can increase/decrease the contrast or brightness of your layer.
photoshop-layers-for-beginners
Notice how adjustment layers look different from other layer types. These adjust the layer below them.
Adjustment layers do not actually contain any pixels but instead are a series of instructions for Photoshop on what changes you ask it to make. You can access the Adjustments Layer menu at the bottom of the Layers panel or choose Windows and check the Adjustments option.

Layer Masks

A Layer mask is another non-destructive editing technique in Photoshop, used to control the transparency of the layer you apply it to. An even simpler definition is that a layer mask can make a layer visible or invisible. This is done by painting either white (to make it visible) or black (to make it invisible).
photoshop-layers-for-beginners

Blending Modes

At the upper left corner of the Layers panel is the blend modes drop-down menu. These “modes” are set to Normal by default and control how pixels on the different layers interact with each other. An easy way to understand what the different blending modes do is to duplicate your image (as described above) and cycle through them.
photoshop-layers-for-beginners
An example of how different blend modes change the look and feel of your image: 1. Normal 
2. Multiply 3. Soft Light 4. Vivid Light 5. Hue 6. Luminosity

Important layering notes for beginners

When there are several layers, your changes only affect the layer that is active or selected. This is why it is a good practice to name your layer (Step 3 above) based on what you are using the layer for.
You can save the edits as a Photoshop (PSD) file, close it and open it at a later date to find all your layers (and changes) as you left it. Of note, saving it this way increases the size of your file. If you are finished with your edits and don’t need a large PSD file, you can merge all the layers (or flatten the file) and save it to a smaller, more compressed file type, such as a jpeg. Of course, in doing so, you will no longer have the ability to access those individual layers later.
Layers work in order. This means that the layer on top “covers” everything below it. You can, however, reorder your layers by moving them up or down by simply dragging them. Keep in mind that the layer on the top will be most visible.
photoshop-layers-for-beginners

Conclusion

The key thing to remember as a beginner is that Photoshop layers are a recommended non-destructive way to work. It is flexible, which allows you to organize your work, effect change in selected areas, and undo changes easily.
When you do not merge your layers, you can open your Photoshop file years later and make changes, all without affecting your original image.
I hope you can utilize these Photoshop Layers for Beginners tips, and if you have any tips on this topic, please share in the comments below.

Share this article.

Sunday, November 17, 2019

5 Secrets for Stunning Creative Bird Photography


Do you want to capture stunning bird photography…
…that goes beyond the usual, standard bird photos?
You can!
In this article, I’ll give you 5 bird photography secrets that will ensure you consistently create incredible bird images.
5 Secrets for Stunning Creative Bird Photography
Images that are creative, unique, and original.
Sound good?
Let’s dive right in!

1. Get Low for Gorgeous Bird Photography Backgrounds

Here’s the bread-and-butter of creative bird photography:
Get down low.
Really low.
5 Secrets for Stunning Creative Bird Photography
It may seem tough. You might prefer to stay up high, away from the dirt and water and mud.
But if you want incredible bird photos, you’ve got to get out of your comfort zone. You’ve got to get down low.
Specifically, you need to get on a level with the bird. Your lens should be about even with the bird’s eye.
Why is this so important?
When you shoot from down low, the distance between the bird and the background is greatly increased. And that causes the background to be far more blurred.
Therefore, you’ll capture some beautiful bokeh.
5 Secrets for Stunning Creative Bird Photography
And beautiful bokeh?
Makes for a stunning bird photo.
This is how professionals capture such dreamy backdrops in their bird photography.
They get down as low as they can go. That’s all.
It really does make a huge difference!
Try it. I can guarantee that you won’t regret the resulting shots.

2. Shoot in water for stunning reflections

Do you want to capture especially gorgeous bird photography?
One of my favorite ways to do this…
…is to shoot reflections.
5 Secrets for Stunning Creative Bird Photography
Let me explain:
A photo of a bird is nice. It’s standard. It can be beautiful.
But if you add a reflection, the image immediately becomes far more captivating. Viewers are instantly sucked into the scene.
The reflection adds a sense of subtle beauty and delicateness – one that you can’t get any other way.
Now, here’s how you capture gorgeous bird reflections:
First, shoot by still water.
Mudflats (with puddles) work well. Same with sheltered lakes.
If you’re struggling to find water still enough to generate full reflections, try shooting during the early morning. That’s when the wind tends to be a lot less noticeable.
Second, make sure the sun is low in the sky. (The lower, the better.) This will ensure that the reflection includes some nice colors.
5 Secrets for Stunning Creative Bird Photography
You also have to be careful not to get too low over the water.
Why?
If you’re too low, the full reflection won’t come through. And a broken reflection has far less power than a full reflection.
Bottom line?
Find some birds near the water, and start taking photos!

3. Capture action for compelling bird photos

One of the biggest problems with beginning bird photography…
…is that it’s static.
The bird just stands in the frame.
And while there are methods of making this type of photo work, it’s often just a boring photo.
That’s why you should spice up your bird photos using action.
5 Secrets for Stunning Creative Bird Photography
Once you’ve found a subject, watch it through your camera. Keep your finger on the shutter button.
Then, as soon as it starts to move, take a burst of photos. The more photos, the better!
Of course, you’re going to have a lot of failed shots. But you’ll also capture some keepers. And these will (with a little luck) blow you away!
Some of my favorite shots involve birds flapping their wings, preening, or feeding. If you wait for this behavior, you’ll get some stellar action shots.
5 Secrets for Stunning Creative Bird Photography
One thing I’d recommend:
When you’re watching a bird through the camera viewfinder, keep some space between the bird and the edge of the frame.
Because birds can rapidly change their size – just by opening their wings. And clipped body parts are one of the easiest ways to ruin a bird photo.
Just remember these tips, and you’ll be capturing some great action photos in no time!

4. Shoot through vegetation for unique images

Another way to capture original images…
…is to find a subject.
Get down low.
And shoot through some vegetation.
This creates a gorgeous foreground wash – one that frames the subject without dominating the photo.
5 Secrets for Stunning Creative Bird Photography
To pull this off, you generally have to lie flat on the ground. I advise experimenting with a few different angles – move around your subject, testing different possible foregrounds.
Note: It’s important that the vegetation is very close to your lens (and very far from your subject). Because the farther the vegetation is from your lens, the more in focus (and distracting) it becomes.
5 Secrets for Stunning Creative Bird Photography
It’s also important to limit the amount of vegetation in the photo. You don’t want to cover up the bird entirely. Instead, you want to frame the bird with the vegetation.
Make sense?
Then start taking some shots with a foreground wash. You’ll love the shots you get.

5. Capture silhouettes for dramatic bird shots

Here’s one more way to capture creative bird photos:
Shoot silhouettes!
Silhouettes are really easy to pull off – and they look incredible.
5 Secrets for Stunning Creative Bird Photography
Here’s how you do it:
Go out as the sun is just about to set. Find a subject (birds with a clear outline are best).
Then change your position so that the bird is between you and the setting sun. Ideally, the bird blocks the sun from your camera. This will prevent the sky from being completely blown out.
Make sure that the bird is in front of as much of the sky as possible.
That is, you want to frame the bird with sky – and you don’t want any dark patches behind the bird (from trees or other objects).
5 Secrets for Stunning Creative Bird Photography
If you’re struggling with this, try getting down as low as you can. Because the lower you get, the more sky you’ll include in the frame.
Finally, ensure that you drastically underexpose your subject. One trick is to set the exposure based on the sky next to the bird.
That way, you’ll get a beautiful sky – with a nicely silhouetted subject.

Creative bird photography: next steps

Now you know how to capture stunning, original bird photos.
You know how to produce amazing backgrounds.
You know how to generate interest.
And you know how to capture incredible foregrounds.
5 Secrets for Stunning Creative Bird Photography
The next step…
…is to get out and shoot!
Have any tips for creative bird photography? Share them in the comments!

A Quick Guide to Amazing Bird Photography Compositions


Do you want to capture amazing photos of birds? If so, you have to master bird photography compositions.
Composition refers to the arrangement of elements within the photo. And it’s often the difference between a creative, compelling image, and an image that just falls flat.
In this article, I’m going to share with you everything you need to know about bird photography composition. I’m going to give you several tips that ensure you capture beautiful bird photography compositions, without fail.
Sound good?
Let’s dive right in.
amazing-bird-photography-compositions

The composition basics: Capturing a gorgeous bird photo

When you take a bird photo, everything in the frame matters.
The bird. The position of the bird. The position of the bird’s head. The background. Any elements behind the bird. Any elements in front of the bird.
It’s all important.
Because the key to a gorgeous bird photography compositions is keeping the shot focused on your main subject.
amazing-bird-photography-compositions
You want to make sure that the bird stands out in the frame. You want to make sure everything else in the photo emphasizes and enhances the bird.
So how do you do that?
A few simple ways, starting with:

Simplify the entire composition to make the bird stand out

If your composition is chaotic, then the viewer is going to get lost.
And that’s absolutely not what you want.
Instead, you should aim to simplify the composition as much as possible. The best compositions tend to include a bird and a background. That’s it.
A Quick Guide to Amazing Bird Photography Compositions
While it’s possible to create beautiful shots by including additional birds or interesting features (e.g., shells, flowers), I recommend avoiding that as much as possible. These mess up compositions more often than they enhance them.
Also, in the interest of simplicity: If there’s anything in the frame that’s distracting, get rid of it. So make sure there are no branches behind the bird. Make sure there’s nothing in the background that dominates the frame or draws the eye.
That’s how you’ll keep your bird photography compositions beautiful.
And speaking of backgrounds:

Aim for a uniform, simple background that makes the bird pop

If you want a beautiful bird photography compositions, then you need a beautiful background.
What does this involve?
First, the best bird photography backgrounds are simple. They’re also uniform.
Like this:
A Quick Guide to Amazing Bird Photography Compositions
Notice how the background is a nice uniform color.
It keeps the attention on the bird. It doesn’t distract.
To create a background like this, you want to start by ensuring a large separation between the bird and the background. One trick is to get down low, on the bird’s level; this will cause the ground behind the bird to fall away, creating a more distant background.
You should also make sure you use a decently wide aperture, such as f/5.6 or f/6.3 (the particulars depend on the size of your bird, because you don’t want to accidentally make parts of the bird soft!).
Finally, you should ensure that the background doesn’t include colorful elements that catch the eye. Before you take a shot, look behind your bird, and ask yourself: Will anything in the background dominate the frame? Will anything pull the viewer away from the bird?
If the answer is “Yes,” then you should consider moving slightly to the left or right so that you’re no longer stuck with a distracting background.

Use the rule of thirds to position the bird’s eye

Now that you know how to capture beautiful backgrounds, it’s time to look at your main subject and how to position it.
Generally speaking, you’ll have a single bird in your photos. And you need to position this bird carefully.
You don’t want to put it smack-dab in the middle of the frame. That’s a recipe for a boring, static composition.
Instead, I recommend you place the bird so that its eye falls along a rule of thirds power point.
What is the rule of thirds power points?
They’re simply points that are a third of the way into the frame, both vertically and horizontally.
The eye in this photo, for instance, falls along a power point:
A Quick Guide to Amazing Bird Photography Compositions
It’s a third of the way down, and a third of the way from the left.
Now, the rule of thirds is misnamed; it’s a guideline, not a hard-and-fast rule. But it is a great way to position your bird and will ensure that the shot feels a lot more interesting.
So use the rule of thirds whenever you can to position your bird within the frame.

Point the bird into the frame to add movement

I’ve talked about positioning your main subject using the rule of thirds, but there’s another aspect to positioning that you should always, always consider:
The direction the bird is pointing.
You see, most bird photos have some empty space in the frame.
And when they do…
…you want to point the bird into the empty space, rather than away from it.
amazing-bird-photography-compositions
You see, by making sure the bird is looking into the empty space, it adds a sense of completeness and a sense of motion to the frame. The viewer’s eye follows the birds line of sight, and everything feels satisfying.
Whereas if you point the bird out of the frame, the whole shot feels tense. The viewer wants to know what’s outside the frame, with no resolution in sight.
That’s why bird photographers love to point the bird into the frame. It’s far more satisfying, and can turn the shot into something powerful.

Capture the bird in a creative pose for increased interest

Now, when it comes to bird photography, you can capture birds in a normal standing pose.
And that’ll get you some nice photos.
But sometimes…
This isn’t enough.
If you want to create truly creative bird photography, you need to go beyond the simple standing pose. And capture the bird doing something interesting.
What counts as interesting?
For one, preening birds look really interesting. They appear wonderfully tranquil as they clean their feathers.
A Quick Guide to Amazing Bird Photography Compositions
And birds that are sleeping also give off a sense of peace that I love.
You can also go for action shots: Birds feeding, for instance, can create a lot of interest. You can capture photos of birds that are about to catch food, are currently catching food, or have just caught food. Think of a bird with a huge fish in its mouth.
It’s guaranteed to add interest.
Cool, right?
You can also go for shots of birds fighting or, as is a common bird photography practice, shots of birds flying. Photographing birds in flight can be a challenge, but a really rewarding one.
So whenever you’re able, don’t just take a standard bird photo. Go beyond this.
Make something unique!

A quick guide to amazing bird photography compositions: Conclusion

You should now have a sense of the best ways to capture beautiful bird photography compositions.
And remember:
Getting amazing compositions isn’t hard. You just have to use the tips that I’ve given you, and you’ll be taking stunning photos in no time.
Have other tips for gorgeous bird photography compositions? Share them in the comments!
amazing-bird-photography-compositions

Saturday, November 16, 2019


This week's Photography Freebie is a 30-day FREE subscription to Amazon Kindle.

You can access the titles below (and many more) free of charge for the first 30 days of a subscription.  There is NO obligation to continue the subscription past 30 days.  View these on your computer, tablet or smart device.  If you don't want the subscription to continue,  just cancel before day 30.

Access these freebies here:  https://amzn.to/2ODeqFB


Photo Therapy Motivation and Wisdom: Discovering the Power of Pictures  Mastering Digital Cameras: An Illustrated Guidebook (Digital Photography 1) Mastering Aperture, Shutter Speed, ISO and Exposure  Mastering Digital Photography: Jason Youn's Essential Guide to Understanding the Art & Science of Aperture, Shutter, Exposure, Light, & Composition

The Photographer's Guide to Posing: Techniques to Flatter Everyone  The Landscape Photography Book: The step-by-step techniques you need to capture breathtaking landscape photos like the pros Understanding Exposure, Fourth Edition: How to Shoot Great Photographs with Any Camera


DSLR Photography for Beginners: Take 10 Times Better Pictures in 48 Hours or Less! Best Way to Learn Digital Photography, Master Your DSLR Camera & Improve Your Digital SLR Photography Skills Adobe Lightroom Classic CC Video Book  David Busch's Nikon D850 Guide to Digital SLR Photography (The David Busch Camera Guide Series)

Friday, November 15, 2019

11 Easy Ways to Improve Your Sports Photography


With our current sports-focused Critique the Community, now seems like a great time to share some tips and best practices to help you improve your sports and action photography in 2016. Read on for 11 solid suggestions to help you become a better shooter.
Here's some quick background on me: I started in photography in 2008 when I was in college. As a former high school athlete, I was immediately drawn to sports and started shooting it whenever I could. I started sending my portfolio out to various sports image agencies and was eventually contracted by one to be a backup shooter for MLB games in Houston. After that, I got an internship at the Houston Chronicle and continued to shoot professional and collegiate sports. I've had my work published in Sports Illustrated and ESPN Magazine many times, and I even think one of my NFL shots is on one of those Fathead wall clings somewhere. All that being said, I still have so many areas I can improve in and I am never fully satisfied with where I am as a shooter. I've put together the list below to hit on some things I've learned in my years covering sports in the hope that they might help others improve in photographing the crazy world of live sports. Let's get to it.

1. Learn the Sport

I mean really learn the sport. A big part of sports photography is anticipating action. You will (almost) never get that great shot of a diving shortstop spearing a line drive by simply reacting; you have to be just as ready for that play as the player is himself. You need to have a strong and instinctive understanding of a sport to really shoot it well. Shooting baseball? Watch the defense and see where they shift. They know the scouting report on the batter and are moving accordingly. Pay attention to whether the batter is left-handed or right-handed, same for the pitcher. Know the situation and plan accordingly. Football is the same thing, watch how the teams line up, know where they are on the field, and position yourself to take advantage of that. Basketball? Basketball can be a lot of fun because it's more confined and somewhat more predictable. Pay attention to the tendencies that players display throughout the game. Watch for people that seem to be emotional or play a certain way.
Soccer, hockey, tennis, golf, fighting, racing: it's all the same. Doing some research and knowing the sport will provide a big lift for your images. Getting a feel for a sport also allows you to nail a shot with a single frame instead of spraying and praying (nothing wrong with that, but it's fun to grab a frame at the exact moment you wanted). Both of my shots below were by timing a single exposure vs. just holding down the shutter release.
michael russel clay court sports photography
Michael Russell during the Clay Court Championships in Houston in 2012.
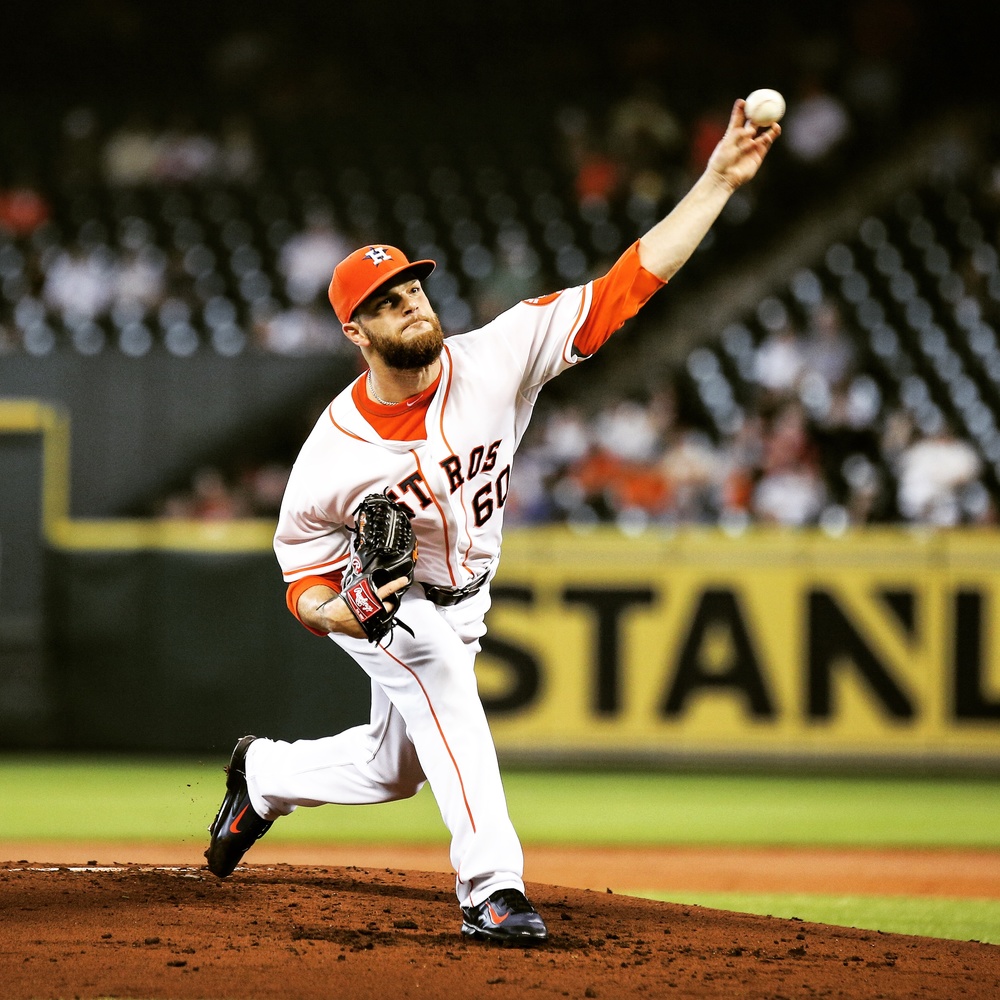
sports photography tips dallas keuchel
AL Cy Young winner Dallas Keuchel during a game in 2014.
2. Back-Button Focus
If you bought your camera new, then chances are it came set up to initiate autofocus a certain way: by half-pressing the shutter button. This is all well and good, and many great photographers function just fine with the default setting, but here's a little secret: there's a better different way! There's a good chance you've heard of back-button focusing, most (I'm looking at you D750) higher-end cameras actually come with an "AF-ON" button on the back of the camera, right around where your thumb would normally rest. Even if you don't have that button, you should be able to go into your camera's custom settings and enable whatever button is back there as the button to initiate autofocus. I even go ahead and disable autofocus from my shutter release completely; I set the half-press to lock my exposure, but I autofocus with the back button.
So, why would you want to do this? The short answer is it's just better different, but there are several good reasons to move to this setup. Half-pressing the shutter while shooting sports, action, photojournalism, etc., can often lead to accidentally triggering your shutter when you don't mean to. This is an annoying and sometimes rage-inducing experience. Moving focus control to the back button ensures that you're only taking photos when you want to. Shooting sports means constantly engaging and disengaging your AF, and having a single button right under your thumb dedicated to just that task is a life saver. Think about it; two of your camera's most important functions, focusing and exposing, are both controlled by the exact same button with only a the tiniest bit of pressure separating the two. That's kind of crazy! Separating the two functions helps to minimize mistakes in situations where you don't have time to make up for them.
sports photography tips aggie football christine michael
Texas A&M Aggie Christine Michael during a game against the Florida Gators in 2012.

3. Tell a Story

Quick, what separates Getty and (former) Sports Illustrated staff shooters from everyone else? Gear? Not really. Anyone can get gear, and you can get great AF and FPS on consumer level bodies these days. Access? Nope, a seasoned Getty shooter could kick your ass at Little League or the Super Bowl. Great athletes aren't what make great images. Two things separate the upper-echelon of sports shooters from the rest: practice and storytelling. I'll get to practice in my 10th point, but storytelling should never be undersold. If you have good gear that you know how to use and a good level of comfort with a sport, you can be a solid action photographer. Anticipation and luck are going to give you a good action shot 9 times out of 10 if you have those other things down, but the ability to tell the story of a game or event is a completely different thing. Check out Sports Illustrated's Top 100 Sports Photos of All Time; more than half of them are "story shots." A great shooter knows what is on the line for any given game, he knows the major players, he knows the sport, he knows tendencies. He pays attention to what is going on in the stadium; maybe there's a fan who is dressed a certain way or has a funny sign that can be incorporated into a shot. Maybe a player's family is in attendance, or an old coach, or a special guest. See where I'm going with this? You should have a running list in your head of shots you want to get should the situation present itself, so that if and when it does, you're ready.
sports photography tips aggie football Damontre Moore
Damontre Moore during an A&M football game in 2012.

4. Stop Chimping (at the Wrong Time)

Chimping: "A colloquial term used in digital photography to describe the habit of checking every photo on the camera display immediately after capture."
- Wikipedia
There isn't anything inherently wrong with chimping, but as with so many things in life, it's all about your timing. You never want chimp in the middle of the action, and you pretty much never want to chimp immediately following a stop in action (breaks in play are a great moment to find some of those story shots). You want to always be ready to catch the unexpected; even if you think you just got some amazing shot of a fantastic play, wait for the right moment to check. Don't let your own excitement possibly rob you of an even better shot than the one you're gawking at on the back of your camera.
Chimping is necessary at times, when covering an event for a publication, for instance. Many photographers are quickly reviewing their shot sequences and tagging potential keepers in-camera so that they're easy to find when they go to edit and caption later. It's an essential part of the workflow, but it should be done with careful discretion.

5. Be Critical

Your photo sucks; it really does. It doesn't matter that "it was such a great catch!" iI it's out of focus ("but only a little!"), or you can't see the ball ("it's there, I promise!"), or the face is obstructed ("who cares about faces?"), then chances are, it's not a great photo. The sooner you can accept that you have the innate ability to take really crappy photos, the sooner you can start to figure out why they're crappy and move on to taking really good photos. I shot my first basketball game my sophomore year of college, and I couldn't have been more proud of my photos. I posted them up on a local photo forum and got the expected "good job!" and "great shots!" comments, but then one guy ripped my photos to shreds. He pointed out which ones were out of focus, how I was cutting players feet off, where I was missing faces. He wasn't mean, but he didn't pull any punches. After reading his reply, I did one of the most unthinkable things in the history of the Internet: I listened to him. I didn't get mad or take it personally, I wanted to get better and everything he said about my images was right, so I listened to what he had to say, and I got better. We can't improve on our mistakes without acknowledging them, and we don't correct our flaws by accident. Be brutal with yourself; find someone who is better than you to be brutal as well, then listen to them.
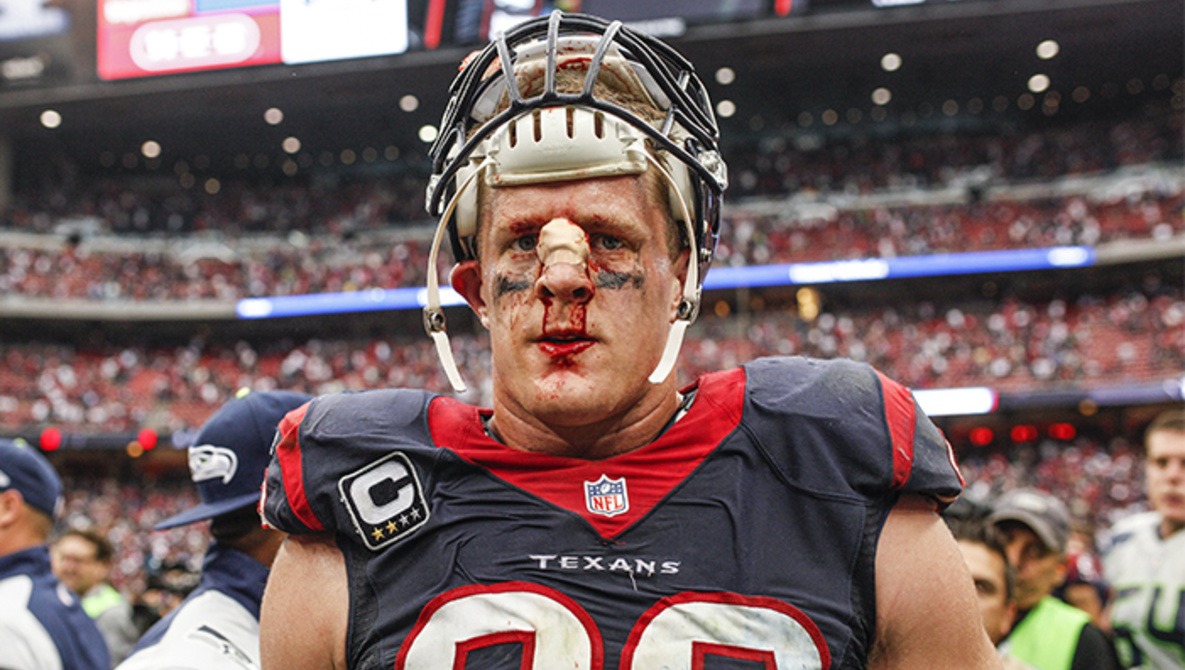
I posted the photo below on Instagram a few years ago. It's not a very good photo. People liked it because it's JJ, but it's not the level of quality I wanted to be at. Never settle when you know you could improve.
sports photography tips houston texans jj watt
J.J. Watt. Not my best work. Always strive to get better!

6. It's (Almost) Always About the Face

This plays into the above, but faces are one of the most important things in a sports image. Faces personalize and humanize the image; they connect the viewer to the moment and draw them in. Yes, there are photos that capture such a powerful moment that they can get away with not having the face in them, but I guarantee you that the guys who shot those photos would have preferred a shot that showed the face.

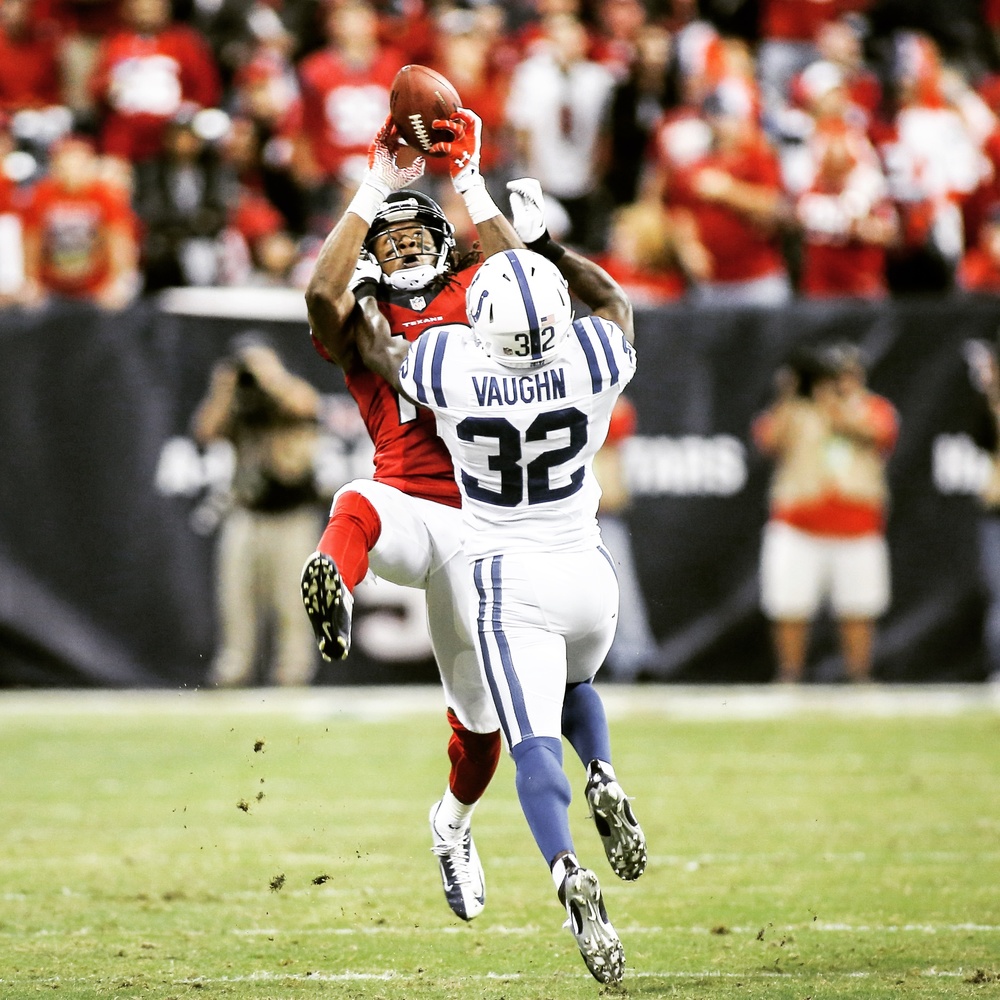
My shot below is technically better, but the Helmet Catch carries the weight of the moment and is a better photo simply on the basis of the story that is being told.
sports photography tips houston texans deandre hopkins
DeAndre Hopkins is unstoppable in a game against the Colts in 2013.

7. Step Away From the Crowd

If you have the ability to move around a venue, use it. Find angles that no one else is shooting. My editor at one of my newspaper internships in college once told me: "Get high or get low; no one wants to see your point of view. Everyone knows what the world looks like from a few feet off the ground." Sports Illustrated's greatest photo of all time is that famous shot by Neil Leifer of Ali vs. Williams, the overhead angle telling the story of the fight better than anything ringside could. Don't underestimate what you can get when you combine a tight or wide angle with an extremely high or extremely low angle.
sports photography tips houston texans arian foster
Arian Foster carries the ball during a game against the Seattle Seahawks.

8. Don't Stop Once the Whistle Blows

Coaches tell players to keep going until they hear the whistle; well, you keep going until the whistle and then some. That's how you get moments of celebration and failure, coaches and players losing their minds, the moments that oftentimes define the game more than any individual play. Don't stop shooting once the catch is made, and don't ever assume that a whistle means the play is over. Cam Newton is a walking photo gallery after a touchdown; the most compelling shots of runners are almost always after they have crossed the finish line. Always keep your camera ready, and you will catch some of your most compelling photos.
sports photography tips houston dynamo soccer
Omar Cummings celebrates a goal for the Houston Dynamo during a game in 2013.

9. Make Smart Gambles

You ever wonder how this shooter or that shooter managed to get the shot that they did? I mean, how could they possible know that the ball would be fumbled and returned 90 yards for a touchdown as the clock expired? The answer is that they didn't know, but they were willing to take a gamble. Now, just like in real betting, there are smart gambles and dumb gambles. A dumb gamble would be positioning yourself for a shot that you hope will happen, even though it means sacrificing your ability to get other important images. You can sit in a single end zone all game long, just in case something totally crazy happens, but you're completely missing other opportunities to tell the story of the game: dumb gamble. A smart gambling photographer is extremely mindful. They know what they have shot so far that day, they know the potential storylines and outcomes from the game, they know who the big players are, they know their tendencies. The smart gambler is constantly calculating risk vs. opportunity and is able to decide in a moment whether or not it's worth missing shot A to potentially get a one-of-a-kind shot B. Smart gamblers are also lucky; they just are. You can't teach luck, but you can make smart gambles.
sports photography tips houston rockets chandler parsons basketball nba
Chandler Parsons attempts to dunk over Amir Johnson.

10. Shoot Tight, Crop Tighter

Tried and true wisdom from editors across the globe: Keep the action tight, crop even tighter later. Lose extraneous and distracting elements; draw the viewer into the action. Athletes are perceived as larger than life; let your photos play off that feeling. As with all rules, of course, this one is made to be broken, but it is a good rule of thumb and a good thing to have in mind when you're shooting and editing.


11. Shoot, Shoot, Then Shoot Some More

This holds true for all genres of photography and really anything in life you choose to pursue. You can't get better at something if you aren't doing it. Shoot a lot, get critiqued a lot, correct your mistakes, and shoot some more. Challenge yourself; look at images of photographers you admire, and go to a game with the mindset of trying to emulate something you like about their style. Find new ways to tell stories, and accept that you will probably fail a lot along the way.
Action and sports are some of the most thrilling and frustrating things you can shoot, but when you nail the shot, there's no better feeling. Here's to all of us improving our skills in 2016!
sports photography tips ufc mma
Cain Velasquez during UFC 166 in Houston, TX.

Share this article.