Saturday, October 19, 2019

The Complete Guide to Time-Lapse Photography: 82 tips


Related course: Total Time-Lapse
Time-lapse photography has become very popular in the last few years. This is the method used to capture light-trails.
Photographers also use it to capture the movement of the moon. Or space rockets firing into the sky.
This is a great way to deal with low light conditions. It is also used to show a lot of action in a very short amount of time.

Time-Lapse Photography: What It Is and How To Get Started

The basic idea is that you take many photographs at intervals. You then stitch them together during post-processing.
What you get is a sequence that plays back faster than usual.
The end result will become a video, as it is the only way to show this sequence of images in succession – one after the other.
This is a technique you can see everywhere. In commercials (Turkish Airlines), title sequences (House of Cards) and films (Baraka).
Here, they show cities going about their daily life in a sped-up manner.
These videos add a very high-production value to any project. However, they are complicated, time-consuming and need a lot of planning.

Camera Equipment

Camera Recommendations

There are many different cameras you can use for time-lapse photography. These can range from DSLRs, Go Pros and even mirrorless versions.
The only caveat is that the system needs to be digital. This is because you will be taking hundreds of images in a short period of time.
Also, checking your scene is very import. This could be the focus through live view and the exposure. Checking your images lets you know if you’re on the right path.
Your camera system doesn’t need to be top of the range. With the right equipment, you can create time-lapses from any DLSR.
But be aware that older camera systems might give you more challenges. They may lack the quality needed to produce these stunning videos.
Astro-Lapses (Time-Lapses of the night sky) need high-quality images. A full-frame DSLR (such as Canon 5D MIII) might be the best bet.
This is because a cropped sensor would not do the scene justice.
There are many different camera options for timelapse photography

Best Tripod for Time-Lapse Photography

Tripods are a necessary piece of equipment when it comes to time-lapse photography.
This technique requires your camera to stay undisturbed for long periods of time.
Tripods allow the shot to keep the same frame. This retains that fluidity from one photograph to the next.
Any slight movement will cause flickering and ruin any professional photographic sequence.
Your tripod needs to be of good quality, sturdy and stable, but light enough for you to take on adventures with you.
It all depends on what you are photographing and your budget.
This article recommends a carbon fiber tripod. You’ll find all the reasons why this should be your choice.
But, don’t run out and buy one if you don’t need it. Any tripod will work just as well.
A tripod is a necessary accessory for timelapse photography

edelkrone SliderONE V2 Review

The edelkrone SliderONE V2 is a motorized slider. Its purpose is to move your camera while you film or capture stills for time-lapse projects.
Everything is set up with the app, which helps to make it one of the simplest sliders out there. I tried it combined with the HeadONE motor-pan.
Not only is it easy to work with, it adds that dynamic element to your scene. Read here on how it can help you and your project.

What Is an Intervalometer and How to Choose One for Time-Lapse Photography

An intervalometer is a remote control device that plugs into your DSLR. This allows you to set-up the picture taking aspects of your Time-Lapse.
It helps you set up the intervals between each photograph and how many pictures to take.
There are many options to choose from. Some being from camera manufacturers that fit your specific camera body. Others are from third party companies.
Research your camera system a little. Think about what you want to get out of your Intervalometer.
Before you buy an intervalometer, find out is whether your camera has one already built-in.
If it does, then a separate, external intervalometer is not needed. This is unless you prefer to have a system off-camera.
An Intervalometer is a very handy piece of equipment for Time-lapse Photography

How to Use an ND Filter for Time-Lapse Photography

One of the most important filters in the world of photography is the Neutral Density (Nd) filter.
These are necessary for long exposures and time-lapses. This is true in very light conditions, such as the middle of the day.
This is because an Nd filter takes exposure stops out of what you are photographing. It does this by blocking the light.
The filters can go from 1 stop to 10, and although you can stack them, we do not recommend this.
Stacking Nd filters might be a cheap way to get the desired result. But you can often see them in your frame. they also create unpleasant lens flares.
These are time-consuming to fix in post-production (if at all). They could lower your production value.
This article gives you all the information you need about Nd filters.
Using a Neutral Density filter for Time-lapse Photography can help keep your exposure time down

Camera Settings

Shooting Modes for Time-Lapse Photography

When it comes to modes on your DSLR for shooting time-lapses, you should have a basic idea of the possibilities. The four modes you need to understand are Av/A, Tv/T, B, and M.
M, which is Manual, lets you control every aspect of the camera. This is the setting we recommend for time-lapse photography.
It can be frustrating at first to learn through trial and error. But it is better for you and your photography in the long run.
When it comes to the exposure triangle, you want the lowest ISO as possible, as this gives you the best quality.
You also want medium to narrow apertures, such as f/5.6 – f/16. These allow the biggest area of focus on your subject.
These settings should determine your exposure time. The exposure time is the least important in this aspect.
There are other things you can do to keep the shutter speed fast (see Nd filters).
Showing the possible camera settings for timelapse photography

Motion Blur

When creating your first time-lapse photography project, there will be challenges to overcome.
One challenge might be that you find some of the photographed subjects choppy and staccato. You want to create smooth time-lapse motion. And we can teach you how to do it.
Subjects like traffic or people are the most affected. This is due to the intervals between the photographs being too long.
Photographing at 1-second intervals loses a lot of information between each shot.
So people and cars jump from one position to another. This might be a necessity due to the amount of light denoting what your camera settings are.
This is where ND filters come into play. They cut down on the light and allow you to photograph longer exposures.
This allows more collected information from movement and giving your subject more blur
There is also the 180° rule. The idea is that you should set your shutter speed to twice that of your frame rate.
For example, if you are shooting 25 fps (frames per second) then your shutter speed should be set at 1/50. 200 fps equal 1/400.
What this does is create a more natural look during final playback. If you were just photographing one image at 1/50, the subject would be blurry and uninteresting.
As we are working with 24 fps, the single image doesn’t matter. It’s the fluidity that makes the final outcome powerful.
This article gives you great advice and examples to follow for stunning images.
Finding the correct balance of motion blur to your Time-lapse photography

Best Memory Cards for all Photography Budgets – CF | SD | MicroSD

One of the most overlooked areas of photography is using correct memory cards for your project.
If you don’t need to take a lot of photographs in a very short period of time, you can get away with most memory cards.
However, some cameras need high-speed cards to be able to record. Or you’ll find some filming or photographic options are unavailable.
The speed of your memory card does matter. Especially in the field of time-lapse photography.
You will need something that records all visual information. Photographs come thick and fast. Faster cards process faster, so they can move on to the next shot.
With a slow-speed card, you might find that the time it takes to record and write information is longer. This is true while photographing with 1-second intervals.
This has the potential to stop your time-lapse dead and send you home. Or, gives you junk when you come to process the images into a time-lapse photography video.
Whether using a Micro-SD card, an SD card or Compact Flash card, there are different options to be aware of.
This article runs through all information on what to look for when buying.
A collection of the best and fastest memory cards to use

How to Shoot Timelapses

5 Best Subjects for Time Lapse Photography

While researching the subject of time-lapse photography, you will find many different possibilities. The options are endless.
Anything moving has the potential to be a time-lapse. There are beautiful examples of cities, landscapes, and even germinating seeds.
They all shine through this time-lapse process. Find something that interests you. This article gives you five examples of how you can start, and get the hang of things.
Try them before you start. Don’t waste that 4k time-lapse from an expensive helicopter ride.
Shooting a time-lapse photography project from a high-vantage point

How to Calculate the Number of Frames

Every time-lapse project is different. The number of frames and the speed of your intervals relies on the scene.
The faster the changes, the shorter the gap should be. If the movement lasts a long time, consider having a long project with a high number of frames.
A building project taking place over many years will need one number. A shot of cars on a highway at night will be very different.
A rough idea would be that fast moving clouds would need around 1-second intervals.
Slow moving construction projects could be one image every 15 minutes.
The number of photographs you need might depend on your finished video.
If you need a 30-second clip of moving clouds, you will need (1-second interval @ 25fps) 25 pictures for every second of footage. 25fps x 30-second clip = 750 exposures.
These will take (750 seconds/60) 12.5 minutes to photograph.
Trial-and-error plays a big part here. But this article gives a great idea to help you get started and very close to the perfect interval exposures.
Time-lapse photography interval calculations

Long Exposure Time-Lapses

Long exposures are utilising a very slow shutter speed. You capture one photographic scene, where the shutter stays open for a period of time.
A time-lapse is taking many photographs of the same scene and creating a video from all the captures.
It is possible to make a time-lapse out of long exposures. The benefit here is it can help create a more fluid project.
The transition between the images becomes smooth and lowers possible flickering.
If you are shooting in the daytime, you might find areas go from harsh sunlight to shade.
This can play havoc with your exposure time and can also create light flutters.
When you are going from a well-lit area to a dark one very fast, it will create a distracting effect.
Here, the article goes through why long exposures are great to use in your time-lapses. It also gives you stunning examples of the possible effects.
Using the beach for great long exposures is a great way to make stunning photographs

Ten Tips on What to Do for Time-Lapses

The ten tips here cover some basic ideas, such as making sure you have all the necessary equipment.
Wise words for all kinds of photography. Others, such as making sure you know about your camera settings and how to frame, are also essential.
There are ones you might not have thought about yet. Such as using live view to photograph.
This allows you to halt the mirror dropping and raising in every photograph. It also helps with framing and especially focusing.
Go through this article and make sure you have all the equipment you need. It will ensure you have given everything some thought.
Using rock formations is a great example of time-lapse photography

Ten Tips on What Not to Do for Time-Lapses

There are ten tips on what you should do for time-lapse photography. There are also ten things that you shouldn’t do.
Some of these are very obvious; don’t shoot in JPEG being the most important.
Others concentrate more on the time-lapse itself. They do not focus only on the moving subject.
Each time-lapse needs correct and creative framing. The movement alone will not be interesting enough.
Others tips focus more on the final stage of the project. One thing to not do is overdo the manipulation or retouching.
This can take away from the image itself and make it too fantasy-esque.
Another would be NOT to use the music of Sigur Ros, or use Youtube. This is because of bad compression rates.
This article is very informative. Especially as it is written by a time-lapse photographer with a lot of experience.
Read it to get more out of your time-lapse photography.
An over developed time-lapse photograph can be unattractive

How to Make a Cinemagraph

Cinemagraphs are a combination of video and photography. But almost the reverse of a time-lapse.
They are still images that have moved within them. But they aren’t still images or videos.
They embrace the world of gifs, where the name came about in 2011. It is an animation in a very creative sense.
They are made using any environment that has movement. They are best made where some movements freeze in time, and others are left to run wild.
A great example would be a flamboyant dinner party in full swing, but the only thing moving is wine pouring into a glass.
Cinemagraphs, like time lapses, are very easy to get wrong. And they can often be overdone or retouched too much. Try to be subtle and low-key, and use your creativity.
Here you can find an in-depth tutorial on how to go about this cinematographic process.
A cinemagraph of reeds and water

How to Shoot iPhone Time Lapse Photography


10 Best Apps for Time-Lapse Photography

What could be better than creating these time-lapses on your phone? You don’t need to worry about memory cards, expensive wide-angle lenses or complicated batch processing.
There are already ways to capture time-lapses on the last few iPhone releases. But if your smartphone doesn’t have this option, check these apps.
There are free and paid versions, both for iPhone and Android users. This means you can try them out before you commit.
Go through the list here and start practicing.
Time-lapse app Lapse-it application for your smartphone

Other Useful Applications

The Photographer’s Ephemeris Review: Why Use TPE?

This great little app started off for landscape photographers. It gave important information on the positions of the sun and moon.
This is great for planning a trip, to see the times of sunrise and sunsets so that you don’t miss a thing.
Now the app has a 3D version. This allows you to see how the sun/moonlight affects the landscape anywhere in the world.
It will show you when and where shadows will fall, leaving other areas well lit.
This means that you can plan and organize your time, in a country you haven’t arrived in yet.
It will even tell you the position of the milky-way in comparison to the landscape. This will help you understand where best to photograph.
This article gives you all the information on what it can do and where you can get it.
The photographers Empheris smartphone app to help you with your time-lapse photography

Time-Lapse Calculator and Why You Need One!

The basic idea of this app is to calculate the combination of interval and amount of shots.  This gives you the perfect chance to create a video of a certain length.
For example, if you wanted to capture traffic at a busy intersection to create a 1-minute video.
If the frame rate was set at 30fps and you wanted 2 seconds between shots, this would take 90 minutes to capture.
You can even save presets to go back to time and time again.
The interface is a little crude. But you aren’t using it because it looks nice. You are using it to further your time-lapse photography.
Time-lapse photography calculator for figuring out how many images to photograph

DSLR Phone Remote 

Was there a time where you wanted to photograph outside? Did you need a remote device to control and fire the shutter?
You no longer need a dedicated cable release or shutter control plugged into your camera, thanks to your phone. That’s right – your phone can now act as a remote.
Handy for those times where your camera is out of reach, or you are worried about knocking it over.
This is a real danger when it comes to long exposures or time-lapses. Especially where a whole project can be ruined by any shake or movement.
One thing you need for this free app. A DSLR and an Android phone with an IR (InfraRed) Blaster is all you need.
This is what allows your phone to communicate with your camera.
There are other cool features this app will allow you to play with, but we shall leave them for you to find. Go grab it today!
A DSLR can be remotely used by using an app on your smart phone

Types of Timelapses

Capturing Star Trails

Photographing star trails is a popular scene in the world of time-lapse photography. It reminds us of the universe above us, and how small we all are in comparison.
It is easy to forget that the sky is very dynamic. What we see with our naked eye is only a fragment of what is happening.
To photograph the night sky with the light trails, you just need to take a long exposure. That’s the basic idea.
You will, of course, need help from camera equipment. A wide angle lens and a tripod are essential.
Other things, such as mobile apps can also help you plan. How and where to capture these images are the most important aspects.
This comprehensive guide will get you eager to photograph the night sky as soon as possible.
Star trails in the sky photographed over a rock formation

Long Exposure vs Time-Lapse

A long exposure is just one image, taken over a long period of time.
Time-lapses are many photographs taken over a long period of time. They are then stitched together to create a video.
Depending on what you are photographing and want to achieve, you will need to make a choice between the two.
Both styles have different qualities. They bring different themes and focuses out of the captured scenes.
There are benefits to both workflows. Time-lapses will have a smaller amount of noise and will be easier to retouch afterward.
Star trails photographed over a windy road adds two levels of time-lapse photography

Holy Grail Time-Lapses

The holy grail refers to a time-lapse photographic project that goes from day to night. Its name comes from its difficulty.
You’ll find there are so many elements that need to be addressed. Plan according to the results.
There are easy ways to try this challenging project. If you set up your camera, it will do most of the work for you.
The biggest problem to overcome is flicker. These are discrepancies between shots where something changes very quickly.
The onboard light meter can have a difficult time. Its job is to balance out all the available light sources, which you’ll have many.
Think of cars, traffic lights, neon lights, and street lighting. Sometimes it causes the light to change in ‘exposure steps’ rather than gradual.
This article goes through everything you need to know about these time-lapses, so you can try them out.
A holy grail time-lapse goes through the day and into the night

Post-Processing

Batch Processing Raw Files

So you have taken a sequence of images over a designated time-frame and now you are ready to create a video out of them.
It’s that simple, right? During the post-production stage of the time-lapse project, there are a few basic elements you need to address.
They can change how your final product will look like.
Colour-correction and de-flickering are two aspects that you will need to think about.
The great thing about photographing the same place many many times is that you can ‘batch process’ images.
Since the settings didn’t change much, you can edit many if not all, the images at the same time.
This article shows you how to use Raw files. And how to go through the huge stack of images.
Using Camera raw to batch edit your images

How To Make a Time-Lapse in Photoshop

There are a few ways you can create your time-lapse after taking all those images. This list includes Photoshop.
You can use Camera Raw to edit your images. Or go for Lightroom and then import them into Photoshop.
Navigate to the first image of the folder. Click the ‘image sequence’ checkbox at the bottom and import.
Photoshop will do all the work for you and import the rest of the images, creating a sequence.
You can then decide on the frame rate. Continue to work out all the details of what you want the final product to be like.
This system will only work if all the images are in a sequential numbered format. I find it best to leave the file names to the camera.
Skipped over areas can leave images blank and create flickering in your flow.
Try it out and see if creating time-lapses in Photoshop is for you.
Creating a time-lapse in Adobe Photoshop

How to Create a Time-Lapse Using Lightroom and LRTimelapse

Lightroom is one of the easiest and fastest ways to work on your images. This is great for time-lapses.
You will have many, many images (500+), which Lightroom allows you to batch process at a click of a button.
To create a time-lapse video, you will need to download a time-lapse video template. This will allow you to work with 15, 24 and 30 fps.
Using the slideshow module, you can import the sequence of images. Decide on the frame-rate, export and you’re done.
It is simple, and a no-nonsense way to go about finishing your project. But, Lightroom will never give you the same control over your images like Photoshop.
This is a great way to practice your time-lapse photography. You’ll see a finished product fast.
Using Lightroom for your time-lapse photography projects

Other Techniques

What is a Hyperlapse and How to Make One

A Hyperlapse is a moving Timelapse. Timelapses are static images, photographed from the same point and perspective.
Hyperlapses use the same equipment – your camera, a tripod, and an intervalometer.
You start by taking one photograph, using live view to focus, which should be set to manual.
After taking one photograph, you move the tripod, reframe the scene and shoot again. This continues for as many images as you want; move and shoot.
The smaller the movement between the tripod jumps means more fluidity. It is better to have something less choppy.
The processing happens the same way as time-lapses. But now you have created a high-value time-lapse without expensive motion capture devices.
Photographing a Hyperlapse by using a tripod, camera and intervalometer can have amazing results

Tilt and Shift Lenses

Now you have a good workflow with your time-lapses, and you are ready to move on to the next level.
There are other pieces of equipment you can use to create interesting time-lapses.
Tilt and shift lenses are special lenses that allow your camera to act like a Large Format camera.
The benefit of this is that instead of only focusing on one plane, you can focus on two.
When you focus using your DSLR, you aim for one point in the distance. This comes down on how far your camera is away from the subject.
With the tilt and shift lens, you are also able to manipulate the focal plane. This allows you to create areas of focus, both horizontally and vertically.
These can be used to make landscapes and scenes look miniaturized.
You can replicate this technique using a few simple tips. This article gives you everything you need.
Tilt and Shift within time-lapse photography make scenes look miniturised

Time-Stacking Images

Another way to create something similar to a time-lapse photograph is to time-stack.
This also involves taking a lot of images over a designated period of time. But instead of turning it into a video, you layer them into one image.
The end result is somewhat halfway between a time-lapse and a long exposure.
These can give you very interesting, creative effects. Static subjects stay still and sharp, and the movement in the images comes out as very abstract.
Read this article on how to use this idea with Photoshop and layering to start creating them today.
Using image stacking in Photoshop

Using a Drone in Time-Lapse Photography

One of the most creative ways to create time-lapses is by using a drone.
Creating a time-lapse from above looking down is a very powerful way to show the life and soul of a city.
As it comes from an unusual perspective, and also in motion, you can end up with something very special.
To produce something like this, you will need a drone. Especially one capable of photographing many images over a period of time.
We have already covered camera settings such as what ISO to use and the benefits of using raw over JPEG.
First, you will need patience and practice. You’ll also need a good working knowledge of your drone and all permissions surrounding its usage.
Using a drone in time-lapse photography

Motion Control Devices

There are great pieces of equipment designed to help you get the best from you and your time-lapses. Motion control devices are one example.
These are devices that control the motion (duh!) of your camera when you take images for your time-lapse project.
They can be little boxes, sandwiched between your camera and tripod. They turn your camera while it photographs.
This allows a smooth pan over an area to add that extra level of interest in your project.
The Syrp Genie Mini is just one of the possibilities out there for motion control.
Go through this article. Look at the examples of what your project can get out of these little, magical devices.
Motion Control Device for time-lapse photography being controlled by a smartphone app

Using Bramping

Time-lapses can be difficult to shoot. Especially more so when trying to photograph a holy grail time-lapse. Or rather, going from day to night.
There is another way, with something called Bramping. This is short for Bulb-Ramping.
The idea is that as the exposure changes in your scene, your camera changes accordingly. It uses the Bulb setting on your camera.
An intervalometer control can help here, as it gives you more options to play around with.
By using this system, with the Bulb setting, your images will have a fluid light to dark transition. All this without annoying flickering.

Share this article.

Friday, October 18, 2019


Use this link to access this Photography freebie:

 https://expertphotography.com/lg/p11-photography-for-beginners-sharp-photos/?inf_custom_source=sidebar

How to Crop Photos for Perfect Results


Related course: Photography for Beginners
You might have a photo you love but can’t add to your portfolio. The composition might not be great, the subject is too far away, or there are too many distractions in the shot.
Knowing how to crop a picture in Photoshop or Lightroom will help you fix most, if not all, of these issues. Here’s how to crop photos for best results.

Why Is Cropping Important?

Photo of gondolas in Venice at sunset
Cropping provides you with a chance to fix seemingly impossible flaws in an image. You can save hundreds of photographs by cropping them the right way.
For example, if you have a candid photo of an animal running in the distance, you can crop it to make the animal stand out. With the right technique, you’ll be able to print and share that photo. And you won’t have to worry about low quality.
Cropping also lets photographers express themselves creatively. Some cropping techniques, such as circular crop, are a fun way to experiment with design.

How Much Cropping Is Too Much?

Photo of a hand reaching up with sharp light in the background
A common misconception about cropping is that it instantly ruins the quality of an image. If you approach your photo shoot the right way, you’ll have enough room to crop. And you won’t ruin the resolution of your photos.
Cropping does have a limit.
The higher your resolution, the easier it will be to crop images and not compromise their quality. This doesn’t mean you have to buy an expensive camera, but it does mean that you need to be aware of your limits.
If you’re using a standard iPhone with an 8-megapixel camera, your image dimensions will be around 2400 x 3600. This is enough to print photos, make decent photo books, and create wall decor.
Even if you crop your photos a lot, you’ll still be able to print and share them online!
If you use a professional 20-megapixel camera, you’ll have even more freedom to crop. And then you won’t be worrying about image resolution.
Your goals are another thing worth keeping in mind.
If you want to sell stock photos online, you need to be aware of the minimum image resolution of your agency. Make sure you know the minimum resolution for any given website or printing size.

Shoot in the Highest Quality to Guarantee a Smooth Editing Experience

Photo of an elderly man having breakfast at a small café
This might seem like a given. But it’s something that many photographers overlook during a photoshoot. Make sure your image resolution is as large as possible.
If you plan to color correct or manipulate your photos in any way, shoot in RAW mode. This will provide you with uncompressed files. These will make your editing workflow much smoother.
If you’re using your smartphone camera, use a camera app with advanced features. This will give you more control over your images. And it’ll give you more photos to choose from when you get to the cropping process.

Make Sure You Pay Attention to Compositions During Your Shoot

Portrait photo of a girl
In general, your photos already need to look good before you start editing them. Your aim is to focus on creating a decent composition.
You can then use cropping to get creative, remove distractions, or emphasize details.
You’ll need extra space around your subject to crop in different ways. Never get too close to what you’re photographing. A small distance between you and your subject will allow you to crop where necessary. And you won’t cut off any limbs or create awkward compositions.
You might have imperfect candid photos that you want to keep. Don’t delete them because the composition looks off. Most of the time, you can fix even the most complicated mistakes.

Avoid Dull Photos by Not Centering Your Subject All the Time

Close up photo of a cat
You don’t need to center your subject in every photo. Off-center subjects tend to be more eye-catching, while centered ones are straightforward. Both can work well in the right circumstances.
If you find that your centered composition looks too dull, you can crop out a part of the image. This might create the illusion of extra space and add depth to your image. It can give your eyes more room to explore every part of the photo.
In the photo above, I cropped out the top and left sides to bring attention to my cat and emphasise the shadows. The darkness at the bottom makes it seem like something exciting is about to happen.
If the photo were centered, this negative space wouldn’t stand out as much and there would be less tension.

Create Balance by Cropping out Distractions

Portrait photo of a girl with a cat on her shoulder
If you want to bring attention to expression, pose, or shape, you’ll find the crop tool very useful.
You can start by cropping out distractions. These can be people or objects, that don’t complement your story. Make sure you crop out only the things you can’t remove manually.
For example, I cropped out the fairy lights above. I did this to create a sense of continuation and to put a spotlight on my cat and myself.
Removing the lights using the Clone Stamp tool wouldn’t have been as effective.
Here’s a general rule of thumb. If you like your composition but want to remove a few distracting elements, don’t crop them out.

Focus on Details by Cropping 80% of Your Photos

Montage of portrait photos of a girl
Creative photo cropping techniques are perfect for telling a story. One of these techniques involves cropping almost your entire image to focus on a specific detail.
Keep in mind that extreme cropping like this will limit your printing options. When you crop photos this way, keep the original file in a separate folder in case you want to do more with it later.
Portrait photo of a girl in brownish hue
You can use cropped images in double exposures, diptychs, or photo collages like the one above.
If you’re photographing people, you can get extra creative by cropping out half of their face. This won’t be as extreme as cropping 80% of your image and will provide you with a new perspective in portraiture.

Create Intimacy With Tight Cropping

This works great if you’re photographing a person or an animal. You can intensify their expression by tightly cropping your photos. This means cropping out anything that isn’t a part of their face.
The lack of distractions will make it easy to notice details that are often overlooked. These can be freckles or eye color.
Black and white portrait photo of a girl
Tight cropping is sometimes better than photographing your subject up close. Some would even say that it’s a cheaper alternative to using a zoom lens. Tight cropping won’t emphasize the wrong details or distort an image. It’s perfect for close-up portrait photographers.

Understanding how and when to crop photos is a superpower.
Using simple techniques, you can transform dull photos and emphasize details. You can make your images look more eye-catching, all with the help of one tool.

Share this article.

Thursday, October 17, 2019

SmugMug Review: Is It the Best Hosting Site for Photographers


Creating a website for your photography may seem overwhelming at first. There are so many options out there and everyone seems to have different opinions. One of the most common hosting providers is SmugMug.
This SmugMug review will take you through its options and interface so that you can consider if it fits your needs.
Keep in mind that the host that you choose for your website depends on a few key things. You have to consider what you need the website to do (sell prints, market your services, schedule mini-sessions, portfolio only), ease of use, and cost.
Note: As a disclaimer, I’ve been using Squarespace for years. Before that, I used WordPress. I’ll be exploring SmugMug and its possibilities, seeing it through the lens of how it compares to the other hosts I’ve used in the past.
Overhead view of a photographer accessing smugmug on their laptoop - smugmug review

Basic Setup and Customization

SmugMug subscription plans offer 4 different package levels. The difference is in how many options they offer you. If you’re starting out and want a place to have nice galleries, SmugMug plans start with a basic one for $4 per month.
If you’re a professional there’s a package that offers the most options and starts at $30 per month. This allows you to offer price lists for digital, paper, or fine art prints.
SmugMug does a great job of laying out the specifics of what you do and don’t get with each package. You’ll have an easy time comparing the four.
They even add in a final column to show you which features you’re currently using. This can help you decide which package is the best fit.
Screenshot of the smugmug pricing plan - smugmug review
I started a free trial and began to set up my new website. The initial walk-through is very user-friendly. It guides you through adding new photos, selecting a theme, and beginning your customization.
The customization panels can be a bit tricky at first. They take some getting used to. During my trial, I accidentally changed my homepage gallery somewhere along the way. I was unable to get it to resort back to a slideshow after that.
SmugMug does seem to offer more options for customization than other theme sites on Squarespace or WordPress. Without needing to resort to coding.
You can add blocks of content such as galleries or text by simply dragging and dropping into place. And then you can move the blocks around quite freely. The themes they do have available are simple. They can apply to a variety of genres of photography.
If you’re looking to do a site with a fair amount of writing mixed in with photos, you’ll need to a bit of customization along the way. The templates are set up to fit image-heavy portfolios.
The existing parts of a theme can be customized in terms of colors, sizes, margins, fonts, and transitions. Fonts offered are fairly varied, but color options felt a bit limited.
Branding can be customized as well. And most of SmugMug’s branding can be deleted or minimized. I couldn’t find a way to erase the SmugMug name in the foot. Nor in the shopping cart during check-out.
As far as the custom domain goes, you can connect to a domain you already own. Or you can purchase a domain directly through SmugMug.
If you don’t have a unique domain, then you can use a free one that has the SmugMug name. It will be www.yourname.smugmug.com.
Screenshot of using smugmug

Selling on SmugMug

SmugMug lets you offer prints, whether digital or physical. They work directly with four printing labs (BayPhoto, WHCC, EZPrints, Loxley Colour). This easy to offer drip shipped prints direct to clients!
During busy seasons or for mini sessions, you can offer a quick, affordable option to clients. And it’ll require minimal labor on your part. Once photos are set up in a gallery and the price list is created, it can be an automated process.
With the three smaller SmugMug packages, you use one universal price list for all galleries on your site. You can customize this price list. But you can’t assign different ones to different galleries unless you’re in the professional plan.
Setting up the price lists is relatively direct, although it wasn’t as simple as I would have liked. SmugMug shows you a base price. Then you can direct it to do a specific percentage profit upcharge. And then it creates a final rate based on the 15% commission that SmugMug keeps from each sale.
For example, if there’s a base price of $1 for a print and you ask for a 400% mark-up, then the rate you need to get is $4. Since SmugMug keeps 15% of all sales, though, the final product price will be $6. The exact amount will also be determined by how much you tell SmugMug to round the prices up. This can also be set within the price list.
Having the numbers broken down this way for you can be a great benefit. But it can also be quite confusing when first setting up the price list.
It does do a great job of keeping it clear that you need to account for the 15% fee, though. This is important for all businesses to note.
Screenshot of editing a pricelist on smugmug
SmugMug does do a fantastic job of offering loads of options for selling in different ways. For example, you can create packages of products to offer instead of single products.
If you want to create a deal that includes a specific combination of items, you can customize it. And you can link it to certain galleries.
Also, you can include options for boutique packaging of products and custom branding on deliverables. Options like these are ideal if you do portraits, weddings, or events!
Note that some of these options are only available with the professional package. Comparing the package plans to fit your exact needs is crucial. Also, the various plans allow you to upgrade as your business grows.
Overhead view of a photographers home office - smugmug review

Other Notable Features

It’s worth noting that there are a few other features either present or lacking that might affect your decision. SmugMug doesn’t allow for a way to create a blog within your site. You would need to connect to a third party site for the blog itself.
You can create a custom page and add text blocks to it if you want to just have a few posts here or there. But if your goal is to regularly share written posts then you’ll need to connect to a third party blog.
If you journey your travels along with the photos, or if you showcase each wedding you photograph, a photography blog needs may be something to consider.
Another small quirk about SmugMug is that there’s no custom URL you can create for a contact form. It’s only available in the form of a pop-up window.
Silhouette of a photographer setting up a camera on a tripod at sunset - smugmug review

Creating a new website can be overwhelming. Options are everywhere and seem to all offer the perfect solution. SmugMug is a great option hosting for your website, depending on your needs.
It offers lots of options. And it is especially well-built for selling via online galleries. The selling options of custom price lists, boutique packaging, fine art prints, product package offers, and event offerings are all ideal for commerce.
While there are lots of ways to customize just about everything, I didn’t find the interface to be very user-friendly. This made taking advantage of the customization a bit difficult. Squarespace, for example, I find to be much more intuitive and user-friendly. A “websites for dummies”, so to speak.
Wordpress can be quite complicated and difficult for creative types like photographers to maneuver.
SmugMug feels like it’s somewhere in between those two. It’s simple, yet not always intuitive. Cost-wise, SmugMug is reasonably priced if you sell regularly through it. Otherwise, it’s a bit high in cost.
My overall recommendation is that SmugMug is a wonderful host for your site if you’re looking to create a portfolio site only. With low costs for the basic plan, you can have a website for under $50 per year!
If you’re looking for a full professional site that has more capabilities, I highly recommend taking a close look at your needs before committing.
For professionals, I only recommend SmugMug if you sell prints and product regularly and in volume.

Share this article.
Best Free Photo Editing Software 2019


Our Top 3 Picks

paint.net-best-free-editing-software

3. Pixlr X

Price Range: $$$
Our Rating:
paint.net-best-free-editing-software

2. Darktable

Price Range: $$$
Our Rating:
paint.net-best-free-editing-software

1. GIMP

Price Range: $$$
Our Rating:
Editing software is essential for getting the most out of your image. Capturing the scene is only one step towards a perfect image. You’ll want to tweak the exposure, contrast and/or other areas.
Adobe products shine when it comes to editing photos. But, they are expensive and have a steep learning curve. Especially if you do not need all the bells-and-whistles they put forward.
Here is our concise list of the 12 best free photo editor software in 2019. Perfecting your photography shouldn’t cost the earth.

Price Range: $$$

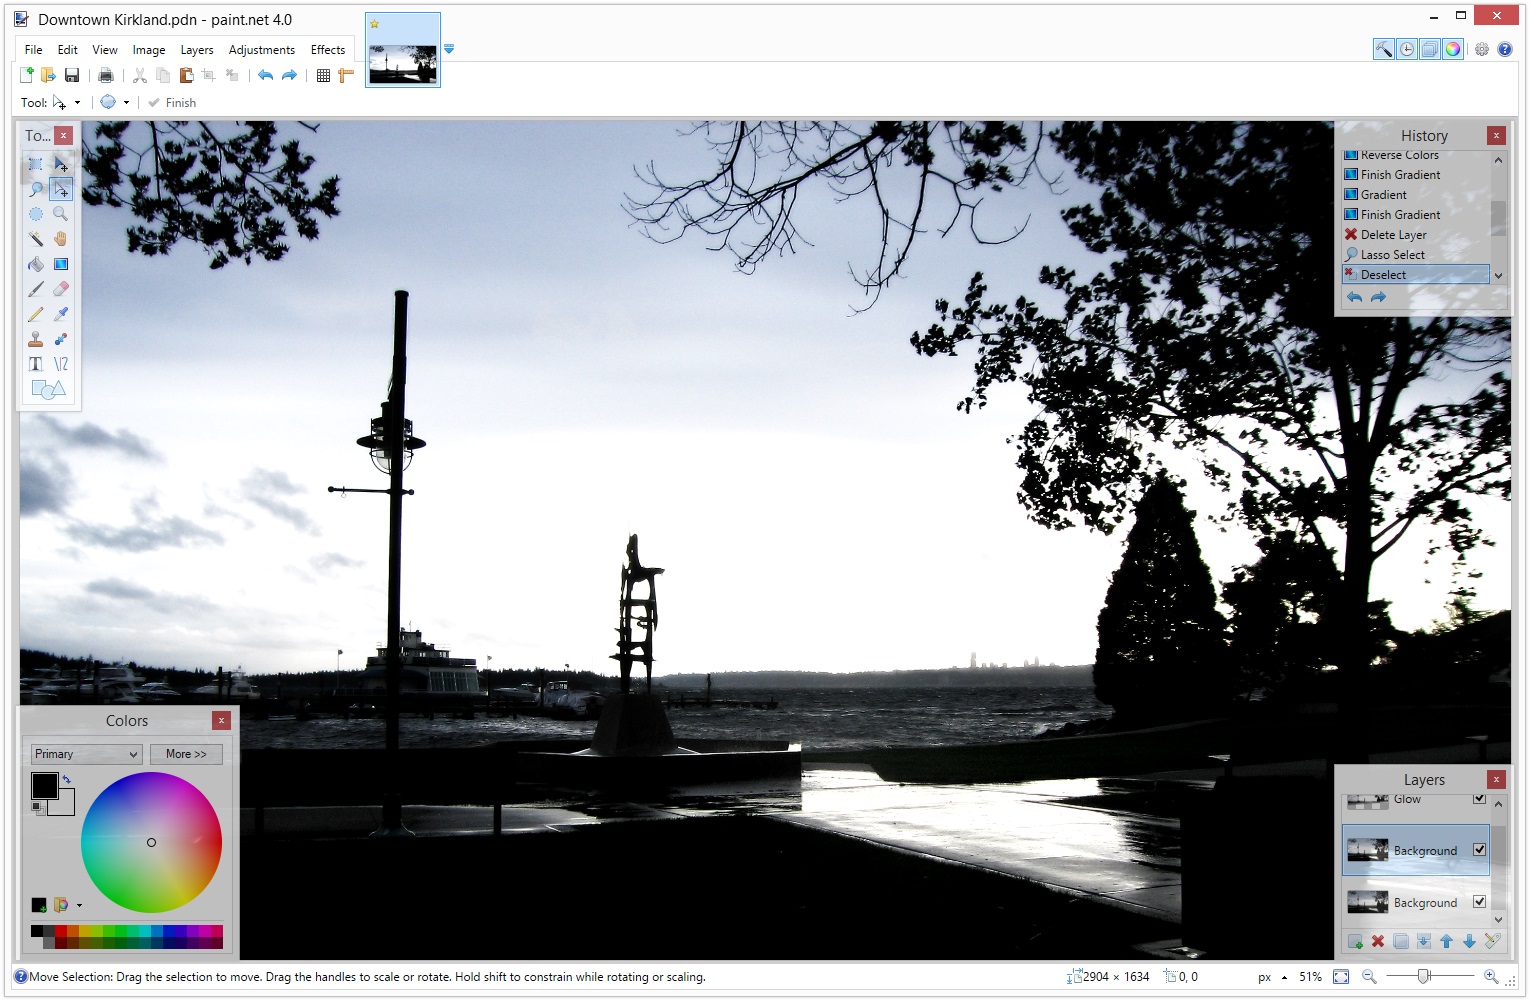
12. Paint.NET

paint.net-best-free-editing-software
  • Plugin support
  • Layer and filter adjustments
  • 3D rotate/zoom function
  • Not as powerful as other photo editing tools
The best free photo editor software is the simplest. With Paint.NET, simplicity is key. What it means is the photo editor isn’t only free but quick and easy to operate.
It is a perfect photo editing tool to use for those minor changes you need. No point using the processing power behind GIMP, when all you need to do is crop an image.
The name doesn’t sound all that fancy. Although it sounds like Microsoft Paint, it is a dedicated photo editor. Albeit a basic one.
What you’ll find are photo editing tools such as layers, history, an array of filters and plugins from their enthusiastic community. You’ll also notice a great 3D rotate/zoom function.
It won’t have every feature you can dream of in a photo editor, but if you don’t need more, this is perfect for your needs.
Our Rating:
Price Range: $$$

11. Ashampoo Photo Optimizer 2019

paint.net-best-free-editing-software
  • Clean and tidy Interface
  • Single-Click optimization
  • Manual controls
  • Batch processing for flip and rotate
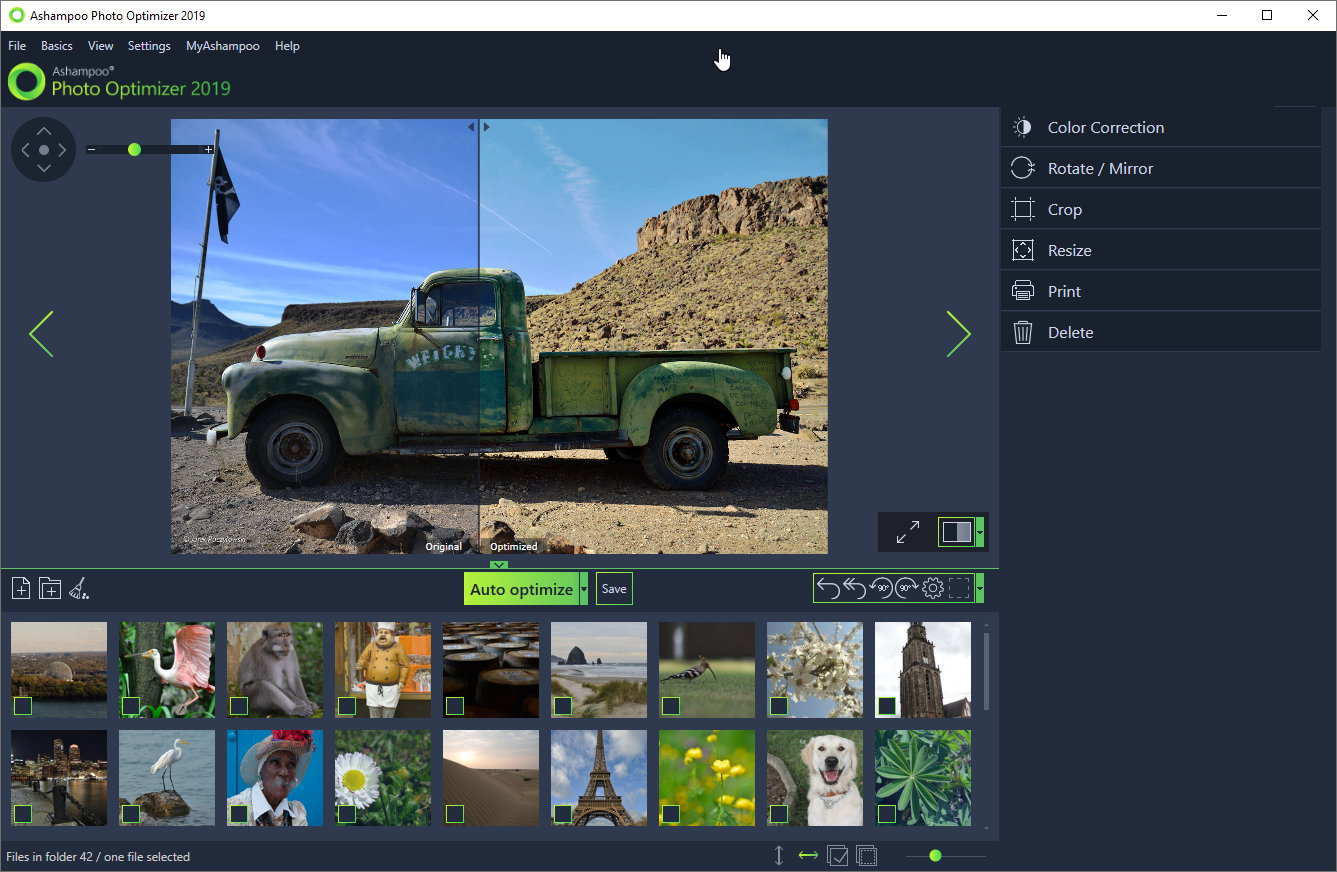
If batch processing photos is your thing, then check out Ashampoo Photo Optimizer 2019. With a clean interface, you won’t be hindered by ads or an untidy, overabundance of tools.
To begin, importing images is simple. Once added, you can select as many as you need to rotate or flip. This saves you valuable time when editing photos. You can also edit each image individually, as the software includes a single-click optimization tool.
This tool is something that works well for landscapes but falls short for topics such as portraits. Manual adjustments are made through a few sliders, which is more than enough for most of your photo editing.
The one thing you may notice when you edit a photo is that the changes can’t be applied across a set of pictures in one go. For quick corrections, there is nothing better.
Our Rating:
Price Range: $$$

10. Digital Photo Professional for Canon

paint.net-best-free-editing-software
  • Canon Raw conversions
  • Lens corrections
  • No local adjustments
  • Canon only
Despite being a free photo editing software, this program is for serious photographers. Specifically for Canon photographers who shoot Raw images and wish to convert and work on them.
This is obviously a disadvantage too, to all those who work with other brands, such as Sony, Olympus and of course, Nikon.
You won’t find all the bells-and-whistles from other photo editing software options. But, it does make excellent use of sharpness, which is essential for great photography.
The noise control aspect is also something you’ll benefit from. In these two aspects, some users have noted they are better than the Lightroom/Adobe Camera Raw photo editor package.
If you are a Canon user, this software is fine-tuned for your cameras and lenses to bring you the best possible images. You can’t get more Canon specific than this photo editor.
Our Rating:
Price Range: $$$

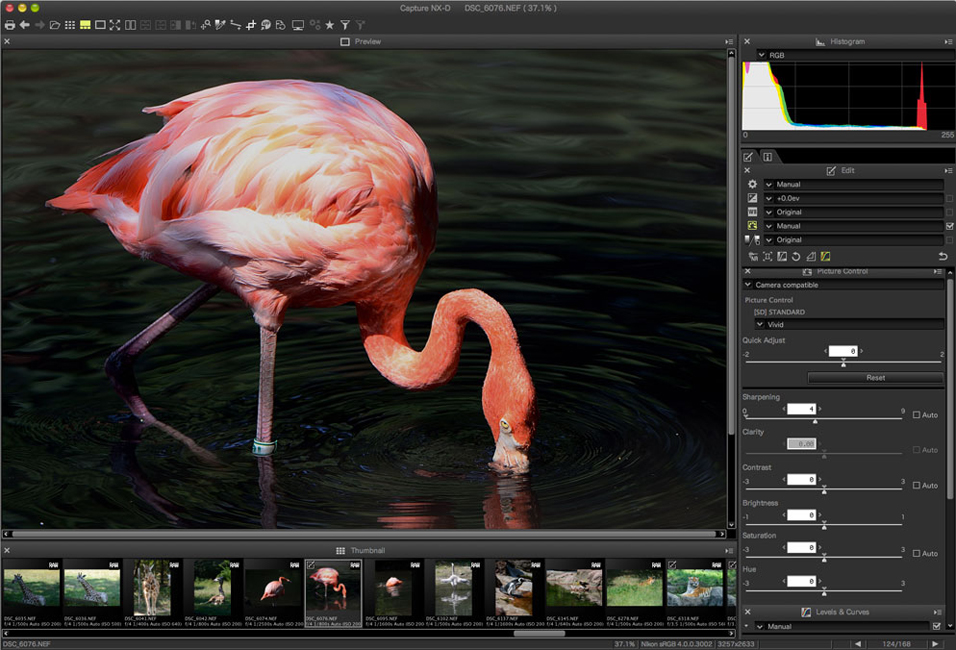
9. Nikon Capture NX-D for Nikon

paint.net-best-free-editing-software
  • Matches Nikon Picture Controls
  • Comprehensive image adjustments
  • Local adjustment tools
  • Nikon only
Many photographers are turned off by specific photo editor software, such as Nikon Capture NX-D. I’m not sure why. If you shoot with the same brand of camera, your images will receive a lot more specific fine-tuning.
Ok, so this photo editing software is a little clunky, and perhaps a little dated. You won’t find all the features of a ‘heavy’ photo editor. After all, it is free photo editing software.
But if you have a Nikon camera, then you will benefit from this free photo editor. It knows how to deal with your images in a true Nikon light through Raw conversion and enhancements.
One of the biggest benefits of this picture editor is that it matches the Nikon cameras’ own Picture Controls. On top of that, you’ll find the white balance settings also match exactly.
Some photo editor programs give you hassle when trying to convert NEF files (Nikon’s own Raw file format). But, this comes as standard here and only offers local adjustments that you’ll actually use.
Our Rating:
Price Range: $$$

8. Capture One Express for Sony and Fujifilm

paint.net-best-free-editing-software
  • Brilliant Raw conversions
  • Cataloging and included tools
  • Hefty adjustments
  • Only for Sony and Fujifilm
If you own either a Sony or Fujifilm camera, this free photo editing software is for you. As many of you know, Capture One is the flagship editing software from digital medium format company Phase One.
This professional picture editor company makes a ‘free’ express version, specifically for these two brands. You might ask, why use this rather than the software that comes bundled with the cameras?
For one, Capture One is known for their image software, whereas Sony and Fujifilm are not. The Raw conversions that come with Capture One Express are brilliant. On top of this, the wide range of necessary image enhancement tools is wide-ranging.
You also get organizing features through the use of the software’s catalog system. This makes it easier to sort through and work on each image properly.
This might be all you need, but if you find you need more, you can purchase the Pro version for local adjustments.
Our Rating:
Price Range: $$$

7. Canva

paint.net-best-free-editing-software
  • Large selection of templates
  • Free cloud storage included
  • No editing tools for fine-tuned editing
  • No need to download
Canva is a free online photo editor, meaning you don’t need to download anything to your desktop. But, as it saves you space, it might limit your access when away from your static hard drives. Luckily, there is free cloud storage, although limited.
This web browser free editor software is a perfect place for changing your images into gifts, either for yourself or family and friends. Cards, posters, and invitations are easily created if you don’t opt for social media stylings.
You won’t find advanced tools here. For clone brushes and smart selectors, you’ll need to look elsewhere. But, you will find sliders covering an array of adjustments.
Applying tints, adding vignettes, sharpening and adjusting brightness are just a few things you can use.
There are upgradable options other than free software. Canva for work comes in $12.95 and gives you access to thousands of stock images and unlimited storage. All of which is handy for your business.
Our Rating:
Price Range: $$$

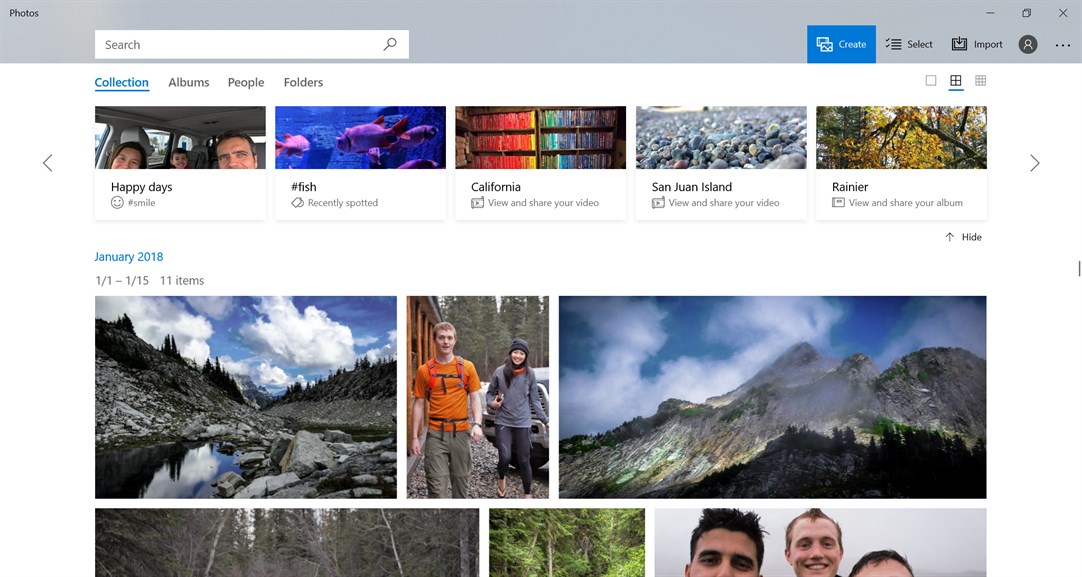
6. Microsoft Windows 10 Photos

paint.net-best-free-editing-software
  • Image organizer
  • Free for Windows 10 users
  • Video editor
  • Perfect for quick fixes
Apple has its own photo editing app, namely Apple Photos. Microsoft is no different from its free photo editing software. You’ll find a fun-to-use platform that lets you use basic photographic fixes. Image effects are possible, and so is adding text to your pictures.
If you need a little organization or a simple tool for adding quick adjustments or enhancements – this is the program for you.
Cropping, rotating, adding brightness or contrast are all possible. But, if you are more serious about photo editing, you would benefit from a more powerful tool.
Our Rating:
Price Range: $$$

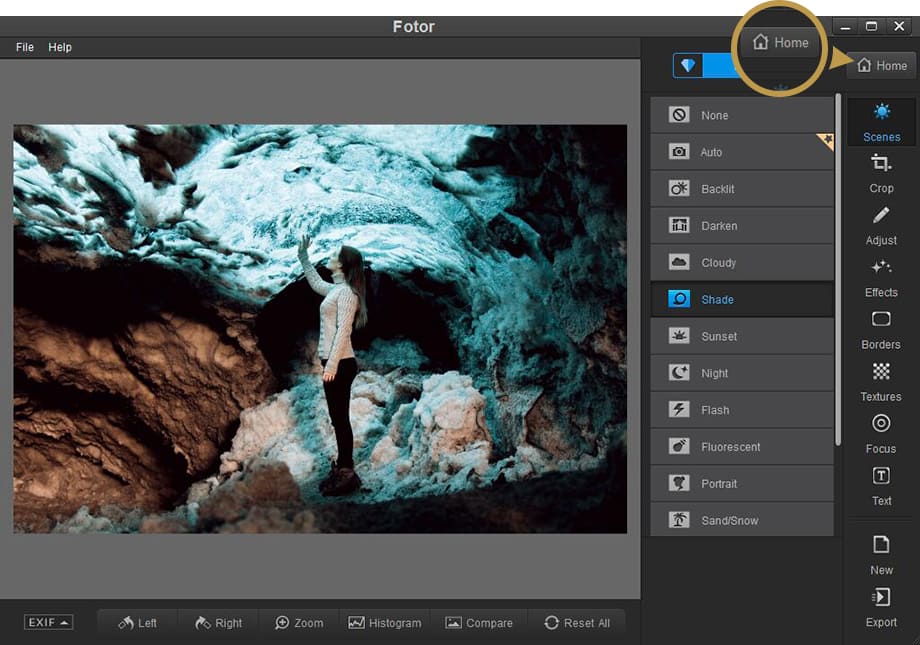
5. Fotor

paint.net-best-free-editing-software
  • An array of effects to use
  • No downloads necessary
  • Watermarked effects
  • Limited resolution
Fotor is a free online photo editor and might be the only thing you’ll need. The best thing is that you can run it through your browser instead of taking up precious space on your desktop.
Remember to use it on Google Chrome rather than Safari (who uses Safari?!) as some of the adjustments are limited.
There are plenty of effects to use, you’ll find that some of them are watermarked. These are removed when you sign up and pay the subscription fee.
For the free photo editor, you are limited to working with 4000px images. This resolution is something most enthusiast or hobby photographers won’t have a problem with but can become a hindrance to larger images.
This is a fun, free photo editor software but will not satisfy you if looking for professional photo editing or adjustments.
Our Rating:
Price Range: $$$

4. Adobe Photoshop Express Editor

paint.net-best-free-editing-software
  • Well designed
  • Needs flash player
  • Only supports jpg
  • Full-screen option
You’ll know Adobe Photoshop as a professional, albeit, expensive editing software platform. But, they do have a free version, named the Express Editor, that works in a web browser of your choice.
It is a flash tool, so you’ll need to have that installed. Not to worry, it will prompt you as soon as you get to the page. If you prefer to work from the road on your smartphone, there is a handy mobile app too.
This is the trimmed down version from the world-renowned editing software company. This means only jpgs will work, and they need to be under 16mb each. So you may need to convert yours before using this free photo editor online.
You’ll get most of what you expect from Adobe, but you’ll miss the essential tools that some of the rivals supply. Apart from a few tools, everything else is polished and works well.
What we find interesting is the Pop Color tool. It allows you to quickly change the hue of any particular image you have your heart set on. Fill Light is a tool we like to use, boosting the lighting conditions for any image that falls short.
Our Rating:
Price Range: $$$

3. Pixlr X

paint.net-best-free-editing-software
  • Runs from HTML 5
  • Well designed
  • Less powerful than other online editors
  • Huge improvement on Pixlr editor
Another great free photo editor is Pixlr X. This works with HTML 5 rather than flash, so no unnecessary downloads on your end. With this free photo editor, you can make finely detailed changes to colors, saturation, and vignette effects.
On top of these, sharpening and blurring your images is a breeze. There is also layer support, which many of these free software’s miss.
You can paint and draw on top of your images, which is perfect if your business is about mixed media or more creative endeavors.
If you heard of Pixlr editor, this is the successor to that popular platform. The former ran off Flash, so already we see the improvements. This means you are not limited to any browser, leaving you to use Safari (who uses Safari?!) if you so wish.
It’s nice to play with, helped partly by its sleek design. Those who like Photoshop Express will see similarities in its outline.  You can change the color scheme if you wish.
Our Rating:
Price Range: $$$

2. Darktable

paint.net-best-free-editing-software
  • Cataloging similar to Lightroom
  • Non-destructive editing
  • No push to ‘upgrade’
  • Technical
Darktable is one of the best free image software around. You can use it for simple adjustments, but it also allows you to professionally edit through areas that you would typically find in Lightroom. The cataloging concept takes ideas from this paid-software tool.
Firstly, you can import your images into the program via a database. You are then free to use non-destructive tools to get the most from your images. You are not restricted to jpgs, as Raw files are easily and automatically converted.
There are some very powerful tools to be found. For example, lens and perspective corrections come as standard. It will come across as being technical and not as simple to use as others, but you do get a lot of features to play with.
You may forget you aren’t using Lightroom, and although it isn’t as powerful as the paid version, it does a good job. There are no adverts or annoying, locked premium features.
Our Rating:
Price Range: $$$

1. GIMP

paint.net-best-free-editing-software
  • A huge array of advanced options
  • Interface similar to Photoshop
  • No ads or limitations
  • The learning curve is steep
GIMP (the GNU Image Manipulation Program) is clearly the winner here. The name might get a few giggles, but no one is laughing when they use the program for powerful image editing.
This free photo editing software comes jam-packed with all the image enhancing features you’d expect from very expensive platforms. The best thing about this software is that it is an open source free photo editor.
Meaning anyone with a little programming knowledge can create features that can be added and used. And they are. Every day brings something new to the platform.
The interface is simple to access and understand, especially if you are used to premium photo editing software. The single-window mode lays out the toolbars and canvas in an Adobe-style layout.
If you can’t do it with GIMP, the chances are that you can’t do it anywhere. The toolkit is full of great features. Layers, masks, curves, and levels are all there.
For blemishes, there is the clone stamp, healing tools and you can even apply changes to isolated areas.
There is a huge array of plugins to get the best out of your image, whether portraits or landscapes. All are free to download, and if you miss Photoshop, you can even install them into your GIMP.
Our Rating:
 
Share this article. 
12 Bad Photoshop Mistakes to Avoid


Are you trying to learn all the great tools Photoshop has to offer? That’s great but not easy, right?
A common mistake is starting off on the wrong foot. Make sure you teach yourself a correct workflow from the beginning.
Here’s a list of common bad Photoshop mistakes, so you don’t make them.

1. Not Using Layers

Photoshop is complex. Hundreds of tools, filters, adjustments, and much more are available in this professional editing software.
A big Photoshop mistake is not using layers. Layers will make it a lot easier to keep track of every edit you make.
Screenshot of layers in Photoshop
Learn how to use layers the minute you start working with Photoshop. And remember, it’s better to create one layer too many than not enough. Layers are the most important feature Photoshop offers.

2. Not Learning Shortcuts

Another bad Photoshop mistake a lot of people make is not using shortcuts from the beginning. Shortcuts significantly shorten the time spent working in Photoshop. This is time you can use for other projects and new clients.
The problem is that it takes effort to learn them. Most people start using shortcuts after having developed a workflow already. Then, later on in their career, it’s too late to change to a more efficient workflow.
It will take even more effort to learn all the shortcuts and change habits. Habits that will leave you frustrated.

3. Applying Adjustments to the Layer

Not all layers are the same. You might be using a lot of layers but don’t forget about specific layers. Basic adjustments like contrast, levels, saturation, and much more, can be done using Adjustment Layers.
They allow you to change your adjustments at any time during your workflow.
Photoshop also adds a layer mask to every Adjustment Layer. Use that mask to make adjustments to specific areas of your image.
Masking, by the way, is one of the most important things you should learn when starting with Photoshop.

4. Overdoing It

A very common Photoshop mistake is just going overboard. Photoshop offers so many tools and filters that you might get lost. After hours and hours of working in Photoshop, your own eyes start to deceive you.
You want everything to look perfect but in fact, you’re just taking it over the top without noticing it.
Photo of an ancient temple
Before saving the final result, take a step back. Close the project for a few hours or even days and then, look at it with fresh eyes. It will help to see clearly again.
You’ll probably notice that you’ve used too much saturation or HDR for example. It’s important to let your eyes rest when working on a project where colors need to be correct.

5. Over Softening of the Skin

A lot of beginning fashion and portrait photographers make this bad Photoshop mistake. They notice those perfect skin tones in magazines and want to try the same when editing their own work. It’s almost an art to get it right.
A lot of beginners make their models look like a plastic doll. It’s key to find the thin line between a perfect image and an over-edited image.
The same applies to whitening teeth, for example. Make sure people look real in your photos. Make sure to Google: “Funny Photoshop mistakes on Instagram and in fashion magazines”, and you’ll know what I mean.

6. Not Using Smart Filters

Photoshop offers a lot of filters. Instead of just applying them on a new layer, you can use Smart Filters. Smart Filters, like Adjustment Layers, allow you to change the settings of a filter at any moment.
If you apply a normal filter, you’ll always have to delete the layer.
Later, you’ll have to reapply the filter if you want to change the settings. This not only slows down your workflow but, unless you rename the layer, you can’t see what filter is applied.
Smart Filters show you what’s happening during your entire workflow.
Screenshot of smart filters in Photoshop

7. Not Naming and Organizing Your Files Properly

When working on a complex design job, it’s easy to end up with a mess of files and layers. If you don’t start organizing everything from the beginning, you’ll end up in chaos.
Tons of layers named the same and files that are named “Copy of copy of original file”. Get into the habit of deleting, organising, and renaming layers as you go. Give all your files a simple and descriptive name. That also means organising extra files like stock-photos in separate folders.
This way, when you open the same files or folder a few weeks later, you can still pick up where you left off.

8. Using Photoshop Instead of Illustrator or Lightroom

Photoshop is amazing. That doesn’t mean it’s the right program for any job. Don’t make the mistake of using Photoshop for a project that’s easier in Illustrator.
Learn the differences between all the programs Adobe offers. Photoshop is great for manipulating photos. If you want to create a poster, Illustrator is what you need.
Screenshot of software abbreviations
Generally, use Photoshop for photo manipulation. Lightroom for photo editing and Illustrator and InDesign for creating artworks and layouts.

9. Not Saving a Master File With Layers

Once you’ve finished your project, the worst mistake you can make is flattening the image and saving it. Always keep a file with all the layers and edits you’ve made.
You never know if you want to change it next week or, even worse, if the client wants to make a change.
Keep your master files separate from print files and low-resolution files. Organize them all in folders so you don’t run into any problems if you need the files again.

10. Forgetting to Save

A classic and also big Photoshop mistake is not saving your work. Can you imagine how frustrating it is to lose all your work because you didn’t save?
When you’re stacking up layer after layer, it’s good to hit Cmd + S (Ctrl + S for windows) regularly. In fact, this is the first shortcut you should learn and it should be secured in your muscle memory.
Screenshot of Photoshop CC
Usually, saving every ten minutes will do the trick. Photoshop will try to recover your work in case of a crash but in my experience, it doesn’t work more often than it does. Learn that shortcut now!

11. Not Getting It Right on Location

Some beginners rush it when taking photos on location. They get sloppy and don’t get the shot perfect. They often think that Photoshop will fix it.
It’s true that Photoshop can fix a lot but every mistake you make on location will double your editing time in Photoshop. Make sure to capture the photo as good as you can before you start editing.

12. Not Customising Your Workspace

Every photographer is different. Customise your workspace so that you can find the tools you need within seconds. You don’t want to spend valuable minutes looking for that one tool.
Hide all the tools that you don’t use.
Screenshot of Photoshop

There’s so much to learn when you start using Photoshop and it’s easy to make mistakes. Don’t worry, everyone makes mistakes. Especially when learning a professional complex editing program like Photoshop.
This list will help you to avoid the most common bad Photoshop mistakes. And hopefully, you don’t have to change your workflow later on down the road.
Learning an efficient workflow from the beginning will save you a lot of frustration. You could even lose clients by making common Photoshop fails.

Share this article.