he timeline behind Canon’s launch of its rumored mirrorless 80MP EOS R model is becoming a lot clearer but we’re still not certain on the exact release date.
That said, rumors indicate that Canon’s new powerhouse could come out in early 2020 which is, technically speaking, just around the corner.
What we do know about the camera’s specs hasn’t really changed for some time now: A patent that Canon Rumors released to the world indicates that the new camera will be a mirrorless with a 80MP full-frame image sensor, a bigger body than the EOS R that has a bigger, tiltable LCD screen and EVF than the EOS R. It will also have a “new” type of joystick and two SD card slots. Basically, it sounds like a beast, and many see it as an inflection point for Canon when it comes to its camera lineup.
That’s because a lot of people are thinking this is the end of the road for Canon 5DS and 5DS R DSLR cameras. As PetaPixel reports, there are no updates scheduled for that model line which is as good a sign as any we suppose.
As for the release date, all reports seem to point to early 2020. That’s probably a disappointment for some of us that were hoping to see some new Canon kit before the New Year, but it gives you that much more time to save up for it when it does finally arrive.
Are you looking forward to the new Canon EOS R? What are your thoughts on the DSLR/mirrorless debate in general? We’d love to hear your thoughts in the comments below.
Also, please check out some other interesting photography news articles by clicking here.
Share this article.
Sunday, September 15, 2019
Ready to take professional looking landscape photographs?
Are you a beginner looking to improve your post-processing skills?
That’s what this article is all about. In it, you’ll discover five post-processing tips that will immediately take your photos to the next level. Best of all, these tips aren’t even difficult to follow, and they require nothing more than the most basic image-editing program.
Let’s dive right in.
1. Straighten your horizon for professional-looking photos
When the horizon isn’t straight, even the untrained eye picks up that something is off. They might not know exactly what’s wrong, but they’ll be aware that the scene seems out of order.
Which is why you absolutely must make sure your horizon is straight.
Fortunately, it’s very easy to correct the horizon; you can do it in any post-processing program.
Here are the instructions for straightening the horizon in Photoshop: Step 1: Select the Crop tool Step 2: Click the Straighten option at the top Step 3: Click one side of your horizon and drag across the horizon line before you release
Your horizon will instantly straighten!
2. Adjust the white balance for natural-looking images
White balance is a setting used to balance the color of the light you shoot, in order to get it close to a neutral white.
You see, when the color of your subject is distorted by the existing lighting conditions, you need to use the white balance setting to save the day.
Now, one way to set the white balance correctly is to get it right in-camera. However, some photographers prefer to shoot in RAW with an auto white balance setting, and then adjust the white balance afterward.
If that’s your preference, then you’ll need to choose your white balance in a post-processing program. It’s generally easy to select a white balance option that adjusts for the lighting of your shot. You’re also free to experiment with different white balance options so you can choose the one that most reflects your creative vision.
For instance, the scene below has a Fluorescent white balance applied to it using Adobe Camera Raw.
And here’s the same scene but with a Shade white balance applied:
3. Boost your contrast to create images that pop
Do your images look a little flat?
One of the simplest ways to make your photos pop is to adjust the contrast. A contrast adjustment further separates the darkest and brightest areas of your image. In other words, it makes the dark tones darker and the light tones lighter.
Increased contrast, therefore, makes tones stand out and gives your photos a more three-dimensional feel. Compare the image above to the image below; I added contrast to the second image, which gives it a subtle pop.
Pretty much every image editor has a contrast slider. And boosting the contrast is often as simple as pushing the slider to the right.
So just remember:
If you’re struggling to make your photos more lively, try increasing the contrast. It’s a simple post-processing tip, but one that really works!
4. Boost the saturation or vibrance sliders for better colors
The saturation and vibrance adjustment sliders usually sit next to each other and can be confusing. Both of these add an extra color punch to your image, but they do so in different ways.
You see, saturation adjusts the intensity of all the colors in your image at once. If you push the saturation slider, you’re going to see color saturation increase across the board. Therefore, it’s an adjustment you want to use sparingly.
Vibrance, by comparison, is a “smarter” saturation tool, one that adjusts only the duller colors in your image. Increasing the vibrance will boost the less-saturated colors, but won’t affect colors that are already saturated.
Look at these two photos:
I boosted the saturation of the photo on the left, and I boosted the vibrance of the photo on the right.
Note that when you lower the saturation of your colors, your image takes on a more muted effect, like this:
In general, boosting the vibrance or the saturation will instantly improve your images.
5. Sharpen your photos for the best display on the web
Your images are most likely going to be displayed on the internet.
However, when you export your photos from most image-editing programs, you’re going to end up with blurry photos. Unless you sharpen for the web, that is.
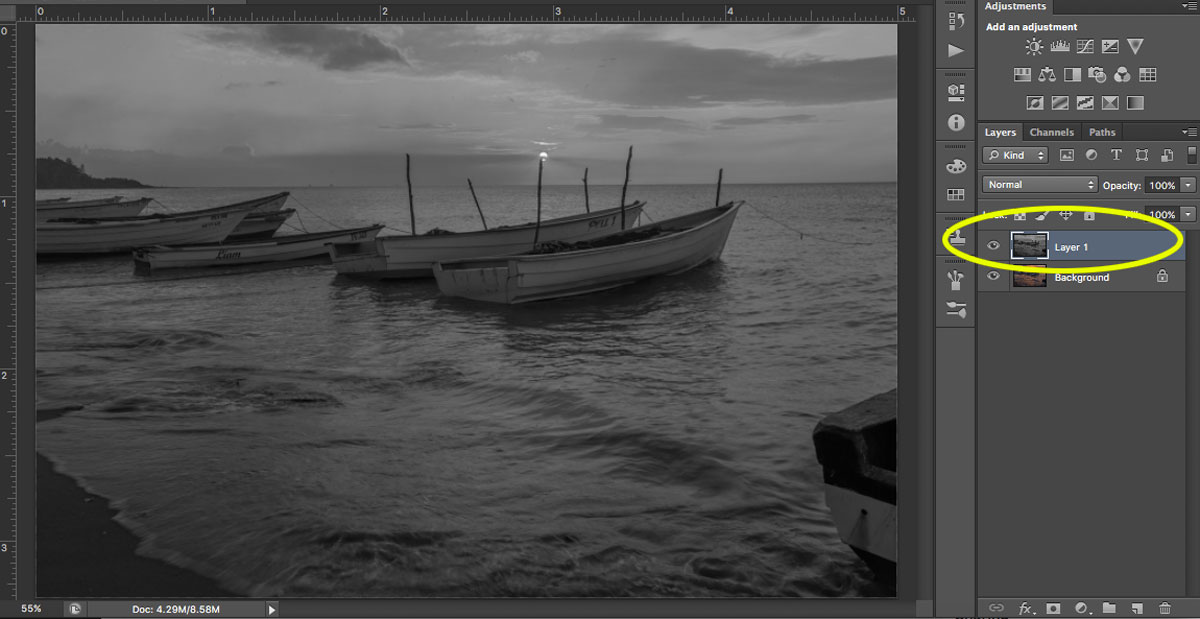
There are a few ways to sharpen in Photoshop. Here is one you can try: Step 1: Resize your image to the size you want it displayed. (If you sharpen your high resolution/original image and then resize it, the image will appear to lose its sharpness. Sharpening an image at your display resolution works better.) Step 2: Duplicate your layer. Step 3: Desaturate your new layer (from Menu, Image > Adjustments > Desaturate). Step 4: Change your blend mode to Overlay. (Alternatively, you can use the Soft Light blend mode for a more subtle effect.) Step 5: Now apply a High-Pass filter (from Menu, Filter > Other > HighPass) and choose a radius around 2.0 for an image of 730 pixels (on the long side). The Overlay option you chose above allows you to see how the radius affects the image so you can play around with it.
Note: The bigger your image, the larger your radius will be.
If the sharpness doesn’t look good on the entire image, you can use a layer mask and paint black over the areas where you want to hide the effect. Step 6: Save for the web (from Menu, File > Save for Web). Check the Convert to sRGB box if unchecked.
If you’ve just begun your photography journey or if you’re looking to improve your basic editing skills, then these post-processing tips are a great place to start.
In fact, basic editing is often all you need to dramatically improve your photos.
So follow these tips, and watch as your images improve!
Share this article.
Thoughts and a Field Test: The Tamron 17-28mm f/2.8 Lens for Sony
Sony lenses are notoriously expensive, so it’s a welcome relief that third-party manufacturers have been making solid E-Mount lenses. The Tamron 17-28mm f/2.8 is one such lens. It is the highly anticipated follow-up to the Tamron 28-75mm f/2.8, which was announced in 2018 and is almost always on backorder due to its popularity. After testing the Tamron 17-28mm f/2.8, I have no doubt that this lens will be equally popular.
Read on to find out why.
The Tamron 17-28mm f/2.8 tech specs
First off, 17-28mm is indeed a niche and unique focal length. No other manufacturer makes a lens with this range. The closest comparison is the 16-35mm f/2.8, a focal length made by Sony, Canon, and Nikon.
If you’re disappointed about having less reach with the Tamron, consider that if you use this lens with a Sony full-frame, you can always shoot in APS-C mode, which gives you more range. This is one of the most useful features on my Sony a7R III.
Why Tamron went for this slightly more limited focal length is puzzling, but it likely explains how they kept the lens to such a small size. In the comparison photo below, you’ll see that the 17-28mm is essentially the same size as the original Canon 16-35mm f/2.8 and the Sony 24-70mm f/4. Weight-wise, the Tamron is the lightest, coming in at 420 g (0.93 lbs). That is quite a bit lighter than Sony’s own 16-35mm f/2.8, which weighs a whopping 680 g (1.5 lbs).
Since we’re on the subject of comparisons, let’s talk price. Sony charges $2,200 USD for their 16-35mm f/2.8 lens. While their lens offers more solid construction and a more flexible focal range, this is still a chunk of change. On the other hand, the Tamron 17-28mm is priced at $899 USD, which is quite reasonable for an f/2.8 lens.
Size comparison of the Canon 16-35mm f/2.8 (left), the Tamron 17-28mm f/2.8 (center), and
the Sony 24-70mm f/4 (right).
Image stabilization
The Tamron 17-28mm lens does not have optical image stabilization (OIS). However, it’s so lightweight that it’s still pretty easy to shoot stable photos and videos handheld. In fact, its size goes well with the Sony a7R III and the Sony a7 III.
Autofocus
The Tamron 17-28mm f/2.8 is equipped with a smooth and quiet autofocus (AF) system. It pairs well with modern Sony mirrorless cameras, and all AF modes are available, including Eye AF. In practice, I found Eye AF to be a bit sluggish and hit or miss. But then again, I don’t consider 17-28mm to be my ideal focal range for portraits anyway, and I would rather reach for a midrange zoom or a standard 50mm lens.
Best uses for the Tamron 17-28mm f/2.8
A wide-angle lens like the 17-28mm is ideal for capturing landscapes, interiors, and real estate. Those are the types of photography I focused on while testing this lens. The portraiture I did was minimal, and it was mainly for the purpose of shooting at an aperture other than f/11 to see how the bokeh performed (it did very well).
A handheld shot taken from a doors-off helicopter ride.
Image quality
For my first test shooting with the 17-28mm, I took it on a doors-off helicopter ride. If you’ve ever been on one of these, you know how incredibly windy it can be in the main cabin and how difficult it is to get any shots in focus. This is very much a “spray and pray” kind of photography scenario. To my surprise, the 17-28mm did incredibly well.
From the moment I started shooting with the Tamron 17-28mm, I almost immediately forgot it was a third-party lens. Autofocus was snappy (I wasn’t using Eye AF), there was zero lag or miscommunication between the lens and the camera, and the image quality was stunning. Photos were tack sharp, there was no distortion, and the colors even seemed to pop a little more than usual.
Physical construction
Since this lens is so compact and lightweight, don’t expect all-metal or polycarbonate materials like Sony uses in their GM lenses. However, the build quality of the Tamron 17-28mm still feels very solid in the hands, and I think it would hold up well over time.
Tamron says the 17-28mm is equipped with “moisture-resistant construction” and a hydrophobic fluorine coating to repel dirt and fingerprints. Not much else is said about weather sealing, and I wouldn’t feel comfortable subjecting this lens to extreme weather conditions.
6-year Tamron warranty
One of the biggest benefits of buying a Tamron lens is their generous 6-year warranty. Effective for six years from the date of purchase (in the USA only), Tamron lenses are “warranted against defective materials or workmanship.” Meanwhile, Sony provides 1 year of warranty on their lenses.
A match made in photographer heaven
Based purely on specs, this lens pairs beautifully with the Tamron 28-75mm f/2.8. In fact, Tamron claims the combined weight of both of those lenses equates to less than 1 kg (2.2 lbs), which is incredibly light for two f/2.8 lenses. Both lenses also take the same filter size of 67mm, making it easy to swap polarizers and ND filters. This feature alone makes it very compelling to invest in both lenses.
During the reigning days of DSLRs, many photographers scoffed at third-party lenses, saying that “you get what you pay for.” Perhaps back then they had a point.
But today, third-party lenses have really stepped up their game, and the Tamron 17-28mm f/2.8 is one of the best examples of superior third-party glass. If you’re in the market for a wide-angle lens for your Sony body, you can’t go wrong with this lens.
(P.S. After conquering the 31 day challenge above, try this one to become an even better Photographer.) https://resources.digital-photography-school.com/ref/937/
5 Street Photography Rules You Shouldn’t Feel Bad About Ignoring
It’s not difficult to find advice about photography, on absolutely any topic that falls — even remotely — under the umbrella of photography. Some of it is good, some is bad, the rest is some mixture of the two.
The main problem, as I see it, with purveyors of photography advice isn’t so much whether it’s good or bad (everyone’s entitled to their opinions), but that sometimes the individuals dishing out the advice can be incredibly dogmatic about it.
I certainly encountered this years ago when I first got into photography. I was the recipient of more than my fair share of dogmatic ideas about street photography in particular.
So, to help new street photographers avoid some of this ideological consternation, here are five “rules” you can take with a grain of salt.
Street Photography Happens Only On The Street
No. Street photography is something of a blanket term that covers a lot of ground. Museums, amusement parks, beaches, subway stations, markets — photographing people in these places also counts as street photography.
Any time you’re capturing life in public places, you’re doing street photography. Photo by Jason D. Little
Street photography also involves portraying the spaces that humans inhabit and so many other things that give a nod to our existence — discarded items, street signs, construction zones. All of this occurs within the context of human existence and can be a central part of street photography. Photo by Jason D. Little
Street Photography Is Candid
Indeed, street photography is often done in candid fashion because many photographers want to capture moments spontaneously and with as few filters as possible.
This isn’t the only way to do it, however. You can ask people on the street to pose for you or ask them if they mind if you photograph them while they’re doing whatever it is they’re doing. It’s not candid, but it’s still street photography. Photo by Jason D. Little
Street Photographers Don’t Use Telephoto Lenses
It’s true that street photographers tend towards smaller cameras and lenses. There are a few good reasons for this — it facilitates an up close and personal approach, it creates a bit of inconspicuousness and it allows you to travel light.
In reality, any camera and lens can be used for street photography. If you’re unconcerned with others’ reactions to you and you have to fortitude to carry around equipment that’s a little heavier, I say do whatever you need to create the images you want.
If you’re a beginner, you might even use a telephoto lens as a “training” lens — you can get used to photographing strangers while keep some distance. As your confidence grows, you might begin to use a 50mm or even a 35mm lens.
Or you can keep using a telephoto lens if you like the look. Photo by Jason D. Little | Kentmere 400
Street Photography Should Be Black And White
Nope. Unless you just prefer black and white images. But you should never feel that the only way to make legitimate street photos is to shoot in/convert to black and white.
Black and white has the advantage of creating distraction-free images, images that allow the viewer to focus more easily on the subject and not have their eye pulled away by color.
But streets (and the people on them) are often alive with color. If you want your street photography to be representative of that fact, then you should be happily shooting in color. Photo by Jason D. Little | Kodak Gold 200
Not all street photography rises to the level of art. It doesn’t have to. As long as you’re capturing something that matters to you, you’re on the right path. Of course, that doesn’t mean you shouldn’t be constantly striving for creative growth, but in order to achieve that, don’t fall into the trap of believing that you’re beholden to any arbitrary ideas that purport to govern your craft.
Street photography has become quite popular in recent years, and I find it fascinating. Thanks to the Internet, we have access to endless streams of images that keep our craving for images constantly unsatisfied. And since this genre has become so popular, it seems important to talk a bit about three important facts that will help you understand what street photography is all about.
What Street Photography Is Not
First, let's start by defining what is not street photography. Street photography is not about shooting pictures of random crowds or the social mayhem that happens within a landscape. Street photography is about looking for the aesthetics that happen within the ordinary daily life of society. People often comment that certain pictures aren't street photography because they happened inside a store or place, but for me, capturing the beauty of society interacting inside a common place is just another layer of street photography. Some people think street photography needs to happen inside urban venues – but as a Latin American photographer, I don't limit myself to urbanism alone. Rural venues offer a great deal of street photography as well. For me, the main parameter for defining an image as “street” is the presence of humanity and society. That's why I define myself more as a social photographer because it broadens the possibilities. Image by Federico Alegría Some other people say only candid images are “real” street photography, but for me, taking images of unknown people who completely aware you’re photographing them is a valid way to go. The reason I defend this (even though I rarely practice it) is that because even though people may be aware they are being photographed, the previous social interaction makes it a street thing. To avoid confusion, street photography can be summarized in a single equation:
Aesthetics of society + non-controlled situations = Street Photography
What Is Considered Street Photography
Street photography is just visual evidence of the social moments of human nature that come across our eyes for a fraction of a second and trigger us to use our camera to preserve that moment in time. Street photography is the reflection of how we see society and humans interact. Perhaps the most evident element you'll find in a lot of street photographs is human nature (in an obvious way), or even in a metaphorical sense, like when we see images of decaying cities on the Internet. Image by Federico Alegría Many people tend to narrow their own expression and creativity to a monochromatic format when working in street photography, but you should know also color street photography is great. Why has black-and-white street photography become such a standard format that shooting and viewing color images of the streets is called “color street photography”? The answer is simple and has nothing to do with glamour and style. The main reason why a lot of people find themselves comfortable while working with black and white on the streets is that these scenes tend to have a lot of colors competing with each other, and the black-and-white format is more efficient for telling a message or a story. Image by Federico Alegría
Seek Meaningful Photographs
Street photography is accessible. You don't need huge and expensive equipment (check out Daido Moriyama in this compelling video, where he shoots with an almost generic point & shoot camera), or models and special lighting setups. Even though Street Photography is easy to start practicing, there’s always something more you need to know. It’s not easy to capture meaningful images on the streets. I don't know if Keven Carter actually said this, but I like to believe that he did. Also, Robert Capa knew that getting closer to your subject is extremely important, not just with your camera, but as a human being. You need to “connect” with people to create meaningful images. The term connection is a metaphor; you need to be able to perceive emotions and moments as they happen in front of your eyes. If you’re not quick to recognize those meaningful moments, you need to walk more to connect better with society. You don't need to be extroverted or even awkwardly social; you just need to be able to anticipate and feel those moments that are worth being preserved. Image by Federico Alegría Street photography is getting crowded, and its popularity will grow. This is not a problem for any photographer who loves challenges and understands that capturing meaningful images will always be the ultimate goal. Shooting crowds is easy, but the ability to isolate a truly meaningful moment within the teeming crowds is the first step to becoming an excellent street photographer. Image by Federico Alegría Maybe this list hasn't been as generous as it might have been, and the reason why is because I want to leave the discovery up to you. We are sure you'll become a passionate and talented street photographer simply by knowing what street photography is and is not, and also by recognizing that you need to set your goals high. Look for work that matters. Rise above the random shots taken at crowds in the streets. And remember to always have a camera with you. You never know when the best picture of your life will cross your sight – and trust me, you want to be prepared for that.
Thursday, September 12, 2019
Back to Basics: Understanding the “Sunny 16 Rule” in Photography
In life, we are sometimes met with certain inalienable truths; water will always flow downhill, there will always be an unhappy baby on your flight, and the milkshake machine at your favorite fast food place will always be broken when you need it the most. There are also some self-evident truths that we must accept when it comes to photography; one being, one day, you will need to set your own exposure manually. If you’ve been shooting exclusively in Auto Mode or Aperture and Shutter Priority Modes, this can be an enormous challenge.
Take heart! I’m about to show you one of the easiest and most long-standing methods for calculating exposures. Using it will help you almost always get a usable baseline exposure when shooting your camera in full manual mode. Yes, really.
It’s called the Sunny 16 Rule, and it’s going to be your best friend.
You may very well have heard of it before but never fully understood how simple it truly is to implement (and modify) this handy little formula to fit the situation in which you find yourself shooting.
Getting to know the Sunny 16 Rule
Understanding the Sunny 16 Rule couldn’t be more simple. It’s all based around the relationships between our three key elements of exposure: ISO, aperture, and shutter speed.
Sunny 16 had its roots in film photography when it was used to help photographers figure out their exposure when a light meter wasn’t available. However, it works perfectly well with digital photography too. In fact, since we have the added convenience of on-the-fly ISO adjustments with our digital cameras, the Sunny 16 Rule becomes even more universally useful.
As you might have guessed, the concept of the Sunny 16 Rule begins with bright sunlight and setting our aperture to…*drum roll*…f/16. Bright sunlight refers to unobstructed sunlight on a cloudless day; think noon with a clear sky, and its brightness is virtually constant.
After we’ve got our aperture set to f/16, we can now dial in our shutter speed based on the ISO we happen to be shooting. To calculate your shutter speed based on Sunny 16, all we have to do is put “1” over our ISO. This will be your shutter speed.
Keep in mind that some cameras measure exposure in full, half or third stops and your shutter speed might not be exactly the same as your ISO. For example, in half-stop increments, if you are shooting ISO 400 then your exposure would be (for slight underexposure) f/16 at 1/500th of a second. At ISO 100 your settings would be f/16 at 1/125th of a second. For ISO 800 it would be 1/1000th of a second and so forth.
As far as ISO settings are concerned, it is a good practice to “set it and forget it.” There’s not much need to adjust the ISO as we can vary our exposure using our aperture settings – unless the scene dictates otherwise…more on this in just a bit.
Why the Sunny 16 Rule is so useful
The reason the Sunny 16 Rule is such a fantastic concept is due to the fact it gives us a usable exposure setting based on what will likely be the brightest light you will encounter – the sun. Once you know what your shutter speed will be at a given ISO and f/16 in bright sunlight, you can essentially estimate any exposures for darker environments. The reason for this is that ISO, aperture, and shutter speed are all connected. You can adjust each relative to the another so that you can control your exposures based on the needs of a particular scene. If you’d like to learn a little more about how ISO, aperture and shutter speed relate to one another, have a look at this great article on understanding the exposure triangle.
Perhaps one of the best things about working with the Sunny 16 rule is that it’s a great way to teach yourself to read light and adjust your exposure based around the creative requirements for your photo. Let’s look at some considerations to take into account when you need a little more control over your photographs when basing your exposures around the Sunny 16 concept.
How to modify the Sunny 16 Rule
Years ago, when I first heard of the Sunny 16 Rule, my first thought was “That’s great, but what if I don’t want to shoot at f/16?”
Indeed, a great question.
What happens when you need a more shallow depth of field than f/16 can produce? Alternatively, what if the indicated ISO-based shutter speed just isn’t fast enough or slow enough for your subject? Furthermore, you definitely won’t always photograph in blazingly bright sunlight (ironically not ideal for most photography).
The good news is that the Sunny 16 Rule is incredibly flexible.
Remember, the Sunny 16 Rule does nothing more than eliminate variables in your exposure to produce a baseline camera setting which you can then manipulate given your particular needs.
Virtually identical exposures in direct sunlight based on the Sunny 16 Rule with constant f/16
apertures and ISO-dependent shutter speeds.
For example, let’s say you’re shooting a subject that requires a more shallow depth of field, like a portrait or still life that is in bright sunlight. At ISO 100, your resulting Sunny 16 exposure would be f/16 at 1/125. For reference, here’s a sample photo I shot at those settings in direct afternoon sunlight.
Needless to say that if I open up my aperture to f/2.8 (five full stops wider) in order to better blur the background, the resulting image will be completely overexposed, and looks something like this:
Yes…there is a photo there.
So, how to remedy this problem? Since we are working from the Sunny 16 Rule, all we have to do is apply some basic photographic principles (remember the exposure triangle?) to normalize our exposure based on our new, wider aperture.
Seeing as we opened up our aperture by five stops, we simply need to increase our shutter speed by five stops to compensate.
So if my initial shutter speed were 1/125th at f/16, my new adjusted shutter speed setting at f/2.8 would be 1/4000th. Here is the resulting exposure:
Blurred background and a normalized exposure based on the Sunny 16 Rule.
The same is true in the case of fast-moving subjects. If you’re experiencing unwanted subject motion at, say, 1/125th of a second at f/16, and you want to try a faster shutter speed of 1/500th of a second to help arrest the motion, you need to compensate for the faster shutter speed with a corresponding wider aperture setting to allow more light to come into the camera. In this case, 1/500th of a second – two full stops faster than 1/125th – so we would open our aperture by two stops from f/16 to f/8.
Some adjusted Sunny 16 baseline exposures
If you’re wondering about lighting situations other than bright sun, here’s a quick (but by no means definitive) list of baseline aperture adjustments derived from the Sunny 16 Rule. I’ve listed Sunny 16 at the top as a baseline exposure at ISO 100 and 1/125th of a second. To adjust your exposures for varying degrees of brightness, all you need to do is change your aperture.
Direct bright sunlight with harsh shadows: f/16 at 1/125th of a second and ISO 100
Indirect bright sun with soft shadows (shade/cloudy): f/11 at 1/125th and ISO 100
Overcast skies with little to no shadows: f/8 at 1/125th and ISO 100
Dusk/morning light: f/4 at 1/125 and ISO 100
I also want to point out the elephant in the room which is holding a big neon-yellow sign that reads, “Why not just bump up the ISO?”
In short, you can adjust your ISO settings to compensate for more or less light in the scene. Modern cameras are becoming better and better at reducing high ISO digital noise. The Sunny 16 Rule was based on the fact that most film cameras are limited to the ISO of the film used. In these cases, the ability to read and understand light becomes paramount.
The concept of Sunny 16 gives us digital shooters a way to nail exposures (or come close) every time in-camera without constantly checking our images after each shot.
Final thoughts on the Sunny 16 Rule
Of course, as with most things, the Sunny 16 Rule isn’t a true “rule” in the sense that you must follow it to the letter. Instead, it is a rule in the way that gives something to relate one thing to another; in our case it allows us to relate the luminance of available light to our camera settings to achieve predictable and reproducible results.
Sunny 16 is also a great learning tool to help us understand the nature and measurement of light. Going further, it is a guide that is extremely versatile once you understand just a few basic principles of exposure. I, for one, feel as if I don’t use Sunny 16 enough in my work. I think that is about to change. Do you practice the Sunny 16 Rule? How has it affected your shooting? Let us know in the comments below!


 https://resources.digital-photography-school.com/ref/937/


 Image by Federico Alegría
 Image by Federico Alegría
 Image by Federico Alegría
 Image by Federico Alegría
 Image by Federico Alegría


 https://resources.digital-photography-school.com/ref/937/