Wednesday, August 21, 2019

How to Photograph Lightning (With Awesome Examples)


By Rob Wood  
  
Probably one of the most common questions we get at Light Stalking is how to photography lightning and get those spectacular shots you see in magazines. But photographing lightning can be a damn tricky thing to attempt. Besides the obvious safety concerns, the photographic variables are difficult to overcome and the conditions don’t usually make for easy shooting. Even so, as the shots below show, good preparation and knowledge of how to photograph lightning properly can lead to some incredible photography!
photo by Brandon Morgan

photo by Emil Jarfelt

Camera Equipment for Photographing Lightning

It’s important to get your setup right and this is something you have a little while to think about (unlike the actual process of shooting lightning which can be quite adrenalin-filled). Here’s some of the stuff you will need as part of your quest:
  • camera capable of letting you set the shutter speed manually (usually you’ll need to use the B setting for shutter speed so a Mirroless or DSLR is probably what you will need).
  • cable or remote shutter release
  • sturdy tripod (the heavier the better as wind can move it around)
  • if you're a film shooter, ISO 100 film or equivalent digital setting (ISO 200 is also acceptable and even preferable for certain situations explained below)
A quick thing to remember is that it is likely that you will be in a spot where you and your equipment are getting rained on! I always carry a poncho in my camera kit for such occasions, but have also been known to take along a very hefty umbrella for when things get really nasty. To be honest, I have never found the perfect solution for shooting in the wind and rain so if you have some advice, leave it in the comments! Each place you're likely to be shooting from will be different from the last, so take shelter as best you can – there is no easy solution for storm photographers.
photo by Skeeze on Pixabay

The Technique for Photographing Lightning

The Simple Explanation
In a perfect scenario, learning the technique and settinhs for how to photograph lightning at night should be quite simple.
Just make sure the camera is on a tripod and you have a cable or remote shutter release. Set the focus to infinity, the ISO to 100 or 200 (on DSLRs) and choose the aperture accordant to the intensity of the lightning. Then open the shutter until the lightning goes off and then shut it just after you get a flash of lightning. This is obviously a lot easier in situations where there is a lot of lightning and you can try multiple times. If you really want to get things right, then it's probably a good idea for you to study the ways that landscape photographers assure themselves of getting sharp images – while you probably won't be able to match the sharpness of a landscape taken in perfect conditions due to the usual stormy nature of lightning photography, the general technique will still serve you well (just be aware that your aperture settings might need to be different depending on the intensity of the lightning strikes which we will talk about below).
While it is not necessary to do any more than above, there are also a lot of devices on the market that can detect lightning and fire the shutter of the camera at the ideal time. While not specifically necessary, these types of devices can make life easier for a lightning photographer. There is no real need to get them, but they are useful. 
photo by Jeremy Bishop

How to Choose the Correct Aperture for Lightning Photos
This is going to take a little bit of judgement on your part and largely relies on how intense the lightning is and how far away it is. This table is a guide to what you’ll probably need to shoot at. It is not set in stone. The top row refers to the brightness of the lightning and the first column refers to how far away the lightning is.

BlindingAverageDull
Close LightningISO 100 @ f/16-22ISO 100 @ f/5.6-11ISO 100 @ f/5.6
Mid-distanceISO 100 @ f/11ISO 100 @ f/5.6ISO 200 @ f/4-5.6
Distant LightningISO 200 @ f/4ISO 200 @ f/2.8ISO 200 @ f/2.8
Note: Unless you are a hard core storm chaser, most of the time you are going to be photographing distant lightning so you will probably need a wide aperture.
photo by Lucy Chian

How to Photograph Lightning With Good Composition

When you are intent on photographing one component of a scene, it is very easy to get caught up in just that one thing. It's easy to forget that lightning is simply one aspect of your overall composition.
What this means is that you need to be thinking of the overall scene of your photography. Look at the images on this page for example – the most effective ones would have been reasonable shots even without the lightning. It is imperative that you think of the components of a good composition in order to achieve the most effect lightning images. Check out our article on 7 composition tips for landscape photography to give you a start on that.

Storm Safety

Storms are dangerous things and when learning how to photograph lightning it is important to remember than safety is far more important than any photograph. Photographing lightning might sound exciting, but it’s also quite dangerous. Remember that if a storm is nearby and you are on a hill, on top of a building, near a tree, in an open field, on the phone or near a power pole or fence, then you are already in danger. Be sensible. Check out this lightning safety page before you do anything and when you have finished reading it, read this one too.
A few of the tips from their fact sheet include:
  • Lightning is likely to strike the tallest objects in a given area—you should not be the tallest object.
  • Avoid isolated tall trees, hilltops, utility poles, cell phone towers, cranes, large equipment, ladders, scaffolding, or rooftops.
  • Avoid open areas, such as fields. Never lie flat on the ground.
  • Retreat to dense areas of smaller trees that are surrounded by larger trees, or retreat to lowlying areas (e.g., valleys, ditches) but watch for flooding.
  • Avoid water, and immediately get out of and away from bodies of water (e.g., pools, lakes).
photo by Sebastian Voortman

Patience

Outdoor photography is all about finding the light, finding the composition and being patient. It is one of the ultimate tests of a photographer, but adding lightning to an image takes things to a whole new level with the amount of patience required. It takes a lot of practice to get a good shot of lightning. Be patient. Expect that most of your shots won’t work out. But remember that when one does work out it will be worth the wait.

Share this article.


How to Get Amazing Photos When the Weather is Awful

By Jason Row 


#photographyeveryday #photographyislife #photographylover


Are you a fair-weather photographer? Let’s be honest, when the rain is tipping down or the wind bending trees to 90 degrees, it can be difficult to garner motivation to shoot. However it is often a very good time for some great shots. Bad weather can give us some of the most dramatic images we will ever shoot. Equally the transition from bad weather to better weather gives us the juxtaposition of the dark and foreboding with the light and inspiring. Today we are going to look at what to shoot, how to shoot it and importantly how to protect yourself in the bad weather.

Types of Bad Weather

The main types of bad weather are heavy rain, strong wind, snow, and mist and fog. Each has its own unique challenges but all are capable of providing stunning shots.

Rainy days are great for colour contrast, especially on dark dank days. The ambient light tends to be very blue, yet artificial light from cars, offices and shops will contrast that blue with bright warm yellows and reds. High shutter speeds can freeze the raindrops as they fall. By dropping to a slower shutter speed you can blur the rain as it falls. You don’t even have to be outside, shooting through a rain splattered window lends itself to very enigmatic images. Of course rain lends itself to great reflections too, not only in puddles but in any wet and shiny such as a cobbled street.

Photo by Ron W

Rain can lead to some lovely images.
Wind is tough to shoot in but perfect for slow exposures. Leaves become a soft blur, water a foaming cauldron. Waves look majestic, crashing against a coastline or man made structures. A sturdy tripod and very sheltered place are the order of the day, especially if you plan to shoot slow shutter speeds. Hanging your camera bag underneath the tripod can add extra need weight and stability in high winds.

Photo by Maximabdulin

Windy days lend themselves to the abstract.
Mist and fog provide such beautiful images that we have written an entire article about it. Fog can add drama and intrigue to an image, hinting at what is in the background. Mist adds patches of low contrast and clarity giving a very ethereal feel to an image. With both, your main issues will be focus and exposure. Autofocus may hunt in low contrast scenes such as fog. Switch over to manual to get the best results. Exposure meters may well underexpose, so either bracket or add some exposure compensation. Plus one stop is a good starting point.

 Photo by Steve Wilson 


Overcome the technical problems with mist and fog and you can create stunning images.
Snow is perhaps the most challenging. The cold does not sit well with modern batteries. Turning small controls with cold or gloved hands can be tricky. The rewards can be great though. Freshly lain snow looks magical, pure white covering the landscape. Snowy days are low contrast and flat but this serves to make any colour in the scene pop.  Exposure and autofocus are again likely to be your main issues.

Photo by Joseph

Snow is also challenging but allows for beautiful images.
Of course one thing a lot of bad weather has in common is a dramatic cloudscape. Dark brooding skies give depth and drama to our images. Take along some graduated ND filters to really punch the clouds out whilst maintaining a good exposure on the ground.

Protecting Yourself and Your Equipment

With bad weather always think safety first. Shoot any weather event from an area of relative shelter and have a plan to get under cover if needed. Kit yourself out with good quality rain jacket, shoes and gloves. Make sure your equipment is protected in a waterproof camera bag, many are not.
To shooting in rain, look at investing in dedicated rain covers for your camera. These are inexpensive plastic bags in which you seal the camera and lens.

Photo by Gordon Tarpley

Don't rely solely on your camera's weather proofing.
Make sure all your lenses are protected with a UV filter. In the cold take plenty of fully charged batteries. A large memory card is useful too, negating the need to swap cards in the inclement weather. Also check to see if your insurance will cover weather issues. Many higher end cameras and lenses are weather sealed but don’t rely on this. Add the extra protection mentioned above to give yourself more assurance.
Bad weather does not mean bad photographs. With a little forethought and planning, bad weather can give us some incredible pictures. The most important aspect of shooting in poor conditions is to protect yourself and protect your equipment, if you have that covered, you are on the way to spectacular images.
Note: Bad weather can also be the perfect time to get powerful long exposure photographs.

https://resources.digital-photography-school.com/ref/937/


15 Kick Butt Photos of Storms

By Rob Wood


Photos of storms can be about the most atmospheric and gripping of any landscape photography. In fact some people make storm photography and chasing storms their photographic specialty, following weather and forecast reports like hawks.
We're sure you will agree that the images of storms that they produce are well worth the specialisation with spectacular images seeming to be the norm rather than the exception for many talented storm photographers. That's why we put together this little tribute of 13 awesome storm photos for you to enjoy.

This collection was originally put together way back in March of 2009, but we have updated it with some even more amazing shots, so enjoy!


Boat near storm.
Photo by Johannes Plenio 
Lightning over city
Photo by Andre Furtado 
Tornado and lightning
Photo by Ralph W. lambrecht
Storm over a wave.
Photo by Matt Hardy 
Storm front over water.
Photo by Arthur Brognoli 
Lightning on hills.
Photo by Frank Cone 
Storm clouds over city.
Photo by Khaled Ashgr 
Storm over waves meeting mountains.
Photo by stein egil liland 
Lightning.
Photo by Johannes Plenio 
Bird flying over beach near storm.
Photo by Francesco Ungaro 
Black and white storm.
Photo by Pok Rie 
Hills with storm.
Photo by Vittorio Staffolani 
Rain storm in distance.
Photo by Josh Sorenson 
lightning and clouds.
Photo by Felix Mittermeier
Storm at sea from a boat.
Photo by Torsten Dederichs
Stormy coastline.
Photo by Michael Dam
Lightning over city
Photo by lee junda
Lightning striking building.
Desert storm with lightning.
Photo by Lucy Chian
If you think there are any storm photos that we should have included in this list or think you have a photograph of storms that you want to put up against these ones, then let us know in the comments!
Hopefully, these fantastic storm photos have inspired you to learn a little more about the topic of photographing storms.
Share this article.

Tuesday, August 20, 2019


Forgot A Photo Release Form? Think Again Before Submitting That Photo


By Justin Li  


This post is for all the photo hobbyists who are starting to take photography more seriously. Before publishing or selling that photo, it's worth exploring the finer points of privacy laws and why photo release forms are important. 
A photo release form is also known as a photo waiver or model release form, but it is not just for professional models. Anytime you take a photo that you plan to use commercially you need the paperwork backing up the subject’s consent. Dropping the ball on having subjects sign a photo release consent form can cost you both money and your reputation. 


Woman taking a photo Andre Furtado 

Consider the case of a woman who sued Chipotle for using her picture in branding without her consent. Leah Caldwell was photographed by Steven Adams on a work-for-hire assignment while she was eating at Chipotle back in 2006. She did not sign a release. Fast forward to 2017, and you can imagine Adams’ shock when he learned that he and the restaurant chain were being sued for $2.2 billion!
Caldwell discovered in 2014 that her photo was used on wall branding at Chipotle restaurants. Since she had not signed a release, she sued on the grounds that her “reasonable expectation of privacy” was violated. 
Caldwell and Chipotle ultimately reached a settlement for a confidential sum before the case reached the courts. It’s unlikely she received the outrageous amount she was asking for, but regardless, both Adams and Chipotle took a financial hit. 
So before you submit that photo, read on to make sure you fully understand the legalities of photography! 

When Are Photo Release Forms Necessary? 

A photo release is a contract that is signed by a photo subject or owner of the private property pictured in a shoot. It gives the photographer or organization they represent the legal right to use those photos for commercial purposes. 


In simple terms, you must get a photo release signed whenever a photo of an individual or property will be used for profit. “Profit” includes either receiving a chunk of change for the photo directly or the submission of a photo for promotional material. This includes your own promotional material, such as an online portfolio. 
Most companies that buy photos will insist that you include the release form when you submit a photo. However, you need only look at the Chipotle example above to know that this isn’t always the case. And if it helps – publishers will generally pay more for a photo that includes a release! 
If a photo you took ends up being used for commercial purposes without a release, the subject can potentially sue for a breach of privacy. 

Photography and Expectation of Privacy Laws 

Photography lawsuits tend to revolve around the issue of privacy. People have an expectation of privacy when they are on private land or within private property. They have the right to decline to have their photo taken at all, let alone have their photo sold for commercial use. A release form in these cases is an absolute must. 
Street photographers don’t need to fret. As soon as someone steps onto public property they waive the right to privacy. This means you can sell a photo without a release if the people or property are incidental and would not be easily recognized. 
This does not apply to photos taken directly of a subject on public property, such as in a photoshoot. Selling these photos without the subject’s release infringes on their right to control their likeness for commercial purposes
Commercial use aside, if a photo is taken for personal use, news, or education – it is fair game to use without a release. If there is any chance that you will want to use the photo for profit, it’s worth covering yourself and getting a photo release signed. 

Important Considerations For Photo Release Forms 

A photo release needs to include your name and any organization you are representing. It should also be very specific in outlining your intended use of any photography, and whether or not you grant the subject to have any use of those images. The photo release would also include any financial agreements you or your organization make with the subject. 
The website Film Shooters Collective outlines what a photo release needs to include in order to be effective: 
  1. It must be granted by someone who is capable of understanding the nature and consequences associated with the photography and who has the authority to consent.
  2. The release needs to specify the uses for the photographs.
  3. The release should include a general comment as to the general nature of the photographs taken and the dates of the shoot. (If you do a lot of shooting, this will certainly make your records a lot easier to understand and prevent any confusion in this matter.) 
There are lots of photo release templates online, but it’s always recommended that you have a local lawyer ensure that the wording of your form is sound. 

Photos Release Forms For Minors 

Taking photos of minors is a particularly sensitive issue. Any release form for photography of a minor must be signed by a legal guardian. Many schools, camps, and activities for children have parents sign blanket photo release forms for the year/term so that photos can be taken and used in their promotional materials. 
For public photography, the same expectation of privacy rules for adults applies to minors. But many states and countries take those laws further, prohibiting the photographing of minors by anyone except a parent without parental consent. You need to make sure you research these rules wherever you live and work. 

Always Be Prepared 

Photography is an art form, and you deserve to be protected in your craft. A photographic moment can happen anytime, anywhere. Serious photographers should always have access to photo release forms at a moment’s notice. 
If you’re the forgetful sort or don’t want to lug around piles of paper, making use of a waiver app will ensure you have access to waivers anytime on your mobile device. Otherwise, you should always have a pile in your photography bag at the ready. 
You will have a long, lucrative career and a collection of happy clients if you are diligent in following the laws designed to protect both you and your subjects.

Share this article.


7 Ways To Earn A Little Extra Money From Your Photos In 2019

By Jason Row 


A quick Google will reveal many many pages of sites telling you how to make money from your images. Some of them are accurate, some exaggerate the amounts you can make greatly. Making money from images is possible but it’s not easy.
Today, we are going to look at some of the ways you can generate income from your photography. We are focussing on those that want to earn a little extra on the side and not go into photography as a full-time profession. 


1. Stock Photography

Perhaps one of the most common and well-known ways to generate money from photography. However, it's not a simple task of uploading 200 images of your cat and one sunset and waiting for the money to roll in. Stock is a game of patience and hard work.
The vast majority of your images will sell for pennies. If you have some particularly unique images then you might get some three figure commissions but they are really quite rare. The vast majority of stock agencies are what are called microstock, that is to say, pile them high sell them cheap.
Some agencies are better than others, my best returns come from Shutterstock, my worst from iStock/Getty. We have several articles here Light Stalking on getting your stock accepted. 

There are 7.3 million sunset pictures on Shutterstock. Choose your genre carefully.

2. Sell Your Own Prints

It’s never been easier to sell your own prints. Let me rephrase that, its never been easier to set up a website to sell your own prints. There are multiple choices of gallery building websites that allow you to upload and sell prints, Zenfolio, Pixpa, and SmugMug to name a few.
However, whilst setting up the site may be easy, the actual selling is not. You are going to need to find your market and market yourself to them. The best options for selling your prints online are when you have a niche subject or when you shoot local interests. 

You are going to need to put a lot of work into not only marketing but also website SEO (search engine optimization) in order to get your work seen. You also have to take into account the cost of a subscription to a gallery site, this can run to several hundreds of dollars per year.

Creating your own site is time-consuming but can be rewarding. By Jason Row Photography

3. Local/Family Events

Weddings, christenings, local events, all can be a source of potential income for your photographic skills. However, you need to be confident in your abilities, have the right equipment and back up equipment and in many cases some form of liability insurance. 
With that said, there are many people out there that make a part-time living at weekends from shooting events. Often the best option here is to become a second shooter for a local professional. Sometimes, local pros will require help shooting the bigger gigs and if you have the experience, you may well find they will embrace your talents. 

4. Editing And Retouching

If you are a bit of a dab hand with Photoshop then there is a whole world of potential for making money as a part-time freelancer. There are a number of sites on the Internet that help connect freelance workers with potential clients. These include Fiverr and Upwork. 
Despite its name, Fiverr is not all about selling your abilities for $5 a go. These days there are many different levels or pricing and you can set your price according to your ability and portfolio.
You will be competing in a very large market place so like with other suggestions, you will need to market yourself and have a good portfolio to demonstrate your capabilities. Again finding niche areas will help maximize your incomes. 

Photo by João Silas

5. Citizen Journalism

Another area that has become a potential revenue source in recent years is citizen journalism. A number of stock agencies such as Alamy have realized the potential of this and have created dedicated portals to upload newsworthy images. These are processed and put online much quicker than regular stock to maximize their potential revenue.
To make money at this you are going to need to work fast, monitor and cover breaking news in your local area and get those images online quickly. That said, if you live in a large city and have time there will always be newsworthy events going on nearby. 
You can shoot with a smartphone and upload your work more or less instantaneously. A number of news oriented stock agencies even have smartphone apps to make the process quick and painless. 

Photo by Artem Maltsev

6. YouTube

This used to be an easier route to generate some revenue but last year Youtube dramatically increased the bar at which you could monetize your channel. However, if you have a talent for demonstrating or talking about all things photographic, there is the possibility of making money. 
Tutorials, vlogs, and reviews are probably the best options to build an audience. You will need to get to 1000 subscribers and 4000 hours per year of viewing time before you can monetize your channel.
That’s quite a challenge but if you upload good videos regularly, once a week and always ask your audience to like share and subscribe, it is possible. Once your videos start reaching a certain viewing level they will become “recommended” helping elevate your channel further.
If you become big enough you may even attract sponsorship or affiliation.

7. Blogging

If you enjoy jotting your thoughts about photography down, then a blog may be a way to generate some extra income. Like other options, it is going to take time and dedication as well as engaging content. Once you have built an audience for your blog, you can add advertising via Google Adsense or by using affiliate programs such as Amazon. To maximize any revenues, you will need to make sure the products you promote are in keeping with the content you write. 

In Summary

There is no easy path to riches in photography. Believe me, if there were, I would be writing this from a beach on the French Riviera. This is a recap of some of the ways you can generate an extra income. 
  • Stock Photography – Easiest to do, but needs dedication and a niche to make real money.
  • Selling Prints – High initial costs and a strong need to market yourself to make money.
  • Local Events – Good option for a competent photographer with local connections.
  • Editing and Retouching – A good option for those with a strong portfolio of Photoshop skills
  • Citizen Journalism – Hard work, but rewarding for those with a nose for a story
  • Will require a lot of work to monetize your channel but rewards can be high for engaging content.
  • Blogging – One of the easier options but again will require you to build and maintain your audience.
Making a sideline through your photography is certainly a possibility. However, whichever way you do it, you are going to need dedication and suitable skills. If you have them, then there is certainly ample opportunity to make some extra money.

Share this article.


Monday, August 19, 2019

A Basic Introduction To Understanding Metering Modes

By Jason D. Little 


The topic of metering modes seems to mystify a great many new photographers. It had me a little perplexed when I was starting out, but maybe I could attribute that to the fact that, as I’ve stated before, I never read the manual. For anything.
Eventually, I learned what all the different metering modes are all about — no thanks to my various camera manuals, because they aren’t all that forthcoming with useful explanations of each metering mode.

Which means beginners just tend to skip over this stuff. But it doesn’t have to be that way.
Understanding metering is a key part of understanding exposure, so let’s take a look at the basic metering modes and what role each plays in determining exposure.

Multi-Zone/Evaluative/Matrix Metering

Different camera manufacturers use different terminology, but regardless of what it’s called this is the default metering mode for most cameras.
Evaluative metering works, essentially, by evaluating the light across the whole frame and then prompting the camera to make a decision about which part of the scene is most important.
Generally, the camera will give preference to the area immediately around the currently selected autofocus point.


https://resources.digital-photography-school.com/ref/937/


This mode works well for a wide variety of subjects and in uniformly lit situations — from landscapes to portraits. You can leave your camera set to matrix/evaluative metering and be sure that it’s going to result in a correct exposure the vast majority of the time.
Photo by Pixabay 

Center-Weighted Metering

With center-weighted metering selected, the camera will measure the light across the frame but will it will be heavily biased toward the light at the center of the frame. Unlike matrix/evaluative metering, center-weighted metering is not tied to the focus point you select; it only cares about what it “sees” in the middle of the frame.
Center-weighted metering is most beneficial when the background is much brighter than your subject.

Spot Metering

Spot metering takes into account only the light around your focus point, ignoring everything else.
The “spot” in spot metering makes up less than 5% of the whole frame.
Spot metering is most useful when your subject occupies a relatively small portion of the frame, allowing you to properly expose the subject no matter how dark or bright the background is.
While the center focus point is typically the default metering spot, many cameras will allow you to choose which focus point will act as the metering spot.
Photo by Jason D. Little

Partial Metering

Not all cameras have partial metering, which is essentially an expanded form of spot metering. Rather than measuring such a tiny portion of the frame, partial metering evaluates approximately 6-10% of the total frame.
Use this mode in the same situations you would use spot metering.

Bonus: Highlight-Weighted Metering

Currently available on select Nikon cameras, highlight-weighted metering measures light in the same manner as matrix metering (over the whole frame), but analyzes the brightest portions of the scene and calculates an exposure intended to prevent blowing out the highlights.
Photo by Evie Shaffer 
This mode is perfect for high contrast situations.

Use evaluative/matrix metering when shooting in even light or using flash. Use center-weighted metering for portraits or anytime the subject is in the center of the frame. Use spot/partial metering when your subject isn’t taking up much of the frame, when your subject is backlit or when you’re shooting the snow. Use highlight-weighted metering (if your camera has it) for mixed lighting and high contrast situations.

Share this article.


An Advanced Guide to Light Metering in Photography

By Jason Row  

n a previous article we took a look at metering using the camera’s built in metering system, explaining the different metering modes and in what situations to use them. For the vast majority of people the metering systems of modern digital cameras is so good that we need not consider other means of reading our exposures, however, for some of us, studio photographers and landscape photographers for example, there is sometimes a need for some more advanced techniques, using a dedicated exposure meter.
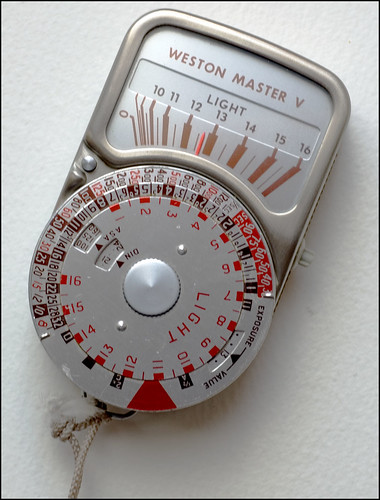
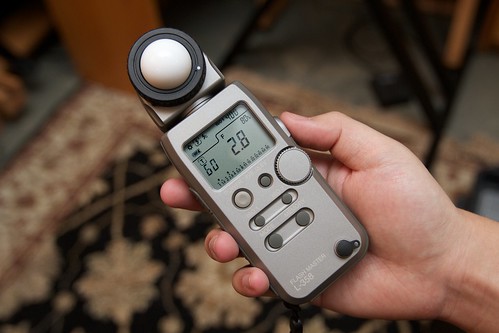
Exposure Meters: Handheld exposure meters used to be a vital tool for many film based photographers – names like Weston being synonymous with professional photography. These days it is possible to pick up older second hand meters for very good prices or, if your budget allows, a brand new digital meter from the likes of Sektronic et al. The advantage of newer meters is that are more likely to include a dedicated flash meter as well as the incident and reflected metering modes. Today we are going to look at both incident and flash metering.

georgerexta [at] gmail [dot] com, on Flickr

Incident Metering: When you read the exposure using your own camera’s systems, you are making a reflected light reading. This means that light falls on your subject and is reflected into your camera. The problem with this is that the surface and color of your subject, modifies the light as it is reflected. If there is a predominance of one color or the subject is significantly darker or lighter than average, your camera’s meter can be fooled.
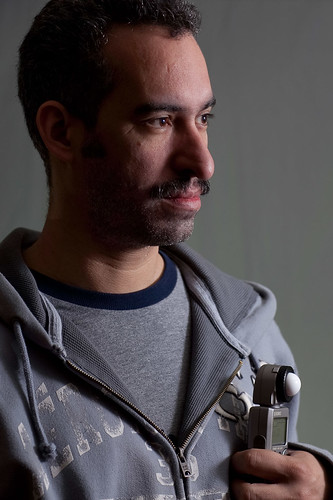
A good solution to this is to use incident light readings. This will measure the light falling directly on the subject, un altered  by the subject itself. Using a handheld meter, you will notice it will have a white, translucent dome that covers the light sensor. This dome evens out the light and gives a very accurate indication of the correct exposure.


Yutaka Tsutano, on Flickr

Making an incident light reading is the opposite of a reflected light reading. With your camera already positioned, you go towards your subject, be it a landscape or ambient light portraits, then point the light meter directly towards the camera to make your reading. The reading you get gives you a very accurate indication of actual exposure without the outside influences caused by a reflected light reading. When transferring your reading to your camera, it is important to make sure you adjust the aperture, shutter speed and ISO rating to the camera. If your meter ISO and camera ISO do not match you will be shooting in vane.
Flash Metering: As mentioned, most modern handheld meters often have a flash meter built in. When using a flash meter, you can use either reflected light metering, at the camera position pointing toward the subject or incident reading as mentioned above.
As with ambient incident light reading, flash incident reading often gives a more accurate result. There are two ways to meter flash, you can either plug your flash sync cable into the meter and press the metering button, this will fire the flash or flashes in the same way as the using the sync socket on your camera.
The other way is when in flash mode, pressing the meter button and firing the flashes manually within a certain time frame, usually 60 seconds. Your meter will usually have a button or switch allowing you to select the required mode. One of the advantages of using flash metering in incident mode is it is not affected by light or dark backgrounds, meaning the exposure for the subject will be correct. As flash exposure is controlled by aperture you can adjust your shutter speed accordingly to get the background looking exactly as you would like it.
 
Vox Efx, on Flickr
Another advantage of using an external flash meter is outdoor portraiture, using fill in flash. An incident flash metering can allow you to accurately calculate the correct amount of fill in flash to keep your subject and background in balance.
Whilst perhaps not an essential piece of equipment for many of us, dedicated, hand held exposure meters can be an invaluable tool to the photographer, allowing us a much greater accuracy in metering in complex light. As photo accessories go, light meters can be a reasonably good value purchase, a decent light meter costing from $200-$400 new, cheaper if you buy second hand.