Beauty dishes are common and well-loved lighting modifiers. They are particularly useful for portraits (beauty is in the name after all). They also tend to be a lot cheaper than decent sized softboxes. Years ago, your choice of beauty dish was quite limited. Nowadays, if you try searching for beauty dishes, you will be presented with a multitude of options that greatly vary in size and even how they set up.
Although the numbers don’t seem to be that different, the actual sizes of these beauty dishes
vary greatly, and they all have a distinct effect on the light in your images.
What do you do when faced with this kind of choice and how do you know what size beauty dish you should buy? This article discusses three common sizes of beauty dishes and shows you what effect they have on your images. All of the beauty dishes discussed here are silver, and none of them are collapsible. As long as they are of decent quality, the fact that a beauty dish is collapsible should have no impact on your images.
What is a beauty dish?
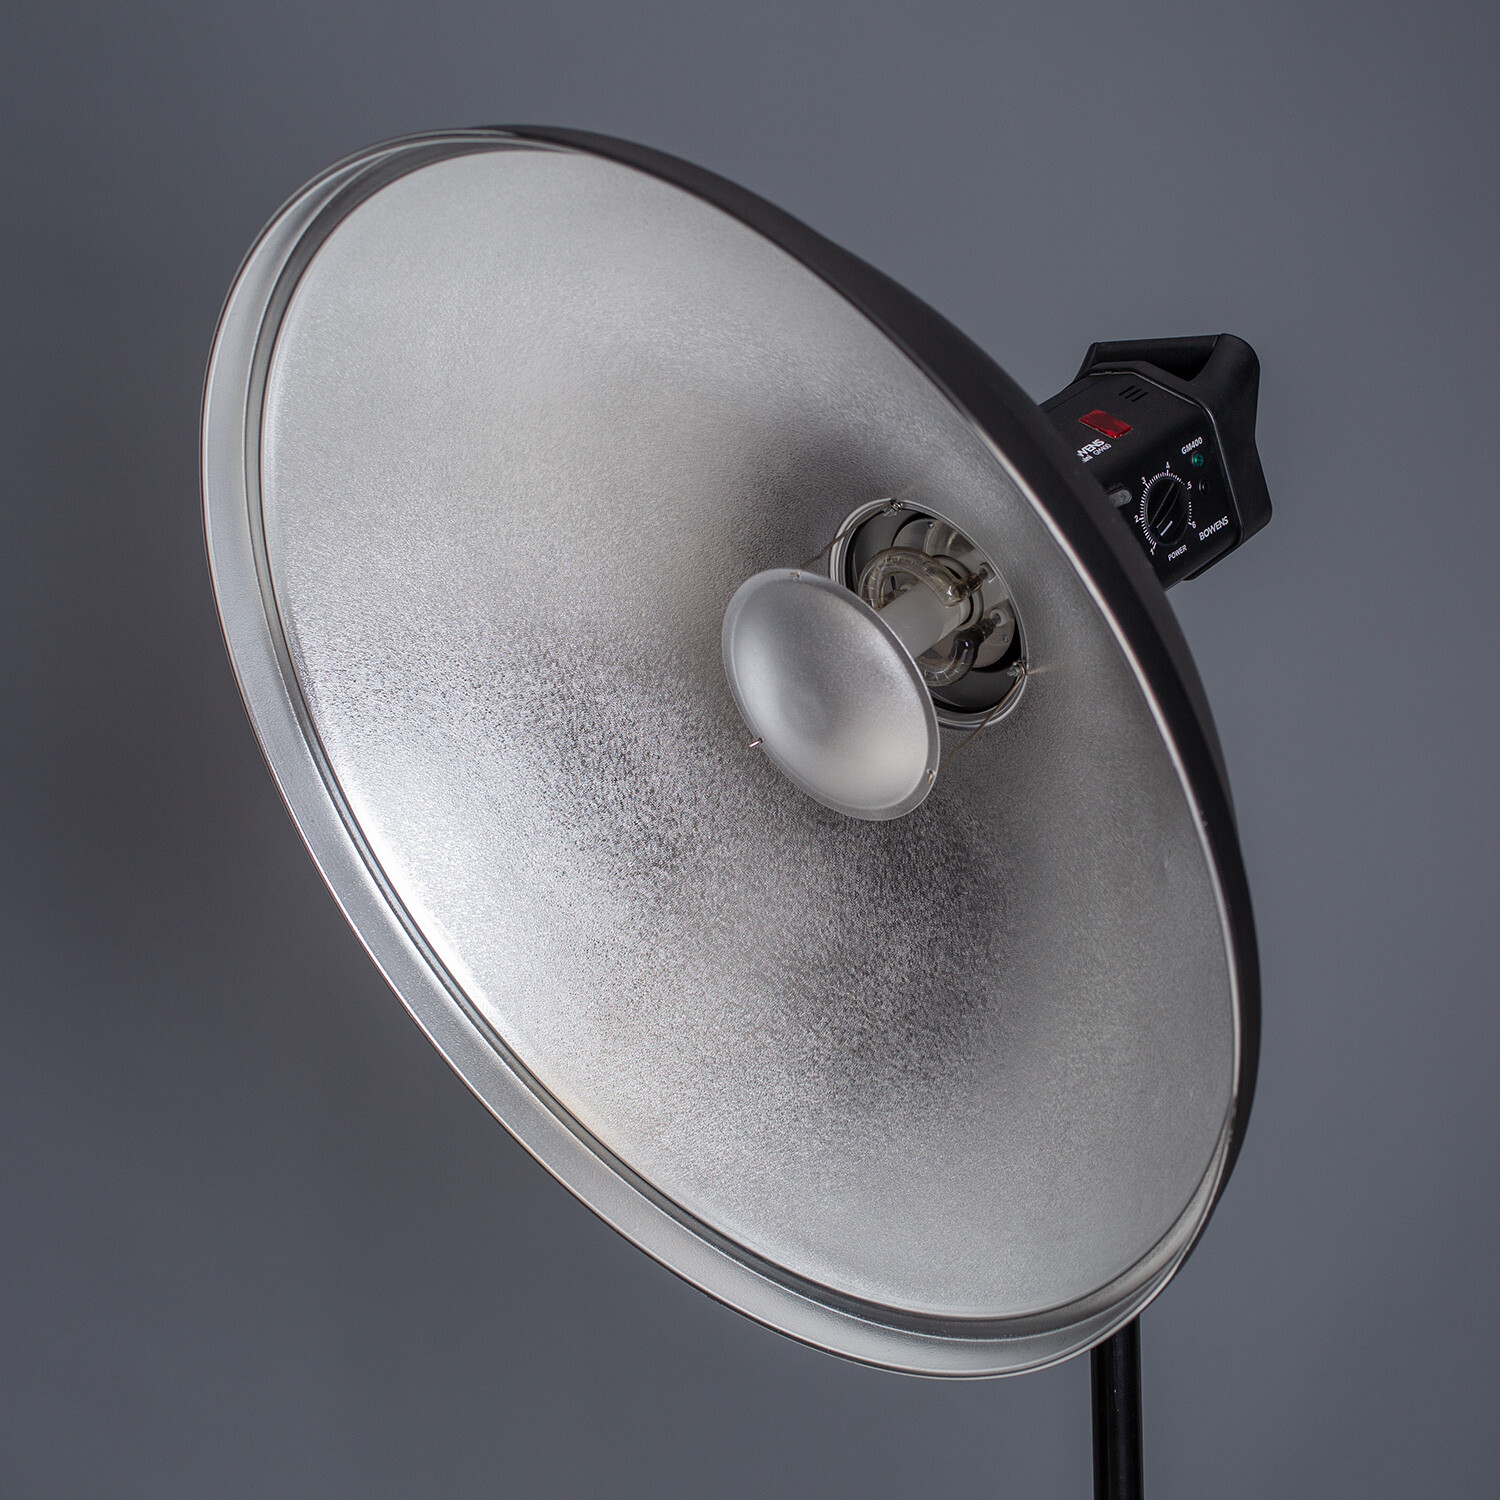
Three different size beauty dishes. Left: 16″ Middle: 20″ Right: 27″
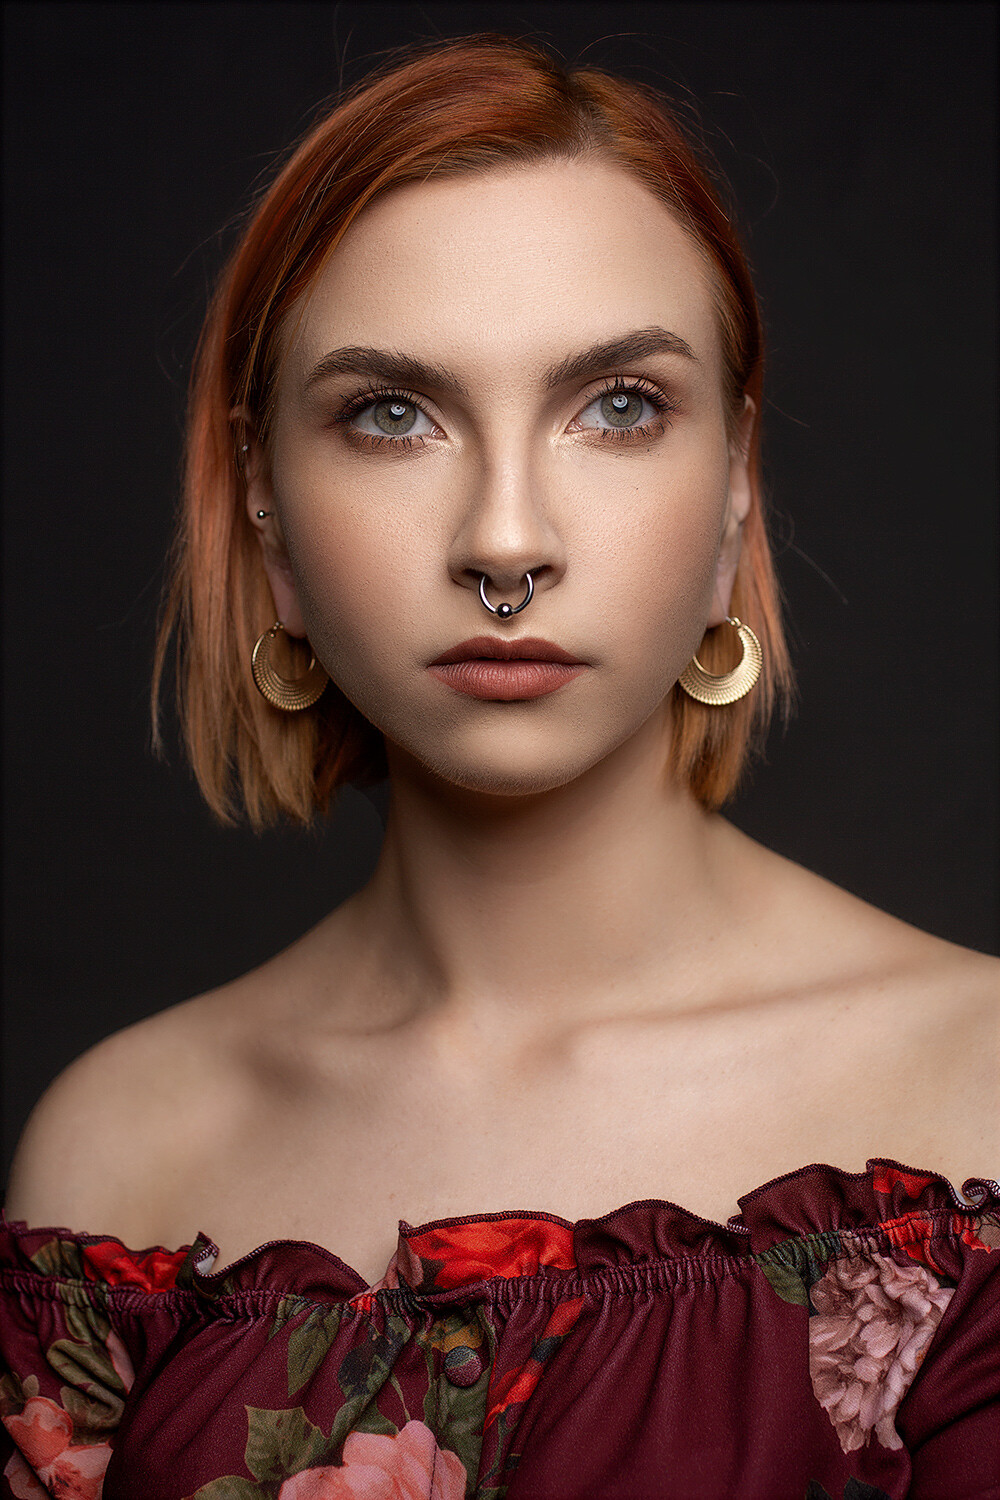
Beauty dishes are bowl-shaped modifiers that are known for the contrasty light they provide. The quality of light is usually somewhere between hard and soft (when brought in close to your subject). This sets them apart from other modifiers, like umbrellas and softboxes, where the goal is to achieve the softest light possible. This allows you to achieve well-defined edges and shadows, but still retain a flattering light on your subject.
This image shows an unmodified beauty dish on the left. A gridded beauty dish in the middle,
and a beauty dish fitted with a diffusion sock on the right.
Often, you will find that beauty dishes come with grids and diffusion socks to help modify them further. Grids alter and increase the directionality of the light, while diffusion socks diffuse the light further, softening it a bit and altering the shape.
What sizes are there?
Any search for a beauty dish should reveal a huge amount of results these days. You can find tiny beauty dishes that are only a few inches across that are designed for flashguns and you can find massive beauty dishes that would be ideal for lighting groups of people. This article compares three sizes that fall more into the normal sized category. These are a 27″, 20″ and 16″.
All three beauty dishes were positioned the same distance from the subject to clearly demonstrate the differences in the effect they provide.
1. 27″
At 27-inch in diameter, this beauty dish is at the upper reaches of what you can expect to find in terms of size. When it’s in close, the light it provides is really soft and is comparable to a medium-sized softbox, but with a bit more contrast to it. It also provides large catchlights in your subject’s eyes.
Because of its size, it’s easy to bring the light further away from your subject to achieve a similar effect to that of smaller beauty dishes, while giving you more room to work. This beauty dish would also be great for lighting multiple people, whereas smaller dishes might struggle.
The 27″ beauty dish provides really soft light when placed in close. Pay attention to the
shadow and highlight transitions as well as to how the light wraps around the subject.
There are a couple of disadvantages to a beauty dish this big. The bigger the light source is in relation to your subject, the less bright your subject’s eyes are going to be. If you want bright, clear eyes, a smaller beauty dish may be the way to go. It is also harder to control the light fall off (without a grid) as the bigger source will cast more light behind your subject.
2. 20″
The second beauty dish we’re going to discuss comes in at 20 inches. This is pretty close to what may be considered a standard size for a beauty dish (if there is such a thing). Placed a few feet (1-4) away from your subject, the qualities of light it produces are great for all sorts of portraiture and for a wide variety of subjects.
It is great for male and female subjects, though for flattering portraits of older people you may want to consider not using a beauty dish. Instead, opt for large softboxes and umbrellas. As the beauty dish isn’t a great deal bigger than your average subject’s head (from an appropriate distance), you also have good control over the light fall off, and you have even more control when you introduce a grid.
The 20″ beauty dish also provides good, soft light but the edges of the transitions from
shadow to highlight are more defined. You’ll also note the light wraps around the
subject less and results in darker shadows toward the back of the subject’s head.
3. 16″
This last beauty dish is 16-inches in diameter. This is the size that I have used the most ever since I bought it well over a decade ago. You can see in the images just how battered and well-used it is.
Because it is quite small, it is easy to control and great to bring in really close to your subject. This beauty dish clearly lights and defines your subject’s eyes. The harder light source also provides clearly defined edges between shadows and highlights but in a flattering manner.
If you want to reduce light fall off as much as possible, this size is definitely the way to go. However, if you want to increase it, you are better off with a larger modifier. This is because moving this beauty dish any distance from your subject will result in really hard light that you might find unflattering to most subjects.
The 16″ beauty dish also provides excellent light. Here you can see the transitions from
shadow to highlight are clearly defined. Also, the rapid light fall off means the areas
towards the back of the subject’s head are more in shadow.
In terms of portability, this size beauty dish is great. It doesn’t weigh very much at all and just carrying it in your hand takes minimum effort.
When used as something other than a key light, this size beauty dish is really effective.
Its small size makes it unobtrusive and easy to position anywhere you need, whether that’s
for use as a hair light or fill.
What size should you get?
Left: 16″ Middle: 20″ Right: 27″
Some of the differences between these three modifiers can be subtle and hard to spot if you’re new to lighting. If you’re still wondering which you should opt for, my best advice (which is by no means gospel) would be to evaluate what you need it for.
Do you need portability? Get a small one or consider a collapsible one.
Will you be shooting groups of people often? Go for the largest one you can.
Are you shooting in a small space? Go for the small one again.
Are you shooting in a large space where you can’t get the lights very close to your subject? Again, go for the biggest one possible.
Whichever you choose, make sure that it comes with both a grid and a diffusion sock for the most control possible.
No matter which way you choose to go, you are going to find yourself with a versatile and useful modifier that will last you for years.
Have you used these modifiers? Share your thoughts with us in the comments below.
Share this article.
Saturday, July 6, 2019
I hope yours was a great July 4th holiday (America). This weeks' Photography freebie is about understanding your cameras' exposure settings. Just copy and paste the link below into your browser, click ENTER and you're on your way to better understanding your camera.
Shutter speed is one of those things that is initially a problem to be solved, but once you do that it becomes a tool that allows you to take better and more creative photos.
First you should understand how shutter speed works and how to change it. You will need to make sure it is fast enough that your pictures turn out crisp. But once you’ve mastered those things, you can start using shutter speed to your advantage. You can slow it down to create a sense of movement, or speed it up to stop the action.
Grey Whale Cove: 1/4 second at f/16, ISO 100
This article will show you the basics of what you need to know regarding shutter speed and get you started with some creative effects using different shutter speeds.
What is Shutter Speed?
Shutter speed is simply the amount of time the shutter inside the camera is open, allowing light onto the digital sensor to expose the picture. The longer you hold the shutter open, the more light is let in to the camera to expose the picture.
But holding the shutter open longer than a tiny fraction of a second has consequences. The camera must be held completely still during the exposure or the picture will be blurry. Without using a tripod or some other means of support, you cannot hold the camera still for longer than about 1/60th of a second and blur will start to creep in to the picture (more on this in a second).
Shutter speed is recorded in fractions of a second. So a shutter speed that says 1/60 (it may just show 60) means that when you take the picture the camera will open the shutter for 1/60th of a second. Most cameras have shutter speed ranges between 1/4000 of a second (on the short side) and about 30 seconds (on the long side). In addition, many cameras have a Bulb mode that allows you to hold the shutter open as long as you wish.
Make Sure Your Shutter Speed is Fast Enough
One of the first issues you will confront as a photographer is making sure your shutter speed is fast enough. If you have a tripod, this will not matter as much and you can leave the shutter open a long time (sometimes even several minutes). But assuming you are hand-holding your camera, a long shutter speed will introduce camera shake and make your image look blurry.
But how fast is fast enough? There is something called the Reciprocal Rule designed to help you with that answer. This rule states that your shutter speed should be at least the reciprocal of your focal length. That sounds complicated, but don’t worry it is easy to figure out. You just put a one over your focal length and that is your minimum shutter speed. So, for example, if your focal length is 60mm, just make sure your shutter speed is 1/60th of a second or faster. If you are zoomed in and your focal length is 200mm, make sure your shutter speed is 1/200 of a second or faster (remember to consider lens factor as well if you have an APS-C sensor) Any slower than that and it is time to break out the tripod (or raise open your aperture and raise the ISO).
1/200th at f/2.8, ISO 3200
Changing Shutter Speeds
The next question you will confront is how to change your shutter speed. The actual physical changing of the shutter speed is pretty simple, it’s typically done via a dial on top of your camera. The more important question is how are you to offset the change to shutter speed, assuming you are in manual mode (if you are in Aperture priority or Program mode the camera will make the change for you).
If you use a faster shutter speed, the shutter is not open as long so the camera gathers less light. So, without something else changing, your picture will be underexposed by using a shorter shutter speed. To make a proper exposure, additional light has to come from somewhere. You can add that extra light to offset the use of a faster shutter speed in one of two ways:
Open up the aperture: The aperture is the hole your the lens that allows light to pass into the camera. A larger aperture allows more light into the camera. So if you open up your aperture by one stop, you are letting in twice as much light during the same period of time. But be careful, a larger aperture also creates a shallower depth of field, which you might not want.
Increase the ISO: The ISO is the rating assigned to how sensitive your digital sensor is to light. It is adjustable, and the higher the number, the more sensitive you make your camera’s digital sensor to light. But this comes at a cost, digital noise, which increases as you increase the ISO.
There are separate controls on your camera to make these changes. Use either of these methods to add more light to your exposure whenever you are shortening your shutter speed.
Using Shutter Speed Creatively
Now that you understand shutter speed a little bit, you will want to put it to use creatively. There are several ways to do this, and we will work through some of them from the faster shutter speeds to the slowest.
Stopping the Action
In times of high action or drama, you can stop the motion by using a very fast shutter speed.
To do this, you will want your shutter speed to be 1/250 of a second or faster. At times, like with the picture below of the water droplets being flipped through the air, you may want the shutter speed to be significantly faster. This particular picture was shot at 1/8000th of a second.
1/8000th at f/2.8, ISO 250
Accomplishing shutter speeds this fast, even on bright sunny days, will require offsetting moves. For example, you will need to open up the aperture to its widest setting. Doing so will result in a shallow depth of field, but in this sort of picture that usually won’t matter. You will also probably need to increase the ISO (a little on bright days, a lot on cloudy days or indoors).
Another key for these type of shots where you are stopping the action, is to anticipate the shot. With the speeds at which modern cameras shoot, you may often want to just hold the shutter button down and blast away, this rarely works though. The decisive moment is usually only captured by anticipation and triggering the shutter at precisely the right moment.
Panning
Another way to use shutter speed creatively in times of action is to pan the subject. Panning is where you move the camera during the exposure to follow the subject. Done properly (or when you get lucky) the subject is relatively sharp, while the background is blurred and conveys a sense of motion.
1/15th at f/7.1, ISO 50
Accomplishing this is usually best at slower shutter speeds between 1/8 and 1/30 of a second. Being able to slow down the shutter speed is typically welcome news, as it will mean you do not have to crank up your ISO, or make other offsetting moves. Getting a good result will frequently require at least a few attempts, while you gauge the speed, and other settings.
If possible, get your exposure set up before you attempt to pan. That way you are only thinking about the panning during the shot, as opposed to worrying about all your other settings.
Creating a Sense of Motion
Still another creative use of shutter speed is slowing it down to create a sense of motion. This is accomplished when the subject is moving slightly through the frame during the exposure. This idea is for the subject to be identifiable, but slightly blurred.
1/4 second at f/16, ISO 50
Shutter speeds for this type of shot are between 1/4 and 1/10th of a second. That is virtually always too slow for you to hand-hold your camera, so you will probably need to break out the tripod for this type of shot.
Long Exposures
The final creative use of shutter speed we will cover here is a long exposure. This is where you hold the shutter open for a long time and allow certain parts of your picture to move through the frame. You will always need a tripod for this technique.
20 seconds at f/8, ISO 400
Long exposure shutter speeds are between 10 and 30 seconds. Most cameras offer you the ability to go even longer by using Bulb mode, where the shutter will stay open as long as you hold the shutter button down. A remote shutter release, which is always a good idea when you are shooting from a tripod, is almost a necessity for this type of shot.
Long exposure is a great technique whenever there is moving water involved, such as coastal scenes, rivers, and waterfalls. It is also great for streaking lights in night photography.
Whereas most of the time, your challenge with shutter speed is to get enough light into the camera; in this context getting the shutter speed you want usually involves the opposite problem. The challenge is to limit the amount of light entering the camera so that you can leave the shutter open a long time without overexposing the image. To do that, first close down the aperture to its smallest setting and use the lowest ISO setting on your camera. The lowest ISO setting is usually 100, but some cameras contain an expandable ISO range that will allow you reduce the ISO further, so be sure to check your camera’s menu for that.
But if those moves don’t restrict the light enough, you will need to use a neutral density filter. These are filters that restrict the amount of light coming into your camera. They come in different strengths, with typical values between two and 10 stops of light. Get one of these (or a few different strengths) and keep it in your bag if you think you will have any long exposures in your future.
15 seconds at f/8, ISO 500
Once you have mastered the basics of shutter speed, it is a great tool for adding creativity to your photography. It is perhaps the most effective way to make our photos more interesting. So lock down the basics, and then give some of these techniques a try.
One of the most crucial factors of making any photograph is the selection of the shutter speed. It is not always an easy task to decide what shutter speed you should select, to correspond to the aperture or ISO setting you have chosen. It can be a little overwhelming, and sometimes discouraging, to learn how to select the proper shutter speed to produce whatever your desired photo may be. You might still be shooting in full auto just because you can’t seem to have any luck with manually selecting your exposures. Luckily, once you understand the basic concept of shutter speed in relation to photography, this aspect will become much easier and almost intuitive.
Let’s take a look at what shutter speed really is, and how to better understand it, so you can begin to have more control over your photography.
What is shutter speed?
First things first, what exactly do photographers mean when they say “shutter speed”? This refers to the amount of time that the shutter of the camera is open. Shutter speed can be easily compared to blinking. Close your eyes, then open them for about one second. Now close them again. You have just performed a one second exposure with your eyes. Though very simplified, the exact same thing happens inside your camera when you press the shutter release button. The shutter opens, and remains open, for whatever duration you have set your camera to expose. This lets in light through the lens which interacts with whatever receptor you’re using (film or digital sensor), in order to produce a photograph. In reality, it might help you to refer to shutter speed as shutter time.
How does shutter speed affect a photograph?
As I have said, shutter speed is one of the biggest assets you can control in order to produce the type of photograph you want. Now, the shutter is not to be confused with aperture. Aperture has nothing to do with the amount of time that light is allowed to enter your camera. Aperture simply refers to the size of the opening through which the light passes when the shutter opens. The larger the opening is, the more light that enters your camera. The shutter speed, on the other hand, controls how long light is allowed to linger in order to make the photograph. Got it? Good.
So since shutter speed is related to time, it naturally means that it will directly affect how motion is recorded by your camera. This is where an infinite amount of creativity can be applied to your photographs. You may have heard a photographer say, “I used a really fast shutter speed to freeze the motion.” What they means here is that he or she used a shutter speed that was much faster than whatever motion was happening in the scene. The faster the motion, the faster the shutter speed will need to be, in order to arrest the movement. This is the very reason beginner photographers can become frustrated when photographing sports, children, or pets. They simply don’t understand that the shutter speed must be set in relation to the subjects motion to produce a desired outcome.
Take a look at this quarter that I froze mid-roll by using a fast shutter speed of 1/1250th of a second.
The flipside of the shutter speed coin comes into play when you want to impart a sense of motion, or to intentionally use blur within your composition. There is no better illustration of this than when working with moving water and waterfalls. Photographers will often use a long shutter time in relation to the speed of the water in order to produce that smooth, almost fog-like appearance that many of us love (or hate) to see. This again, comes down to relativity. A longer shutter time will be needed to blur a slow moving subject. A faster moving subject will not require as long of a shutter time in order to produce the same effect.
Here’s that same quarter shot at 1/50th of a second.
Things to keep in mind about shutter speed.
As with virtually everything else that has to do with photographic technique, there are not absolutes when it comes to how you choose to manipulate your shutter speed. It always comes down to whatever it is you are trying to express through your photograph. However, this doesn’t mean that there aren’t other things that you should know which are related to shutter speed. Two of the most important things you need to know is how aperture and ISO interact with shutter speed.
Aperture
Aperture is the best friend, and worst enemy of your shutter. As you have already learned, aperture controls the size of the opening in your lens and is measured in “stops”. Stops are indicated by the usage of f-numbers. Understanding how aperture is measured is the most difficult aspect of the subject. It is actually somewhat counter intuitive and that is why it becomes so confusing. Basically, the larger the f-number, the SMALLER the physical opening becomes. It might help to think of aperture as a window in your home. The larger the window the more light can come through. When shooting at larger apertures (smaller f-numbers like f/2.8, etc.) you have a lot of light coming into your camera so your shutter time doesn’t have to be as long in order to reach the desired exposure. The opposite is also true. When you are shooting at smaller apertures (bigger f-number like f/22) a longer shutter time will be required to produce the same exposure that was achieved at the larger aperture.
Here you can clearly see why less light can come through a smaller aperture.
Let’s say a certain shutter time at a certain aperture gives you a properly exposed image. You then switch to a higher f-number. If you don’t increase your shutter time, this image will be underexposed compared to the previous one because you have essentially made the window into your camera smaller. The take-away point here is that a change in aperture must also be accompanied by a change in shutter speed if you wish for the overall exposure to remain the same.
It should also be noted that aperture plays a key role in the perceived depth of field of a photograph…but that’s another article.
ISO
ISO is a measurement of light sensitivity. It is fairly straight forward to understand. The higher the ISO number, the more sensitive the camera sensor, or film, is to the light coming in through the lens. Although most modern cameras are capable of selecting ISO in smaller increments, when first learning about how ISO relates to shutter time it might be easier to use increments in powers of two; meaning ISO 100, 200, 400, 800, 1600, etc. Each time the ISO number doubles, the sensitivity to light also doubles. So ISO 200 is twice as sensitive as ISO 100.
We can then easily relate ISO to shutter speed using a one second exposure to simplify the math. Let’s say we find that a proper exposure of a scene requires ISO 100 and a one second exposure time. If we increase the ISO to 200 then we have doubled the sensitivity so we can now get the same exposure using half a second instead of one second. If we further increase the ISO to 400 then we can get the same results from a ¼ second exposure. As you have probably already deduced, increasing your ISO is an easy way to allow for an increase in shutter speed to compensate for subject movement, or for low light.
Take a look at these three images. I was able to get virtually identical results each time even though I decreased the exposure from 1 second to ¼ of a second just by increasing my ISO.
Be aware though, increasing your ISO will add grain (noise) to your final image to some extent depending on your camera and equipment. Still, it is almost always more acceptable to live with a little increased grain in an image, than to underexpose or miss the shot completely.
Understanding what shutter speed means to your images doesn’t have to be a complicated issue at all. Shutter speed, or more accurately shutter time, is simply a measure of how long you choose for light to enter your camera to make an image. Learning how shutter time relates to other aspects of photography is slightly more complex. That doesn’t mean that it should discourage you from experimenting and seeing first hand how ISO, aperture, and shutter time come together to produce different types of images.
Share this article.
For Beginners – Your Camera Explained in Plain English
Beginner, don’t be dismayed! It can be really easy to understand your camera and how the settings in the exposure triangle work the way they do. This explanation is the way I personally think of my camera as an eye:
The sensor in your camera is the brain. It receives data and information.
ISO is how sensitive the ‘eye’ is to the light. The higher the number, the more sensitive the eye.
Aperture is like the pupil. The wider it is (the lower the f/stop number), the more light is allowed into the eye. Over exposure is like when you’re inside where your pupils are more dilated to compensate for lower light. When you step outside, everything it too bright and your pupils have to get smaller to compensate for so much light. Then when you go back in, everything is too dark (under exposed) because your eye’s aperture needs a moment to open up and let in the light.
Shutter speed is like blinking. The faster it blinks, the less light is allowed in and vice versa.
As painfully simple as this is, it really doesn’t get too much more complicated than that – the explanations just do!
How about everyone else? If you had a total beginner ask you to explain how a camera works, what would you tell them?
There are countless Photography books and classes that explain exposure, yet after reading or attending them, your photos may not have improved because…well, let’s be honest… some of us Right-Brainers aren’t super technical!
I recently taught a small photography class to newbies. I thought hard about how I could explain exposure in the simplest way possible. I found that a parallel example of something relatable was the best way to convey the different aspects that impact exposure.
I tested this theory by explaining exposure to my 8-year old daughter and then quizzed her. She proved the theory was a success by grasping the concepts within 10 minutes. So I’d like to share my lesson with you so you can understand exposure in under 10 minutes!
A 10-minute lesson that will change your Photography
Your DSLR camera is like your head with the LENS being your vision and the camera BODY is your brain. Your vision sees things and your brain records the details.
Just like when you look at something – let’s say, a flower – your eyes see it and send information to your brain that the flower has long petals and that it is yellow. If you looked at it too quickly or it was too dark, for example, the information your brain records is compromised.
The “exposure triangle” is about how 3 things — aperture, shutter speed and ISO — work together to provide enough light for your brain (the camera) to record what you see. You need the right combination of these 3 components to have perfect exposure.
For example, if you don’t let in enough light, you won’t see things very well because it’ll be too dark (underexposure).
Too dark, or underexposed
If you let in too much light, then it’ll be too bright and you can’t see a lot of the details (overexposure).
Too bright, or overexposed
APERTURE = how WIDE you open your eyes
A small aperture (a large f-stop or f-number, like f/22) is like squinting. A large aperture (a small f-stop or f-number, like f/1.4) is like having “bug eyes”. Quiz: If you are shooting in low light, how wide do you open your eyes? Will you see well at night if you are squinting (small aperture)? Quiz: What happens on a super bright day if your eyes are wide open and they’re open for a long time (slow shutter and large aperture)? Can you see well then?
Aperture is how wide you open your eyes – bug eyes, or squinting
SHUTTER SPEED = how LONG you open your eyes
A fast shutter, like 1/1000th of a second, is blinking super fast. A slow shutter speed, like 2 seconds, is keeping your eyes open and then blinking. The thing to remember is: your brain is recording everything when your eyes are open. So if you or something you’re looking at is moving, and your eyes are open a long time (slow shutter), then your brain will record a blurry image. Quiz: If you want a crisp shot of someone jumping, how long do you need your eyes open? What will freeze the shot: a quick blink (fast shutter) or a slow one (slow shutter)?
ISO = special glasses
ISO = special glasses that help you see in the dark
ISO is like the opposite of sunglasses. Let’s call them MOONglasses! 😉
The higher the ISO, the thicker your moonglasses, so the more you are able to see in low light. You need thick moonglasses (high ISO) when shooting indoors or at dusk. You need very thin moonglasses (low ISO) when it’s a sunny day. Quiz: do I need thick, thin or medium moonglasses if I’m shooting at the beach on my lunch break?
All 3 of these things work together
Here is an example: You are photographing your sleeping cat who is snuggled on the couch. There is not much light coming through the windows or additional ambient light. To see well, you have medium-to-thick moonglasses on (such as ISO 600). You need to have your eyes open pretty wide (large aperture, such as f/1.4). However, you don’t have great vision (you have a kit lens that only goes up to f/4.5), so you need more light to see. Thus, you leave your eyes open longer (slow shutter speed, such as 1/30th sec).
Final Quiz:
In the same scenario, your cat notices you are snapping photos, so she starts walking away and leaps off the couch. You still want to photograph her. Which would you change: how open your eyes are (aperture), how long you leave your eyes open (shutter speed), or thickness of your moonglasses (ISO)?
If you increase your shutter speed because you want to freeze the image, what else would you need to change? (If you changed nothing else, the image would be too dark because you let in less light.)
Once you get the basic concept of exposure and how the three components of the exposure triangle (aperture, shutter speed and ISO) work together, turn your DSLR camera to “manual” and practice the specific settings based on different circumstances.
Share this article.
Thursday, July 4, 2019
How Do You Know When You’re Ready to Start Charging for Your Photography?
An image from my first wedding. One of the scariest days of my life.
How do you know when you’re ready to start charging for your photography?
When someone is willing to pay you for them.
There you go. In twenty-two words, I have answered one of the most-asked questions in photography.
In all seriousness though, that is pretty much it.
You only have to look at the story of many photographers and how they started. They simply took an offer to get paid, fearing they were not ready.
Let’s be honest right out of the gate. You will be nervous as hell – probably convinced you are a fraud – and will be fearful of delivering the images to the client. Awaiting their reaction, you may wonder why anyone would pay you to take photos. This is natural and is more commonly known as “imposter syndrome.”
Imposter syndrome
To put it simply, it is the feeling that your work isn’t very good and doesn’t deserve the attention it gets. Albert Einstein also suffered from this, so if this sounds like you, you are in good company.
The truth is, people who are highly skilled or accomplished tend to think others are just as skilled. Because you see what you do as simple, you don’t see the vast amount of skill involved in the work you do. You take it for granted because it comes so easily to you.
It is also human nature to be more critical of your own work than that of others. Put this into a world of social media where everyone is #livingtheirbestlife, and there is what appears to be a never-ending stream of amazing images you see as better than yours. Now you have the perfect storm.
The fact that Einstein suffered from this shows there seems to be no level of accomplishment that makes you able to see worth in what you do. In some cases, higher accolades and awards make things worse.
You just need to remember you are skilled in what you do and your work is good.
Unfortunately, if you suffer from imposter syndrome, you may never be able to rid yourself of it. However, there are things you can do to make it easier. Tactics include talking with others about your issues and taking note of the positive feedback you get. People don’t have to say nice things about your work; they say them because they mean it!
Most importantly, remember that almost everybody suffers from this in one respect or another. I suffer from this badly. Repeatedly, I think my work is awful and wonder why people want to pay me to take their photographs. I convince myself that unless I have taken the best photograph in the history of photography of whatever I am shooting, then it is a failure.
Luckily, I have a great family who support me through the tough times and remind me that people pay for my work because I am a good photographer.
I had shot lots of bands, but few band portraits at this point. They were nervous as I had
photographed artists they loved. I was nervous because they were paying me for portraits.
Imposter syndrome at its finest.
Fake it til you make it – except for weddings!
There is always a huge element of “fake it til you make it.” You sometimes need to have faith in yourself and go for it. Standing at the edge of the diving board is the worst place to be because you have time to think. Sometimes you need to jump off and try your best. At times it will be graceful, sometimes you may bellyflop. However, in reality, all that is hurt is your pride (and your belly obviously).
Let’s say a friend asks you to photograph their kids because they have seen photos on your Facebook and want some of their kids. They are happy to pay you for the photos too.
My advice is to go for it.
Let’s say the worst happens, and the photos turn out to all be awful (this is more than likely not going to happen. Even if you do not get loads of great shots, you should get a few keepers). All you do is own up and say you are not happy with the photos and they deserve better. The only thing that is an issue is you have to give up more time to retake the photos.
Photographing a family portrait is the perfect example of when fake it until you make it is okay. Shooting a wedding, however, is not!
The fact that weddings are a one-off event and if you are not 100% certain you can deliver, then you shouldn’t do it.
I have seen (as I am sure many of you have) people on Facebook groups asking questions like “I’m photographing my first wedding next week, I have this lens and that lens. Which will be better? Also, do I need a flash?”
This is irresponsible. You need a certain level of skill and knowledge to photograph a wedding, especially if you are getting paid for it. You cannot gain the knowledge to photograph a wedding by asking questions in a Facebook group a few days before the event. You need to have it before you take on a wedding.
There are always news stories about a wedding photographer getting sued for ruining a couple’s wedding day. Please don’t become one of those. If you aren’t sure if you are ready to photograph a wedding, you probably aren’t.
With that said, your knowledge does not have to be in wedding photography. I know lots of photographers who have never photographed a wedding, but I am sure they would do an awesome job. As a starting point, you need to know how to photograph in a variety of lighting situations. You need to know how to solve exposure issues your camera may throw up, and you need some spare gear in case your main camera dies.
You need a headshot to apply to acting school? Of course, I can (I had no idea).
What equipment do I need if I’m NOT shooting a wedding?
For most photography there are three simple questions:
Do you have a camera?
Do you have a lens?
Do you have a memory card?
If you answered yes to the above three questions, then you have the right equipment to be paid for your photography. Will a variety of lenses and gear make things easier? Yes, but a beginner DSLR with a kit lens is more than capable of producing beautiful images people will be happy to pay you for.
What equipment do I need if I’m shooting a wedding?
As with the knowledge requirements above, the gear requirements for shooting a wedding are different. A wedding requires a different amount of equipment. The most important is to have two camera bodies. If you have one camera body and something goes wrong, you are in a mess. A spare camera body may not be needed, but it is better not to need something and have it there than to need it desperately and it not be there.
In terms of lenses, most wedding photographers tend to go for two f/2.8 zoom lenses or two to three prime lenses. What is best for you depends on how you like to shoot. Fast lenses are always best for weddings as you can use wider apertures to get more light into the camera in low light scenarios such as dark churches.
For those of you looking for specifics, a zoom lens shooter will use a 24-70 f/2.8 and a 70-200 f/2.8. They may also have a prime lens with an even larger aperture for situations where there is really poor light.
A prime lens shooter mostly works with a 35mm and an 85mm. They may also have a 135mm or a 24mm. These are generally f/1.8 or faster.
Now again these are the basics. I have not included flashes, memory cards, hard drive backups, etc.
I will take this opportunity to remind you again; you really do need a high level of skill and equipment to be able to shoot a wedding. It is hard work if you know what you’re doing. If you don’t, it is like a 12-hour waking nightmare.
Want me to shoot your camping space. Of course, I can. It will be…The first part of the
sentence was easy. Asking for the money was always harder. In this case, the client said,
“I was expecting to pay more than that.”
What should I charge?
Now for those of you starting to charge, you will always wonder how much should I ask? When you are first starting, you may photograph for an incredibly low rate, and that’s fine.
No matter what some may say, you are not ruining the photography industry by charging $100 including all the images when you are starting out. The truth is, people looking for photography at that price point are not going to be purchasing from photographers who charge thousands of dollars for a photo shoot.
There isn’t a right or wrong answer. My first family shoot I charged £50 including the images. My first full wedding I charged £500. Would I charge that now? Of course not. However, at the time, I got some cash, I built my portfolio, and most importantly it built my confidence.
The follow on question is how do you know when you are ready to charge more? Again this is down to you, your ability to deliver beautiful images and your confidence.
The moment I decided to raise my prices was when I was paid £600 to photograph a wedding where the couple had spent over £10,000. They didn’t book me for my price; they loved my work.
After that wedding, I doubled my wedding prices.
This led to more inquiries. Not only that, but I also received inquiries for the type of weddings I wanted to photograph. Was I convinced that raising my prices that much would mean no-one would book me? Of course, but they did, and I eventually raised them again. You just have to be confident, and remember, your prices are something you can easily change.
A photo from one of my first family photoshoots. I got paid the grand total of £50
including all images. Even then, I convinced myself I might be overcharging.
There you have it. You are now ready to start charging. Or, maybe you’re not.
The fact remains that in most situations when people offer to pay you, you are ready. The only thing that might mean you are not is you and your confidence.
You might be the type of person who will happily throw yourself off the 10m diving board and see what happens. Or, you might be the type of person who starts on the side of the pool and works your way up until you are at the 10m mark, confident you won’t bellyflop.
However, at some point, you need to leap. It will be scary, but I promise you, it won’t be as scary as it is in your head.
There is a series of free videos on Youtube by Photographer Chris Bray covering many facets of Photography. Because the videos are on Youtube there is no cost to you and me. He goes into detail on subjects ranging from "manual mode" to ISO, to aperture. I think you'll enjoy his indepth explanations and laid back teaching style. If you respond better to the printed word, below are some of the manuals found at the "Digital Photography School" site. You can find these manuals and more here:
https://resources.digital-photography-school.com/ref/937/
Whether you watch the free videos or get the manuals your photography will improve. Personally, I like getting "freebies" and tend to buy things as a last resort unless it's something I really want badly. See the post directly below this one to get access to the free videos. Enjoy!
The autofocus on the Sony A9 is amazing! Set it to eye AF, point in direction of the subject
and let it do the rest. It’s almost too easy.
Everyone is a Photographer these days. It has never been easier or cheaper to create good quality photographs. People sincerely believe that the camera is what takes these amazing images. I am sure you have heard this as many times as I have; “You take beautiful photos, you must have a great camera.”
With the technology we see now though, I sometimes wonder, do they have a point?
We now have cameras in mobile phones, that not long ago professional photographers, paying thousands for their cameras would have dreamed of being able to use. Look at the ‘shot on iPhone’ campaign, and look at Instagram daily. People can take amazing photographs, with a couple of clicks and minimal effort.
Has modern technology democratized photography, or does it mean photography has become easy?
Technology continues to make things easier. But that didn’t start with digital!
Technology has always pushed to make things simpler. Be that the TV remote control or the digital camera. The digital camera was simply the technology industry’s answer to the market forces. Consumers wanted a camera that could take endless photographs. Businesses, noting this need, used the emerging technology to answer their customer cries. Thus, creating digital cameras and changing the face of photography forever.
Let’s get this out of the way early. There was no comparison between shooting digital and shooting film. After the first generations with their inevitable teething problems and huge price tag, photography became incredibly easy with digital. Instant feedback told you whether you had the shot or not. You were not limited by 24 or 36 exposures (or less if you shot medium format). Lastly, after the initial outlay, photography became much cheaper as there were simply no processing bills.
Depending on whom you ask, the digital evolution is either the moment someone got into photography or the beginning of the decline. However, let’s think back a little. If you had shot wet plates, imagine how easy those punks using 35mm film had it.
Imagine when autofocus cameras meant you no longer needed the skill of manual focus? Well, that is just ridiculous! Imagine a flash that didn’t need the incredibly dangerous use of flash powder for goodness sakes. The ability to refocus after the photo is in its infancy, but I can see it being a mainstay of every camera in less than ten years.
Technology helps make life better for humans. The most common way to make things better is often making things easier. In the modern world, we adapt quickly and then quickly rely on the new tech we use. It becomes part of our lives and frees up vital brain space. Every photography innovation, from the first camera onwards, has been about making it easier to preserve a moment in time.
Remember when we only had 18 megapixels, or 12, or six! How did we manage with only nine autofocus points rather than focus points over the entire sensor? Focus points that you don’t really need to use because the camera finds the eyes of humans (or animals), locks on, and all you need to do is decide which eye you want in focus.
I mean imagine how photojournalists in the ’80s would react to a modern digital camera? Moving even further back, imagine telling painters in the 1500s that one day there would be a box that captured the image of the person in minute detail and all you needed to do was to allow light into a box?
I remember the first 0.5MP digital camera I ever used. It was like magic. You could see the photograph instantly, and you never needed to pay for the processing. I was hooked instantly. Even though I had a crappy job, I saved hard for a digital point and shoot and began capturing photos again. I occasionally shot on an SLR camera, but could rarely afford to buy film and process it. I even took a night school class to get access to a darkroom and shot everything in black and white.
The Pentax 3-Megapixel camera I had been saving for months to own, changed my world. The quality wasn’t as good. I had no control over the shutter speed or aperture, but I could take photos. Hundreds of them. All the time. It was life-changing. I had moved more into film making, but this digital camera brought me back. I got hooked again. If it were not for that 0.5 Megapixel camera I got to use in my job, I would probably not even be writing this.
The right place, the right time, but only a phone and no DSLR. Yet I still get an image like this.
Does gear make you a better Photographer?
We are photographers, and we love to lust over gear. The newest this, the better that. Camera companies spend millions trying to persuade us that we need new gear. Will the latest Sony with the mind-blowing eye autofocus really make your photos better? No. Will it make them easier? Undoubtedly, yes.
But, thanks to another wonderful technological invention – the internet – many of us spend more time talking about megapixels than actually using them.
We are as guilty as the influencers who “don’t even use a real camera” because we are the opposite. Instead, we sit pixel peeping the corner sharpness at four million percent and then badmouth how a manufacturer could release such a piece of crap.
A phone camera can take the most breathtaking image, worthy of an art gallery. Conversely, a multi-megapixel medium format camera with the best lens can take a snapshot.
50 years ago this photo was shot on a modified film camera. Gear does not matter
as much as you think. Image courtesy of NASA.
Digital makes it easy, but so much harder to stand out
Estimates suggest that over one trillion photographs were taken in 2018 (if you want to see the zeros, one trillion is 1,000,000,000,000). Ninety-five million photos get uploaded to Instagram every day. Add to that the three hundred hours of footage uploaded to YouTube every minute and the number of photographs and videos we are producing is simply staggering. Now whilst you cannot deny that digital made this possible, digital has also made it much harder to stand out.
Camera manufacturers are great at making people believe that they are artists – that everyone has an amazing movie. In the same way that everyone has a great novel, song, or painting inside of them begging to get out. In reality, that isn’t the truth. Photography (to me at least) is art. And art is, for better or worst, elitist.
Some people are not great artists and some are not great songwriters. And many people are not great photographers.
The problem is, with so much poor and average stuff out there, how do you get to see the good stuff? In some cases, you don’t. There are photographers out there, who are taking photographs that are simply some of the best ever taken. However, we will never see them. There are filmmakers out there creating short films that should see them breaking down the doors of Hollywood, but they don’t. Instead, our feeds are filled up with yet more cat memes and average photos we have seen thousands of times before.
We are drowning in content.
It is to the point where photography seems to be a popularity contest, rather than about artistry.
Look at how Canon treated Yvette Roman because she didn’t have 50,000 followers or more on YouTube. Let that sink in. A photographer whose style they loved for a job, who they agreed to hire, was replaced simply due to her lack of numbers. That shows you how companies want to hire photographers who can use their social channels to add to the marketing campaign.
We live in the influencer age, where amazing photographers are turned down for jobs due to not having followers. On the flip side of that, someone who only uses their phone for photography can be given thousands for merely showing that they use a particular piece of gear. They travel the world for free simply because they are popular on Instagram.
This system makes perfect sense when looked at from a marketing perspective. However, these platforms are where most of us spend our time and where we discover new content. Therefore, algorithms now control the amount of photography we get exposed to.
An algorithm doesn’t care about quality; it cares about metrics. The aim is to find popular content and put it out there for more people to find. Does this mean that photography is being reduced to likes? In many ways, yes, but it also shows the power of a story.
My 6-year-old took this photo. Sharp, well exposed and decent color. Not even a
DSLR, just a compact.
A camera does not know how to tell a story yet
We live in an age where you can throw your work out for all the world to see. The level of photography has never been higher. I can give my six-year-old a camera, and he can take sharp, well-exposed photos, telling the stories of his lego figures. But a camera, in fact, no technology, can yet create an image that tells a story.
A great photograph always tells a story. It makes us want to know more about the moment. It allows us to create our own story based on what we see in the image and our world view. The story I see in a photograph will be different from yours. In fact, you may hate a photograph I love and vice versa.
This is simply not possible with even the greatest camera. There is no Ai that will pick the perfect moment for you to click the shutter button. Yes, cameras may do 20 frames per second or more, but even then, you cannot continually record every second of the day. You need to find the angle, frame your subject in the way that tells your story and then press the shutter. Really, the technical aspect (no matter how much the camera companies persuade us otherwise) is not where the photograph is made. It is not in the corner sharpness – many great photos are not sharp. It is the story you tell.
The story is what you need to learn. Telling a story is hard. It has always been hard, and technology is nowhere near being able to do it for us.
You make the decisions before you press the shutter. You use the light, the subject, and find the angle. Then you open a box and let in some light for a little bit. It has always been the same. It’s just that technology over the years has made it easier to let the light in the box and get the image sharp if that is important to you.
No matter what the camera, knowing the moment to press the shutter is still a skill that is
not computer controlled, yet.
The future
I am sure you all saw it? It finally happened – a couple hired a robot to shoot their wedding! Yes, I know it is just a photo-booth style alternative for now, but it does hint to the future. Are we going to be used to weddings where drones automatically take photographs that are better than a human can capture? Photographs that can then be instantly customized by the bride and groom at the touch of a button (or voice command)? Will this mean that people will become obsolete in many photography fields? Will they only need a device; a robot?
Will my future as a photography business owner involve owning several robots? The ten-year-old version of me prays that this is true. Alternatively, will people not need to hire anyone? Perhaps photography will be built into their daily devices? Will we become so vain that a device follows us around capturing our daily lives and then picks the best moments via an algorithm to share on social media for us? (Let’s hope not! – Editor)
What do you think? Share your comments with us below.


 Share this page.


 There are countless Photography books and classes that explain exposure, yet after reading or attending them, your photos may not have improved because…well, let’s be honest… some of us Right-Brainers aren’t super technical!