There is a series of free videos on Youtube by Photographer Chris Bray covering many facets of Photography. Because the videos are on Youtube there is no cost to you and me. He goes into detail on subjects ranging from "manual mode" to ISO, to aperture. I think you'll enjoy his indepth explanations and laid back teaching style. If you respond better to the printed word, below are some of the manuals found at the "Digital Photography School" site. You can find these manuals and more here:
https://resources.digital-photography-school.com/ref/937/
Whether you watch the free videos or get the manuals your photography will improve. Personally, I like getting "freebies" and tend to buy things as a last resort unless it's something I really want badly. See the post directly below this one to get access to the free videos. Enjoy!
The autofocus on the Sony A9 is amazing! Set it to eye AF, point in direction of the subject
and let it do the rest. It’s almost too easy.
Everyone is a Photographer these days. It has never been easier or cheaper to create good quality photographs. People sincerely believe that the camera is what takes these amazing images. I am sure you have heard this as many times as I have; “You take beautiful photos, you must have a great camera.”
With the technology we see now though, I sometimes wonder, do they have a point?
We now have cameras in mobile phones, that not long ago professional photographers, paying thousands for their cameras would have dreamed of being able to use. Look at the ‘shot on iPhone’ campaign, and look at Instagram daily. People can take amazing photographs, with a couple of clicks and minimal effort.
Has modern technology democratized photography, or does it mean photography has become easy?
Technology continues to make things easier. But that didn’t start with digital!
Technology has always pushed to make things simpler. Be that the TV remote control or the digital camera. The digital camera was simply the technology industry’s answer to the market forces. Consumers wanted a camera that could take endless photographs. Businesses, noting this need, used the emerging technology to answer their customer cries. Thus, creating digital cameras and changing the face of photography forever.
Let’s get this out of the way early. There was no comparison between shooting digital and shooting film. After the first generations with their inevitable teething problems and huge price tag, photography became incredibly easy with digital. Instant feedback told you whether you had the shot or not. You were not limited by 24 or 36 exposures (or less if you shot medium format). Lastly, after the initial outlay, photography became much cheaper as there were simply no processing bills.
Depending on whom you ask, the digital evolution is either the moment someone got into photography or the beginning of the decline. However, let’s think back a little. If you had shot wet plates, imagine how easy those punks using 35mm film had it.
Imagine when autofocus cameras meant you no longer needed the skill of manual focus? Well, that is just ridiculous! Imagine a flash that didn’t need the incredibly dangerous use of flash powder for goodness sakes. The ability to refocus after the photo is in its infancy, but I can see it being a mainstay of every camera in less than ten years.
Technology helps make life better for humans. The most common way to make things better is often making things easier. In the modern world, we adapt quickly and then quickly rely on the new tech we use. It becomes part of our lives and frees up vital brain space. Every photography innovation, from the first camera onwards, has been about making it easier to preserve a moment in time.
Remember when we only had 18 megapixels, or 12, or six! How did we manage with only nine autofocus points rather than focus points over the entire sensor? Focus points that you don’t really need to use because the camera finds the eyes of humans (or animals), locks on, and all you need to do is decide which eye you want in focus.
I mean imagine how photojournalists in the ’80s would react to a modern digital camera? Moving even further back, imagine telling painters in the 1500s that one day there would be a box that captured the image of the person in minute detail and all you needed to do was to allow light into a box?
I remember the first 0.5MP digital camera I ever used. It was like magic. You could see the photograph instantly, and you never needed to pay for the processing. I was hooked instantly. Even though I had a crappy job, I saved hard for a digital point and shoot and began capturing photos again. I occasionally shot on an SLR camera, but could rarely afford to buy film and process it. I even took a night school class to get access to a darkroom and shot everything in black and white.
The Pentax 3-Megapixel camera I had been saving for months to own, changed my world. The quality wasn’t as good. I had no control over the shutter speed or aperture, but I could take photos. Hundreds of them. All the time. It was life-changing. I had moved more into film making, but this digital camera brought me back. I got hooked again. If it were not for that 0.5 Megapixel camera I got to use in my job, I would probably not even be writing this.
The right place, the right time, but only a phone and no DSLR. Yet I still get an image like this.
Does gear make you a better Photographer?
We are photographers, and we love to lust over gear. The newest this, the better that. Camera companies spend millions trying to persuade us that we need new gear. Will the latest Sony with the mind-blowing eye autofocus really make your photos better? No. Will it make them easier? Undoubtedly, yes.
But, thanks to another wonderful technological invention – the internet – many of us spend more time talking about megapixels than actually using them.
We are as guilty as the influencers who “don’t even use a real camera” because we are the opposite. Instead, we sit pixel peeping the corner sharpness at four million percent and then badmouth how a manufacturer could release such a piece of crap.
A phone camera can take the most breathtaking image, worthy of an art gallery. Conversely, a multi-megapixel medium format camera with the best lens can take a snapshot.
50 years ago this photo was shot on a modified film camera. Gear does not matter
as much as you think. Image courtesy of NASA.
Digital makes it easy, but so much harder to stand out
Estimates suggest that over one trillion photographs were taken in 2018 (if you want to see the zeros, one trillion is 1,000,000,000,000). Ninety-five million photos get uploaded to Instagram every day. Add to that the three hundred hours of footage uploaded to YouTube every minute and the number of photographs and videos we are producing is simply staggering. Now whilst you cannot deny that digital made this possible, digital has also made it much harder to stand out.
Camera manufacturers are great at making people believe that they are artists – that everyone has an amazing movie. In the same way that everyone has a great novel, song, or painting inside of them begging to get out. In reality, that isn’t the truth. Photography (to me at least) is art. And art is, for better or worst, elitist.
Some people are not great artists and some are not great songwriters. And many people are not great photographers.
The problem is, with so much poor and average stuff out there, how do you get to see the good stuff? In some cases, you don’t. There are photographers out there, who are taking photographs that are simply some of the best ever taken. However, we will never see them. There are filmmakers out there creating short films that should see them breaking down the doors of Hollywood, but they don’t. Instead, our feeds are filled up with yet more cat memes and average photos we have seen thousands of times before.
We are drowning in content.
It is to the point where photography seems to be a popularity contest, rather than about artistry.
Look at how Canon treated Yvette Roman because she didn’t have 50,000 followers or more on YouTube. Let that sink in. A photographer whose style they loved for a job, who they agreed to hire, was replaced simply due to her lack of numbers. That shows you how companies want to hire photographers who can use their social channels to add to the marketing campaign.
We live in the influencer age, where amazing photographers are turned down for jobs due to not having followers. On the flip side of that, someone who only uses their phone for photography can be given thousands for merely showing that they use a particular piece of gear. They travel the world for free simply because they are popular on Instagram.
This system makes perfect sense when looked at from a marketing perspective. However, these platforms are where most of us spend our time and where we discover new content. Therefore, algorithms now control the amount of photography we get exposed to.
An algorithm doesn’t care about quality; it cares about metrics. The aim is to find popular content and put it out there for more people to find. Does this mean that photography is being reduced to likes? In many ways, yes, but it also shows the power of a story.
My 6-year-old took this photo. Sharp, well exposed and decent color. Not even a
DSLR, just a compact.
A camera does not know how to tell a story yet
We live in an age where you can throw your work out for all the world to see. The level of photography has never been higher. I can give my six-year-old a camera, and he can take sharp, well-exposed photos, telling the stories of his lego figures. But a camera, in fact, no technology, can yet create an image that tells a story.
A great photograph always tells a story. It makes us want to know more about the moment. It allows us to create our own story based on what we see in the image and our world view. The story I see in a photograph will be different from yours. In fact, you may hate a photograph I love and vice versa.
This is simply not possible with even the greatest camera. There is no Ai that will pick the perfect moment for you to click the shutter button. Yes, cameras may do 20 frames per second or more, but even then, you cannot continually record every second of the day. You need to find the angle, frame your subject in the way that tells your story and then press the shutter. Really, the technical aspect (no matter how much the camera companies persuade us otherwise) is not where the photograph is made. It is not in the corner sharpness – many great photos are not sharp. It is the story you tell.
The story is what you need to learn. Telling a story is hard. It has always been hard, and technology is nowhere near being able to do it for us.
You make the decisions before you press the shutter. You use the light, the subject, and find the angle. Then you open a box and let in some light for a little bit. It has always been the same. It’s just that technology over the years has made it easier to let the light in the box and get the image sharp if that is important to you.
No matter what the camera, knowing the moment to press the shutter is still a skill that is
not computer controlled, yet.
The future
I am sure you all saw it? It finally happened – a couple hired a robot to shoot their wedding! Yes, I know it is just a photo-booth style alternative for now, but it does hint to the future. Are we going to be used to weddings where drones automatically take photographs that are better than a human can capture? Photographs that can then be instantly customized by the bride and groom at the touch of a button (or voice command)? Will this mean that people will become obsolete in many photography fields? Will they only need a device; a robot?
Will my future as a photography business owner involve owning several robots? The ten-year-old version of me prays that this is true. Alternatively, will people not need to hire anyone? Perhaps photography will be built into their daily devices? Will we become so vain that a device follows us around capturing our daily lives and then picks the best moments via an algorithm to share on social media for us? (Let’s hope not! – Editor)
What do you think? Share your comments with us below.
Share this article.
7 Techniques for Original (and Stunning) Nature Photos
Do you want to capture original nature photos?
The kind of photos that are both stunning and unique?
You can.
While capturing original nature photography might seem hard, it doesn’t have to be.
Because there are a few simple tricks that you can use…
…which will help you create original photos, consistently.
And it’s not about finding new locations.
It’s not even about finding new subjects.
Instead, it’s about looking at the subjects you have in a completely different light.
Let’s get started.
1. Use unusual lighting for surprisingly dramatic shots
For a long time, I felt like my images were frustratingly similar. I couldn’t find any new compositions. I couldn’t create the kind of magic I wanted. I felt like I had hit a wall.
Until I discovered the power of directional lighting.
Now, directional lighting is something that most photographers are familiar with. You get directional lighting when the sun is low in the sky – so that the light hits your subject from a particular direction.
If the light hits your subject from the front, it’s frontlight. If your light hits your subject from the side, it’s called sidelight.
But while frontlight and sidelight are nice enough, they pale in comparison to the power of backlight.
(Which is the type of light that completely changed my photography.)
Backlight comes from behind your subject. If you want a backlit photo, you should make sure that your subject sits between you and the sun – and then point your lens at your subject.
What’s so great about backlight?
Backlight allows you to capture intense, dramatic light. It allows you to create a contrast-heavy photo, one with a beautiful background and a detailed subject.
However, you want to be careful not to create a silhouette. If you underexpose the photo too much, the subject will lose all its detail, leaving you with nothing but a bright backdrop.
So here’s what I recommend:
Point your camera at your subject. And then crouch down so that the sun moves behind the bulk of your subject. If you can block the sun, you’ll reduce the background brightness. And you’ll be able to capture some nice detail in your subject while giving the overall shot some gorgeous background light.
One more tip:
It can be useful to let the sun fall through a background object. If there’s a tree in the background, angle yourself so the sunlight falls through the tree. This will create some spectacular bokeh.
And it’ll take your nature photos to a whole new level.
2. Shoot from strange angles for a completely new perspective
Shooting from new angles is a classic method for capturing original photos.
That’s because it works. Really, really well.
Of course, you don’t want to use the same new angles, over and over again. That will just cause you to fall into a cycle of creating similar photos once again!
Instead, try to find a new angle for every subject you photograph.
I’m a fan of getting down low, and I recommend you try it, too. Crouching, crawling, or even lying on the ground is a great way of opening up more intimate perspectives.
And more intimate perspectives can make for stunningly original images.
Another tip is to make yourself feel disoriented. Try lying on the ground, looking up at your subject. Or try climbing high above your subject, so that you’re shooting straight down.
These particular angles are just starting points. Take them and make them your own. Experiment as much as possible.
That’s how you’ll capture original photos.
3. Apply creative techniques for unique takes on a subject
Another easy way to produce original nature photos is to add something new to your photography arsenal. Something you’ve never tried before.
One way to find these techniques is to look at photographers in other genres. What are they doing that you like? What’s creative about their work? Is there something that you can take from their photos and apply to yours?
I’ll mention just a few creative techniques here. These will give you a sense of the possibilities of nature photography. And they’ll also open up new shots for you, right now.
First, one of my favorite creative techniques is freelensing. This involves detaching the lens from your camera and tilting it in different directions for a tilt-shift style image.
Freelensing will give you some striking images filled with shallow depth of field, gorgeous bokeh, and stunning light leaks.
Second, I recommend trying intentional camera movement photos (or ICM). ICM photos are beautifully abstract and impressionistic.
To capture amazing ICM photos, simply set your shutter speed to something low (in the 1/2s to 1/20s range). Then experiment with moving your camera when you take the photo.
If you persevere, you’ll soon be taking some amazing images!
Third, you should try the ‘shooting through’ technique, also known as ‘cramming.’
Find a subject – then change your angle so that you’re shooting through something in the foreground. This is generally vegetation, but it doesn’t have to be.
If you can create a shallow depth of field, you’ll blow the foreground into a beautiful wash of color. And you’ll capture some highly-unusual nature photos.
4. Create abstracts of your subjects for something impressively different
One thing I love about abstract photography?
It forces you to see your subject in a whole new light.
And that’s why abstract photography is perfect for creating fresh perspectives of a subject.
But this leads to the question:
How do you actually create stunning abstracts?
I have a few tips:
First, get close. For abstract photos, closer is almost always better.
Two, try to think in terms of shapes and lines, rather than subjects. Compose while keeping these geometric elements in mind.
Third, be careful not to underexpose your photos. It’s easy to do this with close-up abstract photography because you lose light as your lens focuses closer. So make sure to compensate for this possibility.
Finally, use your viewfinder a lot. Move your camera, and watch as the composition changes.
And when things start to look really good…
…take your shot!
5. Switch lenses for a fresh focal length (and fresh feel)
Sometimes, all we need to do for a fresh perspective…
…is switch lenses.
After all, you probably use the same lens for your nature photography pretty often. I know that I have a few lenses in my kit that I use regularly.
And this can cause you to get comfortable with your photography. You might struggle to find new images.
So switch lenses. And make the switch as big as possible.
If you’ve been shooting flowers with a long lens, try using something very short. If you’ve been shooting landscapes with a short lens, try to go for something long. And if you’ve been shooting birds with an ultra-telephoto, why not try something that shows far more of the environment?
Whenever I try this technique, it works wonders. The completely new perspective feels wonderfully fresh – and I get photos that I really love.
6. Find a photo you like and take something different
This technique is a tricky one.
If you can do it correctly, you’ll capture stunning original images. But if you approach it without much motivation, you’ll end up creating something boring and derivative.
Here’s how it works:
Start by finding some nature photos you like, but that were taken by other photographers.
Then recreate those photos. Recreate the setup, the composition, everything.
Finally, make three major changes to the shot.
The changes can be anything: settings, lighting, composition, and more. The point is to create a shot that’s radically different from the original, but that still captures the magic that the original possessed.
You can even use some of the techniques from elsewhere in this article. Add in a bit of ICM. Use a wildly different angle.
You’ll ultimately capture an original image. An image you can be proud of.
7. Shoot until you can’t shoot anymore, then keep shooting
Here’s one final technique for original nature photos:
Find a subject. Then photograph that subject as you normally would, taking all the obvious photos.
But then, once you’ve run out of easy ideas…
Keep going.
Keep taking photos.
And keep trying to innovate. Keep trying to find new nature images.
At first, you’ll struggle. You’ll think there’s nothing more that can be done.
But then you’ll start to have new ideas. Your mind will open up.
And that’s when you’ll get some of your most original photos!
Techniques for original (stunning) nature photos: next steps
Capturing original nature photos can be really, really tough.
Or, at least, it might seem that way.
But the truth is:
Anyone can take original nature photos! As long as they know a few simple tricks.
So as long as you follow the techniques laid out in this article…
…your nature photography will be gorgeous, stunning, and – above all – original! Got any more tricks for original nature photos? Be sure to share them in the comments!
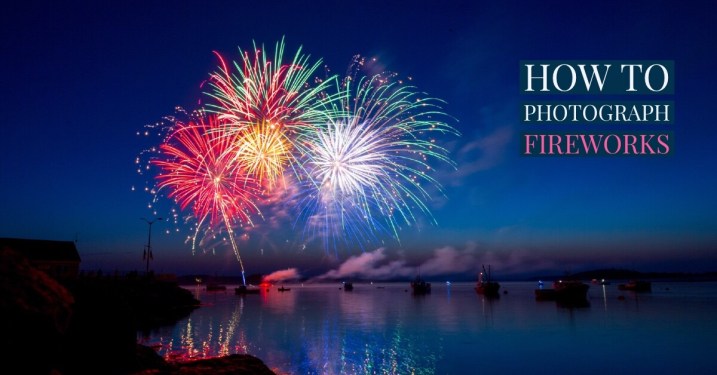
It’s getting close to fireworks time of year so today we wanted to present you with a few tips to help you photograph fireworks displays. The biggest thing to remember is that it’s all about practice, experimentation, and the following mantra (say it with me!)
SHOOT – REVIEW – ADJUST – REPEAT
Please remember that if you’ve never tried fireworks before it’s all trial and error and I’ve made a lot of mistakes myself before I got any images that I was happy to show anyone. Each time I photograph fireworks there’s always some element that’s unpredictable so you have to learn to adapt and learn from your own mistakes, correct for next time and do it again. So take these tips to help you get started.
15 tips for fireworks photography
#1 Use the right equipment: use a sturdy tripod and remote to fire the camera and bring an extra battery as long exposures tend to use them up quickly. I say STURDY tripod because it needs to hold your camera steady for several seconds without sinking, tipping, or wobbling. I wrote an article on my site on Tips for buying a tripod of you need more info on what to get.
This image was actually purchased by the company that put on the fireworks show in Portland.
#2 Set your ISO low like 100 or 200, for a couple reasons. First the higher the ISO you use the more noise you’ll introduce into your images, so keep it low to prevent that. Noise also lives in blue areas of images and nighttime has a lot of blue so that compounds the issue. Long exposures also tend to increase noise so if you add it all up you get a lot of noise so keep the ISO low to eliminate that variable. #3 Turn OFF long exposure noise reduction. This setting, while it does a really good job of noise reduction, adds an extra complication you don’t need when doing photography of fireworks. The way it works is that if you take say a 10 second exposure, it takes a second one of equal length but just black (the shutter doesn’t open). Then it merges the two together and blends the blank one into the shadow areas of the first one which is where noise typically shows the most. The problem is that fireworks happen so fast you don’t want to have to wait 10 seconds to be able to see your image, make any adjustments and shoot again. I did this once my accident and it was very frustrating and I missed most of the show and did not get the results I wanted because I couldn’t review and correct. #4 Do NOT use live view if your camera has it. This will eat up your battery really fast. Live view is really for shooting video and using the display screen so much uses a lot of power, as does making long exposures. Save your battery for actually shooting and set up your shot using the eyecup viewfinder. #5 set your camera on Manual mode for exposure and set your aperture to f5.6 or f8. Those apertures are pretty optimal for fireworks as the light streaks are controlled by the size of the aperture. Closing down more will make the light trails thinner, opening up more will make them wider and possible too over exposed. Do some tests but all the times I’ve done fireworks I keep coming back to f8 as my preference. #6 Set your shutter speed to between two and ten seconds. Do a test shot before the show starts and see if the sky is too dark or too bright and adjust the exposure time accordingly. As long as you’re under 30 seconds you can let the camera time the shots for you. Or you can switch to Bulb and just open and close manually when you feel you’ve captured enough bursts in one image. #7 Focus your lens ahead of time, and then turn off AF otherwise the camera will keep trying to refocus every shot and you may end up with missed images or blurry fireworks if the camera misses. Assuming you’re a fair distance away from the fireworks you shouldn’t have to refocus at all unless you change your angle of view or want to focus somewhere else, like the people in front of you. #8 Use a neutral density filter to get a longer exposure if need be. If it’s not 100% dark out yet it (the sky still has some light) this will allow you to get a longer exposure and make sure the fireworks bursts have a nice arch. If your exposure is too short you’ll end up with short stubby looking bursts, not the nice umbrella shaped ones. If yours are too short, just make the exposure time longer. If you are getting too many bursts in one shot and it’s coming out over exposed, shorten the exposure time. Using the ND filter if it IS dark will also allow you to shoot longer exposures and capture more bursts per image. Play with that and try it with and without the filter if you have one. A polarizing filter will work to a lesser degree also.
ISO 100, f/10, 1 second – notice the bursts don’t really make a nice arch? A longer exposure will make your trails longer. You choose how you want them to appear and adjust accordingly.
#9 Shoot most of your shots at the start of the show to avoid the smoke/haze that appears a bit later. Eventually the sky will be filled with smoke and it’s not as pretty looking. That’s when I’ll try some close ups or abstracts (keep reading for more on that later) #10 Scout your location ahead of time and get there early to get a good spot, think about background (what’s behind the show) and if you want the people around and in front of you as part of the shot. In general the good viewing areas fill up sometimes 1-2 hours prior to the fireworks show. If you want a good spot with enough room for you and your tripod, go early and take a good book or something to entertain you while you wait.
Notice I’ve included the crowd to show perspective.
#11 Make sure you leave enough room in your frame to anticipate the height of the opened bursts. Adjust as necessary if you miss on the first shot – it’s a lot of trial and error and correcting. It’s often hard to tell where the highest fireworks will end up in the sky, you may want to try both horizontal and vertical compositions.
Try a vertical composition for an added sense of power, especially if you can get a reflection like this.
#12 It takes a bit of practice to time your shots when you hear the fireworks being released, so ideally you capture a few bursts. Do some testing to see how many bursts is just right for your taste. Try some with more, and some with less. Having too many may overexpose the overall image, so keep that in mind. #13 Shoot into the eastern sky not facing west, if you want a darker sky. Here in Edmonton we are quite far north and even by 10:30pm in the summer the sky is not fully dark yet. I’ve found that when I shoot into the sunset my sky gets too blown out and the lights of the fireworks don’t show up as well as they do against a darker sky. So try and find a vantage point that has you facing east when possible if that’s an issue for you as well. #14 Try some telephoto shots as well as the usual wide, try some close ups zoomed in tighter for something a bit more abstract. For this you will need to aim basically into thin air and try to anticipate where the bursts will open
Abstracted using a longer lens, I think they look like palm trees.
#15 if you have a zoom lens try zooming during the exposure and see what you get! If you’re going to try this make sure you have focused at the most zoomed in point of the lens. Try different technique including counting 1/2 the exposure before you zoom, or zooming right away and the last 1/2 is zoomed out. Try zooming fast, then slow. Try more bursts, or less. Get some city lights in the shot too.
ISO 100, f/6.3, 6 seconds – lens zoomed during the exposure.
Summary
The biggest tip I can give you overal is experiment with your settings to get the look you want. Use my settings above as a starting point, adapt to your situation and your camera equipment until you’re happy with the results.
Have a great time this summer trying these out and don’t forget to share your images of fireworks, and any additional tips you’d like to add. Also Read: check out our previous post on How to Photograph Fireworks Displays.
Do you want to know how to photograph fireworks?
With New Year’s Eve just days away I thought I’d refresh this article in which I give 10 Fireworks Photography tips to help you get started. Fireworks Displays are something that evoke a lot of emotion in people as they are not only beautiful and spectacular to watch but they also are often used to celebrate momentous occasions.
I’ve had many emails from readers asking how to photograph fireworks displays, quite a few of whom have expressed concern that they might just be too hard to really photograph. My response is always the same – ‘give it a go – you might be surprised at what you end up with’.
My reason for this advice is that back when I bought my first ever SLR (a film one) one of the first things I photographed was fireworks and I was amazed by how easy it was and how spectacular the results were. I think it’s even easier with a digital camera as you can get immediate feedback as to whether the shots you’ve taken are good or not and then make adjustments.
Of course it’s not just a matter of going out finding a fireworks display – there are, as usual, things you can do to improve your results. With 4 July just around the corner I thought I’d share a few fireworks digital photography tips.
How to Photograph: What you need to Know
Here are the steps you’ll need to work through to photograph fireworks:
Perhaps the most important tip is to secure your digital camera to something that will ensure it doesn’t move during the taking of your shots. This is especially important in photographing fireworks simply because you’ll be using longer shutter speeds which will not only capture the movement of the fireworks but any movement of the camera itself. The best way to keep your camera still is with a tripod (read our series on tripods and how to use and buy them). Alternatively – keep in mind that there are other non Tripod options for beating camera shake.
2. Remote Release
One way to ensure your camera is completely still during fireworks shots is to invest in a remote release device. These will vary from camera to camera but most have some sort of accessory made for them. The other way of taking shots without touching your camera is to use the self timer. This can work but you really need to be able to anticipate shots well and its very very hit and miss (read more on remote shutter releases).
3. Framing Your Shot
One of the most difficult parts of photographing fireworks is working out where to aim your camera. The challenge you’ll face in doing this is that you generally need to aim your camera before the fireworks that you’ll be photographing goes off – anticipation is key. Here are a few points on getting your framing right.
Scope out the location early – Planning is important with fireworks and getting to the location early in order to get a good, unobstructed position is important. Think about what is in the foreground and background of your shots and make sure you won’t have people’s heads bobbing up into your shots (also consider what impact you’ll have on others around you also). Take note of where fireworks are being set up and what parts of the sky they are likely to be shot into – you might also want to try to ask some of those setting up the display for a little information on what they are planning. Also consider what focal lengths you might want to use and choose appropriate lenses at this time (rather than in the middle of the show).
Watch your Horizons – One thing that you should always consider when lining up fireworks shots is whether your camera is even or straight in it’s framing. This is especially important if you’re going to shooting with a wide focal length and will get other background elements in your shots (ie a cityscape). Keeping horizons straight is something we covered previously on this site and is important in fireworks shots also. As you get your camera on your tripod make sure it’s level right from the time you set up.
Vertical or Horizontal? – There are two main ways of framing shots in all types of photography, vertically (portrait) or horizontally (landscape). Both can work in fireworks photography but I personally find a vertical perspective is better – particularly as there is a lot of vertical motion in fireworks. Horizontal shots can work if you’re going for more of a landscape shot with a wider focal length of if you’re wanting to capture multiple bursts of fireworks in the one shot – but I don’t tend to go there that often.
Remember your framing – I find that when I photograph fireworks that I spend less time looking in my viewfinder and more looking at the sky directly. As a result it’s important to remember what framing you have and to watch that segment of the sky. Doing this will also help you to anticipate the right time for a shot as you’ll see the light trails of unexploded rockets shooting into the sky.
4. Focal Length?
One of the hardest parts of photographing fireworks is having your camera trained on the right part of the sky at the right time. This is especially difficult if you’re shooting with a longer focal length and are trying to take more tightly cropped shots. I generally shoot at a wider focal length than a tight one but during a show will try a few tighter shots (I usually use a zoom lens to give me this option) to see if I can get lucky with them. Of course zoomed in shots like the one to the left can be quite effective also. They enable you to really fill the frame with great color. Keep in mind however that cropping of your wider angle fireworks shots can always be done later to get a similar impact in your photography.
5. Aperture
A common question around photographing fireworks displays is what aperture to use. Many people think you need a fast lens to get them but in reality it’s quite the opposite as the light that the fireworks emit is quite bright. I find that apertures in the mid to small range tend to work reasonably well and would usually shoot somewhere between f/8 to f/16.
6. Shutter Speed
Probably more important to get right than aperture is shutter speed. Fireworks move and as a result the best photographs of them capture this movement meaning you need a nice long exposure. The technique that I developed when I first photographed fireworks was to shoot in ‘bulb’ mode. This is a mode that allows you to keep the shutter open for as long as you hold down the shutter (preferably using a remote shutter release of some type). Using this technique you hit the shutter as the firework is about to explode and hold it down until it’s finished exploding (generally a few seconds).
You can also experiment with set shutter speeds to see what impact it will have but I find that unless you’re holding the shutter open for very long exposures that the bulb technique works pretty well.
Don’t keep your shutter open too long. The temptation is to think that because it’s dark that you can leave it open as long as you like. The problem with this is that fireworks are bright and it doesn’t take too much to over expose them, especially if your shutter is open for multiple bursts in the one area of the sky. By all means experiment with multiple burst shots – but most people end up finding that the simpler one burst shots can be best.
7. ISO
Shooting at a low ISO is preferable to ensure the cleanest shots possible. Stick to ISO 100 and you should be fine.
8. Switch off your Flash
Shooting with a flash will have no impact upon your shots except to trick your camera into thinking it needs a short exposure time. Keep in mind that your camera’s flash will only have a reach of a few meters and in the case of fireworks even if they were this close a flash wouldn’t really have anything to light except for some smoke which would distract from the real action (the flashing lights).Switch your flash off.
9. Shoot in Manual Mode
I find I get the best results when shooting in manual exposure and manual focus modes. Auto focusing in low light can be very difficult for many cameras and you’ll end up missing a lot of shots. Once your focusing is set you’ll find you don’t really need to change it during the fireworks display – especially if you’re using a small aperture which increases depth of field. Keep in mind that changing focal lengths will mean you need to need to adjust your focusing on most lenses.
10. Experiment and Track Results
Throughout the fireworks display periodically check your results. I generally will take a few shots at the start and do a quick check to see that they are OK before shooting any more. Don’t check after every shot once you’ve got things set up OK (or you’ll miss the action) but do monitor yours shots occasionally to ensure you’re not taking a completely bad batch.
Also experiment with taking shots that include a wider perspective, silhouettes and people around you watching the display. Having your camera pointed at the sky can get you some wonderful shots but sometimes if you look for different perspectives you can get a few shots that are a little less cliche and just as spectacular. Most of the best shots that I’ve seen in the researching of this article have included some other element than the fireworks themselves – whether it be people, buildings, landmarks or wider cityscape perspectives.
More Tips from DPS Readers
“Find Out the Direction of the Wind – You want to shoot up wind, so it goes Camera, Fireworks, Smoke. Otherwise they’ll come out REALLY hazy.”
“Also, I find that if you shoot from a little further back and with a little more lens, you can set the lens to manual focus, focus it at infinity and not have to worry about it after that.”
“Remember to take advantage of a zero processing costs and take as many pictures as possible (more than you’d normally think necessary). That way, you’ll up your chances of getting that “perfect” shot.”
“Make sure you are ready to take pictures of the first fireworks. If there isn’t much wind, you are going to end up with a lot of smoke in your shot. The first explosions are usually the sharpest one.”
“Get some black foam core and set your camera to bulb. Start the exposure when the fireworks start with the piece of foam core in front of the lens. Every time a burst happens move the foam core out of the way. You will get multiple firework bursts in one exposure”
“Another tip I would add to this is pre-focus if possible (need to be able to manually focus or lock down focus for good) before the show starts so other elements in the frame are sharp They did mention that you only need to focus once but its a lot easier to take a few shots before the show starts and check them carefully rather than wait until the show has begun and you are fiddling with focus instead of watching fireworks!”
Tell us your fireworks display photography tips in comments below. Don’t forget to tell us which city you’re in and what the fireworks are like there!


 It’s getting close to fireworks time of year so today we wanted to present you with a few tips to help you photograph fireworks displays. The biggest thing to remember is that it’s all about practice, experimentation, and the following mantra (say it with me!)