Thursday, June 13, 2019

Why You Need a Digital Photo Frame


One of the unsung heroes of modern photography is the tried-and-true digital photo frame. These simple devices have been around for years, and yet they are rarely discussed in photography circles. With huge televisions adorning our walls, and smartphones stuffed into our pockets, one might wonder why there is any reason to own a digital photo frame. In the past few years, I have grown to greatly appreciate these devices, and I have realized how valuable, useful, and downright practical they are. If you or someone you know needs a good solution to viewing photos, a digital frame might be just what you’re looking for.

When digital frames first came on the market back in the mid-2000s, they were a great idea severely hampered by bad technology. Bezels were huge, the screens were small, and the images were dim and blurry. Setting up frames required toiling through a myriad of menus with nonsensical buttons and on-screen context clues.
Adding images to a digital frame was an exercise in frustration and required many steps on the part of the user. Plus, transitions between pictures were garish and often unbecoming of the memories on display.
It’s no wonder most people have stopped thinking about digital frames!
If this sounds like you, you’re not alone.
I was in the same boat until recently. However, the more I investigated what modern technology offers, the more impressed I became. In contrast to their counterparts from a decade ago, today’s digital frames have bright displays, show large high-resolution photos, are thin and sleek, and cost less than you might think. They often have cloud-based interfaces, offer companion smartphone apps, and can even show video clips.

The Nixplay Seed Wave has a large screen and wi-fi connectivity.

One-Trick Pony

One of the best reasons to get a digital frame isn’t because of what they can do, but what they can’t do. It seems silly to have yet another device in a world where screens already surround us, but the digital frames eschew the traditional idea of a computer screen by turning it on its head. They follow the adage of doing one thing and doing it well.
Most digital frames don’t let you do anything but view pictures. And this is precisely what makes them so great. They don’t run thousands of apps, let you surf social networks, or make video calls. They don’t play games, won’t let you binge-watch Netflix or YouTube, and don’t bombard you with notifications.
Digital frames sit there, passively doing only one thing: showing your pictures.

The Aura Digital Photo Frame has facial-recognition built into its companion app and a 
touchscreen for navigating options.
In an era where every device and gadget continually begs for our attention, digital frames are like an oasis in the middle of the desert. It’s downright refreshing to see a bright digital frame sitting on a shelf, knowing you can’t do anything with it other than look at pictures.
You don’t have to worry about software updates, and your viewing experience isn’t cluttered with dozens of icons and bubbles vying for your attention. In a media-saturated world, digital frames are a great way to slow down and enjoy, appreciate, and reflect on your pictures without distraction.
Some smart appliances like the Amazon Echo Show and Google Nest Hub act as photo frames, but I prefer the simplicity and focus of a dedicated frame. Other devices like that are nice, but the features they offer can often distract you from just enjoying your photos.

Advanced frames like the Google Nest Hub Max do lots of things, but I prefer simpler 
frames that don’t have built-in cameras, digital assistants, or alert bubbles begging for your
attention.

To print or not to print

Like many people, my wife and I have struggled for years with the question of what to do about getting prints made of our pictures. We’ve made yearbooks that adorn our end tables, mounted framed snapshots on dressers, and festooned our walls with large prints and canvases. These are great, and we enjoy them a great deal, but every one of them eventually grows old over time.
When that inevitably happens, we have to consider what to do next. Do we keep the old prints around? Do we put up new images in place of what was once there? There are also practical concerns, like where to get prints made, what size to make them, and what happens when our favorite photo book publisher goes out of business?
We enjoy seeing prints as much as anyone, but the logistical hassles have added layers of stress and indecision onto what should be an enjoyable process.

The Pix-Star 15-inch frame lets you see your photos without printing them.
A digital frame solves almost all of these problems. Our 8×10″ Nixplay Seed sits in our living room showing a massive assortment of images without any effort from us. In the course of a single day, we see photos of family vacations, our kids when they were infants, and old slides that we scanned from negatives. We don’t have to think about switching photos out, spend entire evenings trying to decide which images are worth printing, or wonder whether a particular photo is worthy of being displayed for all to see.
Of course, there are still plenty of reasons to get pictures printed. But if you want a simple way to enjoy your pictures without the hassle of making physical copies, a digital frame might be right for you.
As is the case with most digital gadgets these days, storage space is not the same constraint as it used to be. Many frames have internal storage of at least 8GB, which is enough for almost 10,000 images. If that’s not enough, you can look for one with a removable memory card slot to add even more space.

Modern digital frames have more than enough storage space for your pictures. Unlike your 
walls and bookshelves, which can quickly fill up with physical prints.

Image quality

If you think that displaying your images on a digital frame means sacrificing overall quality, think again. This might have been true in 2005, but now, frames are leaps and bounds beyond where they used to be. As recently as a few years ago, many frames had resolutions of about 72 or 96dpi – similar to that of older computers.
This resolution is fine if you’re viewing your images from a distance, as often is the case when using frames in a household setting. However, frames today often have much higher pixel densities or anywhere between 150-300dpi that put them on par with most laptop screens and even that of some mobile phones.
This means that your images, even when viewed up close, are as crisp and sharp as you would see if you got them printed and you’ll be able to make out every detail from wisps of hair to blades of grass.

Aura makes a 9.7-inch frame with 2048×1536 resolution, which shows your memories in
crisp, clear detail.
Most modern digital frames use bright screens that are now viewable from any angle, unlike older versions which required you to stand in the right spot to see your images. Your pictures appear bright and colorful, and some digital frames even let you show video clips alongside your images.

Worry-free sharing

With all the recent problems regarding data privacy on social network sites like Instagram and Facebook, it’s no wonder so many people are deleting their accounts! If you, or your friends and family, are limiting your social media usage but still want to see pictures of the important things in your life, a digital frame is just the answer. To illustrate this, I’m going to use my in-laws as an example.
My wife’s parents aren’t on any social media at all, and they prefer to spend their time reading, gardening, walking the dogs, and going out with friends. This means they don’t get to see any pictures of their grandchildren unless we send them physical prints, which they have to find a spot to display. A few months ago, my wife and I bought them a digital photo frame and have since populated it with well over a thousand images of us and our kids.

Do you have friends or family members who aren’t on social media? Get them a digital frame 
and fill it with photos for them to enjoy.
We shared their frame information with other family members who have also sent pictures to the frame. My wife’s parents love it! The frame sits in their living room, showing photos of the people they love without any effort on their part. And, they didn’t have to join a social network or share any personal data.
If you have people in your life who are concerned about data-mining and privacy, consider a digital frame as a happy medium. It allows you to share pictures on a more limited and intentional basis than sites like Instagram or Flickr. But the tradeoff is, you are in full control of the images, and none of your personal information is sold to third-parties for advertising.

This simple Tenker 7-inch frame, and others like it, won’t send your photos off to be analyzed 
for advertising.

Tips

Here’s a few more tips that might help you with digital frames.
  • Set your display to change pictures less often. Every hour or less is much better than every 30 seconds. It will seem slow at first, but you’ll get a lot more enjoyment in the long term. You won’t feel like you’re seeing the same images over and over.
  • Export your photos to the resolution of your frame to save on storage space. Sending a 24-megapixel image to a 3-megapixel frame won’t do you any good at all.
  • Set your friends and family up with sharing permissions so they can send you photos. Then make sure to return the favor and send photos to their frames too.
  • You can build your own photo frame with a cheap Android tablet and some software, but I recommend getting an off-the-shelf model. It’s just easier and will probably make your life a lot simpler in the long run.
  • Most modern frames have built-in memory but also sync with cloud storage options like Dropbox and Google Drive. You might have to configure a few settings, but it can make the already-easy process of sending pictures even simpler.
Do you use a digital photo frame? Or, are there reasons why you don’t? Feel free to share with us in the comments below.

Share this article.

Wednesday, June 12, 2019

How to Make Friends and Collaborate in the Photography Industry


Have you ever seen or been a part of a photography conference? Or even just walked into a camera store and spent some time observing people interacting in the store? It is as if we photographers speak another language, live in another world, or even belong to a cult. Of course, I mean this without any form of disrespect. Photographers and photography enthusiasts are a class apart. We all get excited about new lens and gear, talk in F-stops and ISO settings, and some of us save for years and years to buy a particular brand of camera or lens!
Ballet inspired styled shoot collaboration with other wedding vendors Karthika Gupta
The photography industry is growing in leaps and bounds – not only in technology but also in the number of people who are aspiring photographers or even hobbyists. With easier access to gear and a wealth of free education around, photography is a career choice for almost any generation. However, it also means that many people are doing the same or similar things. Most photographers, at some point or another, think about industry competition to get ahead of the curve in the kind of money and work they think they need to get ahead.
I want to assure you that making a living is possible in this space. There is more than enough work to go around. Your peers and colleagues are not out to ‘get you’ or ‘steal work from you.’ Let go of that scarcity mindset and instead think of how you can collaborate with your competition in ways that can become a win-win for both of you.
Often times, the colleges and friends you make in the industry do more for you than you could imagine. They send their overflow work your way, and you make genuine friendships with people who speak the same language as you. You also get to collaborate on creative projects that improve your own skill as an artist.
There are several ways you can make friends and collaborate in the photography industry.

1. Attend conferences and photography related events

There is nothing quite like getting a bunch of photographers in a room to talk shop and discuss the latest and greatest gear and techniques. The energy and the learnings at such events are incredible. Most conferences and events get the best speakers and teachers, so this is a great way to increase your skill set and also meet some of your mentors and peers.
As someone who has started to speak and teach at conferences and events, I am just as nervous to get up on stage as you might be to come to an event! However, I am so happy to meet and mingle with my people – folks who love photography as much as I do.
So go with an open mind and be willing to put yourself out there to make genuine connections and friends.
Food styling and food photography workshop Collaborate with other photographers Karthika Gupta
I had the opportunity to attend a conference and took some food styling and food 
photography classes. While there, I made some amazing friends who, to date, 
have been very supportive of each other’s work.

2. Join local groups

If traveling for a conference or an event is not your thing, thanks to apps like Meetup and Eventbrite, there are plenty of local chapters and groups that are photography specific. Some groups routinely go out and photograph. Others have workshops and classes where members exchange ideas and knowledge. Find what works for you and be open to give as much or more than what you receive.

3. Connect with photographers who you admire

I have to admit; this one is one of my favorite ways to connect with others in the photography space. Most photographers are on social media because it is such a great visual tool to showcase your work. So I find it easy to find photographers whose work I admire on social and engage with them regularly. Sometimes it is a ‘like,’ other times it is a comment or a direct message (DM). Nothing crazy or weird, I just say hello and compliment them on something that I find enjoyable. This is not a place to ask favors or ask for work. Instead, this is a place to connect and be social. The more you engage, the more you become a familiar face. Then when the time comes to collaborate or work together, let that organically happen.
Don’t ask open-ended questions or ask to pick their brain. Instead, do your research and ask intelligent questions. Ask about their motivation or inspiration or an accomplishment that they are proud of. Perhaps you could ask how they get over a creative slump…anything that humanizes you and them.
Collaborate with other photographers Karthika Gupta
I collaborated with another photographer who I met online. I stayed at her house for the 
weekend and created some amazing work that I am most proud of to date.

4. Be friendly and cordial

Always be friendly and cordial. No matter the stage of business you are at, always remember you too started at the bottom of the ladder too. Just because you have ‘achieved’ success doesn’t mean you have to be rude. On the flip side, to the person who is reaching out to other photographers, do the same. We are all in this together. You will make genuine friends when you are honest and genuine yourself. You will just put people off when you are insincere.

5. Offer something of value – no, it’s not always money

I am of the school of thought that money is not the ultimate form of success. Yes, we need money to survive – to put food on the table, pay the rent and other necessities like that – but there are many people out there who are motivated by something other than money.
Find your passion and find what feeds your soul. The money is sure to follow.
When working with others, offer something of value. When you are collaborating with other creatives, put your best foot forward so that the collaborative effort is worth its weight in gold. That way, it is a win for everyone included.
Styled shoot and portfolio building Karthika Gupta
I conducted a styled shoot for new wedding photographers, and as a result, collaborated 
with many vendors who got photos in exchange for products and services – a win-win for all.

6. Pre and post follow through is important and essential

When collaborating with other creatives, communication about expectations and outcomes is critical. It is important everyone is on the same page so that each party knows what they need to put in and what they are going to get out of it.
Communication can be as formal or as informal as you all agree. Typically everyone pitches in or brings something of value (time, talent, props) to the table. After the collaboration, people share each other’s work, give critique and sometimes even share images for each other’s portfolios.
No matter what process you use, make sure everyone agrees.
It is also important to do a debrief on the collaboration. Figure out what worked and what didn’t. How can you all make it better next time? Make sure to address any issues so you can all walk away with a positive experience.
Collaboration isn’t just with other photographers. It can also include vendors and businesses in your area of specialty. You can make a trade of goods and services in exchange for photos. Here pre and post-follow-up are critical so that all expectations are met.

Collaborate with vendors and businesses not just other photographers.
Collaboration, when done properly, should be a mutually beneficial arrangement. By collaborating with others, you get to learn, improve yourself, and help others as well. It is a very healthy and creative way to inspire and be inspired while working on something atypical.
Have you collaborated on some great projects? Share your experiences with the dPS community in the comments below.

Share this article.

The Biggest Advantages of Being a Professional Photographer

Mike O'Leary's picture


Being a professional photographer these days is not easy. Everyone with a camera is out to make money, and the industry is saturated. However, despite this, there are some serious — and sometimes serendipitous — perks to the job.

The Backstage Pass

As a teenager, I dreamed about having a coveted VIP All Access Pass. I presume that movies like Wayne's World had a major (and possibly warped) influence on that view, but at the time, it seemed like the most amazing thing to be backstage at a concert or movie set. Now, I still haven't had the opportunity to shoot backstage at anything, mostly because that's not what I shoot and I haven't asked anyone, but my point is I could if I really wanted to. Oh, I did get asked to quote for a small film festival, but they didn't even get back to me. After I inquired, it turned out that they decided to "hire" a couple of students. Nice. I might just set myself a goal where, by the end of the year, I must photograph at least one concert/festival. Hmm.

Making Money Out of Being Moody

It can't be denied that most of us enter the profession because we enjoy it — at least, that's one of the reasons why I decided to turn pro. I would be one of the first to admit, though, that it's not all roses and gravy. Lord knows, I let people know it too. But it can't be denied that doing what you love and getting paid for it is an absolute privilege. This is something I need to tell myself often, because it's easy to get caught up in negative thoughts around the industry. There certainly is a lot to be annoyed about, however, I find that the best remedy for those unwanted emotions is to get up off my ass and go shoot something — to channel those feelings into something creative. Who knows, someone might just want to buy it. That is, after all, the origin of a lot of art, isn't it?
a Turkish ice-cream vendor at work in Doha, Qatar, at night.
Crowds: A former nemesis of mine.

Unforeseen Opportunities 

This point could well be lumped in with backstage pass, but this is of particular significance to me. I've had life-changing opportunities just land on my lap, partly due to pure luck, but they would not have happened if it were not for the fact that I was a full-time professional photographer. Last year, I received a phone call from an acquaintance in South Africa who needed help bringing more money into a conservation program. Lucky that I knew the guy, but it was my position and perceived talent that drew him to me. Since then, I've been to Africa three times (a dream of mine for many years), helped out on projects which protect critically endangered animals, had images published in Playboy Magazine, I'm in the process of setting up photography workshops out there, but most importantly to me, I've made some new friends, which brings me to my last perk.

Connections 

I'm not talking about networking; I mean real human connections. I know this sounds cheesy, but hear me out. After many years of battling social anxiety and depression — which, among other things, led to some very destructive behavior, including prolonged isolation — professional photography gave me a bit of hope. And I mean specifically professional practice as opposed to amateur photography. Why? It forced me to interact with people in ways that I hadn't in years. I needed to do it in order to put food on the table, so I gave myself no choice. Of course, it wasn't as clear cut as that. If I were to approach someone for work, I need to be confident in my abilities — confidence being something that I was severely lacking over the last 17 years. So, I had no choice but to push myself to get better; getting better gave me more confidence and gaining this new confidence allowed me to approach people without hyperventilating. Turns out that a non-hyperventilating Mike can be quite a charming fellow (like most non-hyperventilating people). I've met some truly inspiring people because I haven't freaked out at the mere suggestion of talking to a stranger, some of whom I now call friends. I've even been on a few dates, and yes, I do attribute that to becoming a professional photographer. Because if I didn't have this creative outlet which also earns me money, I genuinely don't know if I would be here now, and I definitely wouldn't have the confidence to tell this story to thousands of strangers.
Two men posing for a photograph in an outdoor setting.
"Yay, friends!"
Creative Director Conor Cronin and wildlife photographer/conservationist Niall Beddy

I'm Just Doing my Job

I'm not looking for kudos — because I'm basically doing the bare minimum as a responsible adult — I'm just doing what I'm paid to do using the point I outlined in advantage number two: I'm channeling my negative life experiences into something creative, and, who knows, maybe I'll make a connection with someone in the process.

Tuesday, June 11, 2019

Brand new film from Fujifilm: NEOPAN 100 ACROS II announced, begins shipping Autumn 2019

Updated June 11th with additional details, speculation and sample images.
Picked up just a few moments ago is the heart-stopping news that Fujifilm is officially bringing black and white films back to the market in Autumn 2019 with the all-new NEOPAN 100 ACROS II. I’m happy to be able to be the first to bring this news to you.

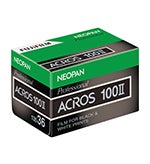
Let’s get started with an official 35mm box shot from Fujifilm:
New Fujifilm NEOPAN 100 ACROS II
MIC DROP

Described (translated from Japanese) as “achieving ultra-high image quality with world-class graininess* and three-dimensional tone reproduction“, the all-new film NEOPAN 100 ACROS II will initially be available in 35mm and 120 formats.
* The word “graininess” is “grainlessness” lost in translation, as commenter Ricardo points out below:
Yes, the “graininess” part was lost in translation.
In the original press release, they use the word 粒状性, that means “granularity”.
This is the scientific, correct word to talk about film grain (as in RMS granularity, often seen in film datasheets).
Therefore, a “world-class granularity” (here also, the Japanese version says “world highest standard of granularity) would mean very fine grain.
Fujifilm terminated sales of their last remaining black and white film, NEOPAN 100 ACROS in Autumn 2018, stating low sales volumes and difficulties in obtaining “raw materials essential for production”.

For those of you unfamiliar with NEOPAN 100 ACROS as it was, here are a few examples:
The film photography community met the news with both outcry at “yet another discontinued Fujifilm stock” and voiced their desire for ACROS sales to be reinstated. It seems that Fujifilm listened and according to Fujifilm, ACROS II has been created “by researching substitutes for raw materials that became difficult to obtain and radically reexamining the manufacturing process to match the new raw materials“.    What this means is open to very wide interpretation. It could mean the creation of a newly formulated emulsion which takes into account modern standards and availability of materials for both the substrate and emulsion layers. It could also mean that Fuji have reinvigorated or reassessed their production, logistics and supply chain in order to meet the reality of the film photography industry in 2019. Honestly, it’s probably a little of both plus additional factors we’re not 100% aware of or in fact, privy to.
According to the Japanese press release:
The newly developed NEOPAN 100 ACROS II is an ultra-high-quality black-and-white film with ISO 100 sensitivity, with the world’s highest level of graininess, three-dimensional tone reproduction, and excellent sharpness. It is suitable for shooting in a wide range of fields, such as product photos and architecture photos, as well as long-exposure celestial and night-shot photographs.
As someone who has recently written about the reality of photographic film production at Fujifilm – my perspective at least, is that this is amazing news and a shot in the arm for the community at large. With both Kodak and Fuji committed to producing new films, the effect on smaller players and new entrants cannot be underestimated. I for one I am sure the film photography community will join me in applauding Fujifilm for this move.
Now all we have to do is wait for the stock to hit our shelves, which should hit the domestic Japanese market first before being rolled out internationally.


Fuji Is Bringing Back Black-and-White Film Because the Kids Demanded It

Illustration for article titled Fuji Is Bringing Back Black-and-White Film Because the Kids Demanded ItPhoto: Matthew Paul Argall (Flickr)
Young people take the blame for a lot of the world’s problems. Ignoring the fact that wages have been stagnant for the last 40 years, we’re often blamed for killing the economy because we’re not buying as many houses or diamonds, having less babies, and waiting longer to move out of our parent’s homes.
But according to FujiFilm, at least we’re helping to keep old-school film photography alive, who recently resumed production of monochrome film after a one-year hiatus due to consumer demand “particularly from millennials and GenZs.”
So, to make it a bit easier to find black-and-white film, FujiFilm is bringing back its Acros line with its new Neopan 100 Acros II film, which will be available in both 35mm and 120mm formats at ISO 100. FujiFilm says its new film features proprietary Super Fine-Σ technology that results in “unsurpassed fine grain, sharpness and exceptional three-dimensional gradation” compared to original Acros film.Here’s what the box for the new Neopan 100 film will look like.
Here’s what the box for the new Neopan 100 film will look like.
Photo: FujiFilm
Here’s what the box for the new Neopan 100 film will look like.

Here’s what the box for the new Neopan 100 film will look like.
For a company with the word film in its name, it seems like a no-brainer to support the small number of photographers who still want to deal with the hassle of analog film. And with some outlets claiming that we’re in the midst of a film photography revival, it’s encouraging to see a company with such a long history in analog photography like FujiFilm come back to the scene.
However, part of FujiFilm’s return is due in part to the development of new materials used to make film, which the company said had become more difficult to source recently due to the decline of film and the rise of digital photography.
In a way, the resurgence of film photography mirrors the rise of vinyl sales, which have grown every year since 2006. Though if you look back at vinyl sales from the 1970s, it’s easy to see that while vinyl is on an uptick, it’s still a minor blip compared to vinyl sales back in the day.
Unfortunately, FujiFilm has yet to reveal pricing for its new Neopan 100 Acros II film. And when it launches later this fall, Neopan 100 will only be available in Japan while FujiFilm evaluates market demand before trying to sell its film in other regions.
But with Kodak having brought back Ektachrome film in 2018 and FujiFilm reviving its Acros film in 2019, even though analog photography might be on life support, it’s not dead just yet.

Share this article.

Monday, June 10, 2019

Review of the Nikon D5600 Camera Body


The Nikon D5000 series debuted its first camera in 2009, and since then new versions have emerged over time. Now the Nikon D5600 has been released. The series has been very popular for Nikon and this one won’t disappoint. It has many of the features that are found on previous models plus some new ones which make it even better.
Review Nikon D5600 Camera Body
The Nikon D5600 – image courtesy Nikon Australia

First Impressions of the Nikon D5600

There is nothing like getting that gold box that all Nikon cameras come in and opening it up for the first time. Inside you will find an instruction manual, eye-piece cover for doing long exposures, battery, charger, and of course, the camera.
I normally use a Nikon D800, which is a big camera, so the size of the D5600 was a real surprise to me. It is small and fits easily into my hand. It is light, and compared to many cameras is a good choice to carry around. Sitting side-by-side with a Panasonic Lumix mirrorless camera there wasn’t a lot of difference in size.
The Nikon D5600 is a DX camera body or cropped sensor, so many of the lenses for it are also light. However, you do have to be careful if you mount a full frame lens on it. They are a lot heavier and it may seem like the lens could come off. Of course, it won’t, but be aware and be careful.
Review Nikon D5600 Camera Body
The Nikon D5600 is small and not that heavy.

Using the Nikon D5600

When you get a new camera you don’t want to get it out of the box and wonder how to use it. If it seems too complicated, then you may lose interest and not want to use it anymore. Thankfully, this camera is easy. It doesn’t take much to figure out how to take photos with it.
Most of the controls are available in the menu and you get access on the LCD, which is also a touch screen. You no longer have to scroll through different settings to be able to get what you want, you can just touch it and make your changes. All the settings become buttons on the back that you touch and change, all very quickly.
Review Nikon D5600 Camera Body
Using Live View to see what you are photographing.
The D5000 series has always had a screen that you can move and change so you can see what you are doing in Live View; this one is much the same as the others. However, with it being a touch screen you do have to be careful as you can start taking photos without meaning too.
The autofocus was fast even when using it with Live View. Once you click the button there isn’t a lot of shutter lag time (time between pressing the button and the image being taken) unlike older Nikons. This makes taking photos much faster no matter how you are doing it.
Review Nikon D5600 Camera Body
Using the camera to take photos looking through the viewfinder.

Battery

Without a doubt, Live View will chew through your battery. After spending one to two hours in the city, and the following day going out to take more images, the battery started dying. You would not be able to spend all day using Live View unless you had spare batteries.
After having said that, however, when the battery indicator light starts blinking, if you turn off Live View and close the screen so you don’t get image previews you can continue taking photos and the battery will last a lot longer. You should only use Live View when you really need it.
Review Nikon D5600 Camera Body
Use Live View to take images that would otherwise be difficult to get. These statues are
too high for me to get images looking through the viewfinder.

The Menu

The menu for the D5600 is very similar to other amateur-level Nikons. If you have had another in the past then navigating your way through the D5600 shouldn’t be an issue. As stated previously, it is all touch screen and makes the whole process very easy to use.
Being able to use the camera without having the manual right beside you is good. For Nikon users, you will find that the manual is not necessary, though people new to the brand may find it more difficult. The manual for this camera is very basic, and I found it hard to figure out. It is almost like it is in point form. Not the type of manual that long time users are used to.

Images

With the 24 megapixels that this camera is capable of you are going to get larger file sizes for each image. The images are 6000 x 4000 pixels, which can mean that you can get them printed quite large. They aren’t that much smaller than those taken with full frame.
If you are shooting jpegs the images are around 6-7 MB each, Raw are around 26 MB. You have to consider this when purchasing the camera because if you shoot a lot then it is a lot of images to store. You will need to consider backup storage and a lot of it. However, it is a problem that most photographers who use digital are facing as cameras become more advanced .
Review Nikon D5600 Camera Body
The file sizes give you enough information to work with and process your images.

ISO settings

For many photographers, not having a good ISO range in the past could have been a deal breaker. But with most new cameras you get a really good range that will suit just about any situation that you find yourself shooting. The ISO range on the Nikon D5600 starts at 100 and goes up to 25,600. It is hard to imagine what you would ever use ISO 25,600 for, but it is there if you are ever in that situation.
Review Nikon D5600 Camera Body
Changing ISO quickly for indoor images is easy with the touch controls.

WiFi and Snapbridge

Like most modern cameras the Nikon D5600 does come with WiFi features. You can use it to get photos from the camera to your phone.
This is the first in the D5000 series to have Snapbridge. This is a new feature from Nikon and allows your phone and the camera to communicate via Bluetooth. It seems to work better for Apple users than Android, but Nikon does seem to favor the former more for many things.
Review Nikon D5600 Camera Body
You can use the Wifi and Snapbridge functions to get images from your camera to
your phone for instant uploading to your Social Media.

Who would buy the Nikon D5600 camera?

The D5600 is not the most entry -level camera for Nikon, but one rung up the ladder. If you are just starting in photography you may think to start at the bottom. However, if you think you may really enjoy photography you would find this a great camera to learn with, and it has many features that you can grow into. It will do almost everything you ever need. The D5600 would be a great camera to start with and continue to use as you learn about photography.
It would also be a great choice for someone who wants to get back into photography and understands how a camera works. For someone who isn’t sure how often they will use it, but they want something that will give them a lot of choice, this could be the camera for them. An amateur who will go out on the weekend to shoot, but doesn’t necessarily want to get too serious will enjoy the D5600.
Review Nikon D5600 Camera Body
Great camera to walk around with in the city.

Finally

The Nikon D5600 camera would be great for many people. With all the options it offers they will likely find that they could use it for long time. With the new features that Nikon has put on this camera, it is getting more sophisticated. It is easy to use and to carry around, hard to imagine many who wouldn’t like this new camera in the D-range. The D5600 is a good update in the popular series.

Share this article.

$1,000 Camera VS $8,000 Camera!!

It's Not About the Gear | We Shot with Cheap Cameras to Prove It

My photo 

Disclaimer:  I am not an affiliate of KEH, the company featuring this Nikon Camera.  Nor am I an affiliate of Nikon Corporation.  While reseaching the internet for blog-worthy information I came across this deal on the Nikon D2H camera.  If I didn't already own a Nikon camera I'd be jumping at this offer.  The price listed below is good as of the date of this blog post.

Browse their website here: https://www.keh.com/shop/nikon-d2h

 Nikon D2H Digital SLR Camera Body {4.1 M/P}


With Battery and Charger

$208.00
Nikon D2H Digital SLR Camera Body {4.1 M/P}
DETAILS
The Nikon D2H, designed specially for action/sports photographers and photojournalists, offers an unprecedented combination of powerful technologies that deliver amazing speed, unerring accuracy, rugged durability and streamlined work flow. With the LBCAST imaging sensor users will immediately notice the D2H far surpasses its predecessor the D1H in higher speed and sharper, highly accurate performance.

Image Sensor
4.1 megapixel, Nikon JFET (Junction Field Effect Transistor) sensor

Sensitivity
ISO: Selectable from 200 to 1600

Lens Compatibility
AF Nikkor: including AF-S, DX, VR and D-/G-type, (All functions possible)
Manual focus Nikon AI-type lenses, produced since 1977 (All functions not possible)
Digital conversion is 1.5x the standard focal length on all lenses.

Shutter Speed
30 seconds to 1/8000th of a second

Continuous Shooting / Burst Rate
8 fps in maximum bursts of 40 shots in JPEG format or 25 shots in RAW format.

Shutter Lag
37 milliseconds

Flash
Built-in: No

External Flash Sync
Fully compatible with Speedlight SB-800, Maximum Flash-X sync 1/250 of a second.
Limited compatibility with DX series flashes.
PC Terminal

White Balance
Auto (hybrid: ambient sensor, 1005-pixel CCD, image sensor) Presets (five), Manual (six steps with fine tuning), Color temperature in Kelvin (31 steps), White balance bracketing (2 to 9 frames, 10, 20, 30 MIRED steps).

LCD
2.5 inch, 211,000 pixel TFT color display

File Types
RAW
TIFF
JPEG

Storage Media
Compact Flash Type I or II and Microdrive compatible

Power Supply
Lithium-Ion (Model# EN-EL4)
AC Adapter (Model# EH-6)

Computer Connectivity
USB or Card Reader

Software
Nikon View

Operating System Requirements
Windows: 98, 98SE, ME, 2000, XP
Mac: OS 9.0, 9.2, 10, 10.1, 10.2

Dimensions (W x H x D)
6.2 x 5.9 x 3.4 inches
158 x 150 x 86 mm

Weight (Excluding Battery)
2.4 lb
1070g

Other Features
The D2H has a regular PC flash sync connector so it can be used with any type of studio lights or external flash units. It also has a flash hot shoe to accommodate Nikon Speedlights, and Nikon claims compatibility with its SB-80DX/50DX/28DX products. When paired with a Nikon SB-800 Speedlight, the D2H supports the features of its Creative Lighting System, including Flash Value Lock, Auto FP High-Speed Sync (allowing flash with shutter speeds up to 1/8000 second), Wide-Area AF Assist Illumination, Flash Color Information Communication (providing the camera with the color temperature of the flash for white balance adjustment), and Advanced Wireless Lighting (providing control for up to three groups of Speedlights through the Master SB-800). The D2H offers six flash sync modes: Front-Curtain Sync (normal sync), Red-Eye Reduction, Red-Eye Reduction with Slow Sync, Slow Sync, Rear-Curtain Sync, and Slow Rear-Curtain Sync.

Additional Information

General
Brand Name Nikon
GTIN 018208252084
Manufacturer Part Number 25208
Imaging
Flash System Nikon i-TTL, Nikon D-TTL
Optics
Focus Type Autofocus (lens motor)
Lens Mount Nikon F Mount Ai, Nikon F Mount Ai-S, Nikon F Mount Ai & contacts (Ai-P), Nikon F Mount AF (pre-D), Nikon F Mount D Type, Nikon F Mount "G" Type       

Sunday, June 9, 2019

Why I Always Use an L-Plate Bracket for Landscape Photography

There’s no secret that there’s an abundance of accessories for landscape photographers. Some of them are considered absolutely essential while others might just be unnecessary extra weight in your backpack. With so many tools to choose between it can be hard to separate the useful from the unuseful, which is probably why we end up purchasing so many unnecessary products.
When talking about accessories that are useful for landscape photographers I find that there’s a handful of products that keep coming up: a tripod, a variety of filters, a remote shutter release and a cleaning kit. There’s no doubt that these are tools that can make a huge difference in your photography.
L-Bracket Plate in use shooting on tripod.
But there’s one that I feel goes under the radar quite often, which is fascinating as it’s one that the majority of professional landscape photographers use: an L-plate bracket.

What is an L-Plate Bracket?

If this is the first time you’ve heard about an L-plate bracket I urge you to keep reading this article and to consider if this is a tool you should be adding to your equipment list.
The L-Plate bracket is a piece of metal that is fastened to your camera body as a replacement for the regular quick release tripod plate. Unlike a regular quick release plate, an L-Plate is shaped as an L, bending 90 degrees up the side of the camera. This makes it easy to quickly switch between a horizontal or vertical orientation, which is a benefit I’ll come back to in a minute.
To connect the camera to the tripod you place a clamp on the tripod’s ball head. These clamps come in a few different options, including a quick-release lock and a twist lock.
Why I Always Use an L-Plate Bracket for Landscape Photography - camera mounted on a tripod with an l-plate bracket

Why I Always Use an L-Plate Bracket

Ever since I started with landscape photography and purchased my first L-Plate, this has been an accessory that I have recommended. During the last few years, I’ve noticed that more and more beginners are understanding the value of this tool and I’m often surprised to see that the majority of my workshop participants use one.
The main benefit of using an L-Plate is that you can easily switch between a horizontal and vertical orientation. Now, you might ask “how is it easier to remove and re-attach the camera than to just loosen the ball head and readjust it?”.
That is a good question and one that might not seem that obvious but the answer is actually quite simple. When shifting from horizontal to a vertical orientation with an L-plate you keep the same composition.
L-Plate Bracket for Landscape Photography - camera mounted vertically using an l-plate
It’s easy to change the orientation of your camera when using an L-Plate
When shifting from horizontal to vertical orientation without an L-Plate you need to move the tripod as you’ve also moved the camera a few centimeters to the side, meaning you’ve lost the composition you had previously. With an L-plate attached, you maintain the composition and don’t have to worry about moving the tripod back and forth each time you change the orientation.
Another big benefit for those who shoot panoramas is that the camera perfectly pivots around the right spot, meaning you won’t have problems stitching the shots together later.

Who are L-Plates for?

Now I’m not going to lie and say that L-Plates are for everyone. If you’re a studio photographer or if you never use a tripod, it’s better not to waste your money on this tool. However, if you’re a photographer who regularly uses a tripod, I highly recommend that you get one right away.
a vertical photo of a landscape scene - L-Plate Bracket for Landscape Photography
It’s easy to quickly change to a vertical orientation when using an L-Plate
Here are a few photography genres which will greatly benefit from using an L-Plate:
  • Landscape photography
  • Astrophotography
  • Architectural photography
  • Commercial photographers
  • Macro photographers
  • Studio photographers (who use tripods)
Shot vertically using the L-Bracket.

What to look for when purchasing an L-Plate

Unlike many of the other types of accessories we find for photography, there aren’t a whole lot of options when it comes to L-plate brackets. There’s no fancy technology or must-have features. This is a simple tool, but there are still a couple of things to look for when you’re purchasing one.
  • Never purchase “universal” plates: When you’re searching for L-Plates you’ll most likely come across several models which are branded as universal plates. Do not purchase one of these! While they claim to be universal, this is rarely the case. Most likely parts of the plate will block the pockets and plugs on the side of your camera.
  • Metal plates are always best: Metal plates might be a few dollars more expensive but they are worth every cent. A sturdy metal plate is more durable and less likely to malfunction (I’ve had my RRS L-Plate for 4 years and it still works like new).

Final tips

The best option is to find a metal plate which is specifically made for your camera model. For example, I’m using a plate that perfectly fits the Nikon D800 and D810 but when using it on my backup camera, the Nikon D750, it covers the ports on the side, meaning I’m not able to use a cable release.
Lastly, you don’t need to purchase the most expensive alternatives. I know many photographers who use L-Plates that cost between $10 and $30, and these work just as well as more expensive versions. Just make sure that it’s made of metal and fits your camera. You’re likely to find good options for less than $50 so don’t feel like you have to get one of the premium $200 versions.

Love Landscape Photography?

https://resources.digital-photography-school.com/ref/937/