Thursday, April 4, 2019

Five Budget Portrait Photography Hacks to Save You Money


We all love some good photography hacks, and what better than some for portraits. Photography is such a great and fun artistic journey and there is always something new to try, or rather, buy. However, taking great portraits can be done with these five hacks that won’t break the bank. Most of these hacks can be made using household items or you can find them at your local craft stores for a quarter of the price.

#Reflector#Diffusers#Photography
Background Portrait Photography Hack - Five Budget Portrait Photography Hacks to Save You Money
Use a plain, solid painted wall on location as a background for your portraits to add a
different look.

#1 – Reflectors

Reflectors are a great tool, especially for both studio and on-location setups. They help fill in the shadows with light, bounce light back onto your subject, and can create cool effects. They can even help block out the sun or light falling on either on you or your subject. A reflector is great all around tool.
There are many great reflectors available, like the very popular 5-in-1. But you can definitely make one yourself that will give you the same results and enhance your portrait photography. The great thing here is that your handmade reflectors can be large or small depending on your portrait needs. Small, perhaps for the studio, and large for outdoors or on location portraits. Or make one of each, as it really is so simple to do!
Reflector portrait photography hack - Five Budget Portrait Photography Hacks to Save You Money
Use your handmade reflector to bounce light back onto your subject’s face.

Making your reflector

Grab a piece of cardboard and some aluminum foil (crinkle it up a bit first). Next, glue down the aluminum foil with the shiny side up with spray glue or double-sided tape. Make sure to smooth it out as best you can and cover one side of your board. Finally, paint the other side white. If you choose to go with white foam board, then you can skip the last step.
What you will have is a very durable and effective two-in-one reflector! Use the silver side for maximum fill and use the white side for a softer look. This reflector can be used for both indoor and outdoor portraits. Make a few in different sizes to fit your needs.

Aluminum foil glued to recycled box cut to lay flat.

DIY reflector in use.
Reflector bounce portrait photography hack - Five Budget Portrait Photography Hacks to Save You Money
Use the white side of your DIY reflector to softly fill in light while photographing portraits on
location. 
Don’t want to DIY it? You can head over to your nearest store and pick up a reflective car shield, 
the ones that help block the sun from heating up the inside of your car. Those also work great as reflectors and the best part is that you can simply fold it up when you’re finished using it.

#2 – Diffusers

Diffusers, like reflectors, are incredible tools especially for outdoor portraits and for newborn photography. They are simply a translucent material that you can use to soften hard lighting or to create soft light on your subject.
I say newborn portraits because even window light can be hard for these little ones and a diffuser helps to soften it. You can also place the diffuser in front of off-camera speedlights to disperse the light over a larger area, effectively softening it.
Newborn portrait photography hack - Five Budget Portrait Photography Hacks to Save You Money
Use a diffuser to create soft light for your subject, especially great for newborns.
You have the ability to create a diffuser just the right size for your portraits. Grab an embroidery ring and some translucent fabric at your local fabric or craft store. Place the fabric inside the embroidery ring, cut the remaining fabric so that you don’t have too much hanging out. You could hem the edges but the embroidery ring really does hold it pretty tightly.
Once you cut the edges, you have a portable and easy to hold/mount diffuser. It’s lightweight and easy to carry. Use this indoors to soften window light or even a speedlight. Or use it on location to soften harsh sunlight and simply to shade your subject during the session.

This scrim was made with a thiPVCvc pipe about 6 feet long to create a diameter of about
3 feet. I duct taped the ends together and hot glued the translucent fabric to the ring.
A hula hoop would be perfect to use for this as well. I couldn’t find one big enough to use
for this so I used PVC, both are inexpensive and quick to make.

DIY lighting diffuser in action.
You can also make a DIY large lighting panel – get instructions here.
Editor’s Note: Make note that a ring, 12″ or so is still a relatively small light source and as such will produce fairly hard light. You need a large diffuser (larger than the subject’s face) to really soften the light.

#3  Portrait stools

There are many tools that are made specifically for portrait photography like the portrait stool. It’s basically a fancy hydraulic stool to sit your subject on while you make their portrait. There are also some made especially for children. You don’t have to invest in one of those, however, you simply have to go to your local hardware store and pick up a small two-step ladder, or if you photograph children, a two-step stool. Both of these options offer you the same functionality as a portrait stool.

Use them during your session to pose your subject indoors or on location. Another advantage to using a ladder as a posing stool is that it gives you the option to use it yourself to get a higher camera angle. There are really no limits to the usefulness of the ladder, or small step stool, and it is easy to transport. If you are a beach photographer, use it as a tabletop to hold your gear and keep it from touching the sand.
Portrait Photography Hack - Five Budget Portrait Photography Hacks to Save You Money
Use a portrait stool to seat your subject.

#4 – Phone Flashlight

Sometimes the best tools are right in your pocket. Your phone is used for so much of your daily life and it can also be a great tool for photography. The flashlight on your phone can serve as a steady fill light in case you don’t have an off-camera flash or need a little boost of light.
Turn your camera’s flashlight on and point it directly toward your subjects. You may need the help of a selfie-stick or a friend because although it’s powerful, you’ll still need to have the light pretty close to your subject. The mighty flash is perfect for portraits where you want to capture the light behind, but need a little fill on your subject. This is perfect for on-location photography, especially when the sun is setting behind your subject.

A phone flashlight was used to create interesting lighting in a dark area.

Use your handy smartphone’s flashlight to add drama to your portraits.
Create a little drama using your phone’s flashlight and use it to manipulate the available light around you. This is also very easily done for indoor portraits and it works great to fill your subjects when there is beautiful warm light behind, like in the photo above. Get creative with this portable light that you always have with you. It’s quick and there’s no fussing with adjustments.

#5 – Backgrounds

One of the best photography hacks that you’ll learn is how to turn plain walls into beautiful portrait backgrounds. When you’re looking to do some headshots or just photograph so that it looks as though you were in a studio, this is the hack you can use every time.
Choose a concrete wall that is plain. Pose your subject a good distance from the wall so that you can let the background blur a bit (use a wide aperture as well). Then, with your handmade reflector or phone flashlight, photograph your subject. What you will get is a beautiful seamless background just a tad out of focus to give it that studio look.
Portrait photography hacks - Five Budget Portrait Photography Hacks to Save You Money
Use your ladder and a plain wall to create studio-style portraits on location.
You can also choose a more patterned wall to give your background added texture. Look for walls that are painted in a solid color or have a repeating texture like the brick wall below. Another great photography hack is to shoot from above and let the concrete stairs or asphalt blur out so that it creates a nice background.
Portrait Photography background hack - Five Budget Portrait Photography Hacks to Save You Money
Choose plain or patterned walls to give your on-location portraits more of a studio look.

These five portrait photography hacks will save you both time and money all while enhancing the portrait experience for both you and your subject while photographing on-location. Use them for your next portrait session to get new and different results!

Share this article.

Wednesday, April 3, 2019

12 Tips for Improving Camera Phone Photos

We are living in a time where ‘convergence’ is everywhere. Gone are the days when a camera was a camera, a MP3 player was an MP3 player, a phone was a phone….
These days digital cameras are found in a variety of other gadgets – including cell phones. In fact Camera Phones are one of the fastest growing segments of the digital camera market and with the improvements in the quality of what is being offered in some phones (higher megapixels, better lenses, high capacity storage) some believe that they are beginning to win market share away from the low end offerings of many digital camera manufacturers. Our current poll on ‘take anywhere cameras‘ reveals that many of you are using camera phones regularly.
Unfortunately many of the pictures being taken with Camera Phones are poor in quality. This might partially be a result of lower quality cameras – but it is also often a result of poor photographic technique.
Following are 13 tips for Camera Phone owners to help them get the most from their cameras phones:

1. Light Your Subject Well

The better lit your subject is the clearer your image is likely to be. If possible shoot outside or turn on lights when shooting inside. If you’re turning on lights in a room to add extra light to your shot be aware that artificial light impacts the color cast in your shots and you might want to experiment with white balance to fix it (see below).
Some cameras come with a built in flash or light – this can really lift a shot and add clarity to it, even if you’re shooting outside (in a sense it becomes a fill flash). If your camera doesn’t have a flash or light you should avoid shooting into bright lights as you’ll end up with subjects that are silhouetted.

2. Get Close to Your Subject

One of the most common mistakes with camera phone images is that their subject ends up being a tiny, unrecognizable object in the distance. Camera phone images tend to be small due to low resolution (although this is changing) – so fill up your view finder with your subject to save having to zoom in on the subject in editing it later (which decreases quality even more).
Having said this, getting too close on some model camera phones creates distortion and focusing issues (particularly if the camera phone doesn’t have a macro or close focusing mode).


Camera-Phone

3. Keep Still

As with all digital photography, the more steady your camera phone is when taking your shot the clearer your image will be.
This is especially important in low light situations where the camera will select longer shutter speeds to compensate for the lack of light. One trick is to lean your camera phone (or the hand holding it) against a solid object (like a tree, wall, ledge) when taking shots.
Keep in mind that many camera phones also suffer from ‘shutter lag’ (ie the time between when you press the shutter and when the camera takes the shot can be a second or so). This means you need to hold the camera still a little longer to ensure it doesn’t take a shot as you’re lowering it away from the subject.

4. Edit Images Later

Whilst it can be fun to use your camera phone’s inbuilt editing and effects, editing pictures later on your computer produces much better quality images. Take your shots in color at high resolution to keep your options open on how to treat it later.
You can always make it black and white on your computer, but you can’t make it color if you take it in Black and White mode.

5. Don’t Throw Away ‘mistakes’

Remember that on many phones the quality of the screen will not be as good as your computer’s. So if possible hang onto your shots until you can get them on your PC. You might just find that they come alive on a quality monitor. You’ll also find that even ‘mistakes’ and blurred shots can actually be quite usable (in an abstract kind of way)

6. Avoid Using the Digital Zoom

As tempting as it might be to zoom in on your subject when taking your picture (if you have a zoom feature on your camera phone), if the zoom is a ‘digital zoom’ it will decrease the quality of your shot to use it (you’ll end up with a more pixelated shot)..
Plus you can always edit your shot later using photo editing software on your computer.
Of course some camera phones are beginning to hit the market with ‘optical zooms’ – these are fine to use as they don’t enlarge your subject by enlarging pixels.

7. Experiment with White Balance

An increasing number of camera phones come with adjustable white balance which allows you to modify color balance in your images based on shooting conditions. Experiment with this feature to get a good feel for the impact that it has on your shots. I find that it impacts different camera phones differently. Read your manual to find out how it works on your phone.

8. Take loads of Shots and Experiment

The beauty of all forms of digital photography (including that of camera phones) is the ability to shoot off many shots quickly and without cost. This means you can experiment with different modes and composition and discard those that you don’t want to keep.
Camera phones are particularly good for experimenting with new angles and perspectives – shoot from down low, up high, close up etc and you’ll end up with interesting and fun shots.

9. Follow Rules of Composition (and then Break them)

Learn some basic composition ‘rules’. (for example – the rule of thirds – ie don’t place your subject squarely in the middle of your frame but a third of the way in). Simple tips like this can bring life toyour photos.
But then also remember that the beauty of a camera phone is its ability to break all conventions – some of the best shots around break all the rules. So shoot from the hip, the floor, up high, up close – anything goes.

10. Keep Your Lens Clean

One of the challenges with many camera phones is keeping them maintained and clean. Phones spend a lot of time in pockets, in bags and being used in all manner of weather and conditions. As a result they get dirty and can easily become damaged – fingerprints are a common problem on camera lenses – especially if your phone doesn’t have a lens cover. From time to time clean the lens of your camera using a soft cloth (sunglasses cleaning cloths are great).

11. Observe Camera Phone Etiquette

While there is no formal set of rules for using camera phones – it is worth considering how you use it and what impact it might have upon others. There are many cases of camera phones being abused to take sneaky or voyeuristic photos. Ask permission to photograph strangers, consider restrictions on the use of cameras in places like theaters and concerts etc.

12. Use the highest resolution possible on your camera phone

Some phones allow you to choose what resolution you want to take photos at. It almost goes without saying (but we like to state the bleeding obvious) that the higher your resolution the clearer your shot will be. This is especially true for camera phones which often have sensors of under 1 megapixel in them. Keep in mind however that the higher the resolution the larger the file size of the images you take – this means if you want to send images they can end up taking a long time to send.

Share this article.

7 Travel Photography Hacks to Get You Going Places

One of the joys of travel is capturing all the new and exciting destination sites from your own perspective. Sometimes you make conscious decisions of what to leave behind and other times you realize you forgot to bring something, only after you got there. Whatever the case, a few travel photography hacks can help you save the day!

#Light#Shotlist#Photography
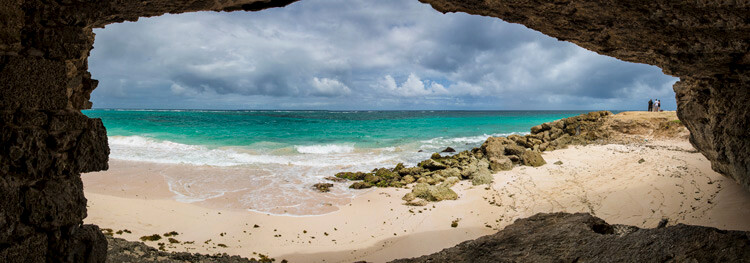
view from a cave of the ocean - travel photography hacks

1. Pack Light

Many times, the biggest challenge in travel photography is whether or not you will be able to capture the essence of the place with the gear you packed. If you are going on vacation, you certainly do not want to take every lens you own. Other than adding weight, there is a chance that much of it will not be used.
 travel photography hacks - lagoon with trees and a boat
This is a good reason to research your destination is to help determine what images you want to capture. Are you going to shoot more landscape scenery or trying to capture the people living there? Your decision will affect what gear you take with you.
blue sky and beach -  travel photography hacks
Additionally, a great way to determine what to take is by reviewing your last trip. Look at what you captured then and decide if it is similar to what you hope to capture now. Many times you will find that most of your photos were taken with the same lens. You can use Lightroom’s filtering system to gather that intel.
For example, if you took both a wide and long zoom lens, but took most shots with the wide lens, then you can safely leave your long zoom behind.

2. Pack Smart

When you decide which lenses you need for your trip, pack well to protect them. It helps to remember that lenses are made mostly of glass, even when built with highly durable exterior bodies. An easy packing hack to avoid damaging your lenses is putting them inside thick socks. This cushions your lens during travel, whether inside your luggage (carry-on only, never check your valuable camera gear) or camera bag.
photo from an airplane window -  travel photography hacks
Optional: further secure your lenses by putting them (sock-wrapped) into shoes/boots.

3. Make a Shot List

You do not have to be a professional photographer to make a shot list. As you research your destination, there are no doubt certain things that you want to see and experience there. As you plan your itinerary, you can make a note of what you want to capture in that location.
b/w architecture image -  travel photography hacks
Take a note of your different points of interest and how you plan to shoot them. Sometimes this simple action can keep you from being overwhelmed when you get there. This will also help you determine what gear to pack (mentioned above).

4. No Neutral Density Filter, No Problem

If you did not pack neutral density filters for your trip, there is no need to kick yourself if an opportunity for a long exposure presents itself. It does take a little familiarity and processing in Photoshop, though. Compose your image and take between 15-20 shots with that composition.
beach shot -  travel photography hacks
15 shots taken of the same scene in short intervals.
You need to shoot in burst mode or ensure that the intervals between your shots are as small as possible. Download your images and load them into Photoshop as layers.
Photoshop layers -  travel photography hacks
15 shots loaded into Photoshop Layers.
Select Auto-Align Layers from the Edit Menu and Auto. Click OK when done. Next, convert your layers into Smart Objects. You do this by selecting the Layer menu, Smart Object and Convert to Smart Object. This step may take a few minutes to process.
When that is finished, go back to your Layer menu and Smart Objects. In Stack Mode, choose Mean (or Median also works well). This process also takes a few minutes to run.
15 images stacked in Photoshop - travel photography hacks
The result, silky smooth water as if it had been shot with a neutral density filter and really long exposure.
Bonus Tip: This method can also help you remove people from your photos.

5. Tripod or Not?

A tripod is that piece of gear that you benefit tremendously from, but when traveling you may be willing to concede. Again it comes down to when and what you are shooting. If you plan on capturing nightscapes or moving subjects, a tripod is a necessity. A good compromise is a tripod that converts to a monopod.
shot of leading lines of a theatre seating area -  travel photography hacks
Conversely you can leave the tripod at home. Depending on where you are going, a tripod can become a nuisance to lug around or may not even be allowed. This is when you have to get creative and make a supporting object your tripod. Tables, walls, rocks or anything stationary which supports your camera will stand-in for a tripod.
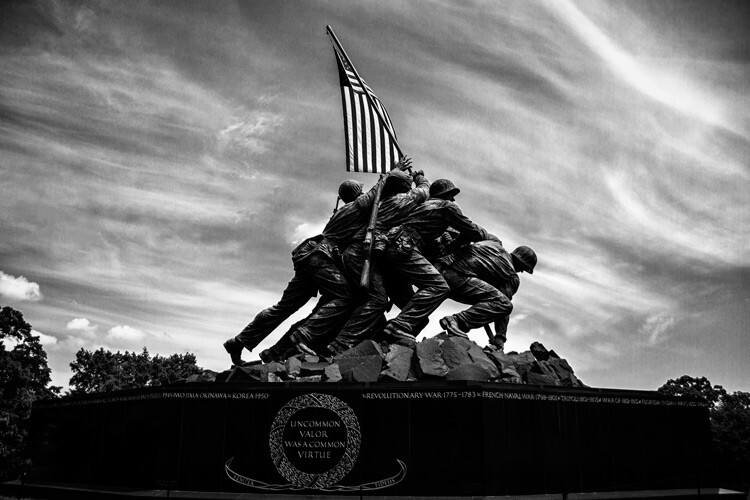
b/w statue -  travel photography hacks

6. Batch It!

Chances are that you will shoot a number of images in one location with the same lighting and conditions. A quick way to edit a large number of photos with your style is to batch process them. Batch processing is applying the same edit across multiple images. In addition to Photoshop and Lightroom, there is other photo editing software available that can help you achieve this.

7. Let’s Reflect

There is no need to walk with a bulky or expensive reflector on your trip. Buy a piece of foam board to bounce light into your shadows. This cheap trick can save you from packing more and you only need apply it to some situations.

city at night - travel photography hacks

With travel photography, most times you want to walk around with less gear (for both your comfort and safety). Once you have done your research and know what you want to achieve, there is no need to go with equipment that you will not use. Sometimes a few travel photography hacks can save you in a pinch.
Please share some of your favorites with us in the comments area below.

Share this article.

Tuesday, April 2, 2019

Beginners Guide to Different Types of Digital Cameras

There is no shortage of digital cameras these days. But for any beginner in photography, it can be a daunting prospect trying to settle on the right one for them. Understanding how the different types of cameras differ could give you a good indication of which one might be right for you. Let’s take a look at a few options:

Standard Compact

Jeff_golden
By jeff_golden
Small, light and fairly cheap, standard compact cameras (also known as Point and Shoots) are usually the basic entry model into the digital photography lineup. They are normally fully automatic, but some do offer some manual exposure options. They would usually have a zoom lens (4-10x) which folds into the camera, a built-in flash, and an LCD screen on the back (no eye viewfinder). Prices usually start from around $85, and can go up to over $400 for the more high-end versions. These might include additional features such as HD video recording, image stabilization, and sometimes Wi-Fi connectivity, which allows for instant upload of photos onto to social network sites.
  • Pros: Inexpensive, light, and a good basic option if you want a camera for personal use.
  • Cons: Limited manual exposure options. Not good enough quality (they have very small sensors) of finished files for professional use. No interchangeable lenses.


Zoom Compact

Carl Berger Sr
By Carl Berger Sr
Zoom compacts are pretty similar to standard compact camera, but usually benefit from a more powerful zoom lens (which can be as high as 30x). These cameras tend to be a little more robust and are generally larger in size than standard compacts. Most would have some manual exposure options, as well as automatic, and usually offer HD video recording. They tend to start at a slightly higher price of around $150 with luxury models over $500. Some will offer additional features, such as GPS for automatic geotagging, which is great for when you are travelling.
  • Pros: Still fairly inexpensive, pretty robust with a powerful zoom, a good option for personal use.
  • Cons: Photo quality not good enough for making large prints or for professional use. No interchangeable lenses.


Adventure Cameras

These types of cameras tend to be similar to compacts, but are designed to withstand the elements. They’re usually waterproof, shock proof, and some recent models are even freeze proof. They usually offer some limited manual exposure options, and a zoom closer to the standard compact (rather than a zoom compact) which is behind toughened glass. With a starting price of around $120, they are a good option if you are after a basic camera that can withstand some extreme conditions. More advanced models will be upwards of $500.
  • Pros: Tough build makes them ideal for use in extreme conditions for personal use.
  • Cons: Limited zoom and exposure options, coupled with smaller sensor and photo quality not being good enough to make large prints or for professional use. No interchangeable lenses.


Advanced Compact

K?rlis Dambr?ns
By K?rlis Dambr?ns
These cameras are designed for more experienced photographers and those who require more versatility, quality, and creative features. Options such as manual exposure mode and manual focusing features, optical viewfinders, and external flash connections, make these cameras a good option for photographers who want more control over their photos. But these features mean they are usually considerably more expensive than other types of compacts cameras. Prices can range from $400, to in excess of $700 for cameras with smaller sensors, and $700 to over $1000 for those with larger sensors.
  • Pros: Small, compact and lightweight and still relatively inexpensive.
  • Cons: Limited features for more advanced photographers. No interchangeable lenses.


Super-zoom

Super-zoom cameras have been falling out of favor in recent years. These cameras used to be the stepping stone between compact cameras and DSLRs (which is why they are called bridge cameras), but with the advances in compact cameras and CSCs (Compact system cameras) more and more people are now foregoing super-zooms. Usually fairly large with an SLR type body, which means hand-grips and an electronic viewfinder, these cameras often benefit from powerful zoom lenses, and image stabilization. Some will have HD video recording and a good set of manual exposure options, and vary from around $250 to $700 or more for advanced models.
  • Pros: A sturdier body than compact cameras and good set of manual exposure features.
  • Cons: Neither here nor there. Not as advanced as DSLRs and not as convenient as compact cameras. No interchangeable lenses.


Smartphone Cameras

The explosion of smart phones is arguably the biggest thing to happen to photography since digital technology. The convenience and readiness of smart phones mean that not only is there greater competition than ever, but also better opportunities for capturing those fleeting moments. Some smart phones are now capable of capturing photos at 16 megapixels, and offer a great low-light capability. Features and prices vary hugely from model to model and manufacturers, so it pays to do some research.
  • Pros: Lightweight, compact and always by your side, ready to shoot.
  • Cons: Image quality and size not good enough for high end or professional use. No interchangeable lenses.

Compact (Mirrorless) System Cameras

Mirrorless cameras and focusing
Compact system (mirrorless) cameras benefit from having interchangeable lenses, which means far greater control for photographers than standard compact cameras. They offer most of the features and capabilities of SLR cameras, but with the added benefit of being lightweight, smaller and generally less expensive. These cameras offer a great option for hobby photographers who want to extend the control over their photos, but do not want the hassle of having to carry heavy sets of full sizes lenses with them. In fact, more and more professional photographers are also investing in these cameras as an alternative option to their usual set of cameras.
  • Pros: Good image quality with good features, lightweight, and often less expensive as a package than SLR cameras.
  • Cons: Not the very best out there if you want the best quality photographs. (Editor’s note: this is the author’s opinion)
Read about some of mirrorless options we’ve reviewed and covered here:

DSLR

Canon-Camera
Image courtesy of Canon
Since their introduction in the late 90s, these cameras have become the choice for serious amateur and professional photographers. DSLR cameras are designed on the same basis as their film predecessors, and they offer superb image quality, interchangeable lenses, and a host of creative controls. The majority of DLSRs use a sensor size called APS-C, but the very top end models will have a full-frame sensor which is the same size as a 35mm film. Prices start from around $400 for an entry-level APS-C model with a standard lens, right through to over $3,000, just for the camera body, for a full-frame model.
  • Pros: The number one choice for professional photographers, offering superb image quality and creative features. Offer the availability to change lenses.
  • Cons: Heavy, bulky and incredibly expensive.
Read more here:

Medium Format Cameras

These are the Rolls Royce of the camera world. If a full-frame DSLR isn’t good enough for you, then the next step up is a medium format camera. These benefit from even bigger sensors than the full-frame DSLRs, which in turn means higher image resolution (60 megapixels), but they also come with a hefty price tag. For example the Hasselblad H5D-200cMS with a standard lens could cost in excess of $50,000!
  • Pros: Amazing picture quality, nothing else will come close.
  • Cons: Very expensive not to mention big, bulky and heavy.


Most new photographers often feel that they need to invest in the most expensive camera to capture great photos, however, don’t forget that the camera is just a tool. The reality is, that unless the other elements of the photo such as composition, lighting subject etc., are all in line, the photo will fail regardless of which camera you use.
There is plenty of choice out there, both in terms of features and price, for any photographer’s price range. So take your time, do your research, and choose something that is within your budget and suits your needs.
Now it’s your turn. Share your advice on cameras below.

Share this article.

Shooting Portraits like a Pro On a Budget

In this post portrait photographer Alexis Godschalk shares some tips on shooting studio like portraits on a budget by talking us through a shoot he did with a band recently.
portraits-budget.jpg
When I started doing photography years ago, I really wanted to shoot fantastic shots, I wanted to make sure that my photographs would be considered for a gallery showing. All I had was Canon 10D and a flash. Most of what I shot was candid and in the style of photo journalism and even though this was fine I wanted more.
What kept me from shooting clean studio like portraits was the mistaken belief that I needed loads of expensive equipment.
One day a friend of mine approached me about photographing his band. He had just gotten new management and wanted to make the band band look pro. He started by showing me some photography he liked and we started talking about what could and could not be done. One of the shots he like was a clean shot with dramatic lighting again a black background. I told him that would be tough but I’d try, and so we did.
Not having a studio or lighting I started getting creative and went into the garage to see what I had. I had a couple of ladders, string, clamps, 8’ pole, a black bed sheet and some tape. I decided to shoot outside in my front yard and use sun light. I knew that I wanted to reflect light so I bought a couple of sheets of 2”x4” white foam-board from the local hardware store. After getting my things together I was ready to go try it out.

The equipment:

  • Two fold-open ladders
  • Two black bed sheets
  • A 8’ pole
  • String
  • Two sheets of 2”x4” white foam board
  • Tape
  • Tripod
  • Camera (Canon 10D)
portraits-budget-2.jpg

The rigging:

I setup my two “fold-open” ladders opposite each other and tied the 8’ pole to the front edge of both. I tied a couple of weights to the bottom step of each ladder. I then taped the black bed sheet to the top of the pole across from one end to the other making sure to keep it as clean as I could. I found another black sheet to put on the grass in front of the backdrop.

Lighting:

Using the sun was going to be a challenge as it was one-directional, so I used the two sheets of foam-board to reflect the light onto the guys faces and add fill-in lighting. As I was shooting digital I was able to look at the results right away and change the angles right away.
Tip: If shooting outside have a small sheet you can pull over your head and camera when reviewing the shot on a digital camera, this will greatly help you see what you shot without the reflections and the sun light dimming your view.
I spent some time getting the look I wanted with and playing with angles. They had some black hats and clothing so I tried to create some trim lighting to make the hats and clothing pop from the black background.

The shoot:

I knew I was going to have to darken the background sheet in photoshop, so I made sure to keep it clean and smooth as much as possible. The creases could become a big job to fix in photoshop so I tried to keep them to an absolute minimum. During I took time to get the band guys to get comfortable and challenge them to try facial expressions and “looks” I wanted to make sure they would look like a band and not goofy. I had some sample photos that I would show them to see if they could duplicate. The funny thing was that within 30min a nice group of neighbors had come to see what we where doing. This was fun but also distracting, so I made sure that we stayed focused.
portraits-budget-3.jpg
Tip: As the photographer take charge, remember you are going to get the best results by keeping things under control and minimizing distractions. Also keep checking your shots for bad reflections, shadows, expressions and wardrobe issues. Remember, it’s better to fix right there than afterward in photoshop.
One of the guys wanted Latin text painted on his chest, we shot some shots but I thought it was to strong so at the end I suggested trying to put a T-shirt on over it and wet the T-shirt “just to see what it would look like” That shot really turned out great. Be flexible and try out some stuff (after you are sure you have want you wanted) in this case, wetting him would have hindered other shots we wanted had i not shot them first.

The result:

The shoot turned out to be great and a load of fun! I was very happy with the results and to this day people think it was shot in a studio with lighting equipment. The band was ubber happy and I was too. For a no-budget shoot and not having any pro-equipment the results were very convincing and opened the door for me to do some other paid shoots and actually buy equipment. Years later I now shoot with lighting equipment, but have to say that, that shoot was one of the most fun and a great paradigm shift for me.
As a photographer the tools you have are just that; tools. You can make great looking shots with some creativity and some random stuff around your home. Money and equipment should not limit you from pushing the limits. So go have fun with it.

Update: A Diagram to Show How it Was Done

We have had a lot of people asking if we could include a diagram of how this shoot was setup. Alexis has kindly put one together for you:
portraits-diagram.jpg
___________________________
Alexis Godschalk is a portrait and wedding photographer from Los Angeles California you can find some of his work at photo.net. Connect with Alexis via twitter at agodschalk.

Can a Professional Photographer spot the difference? $400 Camera VS $4,0...

Monday, April 1, 2019

How to Photograph Kids Playing, Running Around and Generally Being Kids


If you’re a people photographer, it’s hard to resist photographing kids as they play, run around and… well, be kids. It’s also a great chance for you to play as a photographer.
Here are seven tips to help you capture photographs of kids at play.

#Light#Photographing#Kids

It was a grey hazy day at the beach so I focused on silhouette photos of my kids at play.

1. Use Your Phone Instead of Missing the Moment

I teach people how to use their new DSLR cameras. One of their biggest frustrations is that their friends seem to take better photos with a phone than they can with their complicated DSLR.
If you’re still struggling with your DSLR, don’t be afraid to use your phone as a camera. As long as you keep in mind the most important parts of a photo – light, moment, and composition – your phone will take great photos.

This photo of my daughter running through a puddle was captured with my iPhone 4s.
Because it was a bright day, the shutter speed was fast and froze the water as it splashed.

2. Be an Observer Instead of a Boss

If you’re going to photograph kids at play, it’s best to have them acting candidly rather than telling them what to do. Just let them play, and they’ll give you countless moments to photograph. The moment you step in and tell them what to do or how to play, you’ll ruin the moment.

I wanted a nice portrait of my daughter with these fall colors, but I knew I wouldn’t be
able to make her stand still for one. So I let her walk on ahead of me. When I called
her name she looked back, and I snapped the photo.

3. Angles

While photographing kids at play, consider the angle you’re using. Your photos will look more exciting if you go for low angles or face to face. Get down to their level (if not lower) and into their world.

I achieved this extremely low angle by laying down on the ground and looking straight up.

Before it was hauled away, my kids turned this mattress into a trampoline. A low angle
helped to capture how high he was jumping.

4. Get Close

Join in the play, and get as close as you can while using a wide angle. When you look at the photo it will make you feel like you’re right back there in the moment.

This son was wrestling with his dad so I decided to get in as close as I could. The wide-angle
helped to exaggerate the moment.

5. Get Behind Them

Photographing people from behind adds a bit of mystery to your photo. It lets the viewer bring a little more of their own imagination to the photo. When we can’t see the person’s face, it makes us imagine what they’re up to.

This over-the-shoulder shot anticipates the action that’s about to happen.


This photo was taken in a massive outdoor sandbox. Obviously, he’s been sliding down the
dirt hills on his bum.


This combines taking a photo from behind with getting in close. (Taken with an iPhone.)

6. Play With Your Shutter Speed

One of the biggest problems you’ll face when capturing action is motion blur. So you’ll need a fast shutter speed.
But you can also play with a slow shutter speed and capture creative motion blur.
Slow shutter speed motion blur
I took advantage of my iPhone’s slow shutter speed to capture this portrait of my daughter.
As you can see her face is basically sharp while the background is quite blurry. This was
achieved by having her walk toward me while I walked backward. To the camera everything
is moving except for her.

7. Tell a Story With Your Photos

You can tell a story with your photos. It might be a ‘before and after’ story using just two photos. Or it could be a beginning, middle and end with three photos. It might even be a longer story that fills a photo book.
Daddy daughter candid moment.
This story begins with a little girl taking her daddy by the hand and leading him.

Daddy daughter dancing
Then in the middle of the story, she dances with her daddy.

Daddy daughter play
The story ends with her daddy swinging her around wildly.

Final Checklist

Here’s a checklist for photographing kids as they run around and play.
  • Consider this playtime for you as a photographer.
  • Use any camera you’ve got – even your phone.
  • Stand back and let moments happen on their own.
  • Be creative with your angles.
  • Get in close.
  • Add mystery to your photo by photographing kids from behind.
  • Be creative with your shutter speed.
  • Tell stories with multiple photos.
Now go out there and take some great photos of those kids being kids and share them with us in the comments.

Share this article.