Friday, March 8, 2019

Circular Polarizers Versus Graduated Neutral Density Filters for Landscape Photography

Whether you’re a professional or hobby photographer, odds are you’ve come across a beautiful, scenic landscape, that you absolutely had to photograph. Unless you’re an experienced landscape photographer, there’s a good chance the color in that photo wasn’t as saturated, or balanced as you were expecting. That’s because there’s generally a wide disparity in the dynamic range between the foreground and background of landscapes, as well as between the upper (sky) and lower (earth) halves of the frame. Thanks to a couple of lens filters, this hurdle can easily be overcome without having to spend hours of post-processing in Photoshop.

#LandscapePhotography#LensFilters#PolarizingFilter

Drop-in and screw-in filters

What are lens filters?

Lens filters are lightweight pieces of glass that screw onto the front of most camera lenses (or drop-in using a holder system) in order to offer additional protection of your lens while also improving image quality. There are a variety of filter sizes that must match up to the size of the thread on your camera lens, so it is very important to make sure you get the correct size for the lens you plan to use it on (tip look on the back of your lens cap).
In addition to varying sizes, lens filters can also serve several different purposes. Most basic lens filters are ultra-violet (UV) reducing filters (also known as haze filters) that come with an anti-reflective coating to cut through the effects of atmospheric haze, thereby improving overall image quality. Besides UV/haze filters, there are two others that are particularly useful for landscape and outdoor photography – polarizers and graduated neutral density filters.
From left to right: A clear UV filter, a polarizing filter, and a Graduated Neutral Density filter.

What is a polarizing filter?

The next filter we’ll discuss is the polarizing (usually circular) filter, which attaches to the front of a lens and can be spun around to produce varying degrees of saturation throughout an image. This quality of the polarizing filter is important to pay attention to, because it’s easy to produce uneven shades of saturation if the polarizer is even slightly off, such as in the example below.
Circular polarizer versus ND grad filter
Landscape photo with uneven polarization. Notice how the sky is very uneven in color.
Sony a6300 camera with bare kit lens - no filter applied. UV and Polarizing filters on the table.
Sony a6300 camera with bare kit lens – no filter applied. UV and Polarizing filters on the table.
Polarizing filters do two things: first, they help reduce glare or reflections cast by non-metallic reflective surfaces such as glass or water. Second, they saturates colors and enhances image clarity by reducing the overall exposure of an image. The benefits of the polarizing filters are best seen when you are shooting at a 90-degree angle to the sun.
Take a look at the landscape photo below that was taken with no filter, the colors are muted and not very exciting. However, once the polarizing filter is added, you can see a huge boost in overall color saturation. It’s a pretty dramatic difference without even post-processing the photo.
Circular polarizer versus ND grad filter
Landscape photo with no filter.
Circular polarizer versus ND grad filter
Landscape photo with a circular polarizing filter. Notice how overall the colors are intensified.

What is a neutral density filter?

Another effective filter for landscape photography is a neutral density (ND) filter, which reduces the overall exposure of an image. ND filters are uniformly dark in color and they come in different strengths depending on density.
The best use of ND filters is in situations where you wish to use a long exposure or wide aperture to capture an image, without risking overexposure. Some example scenarios when a ND filter would be effective include:
  • Producing a smooth, blurred movement of water in a waterfall, lake, or the sea.
  • Blurring moving subjects to convey movement or motion (such as panning).
  • Reducing diffraction by using a large aperture.
  • Shooting with a shallow depth of field in bright lighting.

What is a graduated neutral density filter?

ND filters also come in a graduated form, also known as a split ND filter. The top half of the filter appears dark, while the bottom half is clear. Similar to the circular polarizer, the graduated ND filter can also be spun around to produce varying degrees of saturation, so it’s important to be careful when using it to avoid unevenly saturating your image.
The best scenarios for a graduated ND filter to shine are when you wish to reduce light, or darken just part of your image. Think landscape photos where the earth is balanced, but the sky is blown out. This would be an ideal time to use a graduated ND filter to darken the sky.
Circular polarizer versus ND grad filter
The above landscape photo with a soft edge ND grad filter. Notice how the sky is darker and more 
saturated, while the water hasn’t changed.
There are two types of ND grad filters: hard edge, and soft edge. You’ll want to use a hard edge filter when the light and dark sections are very clearly separated, while a soft edge filter is best used when the light and dark sections are not distinctly separated.
Circular polarizer versus ND grad filter
Landscape photo with no filter.
Circular polarizer versus ND grad filter
Landscape photo with a circular polarizer.
Circular polarizer versus ND grad filter
Landscape photo with a graduated ND filter.

Do you use polarizers or neutral density filters with frequency in your photography?

Share this article.

5 Camera Filters That Can Enhance Your Photography

Photography can be an expensive hobby, with equipment improvement really making a hole in your wallet. What if I told you there was an inexpensive piece of equipment, which can greatly improve your work! You’d want to know what that is right? Well, step forward the humble camera filter.
Although in truth, there are some camera filter systems that are quite pricey, you can also get ones that are a great value. So let’s take a closer look at what camera filters are all about.

What is a camera filter?

In the age of smart phone filters, it’s worth explaining what the term “filter” used to mean in photography. A filter is something that attaches to the front of your camera lens and is used to alter or adjust the light coming into the camera in some way.
5 Camera Filters That Can Enhance Your Photography - orange warming filter
#Filter#CircularPolarizing#UVfilter

Camera filters allow you to add more creativity to your photography.

Filters come in two different shapes

  • Circular Filters – These filters screw directly onto the front of your lens. You’ll need to buy a filter of the same diameter of the front of your lens (look at the back of your lens cap for the correct size). It is also possible to buy step-up or step-down rings that will allow you to attach your filter to camera lenses of different diameters.
  • Square Filters – These sometimes come as a rectangular filter, and always as part of a system that allows you to attach them to the front of your lens. There is typically a bracket, which itself attaches to a round ring, that you will screw onto the front of your lens. Systems like this make stacking filters easier and are better for graduated filters.
There are in fact many different filters which you can use, and not all of them are going to be mentioned here. Many people like to use a UV filter to protect the glass on the front of their lens. This is a functional use, and this article seeks to look at the creative use of lens filters.
A few notable omissions to this list are the starburst filters, and the softeners/diffusers used in portrait photography. With all this covered, let’s take a look at the five best camera filters that you can use to enhance your photos.
5 Camera Filters That Can Enhance Your Photography - set of different filters
Circular filter are one of the main options out there.

#1 – Circular Polarizing Filter

The circular polarizer is a great filter, it’s a must-have in your bag. Its primary use is for landscape photography, though it can be useful for outdoor portrait scenes as well. This filter works by only allowing polarized light into the camera, that means light traveling from one direction. This has several effects on your photo.
  • Reflections – A circular polarizing filter can enhance or remove reflections from a scene, depending on what you desire. As you rotate the filter, you will see the reflection either increase or decrease.
  • Saturation – This filter can also add more saturation to your photo, giving it more impact with the viewer. You can adjust how much by rotating the filter.
  • Clouds – Related to the increase in saturation, is the enhancement of clouds. On days where there is a mixture of sky and cloud, this is especially effective.
5 Camera Filters That Can Enhance Your Photography - blue sky and a green field
Circular polarizing filters are great for enhancing skies like this one.

#2 – Neutral Density Filter

Neutral density filters are ones that block the light in varying amounts depending on the strength of the filter. The strength ranges from the ND2 to ND1000, weakest to strongest respectively. These filters are mainly used for either portrait work, or landscape work with the stronger filters used in landscape photography.
The darkness these filters add is referred to as a stop, and a stop means one exposure value (1EV). That means an ND2, which is a 1 stop filter, darkens the photo by -EV1. The ND1000 filter is referred to as a 10-stop camera filter.
  • Portrait filters – ND2, ND4, and ND8 filters can broadly be described as portrait filters. They are used with prime lenses when there is too much light for that lens to be used with a large aperture. Their other function, when using a strobe (flash), is to block enough light so you can use the flash at the camera’s regular sync speed (without the need for high-speed sync HSS).
  • Landscape filters – While there are times you might want to use some of the weaker ND filters for landscape photography, typically you’ll be using an ND110 or ND1000 for landscape photography. This allows you to make dramatic long exposure photos during the day, ideal for moving water or clouds.
  • Solar eclipse – Should you be lucky enough to witness a solar eclipse, you’ll want to use the 16-stop ND100000 filter (a special solar filter).
5 Camera Filters That Can Enhance Your Photography - long exposure scene
If you want to take a daytime long exposure you’ll need a strong ND filter.

#3 – Graduated Neutral Density Filter

These filters are the domain of landscape photographers. Graduated Neutral Density filters come in two types, hard and soft. They’re used to make the sky darker, so it balances out the exposure of the image in relation to the foreground.
Purist photographers who like to create their photos from a single image, and avoid techniques like HDR or digital blending like to use these filters. Even those who like to blend their images will use them, as it makes post-processing easier later on.
If you’re looking to buy one you should look at the square variety, as this gives you the ability to adjust where the horizon line is. Let’s look at the types you could use.
  • Hard – This means there is a sharp line between the dark and light areas of the filter. They are more difficult to use but create nice results when applied correctly.
  • Soft – Soft graduated filters have a more graduated transition from dark to light. Easier to use, and better when the horizon line isn’t sharp if it contains buildings or trees.
  • Strength – As with the regular ND filters these vary with strength. You can get ND2, ND4 and ND8 graduated filters.
Note – The quality of the ND filters will be better the more you spend. Cheaper varieties may introduce a color cast to your image and are therefore not entirely neutral. If you have the money to spend, the Lee filter system is highly recommended.
Read these dPS reviews for more on these filters:
5 Camera Filters That Can Enhance Your Photography
The square shape is best for graduated filters.

#4 – Graduated Filter

Progressing on we now look at the Graduated Filter. These are used to enhance the color in the sky. They work just like the graduated ND filters but instead add color. This type of filter will often be used to make a sunset sky even more dramatic, by making the sky orange, or perhaps rose red.
Other options for graduated filters are adding sepia to the top half of your photo. Even more experimental is adding one color to the bottom of the image, and another color to the top by using two of these filters together. This is a great camera filter to be creative with, but you need to apply it to the right place.
Those wishing to try their hand at this type of photography with a filter should look at this excellent guide.
5 Camera Filters That Can Enhance Your Photography - colored filters
You can use filters to add color to the sky, even when it’s not there yet.

#5 – Infrared filter

Do you want to create a dreamscape from your photos, with foliage that looks like it’s from a snowstorm? Then you’ll need to learn how to make infrared photos.
One of the most accessible ways to do this is by using a filter. When you buy a filter like this it will appear black, that’s because the human eye can’t see the infrared spectrum of light. A popular filter for infrared photography is Hoya’s R72. Even with a filter, you’ll need a camera that will perform with this filter attached, and some cameras are better at this than others.
Most manufacturers will block infrared light from reaching the sensor to some extent, the stronger that block is the less effective this filter will be. Should you choose to use this kind of filter on a non-converted camera expect your exposure times to range from 30 seconds up to 4 minutes, depending on your ISO and aperture settings.
Read more: My First Time Shooting Infrared Photography
5 Camera Filters That Can Enhance Your Photography  - b/w infrared style image
Infrared photography is a lot of fun to try. This photo was shot with the Hoya R72 filter.

What camera filters do you use?

There are lots of methods you can add creativity to your photography, a good camera filter is one of those ways. In this article, you’ve seen five of the best filters available to add that little extra to your image.
Have you used any of these filters? Is there another filter that you use in your photography, that can add more creativity? Those who take black and white photos will no doubt point to the effects that red, orange and yellow filters can add to this genre. As always we’d love to see examples of your photos in the comments section, together with hearing about your experience using filters.
5 Camera Filters That Can Enhance Your Photography  - landscape scene
Filters can be used to darken the sky in landscape photography. This can make it more dramatic.

Share this article.

Thursday, March 7, 2019

A Look Inside the Bag of a Hobby Photographer on a Budget

We often get to see inside the bags of professional photographers. You know, the bag that we dream of having ourselves, filled with three full-frame bodies and six or more lenses with plenty of accessories to fill out every pocket the bag has to offer. Well, I’m not a pro – and today’s ‘inside the bag’ post might not be something to drool over, but it should give you an idea of what you can do on a reasonable budget if you’re planning to do some serious photography on the weekends.

Inside the bag of a hobby photographer on a budget

hobby photographer gear
#Nikon#Photographer#Tokina

As you can see from the photo, I have a fairly well rounded collection of lenses that let me capture anything from ultra-wide to super close. I wouldn’t consider anything inside this bag “pro-level”, but the collection is very capable and allows for a wide range of subjects.
My camera body for the last three years has been the trusty Nikon D7000. I highly recommend this camera, or its bigger brother the D7100, to anyone who’s interested in getting into photography seriously. While it’s not an FX (full-frame) body it does have a lot of pro-like features, is very capable in low light situations and being marketed at the enthusiastic hobbyist it’s fairly affordable as well.
As far as lenses go I use the Tokina 11-16mm f/2.8 most frequently, followed closely by the Nikon 55-300mm f/4.5-5.6G. It really depends on the mood that I’m in but I tend to spend most of my time at the extremes of my focal length range. On occasion the Nikon 50mm f/1.8G and the  Nikon 18-105 3.5-5.6G, which came with the D7000, will be used for specific shots. The Nikon SB700 speedlight featured in the photograph above is rarely used and is probably my greatest regret in terms of purchases (not that it’s a bad flash, just that I don’t use it nearly as much as it deserves).
On top of the DSLR stuff I do carry two Olloclip adapters (the telephoto + circular polarizer and the 4-in-1 kit) for my iPhone along with a Gorillapod with an iPhone mount attached to it. Sometimes I just enjoy the simplicity and creativity that the iPhone allows.
Other little things not pictured above include a wireless remote shutter release, 77mm circular polarizing filter, and a 77mm Hoya ND filter.
To support the main camera I use the Manfrotto 190XPROB aluminum tripod with the basic Manfrotto ball head. It does the job I need it to do, and has served me well for three years, but I do want to upgrade to a carbon fiber tripod in the future for the added strength.

What bag holds it all and how’s it packed?

I manage to fit all of this into a Lowpro Slingshot 102 AW which when fully packed it’s bursting at the seams. The bag itself is designed to fit a camera body with a small lens attached, two smaller lenses on either side, and has a couple other storage compartments for extras like filters, charging cables and cleaning supplies.
I almost never pack my flash as it’s not typically something I use, but if I do pack it, the 18-105mm is usually the lens that gets left at home. Here’s a couple photographs to show you the bag fully packed.
hobbyistphotobag1
Main storage compartment from left to right: Tokina 11-16mm, Nikon D7000+18-105mm, 55-300mm.
hobbyistphoto3
Secondary compartment – 50mm, Olloclips, cleaning supplies and remote trigger.
hobbyistphoto2
All closed up and ready for a shoot with Gorillapod attached to the side.
The filters and other little things that I may need can fit in the front compartment and if I want to bring the Gorillapod along I can attach it to the side of the bag using the built in tripod holder (which doesn’t really work well for anything larger than a Gorillapod anyway.

What do I use this kit for?

Whether it’s waterfalls, seascapes or the night sky; the D7000 plus the Tokina, supported by the Manfrotto, works like a charm. While I primarily shoot landscapes, the 55-300mm lens comes in handy when I want to capture a shot of some wildlife or simply looking for a change in perspective. I’ve also done some cityscape photography, a few portraits and one wedding (read: The Story of Photographing my First Wedding also Likely my Last to find out why I won’t do that again.)
hobbyist-photo5
Hobbyistphoto4
All in all I think it’s a pretty well rounded kit for someone who spends his weekends hiking through forests taking photos. Obviously there’s a lot more that I could add to the collection, and I plan to do just that when I have more money to invest into it. Currently on my ‘next to buy’ list is a macro lens and then it might be time to upgrade the body.
So that’s my bag – what do you think about it and feel free to share your own in the comments below.

Share this article.

Gear Review: Fujifilm 50-140mm vs 55-200mm


One of the biggest questions all Fujifilm X-Series users have to contend with is, “which telephoto zoom lens should I buy?” Luckily, there are three great Fujifilm X telephoto lenses to choose from:
Fujifilm Telephoto Lenses: 50-140mm vs 55-200mm
#Fujifilm#Zoomlens#Telephoto

All three lenses are fantastic in their own rights, but which one is best for you? In this article, we’ll take a look at two telephoto lenses in particular: the 55-200mm and 50-140mm. Why these two? Because they’re intended to fill the role of the standard 70-200mm zoom lens, an important tool in every professional photographer’s gear kit. If you’re unfamiliar with Fujifilm, note that all X-Series cameras are crop sensors, so these lenses have a 35mm equivalent.

Specifications

Fujinon XF 55-200mm f/3.5-4.8R LM OIS

  • Released in June 2013
  • Price (MSRP): $699 USD
  • 35mm Equivalent: 83.6-304mm
  • Aperture Range: f/3.5-4.8
  • Dimensions: 75mm (diameter) x 118mm-177mm (length)
  • Weight: 633 grams (with hood and caps)
  • Image Stabilization (OIS): Yes
  • Weather Sealed: No

Fujinon 50-140mm f/2.8 OIS

  • Released in November 2014
  • Price (MSRP): $1599 USD
  • 35mm Equivalent: 76-212.8mm
  • Aperture Range: f/2.8
  • Dimensions: 82.9mm (diameter) x 175.9mm (length)
  • Weight: 1,184 grams (with hood and caps)
  • Image Stabilization (OIS): Yes
  • Weather Sealed: Yes
1 - Gear Review - Fujifilm 50-140mm vs 55-200mm

Specs Summary

Based on specs alone, there are big differences between these two lenses. The 50-140mm is much larger, heavier, and more expensive. Although, it doesn’t even cover nearly as much range as the 55-200mm. What gives? For starters, the 50-140mm is one of few Fujifilm lenses to receive the Red XF Zoom Badge. It’s similar in concept to Canon’s L-lens designation, indicating that red badge lenses are more premium and geared toward professionals.
There are two qualities in particular that make the 50-140mm more premium: weather sealing, and the constant f/2.8 aperture. Both features make this lens more flexible in terms of shooting in bad weather and in low lighting conditions. Both important features for professional photographers. Unfortunately, that also means the price is much higher with the 50-140mm costing more than double the 55-200mm.
2- Gear Review - Fujifilm 50-140mm vs 55-200mm

Build quality

Specs aside, let’s talk about how these two lenses compare in terms of handling and physical construction.

Buttons and rings

Both telephoto lenses are made of a combination of metal and rubber. There’s a rubber ring to control the zoom and another rubber ring for manual focus. The lenses also have Fujifilm’s signature aperture ring that allows the user to twist to select the aperture. There’s a key difference in that the 50-140mm has a marked Auto Aperture ring, whereas this takes the form of a switch on the 55-200mm. Both lenses also have a switch to turn OIS on or off.
3- Gear Review - Fujifilm 50-140mm vs 55-200mm

Zoom

Another big difference between these lenses is how they zoom. The 55-200mm has an external zoom, which means it extends as the zoom ring is turned. When fully extended, the 55-200mm is nearly the same length as the 50-140mm. This can be positive in that the lens ends up being quite compact when not fully extended. However, when fully extended, there’s an added risk of damaging the lens. On the other hand, the 50-140mm lens zooms internally, meaning it physically remains the same length even as you zoom in and out.

Lens Hoods

Both the 50-140mm and 55-200mm come with plastic lens hoods. The 50-140mm’s lens hood is scalloped and has an opening allowing easy access to lens filters (ie. circular polarizers).
4- Gear Review - Fujifilm 50-140mm vs 55-200mm

Tripod collar

Likely due to its size and weight, the 50-140mm comes with a metal tripod collar. This allows for the lens to be mounted to a tripod, rather than the camera body, resulting in better overall balance. The tripod collar has several knobs that allow it to easily be turned in any position, or removed altogether. Compared to other telephoto zooms such as the Canon 70-200mm f/2.8, Fujifilm’s tripod collar is much lighter and easier to remove. Overall, the tripod collar seems to be one of the best and most surprising features of this lens.
The 55-200mm lens does come with a tripod collar.

Lens performance

Let’s start with the 55-200mm f/3.5-4.8 lens as its price point and size makes it the easiest to add to your kit. Overall, the lens performs extremely well. Images are sharp and in focus. Even when shooting at 200mm f/4.8, image bokeh is smooth and there’s a good separation between the photo subject and background. However, it’s still a variable aperture lens. When shooting in low lighting or needing to isolate your subject with creamy bokeh background, this lens is blown out of the water by the 50-140mm.
5- Gear Review - Fujifilm 50-140mm vs 55-200mm
The 50-140mm at f/2.8 performs incredibly well in low lighting.
Moving on to the 50-140mm f/2.8 lens. This lens is definitely much beefier and you’ll need more room in your bag to lug it around. Its size can make it an awkward match for some of Fujifilm’s more compact cameras such as the X-E bodies. If your camera comes with an optional battery grip, using it can help the lens and camera feel more balanced. Personally, I had a hard time turning the aperture ring with the tripod collar attached, although the collar did help hold the lens steady.
In terms of image quality, the 50-140mm offers sharp, crisp images at all focal lengths and apertures. It has an obvious upper hand when it comes to low light shooting and bokeh with that f/2.8. However, if you’ve gotten used to shooting with the 55-200mm, you might miss that extra zoom range that you can’t get with the 50-140mm.
7- Gear Review - Fujifilm 50-140mm vs 55-200mm
55-200mm at 55mm f/3.5
8- Gear Review - Fujifilm 50-140mm vs 55-200mm
50-140mm lens at 140mm f/2.8

So which of these two Fujifilm telephoto lenses is best for you? It’s hard to say. If you’re on a budget, don’t want a bulky lens, or don’t shoot in a lot of low lighting scenarios, the 55-200mm is a great deal that will still give you sharp, clear images. However, if your budget can stretch a bit and you really value having a constant f/2.8 aperture, splurge on the 50-140mm. Despite being larger, pricier, and offering less range, the 50-140mm is a sturdy, reliable lens that will last you a long time.


9- Gear Review - Fujifilm 50-140mm vs 55-200mm
50-140mm lens at 140mm f/11
10- Gear Review - Fujifilm 50-140mm vs 55-200mm
55-200mm at 200mm f/11
11- Gear Review - Fujifilm 50-140mm vs 55-200mm
55-200mm
12- Gear Review - Fujifilm 50-140mm vs 55-200mm
50-140mm
Have you used either of these lenses?

Share this article.

Best Fujifilm Telephoto Lens? Fujifilm 55-200mm vs 50-140mm Field Test ...

Wednesday, March 6, 2019

How to Make a Rifle Stock for Your Camera

By:Michael Zhang
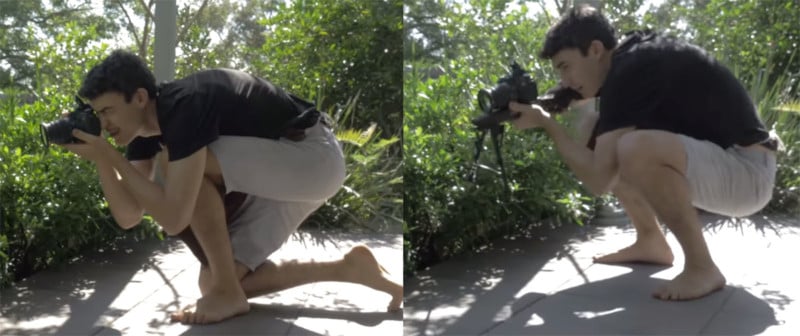
Want a camera stabilizer that’s sure to attract (perhaps unwanted) attention? Just add a rifle-style stock to it. Alex over at I did a thing made this humorous 5-minute video showing how he built such a stabilizer for his own DSLR.

Alex says he was inspired to create the stock after seeing the Asian photographer who went viral earlier this year for doing hunting-style bird photography (and by the vintage Russian Zenit Photosniper stock).

Alex started out by creating the stock itself with some good ol’ woodworking.

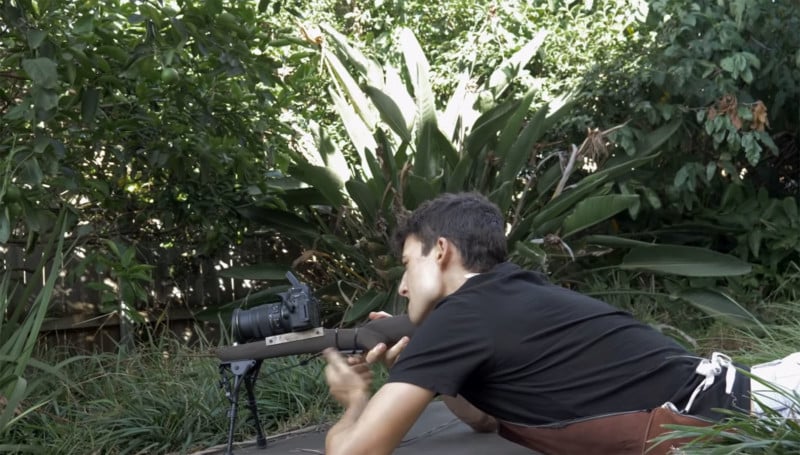
And after sanding and staining the wood, Alex added a remote shutter release that’s operated with the trigger finger. He then mounted his DSLR to a plate and that plate to the stock. Finally, for extra stability, Alex also purchased and added a commercial rifle bipod to the front of the stock.


The resulting setup looks quite intense.


For Alex, it’s quite an unusual tool for his macro photography.
Before and after creating the stock.
Alex hunting for macro photos.
Alex previously shared 5 camera tricks for cheapstakes and how he built a $10 DIY periscope for shooting underwater.

Share this article.


25 Practical Photography Projects for the New Year

So many photographers become stale in their pursuit of photography. Perhaps your hard drive overflows with tens of thousands of photos, yet somehow your photography seems to have become stagnant?
A new year is upon you and with this fresh beginning comes a chance to renew your love of photography. Perhaps there is no better way to do this than with practical photography projects.
Here are 25 practical photography projects to get you started!
Using Lightroom to organize photos - Practical Photography Projects
#Practicalphotography#Projects#Oldphotos

I use Lightroom to bring the chaos of my overflowing hard drives under control. Photos are sorted into
folders waiting to be flagged, tagged, starred, and colored! Once this is done, projects become much 
easier to accomplish.

Projects based on photos you’ve already taken

Many projects can be accomplished based on photos you have already taken. Photography isn’t merely about snapping more and more photos. Therefore, it’s important to look back at our earlier work and draw it together in some sort of coherent project.

1. Study your old photos

You might be surprised by what you find when you sift through your old photos. It’s the perfect way to measure your improvement and growth as a photographer. Take as long as you wish to work on this project.
When you focus on your current difficulties or look ahead at all the skills you’re struggling to learn, it can seem like you’re never going to get there. But when you look back on where you’ve come from you can see how much you’ve truly grown.
Set goals for the future, but always look back to see how you’ve grown.

2. Create a collection

As you study your old work, you may notice patterns in all those photos. Perhaps you’ll see enough of a pattern to create a collection of photos. As you sort through your old photos, try to create collections based on subjects, themes, people or locations.
Practical Photography Projects
Sifting back through old pictures, I noticed I had quite a collection of photos of my kids playing in the
window and curtains.

3. Print your collection

Studying your old work and creating collections are big projects in themselves. Once you’ve completed them, your next project should be taking time to appreciate your work by printing it.

4. Hang your collection

Raise your hand if you’ve already got stacks of photos stored away in albums and boxes? A perfect project for you is to find a place in your home or studio to display your printed collection. Maybe you know a small business owner or hotel manager who would appreciate displaying your collection for a while.

5. Invite other photographers to join you

All of these projects become ten times better when you work on them with other photographers.
Help each other narrow down your collections. Gain insight from others as to what should be printed and why.
You could even host a gallery evening together. Invite other photographers and friends to come and enjoy your photos along with some coffee or wine. Why not approach a local cafe or winery to host your event?
volunteer photography project - Practical Photography Projects
I volunteer as a photographer for Habitat for Humanity. I follow the house build from the first shovel
going into the ground to the keys of the finished house being handed to the family. In the midst of
running my photography business, I have this exciting photography project throughout the year.

Photos you’ve always dreamed of

So much for all those photos you’ve already taken, how about the photos you’ve always dreamed of taking? Let’s look at 20 more projects that will keep you busy exploring new things.

6. A childhood project you never completed

Maybe you had dreams and ideas for photos when you first got your camera but didn’t have the know-how to pull them off. Now that you’ve developed your creativity and skill, you should tackle one of those old ideas.

7. A half-finished project that needs completion

Look around for a half-finished project. There is nothing more discouraging than half-finished work reminding you how incapable you are. Even if you’ve lost your inspiration for that project; get it done! Sometimes tackling a project and finishing it off will inspire you to something bigger.

8. Learn a new skill

Perhaps your project won’t be a collection of photos or a new body of work but learning a new skill. DPS has plenty of books, courses and tips to help you learn something new. You can even document your learning journey through photos on social media or your website.
New skill photography project - Practical Photography Projects
Many of the volunteers with Habitat for Humanity do not know how to build houses. But by the end 
of the day, they’ve learned some new skill and feel happy with their accomplishments.

Projects that take all year

It’s worth considering how long you would like your project to be. You may even wish to tackle a number of smaller projects that feed into one larger project over the year. Here are several more projects that can last a week, month, or year!

9. Start a photography website

Whether you want a place to display your photos, write tutorials, or document your journey as a photographer, a website is a great place to get started. Find something with nice templates if you don’t want to fuss over the details, or use a highly customizable website if you want to stretch your creativity.

10. Something uncomfortable

When we talk about getting better as a photographer we often mean learning about technology or refining our technique. Those are important, and why not add growing as a person?
Try a type of photography that will take you out of your comfort zone. If you’re uncomfortable with people then try portrait or street photography. If you’re lazy, get out hiking and try landscape photography.
Introvert photography project - Practical Photography Projects
As a person who is very introverted, I try to take on photography projects that involve people. This
helps me break out of my shell and be more social. My wife notices that I’m far less withdrawn than I
was a couple of years ago. Photography isn’t just about expanding your portfolio, it’s also about
growing as a person.

11. 365 project

A 365 project usually means taking a picture a day for a whole year. You can use it as a way to document your life, explore a theme, or follow a subject.
  • The first 365 days of your child’s life
  • 365 days in the life of your dog/cat
  • 365 unique plant types
  • 365 landscapes, documenting the seasons
  • 365 streets in a big city like New York
Don’t become anxious if you miss a day. The spirit of this project is to establish a collection over the course of a year. 300 photos, or even 100, is better than 0.

12. 52-week project

If the 365 project sounds too much for you, try a less intense version. Take 52 weekly photos over the course of a year.
  • 52 portraits of strangers
  • 52 food dishes
  • 52 photos of roses
  • 52 pasta dishes

13. A theme

Explore a theme on your own time and on your own terms.
It could be something warm and positive such as childhood or love.
It could be something confrontational such as violence or pollution.
This project is perfect for inquisitive explorer types.
Themed photography project - Practical Photography Projects
Expressing a theme in a photograph can be difficult. In this photo, I wanted to capture the idea of the
difficult and messy work that volunteers do. I captured the muddy boots climbing up the scaffolding
with people working in the background.

14. The seasons

Document the seasons throughout the year. You may consider traveling for this project. Hop on a plane 4 times a year to photograph the seasons in a climate different to yours. This project is perfect for people who travel a lot anyhow.

15. A person a day/week

Photograph a person (family, friend, stranger) daily or weekly. This might mean photographing one person over and over throughout the year or finding a new person each day or week. A perfect project for the social butterfly!
365 photography project - Practical Photography Projects
When I photograph a group of people over a long period of time, I try to mix things up every time I 
photograph them. Sometimes I’ll limit myself to certain angles, like this low angle photo.

Projects that take a month

16. 30-day project

Similar to the 365 or 52-week project, but this one only lasts a month.

17. A color

Choose a color to photograph for one month. Then choose another color each month and make this project last the whole year.

18. Document a charity

Find a charity that you can volunteer to photograph. You’ll expand your experience, build your portfolio and help them with their photography needs.
Volunteer work photography project - Practical Photography Projects
I began with a desire to photograph a house build. Then I discovered a charity who I could volunteer 
with. When you volunteer your time as a photographer, make sure it’s something you’re excited to get
involved in and a worthy cause.

19. One camera, one lens

Choose one camera body and one lens to use for a month. Don’t touch anything else. Constraints like this can really help your creativity and photography to grow.

20. Camera phone

Perhaps that one camera/one lens is your phone! Treat your phone as a serious camera and you can take great photos with it. Through practice, you can learn to be just as creative with your phone as you are with your DSLR and 70-200mm lens.

21. Black and white for a month

Limit yourself to black and white photography in order to grow your vision and creativity. Set your digital camera to photograph in black and white in order to help train your eye.
Black and white photography project - Practical Photography Projects
In my mind, some moments are made for black and white. I know when I lift the camera to my eye 
that the photo will be black and white.

22. One subject

Find one subject to photograph for a month. Push yourself to take a different sort of photo than you did the day before. This will exercise your creativity and leave you craving the next month’s project.

23. Teach photography to a newbie

Your own understanding and ability grow when you teach what you know (or think you know) to somebody else. Your ideas and techniques become more deeply ingrained in yourself when you can learn to explain them simply to another person.
You’ll both grow as photographers. They may even push you to learn new things just so that you can explain it to them!
Habitat for humanity photography project - Practical Photography Projects

Projects that take a day

24. Day in the life of…

Photograph a person, place or thing for a whole day. Maybe your kids, the sun, your dog or a garden.

25. Self-portraits

Break out beyond the selfie and take some interesting portraits of yourself.
  • Street photographers can photograph their reflection in buildings
  • Portrait photographer can experience themselves as the subject
  • Landscape photographers can work themselves into the photo
Practical Photography Projects

Choose one

Pick one of these projects that suits where you are on your photography journey. You can easily choose a variety of shorter projects that you can weave together into a larger project over the course of the year.


Share this article.