Saturday, February 16, 2019


10 Tips to Photograph An African Safari

Today African Safari guide Vernon Swanepoel from safari-pics.blogspot.com shares with us some tips on how to photograph an African Safari.
African-Safari-Photography
An African Safari may be a once in a lifetime experience and one that can be really fun for photographers. If you are planning a trip to Africa some time in the future there are some thoughts that you should consider before you go. I’ll share ten tips from my experience as a guide in Africa.


#photographysafari
#photographyaccesories
#photographyhobby #photographynight


Preparation

1. Know where you are going, and what to expect photographically

It is so important to have a good idea of what to expect. Involve a good travel agent or communicate directly with a tour operator in Africa. Make sure your trip mixes it up a bit. Not just lions and elephants the whole time. And remember that different wildlife situations give different viewing opportunities. Some places you may drive around for a couple of days and see very little. Other areas you drive right up to lions sleeping near the vehicles. Also know about photographic polices, such as those if you visit great apes and specific wildlife rehab centers. Of course, some of the best advice you can get if from friends who have been there.

2. Plan your travel, equipment transport

As you plan how you are going to get around, consider the logistics of the equipment that you are going to carry around. This includes your flights to and from, small flights (with strict language limits,) driving yourself around, moving in towns with high crime rates and so on. Get the best advice possible. You don’t want hassles like this. At some airports there are often problems with lost language. You want to minimize the risk involved with this. I know of some people who buy their big lenses in South Africa on the way out to Safari and sell them again on their way back. This is risky (be careful of not getting yourself into a tangle about import taxes….) and can be really expensive, not to mention the preparation involved in trying to make sure you get it sold at the end.

3. Plan your gear

For wildlife a long lens is the standard peace of equipment. You need a dslr (or other cameras which take exchangeable lenses) and at least a 300mm lens. 400mm is much better and longer may be even better. Consider, however, that you may be in a vehicle with others, in areas where you can’t get out of the vehicle to set up a tripod. So shaking can be a problem. You often have clear open days, with bright light, so you can take really fast shots (less time for shaking,) but still, anything over a 300 you really don’t want to hand hold or get shaken while taking pictures.
You don’t want to change lenses to much, so if you have a standard lens and a long lens, you may want to take two bodies. Otherwise, make a rule that in the field you just don’t change lenses. A dusty sensor is going to give you a headache. And you certainly don’t want to clean that out in the field.
Be aware of flashes. Respect wildlife while in Africa. Don’t use flashes at a waterhole at night or on game drive. There are some nice techniques that you can use to take photographs at night, such as using your guides spotlight to paint a wildlife scene in a long exposure.
You may want to take a nice digital point and shoot for going into areas where there are people, and that may be risky for carrying a large lens and camera around. Remember always that in people centers in Africa, a large lenses and camera shout “rich and easy”.
Are you going to do any boat trips? Or diving? Consider what equipment you want for that.
Also consider memory. You may want a small portable hard drive. They are also great for viewing images. Even though you can store so much, don’t keep too much. You probably will never find the time to view them, let alone sort them out if you arrive home with 5000 images!
Power may be an issue. Take enough charged batteries. Try to get a car charger for your batteries as well, and perhaps your guide can charge it for you in the vehicle while you drive.
It really can be a series of compromises, which is why a clear idea of where you are going and what experiences you are likely to have become so important in knowing what you are going to take.

4. Africa for travelers

Generally being a tourist in Africa means different things depending on the area. Some places are highly tuned in to tourism, and provide a lot of services. Others are less well prepared and take some thinking on your feet to manage your experience. In general, the more familiar a place sounds, the more they are geared towards tourism. But that is a good thing and a bad thing.
Consider whether you are going to join a tour, book a tailor made trip, do it self-drive, or do a flying around trip. Budget makes a lot of that kind of decision for you. But there are all sorts of options these days. I would really recommend private tours for photographers, even if it means that you should stay at some of the cheaper places.
Also, give yourself time. Rather do fewer stops and give yourself time to take it in and enjoy it. Learn what’s there and you will come away with better images!
Techniques on Safari

5. Long lens

As I mentioned earlier, long lenses are a must. A 400mm will give you a good opportunity to shoot wildlife at a distance. This gives you two advantages. Firstly, you get to shoot the pictures that others can’t (or do the lion that fits in the auto focus ring in the middle type of shot.) But secondly, it allows you to get the animal in a position where it is not reacting to you. The “nature” shots. The candid shot, if you would.
Another advantage of the long lens is that you can take images of birds and small mammals. There is so much color and life in the smaller animals that are so often ignored on many Africa trips.

6. Stability and tripod

I really would encourage anyone who is serious about photography in Africa to take along a tripod. Perhaps your tour operator can organize one for you (depending on the type of trip that you are doing.)
If you are driving yourself, or if you will be doing a private tour with a guide in a closed vehicle, you may want something like a window mount.
You can also use an image stabilizer (some are in lenses, and some are in the body.) I for one find it hard to trust something like that. Perhaps that is just from being taught early on that better photographs are taken with a camera that is secured.

7. Composition

Look all over your viewfinder. If you are accustomed to taking photos in a controlled environment, the ‘clutter’ of the bush can make composition a challenge. Sometimes you are shooting fast, but when you have time to set up your shot, really hold the camera steady and have a look around the viewfinder. Trust me, good photographers still get trees sticking out of elephant’s ears. Remember that the depth of field doesn’t look the same in the viewfinder as the final image. Consider if you need to flatten the depth of field (larger aperture) to cut on background clutter.

8. Thoughts on people

I don’t want to give blanket advice for how to photograph people in Africa. But it is important to point out that there are different attitudes to being photographed. Don’t assume that everyone wants handouts in exchange for being photographed. Some people still have religious issues with it. Find out from your tour operator or guide what the right procedures are, and respect them.
After your tour

9. Store and share

If you are a pro you may simply be aiming to sell your images, and would already have a good idea of what to do with them. If you are an amateur, there are many things that you can do with your images. You may want to touch them up in Photoshop (or Gimp if you like a rather good, but completely free image editor.) You can use a program like Windows Movie Maker to create a nice slideshow (or PowerPoint) You can share with flickr, or if you did a slideshow, Youtube, or many others on the internet.
I do find, however, that it is important to sort them right away as you download them on your computer. Otherwise you end up with a rather full “download” file, and never find the time to do what you planned. You may also want to ask others to do the organizing for you, such as creating a slideshow to share with your friends.
One final thought

10. Put your camera away and enjoy the experience

I have been guiding for years and I find that it is really important, from time to time, to get the photographers out from behind their cameras. Pull yourself into the experience. Share with your traveling partners, (especially if it is your wife,) the magic that is and African Safari

Share this article
Friday, February 15, 2019


Free eBook: 22 Landscape Photography Mistakes

#naturephotography #landscapephotography #Photographyoutdoors

When we experience a place, the smells, sounds, warmth in the air, the beauty of our surroundings, and our emotions all combine to give us an overall impression. Then, when we make a photograph, we are sometimes disappointed when everything we felt didn’t come through in the image.
What went wrong?
There are many problems we run into along the way that can prevent our overall impression of a scene from shining through in the final image.In this eBook, I show you the most common traps to expect, and how you can avoid them, so you’ll start making images with more impact.
Best of all, this eBook is completely free, so grab your copy below and start making better images today.

Turn your snapshots into fine art:

SEND MY FREE EBOOK

If you like this FREE e-book, follow me on Pinterest on my Photography Freebies Board.

Share this article 


Free eBook: 

Before the Shutter

Before The Shutter

Don't just hope for a great shot. Leave less to chance by preparing for an award-winning image.

#photographybackgrounds #photographyblog #photographygalleries


Creating a timeless image has as much to do with the work that went in to the photograph long before the shutter was pressed as it has to do with what happened on the scene.
You'll learn how to:
  • Research locations
  • Stretch your creative vision
  • Plan your trip
  • Hire a guide
  • Pack the stuff you will need
  • Scout locations
  • Create a shot list
  • What to do on the scene
  • What to do after the shoot

Prepare for an award-winning image:

SEND MY FREE EBOOK

If you like this FREE e-book, follow me on Pinterest on my Photography Freebies Board.

Share this article 


Free eBook: 8 Types Of Natural Light That Will Add Drama To Your Photographs


#natural light photography
Discover the 8 Types of Natural Light:
  • Backlight: make flowers glow, make dramatic silhouettes
  • Sidelight: emphasize texture and shape
  • Front Light: great for sunset shots
  • Reflected Light: make peaceful water reflections
  • Diffused Light: great for close-ups
  • Dramatic Light: there’s nothing like a storm to create a dramatic image
  • Twilight: beautiful blues and pinks in the sky
  • Night: great for capturing city lights

Turn your snapshots into fine art:

SEND MY FREE EBOOK


I hope you're enjoying the free Ebooks.  I know that taking Photography Courses can be expensive, so I'm currently posting one free ebook per week. (Feel free to share these freebies with your friends on Facebook, Twitter, SnapChat, Instagram, Pinterest, & Reddit)  For those of you who'd rather learn faster, check out the website at the bottom of this page. Either way, thanks for stopping by, and enjoy. 


3 Misunderstood But Important Buttons on Your Camera Explained

#photographybackgrounds #photographyblog #photographygalleries

Today’s modern DSLR cameras have so many functions, buttons, and menus that it can be confusing and overwhelming to learn how to use properly. In this article, you’ll learn about three commonly misunderstood, but extremely important buttons on your camera. See what they each do, and when to use them.

#1 – The Depth of Field Preview Button

This is one that is not often used but it really handy once you know what it’s for, the depth of field preview button. Let’s have a look.

#2 – The Exposure Compensation Button

Next up is the Exposure Compensation button or dial. I use this one a lot with my Fuji X-T1 and X100F cameras when I’m shooting in Aperture Priority mode, which is most of the time. See where to find on your camera and how to apply it here.


#3 – Auto Exposure Lock (AEL)

Finally, the last button you should learn about is the AEL or Auto Exposure Lock button. It’s very handy when you want to lock your exposure, or your focus, or both and take multiple images of the same scene, with different compositions.


Can you confidently say you are familiar with and comfortable using all these buttons on your camera? If not, make it a habit to learn one new thing about your camera every day. Get to know all the buttons and dials. If you can’t figure it out, consult your camera user manual. Or search for your camera and model number on YouTube to find some good tutorials specific to your setup.
Know your camera inside and out. Then, and only then can you decide if it’s time to upgrade or not. But that’s another topic for another day!
 

Darlene Hildebrandt is an educator who teaches aspiring amateurs and hobbyists how to improve their skills through articles on her site Digital Photo Mentor, online photography classes, and travel tours to exotic places like Peru (Aug 31st - Sept 13th, 2019), Thailand, and India (Oct 28th - Nov 11th, 2019). To help you at whatever level you're at she has two email mini-courses. Sign up for her free beginner OR portrait photography email mini-course here. Or get both, no charge! 

Share this article

Depth of Field Preview Button Explained! (aka that mysterious button bel...

Exposure Compensation | The MOST important Button on your camera | Basic...

Photography Tips: Auto Exposure Lock


Post Cover


How to Know The Number of Shots a DSLR Camera Has Taken

If you’re looking to verify the use of a camera you can quickly see how many shots (or shutter actuations) it has taken using these handy apps.

#photographynature #photographyhub #photographyhobby


Cameras, like any piece of mechanical equipment, will break down over time. After enough use the moving parts will simply wear out.
There are instances then, when it is important to know just how many times a camera has been used. Perhaps you’re looking to buy a used camera body or are simply curious about how much life you may have left in yours (you don’t want to be stuck out on a shoot with an old, faulty camera). You can measure how used a camera is by looking at the shutter actuations.
Every time a picture is taken on a DSLR camera the shutter opens and closes – one actuation.
In this post we’ll share a few FREE shutter actuation apps that will tell you your cameras shutter count, as well as info on the average life of popular DSLRs based on shutter actuations.

Canon Shutter Actuations

Here are two free Canon shutter actuation apps that make it quick and easy to determine previous shot counts..
Shutter Count Tools is a FREE PC based app that’s LearningDSLRVideo.com recommended. You can download it here. Check out the following quick tutorial on how to use it:
Mac users will want to check out ShutterCount, a simple app that will display shutter actuation and serial number for Canon DSLRs. At $1.99 it’s nearly free. ShutterCount can be downloaded from the app store here.
Maximum Shutter Actuations Life Prediction for Canon Cameras (taken from this forum):
Canon EOS Digital Rebel XS / 1000D – 100,000
Canon EOS Digital Rebel T1i / 500D – 100,000
Canon EOS Digital Rebel XSi / 450D – 100,000
Canon EOS Digital Rebel XTi / 400D – 50,000
Canon EOS Digital Rebel XT / 350D – 50,000
Canon EOS 50D – 100,000
Canon EOS 40D – 100,000
Canon EOS 30D – 100,000
Canon EOS 20D – 50,000
Canon EOS 10D – 25,000
Canon EOS 5D Mark II – 150,000
Canon EOS 5D – 100,000
Canon EOS 1D Mark III – 300,000
Canon EOS 1D Mark II N – 200,000
Canon EOS 1DS Mark III – 300,000
Canon EOS 1DS Mark II – 200,000

Nikon Shutter Actuations


Nikon (and Pentax) shooters can determine shutter actuations by uploading a still photo from the camera to MyShutterCount.com. Image file types supported include: “Nikon’s NEF, Pentax’s DNG and PEF format, and of course JPG.”
Maximum Shutter Actuations Life Prediction for Nikon Cameras (taken from ShutterActuations.com):
Nikon D4 – 400,000
Nikon D3, D3x, D3s – 300,000
Nikon D800/D800E – 200,000
Nikon D700, Nikon D600 – 150,000
Nikon D7000, D300s, D300 – 150,000
Nikon D5100, D5000, D3100, D3000, D90 – 100,000


Post Cover


What You Need to Know When Buying a Used DSLR

In many cases, buying a used DSLR allows you to get a lot of bang for your buck – but there is a lot to consider before deciding to drop down your hard earned cash.

#photographybackgrounds #photographyblog #photographygalleries


One of the greatest barriers to filmmaking is the amount of money you need to invest in yourself and in your projects. This is especially challenging for new filmmakers who don’t have a lot of money to spend on equipment. Between lenses, camera bodies, lighting, and accessories there is only so much money to go around, and this doesn’t include the money you’ll need to actually fund your projects.
It’s not all bad news though, as these days there is more used gear on the market than ever…especially with regards to DSLR bodies. The key is knowing what to look for in order to make the right investment. As such, I’ve outlined a few key tips for purchasing used DSLRs below to help you make the right choice.

Buy from Non-Professionals

Professionals are notorious for treating their camera gear poorly. In production, a camera isn’t typically treated well as there are many different hands on the camera on any given day, and it is being used day in and day out. For this reason (amongst many others), buying a DSLR from a professional shooter is likely going to mean that the camera you’re buying has a lot more wear and tear on it than if you were to buy if from a consumer. I have personally bought loads of used cameras from consumers, and often times they have barely even used them at all. So whenever possible, look for inexperienced shooters to buy gear from as they usually keep it in the best condition possible.

Always Check for Shutter Count

A camera may look fine on the surface, but if you really want to know how much it’s been used be sure to check the shutter count. The shutter count shows you the amount of actuations that the shutter has completed, and this will give you a relative idea of how long the shutter has left before it will need to get replaced. This is especially important if you happen to be buying a DSLR to shoot still photos with (since the shutter gets way more wear on it when shooting stills), but it’s still a big consideration even if you only shoot video. Check out our previous post on how to determine the number of of shots your DSLR has taken.

Buy Last Years Model

There’s really no sense in buying a used camera if you are purchasing the current years model. Most of the time, if you are buying the most current model of a camera second hand, you’re not going to be getting a great deal on it and you will likely not be getting a warranty on that piece of gear. The whole point of buying used equipment is obviously to save money, so if you aren’t really saving much then do yourself a favor and cough up the extra couple hundred bucks to get a current camera model that will give you the peace of mind of knowing you have a full warranty.
If you’re set on buying a used camera though, make sure to get last years model as that’s the only way you’re going to save any substantial money. In many cases, the current model of a camera is not going to be that far off from it’s predecessor (with regards to specs), so don’t buy into the hype that you need the latest model to make your work look good.

Don’t Forget to Inspect the Sensor

Whenever anyone inspects a camera that they want to buy, they tend to look at nearly everything (including the body, the viewfinder, LCD screen, etc.), but nearly always fail to inspect the sensor. As I stated earlier, it doesn’t matter how amazing the camera looks on the outside, if there are any issues that are lurking beneath the surface you need to identify them as soon as possible.
The biggest and most common of these issues are scratches or imperfections on the sensor. You need to be very careful about buying used gear as the seller may not be completely truthful about the condition of their DSLR, and sensor issues are relatively common amongst older cameras. Be sure to shine a light at the sensor before signing off on the deal, and make sure everything looks nice and clean so you can put your mind at ease. If you don’t do this, you will be kicking yourself down the road when you notice major issues with your footage.

Always Test Shoot with the Camera First

For many reasons, including those stated above, it’s extremely important that you test shoot with the DSLR you want to buy before committing to the sale. Whether there is a sensor issue, a recording problem, a faulty LCD, or any number of other common problems, you likely won’t know there is an issue with any given DSLR until you actually shoot with it. I would recommend that you not only shoot with the camera, but also look at the footage on a proper monitor to ensure that there aren’t any noticeable problem areas or artifacts that may not have been visible when playing it back in the camera. Always bring an SD/CF card and a laptop (or card reader) with you when checking out a used DSLR, and don’t be shy about taking test shots.

Share this article
Wednesday, February 13, 2019

Photography Tips Guide

#photographyblog #photographybackgrounds #photographywithlove
Photographing is a great form of art and can relieve stress. Appreciating taking and looking at pictures can also make
you more aware of everyday things that you may only see once. To paraphrase a common saying, you can say a thousand words with a single photo.

Make sure the background you choose complements the subject of the photo. If you take a photo of a model against a busy background, the viewer’s attention is going to be drawn to the background rather than the clothes. As a general rule, simple backgrounds with colors that contrast with those of the subject are ideal.
Make sure you have a focal point for your photograph. This should be the first thing that the viewer’s eye is drawn to. Whether it’s a flower, a person, or a bird, every shot you take should have a specific focal point. Don’t only think about what the focal point is, but figure out the best spot for it in the shot.
Don’t stay inside when the weather is bad. Although it’s natural to think a sunny day is the best time to grab the camera, overcast and rainy days provide an opportunity to get shots that would be hard to get at any other time. These weather conditions can give shots that would look neutral or cheery on a sunny day a dark and foreboding tone.

Keep your photo subject simple. The busier the subject is the more difficult it is to capture something that is going to be interesting. Keeping the backgrounds simple will make it easier for the eye to focus on the subject that you are capturing. Keeping it uncomplicated seems simple, but many forget to do it.
A great photograph tip is to not be afraid of making mistakes. Mistakes are all part of the learning process. If you refrain from taking a picture because you’re afraid of making a mistake, you’re missing out on a learning opportunity. You must remember that making mistakes is crucial to learning.
When shooting landscapes, remember the rule of thirds which is to keep one-third or two-thirds of the image as the sky or the foreground. This will give the photo more depth and a more dramatic look. This is an easy tip for beginners to follow but will make a huge difference in the appearance of the photos.
Although not all people enjoy taking pictures, most people enjoy looking at them. By becoming a photographer, you can present memorable scenes to the world that might otherwise have gone unnoticed. Photography can be a great artistic outlet. As mentioned, sharing your pictures with everyone can also be an effective way to reduce stress–so have fun with it!

Courtesy of: Black and White Photography
Share this article

Tips for Processing Night Photography with ON1 Photo RAW 2018.5

#photographyhobbyist  #photographybestoftheday #photographyforever

For many students, as they start learning photography they want to know how to take photos at night. It is a mystery to them and they often think it is so complicated that they will never be able to do it. That is until they try it and discover just how easy it is. The next step is editing those images and ON1 Photo RAW 2018.5 has a lot of tools and adjustments that are perfect for processing night photography.
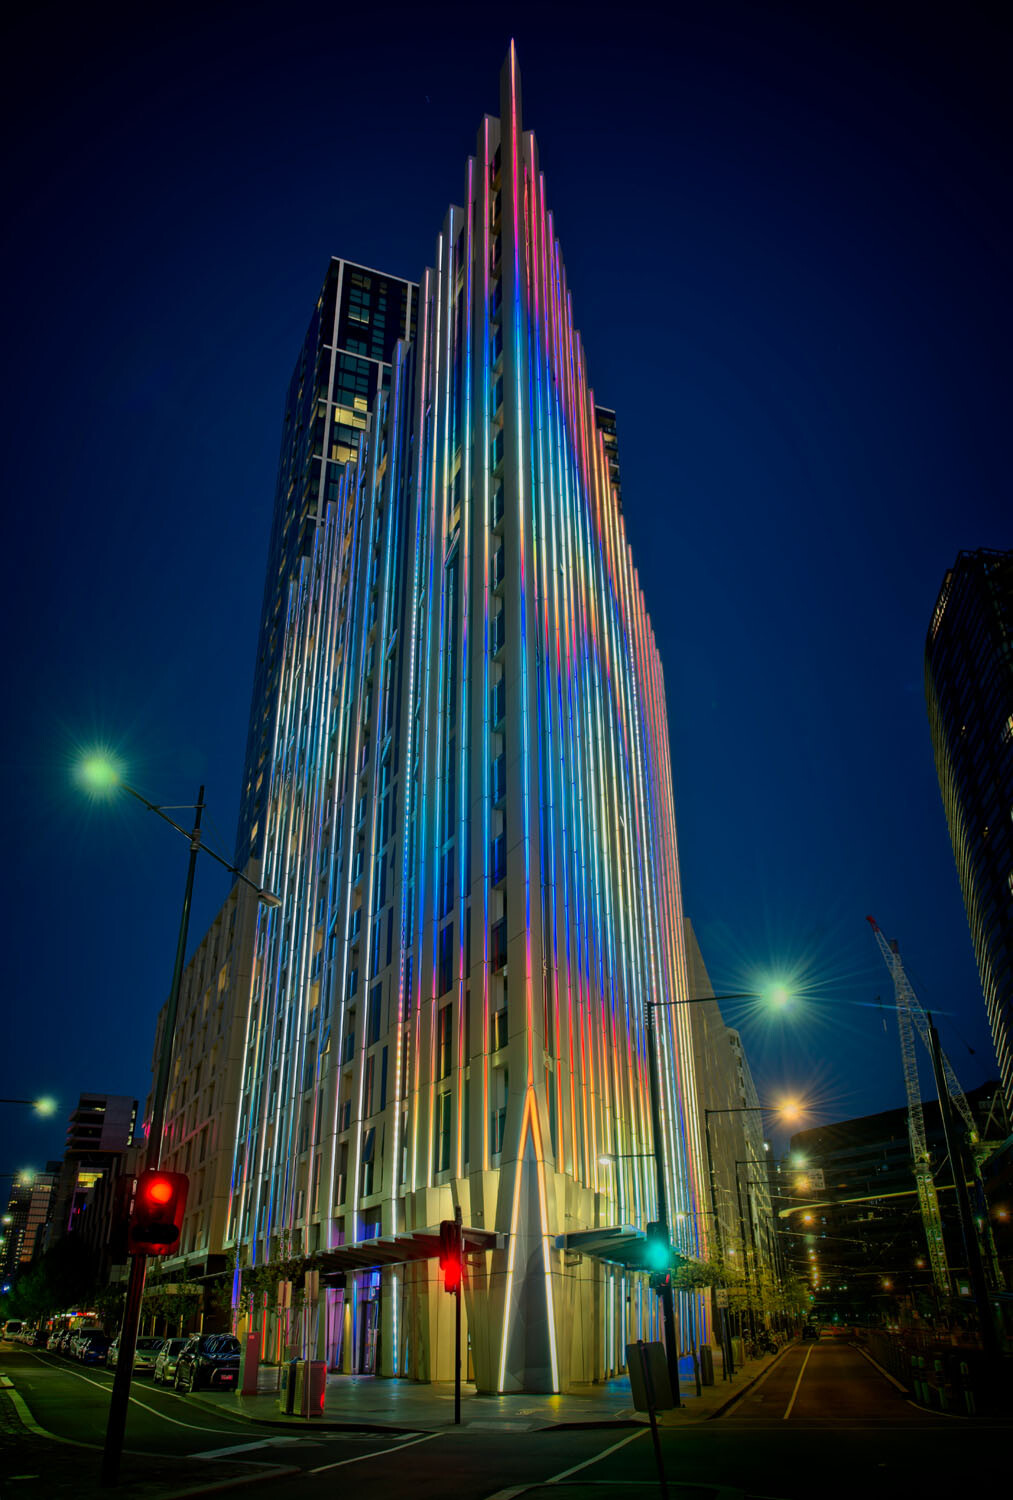
HDR architecture image - Tips for Processing Night Photography with ON1 Photo RAW 2018
An image created using the HDR option in On1 Photo RAW 2018.

Night photography options

First, we should take a look at the different types of night photography that you can do. There is the easiest option of setting your camera up on a tripod and photographing lights somewhere.
The city at night is very popular if you live in an urban area. Perhaps capturing town lights can also be good. You just need something that is making light. HDR has had a lot of bad press, but it really is good for some images, and night shots of cities are perfect for it. ON1 Photo RAW’s HDR processing is one of the best I’ve seen.
When the sun has gone down and there is a lot of traffic you can photograph light trails. Taking longer exposures with your camera on a tripod will make all those lights look like streaks. If you want to make it look like there were a lot, then you can stack the images together, so all the streaks will show in one final image.
One type of night shot that is hugely popular right now, especially in Australia, is astrophotography. Photographing the Milky Way. It is the season for it here and with the low population, you are spoilt for choice where to do them. If you have ever tried doing any astrophotography then you will also be aware that your images have to be processed or they can look at washed out. ON1 Photo RAW 2018.5 has you covered there as well.
Tips for Processing Night Photography with ON1 Photo RAW 2018 - astrophotography milky way image
An astrophotography image processed with ON1 Photo RAW 2018.5

Photographing the City

Night time in the city can be so magical and to be taking photos of it even more so. Processing your images taken at night is much the same as processing any of your images.
Open your image in ON1 Photo RAW and take it into the Develop module. Make the adjustments as you would for other images. Move the sliders around to see what you can get. Take them too far and then bring them back.
sliders in ON1 Photo RAW - Tips for Processing Night Photography with ON1 Photo RAW 2018
Add caption
When learning it is good to take the sliders too far, see what happens.
If you want to make adjustments to particular areas, then look at local adjustments which is the best place to do that.
However, what if you want to do something to your image to really make it pop?
HDR photography, or High Dynamic Range, can be perfect for this. It is a process that has copped a lot of criticism over the years. People say it is too much, that the images can be ugly. But that really only happens when you don’t use it for the right images, or overdo it.
There are some scenes and images that are perfect for HDR and night photography is one of those times.

HDR Night Photography

When you are to decide which images would work best for HDR, look for ones that have a lot of dark areas, and a lot of bright parts as well. Usually, your camera will struggle with getting an even image of a high contrast scene. It will either make the image too bright or too dark. Night images have those problems. Once you get the lights exposed right, all the shadows become too dark or black.
The best way to do HDR is to take a series of images or bracketed shots. If your camera will allow you to bracket then it will sort out the exposures you need. The most common number of shots is 3 or 5. For this article, five images were taken.
Next, select all of your bracketed images inside the ON1 Photo RAW browse module. You can do that by clicking the first then pressing the shift key followed by clicking on the last image. If you have put the images into a subfolder you can then just use Ctrl/Cmd+A.
Tips for Processing Night Photography with ON1 Photo RAW 2018 - bracketed set of images
Work out which images you want to use.
Once they are selected you should be able to see the HDR button over on the right-hand side of your screen, underneath all the different modes.
select images and HDR button - Tips for Processing Night Photography with ON1 Photo RAW 2018
Select all your images.
ON1 Photo RAW will then merge all your images together. The first time you do it, a window will pop up asking you what look you would like. The options include Natural, Natural Auto, Surreal and Surreal Auto. You can make the changes once the image has been merged to HDR. There are lots of choices with ON1.

Let’s take a look around the HDR working window

Tips for Processing Night Photography with ON1 Photo RAW 2018 - HDR looks
Selecting your HDR look in ON1 Photo RAW.
There are several places where you can set the amount of de-ghosting (remove spots where something moved between brackets) you want the program to do. You can change the HDR look you wanted if you think you made a mistake. You can select which image you think should be the main one.
Go through and change the image to suit the look you are after. I know I say this a lot, but the best way to learn is to play around with the settings.
HDR options - Tips for Processing Night Photography with ON1 Photo RAW 2018
All the different things you can do to your image.
Like most images, you need to experiment to see what you like. Remember that ON1 is non-destructive so you won’t ruin anything. Try everything, it is the best way to learn. Take it all too far and then bring it back.
Lastly, choose where you want your image to go when you are done. You can have it open in Develop, Effects or go back to Browse. The last choice is Cancel. If you want to save it then click Save.
Tips for Processing Night Photography with ON1 Photo RAW 2018
Taking the image further.
Once the image is opened in the Develop module, you can then make more adjustments to as you would normally.
Develop module - Tips for Processing Night Photography with ON1 Photo RAW 2018
Where to go next.
ON1 Photo RAW is one of the best programs for doing HDR. You can make so many changes to it as it is happening and after it is done. Nothing is final.
final HDR - Tips for Processing Night Photography with ON1 Photo RAW 2018
The final HDR image.

Astrophotography

For anyone who has ever done astrophotography, you know that the images always need to be processed.
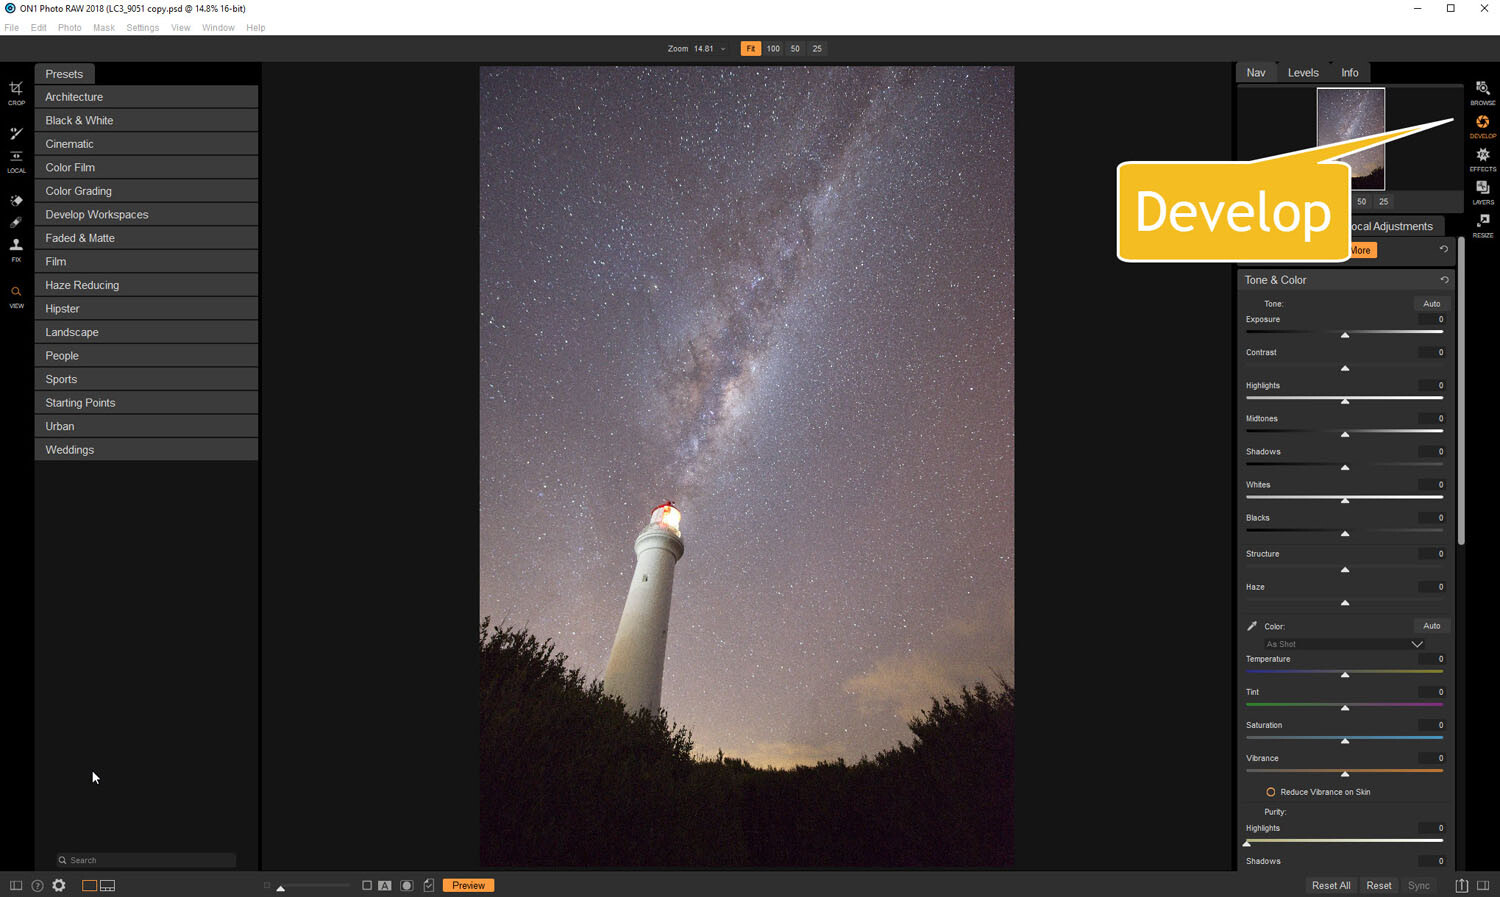
Here is an image that was taken a couple of years ago. This is the raw file and you can see that it needs a lot of work.
night image Milky Way and lighthouse - Tips for Processing Night Photography with ON1 Photo RAW 2018
Raw image from astrophotography shoot.
Open the image up in ON1 Photo RAW and go to the Develop module. Everything you need to make the best astrophotography images is all right there.
develop - Tips for Processing Night Photography with ON1 Photo RAW 2018
Open in the Develop module.

Noise reduction

The first thing you want to do is to work on the noise in the image. All astrophotography images have a great deal of noise. You have to increase your ISO quite high in order to get the Milky Way in your image. Usually, it is going to be somewhere between ISO 3200 up to 6400.
The image for this article was taken at f/2.8, for 30 seconds at ISO 6400. It was taken at 14mm using a 14-24mm lens.
In the Develop module go to Details. This is where you can help reduce the noise in your image. Click on the image to zoom in so you can see the noise better.
noise and details section of develop - Tips for Processing Night Photography with ON1 Photo RAW 2018
The first thing to do is to fix the noise in the image.
Under Noise Reduction, you will see a Luminance slider. Move that along until the noise almost disappears. Be careful not to go too far or you might lose all the stars (noise is just white specs so the stars can easily be misinterpreted as noise if you go too far).
This slider smooths out the image and you can lose a lot of detail if you go too far. Bring up the Detail slider to help maintain it. It is about experimenting and seeing what you like as well.
You can also bring up the Sharpening amount as well but be careful. Over sharpened images can look terrible. Go easy with this slider.
noise adjustments - Tips for Processing Night Photography with ON1 Photo RAW 2018
You can see how much was changed.

Tone & Color

It is time to go back to Tone & Color and make more adjustments.
tone and color - Tips for Processing Night Photography with ON1 Photo RAW 2018
Take the image back to Tone & Color to make basic changes.
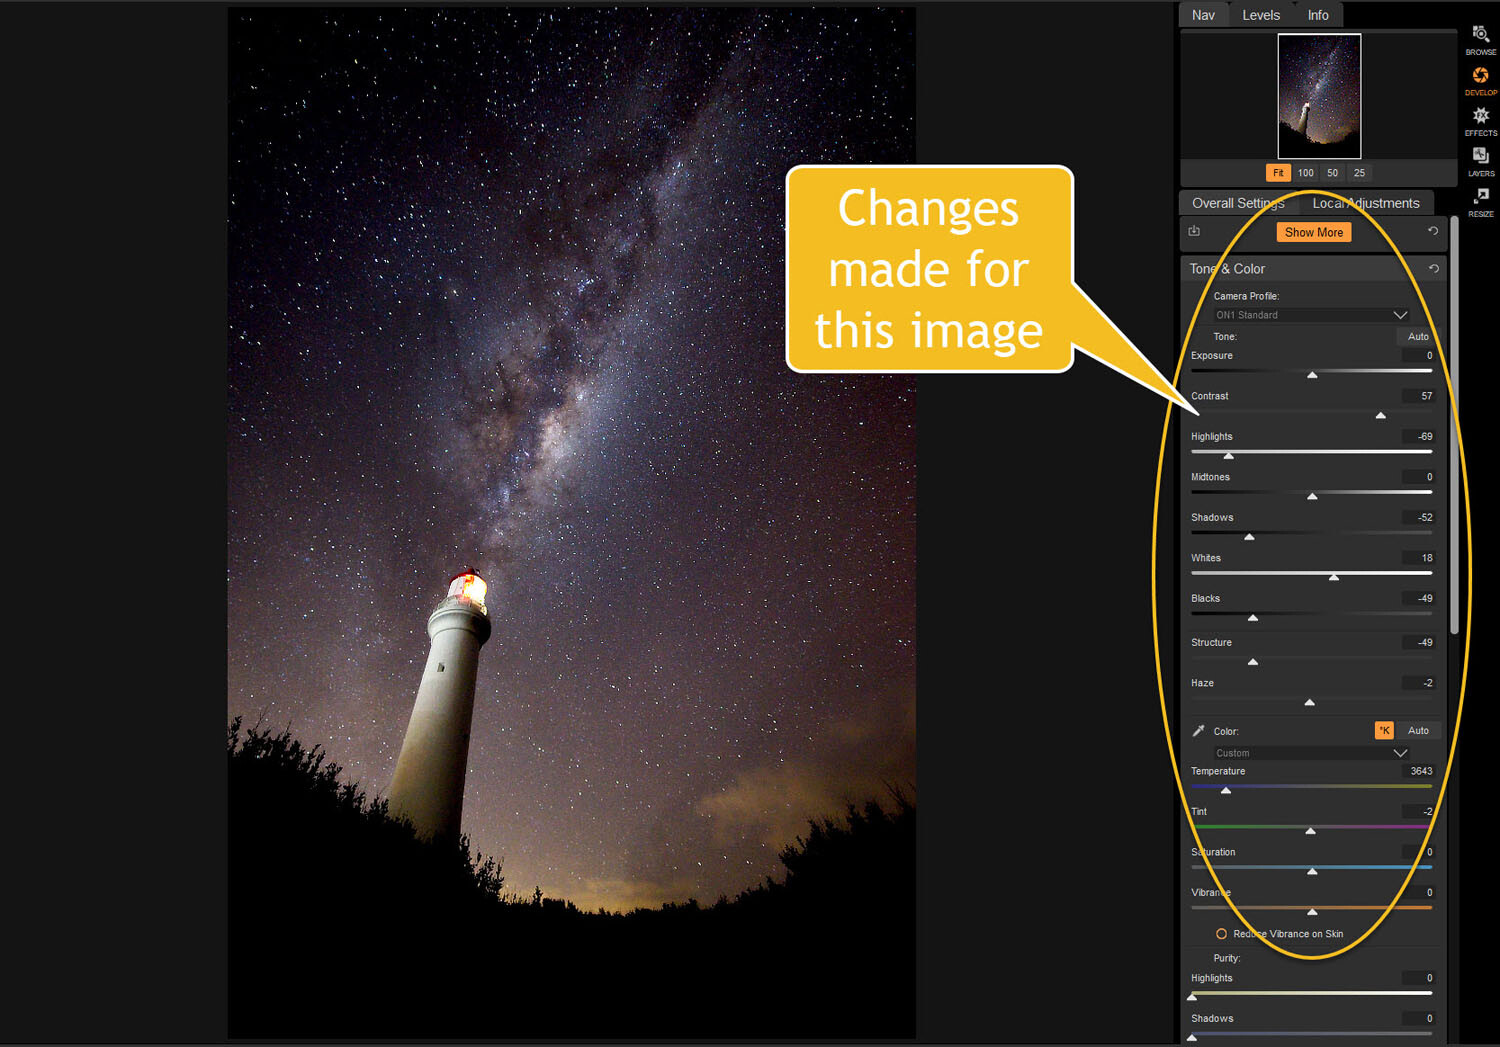
The main things you want to add back into your image are the blacks and lots of contrast. The added contrast will help the stars stand out more from the dark sky. The blacks will allow the darker parts of the sky to appear as you saw them when you shot the image.
The highlights can be brought down to stop the lighthouse from blowing out too much. If you take the shadows down it helps make the darker parts of the sky richer as well. However, be aware that it can also make other parts of the image go black, like the foliage at the bottom of this image.
The whites were brought up a fraction, as this helped to lighten up the Milky Way and make it jump out more.
slider adjustments - Tips for Processing Night Photography with ON1 Photo RAW 2018
Some of the changes that were made in Tone and Color.

Color Adjustments

Most of the changes are made to the image now, but if you look closely there is quite a bit of blue in it. It shouldn’t be there and to remove it you need to go to Show More and then Color Adjustments.
color cast - Tips for Processing Night Photography with ON1 Photo RAW 2018
Taking out the blue cast color in the stars.
A new window for this will open up down below the other adjustment windows.
As it is the blue you want to change, click on that color square. Once it is selected you can move the saturation slider until the blue in the image disappears or is to your liking.
reducing blue saturation - Tips for Processing Night Photography with ON1 Photo RAW 2018
Changing the saturation of the blue.
You can try adding presets to your image as well, though most people with astrophotography just do the basics and leave it there.
You will need to play around with your photos to see what you can do and what is to your tastes. These are just suggestions as to what other photographers do. Experiment, take the sliders too far and then bring them back.
This is the final image.
final image of lighthouse - Tips for Processing Night Photography with ON1 Photo RAW 2018
The final image of the Milky Way over the top of the lighthouse.

Light Trails

In cities, or anywhere there is a lot of traffic, you will see photographers trying to capture the trails of the lights as the cars go past. For most places, the best time to capture this is during peak hour when a lot of vehicles are moving. However, it also needs to be dark.
Unfortunately, there are times of the year where it is impossible to get both at the same time. For instance, in Australia during the summer daylight saving means it doesn’t get dark until after 8 pm. Getting good light trails is reduced because there isn’t enough traffic at that hour.
However, there is a way to make it look like there was more traffic, that is to stack your images. You can also do this for star trails too.

Stacking light trails

Work out which image will be the first one. Take it the Develop module in ON1 Photo RAW and do what you want to process it normally first.
But do not straighten it or do any lens correction on the image. If you do then the other images won’t align up properly, you can do all that after.
original image for light trails - Tips for Processing Night Photography with ON1 Photo RAW 2018
The first image used for the light trails.
Once you have your image ready, go to the Layers module.
layers - Tips for Processing Night Photography with ON1 Photo RAW 2018
Take the image to the Layers mode.
Next, add all the other photos that will make up the final image. The best way to do this is to put all the images into a subfolder. Select the images you want to use, then right-click and go to Add Subfolder.
add subfolder - Tips for Processing Night Photography with ON1 Photo RAW 2018
Putting your images into a subfolder.
A window will pop up once you click Add Subfolder. You can name it as you want, or ON1 will name the folder the same as the filename for the first image. Make sure the box is ticked for Move Selected Items into Subfolder.
add subfolder - Tips for Processing Night Photography with ON1 Photo RAW 2018
Creating the subfolder.
Now you are ready to add all those images as layers to the original photo.
Get your image to the Layers module which is where you will add the images for your light trails. Go up to File in the main menu at the top. Select Add Layer(s) from File.
add images from file - Tips for Processing Night Photography with ON1 Photo RAW 2018
Now it is time to add the layers.
A window will pop up where you can go to the subfolder that you put the images into. Select all the images, Ctrl/Cmd+A, then press Open.
select images - Tips for Processing Night Photography with ON1 Photo RAW 2018
Selecting all the images you want to use.
ON1 Photo RAW will ask you if you want to open them all, say yes. Depending on how many images you are trying to do it can take some time for this to happen. The images used for this demonstration are quite large and took a few minutes.
images added as layers - Tips for Processing Night Photography with ON1 Photo RAW 2018
All the images are added.
Next, you need to blend each layer. You want the lights to shine through from each but not everything else. For each layer, go up to the blending pull-down and select Lighten.
blending options - Tips for Processing Night Photography with ON1 Photo RAW 2018
Blending all the layers with Lighten.
You can now save the image and then you can do more processing if you wish. If the image needs straightening, lens corrections, etc., you can do it in the Develop module.
light trails image - Tips for Processing Night Photography with ON1 Photo RAW 2018
The final image.

Star Trails

If you enjoy doing star trails then you will be able to use this same method for processing and stacking those images using ON1 Photo RAW.

Share this article

You Are Your Own Best Teacher – Learning From Your Photography Mistakes

#photographymasterclass #photographyhub #photographyhomework
Personal experience is the very best teacher. Reading tutorials, studying the professionals, and mastering the fundamentals will certainly incrementally improve your photographic skills, but you’ll grow exponentially when learning from your photography mistakes. This is most true when you study your mistakes. You only learn when you make a mistake and know why.

Learning from your photography mistakes

Conversely, if you don’t seriously study the shots that you captured from each outing (both good and bad), you’ll be more prone to make those mistakes again and again and never clearly understand why. Discovering how camera settings and scene lighting produced specific results can give you real insights that even a private tutor may not deliver. You are your own best teacher because this kind of lesson is concentrated on you alone and concerns you alone. You aren’t competing with anybody else, nor are you being judged by anyone else.

Metadata and EXIF Information

Metadata is the techno-term for the settings your camera uses to capture digital pictures; which includes File Properties and Exif (camera capture data). Every camera collects facts that describe just about everything your camera knows about the pictures it takes.
Metadata and Exif information accompanies every image captured and is disclosed by a variety of different software applications, and it is exhaustively disclosed in Adobe’s Bridge software. The illustrated examples in this article have were captured from Bridge. While Lightroom delivers a small subset of this information, Bridge lists virtually everything and acts as a “bridge” (clever name) between the files and other Adobe software to catalog and process the images.
1 - Learning from your photography mistakes
Metadata reveals that this photo was set up in Auto mode with AWB (Auto White Balance) and Matrix
 metering which opened the Aperture to 3.5, evenly exposing the scene and allowing the camera to
correctly balance the colors based on the neutral gray elements in the scene.
2 - Learning from your photography mistakes
This shot illustrates the danger of setting the camera for full Manual operation but incorrectly selecting
 Tungsten lighting as the light source which biases the colors toward the cooler (blue) side of the
spectrum. Tungsten setting expects the yellow cast of tungsten lights, however, the outdoor lighting
was shaded sunlight. The Aperture was set manually to f/22 which did not allow enough light to
expose the darkened scene.

Discover what works and what doesn’t

Get hard on yourself and discover what works and what doesn’t. Then try to repeat the results you received from your best shots. If you make this exercise a habit, and seriously analyze why some shots worked, and others didn’t, you’ll improve with every outing. Learn to appreciate the “keepers” but don’t view the rejects as failures… they are merely lessons from which to learn.
Note the difference that the time of day makes and the angles (and severity) of the shadows produced during different hours of the day. Take notes on why some shots are 5-star picks, and some others are rejects. Become a student of your work and watch your learning curve shorten.
This metadata also teaches you the limitations and restrictions of specific settings. Sometimes processes that fail are caused by equipment failure rather than judgment error. Here’s an example of the camera being set up for a flash image but encountering an entirely different lighting condition when the flash failed to fire. The ripple effect of a flash misfire caused a massive failure in the camera’s exposure, focus, and color.
3 - Learning from your photography mistakes
The metadata reveals that this image was captured correctly. All processes functioned as expected,
resulting in a color-correct, well-exposed picture.
4 - Learning from your photography mistakes
The metadata in this file reveals why the image is overexposed, grossly discolored, and blurry. While
the flash was instructed to fire, it failed (probably because the flash was fully charged and ready to fire).
This resulted in an image that the camera’s settings (Aperture Priority and Auto exposure) forced the
camera to compensate the lack of flash lighting with extremely slow shutter speed. The yellow cast was
the result of tungsten lighting in the room while the image sensor’s color balance expected daylight
 (flash temperature) settings.

Develop a routine

Develop a routine and a personal discipline that forces you to shoot during the same time of day for a full week. Note that I said “force,” rather than try. Personal discipline is a wonderful trait and one that can improve your photographic skills very quickly. Who knows, it might actually affect other areas of your life that need improvement too.
If you only shoot occasionally, you’ll develop skills at a slower pace. Moreover, if you only critically review your work occasionally, you’ll learn at a snail’s pace. Make the review process a regular exercise, and it becomes habit… a good one. I once had a professor who stated in almost every class, “repetition is the exercise of your mental muscle.” The advice sounded strange back then, but it makes perfect sense now.
Every session you shoot produces winners and losers. Make it a habit to examine all metadata from your session to deduce what went right and what didn’t. More importantly, you’ll learn why. Take ownership of your mistakes, especially errors in judgment. You only grow when you recognize a mistake and work to overcome it. While you’ll always be very proud of the great shots you take, you’ll learn more from the shots that didn’t work!
5 - Learning from your photography mistakes
The metering used in this shot was Pattern or Matrix, which averages light readings from the entire
frame to influence the shutter speed. The average exposure was based on middle-tone (18%) gray.
The sunlight reflecting from the sand on the ground and the black feathers in the bird’s wings
established the outer parameters of the exposure, producing an unacceptably dark overall exposure.
Had I chosen Spot metering, the picture would have considered only the tones in the middle of the
frame, thus lightening the overall exposure.
More often than not, this examination shows you how your camera reacts to specific lighting in a scene. It sometimes produces profound shifts in exposure from small differences in the framing of a scene. Weird but true. While cameras are thought to have “intelligence,” in reality they have no intelligence or no judgment capabilities of their own. They’re merely algorithms that affect settings based on the lighting observed in the scene.
6 - Learning from your photography mistakes
The camera angle was shifted to reduce the amount of sunlight reflection in the frame which, in turn,
changed the lighting ratio and lightened the resulting exposure. Reviewing this result taught me to
carefully evaluate a scene for content before choosing a metering system.

There are many ways to learn

There are many ways to learn. Taking courses online, reading tutorials and technique books, and tips and tricks columns all teach us a little something more. Years ago I decided to learn how to play the game of golf. After shooting some very embarrassing and humbling rounds, I realized that I desperately needed help. I bought many golf magazines and tried to mimic the stance and swings pictured in the exercises. I watched a large number of video tutorials and listened to advise from everybody, but my game remained poor.
Nothing improved and I only became discouraged. It was when I practiced the disciplines on a regular basis and took serious notes on what worked and why that my game began to improve. I continued to fail simply because I didn’t analyze (and learn from) my mistakes. You learn a lot when you expose yourself to the valuable experience of others, but you’ll only truly grow in your photography skills after you study your own results. So here’s an exercise:

An exercise to help you learn

Open any of the excellent software packages that display both the Metadata (aperture, metering type, ISO, color mode, and shutter speed) and Camera Data, or Exif information (exposure mode, white balance, focal length, lens used, light source, flash behavior, etc.) from both RAW and formatted photos.
Set the View in the software so that you can observe the images in browser or catalog mode, allowing you to see thumbnail views of the files in each session. Also, set the window to display the settings for each image as you step from one image to another.
Whether you shoot in Manual, Aperture or Shutter priority, or even Auto mode, the software lists the individual camera settings exhaustively for each image.
Next: note the variations in lighting between the images and recognize what changes in the camera settings cause the small shifts in the results. Each variation gets linked to one or more of the camera settings; sometimes just a small shift in ISO.
If you allow Auto to control any aspect of your shots, the camera makes subtle changes to shutter speed, ISO, or aperture. Using Auto can be very beneficial in this learning stage because you’ll see how each of these controls affects the appearance.
Make a short columned note card and enter the basic settings for the keepers. Add the weather and lighting conditions that existed at the time of the shot.
Keep this note card in your camera bag and try to replicate the results from the keepers.
Repeat this exercise regularly and watch your results, judgment, and predictability improve.

Share this article