Sunday, February 10, 2019

How to Learn Photography


by: Photography Talk


iStock 75424081 MEDIUM image

#photographyhobbyist  #photographybestoftheday #photographyforever


How to learn photography means a lot of different things to a lot of different people. For some, learning how to take photos might be best accomplished by taking a class. For others, watching videos or listening to podcasts might be the way to go. Beyond that, where one photographer benefits greatly from joining a photography website and participating in a photography forum, another photographer might be better served by challenging him or herself to go out and shoot solo each and every day.
So, when thinking about how to learn photography, you have to consider what you want to learn and the ways that you’re most able to absorb information.
But regardless of how you approach learning photography, one thing is certain - it requires that you learn the fundamentals of photography, like composition and lighting, before you worry about buying expensive gear. As you’ll learn in this guide, there are a wide variety of ways that you can learn more about photography. Have a look at some of our favorites, learn the basics of taking a quality photo, and then put what you learn into practice. That’s how to learn photography.
Let’s begin!
Join Today! image

Get Some Practice

iStock 79318253 MEDIUM image
Nevermind the photography gear you have right now. It just isn’t important. Instead of spending thousands of dollars on high-end camera equipment that you won’t know how to use, spend the majority of your time actually learning about photography and practicing the skills you learn.
For example, if you have nothing but your iPhone, you can still practice the fundamentals like composition, framing, the rule of thirds, perspective, and lighting. You don’t need a $5,000 camera body paired with a $3,000 lens in order to do that. Simply setting aside time each day to go practice will be far more beneficial to you as a way to learn photography than spending your savings on fancy gear, and then trying to figure out how to be a photographer.

Get Familiar With Your Gear

If you’re interested learning photography, sooner or later, you’ll need to get familiar with the gear you’re using. Even if it’s a basic point and shoot or your mobile phone, taking a few minutes to familiarize yourself with its features will be highly beneficial as you learn basic concepts related to taking a high-quality photo.
If you have a DSLR or mirrorless system, getting familiar with your gear will take a little bit more time. The owner’s manuals for today’s cameras are quite large, but with good reasons - cameras have more features, functions, and settings today than ever before, and manufacturers have done a good job of providing consumers with detailed instructions for learning how to use them.
One of the more difficult camera features to master is the various shooting modes available to you on your camera’s dial. If you’re a little confused about which shooting modes do what, have a look at the short video above from CanonUSA. Don’t worry if you don’t have a Canon camera - shooting modes are the same regardless of manufacturer.

Seek Out Learning Opportunities

iStock 78610091 MEDIUM image
There is no shortage of ways that you can gain valuable insights into the fundamentals of photography. If you learn best in a formal environment, think about signing up for a photography class at a local community center, or even take a class at a nearby college or university. If you’re an auditory learner, try a photography podcast to learn the essentials. Ebooks and library books are in great supply, on all manner of photography concepts, from landscapes to portraits to travel and street photography.
If you learn best by having some structure with the freedom to practice as you have the time, try an online lesson or tutorial, like those in the ON Demand section of PhotographyTalk, that take you deep into highly-specific concepts, then challenge you with a homework assignment to practice your skills. For visual learners, there are few better resources than YouTube, where there are thousands of step-by-step videos from talented and successful photographers.

Use a Small Memory Card to Force Your Concentration

iStock 11251133 MEDIUM image
One of the simplest, yet most powerful ways to learn photography is by limiting yourself to a specific number of exposures. Though one of the advantages of digital photography over film is that you can take many more pictures without fear of running out of space, restricting yourself to a specific number of frames forces you to concentrate on the skills you learn and be more selective with your shots.
Think about it like this - if you go out shooting with a huge memory card that can accommodate hundreds of pictures, you’re more likely to “point and spray,” paying less attention to what you’re doing in terms of composition, lighting, and the like. However, if you use a smaller memory card and limit yourself to, say, 100 frames or 50 frames, you’re forced to really think about each shot - how it’s framed, how the light interacts with the subject, the placement of the subject in the scene, and so on. That higher level of concentration will only help you master photography more quickly.

Learn About Exposure

Exposure settings - aperture, ISO, and shutter speed - are among the most important for a beginning photographer to learn. Each concept is essential in and of itself, but considering all three have an impact on how your photo turns out, it is also critical to learn them as a unit. But understanding the interplay of these three elements can be a bit confusing at first.
Check out the video above for a quick, yet in-depth discussion on exposure settings with Tony and Chelsea Northrup. In it, you’ll get an overview of aperture, ISO, and shutter speed individually, and also see how all three exposure settings work in concert to get a proper exposure.

Practice Post-Processing

iStock 52957744 MEDIUM image
Some beginning photographers mistakenly think that the bulk of their time will be spent actually taking photos. And though that would be nice, the fact of the matter is that you will spend more time sitting in front of your computer processing the images you take than you will actually taking the pictures.
As a result, a crucial element of how to learn photography is becoming comfortable making adjustments to your images in post-processing. Programs like Adobe Photoshop and Adobe Lightroom are extremely popular for processing images, but are on the expensive side and can be complex to learn. There are also options like GIMP, which is a free platform that is nearly as powerful as Photoshop. Yet other options like Pixlr, are browser-based, so you handle all the processing on the web. Whatever program or platform you choose, it’s essential that you take the time to learn the program inside and out, just like you did when learning to use your camera.

Undertake a Photography Project

iStock 77196973 MEDIUM image
Immersive learning is an excellent tool for learning new skills quickly. As it pertains to photography, immersive learning can take a number of different forms. You might tackle the popular 365-day photo challenge, wherein you have to use your camera every day, selecting one image each day to share via social media. If a year-long challenge is a bit much, tackle something more doable like a 30-day challenge in which you have to take a different kind of picture each day for one month. On day one you might be assigned to photograph something blue. On day two it might be to take a portrait. On day three architecture might be the subject you’re assigned, and so on.
As noted above, practicing your skills is what will help you master the fundamentals of photography. There are few better ways to get that practice than by taking on a long-term project that forces you to get out and shoot every day and practice new skills for an extended period of time.

Expand Your Horizons

iStock 30761026 MEDIUM image
Once you’ve got the basics down and you feel that you have a grasp of the essentials of photography, don’t rest on your laurels and be content. Instead, continue your pursuit of building critical photography skills by trying different things. If you mostly take portraits, give landscapes a try. If you’ve spend most of your time photographing wildlife, head into the city and try your hand at street photography.
It’s not just trying different genres of photography that will help you either. Something as simple as trying nighttime or low-light photography can help you better understand the qualities of light on a deeper level, not to mention the camera settings required to shoot in low-light conditions. To spice things up from a composition standpoint, try the four corner trick. Take a series of four photos, each with the primary subject in a different corner of the photo. Then, examine each, noting how the placement of the subject changes the visual impact of the image.

Draw Inspiration From Others

iStock 85649593 MEDIUM image
It’s a simple step, but an important one nonetheless - finding inspiration to help guide your work will help you clarify your aesthetic. Though it’s certainly not appropriate to copy the work of others, that doesn’t mean that you can’t examine others’ work to see what you like, what you don’t like, and get inspiration for future shoots. Follow your photography idols on Instagram or Flickr. Check out books or online collections that feature photography greats like Ansel Adams or Annie Leibovitz. Do an image search online and pore over the photos you find interesting. The point is to immerse yourself in imagery that you find inspiring such that you can develop your photographer’s eye.

Join a Photography Website

The value of joining a photography website is that there are so many opportunities to learn photography. As noted above, you can read tutorials and learn specific skills that help you become a more advanced photographer. You can read gear reviews and learn about the types of cameras, lenses, and accessories you need for specific types of photography. Photography websites also offer insights into photography classes, workshops, and expos where you can further your learning as well.
Additionally, by joining a photography website like PhotographyTalk, you can access a catalog of lessons and tutorials that will keep you engaged in learning about photography for the long-term. With new material constantly being added to the site, you can be sure that there is never a shortage of something to learn. In fact, by joining a photography website, you’re more apt to pick up your camera and practice your skills more often because of the daily opportunities you have to learn something new. The more you practice, the faster you will learn!

Learn How to Get Sharp Focus

Having your images in focus is one of the most critical aspects of having successful photos. You can have everything else spot on - the lighting, the composition, the framing, and so on - but if the subject is blurry, it completely ruins the image.
Fortunately, there are a number of ways that you can ensure your images are tack-sharp each and every time. In the video above, Phil Steele of Steeltraining takes us through five strategies for getting the focus right, from very simple to very advanced techniques. Have a look, and learn how to make focus work for you instead of against you!
( Download this cheat sheet: 9 Step lens cleaning checklist. So you don't screw up your lenses. )

Get a Mentor

iStock 79797995 MEDIUM image
A photography mentor is a great way to learn photography because you have access to someone that’s already been on the journey to becoming an avid photographer. Not only does a mentorship relationship give you a real, live person to ask questions, but you can also get critical feedback on your work. What’s more, if you want to pursue photography as a career, a mentor will be a valuable resource not just for photography-related topics but business-related topics as well.
Remember that having a mentor is intended to help you learn and grow. You want to inquire about mentorship with someone that is well versed in the genre of photography that you wish to pursue, someone that has the time to effectively mentor you, and someone who will give you the feedback you need to get better.

Get Involved in a Photography Club or Forum

If one-on-one mentoring isn’t your thing, you might consider joining a local photography club. Photography clubs are an ideal way to learn photography because you make connections with other photographers in your area. If you ever want to go shoot, you have a ready-made list of people that might be interested in going. And, much like a mentorship situation, the club is sure to have more experienced members that might be willing to take you under their wing and help you learn more advanced skills.
By the same token, participating in a photography forum, like the one here on PhotographyTalk, is yet another way that you can connect with other beginner, intermediate, and advanced photographers to talk shop. Forums are great for beginners because you can easily ask questions and get insights from other photographers. What’s more, you can upload and share your images, ask for feedback, and inspect the images that other forum members are taking. Any of these activities will help you acquire new skills, but the fact that they are all accessible in one place makes a photography forum a valuable tool for learning photography.

Teach Someone Else

iStock 31074840 MEDIUM image
If you want to accelerate your learning, grab your kid, your sister, or your neighbor and drag them on a photo shoot. Sharing your passion for photography will instantly give you the energy and inspiration you need to take better photos. Plus, the process of explaining what you’re doing to someone else will help you clarify what you’re doing in your own mind. They might give you a little constructive criticism too!
Think about it like this - if you enjoy landscape photography and you don’t feel quite like you understand the concept of depth of field, explaining what you’re doing to change the depth of field will make the process more understandable. Verbalizing to someone else the steps you take, as well as discussing the elements that impact depth of field out loud will go a long way in helping you get a better grasp of the concept. The best part is, whoever you take with you might ask questions about basic photography processes or concepts, furthering your ability to explain what it is you’re doing. It’s like getting practice, finding inspiration, taking on a photography project, and getting feedback all at the same time.

Look Through Your Old Photos

iStock 17760171 MEDIUM image
Part of the beauty of photography is that you have a visual record of your progress. You can see how your skills have improved over the course of a month, six months, or a year simply by going back and having a look at your earlier work. Though some of your old photos might be cringe worthy, it’s still a great way to learn. Armed with a greater set of skills and more knowledge, you can critically analyze your earlier work, identifying what went right, what went wrong, and how you’d approach taking the same photo differently today.
In fact, what better way to further hone your skills than to revisit old photoshoots, recreating them with your expanded set of skills? With a side-by-side analysis of old and new photos, you can begin to see how much you’ve changed in your effort to become a better photographer. If nothing else, doing so will give you the energy and inspiration you need to continue shooting, keep learning, and acquiring even more skills. If you want to know how to learn photography, just take a walk down memory lane and see the progress you’ve made!

Should I Become a Shutterstock Contributor?

#photographyhobbyist  #photographybestoftheday #photographyforever

by: Photograpy Talk

Shutterstock was founded back in 2003 by Jon Orringer, a photographer and entrepreneur, and soon became the first global image subscription service. Orringer realized there was a need to have licensable images at an affordable price, and in fact, began by using about 30,000 of his own digital photos.
Since that time, Shutterstock has become one of the most established and recognized microstock sites around. Marketing agencies, media outlets, and businesses alike from around the globe turn to Shutterstock for both their commercial and editorial needs.
Over 100,000 professionals contribute to the Shutterstock library.

Shutterstock Snapshot 

  • Founded in 2003 by photographer Jon OrringerIs
  • Headquartered in New York City, but has a worldwide presence
  • Over the last 15 years, Shutterstock has paid out half a billion dollars to their worldwide community of contributors
  • Over 150,000 images are added weekly
  • Features over 200 million stock photographs, vector images, and illustrations
  • Has been publicly traded on the New York stock exchange since 2012
  • In 2016, reported it had over 100,000 contributors
  • Has an active customer base of 1.4 million people in 150 countries 

Shutterstock: How Much Does It Pay? 

shutterstock become contributor image
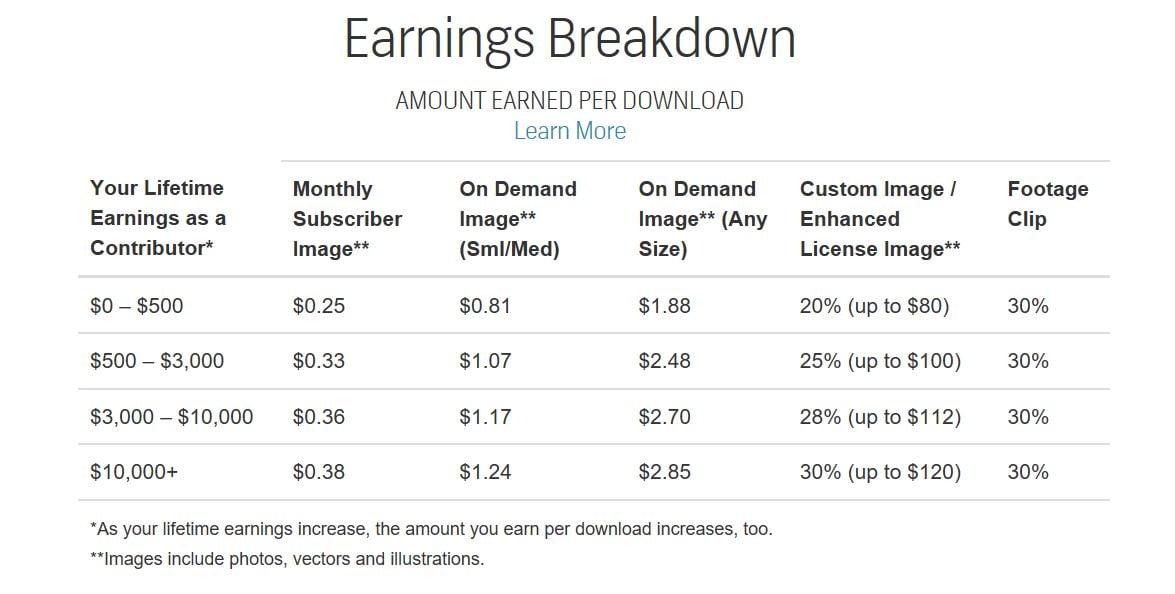
Shutterstock contributors earn royalties every time one of their approved images is downloaded by a customer. The amount of payment is based on a couple of things: the license and subscription used for each download, and your earnings tier.
Customers purchase photos using one of two options: subscriptions and on demand. Your earnings tier is based on your lifetime earnings, and Shutterstock’s subscription and on demand downloads. Shutterstock has four tiers for lifetime earnings:
Tier 1: $0 – 500
Tier 2: $500 - $3000
Tier 3: $3000 - $10,000
Tier 4: $10,000+
Subscription packages let customers pay a monthly fee, then license as many as 750 images per month under a standard license. Shutterstock pays you 25 to 38 cents every time one of your images is downloaded, based on your earnings tier.
The on demand plan lets customers purchase an image pack under the standard or enhanced license. These images must be downloaded within a year of the purchase date. Some packages restrict the size of image that can be downloaded. Those packs pay between $.81 and $1.24 per download, whereas the ones without size restrictions pay $1.88 to $2.85 per download.
Shutterstock also offers customers two primary types of licenses: the standard license and the extended license. Standard licenses restrict how many times an image can be used in print and does not allow for images to be used on products. The enhanced license allows buyers to use downloaded images for merchandising and other high viewership commercial uses.
There is a third option for customers: custom license packages. These are available for high-volume purchasers, such as ad agencies and publishers. Custom licenses without the “sensitive use” option pay a royalty of $2 to $15 or more, depending on the cost of the license and your earnings tier. Custom licenses with a “sensitive use” option pay $75 to $90+, again based on the license and your earnings tier.
“Sensitive use” means that an image of a recognizable model may be used in a manner that implies that the model suffers from a physical or mental health issue. Shutterstock states that it does not necessarily mean that the image will be used that way. Your images may only be allowed as sensitive use if you opt in on your contributor account page.
Shutterstock How much does it pay image

Referral Earnings

In addition to making money by selling your own photos, you can also earn money by referring other photographers/contributors. For the first two years after one of your referred contributors is approved, you earn 4 cents every time one of their images is downloaded. For videos, for the first year after a contributor you referred is approved, you will earn 10% of the sale price each time someone downloads one of their clips.
You can also earn by referring customers to Shutterstock – 20% of their first payment, up to $200.
Keep in mind that Shutterstock reserves the right to hold onto your referral payments for up to 90 days from the date that the contributor or subscriber you referred creates his or her Shutterstock account.

Shutterstock: +Getting Paid

shutterstock 500 million image
Shutterstock’s payment cycles are monthly and restart on the 1st of the month. To receive payment, your earnings must reach the minimum payout amount set up for your account. Some prefer to keep it at the $35 minimum allowed, but others prefer to set higher to avoid more Paypal fees. If you reach your minimum amount, you will receive an email letting you know about the payment you will receive. Shutterstock then pays through Paypal, Payoneer, or Skrill sometime between the 7th and 15th of the month. If you prefer to be paid by check, those are processed around the 15th of the month. Checks typically take 2 to 4 weeks to arrive.
A few other things to keep in mind before you get paid:
  • You must have an approved tax form on file.
  • Some countries require a 90-day waiting period.
  • You will not receive payment if your account is disabled or under investigation. 
Get more tips on making money on Shutterstock by viewing the video below by Nicole Glass.

Shutterstock: How Do I Become a Contributor? 

Shutterstock recently implemented several changes to make it easier for photographers to contribute their images.
  • Simplified Registration Process. To become a contributor, all you have to do is enter your address and contact information, then start submitting content. This makes it easier for contributors to start earning money.
  • Submitting Content. Shutterstock’s newly designed contributor content uploading tool makes it easier to tag and label content. It now offers suggested keywords, the ability to make multiple selections, and simpler content status options. All of this makes your content easier to find and reduces the amount of time and effort it requires to upload photos.
  • Getting Paid. Shutterstock now pays via Paypal, Payoneer, Skrill, or check.
Shutterstock How Do I Become a Contributor image

Shutterstock Account Registration

To be a Shutterstock contributor, you must be at least 18 years old. You also cannot share an account with anyone else. Depending on what country you are in, you must provide any legal documentation – such as tax forms – that your country requires. You can only open one Shutterstock account unless they grant you permission to open a second one.
  1. You must be the sole owner of any photos or videos that you contribute.
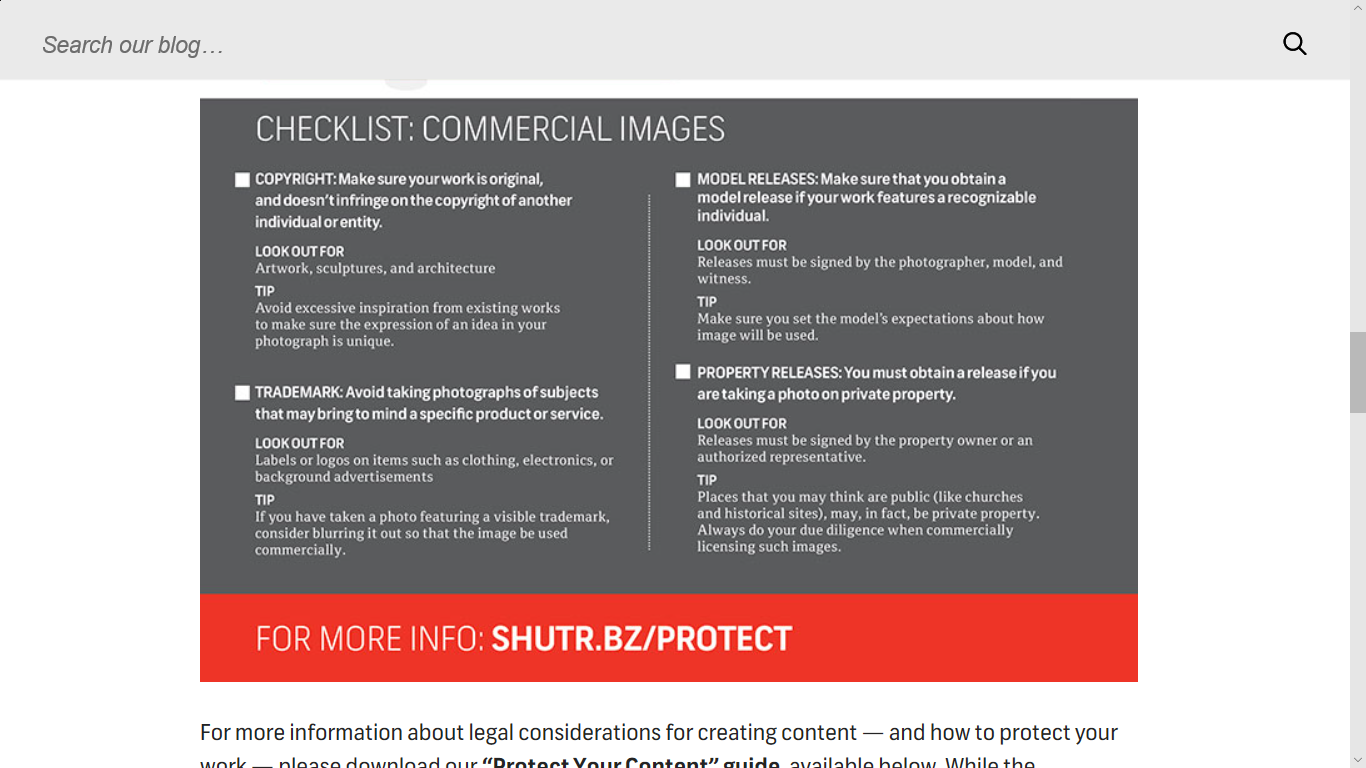
  2. Your commercial photos cannot include any type of copyrighted material, such as sculptures, artwork, architecture, and so on. To use, you must submit releases.
  3. Photos for commercial use can’t have any trademarks, logos, or marks that can be identified (like license plate numbers). To use, you must submit releases.
  4. You can’t submit photos that were created “in a manner that violates human rights.”
  5. Don’t add watermarks or copyrights to your photos. 
Shutterstock How Do I Become a Contributor image

Shutterstock Account Regulation

  • Shutterstock will warn you, and eventually terminate your account, if they see repeated issues related to your account activity or content submissions. Examples include:
  • Resubmitting the same photos that were previously rejected without addressing the rejection reasons.
  • Sharing a Paypal, Payoneer, or Skrill account with another contributor.
  • Submitting photos that they feel is “excessively inspired” by someone else’s work.
  • Copying someone else’s entire description and keywords for their photo(s).
  • Title spamming – i.e., repeating a word in the title
  • Keyword spamming – i.e., using keywords that are irrelevant to the image.
  • Adding keywords back after they were removed by an administrator, modifying a caption that was edited by an administrator, or adding restricted keywords after your content was approved. 
  • Using inappropriate keywords (e.g., sexy, nude, etc.)
 Shutterstock How Do I Become a Contributor  image

Shutterstock Releases

Shutterstock requires more releases than some other microstock sites. Any commercial image that includes an identifiable person requires the appropriate adult or minor model release. Photos of private property require property releases.
  • Nudity: Shutterstock does allow nudity of “artistic value,” but the model must be at least 21 years old and you must provide a model release and a photo ID of the model. Shutterstock has the sole discretion on whether or not to accept nude photos. No photos should be x-rated or contain any illegal content.
  • Artwork: Images containing artwork – including sculptures, paintings, architecture, etc. – requires property releases as well.
  • Vintage Images: Shutterstock may choose to accept vintage images if it’s not in the public domain, but they must have model and/or property releases.
  • 3D Interiors: Images with a 3D interior rendering must have a property release with the name of the software program that you used to create the image and that you have the right to license content in the 3D rendering software. 

Submitting Photos to Shutterstock

Shutterstock accepts both JPEG and TIFF files, and they must be at least 4 megapixels. Files under 50 megabytes can be uploaded directly from your account’s upload page. Larger files have to be uploaded via FTP.
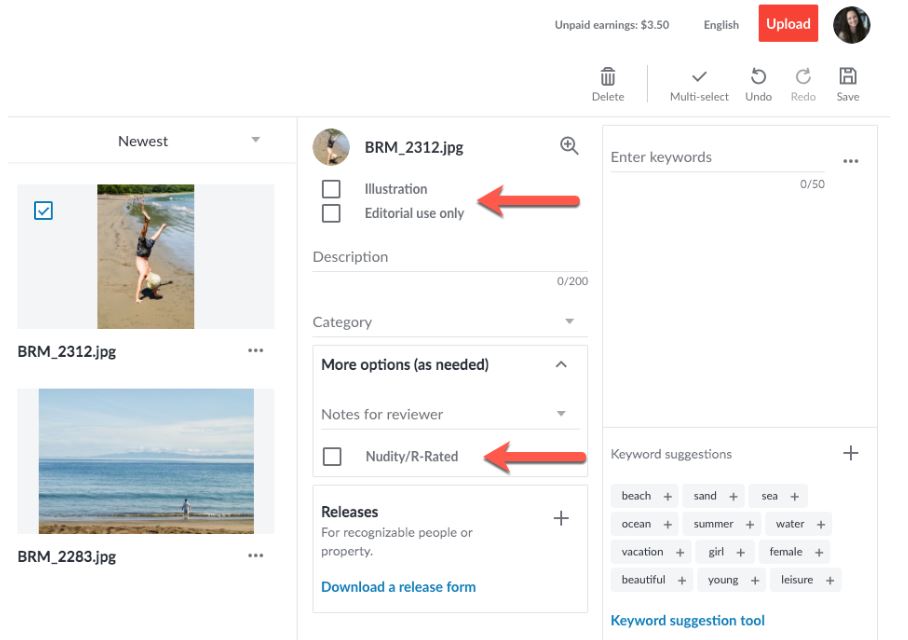
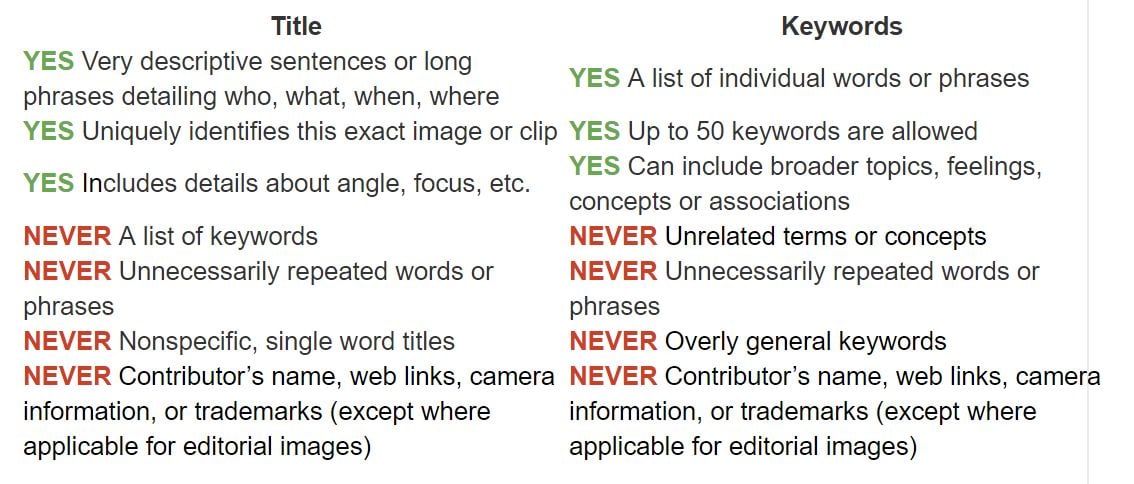
In addition to uploading your photos, you need to add metadata – i.e., the title (description), key words, and category. Once your photos have successfully uploaded you will need to enter titles (description), keywords, and categories. This information is known as metadata, and makes it possible for people to discover your photos. We’ve published some tips here: Title and Keyword Guidelines, Policies and Best Practices. Metadata can be added to multiple images at once by clicking the Multi-select option.
 Shutterstock How Do I Become a Contributor image

The Review Process 

Shutterstock’s review team is made up of a global network or professionals who have a vast amount of experience as artists. They are also trained on all of Shutterstock’s technical and metadata standards and compliance policies.
Reviewers will judge your photos on the following:
  • Technical execution – including things like lighting, noise, and focus.
  • Metadata – your titles and keywords are looked at to ensure they are both accurate and relevant, and that they meet Shutterstock’s compliance restrictions.
  • Intellectual property – reviewers look to make sure there are no intellectual, trademark, or copyright violations.
  • Releases – reviewers make sure all the proper releases have been filed.
  • Policies – reviewers make sure that all submissions adhere to Shutterstock’s various policies for things like similar content or spamming.
Shutterstock’s reviewers try to review all content within 72 hours, but it can take up to 7 business days.  If it takes longer, your content may have needed to be reviewed by a manager, which simply means the reviewer needed a more advanced judgment or a question answered before accepting or rejecting the image.
If your image is declined due to technical execution, you can request another reviewer look at it. Different reviewers have slightly different ideas on what is or isn’t acceptable.

Editorial Images on Shutterstock

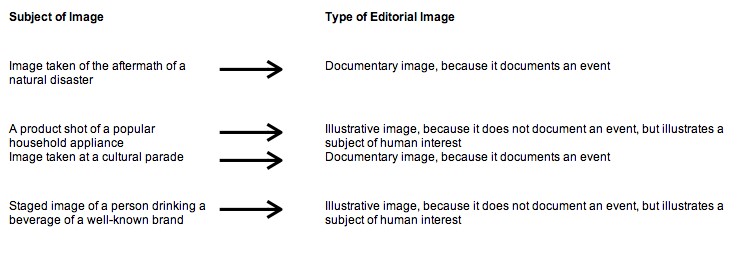
 In addition to commercial images, Shutterstock also accepts editorial images. However, images that are submitted as “editorial” that are obviously trying to avoid the commercial model release requirement will not be accepted. Editorial images cannot be used commercially.
Editorial images must fall under one of two categories:
  • Documentary images: Photos that document an event or human interest subject
  • Illustrative images: Staged photos that illustrate an event or subject of human interest
In order to be accepted, editorial photos must do the following:
  • Meet Shutterstock’s editorial image quality requirements
  • Meet Shutterstock’s documentary or illustrative editorial category
  • Include an editorial caption and appropriate keywords
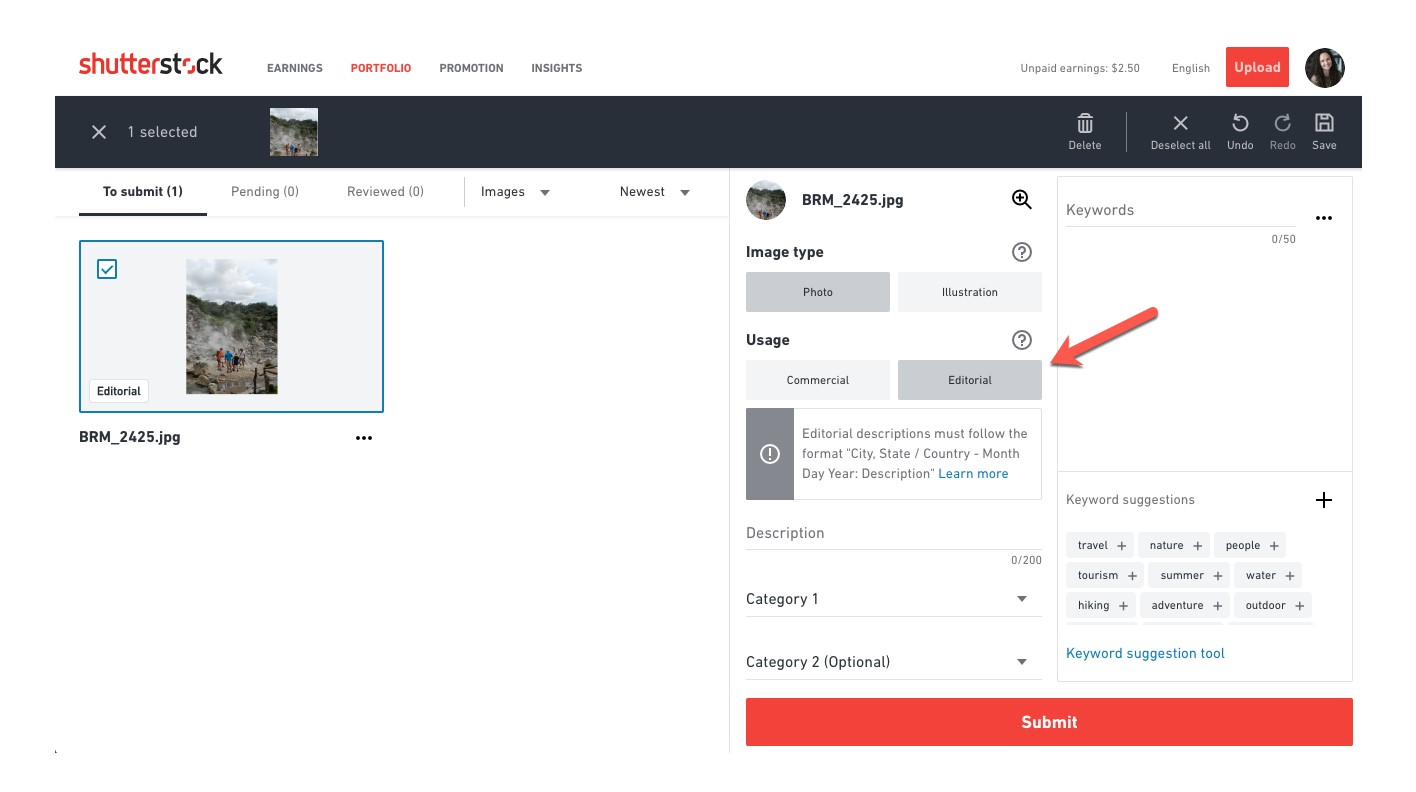
  • Be tagged as an editorial image when submitted
Illustrative editorial images must have the same superior quality as commercial quality images since the images are planned out and controlled. It is ok to use small amounts of post-processing, but nothing extravagant.
The quality for documentary editorial images is more forgiving, but the images must accurately and honestly communicate the subject or event. When possible, images should be left unaltered, although a few minor technical enhancements are allowed if needed to improve the quality of the image.
Editorial Images image
All editorial images must be accompanied by a caption, which need to include the who, what, where, when, and why of the photo. The caption should be accurate and relevant, and must be submitted in the proper editorial format:
CITY, STATE/COUNTRY – MONTH DAY YEAR: Factual description of the image, consisting of who and what the image represents and if necessary, a qualifying newsworthy statement of objective fact.
Editorial content also needs to be selected for editorial use when you upload your images. This can be done by selecting “yes” from the “editorial” dropdown menu in your content editor.
When listing keywords for your editorial photos, you need to include the words “illustrative” and “editorial” or you can list “illustrative editorial.” Editorial keywords can include product brand names if they accurately describe the photos.
Editorial Images 2 image

Tips for Selling Your Photos on Shutterstock 

There’s a lot of competition on Shutterstock, but that doesn’t mean you won’t sell photos. Here are some ideas to help you get noticed:
Keywords. Shutterstock allows you to use up to 50 keywords per image. The more you use, the better the chance of your photo being discovered. To get an idea of what keywords to use, look up similar photos on Shutterstock and see what words they are using – but don’t copy them precisely. Also, make sure the keywords relate to your photos.
  1. Captions. Make your captions long and descriptive.
  2. Think creatively. Try to come up with images that are not overpopulated on Shutterstock. You’ll have less competition.
  3. Editorial photos. If there’s a newsworthy event in your area, it’s smart to take some photos because you may be the only Shutterstock photographer covering the event.
  4. Upload a few photos regularly, not all at once. Shutterstock has a category that shows new photos, so you want to space out your images. That will allow you to show up as fresh content.
  5. Create sets. Place your photos in sets, or categories. This helps you organize your photos, but also helps buyers get a better idea of the types of pictures you offer.
  6. Read the contributor blog and follow on Twitter. Shutterstock’s contributor’s blog and Twitter page have good information to help you on your Shutterstock contributor journey. 
  7. Check out their monthly shot list. It highlights which photos were most requested on Shutterstock and can help you learn what sells. 
  8. Study the 2019 creative trends page. This shows what’s expected to be popular in the coming year based on billions of searches from Shutterstock customers. 

Shutterstock: The Bottom Line

Shutterstock The Bottom Line image
Shutterstock is one of the most popular microstock sites in the world. As a contributor, Shutterstock has several advantages. Their payment percentage is higher than some other microstock sites, their minimum payout amount is less than most, and they offer a few different options to help you earn more money. Shutterstock is also non-exclusive, so you can share the photos you publish on Shutterstock on other non-exclusive microstock sites.
Remember, when submitting to Shutterstock, you should regularly upload new photos, rather than loading them all at once. That allows your images to be displayed in the fresh content area, giving your image increased exposure.

An alternative to Shutterstock;   http://www.photography-jobs.net/?hop=darryl54

Secrets to making money as a Shutterstock photographer

I Capture The Whimsical Side Of Dogs In My Photography

#photographyhobbyist  #photographybestoftheday #photographyforever


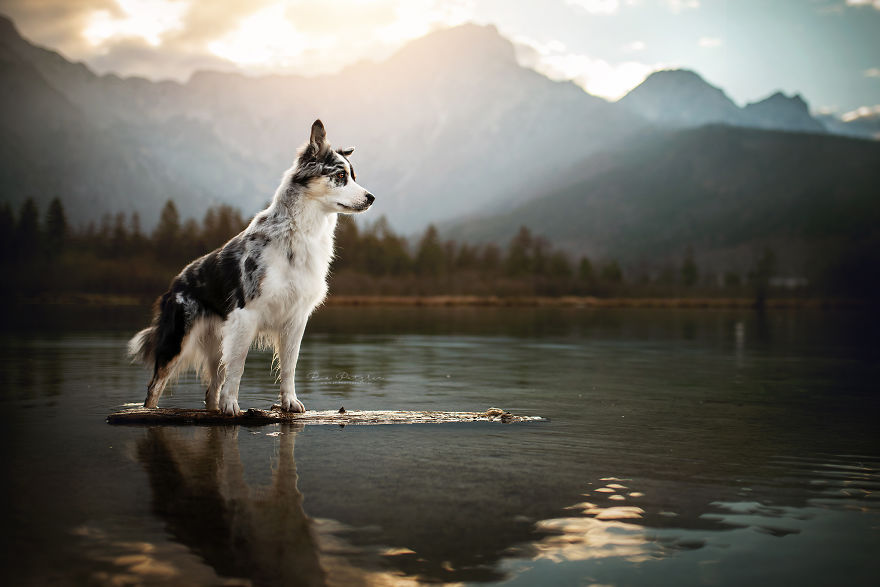
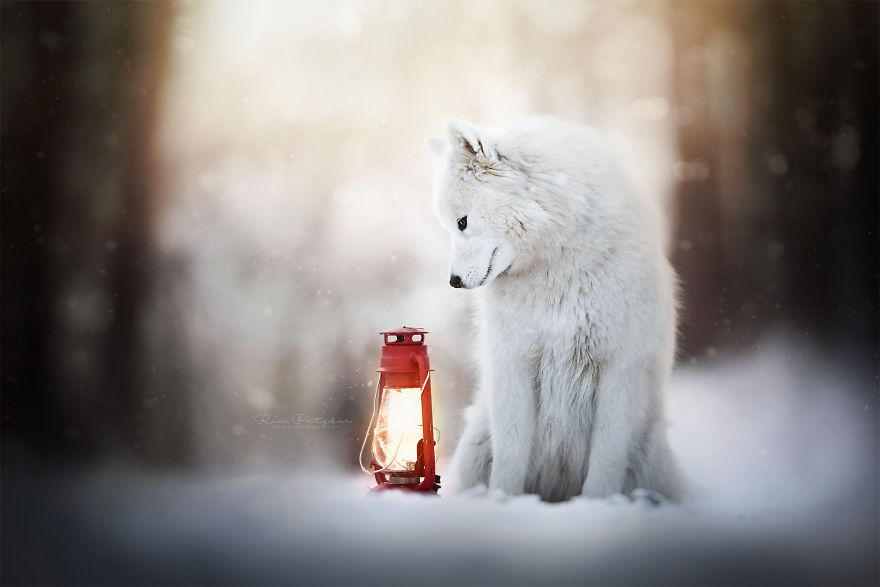
Hello! I am Ria Putzker from Austria and I am 21 years old. My favorite thing is to take photos of dogs. It has been my passion for about 3 years now. Dogs fascinated me in many ways since I was young. My two biggest inspirations are my own dogs, 7-year old Dachshundmix Phoebe and 1-year old rescue dog Maki!
I want to capture a dog’s personality and give the person who looks at the photo a bright smile! Through photography, I met a lot of awesome dogs and cool people, it also helped me to get through hard times.
Here is a selection of my favorite photos I have taken during the last three years!

I Love To Capture The Joyful Soul Of Dogs Through My Photography 

I Love To Capture The Joyful Soul Of Dogs Through My Photography 

I Love To Capture The Joyful Soul Of Dogs Through My Photography 

I Love To Capture The Joyful Soul Of Dogs Through My Photography 

I Love To Capture The Joyful Soul Of Dogs Through My Photography
I Love To Capture The Joyful Soul Of Dogs Through My PhotographyI Love To Capture The Joyful Soul Of Dogs Through My PhotographyI Love To Capture The Joyful Soul Of Dogs Through My Photography

Photographer Resources   

#photographyhobbyist  #photographybestoftheday #photographyforever

You’re about to save yourself hours of time, frustrating moments of writer’s block, and improve your client relationships. Our All-Purpose Prewritten Photographer Scripts cover so much ground and can be used in countless formats ranging from client emails, social media posts, blog posts, welcome packets, brochures, and more.
I love how you can use this prewritten photography text in so many ways!
Don't forget about some of the samples located at the bottom of this description.  
All Pre-written text is sent to you immediately after purchase.
File Format: Word Documents & PDFs.
Each Script can be completely customized to your studio!
To help you navigate this product, we wanted to provide you with a straightforward breakdown. When you open up the main folder, you’ll find a series of folders for each niche of photography. Each of these folders contain text documents that can be copied/pasted wherever you’d like. In some you’ll see highlighted sections. These are parts where you must fill in the blank to personalize the text. You can also tweak the language however you desire. How’s that for flexibility?
You're absolutely going to love this prewritten text to use on your photography website. You can use prewritten text on your website, emails, brochures, blogs, about me sections and more! All you have to do is fill in the blank and copy and paste!
Check out some of the areas that we go over within this product...
About Me: This is a prewritten biography/intro to your business. These are written to be relatively non-specific, so feel free to color them with bits of information about yourself. Make sure to fill in the blanks, as well. These are great for brochures, welcome packets, and “About Me” sections on your website.

FAQs: Most niches have a list of commonly asked questions in that particular field. Some questions are repeats, naturally (every photog client, no matter the niche, wants to know how long it’ll take to get their images), but otherwise they’re pretty niche-focused. Again, these are great for brochures, welcome packets, and websites. You can also post one FAQ at a time to your Facebook page as a conversation starter, or even in your Instagram Stories (we recommend making them a permanent highlight).

Helpful Guides/Articles: These guides run the gamut from “Wearing the Perfect Outfit” to “What You Should Know About Your Session” to “Why Do I Need an Engagement Photographer?” to “When Should I Schedule?” These can be drafted into blog posts, posted onto your Facebook page, or added to welcome packets or brochures. You can also incorporate tidbits into Instagram stories.

Niche Intro: This is a bit of text you can put before you share your pricing or send your pricing over. It explains the process of what you cover and other details the client would need to know! However, it does not include the actual pricing lists. Just the text you would preface the pricing with.

Print and Product Guide: This is simple, straightforward text that outlines different products. Feel free to copy/paste directly or tweak as needed.

Really, there are no limits with how you use this product! Just remember that anytime you need to write something, you always have this handy, comprehensive product to pull from!
Only here’s the thing — you actually don’t have to write all those things. Why? Because we hired Wendy Rose Gould, a writer and photographer, who already did it all for you.

  1. Copy/Paste the document
  2. Fill in a few blanks and tweak however you desire
  3. Email, post, create a brochure or packet, etc.

Yup, it’s literally that easy!

About the writer: Wendy Rose Gould is a freelance lifestyle reporter and photographer based in Phoenix, Arizona. She received her degree in journalism from Franklin College of Indiana and, after a quick stint at a small newspaper, decided to take her writing career into her own hands. She's now a nationally recognized reporter who covers lifestyle topics for websites like NBC, Allure, Total Beauty, PopSugar, Huffington Post, and BravoTV among others. Her ability to break down complicated topics in a conversational way, and her ability to provide high quality photos alongside some of her reporting, sets her apart in a very competitive industry.


What's Included:

All FAQ include the questions with prewritten answers.
() indicates how many different versions there are to pick from.
Session Intro Scripts are what you send when you send them your pricing – See samples below.

Here’s all the text scripts you’ll receive:

Birth
Birth Session Intro (2)

Maternity
6 Ideas for Your Gender Reveal – Article
Gender Reveal Session Intro
Maternity Session Intro (4)

Newborn
Newborn FAQ
Newborn About Me (2)
Newborn Session Intro (4)

Milestone
Milestone Session Intro (2)

Boudoir
Boudoir About Me
FAQ
Mini Boudoir Session Intro
What is Boudoir Photography – Article

Children
Session Intro (2)

Family
Session Intro (2)

Corporate
Corporate Session Intro (2)

Engagement
Engagement Session Intro (3)
When to Schedule An Engagement Session – Article
Why Do I Need An Engagement Session – Article

General Portraits – For the photographer who shoots a variety of niches
FAQ
General Portrait About Me – (4)
General Portrait About Me (Male)
How to Make Your Session Fun – Article
What to Know About Your Upcoming Session – Article
What to Wear – Article (2)
Why Book With Me (2)

Mini Sessions
Mini Session FAQ’s
What is a mini session? – Article
5 Easy Ways to have Your Mini Session Go Off Without a Hitch – Article

Pets
Pet Session Intro (2)

Print & Product Descriptions
A La Carte Items

Senior
FAQ’s for Senior Session
Senior About Me (3)
5 Tips for the Perfect Outfit – Article
How To Be Prepared For Your Senior Session - Article
Senior Session Preparation – Article
The Perfect Outfit - Article
Senior Boy Session Intro (2)
Senior Girl Session Intro (2)

Senior Rep
Senior Rep Intro
Meet the Senior Reps (7)
Senior Rep Application
Senior Rep FAQ’s
The Perks of Being a Senior Rep – Article
How To Get More With Our Senior Rep Program – Article
What Is A Senior Rep Program? – Article

Special Events
Special Event Session Intro (2)

Wedding
Wedding About Me (2)
Wedding FAQ’s
5 Items To Check Off Your Photography Checklist – Article
6 Tips & Tricks For Your Wedding Day – Article
10 Tips For Your Wedding Day – Article
Helpful Photography Tips & Tricks For Your Wedding Day – Article
Must Have Shot List
Wedding Day Coverage Options
Wedding Package Intro (2)
What We Catch On Your Big Day – Article
Why Should You Book Us To Shoot Your Wedding (2)

Wedding Team
Wedding Session Intro
Wedding Team About Us

Samples:

Here's a few samples of what would be included in the FAQ section - now this is just a few items from the full list of FAQ's - not the entire FAQ.
Wedding FAQ (Entire FAQ not shown)
Can I hire an additional photographer to shoot our wedding?
The contract you sign states that (Insert Your Studio Name) photographers are the only photographers allowed to shoot on your wedding day. This helps promote our creativeness and ensures you get the best photos. We do offer additional shooters depending on the photo package you choose. As long as guests do not infringe upon our space, they can take pictures with their cameras/phones.
Do you provide customized packages?
Not all weddings are the same -- we get it! For that reason, we may provide a customized wedding package to suit your needs. These customized packages are for weddings that are far outside the norm (for example, a very short, intimate wedding between only parents and the bride/groom). Talk to us and we'll make it work!
How long does it take to get my pictures?
(Insert Your Studio Name) works diligently to edit your photographs and get them to you in a timely fashion. Our typical delivery rate runs between four weeks during the slower season and up to two months out during our busiest season. We want to make sure every image and product is perfect!
Newborn About Me Sample:
I know exactly what you're feeling. Well, maybe not exactly, but I do know that I can relate. As a mother of two -- ages 1 and 3 -- I've been exactly where you are standing in this journey we call motherhood.

Whether you're a brand new mommy, have a mini-you percolating inside or already have one walking/talking toddler, this fact remains the same,: photographs of your little one are true gifts that are forever cherished. From maternity photos showcasing your pregnancy glow to documented birthing sessions, milestone photographs and beyond, every single moment in your child's life is worth preserving.

As I mentioned, I'm a mother to two wonderful children; two beaming lights in my life that I can't imagine living without. I'm also a wife to my incredibly supportive husband.

In addition to our nightly bath time regimen and strolls around the park, we love working in our backyard garden, which houses plump and juicy tomatoes, green and red bell peppers, a variety of savory herbs and even blackberries. I'm telling you, nothing is quite as delicious or fulfilling as a home cooked meal incorporating produce that you've grown from seed. And a garden certainly comes in handy when the last thing you want to do is head to the grocery store after a tiring day!

Of course, photography is another one of my greatest passions. My forte, if you will, is maternity and newborn photos. There's just something so rewarding about capturing precious moments that are too easily forgotten without a camera. Not to mention the abundance of adorable chubby legs, elated toothless grins, tiny toes and tufts of soft hair I get to see on a regular basis. And that gorgeous look a pregnant woman has about her? Oh how it makes for some of the most radiant photographs of herself she'll ever own! It's as if a tiny light has illuminated her from the inside out for all the world to see.

Gardens, children and photography aside, I also love diving into a good book once the kids are to bed. I'm particularly fond of historical novels, but I love a good adventurous read, as well.

If you have any other questions or want to learn more, don't hesitate to reach out. I'd love to talk with you!
Children Session Intro Sample:
Your kiddos are your world and heaven knows that changes in the blink of an eye. Those precious curls on Sally's head? They won't last forever. That adorable face that Max always makes? He may move on to different expressions. Those tiny fingers? That sibling affection? The chubby cherub cheeks and shy grin? If only you could freeze all those little quirks in time… but wait! You can! With a children's portrait session, of course.

Children's photography sessions are always a good time. I love bringing out a child's personality -- no matter how young he or shy might be.

Typically, one of a parent's biggest "fears" when it comes to a child session is a.) forcing their child into something they don't want to do and b.) having a child not participate in the session at all. Let me qualm your fears.

First, my sessions are fun and I've got a number of tricks up my sleeve that'll make sure your kiddo wants to be there. Second, if your child, or children, are having a terrible, horrible, no-good, very bad day (hey, it happens!) we'll just reschedule -- no cost to you -- and make it work at a time that's convenient for both of us.

In other words: no matter what, we are going to work together to capture your kiddos on camera.

https://bp4uphotographerresources.com/

Share this article

Tips for Doing Natural Light Headshots and Portraits

#photographyhobbyist  #photographybestoftheday #photographyforever

You may think that headshots are just like portraits or perhaps think that they are only best photographed in a studio space. Thankfully, natural light headshots can help you to achieve the perfect look and portraits for your clients.
Both indoors and outdoors, natural light will give you a more organic and authentic feel to your client’s headshots. Making the photos more personable and versatile when it comes to using them on social media, resumes, or the like.
Natural light headshots - portrait of a man in cactus setting
Using natural light allows you to create headshots with a more authentic feel.

Advantages of Natural Light Headshots

While studio headshots are the more traditional route for this style of photography, natural light will offer more options as far as backgrounds and lighting than you could ever imagine.
Photographing in natural light gives you more mobility to go from indoor to outdoor without fussing with setting up or tearing down a whole set.
Natural light headshots - two photos of a lady indoors and outdoors
Natural light gives you the opportunity to photograph your client both indoors and at outdoor locations.
You also have the opportunity to photograph your client more organically and more authentically than a traditional headshot in a studio light setup. These types of headshots are growing in popularity since they can be versatile for social media and online profiles.
For example, a wedding decorator actually decorating an event can be a great optional headshot since this way her clients can see her working the event, in addition to the waist cropped headshot.
Natural light headhshots
Photographing your client in natural light helps to create more authentic and real shots that can be used
for different purposes.
Natural light also helps you choose backgrounds that perhaps you don’t have available or can’t afford in a studio setup. Brick, repetitive lines like stairs, textured concrete, etc., will give your client more options when choosing her headshots.

Photographing Indoor Natural Light Headshots

Your client may ask you to photograph them in the very place where they work, which will most likely be inside. If this is the case, ask them if you can photograph during midday. This ensures that you will get the best possible light entering their office or building.
Natural light headshots - two portraits of ladies
Using elements already found inside near large windows can offer subtle backgrounds without
distracting from your client.
When you are photographing headshots it’s very important to keep your background in mind. Look for evenly dispersed, soft light and a neutral background. Headshots are meant to put the focal point of the photo on the person’s face. Neutral backgrounds help to isolate your client and keep the focus on them. This is one advantage of photographing inside.
Ideal backgrounds where natural light is abundant can include office building lobbies, large windowed offices with lounge seating, plain neutral colored walls, rooms with an interesting pendant or incandescent lighting.
Natural light headshots
Using natural light and combining it with the ambient light in the building can give the portrait a more
interesting look.

Photographing Outdoor Headshots

If your client has asked you to photograph them at their workplace, don’t feel pressured to only photograph them indoors. Most often office buildings will have beautifully manicured gardens, atriums, or lawns where you can photograph your client’s headshots.

Choose the background wisely

Try to steer away from too busy a background, though, as this can cause the background to compete with your client. Photographing your client in the shade is most likely to give you the best results as you don’t want to have blotchy lighting on your client’s face or body.
Natural light headshots
Use neutral backgrounds for your client’s headshots in natural light.
Shooting on location can also offer you other options such as textured walls, patterned walls like a brick wall, solid concrete walls, and staircases. All of which creates a neutral background where you will have an overflow of natural light.   
Natural light headshots
Using different types of backgrounds can give your client options.
One of the best backgrounds that you can use is the pavement. Placing your client on a ladder, crate, or having them crouch down will help you get the right angle so that the pavement becomes an even colored background.
If you do use the pavement, place your client close to the edge where the sunlight and shade meet, this will create a natural reflector and bounce light back onto your subject.
Natural light headshots
Using both solid pavement and a manicured garden can offer your client variety.

Add variety

Another advantage to photographing on location is that you can add variety to the session without being limited. Photograph your client with a textured background and then try a solid background.
Even though placing your client in the shade is ideal, you can also use the sunlight as a hair light or to light parts of the background to create more depth in the image.
Natural light headshots
Depending on where you place your client, you can choose how you want to light the headshot. More 
light or with more drama.
Depending on what your client intends to use the headshots for, you may even try facing your client towards the setting sun.
Natural light headshots
Facing this model towards the sun gives his headshot a different look.
One more advantage of on-location headshots is the option of bringing props for your client’s headshot. For example, if they are a photographer, they can bring cameras. Or if they are a travel writer, they can bring suitcases. Or a fashion blogger with accessories.
All of these, with the various backgrounds work well to create the perfect headshot for your client.
Natural light headshots
Natural light headshots can give you the option of using props to create a more stylized portrait.

In Conclusion

Natural light headshots
Using props can also enhance the effect of your client’s headshots and portraits.
Given that you are using natural light as your main source for your client’s headshots and portraits means that you will be able to offer more variety to your client. This is a great advantage because it can give your client the chance to use the photographs for different purposes.
Furthermore, your client will have more natural and authentic headshots versus more traditional studio headshot, which is becoming more and more popular as well.


Read more from our Tips & Tutorials category


Jackie Lamas is a destination wedding and portrait photographer based on the beautiful beaches of Puerto Vallarta, Mexico. She earned her degree in photography from California State University, Fullerton. Jackie has over 10 years of experience as a professional photographer and teacher. When she’s not on the beach, you can find her writing on her blog and spending time with her baby and husband. See more of her work on Instagram.

Share this article


Good morning and thanks for stopping by.  This blog is dedicated to 35mm photography...but, I know some of you have channels on the YOUTUBE website where you display some of you photos.  I want to introduce you to a young (18 years old) entreprenuer who has grown her channel to over 1 million subscribers in just two years.  Here's how she did it. Enjoy.


How 18 Year Old Alivia D’Andrea Grew a Million Subscribers in Two Years: The YouTube Power Hour Podcast 165

#photographyhobbyist  #photographybestoftheday #photographyforever


“You can’t go wrong when following your heart. Start with that.”
Don’t miss out on my last live bootcamp! Add your name to the waitlist for the upcoming YouTube Bootcamp now to ensure you grab your spot!
You’re definitely not too young or too old to make your voice be heard and build an impactful brand on YouTube! Don’t take my word for it – flexibility and fitness YouTuber Alivia D’Andrea shares her heart-centered approach to blowing up on YouTube! The icing on the cake is: she’s only 18 years old – you’ll want to listen to this one right now!

This powerful young woman is only 18 but she’s a total giant, and it’s not even because she’s grown to over 1 million subscribers in 2 years. It’s because she’s using her platform to impact people and spread the message of self-love, self-acceptance and being of service to others. She started YouTube out of a desire to want to help and connect with people and stuck with it when all of her other friends gave up on their channels. When she found that more people were resonating with her flexibility and fitness videos than her beauty videos, she dove into flexibility with both feet. That commitment to her purpose drove her and her channel to new heights.
“People like to see vulnerability because we like to see our sorrows echoed into the lives of others.”
Alivia is in her freshman year at the University of California Riverside and the future before her is already very bright. I can’t wait to see what more she will create in the world. In this episode, you’re going to learn about the power of vulnerability and how she uses it as a magnet to bring people to her. You’ll also get some great tips and examples on how you can build your own heart-centered brand.
“Find the intersection of doing what you love while at the same time being in the service of others.”

Alivia’s Favorite Items Mentioned in The Podcast!

Resources
My favorite free SEO tool for YouTube: TubeBuddy
(Discount code ErikasBuddy for 20% off the paid version)
PR Guide: How to Get onto PR Lists and Get Lots of Free Product
Getting Started on YouTube: The #1 Downloaded Free Niche Discovery Workbook

Connect with Alivia
Alivia D’Andrea on YouTube
Alivia D’Andrea on Instagram
Alivia D’Andrea on Twitter
Alivia D’Andrea on Pinterest
Alivia D’Andrea on Spotify

Facebook Group:
Don’t forget to sign up for our FREE Facebook group if you are a YouTube content creator or you are thinking of starting a channel!

Podcast Music Credit: Boop by x50 @x50music
Music provided by Free Music for Vlogs youtu.be/o52xQkQWzyU
Author: Erika Vieira
Marketing and sales expert Erika Vieira is the host and producer of the #1 influencer strategy podcast, Beauty and the Vlog. The podcast, with over 100 episodes and hundreds of thousands of downloads is dedicated to content creators who are looking to start, improve and grow their unique influence online. Erika works with influencers on personal branding, content improvement and defining a niche via customized strategy sessions, channel critiques and business support. She also loves makeup, beauty and her family and believes anyone who has the drive and passion can find success online. Feel free to send her a message here.


Saturday, February 9, 2019


teach a moms photography class

How to Teach Photography

What to Teach in a Photography Workshop


We’ve just released a new photography curriculum designed for teaching a mom-tography class. We provide the lesson sheets, instructor notes, sign-in sheet and matching PowerPoint template featuring an outline of the class. This curriculum was designed especially for moms and includes basic information on the following topics: camera gear, exposure, camera settings, lighting and composition. 
Sign Up for Your FREE Guide

How to Teach Photography
This curriculum does not cover the business side of photography. Its purpose is to teach moms how to use their camera to take better photos of their kids in between their professional photo sessions. Files are layered .psd files so you can edit text, insert your logo/studio name and images. All text is included for you to use. We provide images, but recommended that you replace them with your own photos for marketing purposes. We’ve found that teaching the class can be a great way to get new clients.  
 
What is included: 
 
*Curriculum for teaching a mom’s class (12 pages of layered .psd lesson files including cover, so you can change colors/background and insert sample photos to match your branding
*Matching PowerPoint Presentation outlining the class (upload and insert your logo)
*3 pages of basic instructor notes
*All professionally written text and photos for you to use
*Student Sign-in Sheet
*Basic instructions for editing in Photoshop and list of fonts used.
 
Click here to purchase your Basic Digital Photography Curriculum for Moms today.  Use code "momblog20off" to get 20% off this item. 
Courtesy of: Magazine Moma

6 SECRETS TO NEWBORN PHOTOGRAPHY

FREE PHOTOGRAPHY GUIDE
In my FREE photography guide, I'm going to show you how to take your newborn sessions from stress to success in six simple steps.

Crack the Code . . .

Hey there, my name is Jenni Maroney and I went from super stressful 4-hour newborn sessions to sessions that are less than 2 hours start to finish (even with toddlers).
The best part? They're crazy easy, stress-free for myself and my clients, and HUGE money-makers.
Want to know how I do it? Download my FREE newborn guide and I'll show you.

Sound like something you need? Sign up NOW!

https://jenni-maroney.mykajabi.com/free-newborn-photography-guide