Saturday, April 5, 2014

The Konstruktor DIY Camera Super Kit – A Review

konstruktor-diy-camera-kit-review-diyphotography-001
I’ve written before about what shooting film means to me, and I almost always have a film camera in my bag alongside my digital arsenal. I find it relaxing. In many ways it becomes something of a ritual for me. Loading the film. Advancing the frames. Resetting the counter. Taking my time. Doing my best to make every frame count. Don’t even get me started on barricading myself in the darkroom for hours on end. I know that a lot of photographers talk about “making” photos rather than “taking” them, but nothing brings that sentiment home for me more than shooting film. Thankfully, there are legions of photographers out there who still enjoy shooting film– even if just occasionally– which means that there are still companies catering to our need for the film experience. One such company is Lomography, a website dedicated to cameras, films, lenses, and accessories. I recently had the chance to build and test their Konstruktor DIY Kit.
konstruktor-diy-camera-kit-review-diyphotography-002

Specs

  • 35mm film
  • 50mm prime lens
  • f/10 fixed aperture
  • Two shutter modes. N (1/80s, assuming proper assembly) or B (Bulb for long exposures)
  • Adjustable focal length (0.5m, 1m, 2m, Infinity)
  • Magnifying Chimney Hood Kit
  • Close-up and Macro Lens Kit (15cm focal distance on Close-up and 5cm on Macro)
  • Konstruktor brand plate and stickers to personalize the look of your camera
konstruktor-diy-camera-kit-review-diyphotography-003
Fully assembled, with standard vertical viewfinder hood.

Assembly

The last time I built a camera kit, the printed instructions were basically useless, so I was very pleasantly surprised when I opened the Konstruktor box and found high-quality, (mostly) easy-to-follow assembly instructions. While technically the kit does come with everything you need to put the camera together, I would suggest making sure you also have a small flashlight and a tweezers on hand. The spring that connects the shutter mechanism is so small and attaches in such a tight place that it’s almost impossible without them, particularly if– like me– you have big hands.
Here’s another tip. The kit includes at least three different sizes of some of the smallest screws you’ve ever seen, and it’s often difficult to tell one from the other in the diagrams. Unfortunately, they are all packaged together in the same bag. I’d suggest separating them before you start putting the camera together. They are close enough in size to each other that using the occasional wrong screw isn’t the end of the world, but my finished product does have a slight flaw which I’m pretty sure is because I used the wrong screw.
Despite the minor setbacks along the way, the Konstruktor was really not that difficult to assemble. The front of the box tells you it will take 1 – 2 hours, but if this is your first time assembling a camera kit you should probably expect it to be closer to the 2-hour mark.
With optional Magnifying Chimney Hood.

Impressions

For a plastic camera, the Konstruktor has a very solid build. Unlike other camera kits I’ve seen, this one was designed with excellent attention to detail, particularly where moving parts like the lightbox and focal length adjustment on the lens are concerned. While most camera kits give you tips on estimating the film advance (e.g., “turn the dial one and a half times”), the Konstruktor has an actual frame counter which works rather accurately, assuming you remember to reset it when you load a new roll of film.
konstruktor-diy-camera-kit-review-diyphotography-005
The vertical viewfinder will take some getting used to for photographers unfamiliar with them. For starters, everything is flipped horizontally 180 degrees. Right becomes left, left becomes right, and it’s going to take a brief adjustment period to get comfortable with it. Some photographers may also find it a bit restrictive in terms of shooting angles. While this type of viewfinder can be a bit frustrating at first, stick with it. You’ll be glad you did. While I’m on the subject of the viewfinder, I should also point out that the optional Magnifying Chimney Hood not only provides magnification, but also does a great job of shielding the viewfinder from the inevitable glare that makes getting a good look at the image difficult, particularly on a sunny day.
konstruktor-diy-camera-kit-review-diyphotography-007
Since everything about this camera is manual, the mechanism for raising the mirror is no exception. Placed to the left side of the lens where you are probably used to finding the auto-focus switch on your DSLR, a small lever is used to lift the mirror into position after each shot. Don’t worry about forgetting– you won’t be able to see anything through the viewfinder if you don’t raise the mirror.
Mirror reset lever.
Don’t forget– 1/80 is a pretty slow shutter speed. I’m not going to say you can’t hand-hold this camera at 1/80, but you may want to take advantage of the standard tripod mounting hole on the bottom of the camera. I did laugh for a minute when I realized I had a $35 camera sitting on top of a $300 tripod, but you do what you gotta do.

Options

It’s worth pointing out there that we tested the Konstruktor Super Kit, which includes the camera and Magnifying Chimney Hood, as well as the Close-Up Lens & Macro Lens kit. All three are also available individually. While I found the close-up and macro lenses to be nice additions to the kit, it’s really the magnifying hood for the viewfinder that I find to be indispensable.
Optional Magnifying Chimney Hood, Close-up & Macro Lens Kit.

Sample Photos

konstruktor-diy-camera-kit-review-diyphotography-013
konstruktor-diy-camera-kit-review-diyphotography-014
konstruktor-diy-camera-kit-review-diyphotography-015

Wrap-Up and Recommendations

Like I mentioned earlier, I’ve built a few camera kits over the years, with varying degrees of quality and success. The Kontruktor is, by far, the best of them all. It’s important to point out, though, that there is a bit of a learning curve. I’ve been shooting film for a long time and my first couple of rolls with the Konstruktor were disasters. Okay…maybe not disasters, but certainly not what I expected. If this happens to you DO NOT be discouraged. We’re talking about something you put together with your own two hands at the kitchen table, not a precision marvel of modern science that was assembled on a sterile assembly line in a “white room” half-way around the world. Cut yourself some slack and enjoy the experience for what it is– getting back to basics and creating something.
For more information about the Konstruktor DIY Camera Kit and other Lomography products, be sure to check out Lomorgaphy’s website.
[Konstruktor DIY Camera Kit $35 @ Amazon | B&H]

Friday, April 4, 2014

Self-portrait of John Lennon and his Rolleiflex in 1967

Self-portrait of John Lennon and his Rolleiflex in the attic of his house Kenwood, June 29, 1967. (via Images&Visions)

Marilyn Monroe with a Rolleiflex

These photographs were taken by John Vachon during the 1953's summer in Canada, where they were filming a movie, it belonged to the magazine Look and was given to the USA Library of Congress in 1971. Marilyn is holding a Rolleiflex 3.5A or MX.


Celebrity Portraits with Nikon Film Cameras

Following an old article Marilyn Monroe with a Nikon F, here's a collection of celebrity portraits holding a vintage Nikon camera on their hands.

Benny Andersson (of ABBA) with a Nikon F2

Brad Pitt with a shockingly cavalier attitude towards correct camera handling etiquette

Emma Bunton (aka Baby Spice) with a Nikon F

George Harrison with (left to right) A Nikon F, A  Kodak Retina IIS and his Rolleiflex

Jack Lemmon with a cigar, a slightly manic grin and an Nikon F

Jackie Stewart with his Nikon F "Helmet Cam"

Kristen Stewart with Nikon F2 Photomic

Mia Farrow with a Nikon Photomic F

Michael Jackson with a Nikon Nikkormat FT by Araldo di Crollalanza (1978)

Muhammad Ali and a Nikon F Photomic Tn with the F36 motor drive by Howard Bingham

Roddy McDowall (as Cornelius from Planet of The Apes) with a Nikon F

Roger Moore (as James Bond) with his camera rocket launcher from the 1974 film The Man With the Golden Gun. Looks like it’s a Nikon F

Film Photography Day 2014 Photowalk

Home > Melbourne > Free | Fun Things To Do | Photography | Unusual Events | Walks
by Vicky Rae Ellmore (subscribe)
Proudly South African. Currently residing in amazing Melbourne. Lover of music, reading, animals and exploring. Vet nurse student/freelance writer and editor. alphabetsushi.com
Event:
Swop the camera phone for film - it's Film Photography Day
12 April is Film Photography Day and Lomography Australia has organised a two-hour photowalk in Melbourne for the occasion.

Lomography, Australia, Film Photography Day, 2014, photo, Melbourne, photowalk, Fed Square, copyright, Vicky Ellmore
Time to restock on film! Film Photography Day and a photowalk around Melbourne are on their way (image copyright Vicky Ellmore)

It's a great opportunity to meet other analogue aficionados and to get their perspective on the perfect shot, as well as to learn more about shooting with film if you've new to the world of analogue photography. It's also just a good excuse to go out and shoot some of Melbourne's spectacular surrounds – not that an excuse is needed! And, new friends are sure to be made – you might even stumble across a new photo buddy.

Lomography, Australia, Film Photography Day, 2014, photo, Melbourne, photowalk, dog, walkies, copyright, Vicky Ellmore
A film photowalkies (image copyright Vicky Ellmore)

Improve your photography and meet other keen photographers
Film has risen in popularity in recent years and there is a good reason why – it's fun, creative and epitomises free expression. There is something about waiting to find out what you've captured and not being able to delete and retake a shot that makes it more exciting. The cameras themselves are beautiful and the captures' colours are bright, with light effects and imperfections recreating the atmosphere of the exact moment.

Lomography, Australia, Film Photography Day, 2014, photo, Melbourne, photowalk, Auction Rooms, cafe, copyright, Vicky Ellmore
Celebrate the love of analogue photography with like-minded 'lomographers'! (image copyright Vicky Ellmore)

Starting at 11am at the Nicholson Street entrance to the Royal Exhibition Building in Carlton Gardens, the Lomography Australia Film Photography Day Photowalk is the perfect way to spend Film Photography Day – celebrating the love of analogue photography with like-minded 'lomographers'. The instructions are to bring your lomography camera, film and lots of analogue love.

Register your attendance by April 10 by emailing melbourne@lomography.com.au.

Thursday, April 3, 2014

Creative Portrait Photography Course

undefined
You will learn tips and techniques of different aspects of the photgraphic portrait and you will apply them into practice to best apprach your subject and achieve the desired result. Exploring the work of famous portrait photographers you will be challenged to think and work creatively by making the best use of your camera.

About the tutor

Eva was born in Greece. After she was awarded a Greek State Foundation scholarship she moved to UK to complete a PhD in Arts and Communication at UCA. She is a qualified teacher holding a PGCE teaching certificate from the University of Brighton. She is currently working as a fine art photographer and photography tutor. In her artistic practice she is not using the photographic medium to produce a record and a document of the world, which is what we usually expect to see in a photograph. She is using it to question the nature of photography and to cause a tension in what we are looking at. She is playing between representation and abstraction. She was selected for the Bloomberg New Contemporaries 2008 exhibition among numerous solo and group shows. www.playingandreality.co.uk/rt

Camera guidelines

  1. Ideally, buy an SLR (digital if you want digital, film if you want film). SLRs are best if you want to really explore, or even just experiment with photography. There are non-SLR compact digital cameras nowadays that take very good quality pictures but certain key features are limited and therefore limit the photographers capacity to be more creative. Having said that many ex-students have completed the course with a compact and been very happy to continue using their compact cameras.
  2. Canon and Nikon are the safest bets. Not because they are necessarily better, but because they are the biggest companies and therefore have a much wider range of lenses, accessories and equipment on the market (this is particularly true if you are interested in exploring the second-hand market).
  3. Try some out in a shop. The most important things are whether you like it, and whether the way it works makes sense. I personally find the menu system in Canon cameras to be extremely user friendly. All the digital SLR manufacturers - Canon, Nikon, Pentax, Sony, Olympus, etc - make cameras that produce very good pictures and, to be honest, all have pretty similar features. Most important is whether you like how it feels in your hand, it's not too heavy or fiddly and if the menu system etc seems to make sense. So go to a shop and ask to play around with a few, and pick the one that 'feels' best (and you can afford!). If you really like the Sony, get the Sony. Photography isn't as much fun if you don't like your camera.

Luna Simoncini - Me and my film cameras

Luna Simoncini is a 25 years old photographer who's living in Macerata, Italy. Her biggest passion is photography for about 5 years ago and since 2009 she has a blog talking about photography, tutorials, analog photography, etc.
"I shoot on film for about 2 years. I started with the Diana F+ and then I started shooting with the old camera of my father, a Nikkormat FTn. Recently I rediscovered the Polaroid and other old cameras of my father as Agfa, Ferrania and Mamiya."
Here are some of her interesting self-portraits with Nikkormat FTn + 50mm f/2 and AGFA 100 B/W film, expired in January 2012


To see more of Luna's work, please visit her blog, Flickr, Facebook, and Tumblr.

Wednesday, April 2, 2014

10 Famous Photographers, and What You Can Learn from Them!

Photographers today can learn much from the famous photographers that have paved the way before us. Most of these photographers are now deceased, but a few of them are still taking beautiful photos today. Obviously, this is not an exclusive list. The list is composed of a few famous photographers that were nominated by the Improve Photography community on their Facebook fan page.

Henri Cartier-Bresson

This list of famous photographers would be absolutely meaningless without Cartier-Bresson. In many ways, Cartier-Bresson’s style is precisely the opposite of Jerry Uelsmann. Where Uelsmann elished in creating composites, Cartier-Bresson did not even like developing his own photos. His photojournalistic style has done more to influence photography than any other photographer’s contribution. He was one of the first photographers to switch over to the 35mm format and used exclusively Leica cameras with 50mm lenses. Like Ansel Adams, he shot almost exclusively in black and white. You can see Henri Cartier-Bresson’s work here.

Henri Cartier Bresson - Hyeres, France, 1932.

What you can learn from Henri Cartier-Bresson: The great tragedy of Cartier-Bresson’s photography is that he gave up the craft entirely long before he died. In 1975, twenty-nine years before he died, he became bored with photography and turned his attention to painting. He locked his camera in a safe in his home and rarely even took it out. Bottom line–DO NOT let this happen to you! If your goal in photography is to do anything other than enjoy it, then you will likely burn out after time.

Annie Leibovitz

Annie Leibovitz is a contemporary (born in 1949) portrait photographer who is well known for her work over the years with Rolling Stone Magazine and Vanity Fair. Perhaps her best known photograph is a portrait of John Lennon with Yoko Ono, which was taken the same day that John Lennon was murdered.

Recently, Leibovitz has found herself struggling through financial disaster caused by poor financial planning. As collateral for a contract, she has provided her entire portfolio of images. What a shame!

As is evident in viewing Ms. Leibovitz s photography, she prides herself in taking intimate portraits which communicate about the subject. She is quoted as saying, “A thing that you see in my pictures is that I was not afraid to fall in love with these people.” You can see some of Annie Leibovitz’s photography here.

Leibovitz's portrait of John Lennon and Yoko Ono in 1980.

What you can learn from Annie Leibovitz: Your portraits will always look lifeless until you begin to take portraits that communicate the life of the model. Get to know your model and say something about her in your photography.

Ansel Adams

I think it would be safe to say that Ansel Adams is the most famous photographer of all time. Even non-photo nerds know Ansel Adams and have seen his stunning landscapes. Adams is well-known as a master of the darkroom. His black and white landscapes of Yosemite and Grand Teton are outstanding for the captivating contrast that he achieved with extensive dodging and burning in the darkroom. Even later in his life, he continued to use large format cameras.

Ansel Adams - The Tetons and the Snake River, 1942.

What you can learn from Ansel Adams: While on vacation this summer, my wife and I read a book containing his letters and journal entries. What helped me improve my photography from reading those letters is that Adams felt trapped later in his life because he no longer had the physical strength and stamina to do the photography that he wanted to do. Keep yourself in shape so you can enjoy photography for a lifetime.

Brian Duffy

Brian Duffy is an English photographer best known for his work shooting fashion in the 1960′s and 1970′s.

Later in life, Duffy lost his interest in photography and even burned more than half of his entire portfolio of negatives in a fire. Fortunately, some of the photos were saved from the flames and remain on exhibit today. One year before Duffy died, he began taking photos again.

Brian Duffy - Pret a Porter Sept 1977.

What you can learn from Brian Duffy: People are prone to rash decisions when they feel stuck in a rut. Duffy lost a tremendous part of his life by burning his photos, but he came back later and regained his interest for the art. If you find yourself bored with photography, leave all the gear at home and simply go on a few photowalks in places where you have never been. Fall in love with photography again.

Dorothea Lange

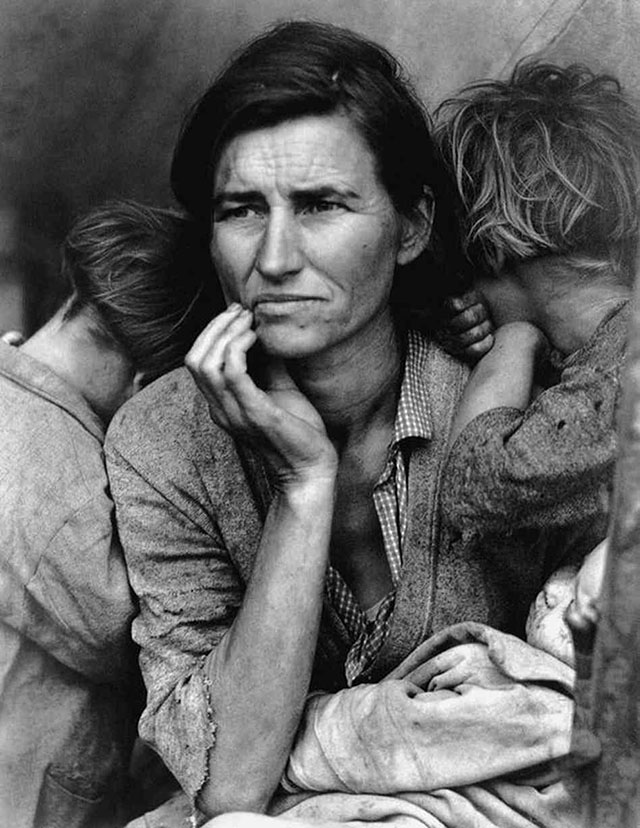
Dorothea Lange was an American photojournalist who is best known for her photos of the Great Depression. Her photo Migrant Mother is one of the most well-known pictures in history. Aside from her well-known work documenting the Great Depression, she also worked tirelessly to photograph the internment camps in the 1940′s.

Dorothea Lange - Migrant Mother. Nipomo, California, 1936.

What you can learn from Dorothea Lange: Most photographers spend their time taking one random picture here, and another random picture there. Great photographers like Dorothea Lange dedicate their time and talent to fully capturing one theme or person before moving on to the next photography project. Dorothea Lange said, “Pick a theme and work it to exhaustion… the subject must be something you truly love or truly hate.”

Yousuf Karsh

I’m going to be honest here. I have carefully selected some of the best, in my opinion, photographers in history; however, I simply don’t understand some of their photos and why some of them became famous. With Yousuf Karsh, every single photo is a masterpiece. You can’t look at any one of his photos and wonder why the photographer got famous. His portraits truly speak volumes about the person. He is the Ansel Adams of portraiture.

Karsh is quoted as saying, “Within every man and woman a secret is hidden, and as a photographer it is my task to reveal it if I can. The revelation, if it comes at all, will come in a small fraction of a second with an unconscious gesture, a gleam of the eye, a brief lifting of the mask that all humans wear to conceal their innermost selves from the world. In that fleeting interval of opportunity the photographer must act or lose his prize.” Many photographers claim to capture such moments, but Karsh truly had a gift for taking portraits that communicate. You see one of his portraits and you feel like you truly understand the model.

Another interesting fact about Yousuf Karsh is that he always lit the hands of the subject separately from the lighting on the rest of the person. He felt that the hands were a vital part of the story of any portrait. You can see photos from Yousuf Karsh here.

Yousuf Karsh portrait of Winston Churchill on cover of Life magazine, 1941.

What you can learn from Yousuf Karsh: Never take a portrait that doesn’t speak something about the person. Pay attention to the hands as an important part of the story. Be super famous and rich enough to own a 76-room house in Manhattan. Accomplish any of those things (especially the last one, which is true about him) and you’ll be better off for reading about his life.

Brassai

Brassai, whose real name is Gyula Halasz (no wonder he picked a nickname), was a photographer best known for his work on the streets of Paris. He did not photograph celebrities or have fame or fortune like many of the other famous photographers listed here. However, his street photography showing ordinary people has made him famous throughout time.

Brassai - The Eiffel Tower at Twilight, 1932.

What you can learn from Brassai: I often hear from photographers that they enjoy photography, but don’t have the money to travel to find great locations. Brassai was born in Hungary, but lived in Paris for most of his life. He did not travel around the world to do photography or have celebrities come to him to have their portraits taken. He did his work in one city and he took captivating photos of ordinary people. Don’t use excuses for your photography!

Robert Capa

Robert Capa is best known for his war-time photography. He worked tirelessly to cover five different wars, including World War II. Capa was one of the co-founders, along with Cartier-Bresson, of Magnum Photos.

Not only was Capa a great photographer, he was also a fantastic business man. His name is actually Endre Friedman. He and an associate decided to form a partnership in which he would take the pictures and do the dark room work, the associate would do the marketing and sales, and they would credit “Robert Capa” as being the photographer. They found that they could get a much higher price in selling the pictures to the newspaper if they sold the photos under the made-up name “Robert Capa” and inventing the story that he was a rich man. Fraudulent? Probably. Did it work? Definitely. You can see Capa’s photography here.

Robert Capa - Landing of the American troops on Omaha Beach, Normandy, June 6th, 1944.

What you can learn from famous photographer Robert Capa: Capa is frequently quoted as saying, ”If your picture isn’t good enough, you’re not close enough.” This was significant because he was a combat photographer! He was known for literally getting down in the trenches with the soldiers to take photos, rather than taking photos from a distance as was the common practice. So, get close to the action and your photos will improve!

Jay Maisel

Maisel is one of the most famous modern photographers. He takes a simplistic approach to photography that is largely unencumbered by complex lighting set ups and fancy gear. In fact, he likes to shoot with one lens and simply look for interesting light and shapes in the city.

Perhaps the best way to learn from Jay Maisel is to subscribe to Kelby Training. They have two video courses which feature Jay Maisel where he walks around the city and shoots with Scott Kelby. It is truly fantastic to watch a master do his work. You can see Jay Maisel’s portfolio here.

Jay Maisel - Tree and Goal posts.

What you can learn from Jay Maisel: Ditch the gear and start paying attention to color, shape, and light. As you go about your day, find little things that have an artistic flair to them. Photography isn’t just about the knock-you-in-the-face obvious shots.

Jerry Uelsmann

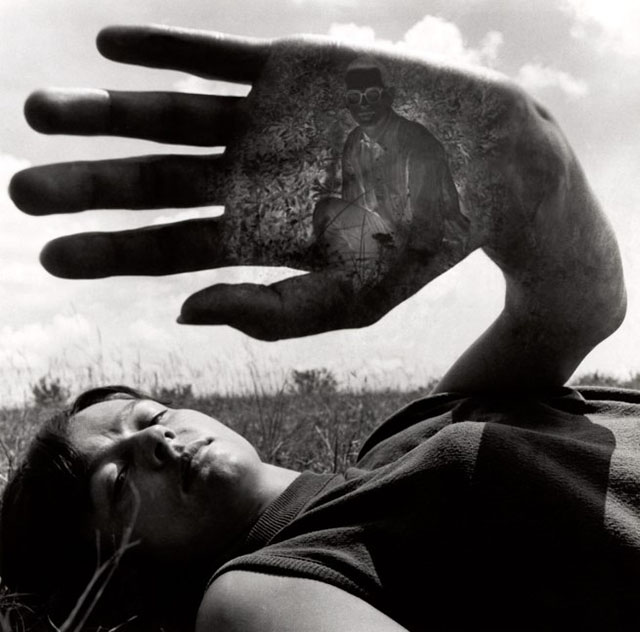
Jerry Uelsmann as established a photographic style using multiple photos to create a surrealistic and impressionist composite image. Born in 1934, he used film for many years and built his works using film cameras. His work became famous mostly for his abilities in the dark room. Few others were capable of creating composites using so many images with such skill. Although Uelsmann is alive today, he never switched to digital cameras. He said, “I am sympathetic to the current digital revolution and excited by the visual options created by the computer. However, I feel my creative process remains intrinsically linked to the alchemy of the darkroom.” You can see Jerry Uelsmann’s photography here.

Jerry Uelsmann - Untitled, 1966.

What you can learn from Jerry Uelsman: Don’t let “photography forum” talk convince you that there is anything wrong with creating surrealistic images. Photography is art and you can express yourself in whatever composited, blurred, cloned, dodged, burned, and liquified way that you want.

15 Film Photography Related Tumblr Blogs You Should Follow

Tumblr is a microblogging platform and social networking website founded by David Karp in 2007. It has become one of the most popular social media sites as of late when it comes to photography. There are many photography blogs on Tumblr, but here we've pulled together a list of 15 Tumblr blogs related to film photography for you to add to your dashboard.


#mediumformat is a Tumblr blog of all things medium format and the like for appreciating this lovely form of photography. The blog is curated by California-based photographer Ani Lynn.

35mmers is a community created around the shared appreciation of 35mm film photography. If you would like to see some of your own work featured on the 35mmers website, then head over here to submit your work.

Analogue Sunrise is a daily photography Tumblr blog related to film photography. Each day photos are hand picked and featured on the blog from their Flickr group. Analogue Sunrise is found by photographer Derek Corneau circa 2010.

BelieveInFilm is the official Tumblr blog of BelieveInFilm.com - an international community of photographers doing awesome things with film photography, helping people find and use film camerasshare photos, share info in their film photography forum and promote film photography projects.

Film is God is a Tumblr blog dedicated to film photography and all things related. It allows its followers to submit their own photography through the blog and their Flickr group. Film is God has a goal to get more people to discover the wonders of analogue. The blog was started by Emily Savill in 2010.

I Still Shoot Film was created by American photographer Rachel Rebibo, is a photography blog dedicated to the art of film photography, sharing inspiring work from photographers around the globe. It also provides a wide array of learning resources, including how-to articles and product reviews. If you're interested in getting started with film, head on over to the Beginner's Guide to Film Photography.

If You Leave was started by London-based photographer Laurence Von Thomas as a place for contemporary photographers to submit their work. With photographs, most of film photography, of a wide variety of subjects and landscapes, the focus is more on the impact of a single image rather than a body of work from those submitting. By now, If You Leave has a following of more than 400K on Tumblr. "My biggest pasion has always been film, it's also my background and I think it shows in my work." - Thomas said in an interview.

In an instant is a daily photography blog showing the beauty of Polaroids. The blog is running by many contributors.

Lomography is the official Tumblr home of the Lomographic Society International. Follow this blog to enjoy fresh lomography snapshots from their community. The Lomographic Society International was founded in 1992 by a group of Viennese students after they discovered the Lomo LC-A camera created by LOMO PLC of Saint Petersburg, Russia.

Only Film Photography is curated by Daniel Espinoza since 2011. This blog is only dedicated to analog photography. If you are a film photography enthusiast, you can submit your best work to the blog here.

Polaroid SF is a photo-a-day instant photography project that stems from a deep-rooted love of all things San Francisco since 2011 by local photographers Bruce Scott and William Westley. They aim to create an analog love letter to San Francisco. "Everything you see is captured through the lenses of vintage Polaroid cameras, no digital enhancements necessary," they said.

Revolog features film photography which are using their own handmade film produces, special effect films for analog photographic cameras. Currently they have ten different effect films which are sold through the webshop. Revolog is founded by Michael Krebs and Hanna Pribitzer in 2010.

The Film Photography Diary is curated by French photographer Ousseynou Cissé. The aim of the magazine is to feed you with good photography, raw talent, simple and creative pieces of work.

The Holga Blog is a blog dedicated to the Holga family. Holgas are known for their vignetting, soft lenses, plastic bodies, and being "pieces of crap." This blog is curated by Adrian Gilliam and Renate Cloud.

The World Through Green Eyes is a blogzine based on the relationship between human and nature. This blogzine was created to give space for new Photographers, to let known their name to the world and to demonstrate their love for the Land. The World Through Green Eyes is for everyone who loves photography and Mother Nature, for everyone who loves to be wild.

And of course, don't forget to follow us on our Tumblr at im.shootingfilm.net.