Thursday, March 13, 2014

Extraordinary Photos of Animals Posed in Human Situations from the 1910's

These photographs were taken by American photographer Harry Whittier Frees (1879–1953), who dressed his cats, Rags and Fluff, as well as the pets (dogs, pigs, rabbits and birds) of his friends and neighbors, and posed them in human situations with props, often with captions.

Those viewing his photography instantly think there is a trick to it. However, Mr. Frees worked in a time in history when tricks in photography didn't exist. The photographer simply had to wait patiently for the shot he wanted. In Mr. Frees' own words, "These unusual photographs of real animals were made possible only by patient, unfailing kindness on the part of the photographer at all times."

His career in animal photography took off at the turn of the 20th century when his pictures first appeared on novelty postcards and calendars. The March 1, 1937, edition of LIFE magazine reatured an article on Mr. Frees titled, "Speaking of Pictures...These are Harry Frees's Lifework". The article explains that Frees's career as a photographer of dressed animals began at a birthday party in 1906, when a paper party hat was passed around the dinner table and landed on the pet cat's head. Harry took a picture and a career was begun! He took others and sold them to a postcard printer, who clamored for more.

In the preface to "Animal Land on the Air", Harry Whittier Frees describes working with his subjects. "Rabbits are the easiest to photograph in costume, but incapable ot taking many "human" parts. Puppies are tractable when rightly understood, but the kitten is the most versatile animal actor, and possesses the greatest variety of appeal. The pig is the most difficult to deal with, but effective on occasion. The best period of young animal models is a short one, being when they are from six to ten weeks of age. An interesting fact is that a kitten's attention is best held through the sense of sight, while that of a puppy is most influenced by sound, and equally readily distracted by it. The native reasoning powers of young animals are, moreover, quite as pronounced as those of the human species, and relatively far surer."

Frees' animal pictures became more elaborate. His exposures were taken at 1/5th of a second and two-thirds of the negatives had to be discarded. He rented his models from neighbors, breeders, and pet shops and said his work was so nerve-racking that he only photographed three months a year. The rest of the time was spent preparing new props, scenes, and situations.


Tuesday, March 11, 2014

La Entrada teacher Janet Gregori keeps her students in the dark(room)

La Entrada School teacher Janet GregoriThe aroma of chemicals emanates from the La Entrada classroom occupied by Janet Gregori. It’s that distinctive smell of developer, stop bath and fixer known to people who are partial to film photography, which she teaches to her middle school students in spite of the digital camera revolution.
“The kids are so fired up to be in here,” she say, standing in the door of the school’s dark room. “They know when it’s their darkroom day. The room can only hold five kids at a time, so they take turns throughout the week.”
Janet has been at La Entrada for 19 years — and teaching school for 23. She was an architecture major at San Francisco State who put herself through college doing before and after school daycare. When she graduated and stopped the daycare job, she found she missed the kids, so after a stint as a social worker, she went into teaching.
“I love teaching and I love helping people and I love art,” she says. “It all comes together for me as an art teacher.”
Janet Gregori_old cameras
There was a darkroom at La Entrada years ago, and the loaner cameras (above) that line the walls attest to that era. When the school was being remodeled, the idea of building a new darkroom surfaced. To get up to speed on the craft of film photography, Janet took some night classes and spent time with a teacher at Hillview School, which had a darkroom.
“When we first started the darkroom, everyone had point and shoot cameras, but the technology didn’t exist for digital,” she says. “Now I teach digital photography as well, but I think there is a certain art form with dark room work that is still very useful. Film can be manipulated in the dark room, and the negatives are archival. There is something amazing about putting paper into developer and having it come to life before your eyes.”
Even before the kids get into the darkroom, Janet believes valuable lessons are learned when you take photographs with a roll of film with just 24 exposures. “A student has to think,” she says. “There’s no easy erase. Each shot has to be planned out.
“I tell the students at the beginning of the semester that they will start to see the world in a different way. Shooting with a film camera helps them become more aware of their surroundings and teaches them that there is beauty in everything.

Photos by Rebecca Flanagan

Monday, March 10, 2014

Find and Share Your Darkrooms with Darkroom Locator


Darkroom Locator is a project born and developed by the people behind analogica.it, the first Italian community dedicated to analogue photography.

This project is completely free and non-profit. The aim of Darkroom Locator is to facilitate and encourage the meeting between film photographers with darkrooms. You can search by postcode to locate facilities nearest to you. For details of hire charges and equipment available, please use the web link or contact the establishment directly.
"We believe that this synergy can only be good for silver-based photography as a whole, enabling and facilitating the exchange of ideas, information and knowledge on techniques and practices related to developing and printing in the darkroom."
The project is off to a great start with quite a few darkrooms already but the more information the directory contains, the more useful it will become. Head over to Darkroom Locator to find and share your darkrooms today.

Sunday, March 9, 2014

12 Cool 35mm Film Cameras to Buy

Whether you're a professional photographer, camera buff, or just want to capture special moments on film, traditional film cameras produce crisp images and rich colors to last a lifetime. Unlike digital cameras, film cameras won't require any computer upgrades or special software. Here's a list of 12 cool 35mm film cameras to buy. Remember that this list isn't exhaustive. There are plenty of other great cameras out there hungry for film. This is simply a sampling of some cameras that may work best for someone just getting into film.

Canon AE-1
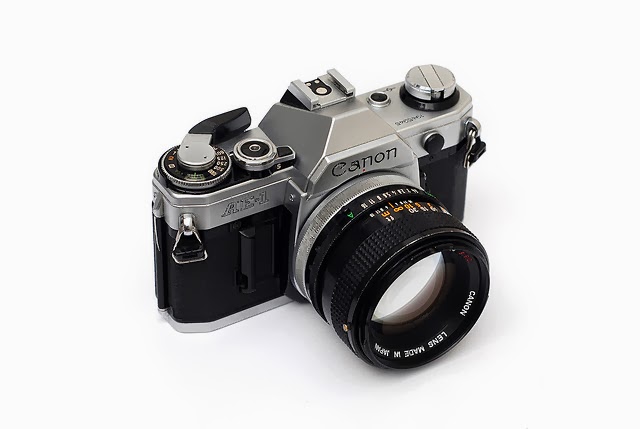
Photo by by Guillermo

First manufactured in Japan in 1976, the Canon AE-1 uses an electronically controlled, electromagnet horizontal cloth focal plane shutter, with a speed range of 2 to 1/1000 second plus Bulb and flash X-sync of 1/60th second. Most of the camera bodies are black with chrome trim, but some are all black.

After its introduction in 1976, the Canon AE-1 quickly became a very popular camera worldwide. Backed by a major advertising campaign, the AE-1 sold over one million units, which made it an unprecedented success in the SLR market.  The AE-1 was replaced a few years later by the AE-1 Program.

The AE-1 has a Canon FD breech-lock lens mount and accepts any FD or New FD (FDn) lens. It is not compatible with Canon's later Canon EF lens mount, though adapters made by independent manufacturers can be found. Original FD lenses, introduced in 1971, did not rotate in the mounting process; instead, a locking ring at the base was turned to attach the lens. This was often criticised as being slower than the bayonet mounts of competing cameras.

Canonet G-III QL17
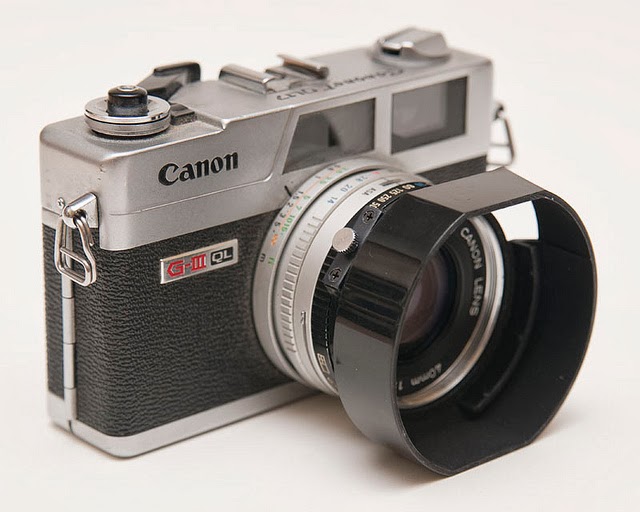
Photo by Symon Chow

The Canonet G-III QL17 is a coupled-rangefinder, leaf-shuttered, fixed-focal-length 35 mm camera first manufactured by Canon in 1972. It features fully shutter-priority automatic exposure and fully manual shooting modes.

The Canonet G-III is the third generation of Canonet, following the original Canonet and the New Canonet. The Canon website goes on to explain that the "G" stood for "grade up" in quality improvement, and the "III" for the third of the Canonet series. The G-III features a 40 mm f/1.7 with six elements in four groups. The integrated lightmeter provides shutter priority and manual modes. The sensor is located on the forward part of the lens, which allows use of filters without manual compensation of exposure. The Canonet can use standard flashes, or the Canonlite D which was custom-designed for the Canonet.

The Canonet G-III is one of the nicest of the '70s compact Rangefinder genre. It became a best-seller with over 1.2 million sold from 1972 to 1982.

Leica M6
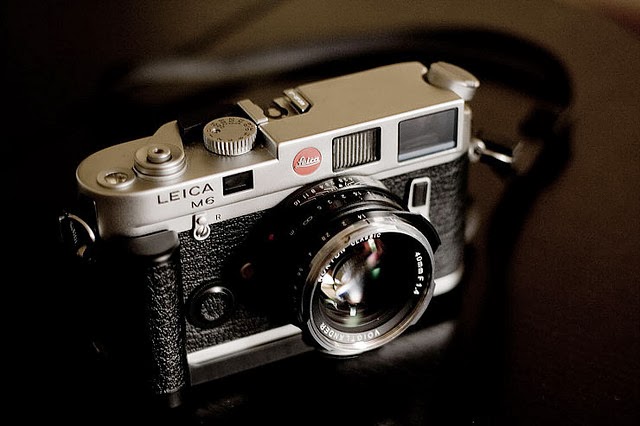
Photo by by Brian Bantog

The Leica M6 is a rangefinder camera manufactured by Leica from 1984 to 1998. It's a successful model of Leica's famous M-series of rangefinder camera bodies for the Summicron lenses. Professional photographers prefer these cameras especially for usage with wide-angle lenses.

The M6 combines the silhouette of the Leica M3 with a modern, off-the-shutter light meter with no moving parts and LED arrows in the viewfinder. Informally referred to as the M6 "Classic" to distinguish it from the "M6 TTL" models, and to indicate its "Classic" M3 dimensions. The top and bottom plates were made from lighter, cheaper magnesium alloy rather than the heavier machined brass of the M3. The M6 and M6 TTL are mechanical cameras; all functions save the light meter work without batteries, unlike the succeeding M7, which needs electrical power to operate properly.

Lomo LC-A+
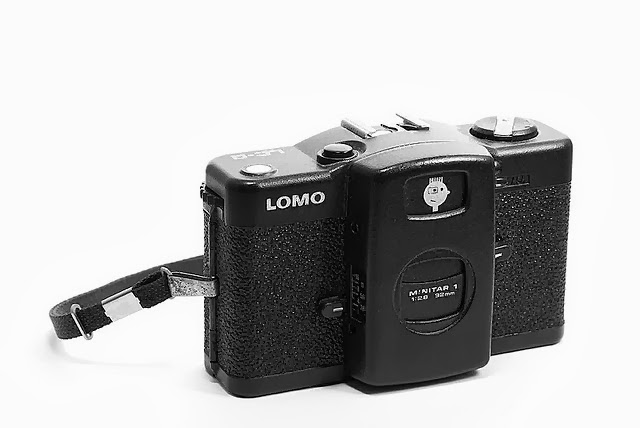
Photo by Amarit Opassetthakul

If you love Lomo's colors or its style "Don't think, Just shoot" then this compact point and shoot camera is your best choice. In 2005, production of the original Lomo LC-A was discontinued. Its replacement, the LC-A+, was introduced in 2006 and production moved to China. Some of the features include the Minitar 1 lens which gives it the shadowy vignetted look and the options for multiple and extended exposure.

The LC-A+ captures the hearts of Lomographers the world over with the same look and feel as the original LC-A, but with a whole host of new experimental features also thrown in. Whether you’re an analogue newcomer or a seasoned Lomographer, the LOMO LC-A+ is a must-have in any photographer’s arsenal.

Minolta X-700
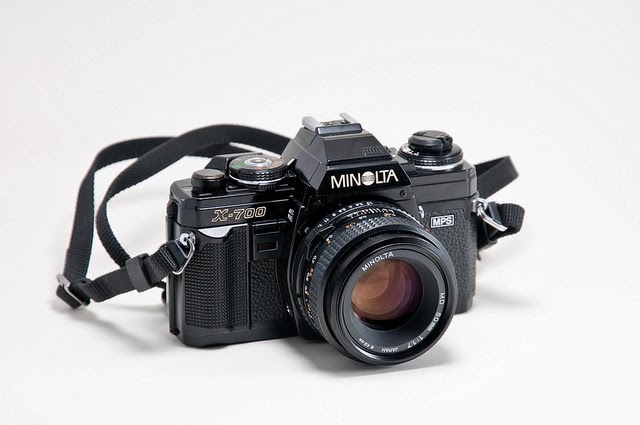
Photo by Daniel

The Minolta X-700 is a 35 mm single-lens reflex film camera introduced by Minolta in 1981. It was the top model of their final manual-focus SLR series before the introduction of the auto-focus Minolta Maxxum 7000. It featured manual, aperture priority and programmed automatic exposure modes when used with MD lenses. MC lens could be used in aperture priority and manual modes. The body was made with a plastic frame and encased in metal. The shutter was a horizontally-travelling cloth shutter with a top speed of 1/1000 sec.

The X-700 was awarded the European "Camera of the Year" award in 1981, and its competitive pricing resulted in its becoming the most successful Minolta camera since the SRT line.

Nikon F3
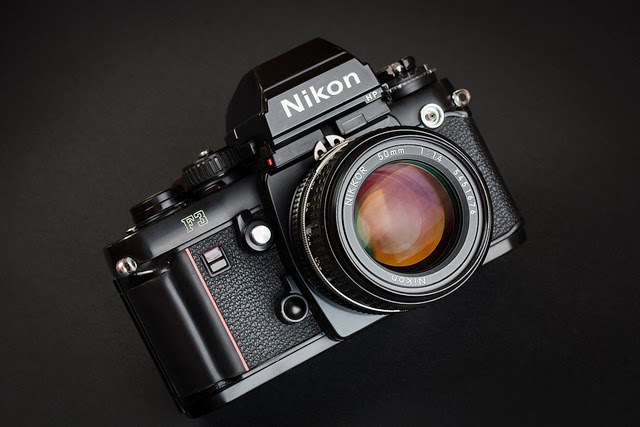
Photo by Gábor Dobrocsi

The Nikon F3 was Nikon's third professional single-lens reflex camera body, preceded by the F and F2. Introduced in 1980, it had manual and semi-automatic exposure control whereby the camera would select the correct shutter speed (aperture priority automation). The Nikon F3 series cameras had the most model variations of any Nikon F camera. It was also the first of numerous Nikon F-series cameras to be styled by Italian designer Giorgetto Giugiaro, and to include a red stripe on the handgrip – a feature that would later become (with variants of stripes and various other shapes) a signature feature of many Nikon cameras.

Nikon FM
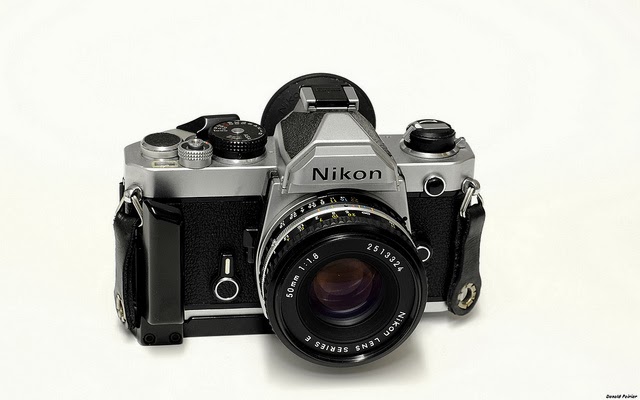
Photo by Donald Poirier

The Nikon FM, introduced in 1977,  was constructed almost entirely from metal and used a mechanical shutter. It was manual-focus-only, with manual exposure control. Being mechanical the FM needs no batteries to operate. The metering system comprised a gallium-arsenide-phosphide photodiode that metered through-the-lens at maximum aperture. The FM utilized a modern titanium-bladed, vertical-travel focal plane shutter capable of speeds from 1 second to 1/1000 of a second, plus bulb. Flash X-sync was at speeds up to 1/125th second.

Olympus OM-1
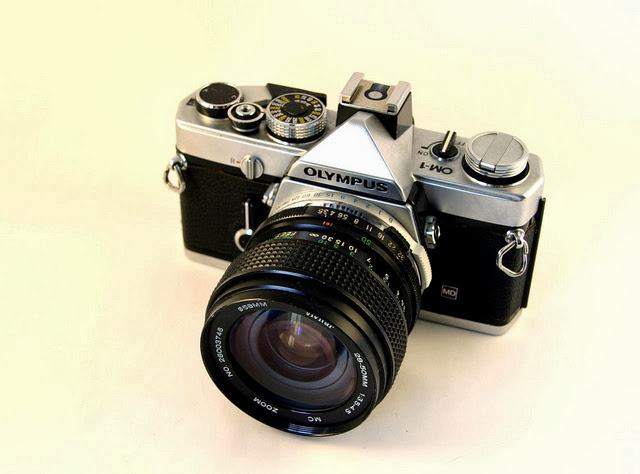
Photo by Andreane Fraser

The Olympus OM-1 is a manually operated 35 mm single-lens reflex camera forming the ground of the OM system introduced in 1972, at first called the Olympus M-1, Leica disputed this designation and it was changed to OM. It was designed by a team led by the late Yoshihisa Maitani with a through-the-lens exposure meter controlling a needle visible in the viewfinder. It was noted for its reduction of size, weight and noise. These features were essentially retained on later models. One feature unique to the OM1 compared to the rest of the OM system was its manual mirror lock-up making it ideal for astrophotography and macrophotography.

The OM-1 is an all-mechanical SLR. It has a very large viewfinder with interchangeable screens but a fixed prism. It also has a through-the-lens exposure meter controlling a needle visible in the viewfinder. It has a very compact body, essentially retained on later models. One novel feature was the decision to locate the shutter speed dial around the lens mount, rather than on the camera's top plate. A significant advantage of this layout is that the camera can remain at the eye far more easily, between shots, than some other SLRs, it also makes it far easier for "left-eyed" users and enables exposure values to be more rapidly adjusted as the shutter operates in the same plane (effectively around the lens) as the aperture ring. It also less fussy to use than a conventional shutter dial, and easy to sense what shutter speed is being set. With practice both aperture and shutter speed can be adjusted at the same time, made easier by their being reasonably close together but distinct in use.

Originally, the bottom plate needed to be modified to mount a motor drive on the OM-1. In 1974, Olympus launched the OM-1MD (MD standing for Motor Drive), to which a motor drive can be attached without need for modification. This new version has a small plate marked 'MD' on the front, and a small circular cover with a coin slot (covering the motor drive coupling) on the underside of the body.

Pentax K1000
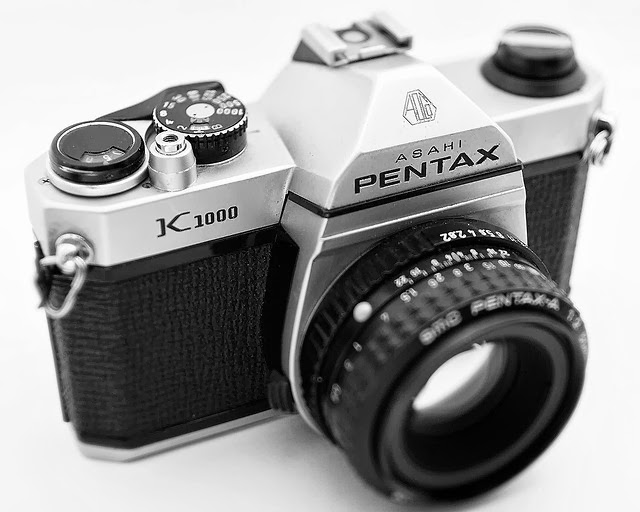
Photo by Justin

K1000 is a 35mm film SLR camera made by Pentax and produced between 1976–97. Its design descends from the original Spotmatic series of screw-mount SLRs introduced in the 1960s.

An affordable camera for the amateur photographer, it was a fully mechanical, manual camera designed without any program modes. It survived much longer than originally intended and became the archetypal "student's camera." The K1000 was equipped with all features required for manual photography: a TTL metering system, wide-ranging shutter speeds from 1/1000 to 1 second, and the ability to use all the available K-mount lenses made by Pentax and licensees such as Ricoh and Cosina. The K1000 omitted some features found on more advanced models, such as depth-of-field preview, self-timer, and separate meter on/off switch.

Despite its great popularity and longevity of the same basic design, Pentax finally ceased production of the K1000 after more than 20 years in 1997.

Pentax LX
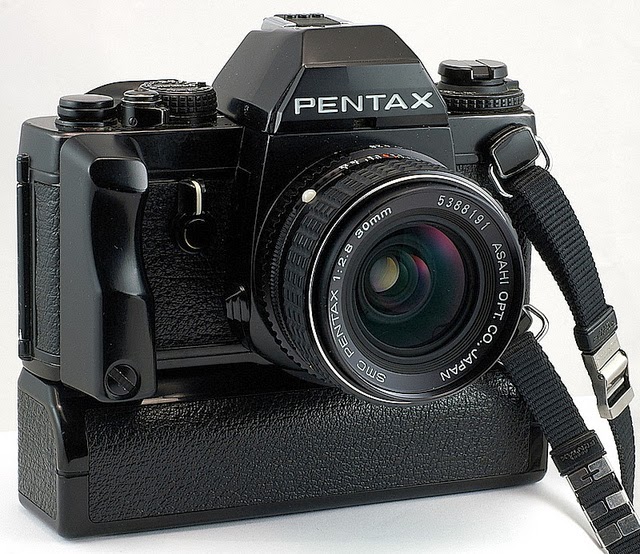
Photo by ebelbeb

The Pentax LX was Pentax's most advanced manual focus camera, and only attempt at entering the professional segment of the 35mm SLR camera market. When introduced in 1980 it comprised from the start a series of accessories such as interchangeable viewfinders and viewfinder screens in addition to the vast range of SMC lenses.

As expected of a professional camera at the time, the LX provides mechanical shutter speeds, ranging from the flash synchronization ('X') speed of 1/75 second to 1/2000 second and bulb ('B'), permitting manual operation without battery power. The slow speeds from 1/60 second to 4 seconds, as well as the exposure meter, are battery dependent. Construction is strong and durable, with a solid cast metal frame and metal covering plates. All buttons and dials are weather and dust sealed, a unique feature not found on other professional cameras of the day.

Underneath the satin black finish is black chrome, so that even as the surface finish inevitably wore through in hard professional use, the underlying metal would not look brassy. Both the viewfinder and the focusing screen are interchangeable to suit the task at hand, a large choice of alternatives were available. The camera has a somewhat uncommon frame counter, being able to keep track of the frame number in either direction, whether advancing or rewinding the film; this feature dramatically adds to the flexibility of the camera. The camera supports mirror lock-up, multiple exposures, and depth of field preview. Both a winder and motor drive were available, and a full complement of other professional accessories.

Praktica MTL 3
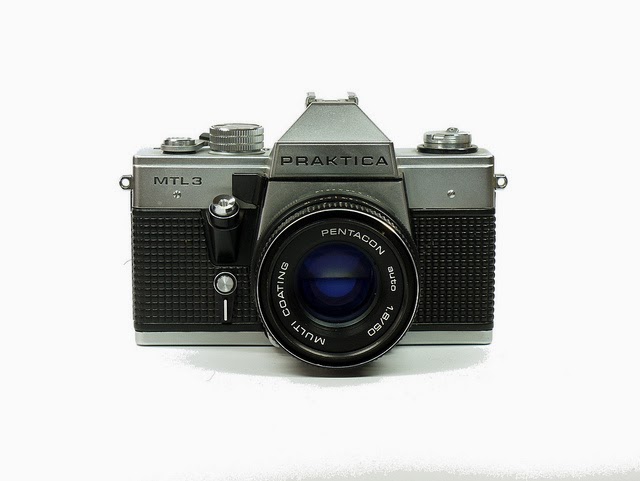
Photo by photo_foto1

The Praktica MTL 3 is an East German SLR made by Pentacon, using the 42mm screw mount. It was produced in high numbers between 1978 and 1984. It is said to be based on the LTL 3. It's a solidly made camera with some rather crude and some advanced features.

The MTL 3 has a metal curtain shutter. This is the best part about this camera. It moves vertically and is likely to work some 25 years after its production. Speeds are B, then from 1 to 1/1000 sec. It has a separate position for use with electronic flash units; this is "about" 1/125 sec according to the camera's manual. Its metal curtains are not known to get punctured easily as do cloth shutters.

Rollei 35
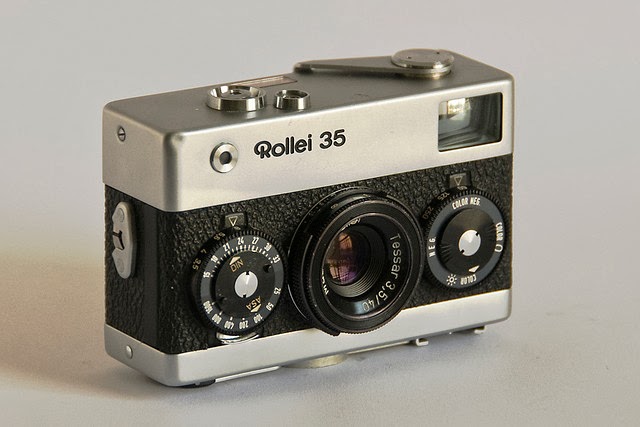
Photo by Robin Claw

The Rollei 35 is a 35mm miniature viewfinder camera built by Rollei. The original Rollei 35, when introduced at Photokina in 1966, was the smallest existing 135 film camera. Still today, the Rollei 35 series remain the second smallest 35 mm camera after the Minox 35. In 30 years, about 2 million Rollei 35 series cameras were manufactured.

Saturday, March 8, 2014

How to Discover Your Own Style and Make it Unique

5 Tips from Wedding Photographer Danny Dong

1. Build a comprehensive and solid lighting skills

To form a certain style in your photography is not easy, not to mention forming a unique style and distinguishing yourself from others. Lighting is the most basic part of photography. A good photographer needs to learn to observe light and use light to create magic. To make your work unique and stand out from others, you need to have solid lighting skills. The following two images were from an engagement photo session I shot on January 19th, 2014. The couple brought a bubble machine and asked me if I can shoot some images with bubbles. They didn’t tell me this before the shoot. When I thought of bubbles, I quickly thought of using backlight to create a dramatic look of bubbles. Here the backlit image I shot with one single Canon EX600 off-camera flash:
undefined
The following image shows how I set up this shot. My wife, Julia, held the bubble machine. I put the flash on a light stand and hid this light stand behind the couple. You cannot, however, control the wind. So when wind blew in the wrong direction, Julia had to eat lots of bubbles that day. But, she had a lot of fun too.
undefined

2. Try something new and brave, but make sure your clients’ families are comfortable with it

In 2011, I had a gorgeous couple who hoped that I could shoot a few unique and sexy images for the bride on the wedding day. I had no problem with creating some boudoir and glamour style images. The challenging part was, because it was the wedding day, her mom, her sister, aunt and other bridesmaid were all getting ready nearby. So, these images needed to be sexy yet classic. I asked her to pose completely undressed, but holding her wedding dress to cover her body. The following photo is from that day:
undefined
After I finished these images, the bride’s mom came to hug me and said to me: “Danny, these images are incredibly beautiful and artistic. If I knew you 30 years ago when I got married, I would have hired you to do this for me.”

3. Collect feedback from viewers and continue to improve your style

After I shot Lauren’s wedding, I got so many great comments from her family and friends, which led me to test how many brides would desire this sexy and glamourous style portrait on their wedding day. I wanted to see if I could add boudoir sessions to my wedding coverage to make my work unique and different. I printed two big metal prints with the above image and displayed them at my bridal show booth. Then, I was able to see every brides’ reaction when they saw the image. I found most brides thought this style was unique, creative, and different. Others said comments like, “Well, this does not make any sense. Why did she hold her dress but not put it on?” Or, “Is she a model? Was this image shot from a model session instead of a real wedding and real clients?” I could have simply ignored these comments and kept shooting these types of wedding images, but these comments did make me think: “How should I make the wedding day boudoir images more believable and more storytelling? How can I make the viewer believe these are wedding day images?” With these questions in mind, I then created the following image, “Dressing the Angel” for my clients and they loved them. Furthermore, I think it’s more interesting and storytelling then a single bridal boudoir portrait image:
undefined

4. Pay attention to the story and concept

When I first began photography, I always thought the image had to be at a unique location or the subject needed to be beautiful in order for the image to be outstanding. But later, I realized that viewers find the image memorable because of the story and concept. So if you try to create a unique image, then you need to first pay attention to the story and concept.
undefined
The following image was shot during an engagement photo session. The groom is a magician and he wanted me to incorporate magic into the engagement photo session. I used the concept of floating to create this image. They loved it.
undefined

5. Enter photography contests to observe market trends

Wedding photography trends comes and go. Sometimes we are too obsessed with our own work and we are not able to see the new trends in the market and what other photographers are doing. To me, one of the most important resources to learn the market trends is to attend the WPPI 16×20 Print Competition every year. Why is it so important to me? The purpose of entering the contest is not to win. It is, instead, to see other photographers’ best work of the year and see the difference. All the world famous masters such as Jerry Ghionis, Bambi Central, Cliff Mautner, Rocco Ancora, and many others are still competing in this competition. Those masters’ work does influence wedding photography trends.
I entered this image in 2012 and received an award of excellence (score above 80).
I used HDR processing on this image and added fake clouds to give un unrealistic look to the image. If I shot this image in 2014, I would not have entered this image into the contest. In the past two years, HDR technique has been overly used in the wedding photography market and it’s not unique any more. So, if you are in the competition every year, you will be able to see the trends and will be able to judge which images have potential. In 2014, Instead of fake sky or clouds and using HDR processing, I would rather use flash to create mood and depth for an image like this:
undefined

About Danny Dong
Danny Dong started wedding photography in 2008 and was able to quickly grow his studio from scratch to a high end wedding studio in the San Francisco Bay Area within 5 years time. In recent years, Danny has received awards from many international photographic competitions and his work has been well recognized by the industry.
As a wedding photographer, Danny focuses on every detail and every moment unobtrusively. Danny specializes in Stylized Unconventional Wedding Portraiture, however still embraces tradition with wedding photojournalism and capturing moments and emotions. He incorporates his bold sense of fashion and unique style to create classic, timeless images. Capturing the true spirit of his clients, Danny creates a comfortable, candid atmosphere allowing subjects to relax and be themselves.
Danny started teaching and sharing his photography vision and skills through international seminars and workshops. His workshop in Asia is rated one of the most popular wedding photography workshops in Asia and is highly welcomed by his students.

35mm Film Photography Feature by Red Bull Skateboading

undefined
The art of skateboarding and photography have long complemented one another, as seen here in this latest feature from Red Bull Skateboarding. Shot by Gaston Francis using 35mm film, the selection of photos show Francis’s escapades around the world, documenting his friends skating on iconic monuments and daunting spots in Morocco, Russia, Argentina, Sweden, France and the U.S. Shot in both black and white and color, the photos showcase the sport’s propensity for thrill and adventure and the characters who partake in it.

Friday, March 7, 2014

  • Hero1
    Kate Friend: Beneath Iceland’s largest glacier

Photography: Unbelievable photos taken beneath Iceland's biggest glacier, by Kate Friend

  by Liv Siddall
You may know photographer Kate Friend for her high-end fashion editorial photography for the likes of NOWNESS, Dazed Digital or The Sunday Times, and for being the founder of contemporary fashion and culture magazine MOTHER. Stepping away from fashion editorial, Kate ventured out to Iceland where she delved below the largest glacier in the country to take photographs of it from beneath.
“Vatnajökull is the largest glacier in Iceland and the largest glacier mass in all of Europe,” Kate tells us. “It covers an area of roughly 8,000 sq. km and is almost 1000m thick at its deepest point. The landscape under the glacier is an undulating plateau, 600-800m above sea level with numerous valleys and canyons. The glacier is melting at a rate of around one metre-per-year. It is only possible to climb beneath the glacier in winter, when the ice is completely frozen.”
The photographs, you’ll agree, are utterly mind-boggling. The inside of the glacier is a huge, indigo cathedral that ripples upwards in huge cascading waves of ice. The series is almost a photography diary of Kate’s journey deep below the surface of the ice. “The story follows a timeline, from the winding and very lonely road through volcanic plains and gale force winds, to the entrance of the ice cave (a crack in the glacial surface), and to the cathedral-like interior of the glacier. It might seem hard to believe but the images have not been colour-altered.”
Kate’s trip out to Iceland to document this extremely rare sight was one of curiosity and of concern, “Vatnajökull is estimated to be melting at a rate of one metre per-year. In one of the most recent reports from the Icelandic government’s Committee on Climate Change, it warns that by the next century, Iceland’s glaciers will no longer exist.”
  • 2
    Kate Friend: Beneath Iceland’s largest glacier
  • 3
    Kate Friend: Beneath Iceland’s largest glacier
  • 4
    Kate Friend: Beneath Iceland’s largest glacier
  • 6
    Kate Friend: Beneath Iceland’s largest glacier
  • 7
    Kate Friend: Beneath Iceland’s largest glacier
  • 8
    Kate Friend: Beneath Iceland’s largest glacier
  • 9
    Kate Friend: Beneath Iceland’s largest glacier
  • 10
    Kate Friend: Beneath Iceland’s largest glacier
  • 11
    Kate Friend: Beneath Iceland’s largest glacier
  • 12
    Kate Friend: Beneath Iceland’s largest glacier

Thursday, March 6, 2014


  • Top
    José Gallego Robinson: Untitled

Photography: Palpable loveliness from photographer José Gallego Robinson

  by Liv Siddall
Hmmm looks like someone’s got a thing for hands, which is no bad thing when you’re as talented as Argentinian photographer JosĂ© Gallego Robinson. His photographs conjure up the taste of underripe berries, the feel of sand on cold legs, and the bliss of seeing morning sunshine give old wooden floorboards a wake-up call. To see someone with such a consistent atmosphere throughout his portfolio is so pleasing; it’s like his whole collection of photographs has it’s own entirely unique flavour or perhaps fragrance.
  • 5
    José Gallego Robinson: Untitled
  • 1
    José Gallego Robinson: This line is part of a very large circle
  • 3
    José Gallego Robinson: Untitled
  • 7
    José Gallego Robinson: Untitled
  • 4
    José Gallego Robinson: Untitled
  • 8
    José Gallego Robinson:
  • 9
    José Gallego Robinson: Untitled