When noted outdoor photographer and author Darwin Wiggett
writes about filters, he speaks from his own years of successful
experience. His series of stories featured on this blog have become a
trusted reference source for many visitors. Now Darwin reviews the basic
topic of polarizers, and offers us his personal perspective based on his own methods, experience and equipment."I
use a polarizer for almost every landscape and nature image I make,"
says Darwin Wiggett. "In fact, I always start off with a polarizer on my
lens. It's only if the filter has no effect -- or a negative effect
(which is rare) -- that I will take it off the lens. And if you think
you can replicate the effect of a polarizer in software, you can’t --
plain and simple. Below are my Seven Rules for using a polarizer.
Rule 1: Use a Polarizer for Side-Lit Landscapes 
"Whenever
I am shooting at sunrise and sunset and the landscape is side lit, a
polarizer will have an enormously beneficial effect. The filter reduces
the scattered light in the scene, effectively darkening the sky and
adding saturation to the ground elements by removing glare from the
reflected highlights. Compare the two images in Photo 1. The left image
was taken without a polarizer and the right was taken with one (a
Singh-Ray LB Neutral Polarizer). The right image has more saturation of
colour in the foreground because the filter removed reflective glare.
The sky in the right-hand image is also more saturated and richer in
tone.
Rule 2: Use a Polarizer to Enhance Rainbows 
"Any
time you see a rainbow, immediately slap a polarizer on your lens! Spin
the polarizer around and you’ll see the rainbow disappear totally and
then reappear with great intensity. Obviously you want to rotate the
filter to give you the best intensity in the rainbow. A rainbow is
polarized light so a polarizer either kills the rainbow or it pumps up
the colours enormously, depending on how you rotate it.
"As soon
as I saw this rainbow in Photo 2, I knew I had a winner. But by the time
I got my gear out and the composition set up, the rainbow was already
fading. To recover the intensity in the rainbow, I simply used my handy
polarizer. A side benefit to the polarizer is that it removed reflective
glare from the road and saturated the colour in the yellow line.
Rule 3: Use a Polarizer for Intimate Landscapes on Overcast and Rainy Days 
"One
of the cardinal rules in landscape photography is 'in overcast light
shoot tight.' Bald white skies in a landscape photo really jar the eye
so most photographers concentrate on more intimate landscapes and
exclude the sky when it is overcast. A polarizer won’t darken an
overcast sky but it will eliminate reflective highlights off leaves,
rocks and water to help saturate the colours in the photo.
"Just
how much effect does a polarizer have on an overcast day? See for
yourself in Photo 3 (top image with no polarizer; bottom image polarized
with a Singh-Ray LB Warming Polarizer). I think you’ll agree polarizers
have their place on grey days!

"On
overcast days after a rain, it is even more important to use a
polarizer. When everything is wet, there will be a lot of reflected
light coming off the wet surfaces and this glare reduces the quality of
tones and colour. In Photo 4, I used a Singh-Ray LB Warming Polarizer to
supersaturate the colours. Who needs the hue and saturation slider in
Photoshop when you can capture colours this good in-camera?
"Many
people ask me why I use a warming polarizer when I could just change
the white balance on the camera to get the same warm effect. The warming
filter in the LB Polarizer is subtle -- just enough to offset the
effects of UV light -- and the result is a cleaner file captured
in-camera than if I just used a polarizer plus a warmer white balance
setting. The better the information captured by the sensor, the better
the final image. So on grey days, in particular, I always use a
Singh-Ray LB warming polarizer.
Rule 4: Use a Polarizer to Remove Reflective Highlights on Glass, Metal and Water 
"If
you want to pierce through the reflective surface glare of water, see
through glass and remove the glare from metal, be sure to use a
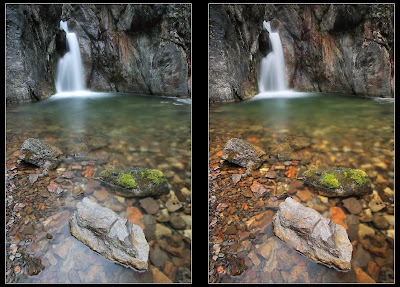
polarizer. In Photo 5 you can see how the addition of a polarizer (right
side) gives you views underwater that are not possible in the
un-polarized photo (left side). With reflective surfaces, the reflection
is sometimes the most important element and sometimes the subsurface is
more important. Just rotate your polarizer until you see the precise
effect you like best.
"In
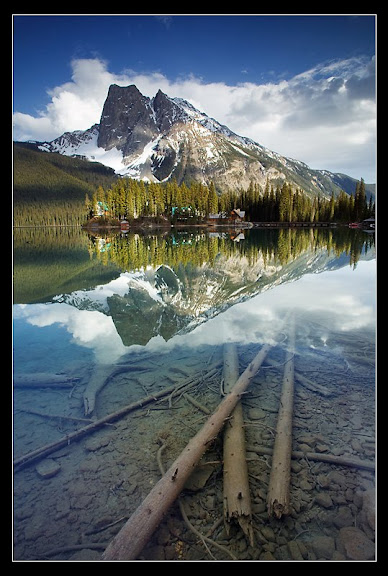
Photo 6 the image is improved by using the polarizer (right side image)
because it allows the viewer to see the interesting rocks under the
water which could not be seen well in the non-polarized version (left
side image).
"In
Photo 7, my LB Warming Polarizer allowed my to reach under the surface
of the lake for my foreground interest. The polarizer not only let me
see underwater, it also darkened the sky above and increased the warm
colour saturation of the forest around the lodge. And it was all done in
the camera.
Rule 5: Avoid Uneven Polarization of Blue Skies When Using Wide Angle Lenses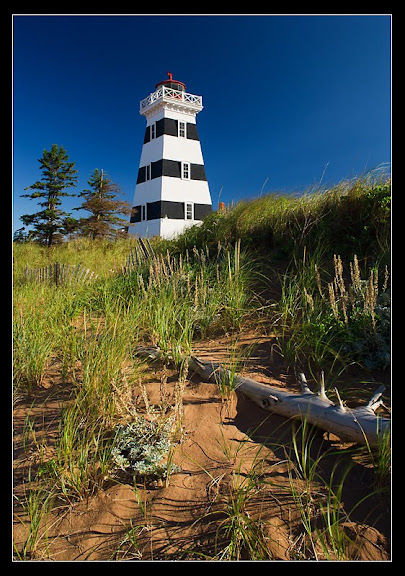
"One
of the classic mistakes when using a polarizer is to rotate the filter
to create the maximum effect when shooting blue-sky scenes with
wide-angle lenses. In Photo 8 the upper center of the sky is much darker
than the rest of the sky and for some viewers this uneven polarization
is unacceptable. There are several solutions to this problem. Sometimes
just rotating the filter slightly will reduce the uneven effect. Often
if you move back a bit from the scene and use a little longer focal
length setting on your zoom lens you will take in less sky and thereby
reduce the problem. And finally you can make two exposures of the same
scene, one with the polarizer rotated to maximum for the greatest
benefit to the foreground and one exposure with the polarizer turned to
minimum effect for a more even, ‘natural’ sky. Then you can blend the
two exposures together in Photoshop.
Rule 6: Combine an ND Grad Filter with a Polarizer for the Ultimate in Contrast Control 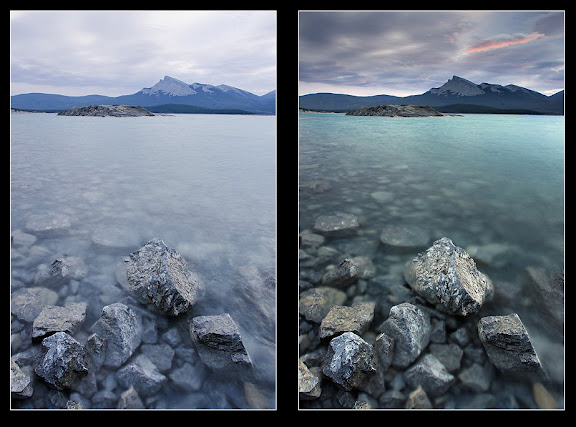
"One
of the major hurdles to leap over in landscape photography is the
problem of high contrast between the sky and the land. In many cases
skies are so much brighter than the landscape that if we expose properly
for one, the other is either washed out or is too dark. In Photo 9, the
image on the left was made without any filters. Notice how the sky is
overexposed without detail and how the water has a pale ghostly sheen.
By adding a Singh-Ray LB Warming Polarizer, I not only removed the sheen
from the water (caused by reflective glare and UV haze) but the
polarizer also allowed me to see the underwater rocks much better and
added colour saturation to the above water rocks (right image). The use
of a 2-stop hard-edge
Graduated Neutral Density
filter over the sky and mountains darkened this overexposed area of the
image revealing all the detail that was there that day. Whenever I have
a bright sky in a landscape scene you can bet I’ll pull out both my
polarizer and my grad for contrast control. To understand how to stack a
grad and polarizer together see my previous blog article:
Filters, holders and vignetting: building a filter system that works with your lensesRule 7: Combine a Polarizer with a Solid ND Filter or use the Singh-Ray Vari-N-Duo for Creative Motion Effects"One
of my favorite techniques in nature photography is 'Painting with
Time.' This technique is created by combining a polarizer with a
solid ND filter
(e.g. 5 f-stops or more) to create long exposures to record movement in
nature. Anything that moves -- rushing water, swaying grass, flitting
clouds -- takes on a surreal, painterly look when recorded with a long
exposure. The polarizer gives all the benefits we have seen with the
filter (reduced glare, increased colour saturation) while the solid ND
filter allows us to record nature’s movement over time.
"Often I like to use the Singh-Ray
Vari-N-Duo
because it is a polarizer and variable solid ND filter (2-8 stops)
built into one convenient filter. But you can also use filter holders to
combine a polarizer and a 5-stop solid ND filter like I described in
Filters, holders and vignetting. To learn more about other benefits of using a polarizer, a grad and a solid ND filter together see
The Terrific Triple Threat.
"Remember
when you use a polarizer and a solid ND filter together -- or if you
use the Vari-N-Duo -- that your exposure times will be long (from 4
seconds to several minutes), so a solid tripod and cable release are
mandatory. There are other things to consider in terms of getting proper
exposure and I cover these in detail in my
Paint with Time download for anyone interested in detailed specifics.
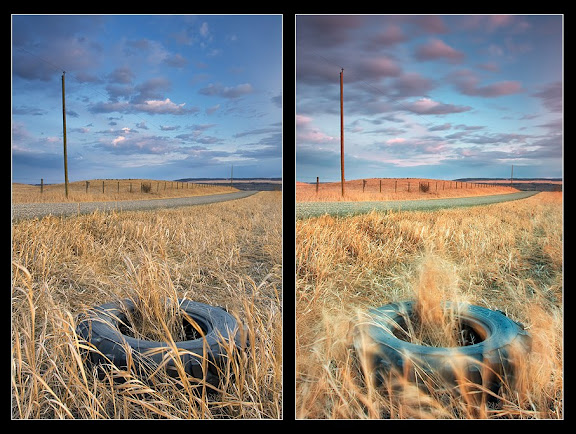
"In
Photo 10, the left side image was taken on a windy day using a
Singh-Ray LB Warming Polarizer to get a better colour and tonality in a
side-lit scene (Rule 1). The exposure was 3 seconds at f16 at 100 ISO.
In the photo on the right, I used the Singh-Ray Polarizer combined with
the Singh-Ray
George Lepp 5-Stop solid ND
filter to give me a 121 second exposure at f16. Notice how the grass in
the right-hand photo shows a much greater range of movements, like a
brush stoke painting. As well the clouds streaked across the sky in the
longer exposure and painted more colour and movement into the sky. I
really love the effects of long exposure and combining a polarizer with a
solid ND filter was all I needed to make these images happen.
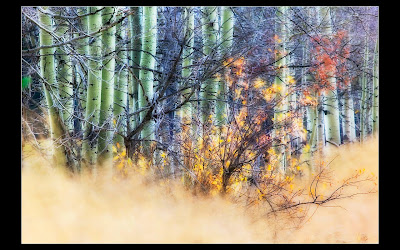
"In
Photo 11, a polarizer gave me great colours on a grey day (Rule 3) and a
solid ND filter gave me a long exposure to record the windy day in
sweeps of tones.
"Rather than use a UV filter for protection of
the front element of my lens, I use a polarizer instead. For my
photography, a UV filter has very little effect, but a polarizer does. I
simply leave a polarizer on my lens all the time, because for me, this
filter is essential to help me capture the images I see in the world."
To learn more about Darwin's photography and check his other educational resources, stop by
his website or visit
his blog for the latest information.


