Back in February, I posted about watermarking and how I use this opportunity for advertising. I mentioned briefly the idea that if someone was going to steal your images, you may as well make them work for you with watermarks that are attractive and don’t get cropped out. At least then when Tight Theresa steals my images, her friends will know where they came from and hopefully get in touch. Although on second thought, do I want all her tight friends also scamming me for freebies? A subject for another day. But I digress.
I also mentioned in that post that I couldn’t believe the lengths people go to in order to steal my images and that watermarks make no difference when someone has their heart set on stealing your stuff. Ironically, it was only a couple months later that a friend many hours away called to say she’d seen some of my stuff being displayed on canvas in a printers near her. After some investigation, I found that the images (stolen off Flickr, cropped to oblivion) were being distributed on canvas by a large warehouse in this country. And they weren’t just any old images, they were four images of my son.
Now, some well-meaning friends who don’t understand the nature of piracy and the invasion I felt just said, “wow that’s so cool! You’re like…famous and stuff! You’re good enough to steal from.” Um…thanks but no thanks. I’m also good enough to get paid.
Through this event and hearing the reactions of people who really didn’t see the big deal made me realise that we are pirates. Some of us copy CDs, some ‘let’ our friends leave their pirate DVDs at the house, others copy images off Google to fill the corners of our blog posts, quote Wiki without attribution, directly steal concepts for our photography without giving props. In some way or another, many of us do something unethical with another person’s intellectual property once in a while.
And even more, I believe that we’ve all been the victim of piracy at some time or another, whether knowingly or unknowingly. Take that image stolen from me for instance. It’s being distributed by a massive warehouse in Birmingham. Who knows where in the world there are hanging photos of my little boy. But that’s the risk I take when I decide to share my work online. You have to do so knowing that once it’s out there, you can’t control what happens next. But please let me know if you see this image in a canvas printers’ near you! 🙂
This isn’t a list for how to avoid being a victim or piracy because clearly, I can’t control that in my own life. But I just thought it would be great to get the discussion going and hear stories of photographers who have had their work stolen. Even more interesting to know is how did you find out?
Share this article.
Help: I Am Being Sued for Nearly $500,000 by a Model I Photographed
Hello fellow photographers. My name is Joshua Resnick. I am a stock photographer, but what I am going to tell you potentially affects all photographers. I wanted to bring to your attention a lawsuit I am involved in that I think could put the whole industry at risk if things don’t go well.
I am being sued in federal court for hundreds of thousands of dollars by a model I worked with in January 2013. This is a model that I paid, and who signed a release allowing me to sell her images through stock photo agencies. Why I am I being sued? It revolves around images that got misused or were just outright stolen and the model is blaming me for it.
It seems that many of her pictures ended up on erotic book covers, escort ads, and strip club ads. To my understanding she is claiming I either sold these directly to these people or through Shutterstock. As for myself, I only sold her images through a stock agency with a terms of service that did not allow pornographic/defamatory use — I have never sold an image of hers directly to someone.
The images I took were also posted by the model on her Facebook page, and eventually I even found pirate sites giving away the images for free. So it is very possible these misuses could have been from her Facebook or from those pirate sites, and it is also possible someone could of bought the image from an agency but potentially broke the TOS. I don’t know exactly what happened yet, but that’s my best guess.
My case has unfortunately received national attention in publications such as the New York Post, the Daily Mail and Fox News, none of which have bothered to explain my side of the story.
If they had not ignored my side of the story, here is what they would have reported: the model was an experienced lingerie model, appearing on a magazine cover in such apparel. I told her agent before the shoot it would be used for stock photography.
During the shoot I also told the model that the images would be for sale for stock photography and explained how stock photography works. I explained to her that these agencies prohibit pornographic use in their terms of service. Another person who often helped me from time to time was present during the shoot and witnessed everything.
I said nothing more and I didn’t lie. I did NOT promise her that her images would not be misused — that’s impossible in our right-click-save-as days. She saw the images before signing the model release, was happy with them and posted them herself on her Facebook page.
Another misconception that seems to be in the news pieces and the complaint is that our arrangement was TFP or Trade for Portfolio use. I paid her via her agent through Paypal and have all the records of it, even providing her gas money to travel to Columbus where the photo shoot was done.
If the court rules in her favor, it could create a dangerous incentive for other models to do the same and try to hold photographers liable for things that are out of our control. Basically, a model release could mean nothing to protect you. All they would need to do is claim there was some sort of oral agreement and it would be void.
Also, I am not the only photographer this has happened to, but as far as I know none of these photographer’s cases are public record and were settled out of court or with non-disclosure agreements or are currently unsettled. Mine being public record and such a high profile is important to win for photographers because of the example it could set.
Defending yourself against even completely false accusations will cost almost anyone a huge amount of money. A common misconception is that when you win in court, you get your attorneys fees paid. That’s not always the case. Even if I do win, this case will likely be financially devastating either way.
On January 7th, I set up a crowd funding campaign to raise the funds that would allow me to defend myself in this case. The case is in New York now and I’m facing a huge financial burden to protect myself and our industry in general. Knowledgeable copyright lawyers cost an absolute fortune. I want to defend myself to the extent I can given my funding to discourage models in the future from bringing forth similar actions. About the author: Joshua Resnick is a stock photographer based in Columbus, Ohio. You can find a selection of his images here.
Share this article.
Texas Can Steal Your Photos Without Paying for ‘Takings’: Court
Photographers were just dealt a big legal blow this week after a Texas state appeals court ruled that the state can infringe upon copyright without risking punishment under the state’s or federal government’s “takings” clause.
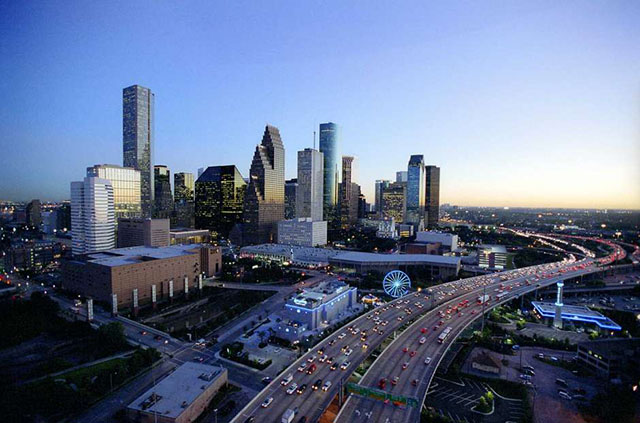
The copyright infringement battle is being waged between Houston photographer Jim Olive and the University of Houston, a public university.
It all started when Olive, who’s known for his photos shot out of open helicopters, found one of his aerial photos (titled “The Cityscape”) of the Houston skyline being used by the university on its website to promote its C.T. Bauer College of Business. The photographer then sent the university a bill for $41,000 — $16,000 for the usage and $25,000 for removing his copyright credit. “The Cityscape” by Jim Olive, the photo at the center of this legal battle.
The university quickly took down the photo but only offered Olive $2,500 for the unauthorized usage.
After Olive sued the university, the university pushed for the case to be dismissed because the public institution has sovereign immunity, which protects state government entities from a variety of lawsuits. Olive’s side responded by arguing that the copyright infringement was an unlawful “taking” under the state’s constitution, which prohibits the government from taking private property without adequately compensating the owner.
A lower court previously ruled that Olive can proceed with his copyright infringement lawsuit, but now the Court of Appeals for the First District of Texas has overturned that ruling.
“Even if the government sets itself up as a competitor by producing a copyrighted work, there probably is not good reason to conclude automatically that the copyright has been ‘taken,'” the three-judge panel cites in its ruling. “The copyright holder can still exclude all private competitors even as the government pirates the entirety of his work.”
“[W]e hold that the Olive’s takings claim, which is based on a single act of copyright infringement by the University, is not viable,” the ruling continues. “This opinion should not be construed as an endorsement of the University’s alleged copyright infringement, and as discussed, copyright owners can seek injunctive relief against a state actor for ongoing and prospective infringement.
“Instead, in the absence of authority that copyright infringement by a state actor presents a viable takings claim […] we decline to so hold.”
The NPPA notes that the US Congress passed the Copyright Remedy Clarification Act (CRCA) decades ago to prevent states from having governmental immunity from copyright claims, but some appeals courts have held that CRCA goes beyond Congress’ powers and have therefore struck it down as unconstitutional. The matter will likely go before the Supreme Court (in Allen v. Cooper) sometime in 2020.
“The Texas ruling affects more than just photographers,” NPPA writes in response to this week’s ruling. “It appears that a state entity could engage in broad piracy without being accountable.”
“It just doesn’t seem fair to me,” Olive tells the Houston Chronicle. “With this, they can just run rampant over copyright and take intellectual property with impunity.”
If any of your images live online in any shape or form, it is inevitable that they will get stolen.
With the Internet, copyright infringement has become rampant and is a worldwide phenomenon.
Some individuals don’t understand copyright and think that because an image appears online that it’s theirs for the taking.
However, there are a lot of companiesthat steal images and use them for commercial purposes – to sell their own products!
How do you know if your image has been stolen?
You can do random image searches on your images in Google. This is a cool feature, but rather tedious and incredibly time-consuming. If you have an extensive library of images, this could take more time than you’d want to spend.
A better alternative is sites like Copytrack, Pixray or Pixsy, which are image tracking services that not only find your stolen images but also will file a copyright infringement claim and sue for damages on your behalf.
This is a great way to seek restitution for stolen photos without the hassle of having to do everything yourself. Not to mention, there is no way you could scan millions of images on the Internet, looking for your work. The technology these services offer does it all for you.
Utilizing an image tracking service is something every photographer should consider. It’s a sad reality that so many photographers today are struggling, while thieves are profiting from our hard work.
An image tracking service can save you a ton of legwork. Most of the time, it’s as simple as uploading your photos. If you get notified that some of your photographs are appearing without permission or licensing, you can file a DMCA takedown notice or a legal claim through the service.
The image search function is free – to a point. It depends on how many images you upload. If you file a legal claim, the service will take a commission.
One caveat to using an image tracking site is that if you do stock photography, it can be hard to ascertain where your image has legitimately appeared.
Stock agencies don’t usually disclose to you who licensed your image. Also, many have partnered up with other stock agencies to sell your work, making your images even more difficult to track.
How an image tracking service works
According to the image tracking site Copytrack, 3 billion images are shared online every day. 85% of them get stolen. Licensing images is about more than just tracking down infringements. Once you discover an infringement, you need to make a decision as to what you’ll do about it. Both Copytrack and Pixsy can handle the legal side in the fight for fair payment for your work. You simply upload your images while their Reverse Image Search functions in the background. They will notify you of your matches by email. Once you confirm the stolen images, they take steps to enforce your copyright. You don’t need to do anything.
What are scraper sites?
One of the worst types of offenders in the realm of stolen images and copyright infringement online are scraper sites. Scraper sites steal your content for their own sites or blogs. Some will just scrape content, but most use automated software that takes your images and posts content on their own site.
These sites take images from Pinterest, Google, and your own website and host them illegally.
Not only does your website host the images for them but also they take up your bandwidth!
If you write a blog in addition to post photos, you may find your content appearing on these sites.
What are your options if your image gets stolen?
If your image gets stolen, your first option is to do nothing, which is exactly what many photographers do. The hassle can make it seem not worth it sometimes. However, if the company that has stolen your image is a large one, you can hire a copyright attorney to take them to court, as this type of claim may be worth thousands of dollars to you. In most cases, the best option is to use a company like Pixsy and either have them file a DMC Takedown Notice, or file a claim on your behalf. A DMC Takedown Notice is a request to remove content from a website at the request of the owner of the copyright of the content.
How to file a DMC takedown
DMCA stands for Digital Millennium Copyright Act. To get your stolen content removed from a website you need to file a DMCA takedown notice.
To file a DMC takedown, you can either hire a service or do it yourself.
You need to find out who owns the website. You can use a Who Is lookup tool.
The problem is that it can be difficult to find out who the website owner is in order to send them the notice, as a lot of these sites hide this info. For example, they use Cloudflare to hide their real IP address.
Luckily, there are DMC takedown services that can help you with this. DMCA charges $10 USD a month for their protection services and charges $199 USD for a full takedown.
How to register your copyright
As a photographer, you automatically own the copyright as soon as you create the image. This means that you do not necessarily have to file copyright for all your photos.
In most countries, you do not need to file copyright papers to prove you own the content or copyright. Government Registered Copyright is NOT necessary in order to get your content removed, however, suing for damages IS easier if you have registered your copyright.
To register your copyright, search online with keywords such as “register copyright Canada/US/Australia” etc., to find the Intellectual Property Office in your country.
If you have had your images stolen, it’s up to you to decide if you want to pursue restitution.
Small transgressions may not seem worth the time and energy, however, if someone is making money off your work, you may want to consider seeking compensation. Not only for the money but also the principle.
Have you had any of your images stolen? Share with us in the comments below.
Share this article.
Friday, June 14, 2019
Thanks for visiting my blog. This weeks photography freebie is by Photographer Ian Plant.
Get your free copy of his Ebook here:
https://ianplant.lpages.co/essential/
Share this page.
10 Questions to Ask a Tour Operator Before Signing up for a Photography Tour
The company has an entrancing website and bedazzling photos. The itinerary looks all-encompassing and the testimonials seem positive. You’re excited and have your credit card ready for the deposit.
Slow down, partner.
Before you hand over your money, it’s a good idea to ask a number of questions of the photography tour operator.
Asking questions before paying for a photography tour is all about setting expectations – both yours and the operators. It’s also a chance to learn about the professionalism of the person or company you are signing up with.
Here then are 10 key questions to help you with your tour choice.
1. Do they have insurance? And what will it cover?
Protecting yourself is important with any tour, and it’s important to know what your tour operator has in place before you sign up. With the proliferation of photographers jumping to offering tours, it’s possible not all have put serious thought into insurance matters.
At the least, your operator should have insurance covering accidents during the trip – both ones they cause and ones out of their control.
The reason operators may skimp on insurance is simple – it’s expensive. And that cuts into profits. It’s also often the reason two operators who offer roughly the same itinerary will differ in price by 10-20%. Make sure you are covered before paying your deposit.
2. What is their guest to instructor ratio?
Everyone has their own ideal when it comes to instructor-to-guest ratios. Some enjoy one-on-one instruction all the time, and others prefer a small group of maybe five or six. Still, others may love the anonymity of a large 15-person group so they can do their own thing without interference.
I prefer groups no larger than six guests per instructor. This allows for some hands-on, one-on-one time. It also ensures the instructor is not being asked 5,000 questions while you wait for your chance.
Also, realize that an instructor may have a low ratio, but the over-group size might be larger, meaning they may bring in other instructors to help out. This is usually not a problem, but if you are hoping to hear directly from the lead instructor who attracted you to the tour, be aware you might not get the amount of facetime you’re expecting.
3. Is this a tour or workshop?
What’s the difference between a workshop and a photo tour? Susan Portnoy has a good comparison on her site, The Insatiable Traveler.
A tour is a chance to be guided through an area typically rich in photographic content. There is less direct hands-on instruction, moment to moment, and the subject matter can cover a large spectrum.
A workshop, by contrast, is usually more hands-on and directed to a specific goal. An example of this is a one day workshop on street photography. Your instructor will be close at hand to make all those small course corrections and critiques needed for improvement.
4. Do they have any other assignments during this trip or is this their only gig?
I’ve run across this myself while taking a tour. The instructors brought us to a scenic overlook and then POOF! Gone.
It turned out they had an assignment in that area. While they only headed off five minutes away, it was rather disconcerting to think I, and the other guests, were less important for that hour of ‘other work.’
It’s important to also realize that having other work isn’t necessarily horrible for you. However, it’s important to know about it up front, and then you can decide if it is acceptable. Most of us are okay with some deviation if we know about it in advance.
5. Will there be daily opportunities to review work?
Some people love to have constant feedback and need that on their tour. While others could not care less because their art is a personal endeavor.
If you want regular feedback, ask about it. Again, it’s about setting expectations, so you’re not disappointed when your needs aren’t being met.
Sometimes the reviews are just back-of-camera check-ins to see what you’re seeing and offer correction or encouragement. Or maybe you want an hour of the instructor’s time every three nights in front of a laptop so you can get more in-depth critiques. Either way, know before you go.
6. Why do they run tours to this location?
This is a big question that should be easy for any operator to answer. I believe the best answer is, “Because I love the area/region/country!” Often, the answer in the background is, “Because it is highly profitable or super popular.”
There’s nothing wrong with making a profit or leading tours to popular spots, but I feel it is important to know why the operator is running the tours they run. If it’s for the love of an area, you’re more likely to get hard-to-acquire information, background details, and unique locations. Experience certainly matters in the photography tour business for access to hidden experiences.
7. What is their cancelation policy?
This item is pretty straightforward. You should ask this for tours, workshops or any time you are plopping down a large sum of cash for a service. Do they offer full refunds? What is the deadline for canceling without a fee? Do they offer to reschedule if extenuating circumstances or family health are involved?
What about the operator canceling a tour? Will they try to rebook you with another, similar operator? How quickly will they offer a return of all funds?
8. What is a typical day like?
The advertisements and website you researched looked incredible! Beautiful images and exotic locations abound in that slick presentation.
But what will it really be like when you’re on the tour? Sure, no two days will be the same if you’re traveling all around. However, it is important to understand if you’ll be on a bus for five hours each day or if dinner is planned without thought to sunset timing each night. It’s often the difference between a photo tour and a regular tour.
In my mind, a photo tour should be a balance of exposure to opportunities with time to reflect and take a break. Food is also very important to keep energy up for shooting all day. If you’re always on the move, you won’t have time for photos. If your itinerary covers too much ground, you’ll see a lot of things through car or bus windows without many opportunities.
Pacing can be essential during a week or two-week long tour. If every day is packed with 18 hours of photography and instruction, you’re going to be exhausted by Day 3. Flexibility is also important so that one event taking extra time doesn’t make the rest of the day’s itinerary crumble.
9. How much instruction can you expect?
This question is also a chance to make your expectations known. If you want hand-holding the whole time, and have barely touched a camera, let the operator know so they can decide if the trip will be a good fit.
Perhaps you have a particular skill set you want to develop. Letting the operator know early will help them prepare, and both of you can work on a simple plan to help you improve during the tour. Everyone on your trip will have different aspects of photography they want to improve. Expressing your desires will help all involved.
10. Do they handle all logistics or work with local operators?
This is another question that has no right or wrong answer, but it’s important to know in setting your expectations. Some operators, to increase profits or because they desire more control, will want to book all the hotels, events, admissions, etc., themselves. This can also lead to a lower cost for guests. But it can also lead to the operator taking more time away from instructing.
On the other hand, an operator who hires a local guide or tour company should have more time for instructing. It can also help to have a local when things go sideways, and a deep understanding of local customs and protocol is essential. It allows for a division of labor; the local guide can go ahead and check the group into a hotel and have rooms ready while the group continues to soak up a particularly beautiful sunset.
Many of the questions I posed here have no right or wrong answer. However, I feel they are all important to ask in setting expectations before investing time and money in a tour. Asking them can also help expose a guide who is not organized or ready to take a group on a trip due to lack of diligence.
Share this article.
5 Reasons to Consider Aperture Priority Over Manual Mode
Choosing aperture priority mode in difficult lighting situations can free your mind up to deal
with the things that matter most to the photo, like timing, rather than messing around with
the dials to get the same result.
There’s a lot to be said for the manual exposure mode on your camera. When you’re starting out, learning how to shoot in manual will help you to learn the relationship between shutter speed and aperture. This ensures that you learn what the camera is doing every time you make an exposure. It also builds the basis for you to take what you learn about exposure and correct for the camera’s inability to cope with extreme exposure situations as well as to make creative choices for your images.
After you’ve learned the ins and outs of manual mode, however, there are a few reasons why you might want to forego your hard-learned manual skills for Aperture Priority mode. This article outlines five of these reasons and details what Aperture Priority mode might offer you and your photography in some situations.
1. Aperture priority does the same job as manual mode
In manual mode, the meter in your camera is taking a reading based on your set ISO (provided you’re not using auto ISO). The chances are likely that you’ve picked a deliberate aperture setting before you even lifted the camera up. To get your exposure, you now have to alter the shutter speed so that the indicator on your camera lines up with what the meter dictates is a correct exposure.
Aperture priority does the exact same thing, except that the camera sets up the shutter speed for you.
In instances where you are trusting your camera’s light meter (let’s be honest, that’s most of the time), this will result in the same exposure every single time whether you are shooting in manual mode or aperture priority mode.
What aperture priority mode does is remove the need for you to set the shutter speed yourself. It frees you to concentrate on things like composition without having to constantly keep an eye on the meter.
Exposing for the meter in manual mode resulted in an exposure of f/11 at 1/50th of a second.
Exposing the scene in aperture priority mode just a second later resulted in the exact same
exposure. f/11 at 1/50th of a second.
In situations where you need to compensate for dark or light subjects, aperture priority mode still gives you full manual control of the exposure through exposure compensation. Are you taking photos of a dark subject like a black dog? Dial in -1 stop of exposure compensation just one time and keep shooting without having to constantly adjust your settings to get to the same result. Are you taking photos of a fluffy white dog? Same again. This time, add +1 stop of exposure compensation and away you go.
Dark subjects will require you to underexpose them. In Aperture priority mode, this is
easily done with exposure compensation. Once you dial in exposure compensation, you
are set to go until it has to be changed again. With light-toned subjects, you will have to
overexpose them to maintain the correct exposure.
High contrast subjects, like this sheep’s white face lit directly by the setting sun, will also
have to be underexposed by at least a few stops.
The only difference between aperture priority mode and manual mode in these circumstances is that you will be spending more time focusing on the creation of the photos than you will be on the dials on your camera.
To be clear, I am not advocating for not learning how to use manual mode. For the best results, it is important for you to understand how your camera works in relation to exposure. Using manual mode is the best and fastest way to do that. So, please, don’t skip over manual altogether. However, once you have it down, using other modes alongside your knowledge of exposure and how it works will help you and your photos in the long run.
2. Speed
The backlighting in this image created an extremely high contrast situation. By dialing
in -3 stops of exposure compensation, I was able to ensure that the issues were dealt with
in a series of images with one turn of the dial.
As mentioned, using aperture priority reduces the amount of time you have to spend watching the camera’s meter. Because the camera is now setting the shutter speed for you, the only thing you have to worry about in most situations is exposure compensation. Once you set your camera to aperture priority mode, it takes only one finger (on all modern cameras that I’ve used) to adjust the exposure compensation settings.
Need to underexpose by a stop? Just turn the one (relevant) dial three clicks. Done.
The only other thing you might have to worry about is if you have the need, or want, to change your ISO. But that is going to be more uncommon.
3. Aperture priority still gives full manual control
At the risk of repeating myself, but I feel this point really needs to be driven home. Aperture priority mode gives you full manual control over your exposure. It is not automatic, or an auto mode, in any way more than it allows the camera to set the shutter speed based on the meter you are already using. At any time while in aperture priority mode, you will still have full manual input on what exposure the camera is recording. You just have less physical steps to go through before you get there.
4. Helps to create a constant exposure in changing lighting conditions
One scenario in which aperture priority mode really shines is in changing lighting conditions. For example, if you’re out on a windy and cloudy day, the light levels can constantly shift. In aperture priority mode, your camera changes the shutter speed for correct exposure (already taking into account any exposure compensation that you might have set). Thus, helping you to achieve a consistent look for all of the images in a sequence. This is most useful in terms of shooting a sequence of images to later stitch into a panorama.
When creating a sequence of images for a panorama, aperture priority can help to ensure
a consistent exposure throughout the frames.
If you were shooting this sequence in manual mode, it would require you to be constantly looking at the meter and changing your shutter speed settings as required. This isn’t a big deal, but using aperture priority mode allows you to get the same results without constant fetter over the settings.
At sunset, the light rapidly changes. Add a moving subject to that high contrast scene and
you have an exposure nightmare. Aperture priority can help to maintain a fairly consistent
exposure between frames.
This isn’t perfect, and extreme shifts in lighting can have drastic effects on your images and your exposure. You will still have to pay attention to the details to ensure nothing is going wrong. On normal days, however, it will work just fine.
5. TTL and HSS enabled flashes
Using aperture priority with TTL and HSS enabled flashes might just be the perfect match.
When you are using a flash with TTL (through the lens metering) and HSS (High-Speed Sync) enabled, the chances are that you are going to be working with a fixed aperture anyway.
Remember, shutter speed does not affect flash exposure, only ambient exposure. Aperture priority mode will give you the freedom to set your desired aperture and then let the camera do what it needs to match the meter.
Not only will you still have full control over the exposure compensation for the ambient, but you will also have full control over exposure compensation with the flash unit.
Again, this allows you to get the exposure where you want it one time, and then you are free to concentrate on the actual photos.
That’s it
Aperture priority can be a fantastic tool for any photographer. At the end of the day, it does the exact same thing that manual mode does. It just takes away some physical steps that you have to go through in manual mode to set the exposure.
That said, like just about everything else in photography, it is not perfect, and it won’t always be a solution.
If you take only one thing away from this article, let it be this: shooting only in manual mode does not make you a better photographer. Aperture priority and shutter priority modes do the exact same thing, just in a different way. Use whichever works for the situation you’re in.
Do you use Aperture or Shutter Priority? Share with us your thoughts in the comments below.
One of the unsung heroes of modern photography is the tried-and-true digital photo frame. These simple devices have been around for years, and yet they are rarely discussed in photography circles. With huge televisions adorning our walls, and smartphones stuffed into our pockets, one might wonder why there is any reason to own a digital photo frame. In the past few years, I have grown to greatly appreciate these devices, and I have realized how valuable, useful, and downright practical they are. If you or someone you know needs a good solution to viewing photos, a digital frame might be just what you’re looking for.
When digital frames first came on the market back in the mid-2000s, they were a great idea severely hampered by bad technology. Bezels were huge, the screens were small, and the images were dim and blurry. Setting up frames required toiling through a myriad of menus with nonsensical buttons and on-screen context clues.
Adding images to a digital frame was an exercise in frustration and required many steps on the part of the user. Plus, transitions between pictures were garish and often unbecoming of the memories on display.
It’s no wonder most people have stopped thinking about digital frames!
If this sounds like you, you’re not alone.
I was in the same boat until recently. However, the more I investigated what modern technology offers, the more impressed I became. In contrast to their counterparts from a decade ago, today’s digital frames have bright displays, show large high-resolution photos, are thin and sleek, and cost less than you might think. They often have cloud-based interfaces, offer companion smartphone apps, and can even show video clips.
One of the best reasons to get a digital frame isn’t because of what they can do, but what they can’t do. It seems silly to have yet another device in a world where screens already surround us, but the digital frames eschew the traditional idea of a computer screen by turning it on its head. They follow the adage of doing one thing and doing it well.
Most digital frames don’t let you do anything but view pictures. And this is precisely what makes them so great. They don’t run thousands of apps, let you surf social networks, or make video calls. They don’t play games, won’t let you binge-watch Netflix or YouTube, and don’t bombard you with notifications.
Digital frames sit there, passively doing only one thing: showing your pictures.
In an era where every device and gadget continually begs for our attention, digital frames are like an oasis in the middle of the desert. It’s downright refreshing to see a bright digital frame sitting on a shelf, knowing you can’t do anything with it other than look at pictures.
You don’t have to worry about software updates, and your viewing experience isn’t cluttered with dozens of icons and bubbles vying for your attention. In a media-saturated world, digital frames are a great way to slow down and enjoy, appreciate, and reflect on your pictures without distraction.
Some smart appliances like the Amazon Echo Show and Google Nest Hub act as photo frames, but I prefer the simplicity and focus of a dedicated frame. Other devices like that are nice, but the features they offer can often distract you from just enjoying your photos.
Advanced frames like the Google Nest Hub Max do lots of things, but I prefer simpler
frames that don’t have built-in cameras, digital assistants, or alert bubbles begging for your
attention.
To print or not to print
Like many people, my wife and I have struggled for years with the question of what to do about getting prints made of our pictures. We’ve made yearbooks that adorn our end tables, mounted framed snapshots on dressers, and festooned our walls with large prints and canvases. These are great, and we enjoy them a great deal, but every one of them eventually grows old over time.
When that inevitably happens, we have to consider what to do next. Do we keep the old prints around? Do we put up new images in place of what was once there? There are also practical concerns, like where to get prints made, what size to make them, and what happens when our favorite photo book publisher goes out of business?
We enjoy seeing prints as much as anyone, but the logistical hassles have added layers of stress and indecision onto what should be an enjoyable process.
A digital frame solves almost all of these problems. Our 8×10″ Nixplay Seed sits in our living room showing a massive assortment of images without any effort from us. In the course of a single day, we see photos of family vacations, our kids when they were infants, and old slides that we scanned from negatives. We don’t have to think about switching photos out, spend entire evenings trying to decide which images are worth printing, or wonder whether a particular photo is worthy of being displayed for all to see.
Of course, there are still plenty of reasons to get pictures printed. But if you want a simple way to enjoy your pictures without the hassle of making physical copies, a digital frame might be right for you.
As is the case with most digital gadgets these days, storage space is not the same constraint as it used to be. Many frames have internal storage of at least 8GB, which is enough for almost 10,000 images. If that’s not enough, you can look for one with a removable memory card slot to add even more space.
Modern digital frames have more than enough storage space for your pictures. Unlike your
walls and bookshelves, which can quickly fill up with physical prints.
Image quality
If you think that displaying your images on a digital frame means sacrificing overall quality, think again. This might have been true in 2005, but now, frames are leaps and bounds beyond where they used to be. As recently as a few years ago, many frames had resolutions of about 72 or 96dpi – similar to that of older computers.
This resolution is fine if you’re viewing your images from a distance, as often is the case when using frames in a household setting. However, frames today often have much higher pixel densities or anywhere between 150-300dpi that put them on par with most laptop screens and even that of some mobile phones.
This means that your images, even when viewed up close, are as crisp and sharp as you would see if you got them printed and you’ll be able to make out every detail from wisps of hair to blades of grass.
Most modern digital frames use bright screens that are now viewable from any angle, unlike older versions which required you to stand in the right spot to see your images. Your pictures appear bright and colorful, and some digital frames even let you show video clips alongside your images.
Worry-free sharing
With all the recent problems regarding data privacy on social network sites like Instagram and Facebook, it’s no wonder so many people are deleting their accounts! If you, or your friends and family, are limiting your social media usage but still want to see pictures of the important things in your life, a digital frame is just the answer. To illustrate this, I’m going to use my in-laws as an example.
My wife’s parents aren’t on any social media at all, and they prefer to spend their time reading, gardening, walking the dogs, and going out with friends. This means they don’t get to see any pictures of their grandchildren unless we send them physical prints, which they have to find a spot to display. A few months ago, my wife and I bought them a digital photo frame and have since populated it with well over a thousand images of us and our kids.
Do you have friends or family members who aren’t on social media? Get them a digital frame
and fill it with photos for them to enjoy.
We shared their frame information with other family members who have also sent pictures to the frame. My wife’s parents love it! The frame sits in their living room, showing photos of the people they love without any effort on their part. And, they didn’t have to join a social network or share any personal data.
If you have people in your life who are concerned about data-mining and privacy, consider a digital frame as a happy medium. It allows you to share pictures on a more limited and intentional basis than sites like Instagram or Flickr. But the tradeoff is, you are in full control of the images, and none of your personal information is sold to third-parties for advertising.
This simple Tenker 7-inch frame, and others like it, won’t send your photos off to be analyzed
for advertising.
Tips
Here’s a few more tips that might help you with digital frames.
Set your display to change pictures less often. Every hour or less is much better than every 30 seconds. It will seem slow at first, but you’ll get a lot more enjoyment in the long term. You won’t feel like you’re seeing the same images over and over.
Export your photos to the resolution of your frame to save on storage space. Sending a 24-megapixel image to a 3-megapixel frame won’t do you any good at all.
Set your friends and family up with sharing permissions so they can send you photos. Then make sure to return the favor and send photos to their frames too.
You can build your own photo frame with a cheap Android tablet and some software, but I recommend getting an off-the-shelf model. It’s just easier and will probably make your life a lot simpler in the long run.
Most modern frames have built-in memory but also sync with cloud storage options like Dropbox and Google Drive. You might have to configure a few settings, but it can make the already-easy process of sending pictures even simpler.
Do you use a digital photo frame? Or, are there reasons why you don’t? Feel free to share with us in the comments below.
Share this article.
Wednesday, June 12, 2019
How to Make Friends and Collaborate in the Photography Industry
Have you ever seen or been a part of a photography conference? Or even just walked into a camera store and spent some time observing people interacting in the store? It is as if we photographers speak another language, live in another world, or even belong to a cult. Of course, I mean this without any form of disrespect. Photographers and photography enthusiasts are a class apart. We all get excited about new lens and gear, talk in F-stops and ISO settings, and some of us save for years and years to buy a particular brand of camera or lens!
The photography industry is growing in leaps and bounds – not only in technology but also in the number of people who are aspiring photographers or even hobbyists. With easier access to gear and a wealth of free education around, photography is a career choice for almost any generation. However, it also means that many people are doing the same or similar things. Most photographers, at some point or another, think about industry competition to get ahead of the curve in the kind of money and work they think they need to get ahead.
I want to assure you that making a living is possible in this space. There is more than enough work to go around. Your peers and colleagues are not out to ‘get you’ or ‘steal work from you.’ Let go of that scarcity mindset and instead think of how you can collaborate with your competition in ways that can become a win-win for both of you.
Often times, the colleges and friends you make in the industry do more for you than you could imagine. They send their overflow work your way, and you make genuine friendships with people who speak the same language as you. You also get to collaborate on creative projects that improve your own skill as an artist.
There are several ways you can make friends and collaborate in the photography industry.
1. Attend conferences and photography related events
There is nothing quite like getting a bunch of photographers in a room to talk shop and discuss the latest and greatest gear and techniques. The energy and the learnings at such events are incredible. Most conferences and events get the best speakers and teachers, so this is a great way to increase your skill set and also meet some of your mentors and peers.
As someone who has started to speak and teach at conferences and events, I am just as nervous to get up on stage as you might be to come to an event! However, I am so happy to meet and mingle with my people – folks who love photography as much as I do.
So go with an open mind and be willing to put yourself out there to make genuine connections and friends.
I had the opportunity to attend a conference and took some food styling and food
photography classes. While there, I made some amazing friends who, to date,
have been very supportive of each other’s work.
2. Join local groups
If traveling for a conference or an event is not your thing, thanks to apps like Meetup and Eventbrite, there are plenty of local chapters and groups that are photography specific. Some groups routinely go out and photograph. Others have workshops and classes where members exchange ideas and knowledge. Find what works for you and be open to give as much or more than what you receive.
3. Connect with photographers who you admire
I have to admit; this one is one of my favorite ways to connect with others in the photography space. Most photographers are on social media because it is such a great visual tool to showcase your work. So I find it easy to find photographers whose work I admire on social and engage with them regularly. Sometimes it is a ‘like,’ other times it is a comment or a direct message (DM). Nothing crazy or weird, I just say hello and compliment them on something that I find enjoyable. This is not a place to ask favors or ask for work. Instead, this is a place to connect and be social. The more you engage, the more you become a familiar face. Then when the time comes to collaborate or work together, let that organically happen.
Don’t ask open-ended questions or ask to pick their brain. Instead, do your research and ask intelligent questions. Ask about their motivation or inspiration or an accomplishment that they are proud of. Perhaps you could ask how they get over a creative slump…anything that humanizes you and them.
I collaborated with another photographer who I met online. I stayed at her house for the
weekend and created some amazing work that I am most proud of to date.
4. Be friendly and cordial
Always be friendly and cordial. No matter the stage of business you are at, always remember you too started at the bottom of the ladder too. Just because you have ‘achieved’ success doesn’t mean you have to be rude. On the flip side, to the person who is reaching out to other photographers, do the same. We are all in this together. You will make genuine friends when you are honest and genuine yourself. You will just put people off when you are insincere.
5. Offer something of value – no, it’s not always money
I am of the school of thought that money is not the ultimate form of success. Yes, we need money to survive – to put food on the table, pay the rent and other necessities like that – but there are many people out there who are motivated by something other than money.
Find your passion and find what feeds your soul. The money is sure to follow.
When working with others, offer something of value. When you are collaborating with other creatives, put your best foot forward so that the collaborative effort is worth its weight in gold. That way, it is a win for everyone included.
I conducted a styled shoot for new wedding photographers, and as a result, collaborated
with many vendors who got photos in exchange for products and services – a win-win for all.
6. Pre and post follow through is important and essential
When collaborating with other creatives, communication about expectations and outcomes is critical. It is important everyone is on the same page so that each party knows what they need to put in and what they are going to get out of it.
Communication can be as formal or as informal as you all agree. Typically everyone pitches in or brings something of value (time, talent, props) to the table. After the collaboration, people share each other’s work, give critique and sometimes even share images for each other’s portfolios.
No matter what process you use, make sure everyone agrees.
It is also important to do a debrief on the collaboration. Figure out what worked and what didn’t. How can you all make it better next time? Make sure to address any issues so you can all walk away with a positive experience.
Collaboration isn’t just with other photographers. It can also include vendors and businesses in your area of specialty. You can make a trade of goods and services in exchange for photos. Here pre and post-follow-up are critical so that all expectations are met.
Collaborate with vendors and businesses not just other photographers.
Collaboration, when done properly, should be a mutually beneficial arrangement. By collaborating with others, you get to learn, improve yourself, and help others as well. It is a very healthy and creative way to inspire and be inspired while working on something atypical.
Have you collaborated on some great projects? Share your experiences with the dPS community in the comments below.
 Back in February, I posted about watermarking and how I use this opportunity for advertising. I mentioned briefly the idea that if someone was going to steal your images, you may as well make them work for you with watermarks that are attractive and don’t get cropped out. At least then when Tight Theresa steals my images, her friends will know where they came from and hopefully get in touch. Although on second thought, do I want all her tight friends also scamming me for freebies? A subject for another day. But I digress.